免費的連接埠掃描程式
Содержание:
- Nmap & db_nmap
- Idle Scanning
- Why Portscan is needed?
- Final thoughts
- The six states recognized by Network Mapper
- Advanced Port Scanner
- Advanced Port Scanner — 帮助
- Conclusion
- Conclusion
- PortScan & Stuff
- Возможности nmap и примеры сканирования
- Conclusion
- SMB Version Scanning
- Nmap Network Scanning
- Примеры
- Advanced Port Scanner — 도움말
- Сканирование сети с помощью nmap – немного теории
- MiTeC Network Scanner
- Preparing Metasploit for Port Scanning
Nmap & db_nmap
We can use the db_nmap command to run Nmap against our targets and our scan results would than be stored automatically in our database. However, if you also wish to import the scan results into another application or framework later on, you will likely want to export the scan results in XML format. It is always nice to have all three Nmap outputs (xml, grepable, and normal). So we can run the Nmap scan using the -oA flag followed by the desired filename to generate the three output files, then issue the db_import command to populate the Metasploit database.
Run Nmap with the options you would normally use from the command line. If we wished for our scan to be saved to our database, we would omit the output flag and use db_nmap. The example below would then be db_nmap -v -sV 192.168.1.0/24.
msf > nmap -v -sV 192.168.1.0/24 -oA subnet_1
 exec: nmap -v -sV 192.168.1.0/24 -oA subnet_1

Starting Nmap 5.00 ( http://nmap.org ) at 2009-08-13 19:29 MDT
NSE: Loaded 3 scripts for scanning.
Initiating ARP Ping Scan at 19:29
Scanning 101 hosts [1 port/host]
...
Nmap done: 256 IP addresses (16 hosts up) scanned in 499.41 seconds
Raw packets sent: 19973 (877.822KB) | Rcvd: 15125 (609.512KB)
Idle Scanning
Nmap’s IPID Idle scanning allows us to be a little stealthy scanning a target while spoofing the IP address of another host on the network. In order for this type of scan to work, we will need to locate a host that is idle on the network and uses IPID sequences of either Incremental or Broken Little-Endian Incremental. Metasploit contains the module scanner/ip/ipidseq to scan and look for a host that fits the requirements.
In the free online Nmap book, you can find out more information on Nmap Idle Scanning.
msf > use auxiliary/scanner/ip/ipidseq
msf auxiliary(ipidseq) > show options

Module options (auxiliary/scanner/ip/ipidseq):

   Name       Current Setting  Required  Description
   ----       ---------------  --------  -----------
   INTERFACE                   no        The name of the interface
   RHOSTS                      yes       The target address range or CIDR identifier
   RPORT      80               yes       The target port
   SNAPLEN    65535            yes       The number of bytes to capture
   THREADS    1                yes       The number of concurrent threads
   TIMEOUT    500              yes       The reply read timeout in milliseconds

msf auxiliary(ipidseq) > set RHOSTS 192.168.1.0/24
RHOSTS => 192.168.1.0/24
msf auxiliary(ipidseq) > set THREADS 50
THREADS => 50
msf auxiliary(ipidseq) > run

 192.168.1.1's IPID sequence class: All zeros
 192.168.1.2's IPID sequence class: Incremental!
 192.168.1.10's IPID sequence class: Incremental!
 192.168.1.104's IPID sequence class: Randomized
 192.168.1.109's IPID sequence class: Incremental!
 192.168.1.111's IPID sequence class: Incremental!
 192.168.1.114's IPID sequence class: Incremental!
 192.168.1.116's IPID sequence class: All zeros
 192.168.1.124's IPID sequence class: Incremental!
 192.168.1.123's IPID sequence class: Incremental!
 192.168.1.137's IPID sequence class: All zeros
 192.168.1.150's IPID sequence class: All zeros
 192.168.1.151's IPID sequence class: Incremental!
 Auxiliary module execution completed
Judging by the results of our scan, we have a number of potential zombies we can use to perform idle scanning. We’ll try scanning a host using the zombie at 192.168.1.109 and see if we get the same results we had earlier.
msf auxiliary(ipidseq) > nmap -Pn -sI 192.168.1.109 192.168.1.114
 exec: nmap -Pn -sI 192.168.1.109 192.168.1.114

Starting Nmap 5.00 ( http://nmap.org ) at 2009-08-14 05:51 MDT
Idle scan using zombie 192.168.1.109 (192.168.1.109:80); Class: Incremental
Interesting ports on 192.168.1.114:
Not shown: 996 closed|filtered ports
PORT STATE SERVICE
135/tcp open msrpc
139/tcp open netbios-ssn
445/tcp open microsoft-ds
3389/tcp open ms-term-serv
MAC Address: 00:0C:29:41:F2:E8 (VMware)

Nmap done: 1 IP address (1 host up) scanned in 5.56 seconds
Why Portscan is needed?
Port scanner, a free online tool allows you to scan commonly used ports on your computer. Scan takes less than a minute, after which the result will be displayed in a table.
if you are connected to Internet, unnecessary opened ports can prove as a security threat. With this utility you can check for unwanted running services and can close them if those are not being used intentionally. Stopping unwanted services will also increase system performance.
Which ports are checked?
Below is a table of ports, describing protocols that check port scanner.
| Number | Port | Protocol | Description | Quick List |
|---|---|---|---|---|
| 1 | 20 | FTP Data | File Transfer Protocol — File Transfer Protocol. Port for data. | N |
| 2 | 21 | FTP Control | File Transfer Protocol — File Transfer Protocol. Port for commands. | Y |
| 3 | 22 | SSH | Secure SHell — «secure shell». Remote Management Protocol operating system. | Y |
| 4 | 23 | telnet | TErminaL NETwork. Protocol implementation text interface over the network. | Y |
| 5 | 25 | SMTP | Simple Mail Transfer Protocol — Simple Mail Transfer Protocol. | Y |
| 6 | 42 | WINS | Windows Internet Name Service. Mapping NetBIOS-name computers with IP-addresses of nodes | N |
| 7 | 43 | WHOIS | «Who is». Protocol obtaining the registration of ownership of domain names and IP addresses | N |
| 8 | 53 | DNS | Domain Name System — Domain Name System. | N |
| 9 | 67 | DHCP | Dynamic Host Configuration Protocol — Dynamic Host Configuration Protocol. Dynamic IP | N |
| 10 | 69 | TFTP | Trivial File Transfer Protocol — a simple file transfer protocol. | N |
| 11 | 80 | HTTP / Web | HyperText Transfer Protocol — hypertext transfer protocol. | Y |
| 12 | 110 | POP3 | Post Office Protocol Version 3 — receive e-mail protocol, version 3 | Y |
| 13 | 115 | SFTP | SSH File Transfer Protocol. Secure data transmission protocol. | Y |
| 14 | 123 | NTP | Network Time Protocol. Synchronization protocol computer’s internal clock. | N |
| 15 | 137 | NetBIOS | Network Basic Input / Output System. Protocol for network I / O operations. Naming Service. | N |
| 16 | 138 | NetBIOS | Network Basic Input / Output System. Protocol for network I / O operations. Service connection. | N |
| 17 | 139 | NetBIOS | Network Basic Input / Output System. Protocol for network I / O operations. Service sessions. | N |
| 18 | 143 | IMAP | Internet Message Access Protocol. Application-level protocol for accessing e-mail. | N |
| 19 | 161 | SNMP | Simple Network Management Protocol — Simple Network Management Protocol. Device Management. | N |
| 20 | 179 | BGP | Border Gateway Protocol, Border Gateway Protocol. Dynamic routing protocol. | N |
| 21 | 443 | HTTPS | HyperText Transfer Protocol Secure) — protocol HTTP, which supports encryption. | Y |
| 22 | 445 | SMB | Server Message Block. The remote access to files, printers, and network resources. | N |
| 23 | 514 | Syslog | System Log. Protocol and sending log messages about system events occur. | N |
| 24 | 515 | LPD | Line Printer Daemon. Remote printing protocol on the printer. | N |
| 25 | 993 | IMAP SSL | Protocol IMAP, supports SSL encryption. | N |
| 26 | 995 | POP3 SSL | POP3 protocol supports SSL encryption. | N |
| 27 | 1080 | SOCKS | SOCKet Secure. Receiving protocol secure anonymous access. | N |
| 28 | 1433 | MSSQL | Microsoft SQL Server — database management system. Port to access the database. | Y |
| 29 | 3128 | Proxy | Currently the port often used proxies. | N |
| 30 | 3268 | LDAP | Lightweight Directory Access Protocol — lightweight directory access protocol (directory service). | N |
| 31 | 3306 | MySQL | Access to MySQL databases. | Y |
| 32 | 3389 | RDP | Remote Desktop Protocol — Remote Desktop for Windows. | Y |
| 33 | 5432 | PostgreSQL | Access to PostgreSQL databases. | N |
| 34 | 5900 | VNC | Virtual Network Computing — a system of remote access to the desktop computer. | Y |
| 35 | 5938 | TeamViewer | TeamViewer — Remote control system for ensuring your computer and data exchange. | N |
| 36 | 8080 | HTTP / Web | Alternate port for the HTTP protocol. Sometimes used proxies. | Y |
Final thoughts
Microsoft also has its own port scanner called PortQryUI, and it’s been around for a long while. But comparing to what’s offered in the tools listed above, it’s quite limited so if you are a frequent port scanner I wouldn’t recommend using it.
Personally, I like Advanced Port Scanner and will probably keep it as my primary go-to tool. I also like what I see in PortScan & Stuff, especially the filter feature that would make my life a lot easier. MiTeC’s Network Scanner is a new tool that I just discovered recently. So far I like what I see. It’s an advanced network scanning tool with a lot of features for both home users and IT pros to use.
The six states recognized by Network Mapper
- open An application is actively accepting TCP connections, UDP datagrams or SCTP associations on this port. Finding these is often the primary goal of port scanning. Security-minded people know that each open port is an avenue for attack. Attackers and pen-testers want to exploit the open ports, while administrators try to close or protect them with firewalls without thwarting legitimate users. Open ports are also interesting for non-security scans because they show services available for use on the network
- closed A closed port is accessible (it receives and responds to probe packets), but there is no application listening on it. They can be helpful in showing that a host is up on an IP address (host discovery, or ping scanning), and as part of OS detection. Because closed ports are reachable, it may be worth scanning later in case some open up. Administrators may want to consider blocking such ports with a firewall. Then they would appear in the filtered state, discussed next.
- filtered Nmap cannot determine whether the port is open because packet filtering prevents its probes from reaching the port. The filtering could be from a dedicated firewall device, router rules, or host-based firewall software. These ports frustrate attackers because they provide so little information. Sometimes they respond with ICMP error messages such as type 3 code 13 (destination unreachable: communication administratively prohibited), but filters that simply drop probes without responding are far more common. This forces a retry several times just in case the probe was dropped due to network congestion rather than filtering. This slows down the scan dramatically.
- unfiltered The unfiltered state means that a port is accessible, but Network mapper is unable to determine whether it is open or closed. Only the ACK scan, which is used to map firewall rulesets, classifies ports into this state. Scanning unfiltered ports with other scan types such as Window scan, SYN scan, or FIN scan, may help resolve whether the port is open.
-
open|filtered In this state when it is unable to determine whether a port is open or filtered. This occurs for scan types in which open ports give no response. The lack of response could also mean that a packet filter dropped the probe or any response it elicited. So Network nmapper does not know for sure whether the port is open or being filtered. The UDP, IP protocol, FIN, NULL, and Xmas scans classify ports this way.
-
closed|filtered This state is used when Network nmmapper is unable to determine whether a port is closed or filtered. It is only used for the IP ID idle scan.
Advanced Port Scanner

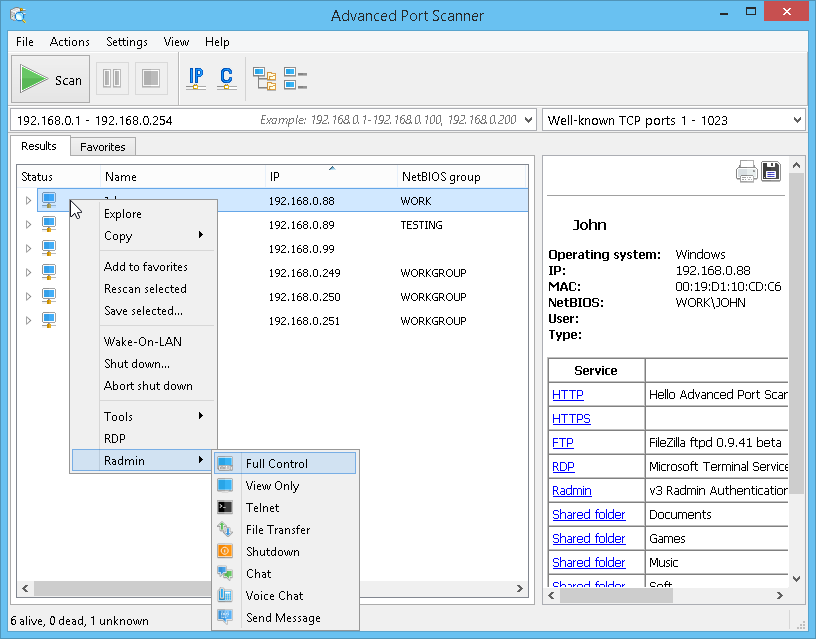
With Advanced Port Scanner, you can scan hundreds of IP addresses simultaneously at high speed. The software scans ports of network computers and finds any open well-known TCP ports, as well as their computer names and MAC addresses. Not only that, it also allows you to remote shutdown or wakes up any PCs found on the network.
Advanced Port Scanner is my go-to tool whenever I need to run to find any open ports on a particular computer. It works on Windows from XP up to Windows 7 and 8.1, both 32-bit and 64-bit. The downloaded software package comes with both installation and portable versions. If you want just to run it without installing it on your computer, simply choose Portable after launching the tool.
Advanced Port Scanner — 帮助
Advanced Port Scanner 是一种快速且免费的端口扫描软件。该软件使您能够快速找到所有开放端口(TCP 和 UDP)并检测这些端口上运行的程序版本。该实用程序包含众多能够简化网络管理工作的功能。
使用 Advanced Port Scanner
1. 输入所需的 IP 地址范围(工具栏中的»IP»按钮将帮助您设置网络 IP 地址范围)。

2. 输入您要扫描的端口列表。

3. 单击»扫描»。 扫描结束后,您将得到网络内的计算机列表。

创建经常使用的计算机收藏夹列表
1. 扫描网络。
2. 选择所需计算机,然后单击快捷菜单中的»添加到‘收藏夹’»选项。

3. 现在您可以使用»收藏夹»选项卡对这些计算机进行操作。

4.在菜单中选择»操作 → 添加计算机…»并在对话框中输入计算机信息便可将新计算机添加到»收藏夹»中。

您也可以保存»收藏夹»选项卡中的计算机列表。 文件将保存为 .xml、.html 或 .csv 格式。
要执行此操作:
- 快捷菜单 — «保存已选择…»;
- 主菜单 — «文件 → 另存为».
若要将计算机列表从文件加载到»收藏夹»选项卡中,请执行以下步骤:: 主菜单 — «文件 → 添加到收藏夹».
如果您愿意,您可以为您输入的端口列表命名。搜索历史记录中将显示该名称。
Radmin 和 Advanced Port Scanner
Radmin 是适用于 Windows 系统的最佳远程控制软件之一,它允许您使用标准的图形界面远程操作计算机,好像您就坐在计算机前操作一样。
1. 从网络扫描结果中或从»收藏夹»选项卡中选择所需的计算机。
2. 如果在计算机上检测到 Radmin Server,则右键单击 Radmin 选项,从快捷菜单中选择所需的 Radmin 连接类型。 若要连接到远程计算机,您需要在您的计算机上安装 Radmin Viewer。 您可从此处下载免费的 Radmin Viewer:www.radmin.cn/download/。

还可使用便携版 Radmin Viewer。可在»设置 → 选项… → 其他»中启用»使用便携版 Radmin Viewer»并指定路径。
功能
此功能允许您保存当前选项卡中的计算机列表。文件保存为 .xml、.html 或 .csv 格式。
要执行此操作:
- 快捷菜单 — «保存已选择…»;
- 主菜单 — «文件 → 另存为».
此功能允许您将计算机列表从指定文件加载至»收藏夹»列表。 只有 .xml 格式的文件可加载。
要执行此操作:
主菜单 — «文件 → 添加到收藏夹».
此功能允许您将起始 IP 地址设置为 ***.***.***.0,将结束 IP 地址设置为 ***.***.***.255,其中»***»是输入的 IP 地址当前值。
要执行此操作:
工具栏 — «C»类子网»按钮。

此功能允许您根据计算机的子网掩码设置起始和结束 IP 地址。
要执行此操作:
工具栏 — «IP»按钮。

工具 — Ping
要执行此操作:
- 快捷菜单 — «工具 → Ping»;
- 主菜单 — «操作 → 工具 → Ping».

使用检测远程计算机的 ping 命令启动一个终端窗口。
要执行此操作:
- 快捷菜单 — «工具 → Tracert»;
- 主菜单 — «操作 → 工具 → Tracert».

工具 — Telnet
启动在标准 Telnet 端口上与所选计算机连接的终端机。
欲使用 Telnet 客户端(而非默认客户端),请在»设置 → 选项… → 其他»中创建此客户端路径。
要执行此操作:
- 快捷菜单 — «工具 → Telnet»;
- 主菜单 — «操作 → 工具 → Telnet».

允许您通过用户选择的 SSH 客户端连接至所选的计算机。 在»设置 → 选项 …→ 其他»中指定 SSH 客户端
要执行此操作:
- 快捷菜单 — «工具 → SSH»;
- 主菜单 — «操作 → 工具 → SSH».

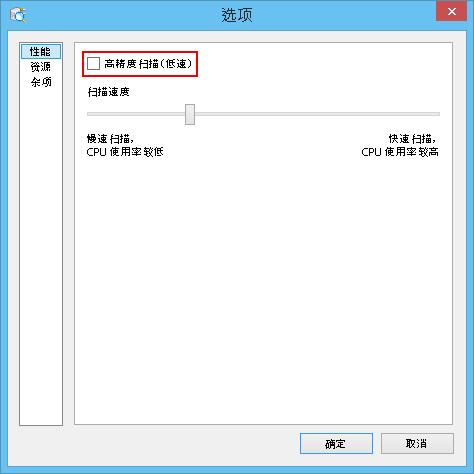
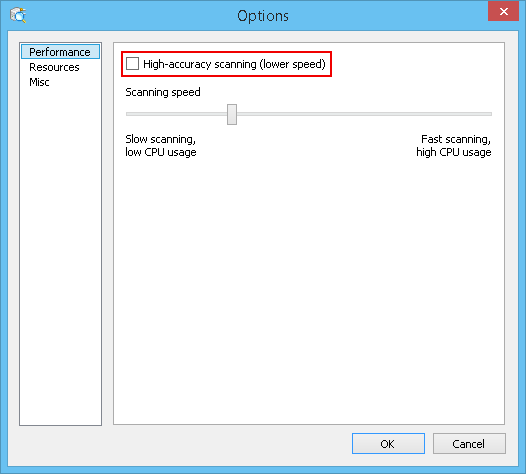
选项 — 性能
«高精度扫描(低速)»选项允许您对各个计算机进行多次扫描。 这提高了扫描的精确度,但时间较长。
扫描速度滑块允许您平稳连续地更改扫描速度、处理器和网络负载。
单击»确定»按钮,保存对设置的更改。
要执行此操作:
主菜单 — «设置(S) → 选项 → 性能».

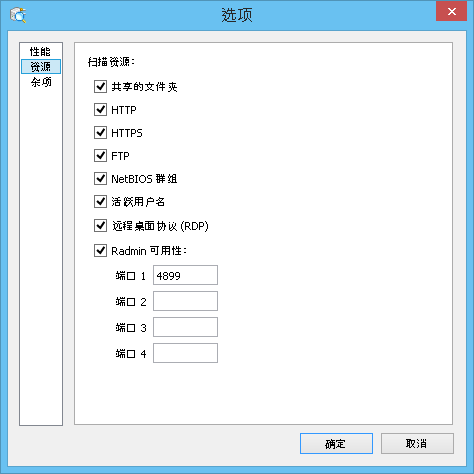
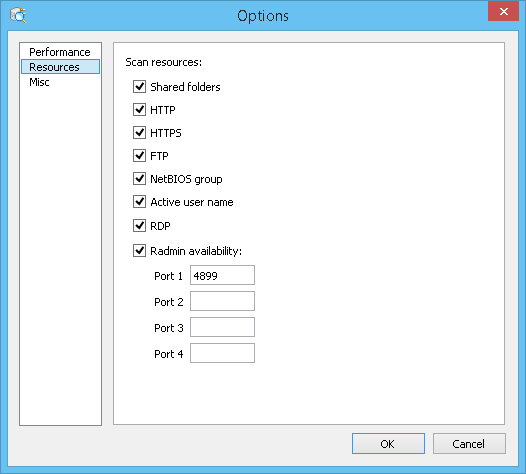
可在»资源»部分选择扫描到的资源。所选资源越少,扫描过程越短。
单击»确定»按钮,保存对设置的更改。
要执行此操作:
主菜单 — «设置(S) → 选项 → 资源».

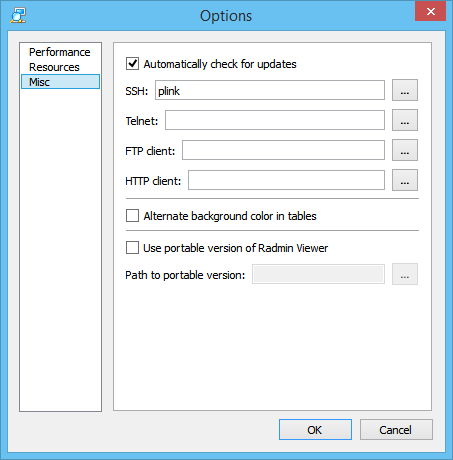
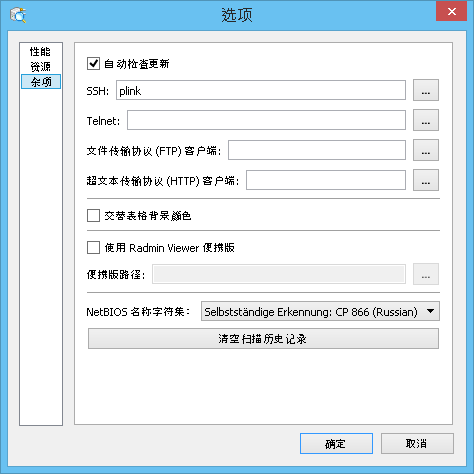
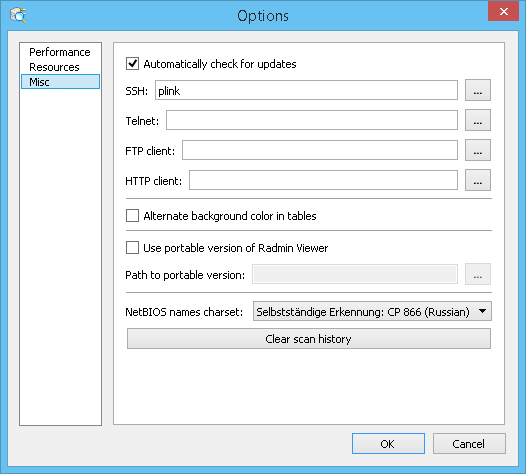
选项 — 杂项
可在程序的»其他»设置部分启用自动检查更新,并指定 SSH、Telnet、FTP 和 HTTP 客户端的使用。可启用便携版 Radmin Viewer 并指定路径。
在此部分中,可启用桌面色彩更换。
要执行此操作:
主菜单 — «设置(S) → 选项 → 杂项».
关闭计算机
此功能允许您远程关闭所选的计算机(若您有权这样操作)。
要执行此操作:
- 主菜单 — «操作 → 关机…»;
- 快捷菜单 — «关机…»;
- 工具栏 — «关闭»按钮(可从主菜单下»视图»部分添加其他按钮到工具栏)。
按下»关机»按钮后,屏幕上会出现如下所示对话框,在对话框中选择相应的选项可执行下列操作:
- «强制关机»- 关机/冷启动计算机,即使某些程序仍在运行并有警告消息提示如果重启可能会丢失未保存的数据。
- «重启»- 重启计算机而不是关机;
- «消息»- 警告用户»您的计算机将在 N 秒后重启»。
此功能允许您取消对所选计算机的远程关机。
要执行此操作:
- 主菜单 — «操作 → 中止关机»;
- 快捷菜单 — «中止关机»;
- 工具栏 — «中止关机»按钮(可从主菜单下»视图»部分添加其他按钮到工具栏)。
Wake-on-LAN
此功能可向所选计算机发送»Wake-On-LAN»命令。 该命令仅可发送至已识别具有 MAC 地址的计算机。
要执行此操作:
- 主菜单 — «操作 → Wake-on-LAN»;
- 快捷菜单 — «Wake-On-LAN»;
- 工具栏 — «Wake-On-LAN»按钮(可从主菜单下»视图»部分添加其他按钮到工具栏)。
浏览计算机
此功能将打开 Windows Explorer,显示所选计算机。
要执行此操作:
- 主菜单 — «操作 → 浏览(E)»;
- 快捷菜单 — «浏览(E)»;
- 工具栏 — «浏览(E)»按钮(可从主菜单下»视图»部分添加其他按钮到工具栏)。
HTTP 连接
使用用户所选浏览器通过 HTTP 协议连接到计算机。在»设置 → 选项… → 其他»中指定 HTTP 客户端。若未指定 HTTP 客户端,则使用默认客户端。
要执行此操作:
- 主菜单 — «操作 → HTTP»;
- 结果 — 双击计算机图标,双击»HTTP»进行连接。
- 工具栏 — «HTTP»按钮(可从主菜单下»视图»部分添加其他按钮到工具栏)。
HTTPS 连接
使用用户所选浏览器通过 HTTPS 协议连接到计算机。HTTPS 协议所用客户端与 HTTP 协议客户端的相同。
要执行此操作:
- 主菜单 — «操作 → HTTPS»;
- 结果 — 双击计算机图标,双击»HTTPS»进行连接。
- 工具栏 — «HTTPS»按钮(可从主菜单下»视图»部分添加其他按钮到工具栏)。
FTP 连接
此功能让您可以使用浏览器通过 FTP 协议连接到所选计算机。可在»设置 → 选项… → 其他»部分指定不同的 FTP 客户端。
要执行此操作:
- 主菜单 — «操作 → FTP»;
- 结果 — 双击计算机图标,双击»FTP»进行连接。
- 工具栏 — «FTP»按钮(可从主菜单下»视图»部分添加其他按钮到工具栏)。
通过 Radmin 连接
此功能启动 Radmin 连接至所选计算机。
要执行此操作:
- 主菜单 — «操作 → Radmin»;
- 快捷菜单 — «Radmin»;
- 结果 — 双击计算机图标,双击»Radmin»进行连接。
- 工具栏 — 可从主菜单下»视图»部分添加其他按钮到工具栏。
远程桌面协议连接
微软公司开发的 RDP(远程桌面协议)提供了一种图形界面,使用户能够通过一个网络连接上的另一台电脑工作。
您可通过 RDP 连接至所选的计算机。
要执行此操作:
- 主菜单 — «操作 → RDP»;
- 快捷菜单 — «RDP»;
- 结果 — 双击计算机图标,双击»RDP»进行连接。
- 工具栏 — «RDP»按钮(可从主菜单下»视图»部分添加其他按钮到工具栏)。
Conclusion
In short, port scanners are a vital tool for network administrators as they help to gather information about devices, so as to understand the working of these devices, their security and so much more.
They assist in identifying open ports and possibly vulnerable systems that could potentially allow intursions in your perimeter and cause potential leaks into your infrastructure.
We highly suggest you grab one of the downloads from above and give them a spin in your network. Some programs have nice Interfaces that allow for easy scanning and others have more complicated and advanced command line tools that accept advanced operators and more!
We hope the above information helps you to zero-in on the right port scanner for your network.
Conclusion
Open ports can be gateways into networks and are considered weaknesses if not treated with security in mind.
The toolbox of network and security administrators should contain a Port and Services Scanner to help them identify open ports and control vulnerabilities efficiently, before its too late.
There are many free and online scanners out there as well, But when combining portability, effectiveness, feature-richness, flexibility and cost efficiency, only the previous nine stand out.
They are free, download a copy today and scan your network. We suggest you grab several of them (as they are all Free) and give them a try – they all have different feature sets and work well when there is no internet connection available to use an online variation. We hope this list of some of the top Port Scanners help you secure your network and keep intruders out!
PortScan & Stuff
PortScan & Stuff is a free portable network scanning tool that identifies all active devices on your network, showing all open ports and additional information like hostname, MAC address, HTTP, SMB, FTP, iSCSI, SMTP and SNMP services. For a large network, it uses up to 100 threads to speed up the performance.
One thing I find is quite useful is its Filter feature that narrows down the scanning result based on my own criteria. For example, I can easily type 3389 in the filter box to find out all devices that have Remote Desktop Protocol turned on that I can remotely log in without the problem.
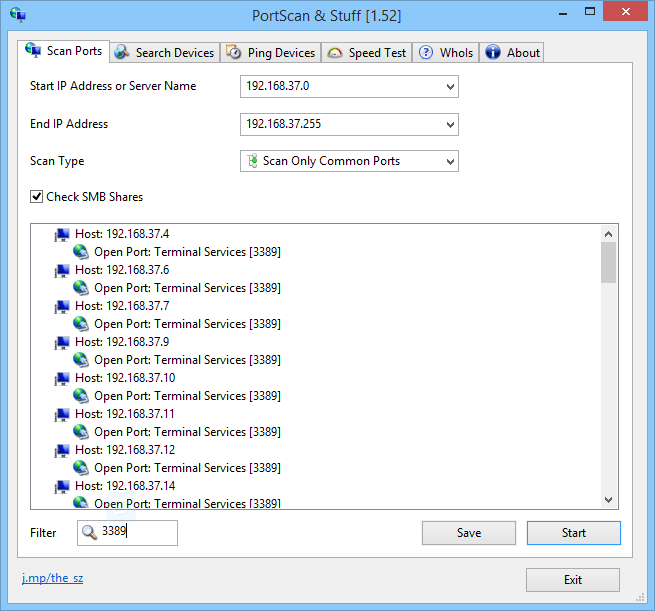 PortScan to find all computers with RDP port open
As its name states, it also can do quite a few other stuff too, such as searching for devices even if you don’t know their IP address, Pinging devices with 3 standard sized Ping packets in 3 different type of pings, or speed testing your internet connection by downloading and uploading data to various servers.
Возможности nmap и примеры сканирования
Синтаксис Network Mapper
nmap {Целевая спецификация}
В качестве целевой спецификации может быть имя хоста, IP-адрес, сеть и т.п.
Список параметров можно получить написав в терминале команду nmap.
Как вы знаете, роутеры сами раздают IP-адреса в диапазоне 192.168.0(1).0 – 192.168.0(1).255, это функция DHCP.
Для сканирования всего радиуса нам необходимо написать команду:
nmap -sL 192.168.1.1/24
-sL – параметр, запускает сканирование списка
24 в IP-адресе – это 24-битная подсетка, которая имеет нужный нам радиус в 256 символов. То есть сканирование пройдёт от 10.0.0.0 – 10.0.0.255.
Для сканирования подключенных устройств мы использует параметр -sn, в таком случае -sL нам не требуется.
nmap -sn 192.168.1.1/24
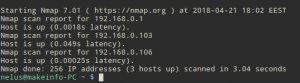
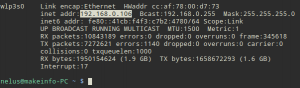
Как вы можете увидеть, в моей сети из было просканировано 256 хостов и 3 из них используются
Важно, что 192.168.0.1 – это роутер. Далее идёт мой телефон и ПК
Теперь давайте просканируем устройства на наличие открытых портов следующей командой:
nmap -Pn {цель}
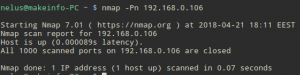
Мой компьютер не имеет открытых портов, что хорошо для меня и плохо для злоумышленника, так как он не сможет провести атаку.
Однако просканировав роутер, мы видим, что 2 порта открыто, 80 и 1900.
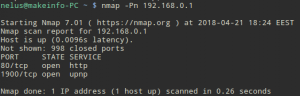
Также можно просканировать и все 256 хостов, однако это займет намного больше времени.
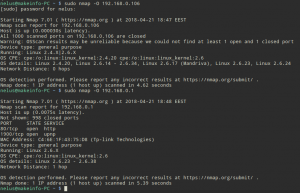
Узнаем версию ОС нашего ПК и роутера. Сканирование на операционную систему требует root привелегий и наличия открытых портов. В случае если порты закрыты, конкретного результата не будет и об этом будет предупреждение. С роутером проблем не возникло и все вывелось корректно, также мы видим MAC-адрес роутера.
nmap -O {цель}
Conclusion
Unlike other Nmap online alternatives, the port scanning we perform here at SecurityTrails is by no means limited: we perform full scans of all your IP addresses, and give you results for the current and historical open ports instantly.
That’s why you’ll want to discover SurfaceBrowser, the enterprise-grade surface analysis tool that will not only help you identify open ports immediately, but also show you other critical intelligence data such as DNS servers, current and historical records, subdomains, SSL certificates, WHOIS history, and much more.
with our sales team today!
Sign up for our newsletter today!
SMB Version Scanning
Now that we have determined which hosts are available on the network, we can attempt to determine the operating systems they are running. This will help us narrow down our attacks to target a specific system and will stop us from wasting time on those that aren’t vulnerable to a particular exploit.
Since there are many systems in our scan that have port 445 open, we will use the scanner/smb/version module to determine which version of Windows is running on a target and which Samba version is on a Linux host.
msf > use auxiliary/scanner/smb/smb_version
msf auxiliary(smb_version) > set RHOSTS 192.168.1.200-210
RHOSTS => 192.168.1.200-210
msf auxiliary(smb_version) > set THREADS 11
THREADS => 11
msf auxiliary(smb_version) > run

 192.168.1.209:445 is running Windows 2003 R2 Service Pack 2 (language: Unknown) (name:XEN-2K3-FUZZ) (domain:WORKGROUP)
 192.168.1.201:445 is running Windows XP Service Pack 3 (language: English) (name:V-XP-EXPLOIT) (domain:WORKGROUP)
 192.168.1.202:445 is running Windows XP Service Pack 3 (language: English) (name:V-XP-DEBUG) (domain:WORKGROUP)
 Scanned 04 of 11 hosts (036% complete)
 Scanned 09 of 11 hosts (081% complete)
 Scanned 11 of 11 hosts (100% complete)
 Auxiliary module execution completed
Also notice that if we issue the hosts command now, the newly-acquired information is stored in Metasploit’s database.
msf auxiliary(smb_version) > hosts

Hosts
=====

address        mac  name  os_name            os_flavor  os_sp  purpose  info  comments
-------        ---  ----  -------            ---------  -----  -------  ----  --------
192.168.1.201             Microsoft Windows  XP         SP3    client
192.168.1.202             Microsoft Windows  XP         SP3    client
192.168.1.209             Microsoft Windows  2003 R2    SP2    server
Nmap Network Scanning
| Примеры | ||
|---|---|---|
Примеры
Здесь приведены несколько примеров использования Nmap, от самых простых до более изощренных. Некоторые
реально существующие IP адреса и доменные имена использованны для того, чтобы сделать примеры более конкретными.
На их место вы должны подставить адреса/имена из вашей собственной сети.. В то время как
сканирование портов некоторой сети не является незаконным, некоторым администраторам сетей может не понравиться
своевольное сканирование их сетей и они могут пожаловаться. Для начала постарайтесь получить разрешение.
В целях тестирования у вас есть разрешение сканировать .
Вы можете использовать сканирование с помощью Nmap, но не тестировать эксплоиты или производить атаки отказа в
обслуживании. Для того чтобы не перегружать канал, пожалуйста, не производите более дюжины сканирований этого
хоста в день. В случае злоупотребления этим свободным для сканирования хостом, он будет отключен и Nmap выдаст
(не могу разрешить данное имя/IP: scanme.nmap.org). Все выше сказанное также
относится и к хостам ,
, и так далее, несмотря на то, что эти хосты еще не
существуют.
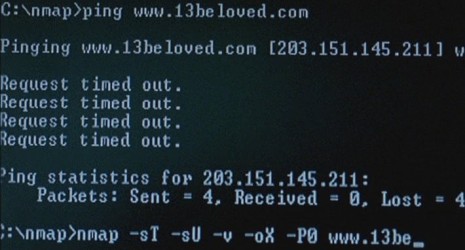
nmap -v scanme.nmap.org
Этой командой будут просканированы все TCP порты машины
. Опция
активирует вербальный режим.
nmap -sS -O scanme.nmap.org/24
Этой командой будет произведено скрытное SYN сканирование всех 255 машин сети «класса C», в
которой расположена машина Scanme. Также будет произведена попытка определения операционной системы на каждом
работающем хосте. Из-за SYN сканирования и опции определения ОС данная команда требует привилегий
суперпользователя (root).
nmap -sV -p 22,53,110,143,4564
198.116.0-255.1-127
Запускает перебор хостов и TCP сканирование первой половины всех (из доступных 255) 8 битных подсетей
адресного пространства 198.116 класса B. Также проверяет запущены ли SSH, DNS, POP3 или IMAP с использованием их
стандартных портов, а также использует ли какое-нибудь приложение порт 4564. Если какой-нибудь из этих портов
открыт, то будет произведена попытка определения работающего с этим портом приложения.
nmap -v -iR 100000 -PN -p 80
Указывает Nmap выбрать случайным образом 100,000 хостов и просканировать их на наличие запущенных на них
веб-серверов (порт 80). Перебор хостов отключен опцией , т.к. посылка пары предварительных
запросов с целью определения доступности хоста является нецелесообразной, когда вас интересует всего один порт на
каждом хосте.
nmap -PN -p80 -oX logs/pb-port80scan.xml -oG
logs/pb-port80scan.gnmap 216.163.128.20/20
Этой командой будут просканированы 4096 IP адресов (без предварительного пингования), а выходные данные
будут сохранены в фомате XML и формате, удобном для просмотра утилитой grep (grepable формат).
Advanced Port Scanner — 도움말
Advanced Port Scanner는 빠른 무료의 포트 스캔을 위한 소프트웨어입니다. 모든 열린 포트(TCP 및 UDP)를 빠르게 찾을 수 있게 해주고, 포트에서 실행 중인 프로그램의 버전을 감지하게 해줍니다. 이 유틸리티에는 네트워크 관리를 쉽게 만들어 주는 많은 기능이 포함되어 있습니다.
Advanced Port Scanner 사용하기
네트워크 스캔하기
1. IP 주소의 범위를 입력합니다(도구 막대의 «IP» 버튼으로 네트워크의 IP 주소 범위를 설정할 수 있음).

2. 스캔할 포트의 목록을 입력합니다.

3. «스캔»을 클릭합니다. 스캔 과정이 완료되면 네트워크에 있는 컴퓨터 목록을 받게 됩니다.

정기적으로 사용하는 컴퓨터의 즐겨찾기 목록 만들기
1. 네트워크를 스캔합니다.
2. 필요한 컴퓨터를 선택하고 바로가기 메뉴에서 «즐겨찾기에 추가»를 클릭합니다.

3. 이제 «즐겨찾기» 탭을 사용하여 해당 컴퓨터에서 작업을 할 수 있습니다.

4. 또한, 메뉴의 «작업 → 컴퓨터 추가…»를 선택하고 대화 상자에서 컴퓨터의 정보를 입력하여 «즐겨찾기»에 새로운 컴퓨터를 추가할 수도 있습니다.

«즐겨찾기» 탭에서 컴퓨터 목록을 저장할 수도 있습니다. 파일은 .xml, .html, .csv 포맷으로 저장됩니다.
이 작업 수행 방법:
- 바로가기 메뉴 — «저장 선택됨»;
- 메인 메뉴 — «파일 → 다음으로 저장…».
파일에서 «즐겨찾기»로 컴퓨터 목록을 불러오려면 다음 단계를 따르십시오: 메인 메뉴 — «파일 → 즐겨찾기 불러오기».
원하는 경우 입력하는 포트의 목록에 이름을 지정할 수 있습니다. 이 이름은 검색 기록에 표시됩니다.
Radmin 및 Advanced IP Scanner
Radmin은 Windows용으로 제작된 최고의 원격 제어 소프트웨어 중 하나입니다. 표준 그래픽 인터페이스를 사용하여 원격 컴퓨터 바로 앞에 앉아 있는 것처럼 원격 컴퓨터에서 작업을 할 수 있게 해줍니다.
1. 네트워크 스캔 결과 또는 «즐겨찾기» 탭에서 필요한 컴퓨터를 선택합니다.
2. Radmin Server가 컴퓨터에 발견되는 경우, 바로가기 메뉴의 관련 유형의 Radmin 연결을 선택하여 연결할 수 있습니다. 원격 컴퓨터에 연결하려면, Radmin Viewer를 설치해야 합니다. 다음에서 무료로 다운로드할 수 있습니다. www.radmin.com/download/
또한, Radmin Viewer의 포터블 버전을 사용할 수도 있습니다. «설정 → 옵션… → 기타»에서 «Radmin Viewer의 포터블 버전 사용»을 활성화하고 경로를 지정하십시오.
기능
이 기능으로 현재 탭에서 컴퓨터 목록을 저장할 수 있습니다. 파일은 .xml, .html, .csv 포맷으로 저장됩니다.
이 작업 수행 방법:
- 바로가기 메뉴 — «저장 선택됨»;
- 메인 메뉴 — «파일 → 다음으로 저장…».
이 기능으로 지정된 파일의 컴퓨터 목록을 «즐겨찾기» 목록으로 불러올 수 있습니다. 불러오기에는 .xml 파일만 사용할 수 있습니다.
이 작업 수행 방법:
메인 메뉴 — «파일 → 즐겨찾기 불러오기».
도구 막대 — 클래스 «C» 서브네트워크
***.***.***.0으로 시작하는 IP 주소와 ***.***.***.255로 끝나는 IP 주소를 설정할 수 있습니다. «***»은(는) 입력한 IP 주소의 현재 값입니다.
이 작업 수행 방법:
도구 막대 — «클래스 «C» 서브네트워크» 버튼입니다.

이 기능으로 컴퓨터의 서브네트워크 마스크마다 시작 및 끝 IP 주소를 설정할 수 있습니다.
이 작업 수행 방법:
도구 막대 — «IP» 버튼입니다.

원격 컴퓨터에 대한 핑 명령어로 터미널 창을 시작합니다.
이 작업 수행 방법:
- 바로가기 메뉴 — «도구 → Ping»;
- 메인 메뉴 — «조치 → 도구 → Ping».

원격 컴퓨터에 대한 경로를 추적하기 위해 트레서트 명령어로 터미널 창을 시작합니다.
이 작업 수행 방법:
- 바로가기 메뉴 — «도구 → Tracert»;
- 메인 메뉴 — «조치 → 도구 → Tracert».

도구 — Telnet
표준 Telnet 포트에 선택된 컴퓨터에 연결된 터미널을 시작합니다.
Telnet 클라이언트(기본 클라이언트가 아닌)를 사용하려면 «설정 → 옵션… → 기타»에 경로를 지정해야 합니다.
이 작업 수행 방법:
- 바로가기 메뉴 — «도구 → Telnet»;
- 메인 메뉴 — «조치 → 도구 → Telnet».

도구 — SSH
사용자가 선택한 SSH-클라이언트를 통해 선택된 컴퓨터에 연결을 할 수 있습니다. SSH-클라이언트는 «설정 → 옵션… → 기타»에서 지정됩니다.
이 작업 수행 방법:
- 바로가기 메뉴 — «도구 → SSH»;
- 메인 메뉴 — «조치 → 도구 → SSH».

옵션 — 성능
«매우 정확한 스캔(속도 느림)» 옵션으로 각 컴퓨터를 여러 번 스캔할 수 있습니다. 스캔의 정확도는 높지만, 시간이 오래 걸립니다.
스캔 비율 슬라이더로 스캔의 속도는 물론, 프로세서와 네트워크 점유율도 변경할 수 있습니다.
«확인» 버튼을 클릭하여 설정에 변경 사항을 저장하십시오.
이 작업 수행 방법:
메인 메뉴 — «설정 → 옵션 → 성능».

옵션 — 리소스
리소스 섹션에서 스캔될 리소스를 선택할 수 있습니다. 선택된 리소스의 개수가 적을수록, 스캔에 걸리는 시간이 줄어듭니다.
«확인» 버튼을 클릭하여 설정에 변경 사항을 저장하십시오.
이 작업 수행 방법:
메인 메뉴 — «설정 → 옵션 → 리소스».

옵션 — 기타
프로그램의 기타 설정 섹션에서 자동 업데이트 확인을 활성화하고, SSH 클라이언트, Telnet 클라이언트, FTP 클라이언트, HTTP 클라이언트의 사용을 지정할 수 있습니다. 또한, Radmin Viewer의 포터블 버전 사용을 활성화하고 경로를 지정할 수도 있습니다.
이 섹션에서 테이블 색깔의 보조를 활성화할 수 있습니다.
이 작업 수행 방법:
메인 메뉴 — «설정 → 옵션 → 기타».
컴퓨터 종료
이 기능으로 선택한 컴퓨터를 원격으로 종료할 수 있습니다(인증된 경우).
이 작업 수행 방법:
- 메인 메뉴 — «조치 → 종료»;
- 바로가기 메뉴 — «종료»;
- 도구 막대 — «종료» 버튼입니다(추가 버튼은 «보기» 섹션의 메인 메뉴에서 도구 막대에 추가될 수 있음).
«종료» 버튼을 누른 후에, 아래 대화 상자가 화면에 나타납니다. 다음과 같은 옵션을 선택하여 다음과 같은 작업을 수행할 수 있습니다.
- «강제 종료» — 일부 프로그램이 실행 중이고 재시작 시 발생할 수 있는 저장하지 않은 데이터의 손실에 대한 경고 메시지가 나타나도 컴퓨터를 종료/다시 불러오기할 수 있습니다.
- «재부팅» — 컴퓨터를 끄지 않고 재부팅합니다.
- «메시지» — «컴퓨터가 N초 내에 재시작됩니다»라고 사용자에게 경고합니다.
원격 종료 중단
이 기능으로 선택된 컴퓨터의 원격 종료를 취소할 수 있습니다.
이 작업 수행 방법:
- 메인 메뉴 — «조치 → 종료 중단»;
- 바로가기 메뉴 — «종료 중단»;
- 도구 막대 — «종료 중단» 버튼입니다(추가 버튼은 «보기» 섹션의 메인 메뉴에서 도구 막대에 추가될 수 있음).
Wake-on-LAN
이 기능은 선택된 컴퓨터에 «Wake-On-LAN» 명령어를 전송합니다. 이 명령어는 MAC 주소가 식별된 컴퓨터에만 전송됩니다.
이 작업 수행 방법:
- 메인 메뉴 — «조치 → Wake-on-LAN»;
- 바로가기 메뉴 — «Wake-On-LAN»;
- 도구 막대 — «Wake-On-LAN» 버튼입니다(추가 버튼은 «보기» 섹션의 메인 메뉴에서 도구 막대에 추가될 수 있음).
컴퓨터 탐색
이 기능은 선택된 컴퓨터를 표시하는 Windows 탐색기를 엽니다.
이 작업 수행 방법:
- 메인 메뉴 — «조치 → 탐색»;
- 바로가기 메뉴 — «탐색»;
- 도구 막대 — 도구 막대 — «탐색» 버튼입니다(추가 버튼은 «보기» 섹션의 메인 메뉴에서 도구 막대에 추가될 수 있음).
HTTP 연결
사용자가 선택한 브라우저를 사용하여 HTTP 프로토콜로 컴퓨터에 연결할 수 있습니다. HTTP 클라이언트는 «설정 → 옵션… → 기타»에 지정되어 있습니다. HTTP 클라이언트가 지정되지 않은 경우, 기본 클라이언트가 사용됩니다.
이 작업 수행 방법:
- 메인 메뉴 — «조치 → HTTP»;
- 컴퓨터 목록 — 컴퓨터 아이콘을 두 번 클릭하고, 연결할 «HTTP»를 두 번 클릭합니다.
- 도구 막대 — HTTP 버튼입니다(추가 버튼은 «보기» 섹션의 메인 메뉴에서 도구 막대에 추가될 수 있음).
HTTPS 연결
사용자가 선택한 브라우저를 사용하여 HTTPS 프로토콜로 컴퓨터에 연결할 수 있습니다. HTTP 프로토콜에 연결과 같은 클라이언트가 사용됩니다.
이 작업 수행 방법:
- 메인 메뉴 — «조치 → HTTPS»;
- 컴퓨터 목록 — 컴퓨터 아이콘을 두 번 클릭하고, 연결할 «HTTPS»를 두 번 클릭합니다.
- 도구 막대 — HTTPS 버튼입니다(추가 버튼은 «보기» 섹션의 메인 메뉴에서 도구 막대에 추가될 수 있음).
FTP 연결
이 기능은 브라우저를 사용하여 FTP 프로토콜로 선택된 컴퓨터에 연결할 수 있습니다. «설정 → 옵션 → 기타» 섹션에서 다른 FTP 클라이언트를 지정할 수 있습니다.
이 작업 수행 방법:
- 메인 메뉴 — «조치 → FTP»;
- 컴퓨터 목록 — 컴퓨터 아이콘을 두 번 클릭하고, 연결할 «FTP»를 두 번 클릭합니다.
- 도구 막대 — FTP 버튼입니다(추가 버튼은 «보기» 섹션의 메인 메뉴에서 도구 막대에 추가될 수 있음).
Radmin으로 연결
이 기능은 Radmin을 시작하여 선택된 컴퓨터에 연결합니다.
이 작업 수행 방법:
- 메인 메뉴 — «조치 → Radmin»;
- 바로가기 메뉴 — «Radmin»;
- 컴퓨터 목록 — 컴퓨터 아이콘을 두 번 클릭하고, «Radmin»을 두 번 클릭합니다.
- 도구 막대 — «보기» 섹션의 메인 메뉴에 있는 도구 막대에 버튼을 추가할 수 있습니다.
원격 데스크톱 프로토콜 연결
Microsoft가 개발한 RDP(원격 데스크톱 프로토콜)는 그래픽 인터페이스를 제공하여 사용자가 네트워크 연결을 통해 다른 컴퓨터에서 작업할 수 있게 해줍니다.
RDP를 통해 선택된 컴퓨터에 연결할 수 있습니다.
이 작업 수행 방법:
- 메인 메뉴 — «조치 → RDP»;
- 바로가기 메뉴 — «RDP»;
- 컴퓨터 목록 — 컴퓨터 아이콘을 두 번 클릭하고, «RDP»를 두 번 클릭합니다.
- 도구 막대 — «RDP» 버튼입니다 («보기» 섹션의 메인 메뉴에 있는 도구 막대에 버튼을 추가할 수 ) 있습니다.
Сканирование сети с помощью nmap – немного теории
nmap – свободная утилита, предназначенная для разнообразного настраиваемого сканирования IP-сетей с любым количеством объектов, определения состояния объектов сканируемой сети.
nmap была написана с помощью C, C++, Python, Lua и предустановлена в Kali Linux, который мы с вами уже обозревали.
Изначально утилита была разработана для систем UNIX, сейчас же не составляет проблем установить её и на Windows.
nmap используется злоумышленниками для сканирования сетей WiFi, LAN и обнаружения открытых портов на подключенных устройствах для проведения различных атак.
Если на подключенном устройстве открыты порты, то оно считается уязвимым и легко поддаётся атакам с помощью различных X-sploits. Одним из самых распространнёных является Metasploit.
Metasploit Project – проект, посвящённый информационной безопасности. Создан для предоставления информации об уязвимостях, помощи в создании сигнатур для IDS, создания и тестирования эксплойтов.
Также вы можете прочитать о скрипте для Termux, с помощью него можно легко установить Network Mapper на ваш смартфон.
MiTeC Network Scanner
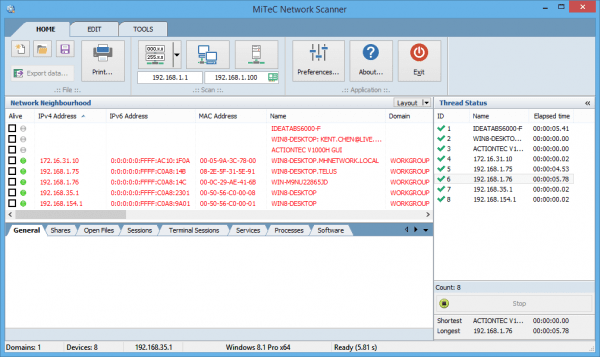 MiTeC Network Scanner
MiTeC’s Network Scanner is a free multi-threaded ICMP, Port, IP, NetBIOS, ActiveDirectory and SNMP scanner with many advanced features. It is intended for both system administrators and general users who are interested in computer security. The program performs ping sweep, scans for opened TCP and UDP ports, resource shares and services.
For devices with SNMP capability, available interfaces are detected and basic properties displayed. In addition, you have to edit results, save/load results to/from CSV and print network device list and any data in any section can be exported to CSV. It can also resolve host names and auto-detect your local IP range.
MiTeC’s Network Scanner works on pretty much all Windows platforms including server versions. It’s free for both personal and commercial use.
Preparing Metasploit for Port Scanning
Scanners and most other auxiliary modules use the ‘RHOSTS’ option instead of ‘RHOST’. RHOSTS can take IP ranges (192.168.1.20-192.168.1.30), CIDR ranges (192.168.1.0/24), multiple ranges separated by commas (192.168.1.0/24, 192.168.3.0/24), and line-separated host list files (file:/tmp/hostlist.txt). This is another use for a grepable Nmap output file.
By default, all of the scanner modules will have the ‘THREADS’ value set to ‘1’. The ‘THREADS’ value sets the number of concurrent threads to use while scanning. Set this value to a higher number in order to speed up your scans or keep it lower in order to reduce network traffic but be sure to adhere to the following guidelines:
-
- Keep the THREADS value under 16 on native Win32 systems
- Keep THREADS under 200 when running MSF under Cygwin
- On Unix-like operating systems, THREADS can be set as high as 256.