How to setup metasploitable 3 on windows 10
Содержание:
Download and Install Metasploitable in VirtualBox
What is Metasploitable, and where to use it?
To install Metasploitable in VirtualBox at first, we need to know what is Metasploitable. Metasploitable is a purposely vulnerable Linux machine which is used to test security tools and test conventional penetration testing methods on it. It will look just like a command prompt in Windows and as a terminal in Linux. I mean it doesn’t have any kinds of graphic design or something. Don’t use it when it is connected to an unknown or public network because as I said, it is a vulnerable machine which can be hacked easily.
What is Penetration Testing?
Penetration testing or pen-test is an attack on a computer system that looks for security weaknesses, want to get access to the computer’s features and data.
Let’s start to know more and to install this OS in a Virtual Machine.
We are going to show you how to download and install Metasploitable in Virtualbox.
Install Metasploitable in Virtualbox
Requirements for this OS.
- Metasploitable
- Virtualbox
- 7-Zip
- A virtual box is a virtualization machine that can install many Operating Systems inside itself. If you can’t install it, click here and learn how to install Virtual Box on Windows or Mac.
-
Well when you are going to the site to download Metasploitable OS, The site need some information about you according to the picture below.
-
After filling all the registration, click on the SUBMIT button at the bottom. On the next page, it will take just a click on the download button as the picture below.
-
Extract the Metasploitable file.
-
Open the Virtual Box and click the new button on the top right side of your Virtual Box. On the first option, write Metasploitable and select Kali Linux in the second option and click Next and go forward.
-
After step 5, you will select the memory size ( RAM). You can use it as a default or give some extra and Click on next then Create button.
-
This step, you will select the type of your Hard disk, and it is VDI(Virtualbox Disk Image). After that, click on Next button and again click Next button.
-
Now you will select the Size and location of your Virtual machine.
-
Now the settings are fixed up, and we have to select our downloaded OS, and for that, we must click on the Storage button as the picture below.
-
Click on the small hard disk on the top right of the dialogue box as the picture.
-
Now go the directory that Metasploitable is downloaded and select that.
-
It is finished, and you are ready to open. To open that click the start button on the top right of the Virtualbox.
Note: – The password and the Username of the OS are msfadmin. And you can shut down it by writing power off and if you got any question or problem, do not hesitate to share with us. Install Metasploitable in VirtualBox.
Setting up Metasploit on Kali Linux 2016 Rolling
When you’re running the latest version of Kali Linux, currently that is the 2016 rolling edition, you just need to click the Metasploit icon on the dock. This will start the PostrgreSQL service, the Metasploit service and msfconsole automatically. When you launch Metasploit for the first time it will set-up and configure the Metasploit database.
Setting up Metasploit on Kali Linux before 2016 Rolling edition
In order to use Metasploit on any Kali Linux version before 2016.01 Rolling edition you need to do 3 things:
- Start the Kali PostgreSQL service.
- Start the Kali Metasploit service.
- Start the msfconsole.
To start the PostgreSQL service we need to issue the following command in the terminal:
service postgresql start
Then use the following command to start the Metasploit service:
service metasploit start
And the following command to start msfconsole:
msfconsole

Now use the following command to check if there is a database connection:
msf > db_status
If you want to start the PostgreSQL and Metasploit service at boot time you need to edit the update-rc.d by using the following commands:
update-rc.d postgresql enable
update-rc.d metasploit enable
Unreal ircd vulnerabilities
Let’s have a look at the Unreal ircd service, a known IRC service supporting many platforms. The only thing we know about this service until now is that it’s running on port 6667 from the Nmap scan. We do not know any further details such as a version number which would help us a lot in determining it’s vulnerabilities. A common method to determine the version of a service is by using a banner grabbing technique. Netcat is a tool which can be used for this purpose (among many other purposes). Let’s see if we can grab a banner using Netcat:
Unfortunately there is no banner returned to us when we connect to the IRC service with Netcat:
 Let’s return to Nmap and use the following command to trigger a full scan on port 6667:
 Nmap does return us the version number of the unreal ircd service which seems to be unreal ircd 3.2.8.1. When we search Google for the version number we quickly find that this version may contain a backdoor: https://www.rapid7.com/db/modules/exploit/unix/irc/unreal_ircd_3281_backdoor
There is also a NMap script available for scanning the target hosts for the trojaned version of unrealircd. Use the following command to have Nmap scan the target host:
The output of the scripts states if the target host is probably vulnerable or not. The script issues a command on the target hosts but since there is no way to return the output of the command to our terminal session, we cannot be a 100% sure that the host is vulnerable using the script in this manner. In the following tutorial we will be looking at a few different ways of exploiting this vulnerability using Metasploit, NetCat and this Nmap script with additional script arguments.
 So far we are not a 100% sure if the unreal IRCD 3.2.8.1 service is vulnerable, we can only suspect it is.
Metasploitable2, Metasploitable3 and InfoSec Assignments
In my first semester of teaching Introduction to Information Security in Semester 1, 2017, I used Metasploitable2 for in-class practical lab exercises. I did the same again this year. For the first assignment in the paper, students have to perform an information security audit and document all findings in a security audit report. It is a fun assignment! Last year, I choose Metasploitable3 in the hopes that they wouldn’t find out what system they were auditing. I went to great lengths to ensure there was no trace of the phrase Metasploitable3 in the system. I am pretty sure it went un-noticed! This year I was looking for something new, and I accidentally stumbled across Metasploitable3… the Linux version! It’s an exciting story, but in summary, I was building the Windows Server 2008 version on Linux and noticed the BASH script was expecting an argument…
A sense of great interest filled my heart. I had just re-read the Metasploitable3 Wiki, perused over the source code on the GitHub repository and had seen nothing about a Linux version. I checked the first Rapid7 blog post about Metasploitable3 and noticed the following statement:
A bit of further digging revealed a GitHub issue was opened by a user named prateepb who stated that they’d be happy to create a Linux version. There was a bit of chatter back and forth, and even a post summarising a selection of tasty vulnerabilities for the system:
Very recently, in February 2018, the user jbarnett-r7 submitted a push request on GitHub to include the code for the Linux box that was used for the capture the flag competition hosted by Rapid7 in December 2017. This addition was after I built the Metasploitable3 Linux version for my assignment.
Even with the odds against me, I decided to use the Metapsploitable3 Linux version for my assignment. It was new and interesting, and I needed a challenge. Also, I luckily started planning the classes in advance so had the time to tinker and test!
Introduction:
Metasploitable is back with version 3, which includes lot more interesting vulnerabilities. Metasploitable3 is special because it is not a pre-configured downloadable VM. The user himself can configure it, and the user can also decide target version of Windows.
By its name, Metasploitable is a designed to practice attacks with Metasploit Framework. Nevertheless, it is lot more fun to exploit those vulnerabilities without Metasploit Framework.
In this series of articles, we will discuss most of the challenges that come with Metasploitable3. Instead of just cracking the challenges with the hints provided at Metasploitable3’s Github page, we will use the VM to learn the penetration testing concepts similar to how we do them in the real-world penetration testing engagements. We will achieve this by following the steps shown below.
- Information Gathering
- Exploitation
- Post Exploitation
Just to make things clear, it is possible to gain access to the target box using any of the remotely exploitable vulnerabilities. However, we will try to gain access to the machine in multiple ways.
In this article, we will discuss how to setup the lab to follow the rest of the articles in the series. Though, lab setup is straightforward with the PowerShell scripts provided; I would like to cover it here for those who need it with the screenshots and clearer steps.
Prerequisite
The prerequisite for the installation of Metasploitable3 are as below:
Latest version of Oracle VirtualBox
Latest version of Oracle VirtualBoxExtensions
Step 1: Download and Install packer on the local host
-Please download the 64-bit packer from https://packer.io/downloads.html
Create a new folder with packer name and save the uncompressed packer to the newly created folder at C:\Program Files\packer folder
Now add the environmental variable by right-clicking this PC- => Click on advance system setting => to click on environment variables => select the Path in the System variables windowà click on edit => New àfill with C:\Program Files\packer => OK. (See below environmental variable setting screenshot).
Open the command prompt and type packer and enter. You should see below which confirms the successful installation of the packer on your machine.
Step 2: Vagrant installation
-Go to https://www.vagrantup.com/downloads.html to download 64-bit windows vagrant executable.
-Accept all default options. Reboot your system after the installation of packer.
-Install vagrant plugin now using this command vagrant plugin install vagrant-reload
Step 3: Install git client on your PC
Download and install 64-bit windows git executable from:https://git-scm.com/downloads. Accept all default options from the installer. You may have to reboot your machine at this point.
Step 4: Install Metasploitable3
-Run this command on command prompt: C:\Users\naveen\metasploitable3>git clone https://github.com/rapid7/metasploitable3.git
Step 5: Build Json Step
-Run this command C:\Users\naveen\metasploitable3>packer build –only=Virtualbox-iso \packer\templates\windows_2008_r2.json
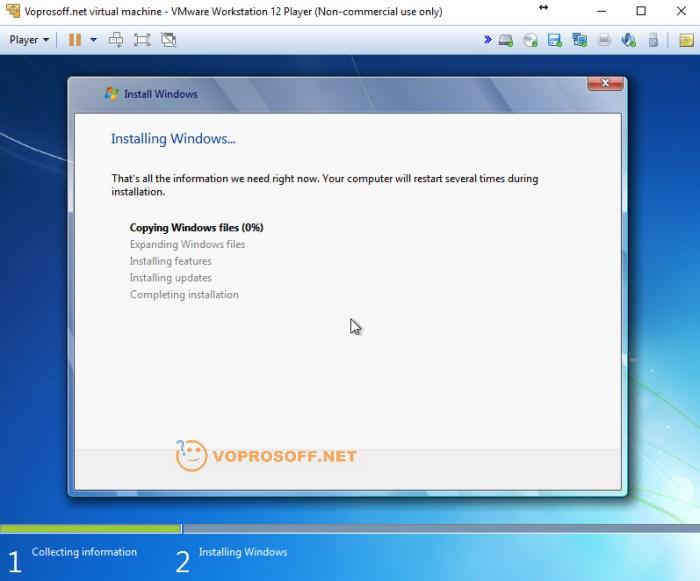
This may take a couple of hours and you have to be patient with the installation process.
The installation process will reboot newly created VM few times.
Now add vagrant box after the installation using below command C:\Users\naveen\metasploitable3>vagrant box add .\packer\builds\windows_2008_r2_virtualbox_0.1.0.box –name=metasploitable3-win2k8
Hooray, finally the fruit of your laborcome to fruition. Head to VirtualBox and you will notice a new Windows 2008 VM. You find two users here: administrator and vagrant (see below screen shot). Password for both the account is vagrant. Enjoy hacking Windows 2008 Server!
Useful Links
- https://packer.io/downloads.html
- https://www.vagrantup.com/downloads.html
- https://www.virtualbox.org/
- https://github.com/rapid7/metasploitable3
- https://github.com/rapid7/metasploitable3/wiki/Vulnerabilities
- https://github.com/rapid7/metasploitable3/blob/master/README.md
Author :
I have more than 10 years’ experience in Security Engineering, Cyber Security Management, and architecture of secure solutions. In my spare time, I practice Yoga and learn the science of Ayurveda.