Как использовать почтовый клиент roundcube
Содержание:
- Шаг 2 — Знакомство с интерфейсом RoundCube Webmail
- Setuid Driver
- Configure Roundcube #
- Резервное копирование
- Сохранение имени и пароля пользователя в броузере
- Размер вложения
- Запрет изменения оформления (скина) пользователем
- e-mail на странице
- Установка Roundcube Ubuntu 18.04
- Conclusion #
- Установка прав на папки и файлы
- Логотип
- Расширения (plugins)
- Configuration/Environment Variables
- Размер папки
- Профили
- Поиск сообщений
- Квоты
- FTP Driver
- Импорт персональных адресных книг
- Проверка русской орфографии
- Tips and tricks
- Адресная книга AD[править]
- Building a Docker image
- Docker Secrets
- Работа с таблицами
- Устанавливаем и настраиваем Roundcube Webmail
- Development
- Current features
- How do I get it?
Шаг 2 — Знакомство с интерфейсом RoundCube Webmail
После входа в RoundCube должно открыться новое окно с веб-интерфейсом почтового клиента. Внешне оно довольно схоже с любыми другими почтовыми сервисами, однако имеет свои особенности о которых будет написано далее.
Вкладка Почта
Это основное место для работы с вашими письмами. Вкладка Почта в RoundCube состоит из 4 разделов.
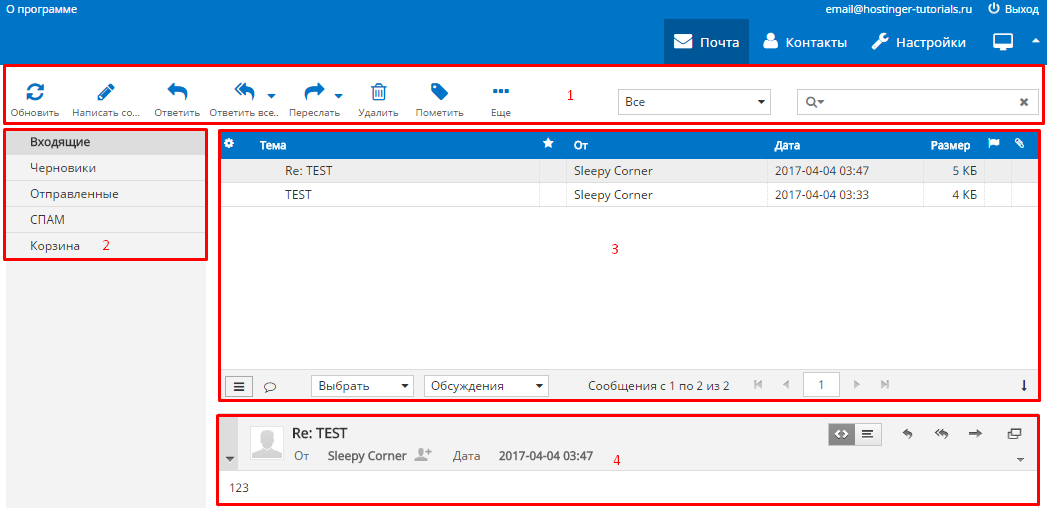
- В разделе под номером 1 представлены основные инструменты для работы с письмами: отправка, пересылка, отправка ответов, удаление. Во вкладке Еще можно найти дополнительные инструменты для импорта писем в формате eml, печати, копирования, переноса и т.д.
- Второй раздел состоит из стандартных папок вашего почтового аккаунта: входящие, черновики, отправленные, спам, корзина (вы можете настроить данные папки в настройках RoundCube).
- Это список писем вашего почтового аккаунта с данными об отправителе дате и размере письма.
- Здесь отображается содержимое выбранного вами в списке письма. Для удобства присутствуют дублирующие кнопки для ответа, пересылки, а также возможность отображения письма в текстовом или HTML формате.
Вкладка Контакты
Интерфейс вкладки Контакты также довольно прост. Его можно поделить на 3 основные части.
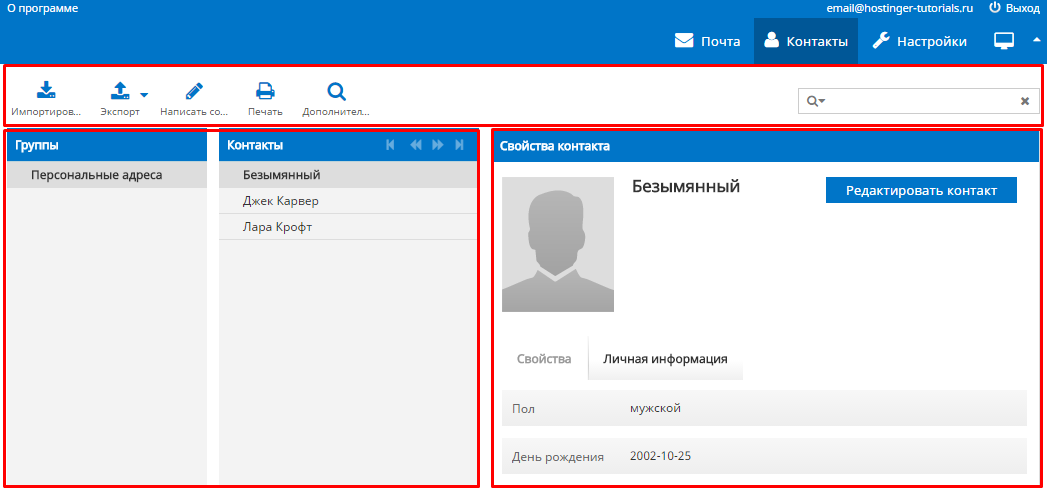
В самом верху расположена панель инструментов. С помощью нее вы можете осуществить импорт или экспорт контактов, отправку сообщения выбранному контакту, печать информации о контакте или найти нужного вам адресата по заданным данным.
Панель слева отображает список групп, которые вы можете настроить по своему желанию и список ваших контактов.
Эта вкладка является достаточно полезной, так как вы можете хранить всю информацию об адресатах в одном месте и соответственно получить доступ к нужной информации в любое время.
Вкладка Настройки
Здесь находятся основные настройки вашего почтового клиента RoundCube.
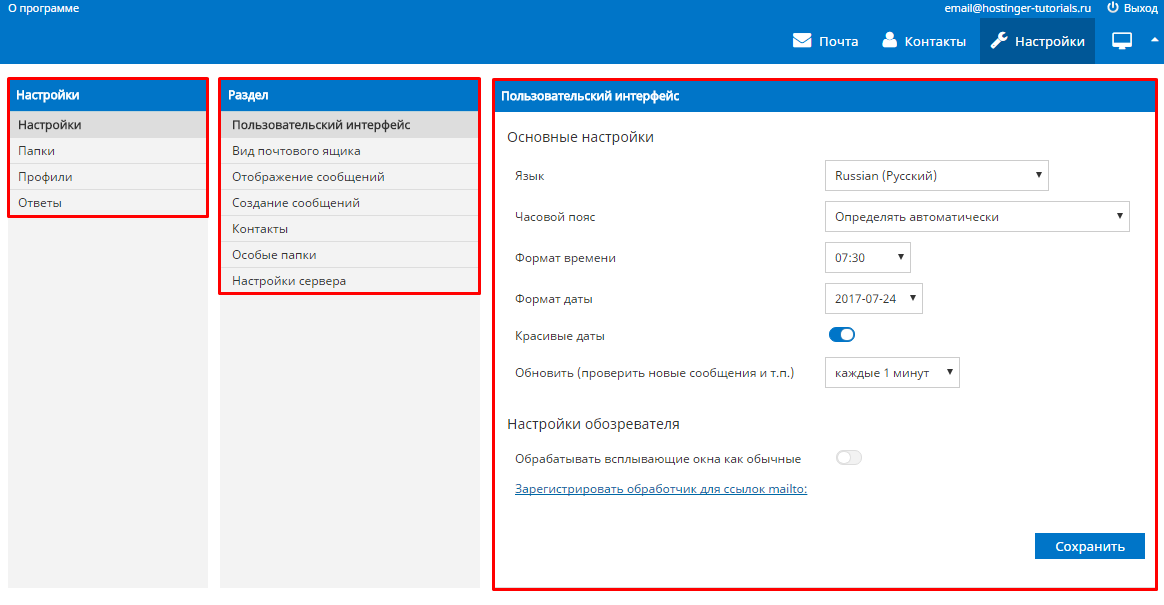
В разделе Настройки вы можете найти множество опций и настроить их под свои нужды. В данном руководстве мы не будем рассказывать о каждой опции в отдельности, а лишь затронем самые полезные из них:
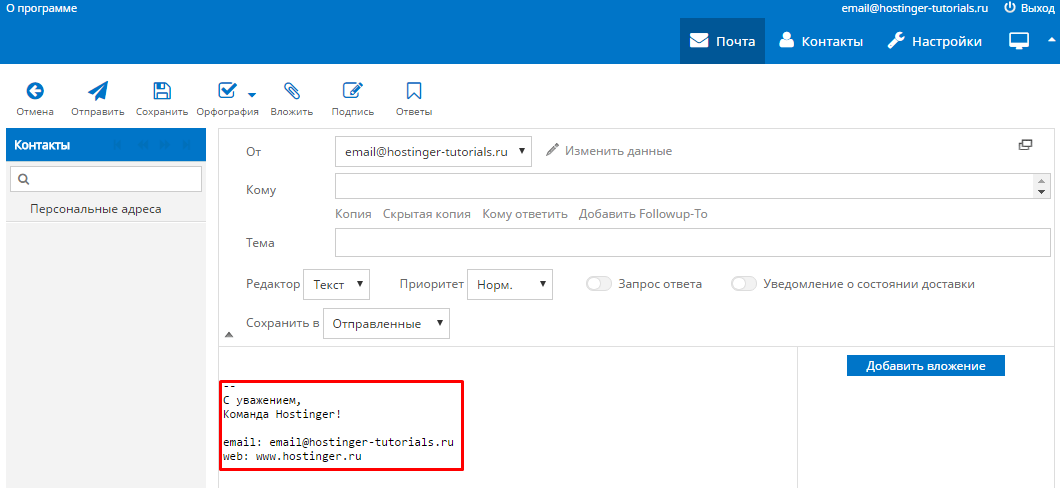
- В разделе Создание сообщений вы сможете настроить Подпись для ваших сообщений.

- Укажите в каких случаях стоит добавлять подпись в текст письма напротив Автоматически добавлять подпись. Остальные настройки не должны вызвать у вас затруднения.
- Теперь перейдите в раздел Профиль → Название вашего профиля.
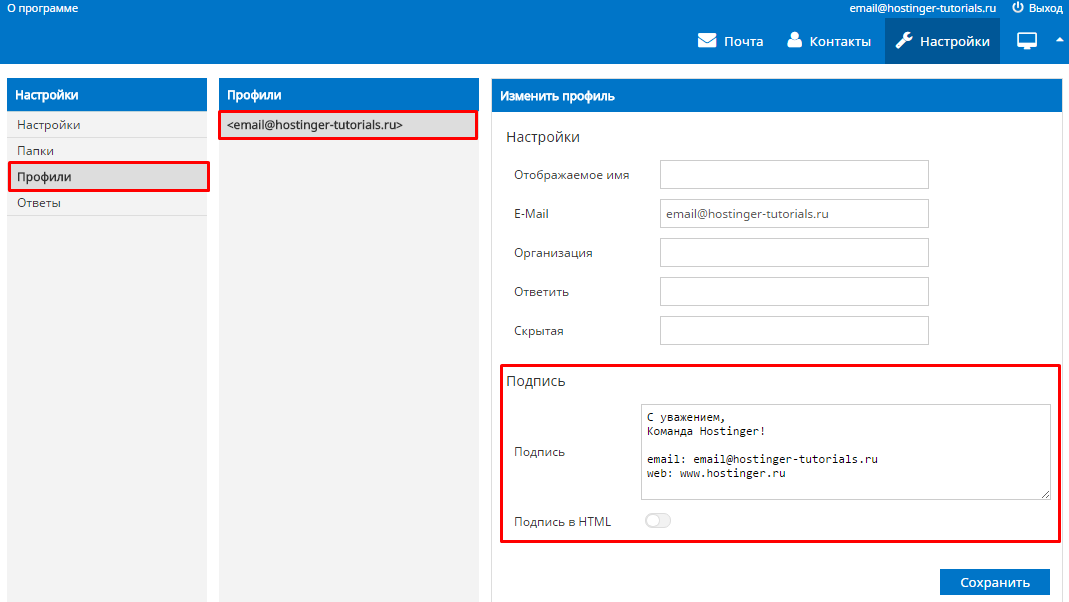
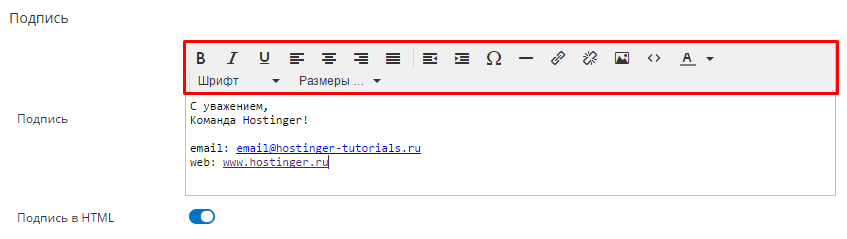
- Укажите в поле Подпись нужный вам текст. Вы также можете добавить в подпись изображение или любую другую графику. Включите опцию Подпись в HTML и добавьте изображение с помощью панели с BB кодами.
ЗАМЕТКА! Если вы используете изображение в вашей подписи убедитесь, что опция Редактор в окне создания письма установлена на HTML. В противном случае подпись может отображаться некорректно.
- Нажмите кнопку Сохранить для сохранения изменений. Теперь в зависимости от установленных вами настроек в разделе Создание сообщений вам не надо будет добавлять подпись вручную.
Еще одной полезной функцией почтового клиента RoundCube является вставка готовых ответов:
- Ее вы также можете настроить во вкладке Настройки → раздел Ответы.
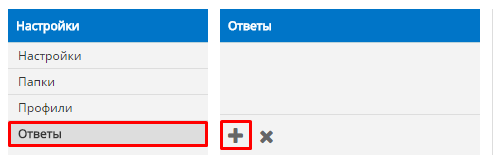
- Нажмите на кнопку + для добавления шаблона ответа. Далее, в правом окне впишите название и сам текст ответа.

- Нажмите кнопку Сохранить для сохранения изменений. Теперь при написании сообщения вам не нужно вручную писать шаблонные фразы или приветствия. Для вставки ответа на экране создания письма нажмите кнопку Ответы в панели инструментов, далее выберите нужный вам шаблон ответа.
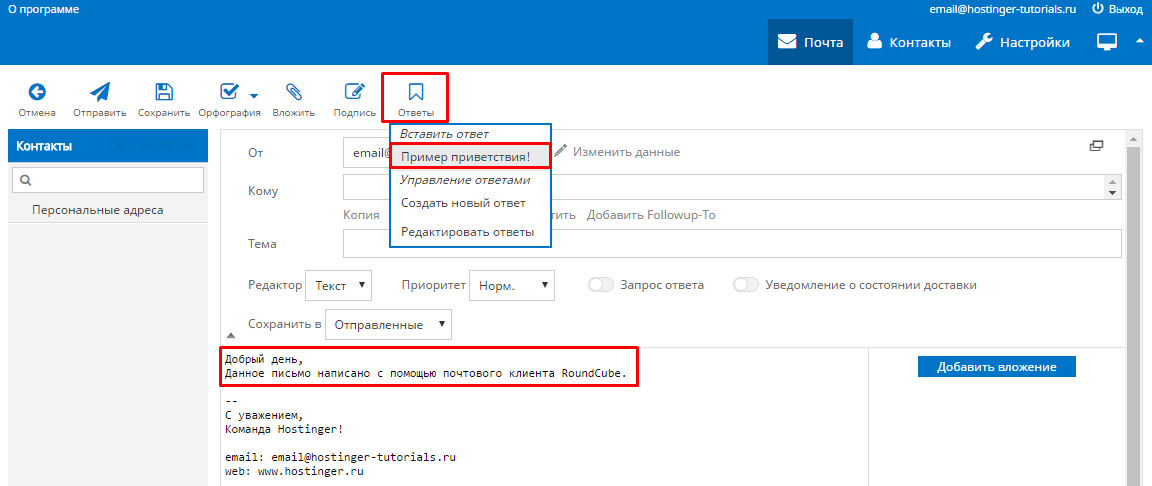
Вот и все, вы настроили функцию добавления ответов для почтового клиента RoundCube.
Внешний вид
Оставшиеся элементы в верхней панели отвечают за внешний вид почтового клиента.
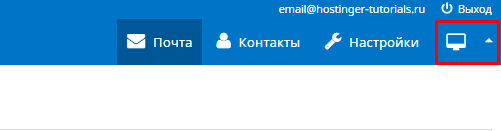
Значок монитора позволяет изменить цветовую гамму почтового клиента и его язык.
Значок треугольника позволяет скрыть верхнее меню почтового клиента.
Setuid Driver
The setuid backend uses a setuid binary to read/write .forward,.vacation.msg
files for the current logged in user.
Apache executes the setuid binary and passes the user credentials as parameters.
The extra/vacation_binary/ directory of the plugin contains the setuid binary and its source code.
To install this driver, change directory to $path/to/extra/vacation_binary and
issue with root priviliges the command: «make install».
This command install «squirrel_vacation_proxy» to /usr/bin with the setuid bit set.
This directory can be changed in config.mk
Apart from the way it reads/writes files, it behaves like the FTP driver.
Requirements for using this driver:
The Apache user needs to be ‘apache’ or you need to edit config.mk
and recompile squirrelmail_vacation_proxy using ‘make’.
Configure Roundcube #
You will be presented with the following screen:
In the section only the MySQL extension is required.
If all required PHP extensions are loaded we can proceed to the next step, where we can configure our Roundcube installation:
The most important part here is to enter the correct MySQL database settings.
When you are done with the configuration step, proceed to the next step and import the Roundcube’s MySQL database structure by clicking on the button.
Once the database structure is created, delete the directory to prevent reconfiguration and/or unauthorized access.
Enabling Roundcube’s automatic cache-cleaning is optional but recommended:
Резервное копирование
- roundcube_backup_mysql.sh
-
mysqldump roundcube -uroundcube -hСЕРВЕР -pПАРОЛЬ > /etc/roundcube/roundcube.`date '+%u'`.sql
Сохранение имени и пароля пользователя в броузере
В файле нужно задать значение переменной:
$config
Значения:
- 0 = отключить
- 1 = только имя и сервер
- 2 = все: имя , сервер и пароль
Размер вложения
- /etc/php/7.3/apache2/php.ini
-
upload_max_filesize = 20M
post_max_size = 28M
upload_max_filesize = 50M
max_file_uploads = 50
Чтобы изменения вступили в силу нужно перечитать настройки Apache:
service apache2 reload
Файл или
php_value       upload_max_filesize     50M
php_value       post_max_size           60M
php_value       memory_limit            64M
Запрет изменения оформления (скина) пользователем
В файле нужно заменить
$rcmail_config = array();
на
$rcmail_config[] = 'skin';
-
default
-
no-border
-
small-border
e-mail на странице
<div id="taskbar"> <span style="font-weight: bold;"><roundcube:object name="username" /></span>
Файл
$messages'folderpurged' = 'Папка очищена';
$messages'folderexpunged' = 'Папка сжата';
Установка Roundcube Ubuntu 18.04
Я предполагаю, что Apache, PHP и MySQL уже установлены на ваш компьютер или сервер. Если это не так, вы можете воспользоваться этой инструкцией для установки.
1. Подготовка Apache
Затем нам необходимо создать виртуальный хост Apache, на котором и будет доступен наш почтовый клиент. Для этого создайте файл /etc/apache2/sites-available/roundcube.conf со следующим содержимым:

В строке ServerName нужно указать поддомен, на котором будет доступен Roundcube, а в строке DocumentRoot мы указываем путь к папке программы.
Затем активируйте только что созданный виртуальный хост, модуль rewrite и перезапустите веб-сервер:
Далее нам нужно создать эту папку:
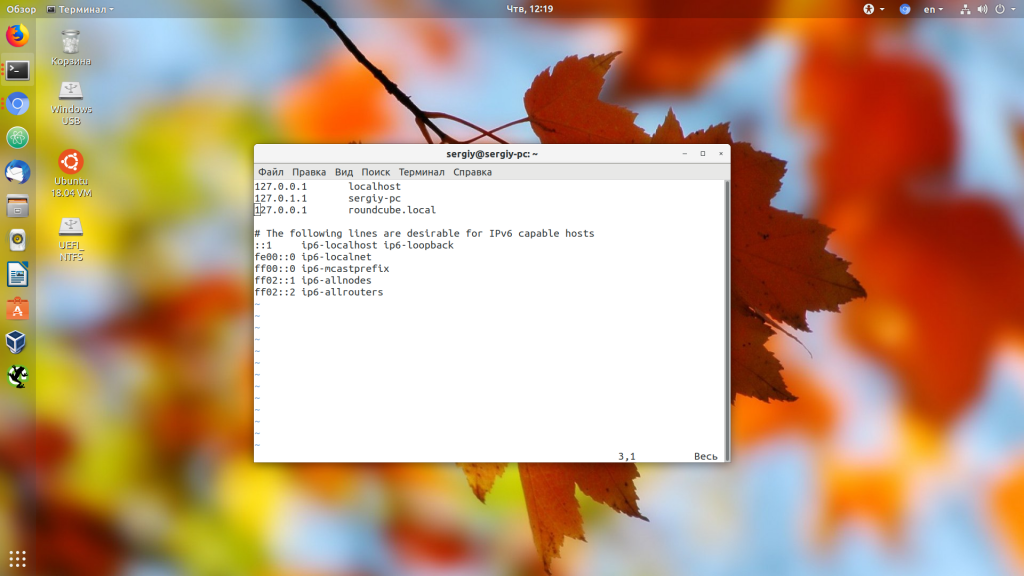
Если вы устанавливаете программу на локальный компьютер, то нужно добавить такую строчку в файл /etc/hosts, чтобы выбранное доменное имя указывало на локальный компьютер:
Также необходимо установить такие пакеты php для работы программы:
Затем надо настроить временную зону php для этого откройте файл /etc/php/7.2/apache2/php.ini, найдите такую строчку и пропишите в ней свою временную зону:
2. Загрузка исходников
Далее перейдите в будущую папку программы командой:
Затем распакуйте загруженный архив:

Затем надо переместить все файлы из полученной папки в текущую:
Далее надо дать веб-серверу права на эту папку и все файлы:
3. Подготовка базы данных
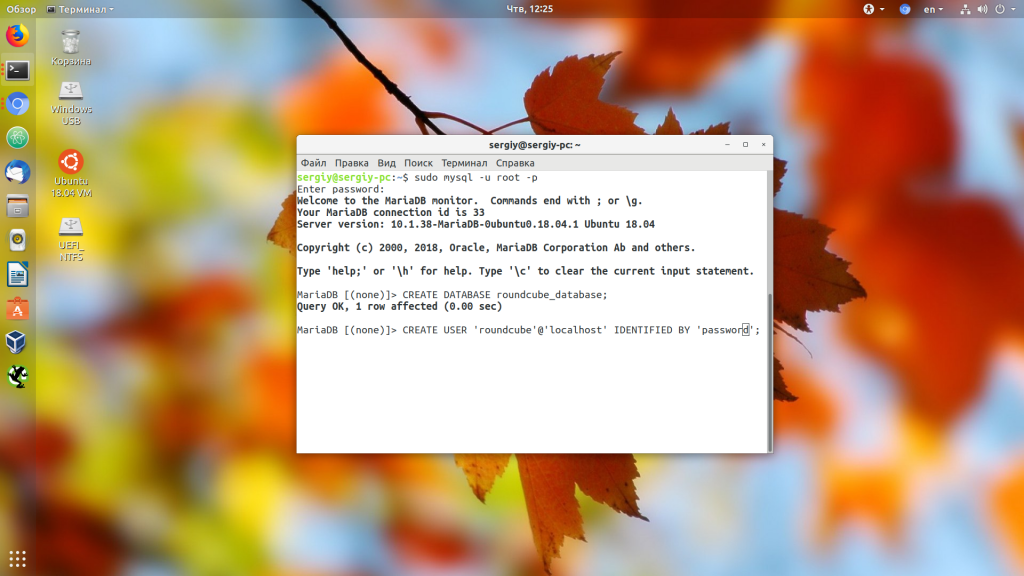
Всю информацию программа хранит в MySQL, поэтому необходимо создать для неё базу данных и пользователя. Для этого запустите консольный клиент MySQL:
И выполните:
Для выхода из программы наберите:
Затем нужно развернуть базу данных Roundcube:
Установка roundcube webmail практически завершена.
4. Установщик roundcube
Теперь давайте разберемся как настроить roundcube. Запустить установщик можно открыв в браузере адрес http://roundcube.local/installer:
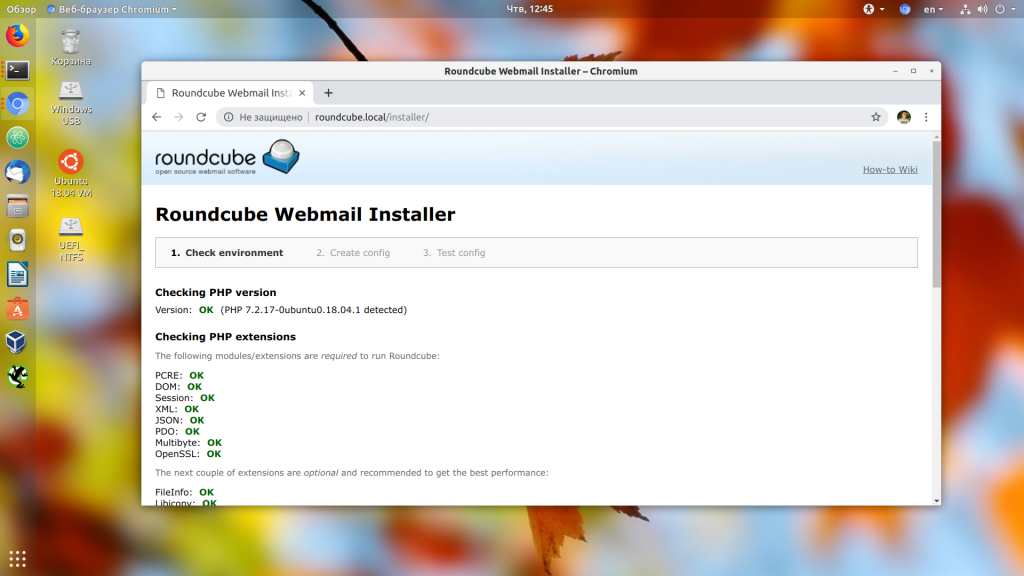
Здесь все пункты, кроме Checking available databases должны иметь значение OK. Если это не так, надо выполнить действия, которые предлагает программа чтобы значение изменилось на OK. Только после этого переходите к следующему шагу:
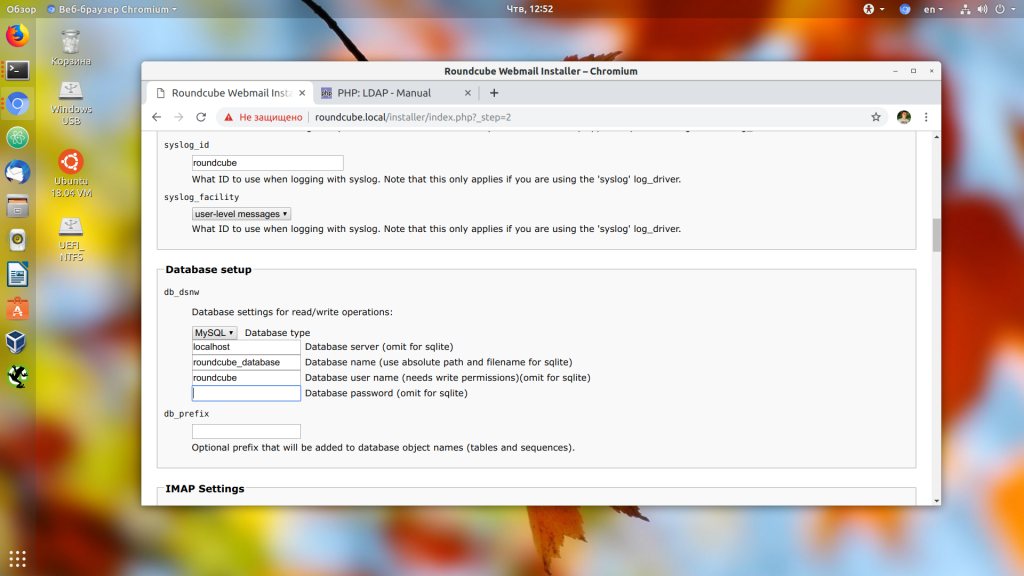
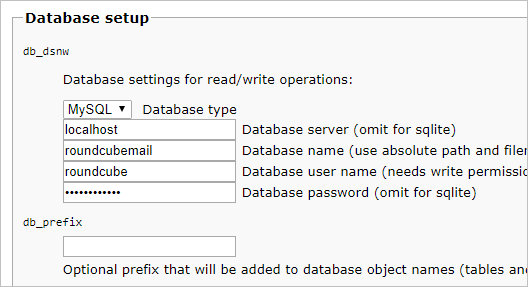
Здесь все настройки можно оставить по умолчанию, изменить надо только параметры доступа к базе данных в разделе Database setup. Укажите имя базы данных, имя пользователя и его пароль:
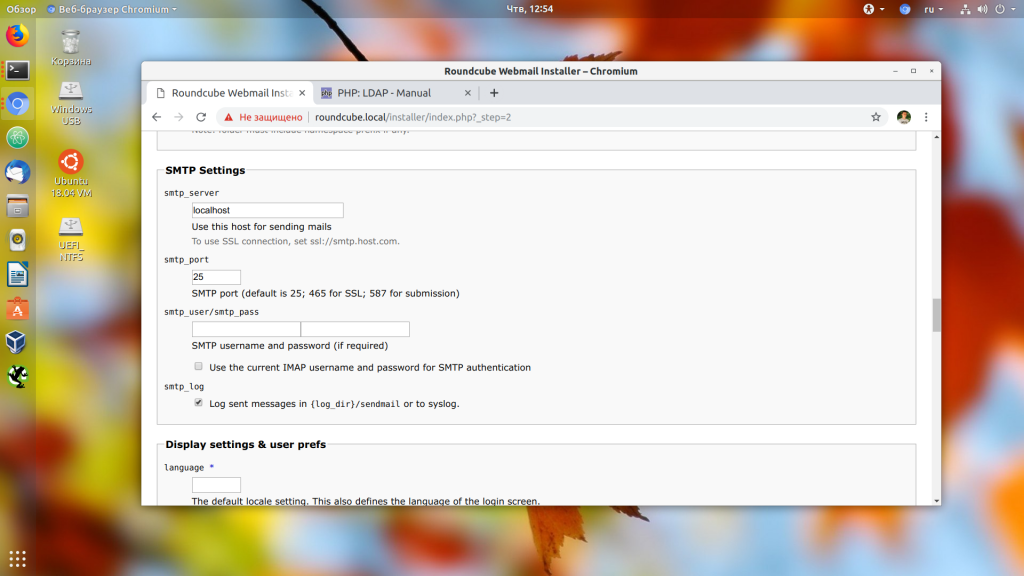
Затем можно настроить параметры IMAP и SMTP для доступа к почтовому серверу. Первый используется для просмотра почты, а второй для отправки. Для примера я воспользуюсь IMAP сервером от моего почтового ящика gmail. Если почтовый сервер находится на локальном компьютере, ничего менять не надо:
Затем программа сообщит, что конфигурационный файл успешно сохранен.

Если программа предлагает сохранить файл вручную, значит у неё нет доступа на запись к папке конфигурации. После того, как файл будет сохранен, нажмите кнопку Continue:
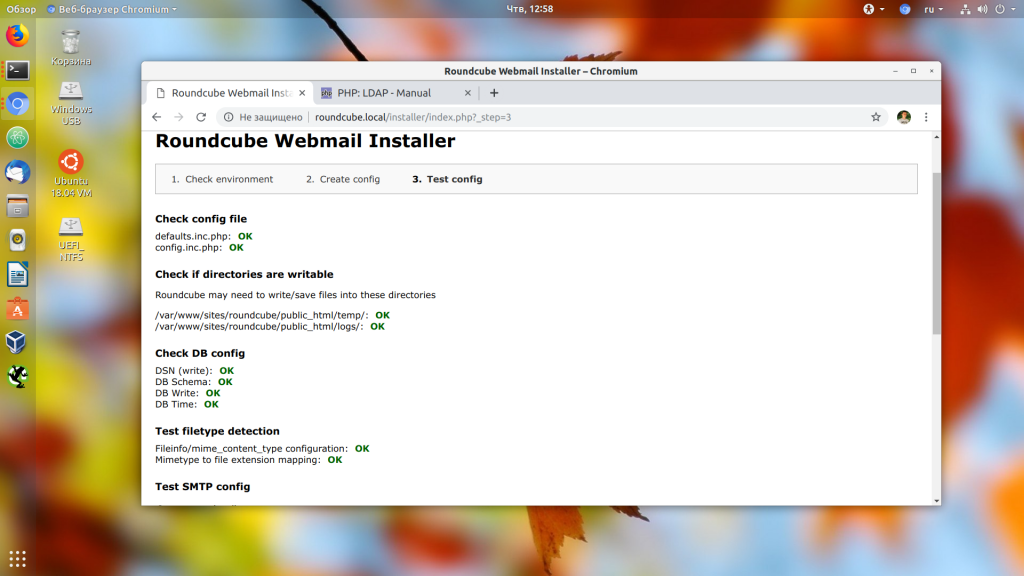
Здесь утилита проверит конфигурационный файл и сообщит, что с ним все нормально. На этом настройка Roundcube завершена.
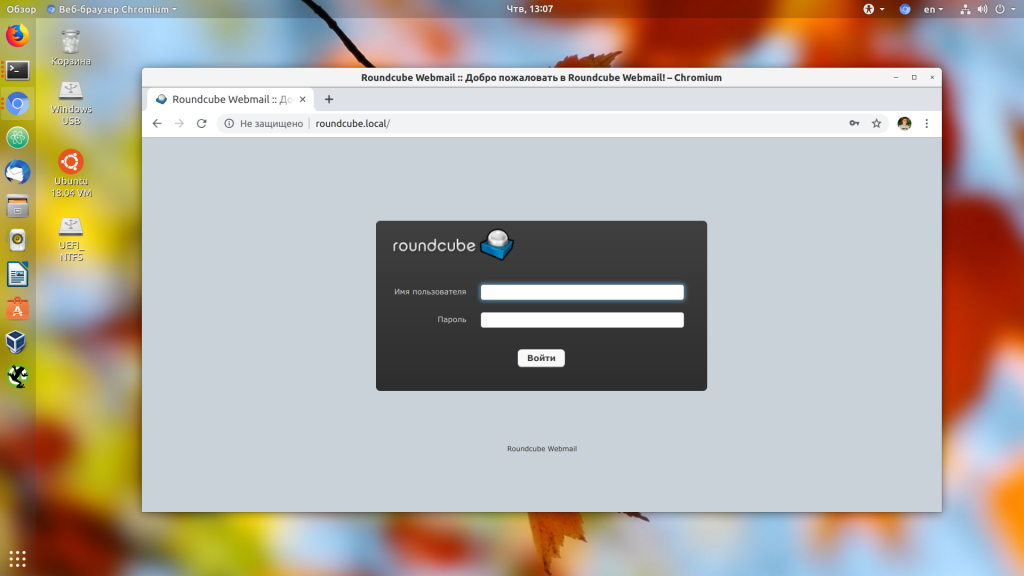
Теперь вы можете выполнить вход в почту Roundcube webmail. Откройте адрес http://roundcube.local и введите логин и пароль вашего аккаунта:
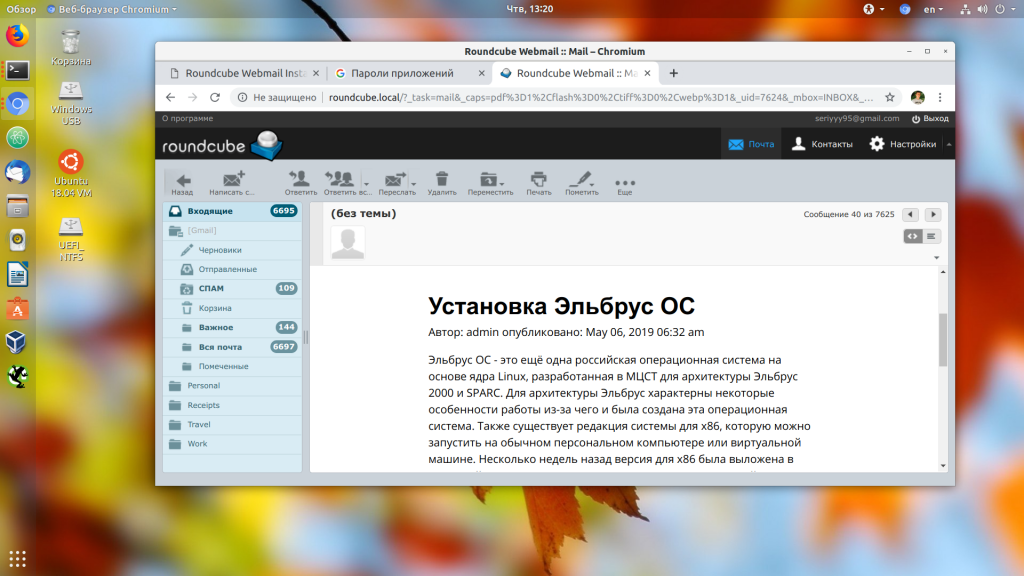
Затем можно читать письма:
Conclusion #
This tutorial showed you how to install and configure Roundcube Webmail on your Ubuntu system, as well as how to install and enable Roundcube plugins in order to add additional functionalities such as sieve filters.
This is the last post of this series. If you have any questions, feel free to leave a comment.
mail server roundcube
This post is a part of the Setting up and configuring a mail server series.Other posts in this series:
• Set up a mail server with PostfixAdmin
March 1, 2018
• Install and configure Postfix and Dovecot
March 2, 2018
• Install and Integrate Rspamd
March 8, 2018
• Install and Configure Roundcube Webmail
March 12, 2018
Установка прав на папки и файлы
Скрипт для установки прав на папки и файлы
Скрипт для установки прав на папки и файлы
- roundcube_opt_rights.sh
-
path=optroundcube
chown -R www-data $path
chgrp -R www-data $path
find $path -type f -exec chmod 644 {} \;
find $path -type d -exec chmod 755 {} \;

path=optroundcubeconfigdebian-db-roundcube.php
chown root $path
chgrp root $path
chmod 644 $path

path=optroundcubeconfigdebian-db.php
chown root $path
chgrp www-data $path
chmod 640 $path

path=optroundcubeconfigconfig.inc.php
chown root $path
chgrp www-data $path
chmod 640 $path

path=optroundcubepluginspasswordconfig.inc.php
chown root $path
chgrp www-data $path
chmod 640 $path

# sqllite
path=optroundcubedb
chmod -R 775 $path
Логотип
- config.inc.php
-
$config'skin_logo' = array (
    '*' => '/images/roundcube_logo.png',
    'messageprint' => '/images/roundcube_logo_print.png');
Расширения (plugins)
| Основная папка |
Для использования расширения его нужно внести в список файла , пример:
$config'plugins' = array(
    'archive',
    'zipdownload',
    'userinfo',
    'password',
    'dovecot_impersonate',
    'newmail_notifier',
    'acl',
    'managesieve',
);
Configuration/Environment Variables
The following env variables can be set to configure your Roundcube Docker instance:
By default, the image will use a local SQLite database for storing user account metadata.
It’ll be created inside the directory and can be backed up from there. Please note that
this option should not be used for production environments.
Connect to a Database
The recommended way to run Roundcube is connected to a MySQL database. Specify the following env variables to do so:
Before starting the container, please make sure that the supplied database exists and the given database user
has privileges to create tables.
Run it with a link to the MySQL host and the username/password variables:
Размер папки
Узнать текущий размер папки можно следующим образом:
-
Нажать кнопку
- Выбрать вкладку (Управление папками)
- В списке папок выбрать нужную папку
-
В разделе нажать на ссылку
Профили
Для работы с профилями нужно перейти в и перейти на вкладку . Далее нужно выбрать в списке (слева) выбрать по имени нужный профиль.
В профиле можно задать следующие данные пользователя:
- Отображаемое имя;
- Основной адрес электронной почты;
- Название организации (поле заголовка: Organization);
- Адрес электронной почты для ответа (поля заголовка: Reply-To, Mail-Reply-To);
- Адрес электронной почты для скрытой копии (поле заголовка: Bcc);
- Подпись, для подписи можно задать параметр .
Также можно выбрать профиль используемый по умолчанию путём установки значения .
Поиск сообщений
Критерии поиска:
- Тема
- От
- Кому
- Копия
- Скрытая
- Тело письма
- Всё сообщение
Область поиска:
- Текущая папка
- Эта и вложенные папки
- Все папки
Квоты
Если у получателя превышена квота, то отправителю сообщения приходит письмо с указанием на это:
This is the mail system at host mail.domain.ru.

I'm sorry to have to inform you that your message could not
be delivered to one or more recipients. It's attached below.

For further assistance, please send mail to postmaster.

If you do so, please include this problem report. You can
delete your own text from the attached returned message.

                   The mail system

<user@domain.ru>: host mail.domain.ru[private/dovecot-lmtp] said:
    552 5.2.2 <user@domain.ru> Quota exceeded (mailbox for user is
    full) (in reply to end of DATA command)
Quota exceeded = квота превышена
FTP Driver
The FTP driver establishes an FTP-connection to the current IMAP-host or the server
specified in config.ini
The login credentials of the current user are used to login to the FTP-server.
If .forward exists and it contains /usr/bin/vacation (as specified in config.ini),
the out of office is enabled.
If there are any forwarding addresses found in .forward, these are displayed to the user.
If alias_identities = true and there are any aliases found in .forward,
these are displayed to the user.
If alias_identities = true and there are no aliases found in .forward,
the identities are loaded and shown.
An alias contains no domain as it’s limited to normal system users (/etc/passwd).
If there is more than one identity present, the button ‘Get aliases’ is shown.
In either case it then downloads the .vacation.msg file that contains both
message body and subject. If .vacation.msg cannot be found,
it uses the default body and subject as defined in ‘config.ini’.
Requirements for using this driver:
- A working FTP-server that allows users to login to their $HOME directory.
- The SMTP-server must use .forward files found in the $HOME directory
- The FTP-server must allow upload of dot-files. Pure-ftpd does not allow this by default
Импорт персональных адресных книг
Для импорта из формата wab нужно:

1. Открыть адресную книгу, выбрать нужные контакты и мышкой перетащить и отпустить в нужную папку
2. copy *.vcf 1.vsf


Требования к формату vcard:

1. Кодировка файла UTF-8

2. Если не email, то заменяем его на несуществущий адрес формата:
EMAIL;TYPE=INTERNET:0@0.0


3. Если контакт входил к группу, то название пишем разделе Другие
NOTE:ИМЯ ГРУППЫ
Проверка русской орфографии
В файле нужно добавить русский язык (можно убрать лишние) в строке:
$spellcheck_langs = (array)$RCMAIL->config->get('spellcheck_languages', array('ru'=>'Russian', 'en' => 'English'));
Если необходимо, то поставить:
apt-get install aspell-ru
Tips and tricks
Setting Roundcube up for use with an IMAP/SMTP server that only allows TLS authentication
 $config = 'tls://mail.my_domain.org';
 // For STARTTLS IMAP
 $config = array(
     'ssl' => array(
       'verify_peer'       => true,
       // certificate is not self-signed if cafile provided
       'allow_self_signed' => false,
       'cafile'  => '/etc/ssl/certs/Your_CA_certificate.pem',
       // For Letsencrypt use the following two lines and remove the 'cafile' option above.
       //'ssl_cert' => '/etc/letsencrypt/live/mail.my_domain.org/fullchain.pem',
       //'ssl_key'  => '/etc/letsencrypt/live/mail.my_domain.org/privkey.pem',
       // probably optional parameters
       'ciphers' => 'TLSv1+HIGH:!aNull:@STRENGTH',
       'peer_name'         => 'mail.my_domain.org',
     ),
 );
 // For STARTTLS SMTP
 $config = array(
     'ssl' => array(
       'verify_peer'       => true,
       // certificate is not self-signed if cafile provided
       'allow_self_signed' => false,
       'cafile'  => '/etc/ssl/certs/Your_CA_certificate.pem',
       // For Letsencrypt use the following two lines and remove the 'cafile' option above.
       //'ssl_cert' => '/etc/letsencrypt/live/mail.my_domain.org/fullchain.pem',
       //'ssl_key'  => '/etc/letsencrypt/live/mail.my_domain.org/privkey.pem',
       // probably optional parameters
       'ciphers' => 'TLSv1+HIGH:!aNull:@STRENGTH',
       'peer_name'         => 'mail.my_domain.org',
     ),
 );
PDF and OpenDocument file preview
The following Roundcube extensions enable you to preview PDF or OpenDocument file attachements.
/etc/webapps/roundcubemail/config/config.inc.php
$config = array(
    'pdfviewer',
    'odfviewer'
);
If you encounter any file permission issues, than try this command:
chown -R http:http /usr/share/webapps/roundcubemail/plugins/odfviewer/files
Calendar Support
Update the roundcube database
# mysql -u root -p roundcubemail < /usr/share/webapps/roundcubemail/plugins/calendar/drivers/database/SQL/mysql.initial.sql
Configure the calendar service
The default configuration should suffice for most applications, however we still need to move it into place.
# cp /usr/share/webapps/roundcubemail/plugins/calendar/config.inc.php.dist /usr/share/webapps/roundcubemail/plugins/calendar/config.inc.php
Sabre\VObject\Property\Text Not Found
If you get this error, it means that either Sabre was not included with the plugin or it is out of date
# cd /usr/share/webapps/roundcubemail ; composer update ; composer require sabre/dav ~3.1.3
Enable the Plugin
/etc/webapps/roundcubemail/config/config.inc.php
$config = array(
    'calendar'
);
Synchronize address book with CardDav contacts
It’s useful to use the Roundcube address book to have auto-completion features for address fields etc. If you have your contacts stored somewhere else and the remote application offers a CardDav server for synchronization, then you can use the AUR extension from the AUR to access your remote address book in Roundcube. To enable it, adjust following lines in your config file:
/etc/webapps/roundcubemail/config/config.inc.php
$config = array(
    'carddav'
);
Адресная книга AD[править]
Для возможности формирования адресной книги на основе данных о пользователях из Active Directory необходимо обеспечить прозрачную аутентификацию на LDAP сервере домена. Для этого необходимо установить следующий пакет:
# apt-get install pear-Net_LDAP3
И добавить настройки адресной книги в config.inc.php:
$config = array(
    'MyAdLdap' =>array (
        'name' => 'Big Company, Inc',
        'hosts' => array('dce.dome.teste'),
        'sizelimit' => 6000,
	'port' => 389,
        'use_tls' => false,
	'user_specific' => false,
        'base_dn' => 'CN=Users,DC=dome,DC=teste',
	'bind_dn' => '',
	'bind_pass' => '',
	'bind_user' => '',
        'writable' => false,
        'ldap_version' => 3,
        'search_fields' => array(
           'mail',
           'cn',
        ),
        'auth_method' => 'GSSAPI',
        'name_field' => 'cn',
        'email_field' => 'mail',
        'surname_field' => 'sn',
        'firstname_field' => 'givenName',
        'sort' => 'sn',
        'scope' => 'list',
        'filter' => '(&(mail=*)(|(&(objectClass=user)(!(objectClass=computer)))(objectClass=group)))',
        'global_search' => true,
        'fuzzy_search' => true
    ),
);
Системному администратору
• APT в ALT Linux • • AltHa • • Apache2 • Api.php • Azure • BIND • BIND SEC • BackUp/DayOfDayBackUp • Bacula • Biarch • Bootflash (VirtualBoot) • CVE-Manager • Capabilities • Changes/rpm • Compact3 (HostingInstallHowto) • Control • Control++ • Control++:Blacklist/Whitelist • DDNS • DhcpBind • • EC2 • Egroupware • EjabberdJit • Enterprise Software • • Etcnet • Evmctl • Evms inside initrd • • Features • Features/ChrootedServices • • Firewall • Flussonic • Ganeti • Hadoop • Hbase • High Availability • • IKVM • IPMI • IPTV • Infiniband • InstallOnFlash • Ipmitool • Iptables • Участник:IvanZakharyaschev/Что делать, если забыл имена пользователей • Участник:IvanZakharyaschev/Что делать, если забыл пароли (в т.ч. пароль root-а) • Участник:IvanZakharyaschev/Что делать, если затёр загрузчик системы • IvmanAutomount • • LDAP • • LXC • LargeFiles • Lotus • MSSQL • Mailman • Mailman and lighttpd • • Migration • • Moodle • Motion • MultiSeat systemd • Multipath • Multistation • MySQL • • Nagios-plugins-smartmon • NetInstall • Netconsole • OpenLDAP • OpenNMS • OpenVPN • OpenVZ • OpenVZ7 • • Oracle10g • OracleALS40 • PVE • Polkit • • Pppoptions • Puppet/Запуск puppetry (пример с libvirt) • RAID • Replace disk online • RoCE • Roundcube • S5000PAL • SCOM • SQLite • SSD • SSH • • Samba • Security • SelinuxOff • SerialLogin • SerialPortOverIP • Server Security • SharedTmpfsMaintainance • Sisyphus-mirror • Sisyphus changes • Spice • Splash • Starterkits • Starterkits/p7 • Starterkits/p8 • SwitchToSisyphus • Sysadmin • SystemImager • • Systemd • Sysvinit • TeXLivePackaging • Utf8/MigrateToKoi8 • • VPN • Vargus • VideoMost • Web-cyradm • Wi-fi • • Xen • Xymon • • Zabbix • Zarafa • Zimbra • • Аутентификация по ключу • БыстраяЗаменаCrontabНаTimers • • Восстановление • Двухфакторная аутентификация • Домен • Доступ по SSH за NAT через TOR • Загрузочная USB Flash • Загрузочные флешки • • Загрузчики • Задачи администратора • Запрет командной строки • • Настройка FTP • НастройкаСервераПриложений • Обновление • Оборудование • Ограничение использования консолей • Ограничения интерфейса KDE • Отключение интерактивного входа • ПроблемыДоступностиРазделов • Программы • Прозрачный прокси-сервер • РазбиениеДиска • РезервноеКопированиеСистемы • Ресолвер • Синхронизация времени • • ТестированиеКомпьютера • Управление пакетами • УчётТрафика • Файловые системы • Шаблоны для развёртывания CT в PVE •
Building a Docker image
Use the in this repository to build your own Docker image.
It pulls the latest build of Roundcube Webmail from the Github download page and builds it on top of a Docker image.
Build it from this directory with
You can also create your own Docker image by extending from this image.
For instance, you could extend this image to add composer and install requirements for builtin plugins or even external plugins:
FROM roundcube/roundcubemail:latest

RUN set -ex; \
    apt-get update; \
    apt-get install -y --no-install-recommends \
        git \
    ; \
    \
    curl -sS https://getcomposer.org/installer | php -- --install-dir=/usr/bin --filename=composer; \
    mv /usr/src/roundcubemail/composer.json-dist /usr/src/roundcubemail/composer.json; \
    \
    composer \
        --working-dir=/usr/src/roundcubemail/ \
        --prefer-dist --prefer-stable \
        --no-update --no-interaction \
        --optimize-autoloader --apcu-autoloader \
        require \
            johndoh/contextmenu \
    ; \
    composer \
        --working-dir=/usr/src/roundcubemail/ \
        --prefer-dist --no-dev \
        --no-interaction \
        --optimize-autoloader --apcu-autoloader \
        update;
Docker Secrets
- : Unique and random key for encryption purposes
- : Database connection username (mappend to )
- : Database connection password (mappend to )
Advanced configuration
Apart from the above described environment variables, the Docker image also allows to add custom config files
which are merged into Roundcube’s default config. Therefore the image defines a volume
where additional config files () are searched and included. Mount a local directory with your config
files — check for valid PHP syntax — when starting the Docker container:
Check the Roundcube Webmail wiki for a reference of Roundcube config options.
Customized PHP settings can be implemented by mounting a configuration file to .
For example, it may be used to increase the PHP memory limit ().
Работа с таблицами
| Тип объекта | Таблица |
|---|---|
| Пользователи | |
| Профили |
Для каждого пользователя создается свой профиль.
Для управление содержимым БД: Adminer
Работа в SQL Buddy, примеры:
- users.sql
-
--
-- MySQL 5.1.66
-- RoundCube 0.85
--
INSERT INTO `users` (`user_id`, `username`, `mail_host`, `alias`, `created`, `last_login`, `language`, `preferences`) VALUES
('1','user1', 'localhost', '', '', '', 'ru_RU', 'a:1:{s:24:\"newmail_notifier_desktop\";b:1;}'),
('2','user2', 'localhost', '', '', '', 'ru_RU', 'a:1:{s:24:\"newmail_notifier_desktop\";b:1;}');
- identity.sql
-
--
-- MySQL 5.1.66
-- RoundCube 0.85
--

INSERT INTO `identities` (`identity_id`, `del`, `standard`, `name`, `organization`, `email`, `reply-to`, `bcc`, `signature`, `html_signature`, `user_id`, `changed`) VALUES
('1', '0', '1','Фамилия1 Имя1','','user1@domain.com', '', '', '', '0', '1', ''),
('2', '0', '1','Фамилия2 Имя2','','user2@domain.com', '', '', '', '0', '2', '');
Таблицы и связаны по полю
Устанавливаем и настраиваем Roundcube Webmail
Открываем страницу загрузки Roundcube. Копируем ссылку на LTS-версию продукта (стабильную):
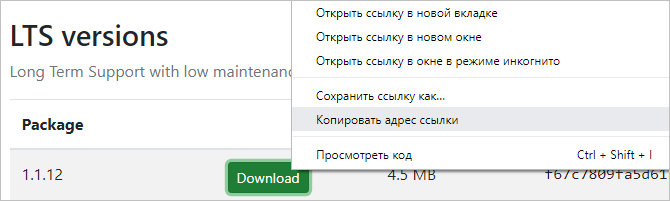
Используем ссылку, чтобы загрузить архив программы:
* на момент написания инструкции LTS версия была 1.1.12.
Создаем каталог для размещения файлов Roundcube:
mkdir /usr/share/nginx/html/webmail
И распаковываем архив в созданную папку:
Копируем шаблон конфигурационного файла и создаем рабочий конфиг:
cp /usr/share/nginx/html/webmail/config/config.inc.php.sample /usr/share/nginx/html/webmail/config/config.inc.php
Открываем его на редактирование:
vi /usr/share/nginx/html/webmail/config/config.inc.php
Редактируем строку для подключения к СУБД:
Создаем следующие строки:
$config = true;
$config = ‘Drafts’;
$config = ‘Junk’;
$config = ‘Sent’;
$config = ‘Trash’;
$config = true;
* первая строка разрешает установку портала. Остальные — указывают на необходимость создания папок по умолчанию, если их нет. Без данной настройки, если не создавались папки другим клиентом, веб-клиент может выдавать ошибки при перемещении писем, например, при их удалении.
Задаем владельца apache на папку портала:
chown -R apache:apache /usr/share/nginx/html/webmail
* несмотря на то, что наш сервер обрабатываем скрипты с помощью php-fpm, работает последний по умолчанию от apache.
mysql -uroot -p
… система запросит пароль — вводим тот, что задавали при установке MariaDB.
> quit
Загружаем в созданную базу данные:
… снова запрос пароля — вводим пароль от суперпользователя MariaDB.
Устанавливаем компоненты, необходимые для работы Roundcube:
yum install php-pear php-mcrypt php-intl php-ldap php-pear-Net-SMTP php-pear-Net-IDNA2 php-pear-Mail-Mime
Настроим php:
vi /etc/php.ini
date.timezone = «Europe/Moscow»
* в данном примере мы задаем московское время.
Перезагружаем php-fpm:
systemctl restart php-fpm
Открываем браузер и переходим по адресу http://<IP-адрес сервера>/webmail/installer/.
В самом низу нажимаем по кнопке Next. Если кнопка будет неактивна, проверяем, что нет ошибок (NOT OK):
На следующей странице мы создаем конфигурационный файл.
а) вводим данные для подключения к СУБД:
б) настраиваем подключение к удаленному почтовому серверу:
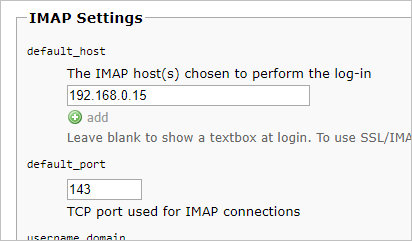
* в данном примере мы указываем сервер 192.168.0.15 с доступом по IMAP.
в) для отправки сообщений нужно использовать следующий удаленный сервер:
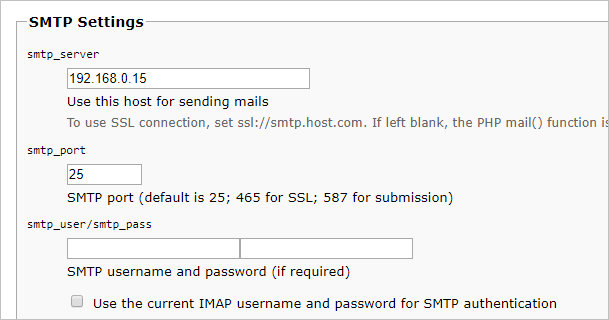
* также указан почтовый сервер 192.168.0.15.
г) после окончания правки конфигурации, кликаем по CREATE CONFIG:
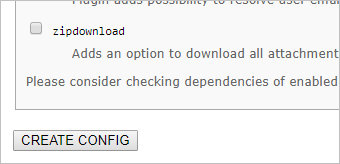
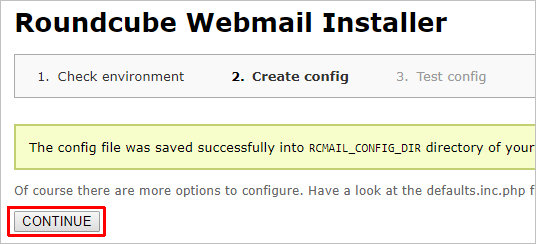
Конфигурационный файл создан — нажимаем CONTINUE, чтобы продолжить установку:
Проверяем, что все пункты находятся в состоянии OK. Установка выполнена.
Открываем конфигурационный файл roundcube:
vi /usr/share/nginx/html/webmail/config/config.inc.php
Запрещаем установку портала:
$config = false;
После удаляем папку с установочными скриптами:
\rm -R /usr/share/nginx/html/webmail/installer
И заходим в браузере по адресу http://<IP-адрес сервера>/webmail/. — должна открыться страница аутентификации пользователя. Пока не вводим никаких данных.
Development
Mail-in-a-Box is based on Ubuntu 18.04 LTS 64-bit and uses very-well-documented shell scripts and a Python management daemon to configure the system. Take a look at the system architecture diagram and security practices.
Development takes place on github at https://github.com/mail-in-a-box/mailinabox.
Note that the goals of this project are to . . .
- Make deploying a good mail server easy.
- Promote decentralization, innovation, and privacy on the web.
- Have automated, auditable, and idempotent system configuration.
- Not make a totally unhackable, NSA-proof server (but see our security practices).
- Not make something customizable by power users.
Additionally, this project has a Code of Conduct, which supersedes the goals above. Please review it when joining our community.
Mail-in-a-Box is dedicated to the public domain using CC0.
Joshua Tauberer (@JoshData) began this project in 2013 and is the primary maintainer. Thank you to all of the contributors!
Current features
- Ajax technology spread throughout the user interface, allowing features such as drag-and-drop message management
- Multilingual with over 70 languages
- Connects to any IMAPv4 server
- Encrypted TLSv1.2 connection to IMAP server using PHP5.6 SSL/TLS libraries
- Full support for MIME and HTML messages
- Sophisticated privacy protection
- Compose Richtext/HTML messages with attachments
- Multiple sender identities
- Threaded message listing
- IDNA support
- Full-featured address book based on vCard with group support
- LDAP directory integration for address books
- Find-as-you-type address book integration
- Forwarding messages with attachments
- Built-in caching for fast mailbox access
- Searching messages and contacts
- Spell checking
- Support for external SMTP server
- Support for shared/global folders and IMAP ACLs
- IMAP folder management
- Template system for custom themes
- Canned response templates
- Three column (widescreen) mailbox view
How do I get it?
The setup guide walks you through getting your own box set up. Users report it taking just a few hours to get to a fully operational system. And see the video above!
Legal note! Mail-in-a-Box is made available per the CC0 public domain dedication. By running Mail-in-a-Box, you will invoke scripts that use Let’s Encrypt to provision TLS certificates per the Let’s Encrypt Subscriber Agreement(s) & Terms of Services. Please be sure you accept the terms in both documents before beginning.
If you are an expert and have a domain name and a completely fresh Ubuntu 18.04 machine running in the cloud, you basically just run on that machine:
curl -s https://mailinabox.email/setup.sh | sudo bash
Please note that the goal of this project is to provide a simple, turn-key solution. There are basically no configuration options and you can’t tweak the machine’s configuration files after installation. If you are looking for something more advanced, try iRedMail or Modoboa.
Note: Mail-in-a-Box’s maintainers work on Mail-in-a-Box in their limited free time. Your mileage may vary.