Как добавить кодек в ffmpeg
Содержание:
- libaom
- FFmpeg
- Keeping the Aspect Ratio
- Constrained encoding (VBV / maximum bit rate)
- Installing the Media SDK on Linux
- Guides and How to’s
- Full Examples
- Установка FFmpeg
- CPU usage / File size
- Miscellaneous
- Using Variables
- Linux
- Developer Documentation
- FFmpeg-related Sponsoring Programs
- Community Contributed Documentation
- Setting
- NVENC
- Documentation
- Updating FFmpeg
- Reverting Changes made by this Guide
- Streaming a simple RTP audio stream from FFmpeg
- Filter Metadata
libaom
AV1 video encoder/decoder:
Warning: libaom does not yet appear to have a stable API, so compilation of libavcodec/libaomenc.c may occasionally fail. Just wait a day or two for us to catch up with these annoying changes, re-download ffmpeg-snapshot.tar.bz2, and try again. Or skip libaom altogether.
cd ~/ffmpeg_sources && \
git -C aom pull 2> /dev/null || git clone --depth 1 https://aomedia.googlesource.com/aom && \
mkdir -p aom_build && \
cd aom_build && \
PATH="$HOME/bin:$PATH" cmake -G "Unix Makefiles" -DCMAKE_INSTALL_PREFIX="$HOME/ffmpeg_build" -DENABLE_SHARED=off -DENABLE_NASM=on ../aom && \
PATH="$HOME/bin:$PATH" make && \
make install
FFmpeg
cd ~/ffmpeg_sources && \
wget -O ffmpeg-snapshot.tar.bz2 https://ffmpeg.org/releases/ffmpeg-snapshot.tar.bz2 && \
tar xjvf ffmpeg-snapshot.tar.bz2 && \
cd ffmpeg && \
PATH="$HOME/bin:$PATH" PKG_CONFIG_PATH="$HOME/ffmpeg_build/lib/pkgconfig" ./configure \
  --prefix="$HOME/ffmpeg_build" \
  --pkg-config-flags="--static" \
  --extra-cflags="-I$HOME/ffmpeg_build/include" \
  --extra-ldflags="-L$HOME/ffmpeg_build/lib" \
  --extra-libs="-lpthread -lm" \
  --bindir="$HOME/bin" \
  --enable-gpl \
  --enable-gnutls \
  --enable-libaom \
  --enable-libass \
  --enable-libfdk-aac \
  --enable-libfreetype \
  --enable-libmp3lame \
  --enable-libopus \
  --enable-libvorbis \
  --enable-libvpx \
  --enable-libx264 \
  --enable-libx265 \
  --enable-nonfree && \
PATH="$HOME/bin:$PATH" make && \
make install && \
hash -r
Now re-login or run the following command for your current shell session to recognize the new ffmpeg location:
source ~/.profile
Compilation and installation are now complete and ffmpeg (also ffplay, ffprobe, lame, x264, & x265) should now be ready to use. The rest of this guide shows how to update or remove FFmpeg.
Keeping the Aspect Ratio
If we’d like to keep the aspect ratio, we need to specify only one component, either width or height, and set the other component to -1. For example, this command line:
ffmpeg -i input.jpg -vf scale=320:-1 output_320.png
will set the width of the output image to 320 pixels and will calculate the height of the output image according to the aspect ratio of the input image. The resulting image will have a dimension of 320⨉207 pixels.

Some codecs require the size of width and height to be a multiple of n. You can achieve this by setting the width or height to -n:
ffmpeg -i input.jpg -vf scale=320:-2 output_320.png
The output will now be 320⨉206 pixels.
Constrained encoding (VBV / maximum bit rate)
Use this mode if you want to constrain the maximum bitrate used, or keep the stream’s bitrate within certain bounds. This is particularly useful for online streaming, where the client expects a certain average bitrate, but you still want the encoder to adjust the bitrate per-frame.
You can use -crf or -b:v with a maximum bit rate by specifying both -maxrate and -bufsize:
ffmpeg -i input -c:v libx264 -crf 23 -maxrate 1M -bufsize 2M output.mp4
This will effectively «target» -crf 23, but if the output were to exceed 1 MBit/s, the encoder would increase the CRF to prevent bitrate spikes. However, be aware that libx264 does not strictly control the maximum bit rate as you specified (the maximum bit rate may be well over 1M for the above file). To reach a perfect maximum bit rate, use two-pass.
In another example, instead of using constant quality (CRF) as a target, the average bitrate is set. A two-pass approach is preferred here:
ffmpeg -i input -c:v libx264 -b:v 1M -maxrate 1M -bufsize 2M -pass 1 -f mp4 /dev/null
ffmpeg -i input -c:v libx264 -b:v 1M -maxrate 1M -bufsize 2M -pass 2 output.mp4
Installing the Media SDK on Linux
Install with open source MSDK stack
Install MSDK and iHD driver:
- Follow the guide of https://github.com/Intel-Media-SDK/MediaSDK to build from source code.
- Starting from Ubuntu 19.04, it is possible to install via apt (see: https://github.com/Intel-Media-SDK/MediaSDK/wiki/Intel-media-stack-on-Ubuntu):
sudo apt-get install libva-dev libmfx-dev
Install with MediaServerStudio?
Note that the kernel patches and modified system libraries are all required. It is recommended not to install this on any machine also used for other purposes, as it does not use normal distribution mechanisms and may break / be broken by other packages unexpectedly.
Build machine:
Build and install the packaged dispatcher: . (It is also possible to extract the necessary files from the Media SDK installation as described in the install manual — this is not recommended, just use the package instead.)
Target machine:
- Ensure the target machine has a supported CPU. Current versions only support gen8/gen9 graphics on expensive CPUs («Xeon»/»Core i» branding). The same graphics cores on cheaper CPUs («Pentium»/»Celeron»/»Atom» branding) are explicitly disabled, presumably for commercial reasons.
- Get a clean version of the supported kernel version (currently 4.4: <https://www.kernel.org/pub/linux/kernel/v4.x/linux-4.4.tar.xz>) and apply the supplied patches. Build and install.
- Build and install the supplied libva and libdrm trees.
- Run the Media SDK install script to install the proprietary components.
- Reboot.
Guides and How to’s
ffmpeg video tutorials
| 42 reviews, Showing 1 to 5 reviews |
Post review Show all 42 reviews |
Report!
ffmpeg 4.3 was updated in original site (date and size changed).
ffmpeg-4.3-win64-static.zip 29-Jun-2020 04:06 71M
on
Jun 30, 2020 Version: 4.3
OS: Windows 10 64-bit Ease of use: 8/10
Functionality: 10/10
Value for money: 10/10
Overall: 9/10
Report!
That’s it!
on
Jan 18, 2020 Version: 3.2.4
OS: Windows 10 Ease of use: 10/10
Functionality: 10/10
Value for money: 10/10
Overall: 10/10
Report!
Superb project as usual. Do anyone know where I can find unofficial builds that include ALL the codecs? (non-free stuff, libfdk_acc, VAAPI/GPU encoding, etc etc) Can be Linux or Windows version, doesn’t matter (Wine can run EXE’s just fine)
on
Nov 10, 2019 Version: 4.2.1
OS: Linux Ease of use: 9/10
Functionality: 10/10
Value for money: 10/10
Overall: 10/10
Report!
Just tried to update ffmpeg.exe 4.1.4 x64 static executable in myFFpmeg 3.6.2 x64 and get the error «The found file is not a FFmpeg.exe file» and I’m not sure what that means, whether it’s an ffmpeg or myFFmpeg issue.
on
Jul 20, 2019 Version: 4.1.4 x64 static
OS: Windows 10 64-bit Ease of use: 9/10
Functionality: 9/10
Value for money: 9/10
Overall: 9/10
Report!
Audio encoding with options:
ffmpeg -i track.cdda.wav -vn -c:a pcm_s24le -af aresample=resampler=soxr -af aresample=precision=28 -ar 96000 track.24-96k.wav
does it give studio quality?
on
Nov 12, 2018 Version: 4.0.2
OS: Windows 10 64-bit Ease of use: 8/10
Functionality: 8/10
Value for money: 8/10
Overall: 8/10
| 42 reviews, Showing 1 to 5 reviews |
Post review
Show all 42 reviews |
Full Examples
Decode-only
Check supported qsv decoder list
ffmpeg -decoders|grep qsv
H264 video decode and download as yuv420p raw file
ffmpeg -hwaccel qsv -c:v h264_qsv -i input.mp4 -vf hwdownload,format=nv12 -pix_fmt yuv420p output.yuv
H264 video decode and display with sdl
ffmpeg -hwaccel qsv -c:v h264_qsv -i input.mp4 -vf hwdownload,format=nv12 -pix_fmt yuv420p -f sdl -
H264 video decode without output (this can be used as a crude benchmark of the decoder)
ffmpeg -hwaccel qsv -c:v h264_qsv -i input.mp4 -f null -
HEVC 10bit video decode and download as p010le yuv file
ffmpeg -hwaccel qsv -c:v hevc_qsv -load_plugin hevc_hw -i input.mp4 -vf hwdownload,format=p010 -pix_fmt p010le output.yuv
Encode-only
Check supported qsv decoder list
ffmpeg -encoders|grep qsv
Check private option list of h264 encoder
ffmpeg -h encoder=h264_qsv
Encode a 1080p raw yuv input as H264 with 5Mbps using VBR mode
ffmpeg -init_hw_device qsv=hw -filter_hw_device hw -f rawvideo -pix_fmt yuv420p -s:v 1920x1080 -i input.yuv -vf hwupload=extra_hw_frames=64,format=qsv -c:v h264_qsv -b:v 5M output.mp4
Encode a 1080p p010le raw yuv input as HEVC main10 profile (supported since Kaby Lake platform)
ffmpeg -init_hw_device qsv=hw -filter_hw_device hw -v verbose -f rawvideo -video_size 1920x1080 -pix_fmt p010le -i input.yuv -an \
-vf 'hwupload=extra_hw_frames=64,format=qsv' -c:v hevc_qsv -profile:v main10 output.mp4
Transcode
Software decode + h264 qsv encode with 5Mbps using CBR mode
ffmpeg -init_hw_device qsv=hw -filter_hw_device hw -i input.mp4 -vf hwupload=extra_hw_frames=64,format=qsv -c:v h264_qsv -b:v 5M -maxrate 5M output.mp4
Software decode + h264 qsv encode with CQP mode
ffmpeg -init_hw_device qsv=hw -filter_hw_device hw -i input.mp4 -vf hwupload=extra_hw_frames=64,format=qsv -c:v h264_qsv -q 25 output.mp4
H264 qsv decode + h264 qsv encode with 5Mbps using VBR && Look_ahead mode (look_ahead may not be supported on some platforms)
ffmpeg -hwaccel qsv -c:v h264_qsv -i input.mp4 -c:v h264_qsv -b:v 5M -look_ahead 1 output.mp4
As previous, but use ICQ mode (which is similar to crf mode of x264)
ffmpeg -hwaccel qsv -c:v h264_qsv -i input.mp4 -c:v h264_qsv -global_quality 25 output.mp4
As previous, but use ICQ && Look_ahead mode
ffmpeg -hwaccel qsv -c:v h264_qsv -i input.mp4 -c:v h264_qsv -global_quality 25 -look_ahead 1 output.mp4
Hevc qsv decode + qsv scaling to 1080p@60fps + h264 qsv encode
ffmpeg -hwaccel qsv -c:v hevc_qsv -i input.mp4 -vf 'vpp_qsv=framerate=60,scale_qsv=w=1920:h=1080' -c:v h264_qsv output.mp4
Hevc qsv decode + qsv scaling to 1080p@60fps and color space convert from nv12 to rgb32 + output as sdl
ffmpeg -hwaccel qsv -c:v hevc_qsv -i input.mp4 -vf 'vpp_qsv=framerate=60,scale_qsv=w=1920:h=1080:format=rgb32,hwdownload,format=rgb32' -f sdl -
1:N transcoding: (MFE will be enabled by default if MSDK can support it)
   ffmpeg -hwaccel qsv -c:v h264_qsv -i input.mp4 \
        -filter_complex "split=2; scale_qsv=1280:720;scale_qsv=960:540" \
        -map  -c:v h264_qsv -b:v 3200k 3200a.mp4 \
        -map  -c:v h264_qsv -b:v 1750k 1750a.264
M:N transcoding
   ffmpeg -hwaccel qsv -c:v h264_qsv -i input1.mp4 -hwaccel qsv -c:v h264_qsv -i input2.mp4 \
     -filter_complex 'split=2,split=2' \
     -map '' -c:v h264_qsv output1.mp4 -map '' -c:v h264_qsv output2.mp4 \
     -map '' -c:v h264_qsv output3.mp4 -map '' -c:v h264_qsv output4.mp4
-qsv_device is an qsv customized option can be used to specify a hardware device and avoid the default device initialization failure when multiple devices usable (eg: an Intel integrated GPU and an AMD/Nvidia discrete graphics card).
One example on Linux (more details please see https://trac.ffmpeg.org/ticket/7649)
fmpeg -hwaccel qsv -qsv_device /dev/dri/renderD128 -c:v h264_qsv -i input.mp4 -c:v h264_qsv output.mp4
Hybrid transcode
It is also possible to use «vaapi decode + vaapi scaling + qsv encode» (available on Linux platform)
ffmpeg -hwaccel vaapi -hwaccel_output_format vaapi -i input.mp4 -vf 'scale_vaapi=1280:720,hwmap=derive_device=qsv,format=qsv' -c:v h264_qsv output.mp4
Or use «dxva decode + qsv scaling + qsv encode» (available on Windows)
ffmpeg -hwaccel dxva2 -hwaccel_output_format dxva2_vld -i input.mp4 -vf 'hwmap=derive_device=qsv,format=qsv,scale_qsv=w=1280:h=720' -c:v h264_qsv output.mp4
Установка FFmpeg
FFmpeg распространяется в исходных кодах, но на официальном сайте есть ссылки на собранные бинарники для MaxOS и Windows.
Как установить FFmpeg в Windows
FFmpeg для Windows.
Разархивируйте содержимое скачанного архива, например в Program Files/ffmpeg (или в другую папку, например, где у вас хранятся портативные программы).
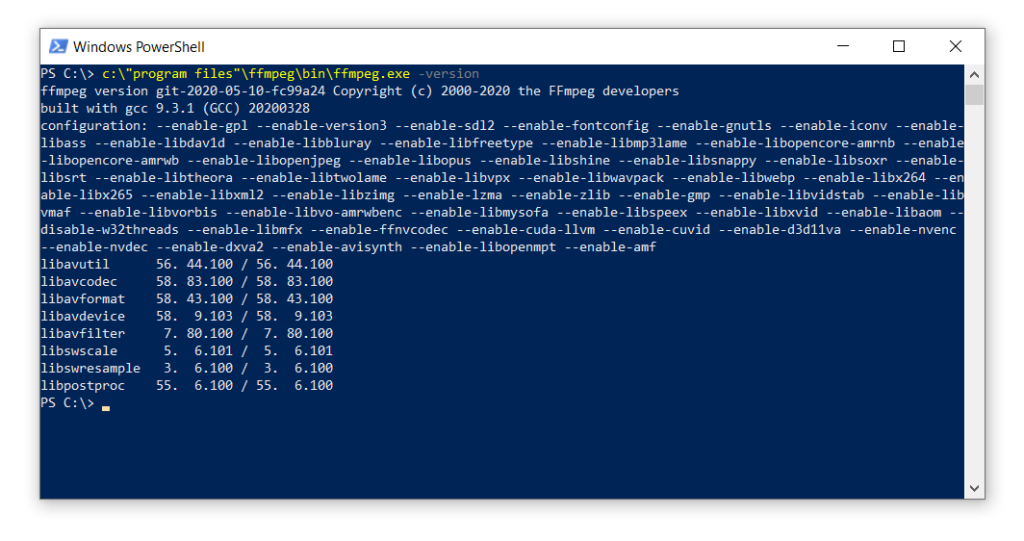
В PowerShell выполните следующую команду.
Для cmd немного модифицированная команда.
Если в консоли появилось сообщение о версии FFmpeg, значит программа работает.
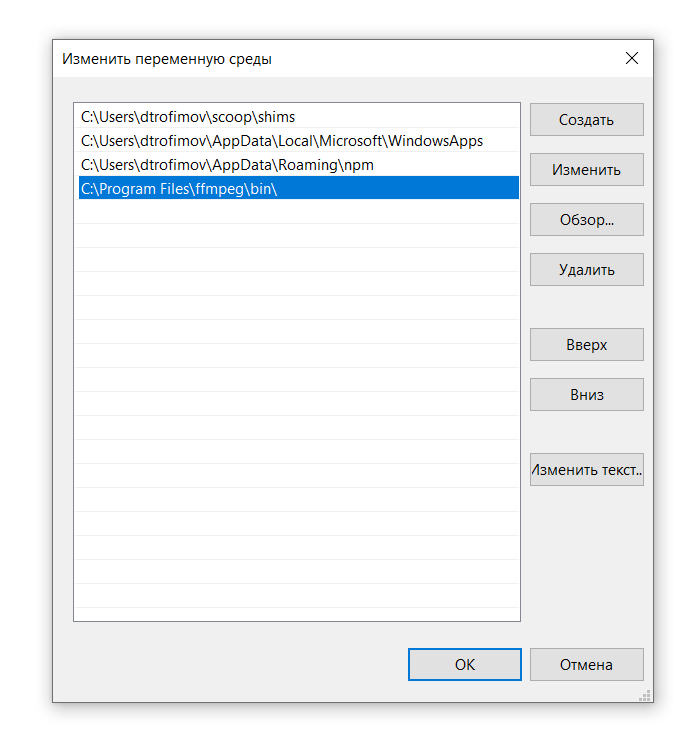
Чтобы каждый раз не вводить длинный путь к программе C:\Program Files\ffmpeg\bin\ffmpeg.exe рекомендую добавить ее в системную переменную Path, для этого:
- перейдите в параметры Windows, в поиске введите Панель управления
- перейдите в Панель управления – Система и безопасность – Система;
- выберите пункт Дополнительные параметры системы;
- нажмите кнопку Переменные среды;
- в поле Системные переменные выберите значение Path и нажмите кнопку Изменить, чтобы добавить новое значение;
- укажите путь к папке с FFmpeg содержащую ffmpeg.exe;
- перезагрузите компьютер.
Теперь для того, чтобы вызвать FFmpeg используйте в консоли следующую команду.
Как установить FFmpeg в MacOS
Самый простой способ установить FFmpeg на MacOS, это Homebrew.
Либо можно поставить FFmpeg вручную. Для этого, FFmpeg для MacOS.
Перейдите в папку с загрузками, распакуйте скачанный архив, а затем переместите исполняемый файл ffmpeg в папку /usr/local/bin
Далее введите пароль и FFmpeg будет скопирован в директорию к остальным бинарникам.
Попробуйте выполнить следующую команду.
Если в консоли появилось сообщение о версии FFmpeg, значит программа работает.
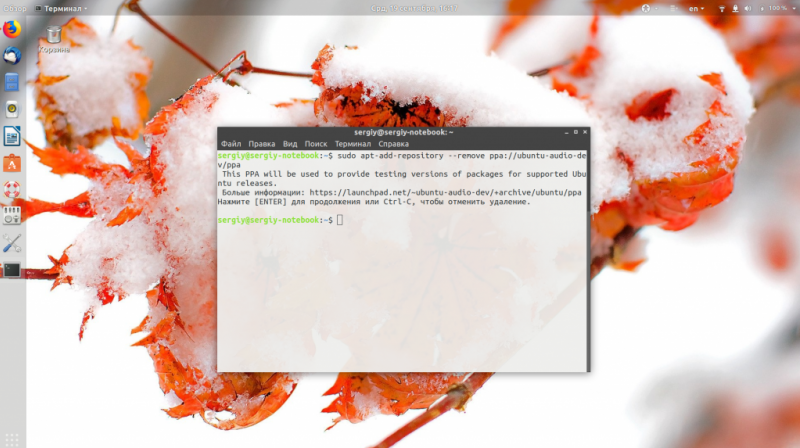
Как установить FFmpeg в Linux
Для Linux можно самостоятельно собрать FFmpeg из исходников, либо установить его, используя менеджер пакетов входящий в состав операционной системы.
Например, для Ubuntu это можно сделать через репозиторий mc3man ppa, поддерживаемый сообществом Ubuntu.
В Debian 9 FFmpeg доступен в официальном репозитории, поэтому для установки достаточно одной команды.
CentOS не предоставляет официальный репозиторий для FFmpeg, поэтому, как и в случае с Ubuntu, его можно установить с помощью стороннего репозитория.
В CentOS 7 и RHEL 7 используйте следующую команду:
В CentOS/RHEL 6/5 команда отличается.
Далее установите FFmpeg.
После установки попробуйте выполнить следующую команду.
Если в консоли появилось сообщение о версии FFmpeg, значит программа работает.
CPU usage / File size
In general, the more CPU you use to compress, the better the output image will be, or the smaller of a file the output will be for the same quality.
Basically, the easiest way to save cpu is to decrease the input frame rate/size, or decrease the output frame rate/size.
Also you could (if capturing from live source), instruct the live source to feed a «smaller stream» (ex: webcam stream 640×480 instead of 1024×1280), or you could set a lower output «output quality» setting (q level), or specify a lower output desired bitrate (see Encode/H.264 for a background). Or try a different output codec, or specify new parameters to your codec (for instance, a different profile or preset for libx264). Specifying $ -threads 0 instructs the encoder to use all available cpu cores, which is the default. You could also resize the input first, before transcoding it, so it’s not as large. Applying a smoothing filter like hqdn3d before encoding might help it compress better, yielding smaller files.
You can also set a lower output frame rate to of course decrease cpu usage.
If you’re able to live capture in a pixel format that matches your output format (ex: yuv420p output from a webcam, instead of mjpeg), that might help with cpu usage, since it avoids an extra conversion. Using 64-bit instead of 32-bit executables (for those that have that choice) can result in a slight speedup. If you’re able to use -vcodec copy that, of course, uses the least cpu of all options since it just sends the frames verbatim to the output.
Sometimes you can change the «pixel formats» somehow, like using rgb16 instead of rgb24, to save time/space (or yuv420 instead of yuv444 or the like, since 420 stores less information it may compress better and use less bandwidth). This may not affect latency.
Miscellaneous
- General command line usage:
- Solutions to some errors and messages
- Creating multiple outputs from the same input
- How to concatenate, join, or merge media files
- How to use -map option to select exactly which streams to process
- Seeking to split a file or select a segment
- framemd5 Intro and HowTo for using per-frame checksums
- FFprobe Tips for getting frame rate, frame size, duration, etc.
- How to extract subtitles that are included within video files.
- Effects:
- Video:
- Changing the frame rate
- Limiting the output bitrate
- Chroma Subsampling
- Debugging Macroblocks and Motion Vectors
- Viterbi Algorithm
- Audio:
- Audio Channel Manipulation – Upmix, downmix, split, and manipulate audio channels
- Audio Types – List of the different types of raw audio
- Audio Volume Manipulation – Change audio volume and perform normalization (peak, RMS, EBU R128)
- FFmpeg and the SoX Resampler – High quality audio resampling
- Working with other tools:
- How to encode with FFmpeg from Adobe Premiere Pro
- Using FFmpeg from PHP scripts
- Other:
- How to ask good questions on ffmpeg-user mailing list
- Articles for Creation – A simple idea/reminder list for new community contributed wiki articles
- Downstreams – A list of downstream software products that distribute FFmpeg, including versions and end-of-life dates
- Projects – A list of free projects and programs known to incorporate work from FFmpeg.
Using Variables
There are also some useful variables which can be used instead of numbers, to specify width and height of the output image.
For example, if you want to stretch the image in such a way to only double the width of the input image, you can use something like this (iw = input width, ih = input height):
ffmpeg -i input.jpg -vf scale=iw*2:ih input_double_width.png
The output image will look like this:

If you want to half the size of the picture, just multiply by .5 or divide by 2:
ffmpeg -i input.jpg -vf "scale=iw*.5:ih*.5" input_half_size.png
ffmpeg -i input.jpg -vf "scale=iw/2:ih/2" input_half_size.png
Linux
A whole open source media stack is provided with much wider HW platforms and Linux distributions supported.
(You can also download the installation binary Media Server Studio from https://software.intel.com/en-us/intel-media-server-studio/.
However, only limited HW platforms and Linux distributions are supported by Media Server Studio.)
Intel open source media stack
| Project Name | Supported Gen Graphics | Open Source Repo |
|---|---|---|
| MSDK | gen8+ | https://github.com/Intel-Media-SDK/MediaSDK |
| Libva | gen5+ | https://github.com/intel/libva |
| i965 driver | gen5 ~ gen9.5 | https://github.com/intel/intel-vaapi-driver |
| iHD driver | gen8+ | https://github.com/intel/media-driver |
VAAPI VS libmfx
VAAPI / i965
- Packaged as standard in most Linux distributions.
- Runs on all usable hardware, including older and cheaper devices.
- Wider codec support.
- Common API for applications which may also use AMD / Nvidia hardware with Mesa.
- Interopable with standard APIs (EGL/OpenGL, OpenCL).
libmfx / iHD
- May give better encode quality in some cases (such as look_ahead).
- May give higher encode throughput in some cases (such as MFE, particularly on Iris graphics).
- Common API for applications which may also run on Windows.
- Interoperable with Intel OpenCL implementation.
The iHD libva driver also provides similar VAAPI functionality as the opensource i965 driver. But; HEVC encoding is for evaluation purposes only and will limit the encode to a mere 1000 frames.
Ref: https://gist.github.com/SeanMollet/0eed16e80630ab67532890a9d42132af
Developer Documentation
- Development Policies and Guides
- Guide for Using Git
- Notes on Maintaining FFmpeg Source Code and Being a Maintainer
- FATE – Our Continuous Integration Platform / regression testing system
- Cleanup – A list of components that may be considered candidates for removal
- Debugging
- How to conduct merges from Libav
- Google Summer of Code
- GSoC 2020
- GSoC 2019
- GSoC 2018
- GSoC 2017
- GSoC 2016
- GSoC 2015
- GSoC 2014
- Outreachy
- Outreachy — Dec 2016
- Outreachy — May 2016
- Outreachy — May 2015
- OPW — Dec 2014
Community Contributed Documentation
The guides below have been written by users and for users to supplement the official FFmpeg Documentation. If you’re confused about something refer to the official documentation and if you’re still having problems we can help.
Setting
Here is what another person once did for broadcast:
ffmpeg -f dshow -i video="Virtual-Camera" -preset ultrafast -vcodec libx264 -tune zerolatency -b 900k -f mpegts udp://10.1.0.102:1234
And here is what another person did:
ffmpeg -f dshow -i video="screen-capture-recorder":audio="Stereo Mix (IDT High Definition" \
-vcodec libx264 -preset ultrafast -tune zerolatency -r 10 -async 1 -acodec libmp3lame -ab 24k -ar 22050 -bsf:v h264_mp4toannexb \
-maxrate 750k -bufsize 3000k -f mpegts udp://192.168.5.215:48550
NB that they also (for directshow devices) had to adjust the rtbufsize in that example.
You can see a description of what some of these means, (for example bufsize, bitrate settings) in the Encode/H.264.
Here’s how one guy broadcast a live stream (in this instance a Capture/Desktop#Windows? screen capture device):
$ ffmpeg -y -loglevel warning -f dshow -i video="screen-capture-recorder" -vf crop=690:388:136:0 -r 30 -s 962x388 -threads 2 -vcodec libx264 -vpre baseline -vpre my_ffpreset -f flv rtmp:///live/myStream.sdp
with a custom FFmpeg preset (libx264-my_ffpreset.ffpreset) in this case:
coder=1
flags2=+wpred+dct8x8
level=31
maxrate=1200000
bufsize=200000
wpredp=0
g=60
refs=1
subq=3
trellis=0
bf=0
rc_lookahead=0
Here is how you stream to twitch.tv or similar services (rtmp protocol), using ffmpeg 1.0 or ffmpeg-git (tested on 2012-11-12), this is also for pulseaudio users:
Example 1, no sound:
ffmpeg -f x11grab -s 1920x1200 -framerate 15 -i :0.0 -c:v libx264 -preset fast -pix_fmt yuv420p -s 1280x800 -threads 0 -f flv "rtmp://live.twitch.tv/app/live_********_******************************"
Example 2, first screen (on dual screen setup, or if on a single screen):
ffmpeg -f x11grab -s 1920x1200 -framerate 15 -i :0.0 -f pulse -ac 2 -i default -c:v libx264 -preset fast -pix_fmt yuv420p -s 1280x800 -c:a aac -b:a 160k -ar 44100 -threads 0 -f flv "rtmp://live.twitch.tv/app/live_********_******************************"
Example 3, second screen (on dual screen setup):
ffmpeg -f x11grab -s 1920x1200 -framerate 15 -i :0.0+1920,0 -f pulse -ac 2 -i default -c:v libx264 -preset fast -pix_fmt yuv420p -s 1280x800 -c:a aac -b:a 160k -ar 44100 -threads 0 -f flv "rtmp://live.twitch.tv/app/live_********_******************************"
NVENC
NVENC can be used for H.264 and HEVC encoding. FFmpeg supports NVENC through the h264_nvenc and hevc_nvenc encoders. In order to enable it in FFmpeg you need:
- A supported GPU
- Supported drivers for your operating system
- The NVIDIA Codec SDK or compiling FFmpeg with —enable-cuda-llvm
- ffmpeg configured with --enable-nvenc (default if the drivers are detected while configuring)
Note:
FFmpeg uses its own slightly modified runtime-loader for NVIDIA’s CUDA/NVENC/NVDEC-related libraries. If you get an error from configure complaining about missing ffnvcodec, this project is what you need. It has a working Makefile with an install target: make install PREFIX=/usr. FFmpeg will look for its pkg-config file, called ffnvcodec.pc. Make sure it is in your PKG_CONFIG_PATH.
This means that running the following before compiling ffmpeg should suffice:
git clone https://git.videolan.org/git/ffmpeg/nv-codec-headers.git
cd nv-codec-headers
make
sudo make install
After compilation, you can use NVENC.
Usage example:
ffmpeg -i input -c:v h264_nvenc -profile high444p -pixel_format yuv444p -preset default output.mp4
You can see available presets, other options, and encoder info with ffmpeg -h encoder=h264_nvenc or ffmpeg -h encoder=hevc_nvenc.
Note: If you get the No NVENC capable devices found error make sure you’re encoding to a supported pixel format. See encoder info as shown above.
Documentation
If you want to run man ffmpeg to have local access to the documentation:
echo "MANPATH_MAP $HOME/bin $HOME/ffmpeg_build/share/man" >> ~/.manpath
You may have to log out and then log in for man ffmpeg to work.
HTML formatted documentation is available in ~/ffmpeg_build/share/doc/ffmpeg.
You can also refer to the online FFmpeg documentation, but remember that it is regenerated daily and is meant to be used with the most current ffmpeg (meaning an old build may not be compatible with the online docs).
Updating FFmpeg
Development of FFmpeg is active and an occasional update can give you new features and bug fixes. First you need to delete (or move) the old files:
rm -rf ~/ffmpeg_build ~/bin/{ffmpeg,ffprobe,ffplay,x264,x265}
Now can just follow the guide from the beginning.
Reverting Changes made by this Guide
Remove the build and source files as well as the binaries:
rm -rf ~/ffmpeg_build ~/ffmpeg_sources ~/bin/{ffmpeg,ffprobe,ffplay,x264,x265,nasm}
sed -i '/ffmpeg_build/d' ~/.manpath
hash -r
You may also remove packages that have been installed from this guide:
sudo apt-get autoremove autoconf automake build-essential cmake git-core libass-dev libfreetype6-dev libgnutls28-dev libmp3lame-dev libnuma-dev libopus-dev libsdl2-dev libtool libva-dev libvdpau-dev libvorbis-dev libvpx-dev libx264-dev libx265-dev libxcb1-dev libxcb-shm0-dev ibxcb-xfixes0-dev texinfo wget yasm zlib1g-dev
Streaming a simple RTP audio stream from FFmpeg
FFmpeg can stream a single stream using the RTP protocol. In order to avoid buffering problems on the other hand, the streaming should be done through the -re option, which means that the stream will be streamed in real-time (i.e. it slows it down to simulate a live streaming source.
For example the following command will generate a signal, and will stream it to the port 1234 on localhost:
ffmpeg -re -f lavfi -i aevalsrc="sin(400*2*PI*t)" -ar 8000 -f mulaw -f rtp rtp://127.0.0.1:1234
To play the stream with ffplay (which has some caveats, see above), run the command:
ffplay rtp://127.0.0.1:1234
Note that rtp by default uses UDP, which, for large streams, can cause packet loss. See the «point to point» section in this document for hints if this ever happens to you.
Filter Metadata
Filters may write metadata entries that can be used for debugging their functionality, or extracting additional information from the input file. For a general description, see .
Metadata keys are defined by the respective filters, and there is no globally accessible list. Some of them are mentioned in the filter documentation itself.
Here are some important metadata keys, all starting with lavfi.<filter>, where <filter> is the name of the filter itself.
| Filter | Key | Description |
|---|---|---|
| aphasemeter | phase | |
| astats | Bit_depth2 | |
| astats | Bit_depth | |
| astats | Crest_factor | |
| astats | DC_offset | |
| astats | Dynamic_range | |
| astats | Flat_factor | |
| astats | Max_difference | |
| astats | Max_level | |
| astats | Mean_difference | |
| astats | Min_difference | |
| astats | Min_level | |
| astats | Overall.Bit_depth2 | |
| astats | Overall.Bit_depth | |
| astats | Overall.DC_offset | |
| astats | Overall.Flat_factor | |
| astats | Overall.Max_difference | |
| astats | Overall.Max_level | |
| astats | Overall.Mean_difference | |
| astats | Overall.Min_difference | |
| astats | Overall.Min_level | |
| astats | Overall.Number_of_samples | |
| astats | Overall.Peak_count | |
| astats | Overall.Peak_level | |
| astats | Overall.RMS_difference | |
| astats | Overall.RMS_level | |
| astats | Overall.RMS_peak | |
| astats | Overall.RMS_trough | |
| astats | Peak_count | |
| astats | Peak_level | |
| astats | RMS_difference | |
| astats | RMS_level | |
| astats | RMS_peak | |
| astats | RMS_trough | |
| astats | Zero_crossings_rate | |
| astats | Zero_crossings | |
| bbox | h | |
| bbox | w | |
| bbox | x1 | |
| bbox | x2 | |
| bbox | y1 | |
| bbox | y2 | |
| blackframe | pblack | |
| cropdetect | h | |
| cropdetect | w | |
| cropdetect | x1 | |
| cropdetect | x2 | |
| cropdetect | x | |
| cropdetect | y1 | |
| cropdetect | y2 | |
| cropdetect | y | |
| ebur128 | r128.I | |
| ebur128 | r128.LRA.high | |
| ebur128 | r128.LRA.low | |
| ebur128 | r128.LRA | |
| ebur128 | r128.M | |
| ebur128 | r128.S | |
| freezedetect | freeze_duration | Duration of the freeze period |
| freezedetect | freeze_end | End of the freeze period |
| freezedetect | freeze_start | Start of the freeze period |
| psnr | mse.u | |
| psnr | mse.v | |
| psnr | mse.y | |
| psnr | mse_avg | |
| psnr | psnr.u | |
| psnr | psnr.v | |
| psnr | psnr.y | |
| psnr | psnr_avg | |
| signalstats | HUEAVG | |
| signalstats | HUEMED | |
| signalstats | key | |
| signalstats | SATAVG | |
| signalstats | SATHIGH | |
| signalstats | SATLOW | |
| signalstats | SATMAX | |
| signalstats | SATMIN | |
| signalstats | UAVG | |
| signalstats | UBITDEPTH | |
| signalstats | UDIF | |
| signalstats | UHIGH | |
| signalstats | ULOW | |
| signalstats | UMAX | |
| signalstats | UMIN | |
| signalstats | VAVG | |
| signalstats | VBITDEPTH | |
| signalstats | VDIF | |
| signalstats | VHIGH | |
| signalstats | VLOW | |
| signalstats | VMAX | |
| signalstats | VMIN | |
| signalstats | YAVG | |
| signalstats | YBITDEPTH | |
| signalstats | YDIF | |
| signalstats | YHIGH | |
| signalstats | YLOW | |
| signalstats | YMAX | |
| signalstats | YMIN | |
| silencedetect | silence_duration | Duration of the silence period |
| silencedetect | silence_end | End of the silence period |
| silencedetect | silence_start | Start of the silence period |
| ssim | All | |
| ssim | dB | |
| ssim | u | |
| ssim | v | |
| ssim | y |