Pjsua manual page
Содержание:
- Building for Windows Targets with Microsoft Visual Studio
- Configure PJSIP
- ◆ reg_retry_interval
- Temporary and Permanent Failures
- General Features
- Configuration Section Format
- MWI
- pjsip show endpoint
- ◆ pjsip_resolver_set_ext_resolver()
- Restart Asterisk
- Wrap Up
- Certificates
- Endpoint Identifiers
- Asterisk cannot route my call
- ◆ pjsip_resolve()
- Configure a SIP channel driver
- Configuration Reference:
- Monitoring Status
- Example SIP Trunk Configuration
- Disabling res_pjsip and chan_pjsip
- Network Address Translation (NAT)
- ◆ pjsip_pres_notify()
- SIP SRV Resolver Features
- Configuration Conversion Script
Building for Windows Targets with Microsoft Visual Studio
4.1 Requirements
The Visual Studio based project files can be used with one of the following tools:
- Microsoft Visual Studio 6,
- Microsoft Visual Studio .NET 2002,
- Microsoft Visual Studio .NET 2003,
- Microsoft Visual C++ 2005 (including Express edition),
In addition, the following SDK’s are needed:
- Platform SDK (tested with Platform SDK for Windows Server 2003 SP1).
- DirectX SDK (tested with DirectX version 8 and 9),
- OpenSSL development kit (optional) is needed if TLS support is wanted.
|
For the host, the following are required:
- Windows NT, 2000, XP, 2003, or later ,
- Windows 95/98 should work too, but this has not been tested,
- Sufficient amount of RAM for the build process.
Installing OpenSSL Library
If TLS support is wanted, then OpenSSL SDK must be installed in the development host.
To install OpenSSL SDK from the Win32 binary distribution:
- Install OpenSSL SDK to any folder (e.g. C:\OpenSSL)
- Add OpenSSL DLL location to the system PATH.
- Add OpenSSL include path to Visual Studio includes search
directory. Make sure that OpenSSL header files can be accessed from the
program with #include <openssl/ssl.h> construct. - Add OpenSSL library path to Visual Studio library search directory. Make sure the following libraries are accessible:
- For Debug build: libeay32MTd and ssleay32MTd.
- For Release build: libeay32MT and ssleay32MT.
Then to enable TLS transport support in PJSIP, just add
#define PJSIP_HAS_TLS_TRANSPORT 1
in your pj/config_site.h. When this macro is defined, OpenSSL libraries will be automatically linked to the application via the #pragma construct in sip_transport_tls_ossl.c file.
4.2 Building the Projects
Follow the steps below to build the libraries/application using Visual Studio:
- For Visual Studio 6: open pjproject.dsw workspace file.
- For Visual Studio 8 (VS 2005): open pjproject-vs8.sln solution file.
- Set pjsua as Active Project.
- Select Debug or Release build as appropriate.
- Build the project. This will build pjsua application and all libraries needed by pjsua.
- After successful build, the pjsua application will be placed in pjsip-apps/bin directory, and the libraries in lib directory under each projects.
To build the samples:
- (Still using the same workspace)
- Set samples project as Active Project
- Select Debug or Release build as appropriate.
- Build the project. This will build all sample applications and all libraries needed.
- After successful build, the sample applications will be placed in pjsip-apps/bin/samples directory, and the libraries in lib directory under each projects.
4.3 Debugging Sample Applications
Sample applications are built using Samples.mak makefile,
therefore it is difficult to setup debugging session in Visual Studio
for these applications. To solve this issue, the pjsip_apps workspace contain one project called sample_debug which can be used to debug a sample application.
To setup debugging using sample_debug project:
- Set sample_debug project as Active Project
- Edit debug.c file inside this project.
- Modify the #include line to include the particular sample application to debug
- Select Debug build.
- Build and debug the project.
Configure PJSIP
If you’re not already familiar with configuring Asterisk’s driver, visit the configuration page.
PJSIP WSS Transport
Although the HTTP server does the heavy lifting for WebSockets, we still need to define a basic PJSIP Transport:
/etc/asterisk/pjsip.conf
PJSIP Endpoint, AOR and Auth
We now need to create the basic PJSIP objects that represent the client. In this example, we’ll call the client but you can use any name you like, such as an extension number. Only the minimum options needed for a working configuration are shown. NOTE: It’s normal for multiple objects in to have the same name as long as the types differ.
/etc/asterisk/pjsip.conf
An explanation of each of these settings parameters can be found on the Asterisk 16 Configuration for page. Briefly:
- Declare an endpoint that references our previously-made aor and auth.
- Notify Asterisk to expect the AVPF profile (secure RTP)
- Setup the DTLS method of media encryption.
- Specify which certificate files to use for TLS negotiations with this endpoint and our verification and setup methods.
- Enable ICE support
- Tell Asterisk to send media across the same transport that we receive it from.
- Enable mux-ing of RTP and RTCP events onto the same socket.
- And setup codecs by first disabling all and then selectively enabling Opus (presuming that you installed the Opus codec for Asterisk as mentioned at the beginning of this tutorial), then G.711 μ-law.
◆ reg_retry_interval
| unsigned pjsua_acc_config::reg_retry_interval |
Specify interval of auto registration retry upon registration failure, in seconds. Set to 0 to disable auto re-registration. Note that registration will only be automatically retried for temporal failures considered to be recoverable in relatively short term, such as: 408 (Request Timeout), 480 (Temporarily Unavailable), 500 (Internal Server Error), 502 (Bad Gateway), 503 (Service Unavailable), 504 (Server Timeout), 6xx (global failure), and failure caused by transport problem. For registration retry caused by transport failure, the first retry will be done after reg_first_retry_interval seconds instead. Note that the interval will be randomized slightly by some seconds (specified in reg_retry_random_interval) to avoid all clients re-registering at the same time.
See also reg_first_retry_interval setting.
Default:
Temporary and Permanent Failures
Whenever Asterisk sends an outbound registration and receives some sort of failure response from the registrar, Asterisk makes a determination about whether a response can be seen as a permanent or temporary failure. The following responses are always seen as temporary failures:
- No Response
- 408 Request Timeout
- 500 Internal Server Error
- 502 Bad Gateway
- 503 Service Unavailable
- 504 Server Timeout
- Any 600-class response
In addition, there is an option called that can be used to determine if authentication-related rejections from a registrar are treated as permanent or temporary failures. By default, this option is enabled, but disabling the setting means the following two responses are also treated as temporary failures:
- 401 Unauthorized
- 407 Proxy Authentication Required
What is meant by temporary and permanent failures? When a temporary failure occurs, Asterisk may re-attempt registering if a is configured in the outbound registration. The is the number of seconds Asterisk will wait before attempting to send another REGISTER request to the registrar. By default, outbound registrations have a of 60 seconds. Another configuration option, , determines how many times Asterisk will attempt to re-attempt registration before permanently giving up. By default, is set to 10.
Permanent failures result in Asterisk immediately ceasing to re-attempt the outbound registration. All responses that were not previously listed as temporary failures are considered to be permanent failures. There is one exception when it comes to permanent failures. The can be set such that if Asterisk receives a 403 Forbidden response from a registrar, Asterisk can wait the number of seconds indicated and re-attempt registration. Retries that are attempted in this manner count towards the same value as temporary failure retries.
Let’s modify our outbound registration to set these options to custom values:
pjsip.conf
type = registration
server_uri = sip:registrar@example.com
client_uri = sip:client@example.com
contact_user = inbound-calls
outbound_auth = provider_auth
auth_rejection_permanent = no
retry_interval = 30
forbidden_retry_interval = 300
max_retries = 20
In general, this configuration is more lenient than the default. We will retry registration more times, we will retry after authentication requests and forbidden responses, and we will retry more often.
General Features
| Open Source | Source is available for public scrutiny. |
| High Performance | Thousands of calls can be processed per second on a typical Intel P4/2.4GHz desktop machine. More can be expected with proper server hardware and more or higher processor specs. |
| Small Footprint, Very Scalable | Scale down to low profile/embedded/small footprint SIP devices, or scale up to servers with mutlple processors using the same SIP stack source tree. |
| Portable |
32bit, 64bit, big/little endian, any OS. |
| Extensive Documentation | There can never be enough documentation, so we try to provide readers with hundreds of pages worth of documentations (some are generated from the source, some are handwritten documents). |
Target Platforms
| Processor | Operating Systems | Status |
|---|---|---|
| alpha | Linux, gcc | Worked once |
| armv4 | Linux/uC-Linux, gcc | Works |
| armv4 | RTEMS, gcc | Supported, and reported to work |
| armv4 | Symbian, gcc | As of May 2007, all have been ported except sound device. |
| armv4 | Microsoft Windows Mobile family, Embedded Visual C++ 4 for targets such as Windows CE (WinCE), PocketPC, and SmartPhone. Microsoft Visual Studio 2005 has also been reported to work. |
Works (WMME sound) |
| armv5b | linux-2.6/XScale | Supported, and reported to work |
| Blackfin | uC-Linux, gcc | underway |
| i386 | Linux, gcc | Works (OSS or ALSA sound) |
| i386 |
Windows 95 family (win95/win98/winME) WinNT family (WinNT/2000/XP/2003/Vista) Development tools: MSVC 6, VS.NET 2003, VC Express 2005 Please see enabling Windows 95/98/ME support page about specific instructions on enabling Win95/Win98/ME support in the software. |
Works (WMME or DirectSound sound backend) |
| i386 |
Mingw with gcc, via autoconf. Cygwin may compile with ./configure-legacy configuration. |
Works (WMME sound backend) |
| i386 | BSD/FreeBSD 6.1 | Compiles and seems to work (sound disabled with —disable-sound) |
| i386 | Linux kernel mode, gcc | Worked once. |
| ia64/Itanium II | Debian 3.1/GNU Linux 2.6.8, gcc-3.3.5 | Works (media/audio untested) |
| ia64/Itanium II | BSD/FreeBSD 6.1, gcc-3.4.4, gmake | Compiles and seems to work (using null audio, media untested) |
| mips | Linux/uC-Linux, gcc, big-endian/little-endian | Works |
| powerpc | MacOS X 10.2 or later, gcc | Works (CoreAudio sound backend) |
| powerpc | RTEMS, gcc | Supported, and reported to work |
| powerpc | uC-Linux, gcc | Reported to work |
| sparc | SunOS/Sparc, gcc | Worked once |
| x86_64/AMD64 | GNU Linux, gcc | Works (media/audio untested) |
| Other | Other people have ported PJSIP to various platforms, including Nintendo DS, iPod Touch, and Texas Instruments DSP. |
Note: some PJMEDIA features may not be available or suitable for some
platforms (for example, because of lacks of floating point support).
Language Bindings
| C | All libraries are written in C. |
| C++ | There’s C++ wrapper for PJLIB (pj++ library), but it’s not maintained and probably will be removed in the future. |
| Python | The Python binding for PJSUA-LIB has been implemented in 0.5.10 release. The documentation for Python is integrated in PJSUA-API Documentation. |
| ActiveX |
This would open possibility to write SIP User Agents in Visual Basic (VB) or C# .NET. Once we had an experimental ActiveX component for pjsua-lib, but the development has been cancelled. Please see the projects page for open source project that wraps PJSIP as .NET component. (If you’d like to download the old code, get the revision 492 of pjproject trunk. The ActiveX source code is in pjsip-apps/src/activex-pjsua directory). |
Configuration Section Format
pjsip.conf is a flat text file composed of sections like most configuration files used with Asterisk. Each section defines configuration for a configuration object within res_pjsip or an associated module.
Sections are identified by names in square brackets. (see SectionName below)
Each section has one or more configuration options that can be assigned a value by using an equal sign followed by a value. (see ConfigOption and Value below)These options and values are the configuration for a particular component of functionality provided by the configuration object’s respective Asterisk modules.
Every section will have a type option that defines what kind of section is being configured. You’ll see that in every example config section below.
MWI
If you are attempting to subscribe to the message-summary package, then here are some troubleshooting steps for determining what is going wrong.
- Ensure that the and the modules are loaded.
- Ensure that the AoR that the MWI SUBSCRIBE is being sent to has configured on it. Note that the option name is and not .
-
When subscribing to MWI, you may see a message like the following:
The most likely cause of something like this is that you have an endpoint and an AoR that both have in your configuration. The endpoint with attempts to subscribe to the AoR that has . In this case, since Asterisk is already sending MWI notifications about mailbox 200 to the endpoint, the subscription to the AoR is denied. To fix this, remove the option from your endpoint, or configure your device not to attempt to subscribe to MWI.
- Asterisk has multiple ways of having MWI state set, but the most common way is to use that comes with Asterisk. has a requirement that mailbox names must follow the format «mailbox@context». If you are using and you configure MWI in and only provide the mailbox name without a context, then you will not receive MWI updates when the state of the mailbox changes.
pjsip show endpoint
DESCRIPTION:
In the mock up below, you’ll see:
- Alphabetically sorted list of miscellaneous options and their current values
- Separate sections below the misc option list for showing info related to other objects associated to the Endpoint. Such as:
- transport
- auth
- aor
- identify
- Each separate section should contain a list of options and their related values.
- Some sections should contain additional information, not represented as «<option> = <value>». This would primarily information that changes during run-time.
- Examples would be:
- Static and Registered Contacts for the associated AOR objects (static contacts shouldn’t be changing, but it makes sense to display them consistently with a list of registered contacts)
- The representation of this kind of information would really have to be determined on a case by case basis.
- «<option> = <value>» Is used to demonstrate where additional options and values relevant to that section would go.
pjsip show registrations
DESCRIPTION:
A tabulated listing of all registrations configured in pjsip, where each row shows a single registration and various attributes about that registration.
Note that the list ends with a summary of how many total registrations exist, and how many are registered vs not registered.
COLUMNS:
- Name — Name of the registration section
- AuthUsername — Username from associated auth configuration
- Host — Host address, IP or Domain of the system we are registering to
- Expiry(sec) — Seconds configured for registration expiry
- State — Registered, Registering, Not Registered
- LastRegTime — When the last registration happened for this registration
- InOut — Inbound (registrations to aor objects) or Outbound (registration objects)
pjsip show subscriptions
DESCRIPTION:
Tabulated list showing all subscriptions, with columns displaying attributes of each subscription.
Note that the list ends with a summary of how many total subscriptions exist, and a distribution of types.
COLUMNS:
- Endpoint — What endpoint is subscribing
- AOR — What AOR the contact is associated with
- Contact — What contact is specifically responsible for the subscription
- Call ID — The SIP Call ID
- Extension — For subscription types, such as presence, this shows the associated dialplan extension.
- LastState — For subscription types with a state, show the last state.
- Type — The type of subscription
- Mailbox — For MWI subscription type, the associated mailbox
- Expiry(sec) — Subscription expiration time in seconds
- InOut — Inbound or Outbound
DESCRIPTION:
List of all pjsip global and system wide settings configured. Includes ACLs since they apply to all PJSIP traffic.
In the mock up below, you’ll see:
- Separate sections showing settings from objects that have a «global» effect in terms of PJSIP.
- global
- system
- acl
- Each section should contain a list of options and their related values.
- «<option> = <value>» Is used to demonstrate where additional options and values relevant to that section would go.
- ACL settings are displayed since they affect all PJSIP traffic.
◆ pjsip_resolver_set_ext_resolver()
| pjsip_resolver_set_ext_resolver | ( | * | res, |
| pjsip_ext_resolver * | ext_res | ||
| ) |
Set the DNS external resolver implementation to use in the SIP resolver engine. Naturally when implementing its own resolver, application would not need the internal resolver, hence this function will also destroy the PJLIB-UTIL DNS resolver if any (e.g: set using ). Application that needs it, still be able create its own instance.
Note that application normally will use instead since it does not normally have access to the SIP resolver instance.
- Parameters
-
res The SIP resolver engine. ext_res The external resolver implementation callback. This argument can be NULL to reset the whole external implementation. However, it is prohibited to reset individual callback.
- Returns
- PJ_SUCCESS on success, or the appropriate error code.
Restart Asterisk
Restart Asterisk to pick up the changes and if you have a firewall, don’t forget to allow TCP port 8089 through so your client can connect.
Wrap Up
At this point, your WebRTC client should be able to register and make calls. If you’ve used self-signed certificates however, your browser may not allow the connection and because the attempt is not from a normal URI supplied by the user, the user might not even be notified that there’s an issue. You may be able to get the browser to accept the certificate by visiting «» directly. This will usually result in a warning from the browser and may give you the opportunity to accept the self-signed certificate and/or create an exception. If you generated your certificate from a pre-existing local Certificate Authority, you can also import that Certificate Authority’s certificate into your trusted store but that procedure is beyond the scope of this document.
Certificates
If you already have certificate files (certificate, key, CA certificate), whether self-signed or trusted, you can skip the rest of this section. If you need to generate a self-signed certificate, read on.
Create Certificates
Asterisk provides a utility script, in the source directory. We will use it to make a self-signed certificate authority and a server certificate for Asterisk, signed by our new authority.
From the Asterisk source directory run the following commands. You’ll be prompted to set a a pass phrase for the CA key, then you’ll be asked for that same pass phrase a few times. Use anything you can easily remember. The pass phrase is indicated below with «». Replace «» with your PBX’s hostname or IP address. Replace «» as appropriate.
We’ll use the and files later to configure the HTTP server.
Endpoint Identifiers
Modules which are responsible for identifying what endpoint should be used for incoming traffic are referred to as endpoint identifiers. A running system may have multiple endpoint identifiers which individually use different logic to find a potential endpoint. One endpoint identifier may use the user portion of the From header while another may do simple IP based matching.
Endpoint identifiers are given whole incoming requests and are expected to execute logic to retrieve an endpoint. If no endpoint is returned from all available endpoint identifiers the incoming request is rejected. A system running without any endpoint identifiers will not accept any incoming requests.
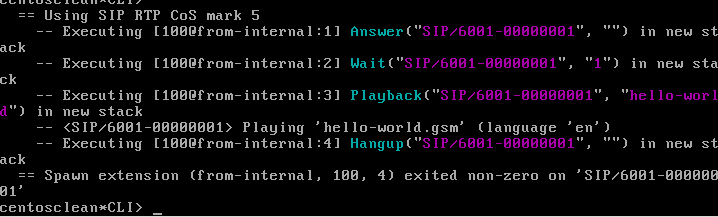
Asterisk cannot route my call
If Asterisk is finding your endpoint successfully, it may be that Asterisk has no address information when trying to dial the endpoint. You may see a message like the following:
If you see this, then the endpoint you are dialling either has no associated address of record (AoR) or the associated AoR does not have any contact URIs bound to it. AoRs are necessary in order to determine the appropriate destination of the call. To see if your endpoint has an associated AoR, run from the Asterisk CLI. The following is sample output of an endpoint that does have an AoR configured on it:
Notice the third line. The endpoint points to the AoR section called «david». If your endpoint does not have an AoR associated with it, this third line will be absent.
If you think you have associated your endpoint with an AoR, but one does not appear in the CLI, then here are some troubleshooting steps:
- Ensure that you have set the option on the endpoint. Notice that the option is not (there is an ‘s’ at the end).
- Ensure that the AoR pointed to by the option exists. Check your spelling!
If those appear to be okay, it may be that there was an error when attempting to load the AoR from configuration. From the Asterisk CLI, run the command . If you see a message like
Then it means the AoR did not get loaded properly. Here are some troubleshooting steps to ensure your AoR is configured correctly:
- Ensure that your AoR has set on it.
-
Ensure that there were no nonexistent configuration options set. You can check the logs at Asterisk startup to see if there were any options Asterisk did not understand. For instance, you may see something like:
In this case, I tried to set an option called «awesomeness» on the AoR 1000. Since Asterisk did not recognize this option, AoR 1000 was unable to be loaded.
- The option can be a pitfall. There is an object type called «contact» that is documented on the wiki, which may make you think that the AoR option should point to the name of a contact object that you have configured. On the contrary, the option for an AoR is meant to be a SIP URI. The resulting contact object will be created by Asterisk based on the provided URI. Make sure when setting the that you use a full SIP URI and not just an IP address.
Another issue you may encounter is that you have properly configured an AoR on the endpoint but that this particular AoR has no contact URIs bound to it. From the CLI, run the command to see details about the AoR. Here is an example of an AoR that has a contact URI bound to it.
The «Contact:» line shows the URI «sip:201@10.24.18.87:5060;ob» is bound to the AoR 201. If the AoR does not have any contacts bound to it, then no Contact lines would appear. The absence of Contact lines can be explained by any of the following:
- If the device is expected to register, then it may be that the device is either not properly configured or that there was a registration failure. See the Inbound Registrations section for details on how to resolve that problem.
- If the device is not intended to register, then the AoR needs to have a option set on it. See the previous bulleted list for possible -related pitfalls.
◆ pjsip_resolve()
| void pjsip_resolve | ( | * | resolver, |
| pj_pool_t * | pool, | ||
| const pjsip_host_info * | target, | ||
| void * | token, | ||
| * | cb | ||
| ) |
Asynchronously resolve a SIP target host or domain according to rule specified in RFC 3263 (Locating SIP Servers). When the resolving operation has completed, the callback will be called.
Note that application normally will use instead since it does not normally have access to the SIP resolver instance.
- Parameters
-
resolver The resolver engine. pool The pool to allocate resolver job. target The target specification to be resolved. token A user defined token to be passed back to callback function. cb The callback function.
Configure a SIP channel driver
Depending on the version of Asterisk in use, you may have the option of more than one SIP channel driver. You’ll have to pick one to use for the example.
Follow the instructions below for the channel driver you chose.
Configure chan_sip
Backup and edit a new blank sip.conf, just like you did with extensions.conf.
Then add the following to your sip.conf file:
Basic configuration will be explained in more detail in other sections of the wiki. For this example to work, just make sure you have everything exactly as written above. For the sake of terminology, it is useful to note that though we have this SIP configuration configured with «type=friend», most people refer to this as configuring a SIP peer.
Configure chan_pjsip
Backup and edit a new blank pjsip.conf, just like you did with extensions.conf.
Then add the following to your pjsip.conf file:
Configuration Reference:
| Parameter | Description |
|---|---|
| type | Must be |
| sends_auth |
Will create an outbound auth object for the endpoint andregistration. At least must be specified. default = |
| accepts_auth |
Will create an inbound auth object for the endpoint.At least ‘inbound/username’ must be specified. default = |
| sends_registrations |
Will create an outbound registration object for eachhost in remote_hosts. default = |
| remote_hosts |
A comma separated list of remote hosts in the form ofIf specified, a static contact for each host will be createdin the aor. If is no, an identifyobject is also created with a match line for each remote host.Hostnames must resolve to A, AAAA or CNAME records.SRV records are not currently supported. default = |
| transport |
The transport to use for the endpoint and registrations default = the pjsip default |
| server_uri_pattern |
The pattern used to construct the registration .The replaceable parameter } is available for use. default = } |
| client_uri_pattern |
The pattern used to construct the registration .The replaceable parameters ${REMOTE_HOST} and${USERNAME} are available for use. default = {{sip:${USERNAME}@${REMOTE_HOST}}} |
| contact_pattern |
The pattern used to construct the aor contact.The replaceable parameter ${REMOTE_HOST} is available for use. default = } |
| has_phoneprov |
Will create a phoneprov object. If yes, both and must be specified. default = |
| has_hint |
Enables the automatic creation of dialplan hints. Two entries will be created. One hint for ‘hint_exten’ and one application to execute when ‘hint_exten’ is dialed. |
| hint_context | The context into which hints are placed. |
| hint_exten | The extension this hint will be registered with. |
| hint_application |
An application with parameters to execute when ‘hint_exten’ is dialed. Example: Gosub(stdexten,${EXTEN},1(${HINT}))
|
| <object>/<parameter> |
These parameters are passed unmodified to the native object. |
Monitoring Status
You can monitor the status of your configured outbound registrations via the CLI and the Asterisk Manager Interface. From the CLI, you can issue the command to list all outbound registrations. Here is an example of what you might see:
On this particular Asterisk instance, there are two outbound registrations configured. The headers at the top explain what is in each column. The «Status» can be one of the following values:
- Unregistered: Asterisk is currently not registered. This is most commonly seen when the registration has not yet been established. This can also be seen when the registration has been forcibly unregistered or if the registration times out.
- Registered: Asterisk has successfully registered.
- Rejected: Asterisk attempted to register but a failure occurred. See the above section for more information on failures that may occur.
- Stopped: The outbound registration has been removed from configuration, and Asterisk is attempting to unregister.
In addition, you can see the details of a particular registration by issuing the command. If I issue , I see the following:
This provides the same status line as before and also provides the configured values for the outbound registration.
AMI provides the command that provides the same information as the CLI commands. Here is an example of executing the command in an AMI session:
The command sends events for each configured outbound registration. Most information is the same as the CLI displays, but there is one additional piece of data displayed: NextReg. This is the number of seconds until Asterisk will send a new REGISTER request to the registrar. In this particular scenario, that number is 0 because the two outbound registrations have reached their maximum number of retries.
Example SIP Trunk Configuration
This shows configuration for a SIP trunk as would typically be provided by an ITSP. That is registration to a remote server, authentication to it and a peer/endpoint setup to allow inbound calls from the provider.
- SIP provider requires registration to their server with a username of «myaccountname» and a password of «1234567890»
- SIP provider requires registration to their server at the address of 203.0.113.1:5060
- SIP provider requires outbound calls to their server at the same address of registration, plus using same authentication details.
- SIP provider will call your server with a user name of «mytrunk». Their traffic will only be coming from 203.0.113.1
| sip.conf | pjsip.conf |
|---|---|
Disabling res_pjsip and chan_pjsip
You may want to keep using chan_sip for a short time in Asterisk 12+ while you migrate to res_pjsip. In that case, it is best to disable res_pjsip unless you understand how to configure them both together.
There are several methods to disable or remove modules in Asterisk. Which method is best depends on your intent.
If you have built Asterisk with the PJSIP modules, but don’t intend to use them at this moment, you might consider the following:
-
Edit the file modules.conf in your Asterisk configuration directory. (typically /etc/asterisk/)
Having a noload for the above modules should (at the moment of writing this) prevent any PJSIP related modules from loading.
- Restart Asterisk!
Other possibilities would be:
- Remove all PJSIP modules from the modules directory (often, /usr/lib/asterisk/modules)
- Remove the configuration file (pjsip.conf)
- Un-install and re-install Asterisk with no PJSIP related modules.
- If you are wanting to use chan_pjsip alongside chan_sip, you could change the port or bind interface of your chan_pjsip transport in pjsip.conf
Network Address Translation (NAT)
When configured with chan_sip, peers that are, relative to Asterisk, located behind a NAT are configured using the nat parameter. In versions 1.8 and greater of Asterisk, the following nat parameter options are available:
| Value | Description |
|---|---|
| no | |
| force_rport | When the rport parameter is not present, send responses to the source IP address and port anyway, as though the rport parameter was present |
| comedia | Send media to the address and port from which Asterisk received it, regardless of where SDP indicates that it should be sent |
| auto_force_rport | Automatically enable the sending of responses to the source IP address and port, as though rport were present, if Asterisk detects NAT. Default. |
| auto_comedia | Automatically send media to the port from which Asterisk received it, regardless of where SDP indicates that it should be sent, if Asterisk detects NAT. |
Versions of Asterisk prior to 1.8 had less granularity for the nat parameter:
| Value | Description |
|---|---|
| no | Do not perform NAT handling other than RFC 3581 |
| yes | Send media to the port from which Asterisk received it, regardless of where SDP indicates that it should be sent; send responses to the source IP address and port as though rport were present; and rewrite the SIP Contact to the source address and port of the request so that subsequent requests go to that address and port. |
| never | Do not perform any NAT handling |
| route | Send media to the port from which Asterisk received it, regardless of where SDP indicates that it should be sent and rewrite the SIP Contact to the source address and port of the request so that subsequent requests go to that address and port. |
In chan_pjsip, the endpoint options that control NAT behavior are:
- rtp_symmetric — Send media to the address and port from which Asterisk receives it, regardless of where SDP indicates that it should be sent
- force_rport — Send responses to the source IP address and port as though port were present, even if it’s not
- rewrite_contact — Rewrite SIP Contact to the source address and port of the request so that subsequent requests go to that address and port.
Thus, the following are equivalent:
◆ pjsip_pres_notify()
| pjsip_pres_notify | ( | * | sub, |
| state, | |||
| const pj_str_t * | state_str, | ||
| const pj_str_t * | reason, | ||
| pjsip_tx_data ** | p_tdata | ||
| ) |
For notifier, create NOTIFY request to subscriber, and set the state of the subscription. Application MUST set the presence status to the appropriate state (by calling ) before calling this function.
- Parameters
-
sub The server subscription (notifier) instance. state New state to set. state_str The state string name, if state contains value other than active, pending, or terminated. Otherwise this argument is ignored. reason Specify reason if new state is terminated, otherwise put NULL. p_tdata Pointer to receive the request.
- Returns
- PJ_SUCCESS on success.
SIP SRV Resolver Features
Some features of the SIP resolver:
- DNS SRV entries are returned on sorted order based on priority to allow failover to the next appropriate server.
- The procedure in RFC 2782 is used to select server with the same priority to load-balance the servers load.
- A single function () performs all server resolution works, from resolving the SRV records to getting the actual IP addresses of the servers with DNS A (or AAAA) resolution.
- When multiple DNS SRV records are returned, parallel DNS A (or AAAA) queries will be issued simultaneously.
- The PJLIB-UTIL DNS resolver provides additional functionality such as response caching, query aggregation, parallel nameservers, fallback nameserver, etc., which will be described below.
- Enable application to provide its own resolver implementation.
Configuration Conversion Script
Contained within a download of Asterisk, there is a Python script, sip_to_pjsip.py, found within the contrib/scripts/sip_to_pjsip subdirectory, that provides a basic conversion of a sip.conf config to a pjsip.conf config. It is not intended to work for every scenario or configuration; for basic configurations it should provide a good example of how to convert it over to pjsip.conf style config.
To insure that the script can read any #include’d files, run it from the /etc/asterisk directory or in another location with a copy of the sip.conf and any included files. The default input file is sip.conf, and the default output file is pjsip.conf. Any included files will also be converted, and written out with a pjsip_ prefix, unless changed with the —prefix=xxx option.