Asterisk key как пользоваться
Содержание:
- Сложный компьютер простыми словами
- 2.1 Repository Configuration
- Getting Started — Certificates
- 2.1 Repository Configuration
- Configuring a TLS-enabled SIP client to talk to Asterisk
- 3.3 Package Installation Order
- 3.3 Package Installation Order
- Why use the bundled version?
- Asterisk chan_sip configuration
- Problems with server verification
- Part 2 (SRTP)
- Usage
- Asterisk 13 RealTime SIP
- 3.1 Package List
- Настройка FreePBX
- Troubleshooting
Сложный компьютер простыми словами
Представляю твоему вниманию статью про всстановления забытых паролей за звездочками. Естественно восстановление своих забытых паролей. В отношении чужих паролей – это уже взлом, а такими делами “мы” не занимаемся. Плюс расскажу как это все работает и подытожу небольшим обзором бесплатных программ по теме (View Password, Password Cracker, Hidden Password, Hackpass, Asterisk Logger, Asterisk Key, Open Pass).
Как пароль скрывается за звездочками?
Вместо скучной теории приведу пример создания программы (на языке программирования – Delphi) с паролем скрытым за звездочки и расскажу как это все работает (не пугайся ):
Для любого программиста (напоминаю – Delphi) не секрет, что у компонента Edit есть свойство PasswordChar (символ ввода пароля), по умолчанию значение свойства равно “#0″, то есть никакого символа (обычный читабельный текст). Если же изменить символ на * (можно указать любой символ, например смайлик), то во время работы программы все символы, которые будет вводить пользователь, в этой строке будет отображаться как звездочки. Причем на сам текст это не окажет никакого влияния, просто его не будет видно в момент ввода…
В тестовую программу добавлена кнопка “Вручную открыть пароль” по нажатию на которую, свойство PasswordChar компонентов Edit изменяется в то самое значение по-умолчанию (пароль станет читабельный и можно будет увидеть текст 12345).
Смотри скрин программы на этапе кодинга (кликни для увеличения):
Скачать программу-пример (могу предоставить исходники).
Как работают программы для просмотра паролей под звездочками?
Все очень просто, как говорится “как два пальца” . Программы просмотрщики всего навсего меняют свойство PasswordChar в чужих программах на “#0″, а затем перерисовывают (обновляют) окно программы “жертвы” или выдергивают значения и вставляют пароли в свои окна.
Подборка бесплатных программ показа пароля под звездочками:
Работа с приложениями проста до безобразия и уверен что в описании не нуждается.
Разработчик: Defoult , Размер программы: 162 KB
Разработчик: LISSOFT-Multimedia , Размер программы: 24 KB
Разработчик: Mazov Gosha , Размер программы: 40 KB
Разработчик: Савченко Виктор , Размер программы: 28 KB
Разработчик: Sistematik , Размер программы: 238 KB
Разработчик: NirSoft , Размер программы: 26 KB
Разработчик: Passware , Размер программы: 456 KB
- Open Pass
Разработчик: S&A Company , Размер программы: 5 KB
Самая компактная и знаменитая программа для просмотра паролей, скрывающихся за звездами.
В тестовой программе, в последнем поле (то которое скрывает пароль смайликами), изменена стандартная кодировка текста. В итоге отобразить скрытый пароль смогли последние три программы из списка ().
Замечания:
В некоторых программах за звездочками скрывается не пароль, а те же самые звездочки (или любой другой знак) – они всего навсего “символизируют” пароль (например программа QIP версии 8.0.8.0).
Можно ли таким образом отобразить пароль за звездочками в браузере? – Нет, в браузере под звездочками скрываются звездочки!
Многие пользователи любят полагаться на хорошую память системы и всюду в программах сохраняют свои пароли, как видишь все легко узнается. Советую либо хранить все в голове, либо использовать программы для хранения паролей (KeePass).
Вчера нужно было вспомнить пароль для FTP, но увидел только «звездочки».
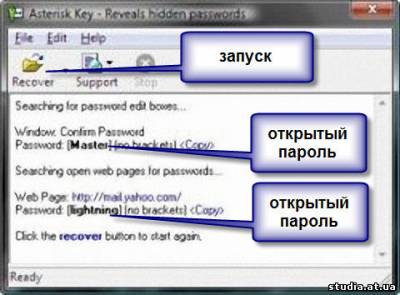
Пришлось вспоминать про старую добрую программу Asterisk Key, которая открывает подобные «звездочки» и показывает скрытые под ними пароли.
Asterisk Key — небольшая программа которая позволяет увидеть пароли, скрытые за звездочками в окнах ввода пароля в windows-приложениях и на веб-страницах.
Для того, чтобы просмотреть скрытый за звездочками пароль, нужно запустить эту утилиту параллельно с программой, в которой вы хотите подсмотреть пароль. После нажатия на панели инструментов программы кнопки Recover произойдет обработка окна, в котором содержится скрытый за звездочками пароль, и произойдет вывод раскрытого для показа пароля в окне программы.
Основные возможности Asterisk Key
- Пароль можно раскрыть практически из любого запущенного приложения или веб-страницы (если на этой странице есть форма, в которой содержится пароль
- Поддерживается работа с паролями на различных языках
- Легко устанавливается и удаляется
Если вы нашли ошибку, пожалуйста, выделите фрагмент текста и нажмите Ctrl+Enter.
2.1 Repository Configuration
The content of a typical yum configuration file, to be
placed in etc/yum.repos.d/unimrcp.repo, is provided below.
|
name=UniMRCP baseurl=https://username:password@unimrcp.org/repo/yum/main/rhel$releasever/$basearch/ enabled=1 sslverify=1 gpgcheck=1 gpgkey=https://unimrcp.org/keys/unimrcp-gpg-key.public name=UniMRCP baseurl=https://username:password@unimrcp.org/repo/yum/asterisk-16/rhel$releasever/$basearch/ enabled=1 sslverify=1 gpgcheck=1 gpgkey=https://unimrcp.org/keys/unimrcp-gpg-key.public # Do name=Asterisk baseurl=http://packages.asterisk.org/centos/$releasever/current/$basearch/ enabled=1 gpgcheck=0 gpgkey=http://packages.asterisk.org/RPM-GPG-KEY-Digium |
The username and password fields included in the HTTPS URI
must be replaced with the corresponding account credentials.
Note that the repository asterisk-current, provided
by Asterisk, is used to retrieve the package asterisk-sounds-core-en-gsm.
Since this repository is currently not available for Red Hat / Cent OS 7, the
Asterisk sound files need to be installed separately in this case.
Getting Started — Certificates
Best practice, however, is to use a publicly-signed certificate. D-Series phones include a current (as of the time of the firmware build date) copy of the publicly-signed root CA list. Thus, they will be able to properly validate any server using a publicly-signed certificate. If the server does not use a publicly-signed certificate, then a copy of the privately-signed root CA must be loaded onto the phone before it will be able to make a SIP TLS connection to the SIP server.
SIP RFC 5922 section 7.2 forbids the use of wildcard certificates for TLS signaling. For many deployments of servers, this can present a problem. Where these servers are often deployed with wildcard certificates for HTTPs traffic, implementors may assume they can do the same thing for SIP. Per the RFC, one cannot. In order to provide assistance for wildcard implementations, D-Series phone firmwares, beginning with 2_9_2 and 1_12_1 provide a setting, tls_allow_wildcard_certs, disabled by default, that will permit the telephone to accept a wildcard certificate as valid for SIP TLS signaling.
2.1 Repository Configuration
The content of a typical configuration file of the APT
repository, to be placed in /etc/apt/sources.list.d/unimrcp.list, is provided
below.
|
deb |
The username and password fields included in
the HTTPS URI must be replaced with the corresponding account credentials.
The distr field must be replaced with the
corresponding distribution code name such as bionic.
The repository provides the following components:
·main – packages containing UniMRCP and its dependencies
·asterisk-16 – packages containing Asterisk 16 and corresponding UniMRCP
modules
Configuring a TLS-enabled SIP client to talk to Asterisk
Next, we’ll configure Blink.
First, let’s add a new account.
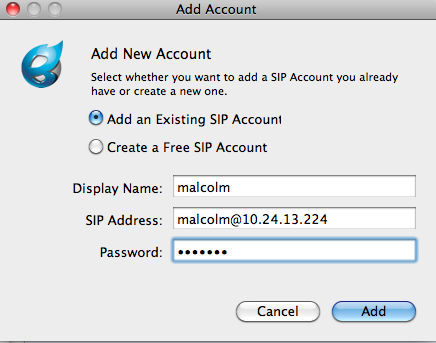
Then, we need to modify the Account Preferences, and under the SIP Settings, we need to set the outbound proxy to connect to the TLS port and transport type on our Asterisk server. In this case, there’s an Asterisk server running on port 5061 on host 10.24.13.224.

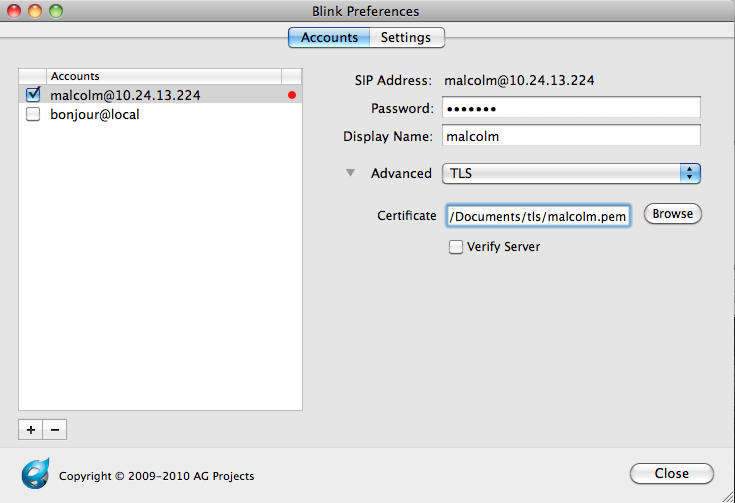
Now, we need to point the TLS account settings to the client certificate (malcolm.pem) that we copied to our computer.
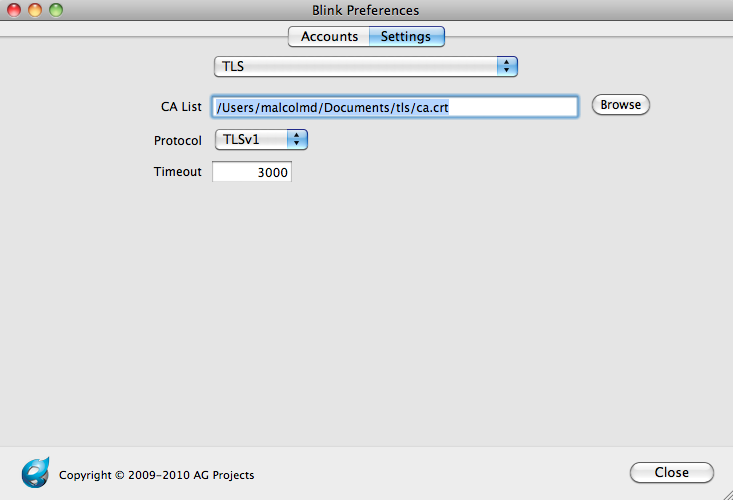
Then, we’ll point the TLS server settings to the ca.crt file that we copied to our computer.
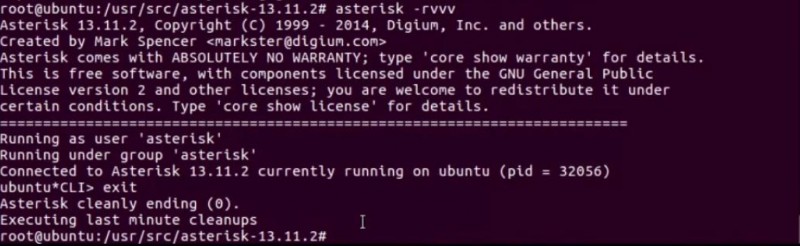
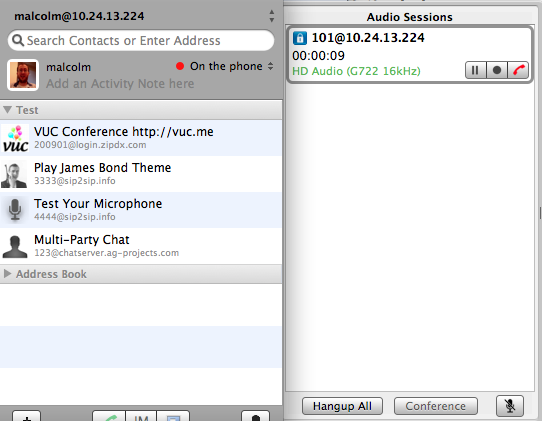
Press «close,» and you should see Blink having successfully registered to Asterisk.
Depending on your Asterisk CLI logging levels, you should see something like:
Notice that we registered on port 5061, the TLS port.
Now, make a call. You should see a small secure lockbox in your Blink calling window to indicate that the call was made using secure (TLS) signaling:
3.3 Package Installation Order
Packages for the APR, APR-Util and Sofia-SIP libraries must
be installed first.
|
sudo sudo sudo |
Then, packages for the common data and the client library should
follow.
|
sudo sudo |
Then, the Asterisk packages should follow.
|
sudo sudo sudo |
Finally, based on your requirements, either app-unimrcp
and/or res-speech-unimrcp packages can be installed.
|
sudo sudo |
The same order should be considered for the installation of
the corresponding development packages.
3.3 Package Installation Order
Note that all the RPM packages provided by UniMRCP are
signed by a GNU Privacy Guard (GPG) key. Before starting the installation, you
may need to import the public key in order to allow the rpm utility to
verify the packages.
|
rpm |
Packages for the APR, APR-Util and Sofia-SIP libraries must
be installed first.
|
rpm rpm -ivh rpm |
Then, packages for common data and the client library should
follow.
|
rpm rpm |
Then, the Asterisk packages should follow.
|
rpm rpm rpm |
Finally, based on your requirements, either app-unimrcp
and/or res-speech-unimrcp packages can be installed.
|
rpm rpm |
The same order should be considered for the installation of
the corresponding development packages.
Why use the bundled version?
- Predictability: When built with the bundled pjproject, you’re always certain of the version you’re running against, no matter where it’s installed.
- Scalability: The default pjproject configuration is optimized for client applications. The bundled version’s configuration is optimized for server use.
- Usability: Several feature patches, which have been submitted upstream to pjproject but not yet released, are usually included in the bundled version.
-
Safety: If a security or critical issue is identified in pjproject, it can be patched and made available with a new release of Asterisk instead of having to waiting for a new release of pjproject.
-
Maintainability: You don’t need to build and install separate packages.
-
Supportability: When asking others for help, there’s no question about which version of pjproject you’re using and what options it was compiled with.
- Debugability: The Asterisk and compile flags, which are essential for troubleshooting crashes and deadlocks, are automatically passed to the pjproject build process.
- Compatibility: This is especially important from a development perspective because it means we can be sure that new pjproject APIs that have been introduced or old ones that have been deprecated, are handled and tested appropriately in Asterisk.
- Reliability: You can be sure that Asterisk was tested against the bundled version.
Asterisk chan_sip configuration
Or, if you are using chan_sip, you can use the following to assist.
In the sip.conf configuration file, set the following:
Here, we’re enabling TLS support. We’re binding it to our local IPv4 wildcard (the port defaults to 5061 for TLS). We’ve set the TLS certificate file to the one we created above. We’ve set the Certificate Authority to the one we created above.
Next, you’ll need to configure a SIP peer within Asterisk to use TLS as a transport type. Here’s an example:
Notice the transport option. The Asterisk SIP channel driver supports three types: udp, tcp and tls. Since we’re configuring for TLS, we’ll set that. It’s also possible to list several supported transport types for the peer by separating them with commas.
Problems with server verification
If the host or IP you used for the common name on your cert doesn’t match up with your server then you may run into problems when your client is calling Asterisk. Make sure the client is configured to not verify the server against the cert.
When calling from Asterisk to Blink or another client, you might run into an ERROR on the Asterisk CLI similar to this:
This is the opposite scenario, where Asterisk is acting as the client and by default attempting to verify the destination server against the cert.
You can set tlsdontverifyserver=yes in sip.conf to prevent Asterisk from attempting to verify the server.
Part 2 (SRTP)
Now that we’ve got TLS enabled, our signaling is secure — so no one knows what extensions on the PBX we’re dialing. But, our media is still not secure — so someone can snoop our RTP conversations from the wire. Let’s fix that.
SRTP support is provided by libsrtp. libsrtp has to be installed on the machine before Asterisk is compiled, otherwise you’re going to see something like:
on your Asterisk CLI. If you do see that, install libsrtp (and the development headers), and then reinstall Asterisk (./configure; make; make install).
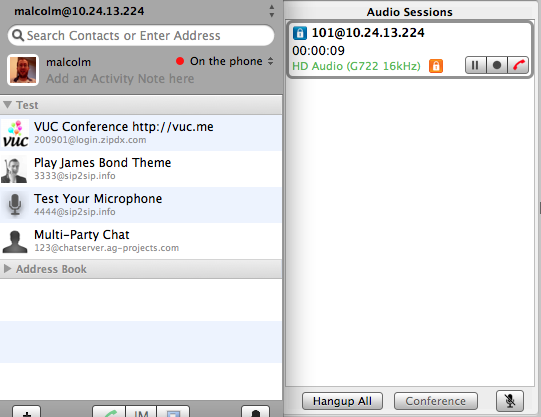
With that complete, let’s first go back into our peer definition in sip.conf. We’re going to add a new encryption line, like:
Next, we’ll set Blink to use SRTP:

Reload Asterisk’s SIP configuration (sip reload), make a call, and voilà:
Usage
First, run . Building the bundled pjproject requires the python development libraries which install_prereq installs. All you have to do now is add the option to your Asterisk command line and remove any other option you may have specified.
The configure and make processes will download the correct version of pjproject, patch it, configure it, build it, and finally link Asterisk to it statically. No changes in runtime configuration are required. You can leave your system-installed version of pjproject in place if needed. Once compiled with the option, Asterisk will ignore any other installed versions of pjproject.
Using the bundled version of pjproject doesn’t necessarily mean you need internet access to download the pjproject tarball every time you build. There are 2 ways to specify an alternate location from which to retrieve it. First, assuming version 2.6 of pjproject is needed and is the directory you’re going to save to, download the following files to the local directory:
It’s important that both files be named and respectively.
Now perform either of the following 2 steps:
Asterisk 13 RealTime SIP
см также: Asterisk PJSIP Realtime
CREATE TABLE `sip_peers` (
  `id` int(11) NOT NULL AUTO_INCREMENT,
  `accountcode` varchar(20) DEFAULT NULL,
  `directmedia` varchar(128) DEFAULT NULL,
  `disallow` varchar(100) DEFAULT 'all',
  `allow` varchar(100) DEFAULT 'alaw;ulaw;gsm;g729',
  `allowoverlap` enum('yes','no') DEFAULT 'yes',
  `allowsubscribe` enum('yes','no') DEFAULT 'yes',
  `allowtransfer` varchar(3) DEFAULT NULL,
  `amaflags` varchar(13) DEFAULT NULL,
  `autoframing` varchar(3) DEFAULT NULL,
  `auth` varchar(40) DEFAULT NULL,
  `buggymwi` enum('yes','no') DEFAULT 'no',
  `callgroup` varchar(10) DEFAULT NULL,
  `callerid` varchar(80) DEFAULT NULL,
  `cid_number` varchar(40) DEFAULT NULL,
  `fullname` varchar(40) DEFAULT NULL,
  `call-limit` int(8) DEFAULT '0',
  `callingpres` varchar(80) DEFAULT NULL,
  `canreinvite` char(6) DEFAULT 'yes',
  `context` varchar(80) DEFAULT NULL,
  `callbackextension` varchar(80) DEFAULT NULL,
  `defaultip` varchar(15) DEFAULT NULL,
  `defaultuser` varchar(128) DEFAULT NULL,
  `dtmfmode` varchar(7) DEFAULT NULL,
  `encryption` varchar(128) DEFAULT NULL,
  `fromuser` varchar(80) DEFAULT NULL,
  `fromdomain` varchar(80) DEFAULT NULL,
  `fullcontact` varchar(80) DEFAULT NULL,
  `g726nonstandard` enum('yes','no') DEFAULT 'no',
  `host` varchar(31) NOT NULL DEFAULT '',
  `insecure` varchar(20) DEFAULT NULL,
  `ipaddr` varchar(15) NOT NULL DEFAULT '',
  `language` char(2) DEFAULT NULL,
  `lastms` varchar(20) DEFAULT NULL,
  `mailbox` varchar(50) DEFAULT NULL,
  `maxcallbitrate` int(8) DEFAULT '384',
  `mohsuggest` varchar(80) DEFAULT NULL,
  `md5secret` varchar(80) DEFAULT NULL,
  `musiconhold` varchar(100) DEFAULT NULL,
  `name` varchar(80) NOT NULL DEFAULT '',
  `nat` varchar(128) DEFAULT NULL,
  `outboundproxy` varchar(80) DEFAULT NULL,
  `deny` varchar(95) DEFAULT NULL,
  `permit` varchar(95) DEFAULT NULL,
  `pickupgroup` varchar(10) DEFAULT NULL,
  `port` varchar(5) NOT NULL DEFAULT '',
  `progressinband` enum('yes','no','never') DEFAULT 'no',
  `promiscredir` enum('yes','no') DEFAULT 'no',
  `qualify` char(3) DEFAULT NULL,
  `regexten` varchar(80) NOT NULL DEFAULT '',
  `regseconds` int(11) NOT NULL DEFAULT '0',
  `rfc2833compensate` enum('yes','no') DEFAULT 'no',
  `rtptimeout` char(3) DEFAULT NULL,
  `rtpholdtimeout` char(3) DEFAULT NULL,
  `secret` varchar(80) DEFAULT NULL,
  `sendrpid` enum('yes','no') DEFAULT 'yes',
  `setvar` varchar(100) NOT NULL DEFAULT '',
  `subscribecontext` varchar(80) DEFAULT NULL,
  `subscribemwi` varchar(3) DEFAULT NULL,
  `t38pt_udptl` enum('yes','no') DEFAULT 'no',
  `transport` varchar(128) DEFAULT NULL,
  `trustrpid` enum('yes','no') DEFAULT 'no',
  `type` varchar(6) NOT NULL DEFAULT 'friend',
  `useclientcode` enum('yes','no') DEFAULT 'no',
  `usereqphone` varchar(3) NOT NULL DEFAULT 'no',
  `username` varchar(128) DEFAULT NULL,
  `videosupport` enum('yes','no') DEFAULT 'yes',
  `vmexten` varchar(80) DEFAULT NULL,
  PRIMARY KEY (`id`),
  UNIQUE KEY `name` (`name`),
  KEY `name_2` (`name`)
) ENGINE=InnoDB AUTO_INCREMENT=74 DEFAULT CHARSET=utf-8 ROW_FORMAT=DYNAMIC;
/etc/odbcinst.ini
# Driver from the mysql-connector-odbc package
# Setup from the unixODBC package

Description     = ODBC for MySQL
Driver          = /usr/lib/libmyodbc5.so
Setup           = /usr/lib/libodbcmyS.so
Driver64        = /usr/lib64/libmyodbc5.so
Setup64         = /usr/lib64/libodbcmyS.so
FileUsage       = 1
/etc/odbc.ini
Driver=MySQL
SERVER=localhost
PORT=3306
DATABASE=asterisk
USER=asterisk
PASSWORD= PASSWORD
/etc/asterisk/res_odbc.conf
enabled => yes
dsn => asterisk
username => asterisk
password => PASSWORD
pre-connect => yes
/etc/asterisk/extconfig.conf
sipusers => odbc,sql,sip_peers
sippeers => odbc,sql,sip_peers
/etc/asterisk.modules.conf
load = res_odbc.so
load = res_config_odbc.so
CLI> module show like odbc
Module                         Description                              Use Count  Status      Support Level
res_config_odbc.so             Realtime ODBC configuration              0          Running              core
res_odbc.so                    ODBC resource                            0          Running              core
2 modules loaded
*CLI> odbc show all

ODBC DSN Settings
-----------------

  Name:   sql
  DSN:    asterisk
    Last connection attempt: 1970-01-01 03:00:00
/etc/asterisk/sip.conf
rtcachefriends=yes
Добавление данных
INSERT INTO asterisk.sip_peers ( NAME, username, secret, context, HOST, nat, qualify, TYPE) VALUES ('1001', '1001', 'USERPASSWORD', 'USERCONTEXT', 'dynamic', 'yes', 'no', 'friend');
3.1 Package List
The following is a list of RPM packages required for
installation of UniMRCP modules for Asterisk, including UniMRCP dependencies.
|
Package Name |
Component |
Description |
|
asterisk-app-unimrcp |
Asterisk |
A suite of MRCP applications. |
|
asterisk-res-speech-unimrcp |
Asterisk |
An MRCP implementation of Generic |
|
asterisk |
Asterisk |
Asterisk package. |
|
asterisk-sip |
Asterisk |
Asterisk SIP channel module. |
|
asterisk-pjsip |
Asterisk |
Asterisk PJSIP channel module. |
|
asterisk-devel |
Asterisk |
Development files for Asterisk. |
|
unimrcp-client |
UniMRCP |
Shared libraries and sample |
|
unimrcp-client-dev |
UniMRCP |
Development kit of the client. |
|
unimrcp-common |
UniMRCP |
Data common for the client and the |
|
unimrcp-common-dev |
UniMRCP |
Development kit of the common |
|
uniapr |
UniMRCP |
UniMRCP edition of the Apache |
|
uniapr-dev |
UniMRCP |
Development kit of the |
|
uniapr-util |
UniMRCP |
UniMRCP edition of the Apache Portable |
|
uniapr-util-dev |
UniMRCP |
Development kit of the |
|
unisofia-sip |
UniMRCP |
UniMRCP edition of the Sofia SIP |
|
unisofia-sip-dev |
UniMRCP |
Development kit of the |
The respective packages for each of the components can be
obtained from the UniMRCP website by visiting the download area having logged
in to your account.
Настройка FreePBX
Руководства по установке и настройке FreePBX.
- Файлы и стандартные контексты FreePBX — Структура конфигурационных файлов используемых FreePBX.
- Asterisk FreePBX Fax-to-Email Прием факсов на емайл во FreePBX
Admin modules
Документация по административным модулям FreePBX
- FreePBX Administrators — Используется для назначения администраторов системы.
- FreePBX: Backup and Restore — Резервные копии и восстановление.
- FreePBX 14 Bulk Handler — Импорт / Экспорт csv.
- FreePBX Feature Codes — Коды абонентских функций.
- FreePBX 12 System Recordings — Запись системных голосовых сообщений.
- FreePBX Custom Destinations — Пользовательские контексты, как модули FreePBX.
- Freepbx — User management — Управление правами пользователей.
Applications
Документация по модулям приложений FreePBX
- Announcements — Объявление без интерактивных функций.
- Bulk Extensions — Импорт/Экспорт экстеншенов из CSV файла.
-
Extensions — Используется для создания экстеншенов.
Add Chan_SIP Extension FreePBX
- FreePBX Follow Me — Follow Me — Следуй за мной
- FreePBX 13 Conferences — Многоканальные телеконференции.
- FreePBX DISA — Прямой доступ в систему
- FreePBX IVR — Интерактивное голосовое меню.
- FreePBX Очереди — Queue — Очереди обработки вызовов.
- FreePBX Группы Вызова — Ring Groups — Группы приема вызовов
- Time Conditions — Условия обработки вызовов в зависимости от текущего времени.
- Time Groups — Временные периоды.
Connectivity
Документация по модулям входящих исходящих соединений FreePBX.
- FreePBX 13 входящая маршрутизация — Наведение входящих вызовов , DID.
- FreePBX 13/14 исходящая маршрутизация. — Маршрутизация исходящих вызовов по заданным линиям (транкам).
- Zap Channel DIDs — Назначение DID для конкретных DAHDI каналов.
- Trunks — Управляет DAHDI, SIP протокол, IAX каналами для выхода в общую телефонную сеть, или соединения АТС.
Settings Modules
Документация по модулям глобальных настроек каналов и приложений FreePBX
-
FreePBX Advanced Settings — Глобальные настройки
- — Параметры отображение настроек.
- — Настройки AMI.
- — Конфигурация DAHDI.
- — Настройки устройств.
- — План набора и операции.
- Asterisk SIP Settings — Настройки SIP
Уязвимости
Критическая уязвимость FreePBX.
Устаревшее
- General Settings — Основные системные установки.
- Day/Night Control — Дневной / Ночной режимы.
Troubleshooting
If the phone fails to connect to the server, it may show an error message indicating the specific TLS error. In the event that it does, the following table provides the definitions of the errors:
| Error Bitmask | Error | Error Definition |
|---|---|---|
| 0x0000 0001 | EISSUER_NOT_FOUND | Issuer cert not found |
| 0x0000 0002 | EUNTRUSTED | Cert untrusted |
| 0x0000 0004 | EVALIDITY_PERIOD | Cert expired or not yet valid |
| 0x0000 0008 | EINVALID_FORMAT | Some cert fields have invalid format |
| 0x0000 0010 | EINVALID_PURPOSE | Cert can’t be used for specified purpose |
| 0x0000 0020 | EISSUER_MISMATCH | Issuer info in cert does not match candidate issuer |
| 0x0000 0040 | ECRL_FAILURE | CRL cert could not be found or read |
| 0x0000 0080 | EREVOKED | Cert has been revoked |
| 0x0000 0100 | ECHAIN_TOO_LONG | Cert chain length too long |
| 0x4000 0000 | EIDENTITY_NOT_MATCH | Server identity mismatch |
| 0x8000 0000 | EUNKNOWN | Unknown verification error |
A typical error response might be something like 0x400000022, which would be EIDENTITY_NOT_MATCH, EISSUER_MISMATCH, EUNTRUSTED