База знаний
Содержание:
Настройка Asterisk
Дадим доступ для управления Asterisk’ом пользователю admin с паролем 1234
sudo nano /etc/asterisk/manager.conf
/etc/asterisk/manager.conf
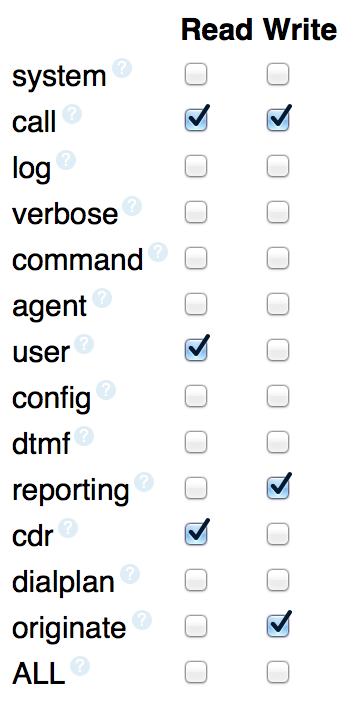
enabled = yes
port = 5038
;bindaddr = 127.0.0.1
webenabled = yes

; No access is allowed by default.
; To set a password, create a file in /etc/asterisk/manager.d
; use creative permission games to allow other serivces to create their own
; files
;include "manager.d/*.conf"


secret = 1234
read = system,call,log,verbose,command,agent,user,config
write = system,call,log,verbose,command,agent,user,config
Настройка встроенного веб сервера
sudo nano /etc/asterisk/http.conf
/etc/asterisk/http.conf
enabled=yes
;bindaddr=127.0.0.1
;bindport=8088
;prefix=asterisk
enablestatic=yes
; Включаем для удобства
redirect = / /static/config/cfgbasic.html

; sslenable=yes         ; enable ssl - default no.
; sslbindport=4433      ; port to use - default is 8089
; sslbindaddr=0.0.0.0   ; address to bind to - default is bindaddr.
; sslcert=/tmp/foo.pem  ; path to the certificate

;
;uploads = /var/lib/asterisk/uploads/
В Ubuntu 10.04 корневая директория веб сервера Asterisk’a располагается в /usr/share/asterisk/static-http/, а GUI устанавливается в /var/lib/asterisk/static-http, поэтому необходимо удалить пустую папку
sudo rmdir /usr/share/asterisk/static-http/
и создать ссылку
sudo ln -s /var/lib/asterisk/static-http/ /usr/share/asterisk/
Выполним проверку
cd ~/asterisk-gui/
sudo make checkconfig
Рестарт
sudo /etc/init.d/asterisk restart
Заходим в панель управления
http://<ip адрес>:8088/
При первом заходе GUI модифицирует конфигурации Asterisk
Настройка Asterisk Manager API
Во первых необходимо создать пользователя для управления asterisk.
Для этого достаточно внести соответствующую запись в /etc/asterisk/manager.conf, в примере ниже добавлен пользователь 1cami с паролем PASSWORD1cami.
Важно также в секцию general добавить опции указанные в примере.
- manager.conf
-
enabled = yes
port = 5038
bindaddr = 0.0.0.0
allowmultiplelogin = yes
webenabled = yes
httptimeout = 60


secret = PASSWORD1cami
deny=0.0.0.0/0.0.0.0
permit=0.0.0.0/0.0.0.0
read = call,cdr,user,config
write = call,originate,reporting

;;; Дополнительные опции для ASTERISK 11+ ;;; Начало ;;;;
eventfilter=!Event: Newexten
eventfilter=!Event: DeviceStateChange
eventfilter=!Event: NewConnectedLine
eventfilter=!Event: Newchannel
eventfilter=!Event: SoftHangupRequest
eventfilter=!Event: HangupRequest
eventfilter=!Event: BridgeDestroy
eventfilter=!Event: BridgeCreate
eventfilter=!Event: BridgeMerge
eventfilter=!Event: MusicOnHoldStop
eventfilter=!Event: MusicOnHoldStart
eventfilter=!Event: NewCallerid
eventfilter=!Event: LocalBridge
eventfilter=!Event: Unhold
eventfilter=!Event: Hold
eventfilter=!Event: AttendedTransfer
;;; Дополнительные опции для ASTERISK 11+ ;;; Конец ;;;;
Обратите внимание на строки фильтра:
eventfilter=!Event: Newexten
Они актуальны для Asterisk 13. Эта настройка крайне необходима!!!
Full Examples:
Phones:
| Configuration | Notes |
|---|---|
|
This example demonstrates the power of both wizards and templates. Once the template is created, adding a new phone could be as simple as creating a wizard objectwith nothing more than a username and password. You don’t even have to specify ‘type’ because it’sinherited from the template. Of course, you can override ANYTHING in the wizard object or specify everything and not use templates at all. |
Trunk to an ITSP requiring registration:
| Configuration | Notes |
|---|---|
|
This is an example of trunks to 2 different ITSPs each of which has a primary andbackup server. It also shows most of the endpoint and aor parameters being left at their defaults. In this scenario, each wizard object takes the place of an endpoint, aor, auth,identify and 2 registrations. |
Установка Asterisk 16 на Debian 10
Запускаем скрипт подготовки исходников asterisk к компиляции.
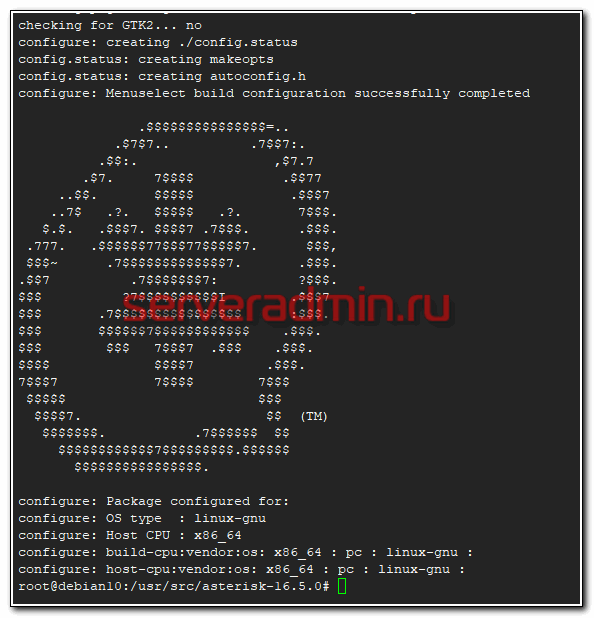
# ./configure
Успешное завершение подготовки будет ознаменовано следующим выводом в консоль.
На следующем этапе мы будем выбирать компоненты астериска для установки.
# make menuselect

К тому, что установлено по-умолчанию, я добавляю:
- На первой вкладке format_mp3.
- В Core Sound Packages указываю русские звуки RU-WAV.
- В Extras Sound Packages выбираю английский EN-WAV, русского, к сожалению, нет.
Продолжаю, после принятия настроек, нажатием на Save & Exit. Компилируем, добавляя ключ j4. В данном случае у меня 4 ядра на сервере, сборка будет происходить с участием всех ядер.
# make -j4
Успешное окончание сборки будет обозначено сообщением в консоли.

Теперь устанавливаем asterisk 16 и все его модули.
# make install
В процессе установки инсталлятор будет загружать некоторые файлы, к примеру wav файлы, из интернета. По окончании установки, увидите сообщение.

Формируем образцы файлов конфигурации, чтобы не писать их с нуля самим.
# make samples
В завершении установки, создаем init скрипт.
# make config
Можно еще обновить кэш используемых динамических библиотек.
# ldconfig
На этом непосредственно установка asterisk 16 закончена.
Use an abstraction layer
One of the beautiful things about ARI is that it’s so easy to just bang out a request. But what’s good for development isn’t necessarily what’s good for production.
Please don’t spread lots of direct HTTP calls throughout your application. There are cross-cutting concerns with accessing the API that you’ll want to deal with in a central location. Today, the only concern is authentication. But as the API evolves, other concerns (such as versioning) will also be important.
Note that the abstraction layer doesn’t (and shouldn’t) be complicated. Your client side API can even be something as simple wrapper around GET, POST and DELETE that addresses the cross-cutting concerns. The Asterisk TestSuite has a very simple abstraction library that can be used like this:
In other words: use one of the aforementioned libraries or write your own!
Настройка веб сервера asterisk’a
sudo nano /etc/asterisk/http.conf
содержимое
http.conf
;
; Asterisk Builtin mini-HTTP server
;
;

;
; Whether HTTP interface is enabled or not.  Default is no.
;
enabled=yes
;
; Whether Asterisk should serve static content from http-static
; Default is no.
;
enablestatic=yes
;
; Address to bind to.  Default is 0.0.0.0
;
;bindaddr=127.0.0.1
;
; Port to bind to (default is 8088)
;
bindport=8088
;
; Prefix allows you to specify a prefix for all requests
; to the server.  The default is "asterisk" so that all
; requests must begin with /asterisk
;
;prefix=asterisk

; The post_mappings section maps URLs to real paths on the filesystem.  If a
; POST is done from within an authenticated manager session to one of the
; configured POST mappings, then any files in the POST will be placed in the
; configured directory.
;
;
;
; In this example, if the prefix option is set to "asterisk", then using the
; POST URL: /asterisk/uploads will put files in /var/lib/asterisk/uploads/.
;uploads = /var/lib/asterisk/uploads/
;
В Ubuntu 8.10 корневая директория веб сервера Asterisk’a располагается в /usr/share/asterisk/static-http/, а GUI устанавливается в /var/lib/asterisk/static-http, поэтому необходимо удалить пустую папку
sudo rmdir /usr/share/asterisk/static-http/
и создать ссылку
sudo ln -s /var/lib/asterisk/static-http/ /usr/share/asterisk/
Выполним проверку
sudo make checkconfig
по прежнему находимся в директории ~/asterisk-gui/2.0
Рестарт asterisk
sudo /etc/init.d/asterisk restart
Заходим в панель управления
http://<you ip>:8088/asterisk/static/config/index.html
Адрес входа в панель может отличаться в разных дистрибутивах. !Внимательно смотрите в чем разница!
http://<you ip>:8088/asterisk/static/config/index.html
http.conf
; Prefix allows you to specify a prefix for all requests
; to the server.  The default is "asterisk" so that all
; requests must begin with /asterisk
;
;prefix=asterisk
http://<you ip>:8088/static/config/index.html
http.conf
; Prefix allows you to specify a prefix for all requests
; to the server.  The default is blank.  If uncommented
; all requests must begin with /asterisk
;
;prefix=asterisk
«asterisk -r» : вызов консоли CLI
CLI> reload : перезагрузка конфигов (без обрыва текущих соединений)
Можно перезагрузить и так
asterisk -rx reload
Asterisk/1.4.21.2~dfsg-1ubuntu3
Asterisk GUI-version : SVN-branch-2.0-r4589
:8088/asterisk/static/config/cfgbasic.html
Темы блога
Microsoft Windows
(59)
Microsoft
(58)
Asterisk
(52)
Linux
(51)
Operating system
(47)
Operating Systems
(36)
Windows XP
(34)
Protocols
(28)
Windows
(28)
Business
(19)
(18)
Programming
(18)
FAQs Help and Tutorials
(17)
Windows 7
(17)
Windows Vista
(15)
Администратору на заметку
(14)
Windows Server 2008
(13)
Domain Name System
(12)
IP address
(11)
Open source
(11)
Clients
(10)
Security
(10)
DNS
(9)
Internet Protocol
(9)
Server
(9)
Windows 2000
(9)
Active Directory
(8)
Hardware
(8)
IPhone
(8)
Shareware
(8)
Skype
(8)
Windows Server
(8)
Windows Server 2003
(8)
DNS Providers
(7)
Virtual private network
(7)
Apple
(6)
Domain name
(6)
Dynamic DNS
(6)
Internet Explorer
(6)
Internet Protocol Suite
(6)
Hard disk drive
(5)
RAID
(5)
Web Tools
(5)
Windows NT
(5)
Windows Server 2008 R2
(5)
Cisco Systems
(4)
Computers and Internet
(4)
Dynamic Host Configuration Protocol
(4)
Firewall
(4)
Personal computer
(4)
Search Engines
(4)
Storage
(4)
Symantec
(4)
Yahoo
(4)
DVD
(3)
Local area network
(3)
NTFS
(3)
Opera
(3)
Remote Desktop
(3)
Remote Desktop Protocol
(3)
Router
(3)
Terminal Services
(3)
Wi-Fi
(3)
Window 7
(3)
YouTube
(3)
Сервер терминалов
(3)
Синий экран смерти
(3)
восстановление данных
(3)
BIOS
(2)
Blue Screen of Death
(2)
CD-ROM
(2)
Cisco
(2)
Data recovery
(2)
Disk Management
(2)
General Packet Radio Service
(2)
Internet
(2)
Mac OS
(2)
NTLDR
(2)
RSS
(2)
Remote Access
(2)
Service pack
(2)
Sony Ericsson
(2)
Terminal server
(2)
Transmission Protocols
(2)
Unix
(2)
Window XP
(2)
Windows Mobile
(2)
ntdetect.com
(2)
Почта
(2)
Серверное оборудование
(2)
Cisco IOS
(1)
Conficker
(1)
DirectX
(1)
IPSec
(1)
Java
(1)
Motherboard
(1)
Net-Worm
(1)
Printer
(1)
Telnet
(1)
VentaFax
(1)
Windows 98/ME/NT
(1)
Windows 9x
(1)
Windows Me
(1)
Windows Mobile 6
(1)
Windows XP Professional
(1)
Windows XP editions
(1)
Winsock
(1)
Wireless
(1)
dlink
(1)
ВОССТАНОВЛЕНИЕ ФАЙЛОВ
(1)
Горячие клавиши
(1)
Защита от вирусов
(1)
Интернет
(1)
ОГО
(1)
Сборками Windows
(1)
Серверные шкафы
(1)
Сетевые черви
(1)
Тонкий клиент
(1)
прокси proxy
(1)
Configuration files needed
You should have already run «make samples» if you installed from source, otherwise you may have the sample config files if you installed from packages.
If you have no configuration files in /etc/asterisk/ then grab the sample config files from the source directory by navigating to it and running «make samples».
Files needed for this example:
- asterisk.conf
- modules.conf
- extensions.conf
- sip.conf or pjsip.conf
You can use the defaults for asterisk.conf and modules.conf, we’ll only need to modify extensions.conf and sip.conf or pjsip.conf.
To get started, go ahead and move to the /etc/asterisk/ directory where the files are located.
Make the call
Go back to the main Zoiper interface, and make sure the account is registered. Select the account from the drop down list and click the Register button next to it. If it says registered, you are good to go. If it doesn’t register, then double check your configuration.
Once registered, enter extension 100 and click the Dial button. The call should be made and you should hear the sound file hello-world!
On the Asterisk CLI, you should see something like:
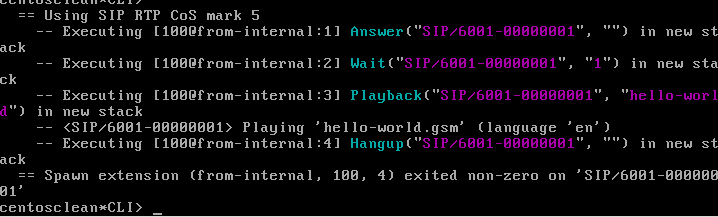
Now that you have made a very simple call, you may want to start reading through the other sections on the wiki to learn more about Operation, Fundamentals and Configuration.