Freepbx 13/14 исходящая маршрутизация
Содержание:
- Command line
- Resolving OS configuration file changes
- Specific update notes
- Upgrade Scripts
- Regenerate phone configuration files using Endpoint Manager and test phone registration by rebooting all phones
- Migration validation, part 2 (phone TFTP configurations and registration)
- Registration Settings
- Список файлов
- Устанавливаем DAHDI, LibPRI
- Advanced General Settings
- Resolve updated configuration files
- Upgrade using commercial System Administration module
- Asterisk-gui — «прикручиваем» web-интерфейс к Asterisk
- Подготовка WEB сервера
- Что такое Freepbx
- Verification of desired version
- Quiesce the current system to be upgraded
- Back up the current (old) system to be upgraded
- Old server hardware migration
- Restore the FreePBX backup on the new system
- Specific Update Notes
- The Easy Way (use a Distro)
Command line
/usr/sbin/sysadmin_update_system
Resolving OS configuration file changes
Some upgrade scripts will result in .rpm package updates that need configuration files to be manually cleaned up afterwards. The general procedure is described in the page Cleaning up files from a RPM update.
Specific update notes
-
upgrade-6.13.66-14.sh
-
Delete the default package fail2ban configuration file. FreePBX Distro generates a customized version of this file
rm /etc/fail2ban/jail.local.rpmnew
-
MySQL activity logging to /var/log/mysql/mysql.log is disabled in this release. This MySQL log file can be quite large, depending on server usage loads. Delete this file after the update to reclaim this disk space.
rm /var/log/mysql/mysql.log
-
- upgrade-6.13.66-17.sh
CentOS is a Trademark of Red Hat and we do not claim to have any relationship with either Red Hat or CentOS
Asterisk and AsteriskNOW are registered trademarks of Digium Inc.
Upgrade Scripts
-
FreePBX Distro 10.13.66-1
(No upgrade script as this is the initial release version of this track.)
-
FreePBX Distro 10.13.66-2
https://upgrades.freepbxdistro.org/stable/10.13.66/upgrade-10.13.66-2.sh
-
FreePBX Distro 10.13.66-3
https://upgrades.freepbxdistro.org/stable/10.13.66/upgrade-10.13.66-3.sh
-
FreePBX Distro 10.13.66-4
https://upgrades.freepbxdistro.org/stable/10.13.66/upgrade-10.13.66-4.sh
-
FreePBX Distro 10.13.66-5
https://upgrades.freepbxdistro.org/stable/10.13.66/upgrade-10.13.66-5.sh
-
FreePBX Distro 10.13.66-6
https://upgrades.freepbxdistro.org/stable/10.13.66/upgrade-10.13.66-6.sh
-
FreePBX Distro 10.13.66-7
https://upgrades.freepbxdistro.org/stable/10.13.66/upgrade-10.13.66-7.sh
-
FreePBX Distro 10.13.66-8
https://upgrades.freepbxdistro.org/stable/10.13.66/upgrade-10.13.66-8.sh
-
FreePBX Distro 10.13.66-9
https://upgrades.freepbxdistro.org/stable/10.13.66/upgrade-10.13.66-9.sh
-
FreePBX Distro 10.13.66-10
https://upgrades.freepbxdistro.org/stable/10.13.66/upgrade-10.13.66-10.sh
-
FreePBX Distro 10.13.66-11
https://upgrades.freepbxdistro.org/stable/10.13.66/upgrade-10.13.66-11.sh
-
FreePBX Distro 10.13.66-12
https://upgrades.freepbxdistro.org/stable/10.13.66/upgrade-10.13.66-12.sh
-
FreePBX Distro 10.13.66-13
https://upgrades.freepbxdistro.org/stable/10.13.66/upgrade-10.13.66-13.sh
-
FreePBX Distro 10.13.66-14
https://upgrades.freepbxdistro.org/stable/10.13.66/upgrade-10.13.66-14.sh
-
FreePBX Distro 10.13.66-15
https://upgrades.freepbxdistro.org/stable/10.13.66/upgrade-10.13.66-15.sh
-
FreePBX Distro 10.13.66-16
https://upgrades.freepbxdistro.org/stable/10.13.66/upgrade-10.13.66-16.sh
-
FreePBX Distro 10.13.66-17
https://upgrades.freepbxdistro.org/stable/10.13.66/upgrade-10.13.66-17.sh
Regenerate phone configuration files using Endpoint Manager and test phone registration by rebooting all phones
- Connectivity > OSS Endpoint Device List
- Global Phone Options > «Rebuild Configs for All Phones» > enable the «Reboot Phones» option under this button
- click the «Rebuild Configs for All Phones» button
- All phones should reboot at this point
Migration validation, part 2 (phone TFTP configurations and registration)
- Ensure phones reboot OK and come up normally with a successful registration to the new PBX and with the correct time
- Check phone registrations in Connectivity > OSS Endpoint Device List as above to ensure all phones are listed with green connection icons after they reboot
- Reset a test phone to its factory configuration and ensure it is configured correctly on a reboot using TFTP settings from the new server
Registration Settings
Registrations
registertimeout. Повторяет попытки регистрации каждые N секунд, указанные в registertimeout до успешной регистрации, или при достижении указанного ограничения в registrationattempts.
registrationattempts. Количество попыток регистрации. Значение 0 соответствует бесконечному числу попыток. Обычное значение указывается 0 для того, чтобы Астериск продолжал попытки зарегистрироваться при пропадании локальной сети или маршрута в публичных сетях.
- 20 (registertimeout)
- 0 (registerattempts)
Registration Times
minexpiry. Минимальное значение действия регистрации/подписки.
maxepiry. Максимально возможное время действия для входящих регистраций.
defaultexpiry. Дефолтное значение действия входящих и исходящих регистраций.
- 60 (minexpiry)
- 3600 (maxexpiry)
- 120 (defaultexpiry)
Список файлов
| asterisk.conf |
| ccss_general_additional.conf |
| ccss_general_custom.conf |
| cdr_adaptive_odbc.conf |
| cdr.conf |
| cdr_mysql.conf |
| cdr_mysql.conf.bak |
| cel.conf → /var/www/html/admin/modules/cdr/etc/cel.conf |
| cel_custom_post.conf |
| cel_general_additional.conf |
| cel_general_custom.conf |
| cel_odbc.conf → /var/www/html/admin/modules/cdr/etc/cel_odbc.conf |
| cel_odbc_custom.conf |
| chan_dahdi_additional.conf |
| chan_dahdi.conf.template |
| confbridge_additional.conf |
| confbridge.conf → /var/www/html/admin/modules/conferences/etc/confbridge.conf |
| confbridge_custom.conf |
| enum.conf |
| xtconfig.conf |
| extensions_additional.conf |
| extensions.conf → /var/www/html/admin/modules/core/etc/extensions.conf |
| extensions_custom.conf |
| extensions_custom.conf.sample |
| extensions_override_freepbx.conf |
| features_applicationmap_additional.conf |
| features_applicationmap_custom.conf |
| features.conf → /var/www/html/admin/modules/core/etc/features.conf |
| features_featuremap_additional.conf |
| features_featuremap_custom.conf |
| features_general_additional.conf |
| features_general_custom.conf |
| freepbx_featurecodes.conf.template |
| freepbx_menu.conf.template |
| freepbx_module_admin.conf |
| globals_custom.conf |
| http_additional.conf |
| http.conf → /var/www/html/admin/modules/core/etc/http.conf |
| http_custom.conf |
| iax_additional.conf |
| iax.conf → /var/www/html/admin/modules/core/etc/iax.conf |
| iax_custom.conf |
| iax_custom_post.conf |
| iax_general_additional.conf |
| iax_general_custom.conf |
| iax_registrations.conf |
| iax_registrations_custom.conf |
| indications.conf |
| localprefixes.conf |
| logger.conf → /var/www/html/admin/modules/logfiles/etc/logger.conf |
| logger_general_additional.conf |
| logger_general_custom.conf |
| logger_logfiles_additional.conf |
| logger_logfiles_custom.conf |
| manager_additional.conf |
| manager.conf |
| manager.conf.bak |
| manager_custom.conf |
| meetme_additional.conf |
| meetme.conf |
| modem.conf |
| modules.conf |
| modules.conf.2.8.0-1.bak |
| musiconhold_additional.conf |
| musiconhold.conf |
| musiconhold_custom.conf |
| phone.conf |
| phpagi.conf |
| privacy.conf |
| queues_additional.conf |
| queues.conf |
| queues_custom.conf |
| queues_custom_general.conf |
| queues_general_additional.conf |
| queues_post_custom.conf |
| res_digium_phone_additional.conf |
| res_digium_phone_applications.conf |
| res_digium_phone.conf → /var/www/html/admin/modules/digium_phones/etc/res_digium_phone.conf |
| res_digium_phone_devices.conf |
| res_digium_phone_firmware.conf |
| res_digium_phone_general.conf |
| res_odbc_additional.conf |
| res_odbc.conf → /var/www/html/admin/modules/core/etc/res_odbc.conf |
| res_odbc_custom.conf |
| rtp_additional.conf |
| rtp.conf → /var/www/html/admin/modules/core/etc/rtp.conf |
| rtp_custom.conf |
| sip_additional.conf |
| sip.conf → /var/www/html/admin/modules/core/etc/sip.conf |
| sip_custom.conf |
| sip_custom_post.conf |
| sip_general_additional.conf |
| sip_general_custom.conf |
| sip_nat.conf |
| sip_notify_additional.conf |
| sip_notify.conf → /var/www/html/admin/modules/core/etc/sip_notify.conf |
| sip_notify_custom.conf |
| sip_registrations.conf |
| sip_registrations_custom.conf |
| udptl.conf → /var/www/html/admin/modules/core/etc/udptl.conf |
| udptl_custom.conf |
| version |
| vm_email.inc |
| vm_general.inc |
| voicemail.conf |
| voicemail.conf.template |
| zapata.conf.template |
Устанавливаем DAHDI, LibPRI
Для удобства дальнейшей инсталляции скачиваем все необходимые исходники (dahdi, libpri, asterisk, freepbx) и распаковываем их:
|
1 |
cd /opt/ wget http://downloads.asterisk.org/pub/telephony/dahdi-linux-complete/dahdi-linux-complete-current.tar.gz wget http://downloads.asterisk.org/pub/telephony/libpri/libpri-current.tar.gz wget http://downloads.asterisk.org/pub/telephony/asterisk/asterisk-16-current.tar.gz wget http://mirror.freepbx.org/modules/packages/freepbx/freepbx-14.0-latest.tgz tar -zxvf dahdi-linux-complete-current.tar.gz tar -zxvf libpri-current.tar.gz tar -zxvf asterisk-16-current.tar.gz tar -zxvf freepbx-14.0-latest.tgz |
Собираем по очереди (dahdi, libpri) из исходников и устанавливаем:
|
1 |
cd dahdi-linux-complete-3.* make all make install make config cd .. |
|
1 |
cd libpri-1.* make make install cd .. |
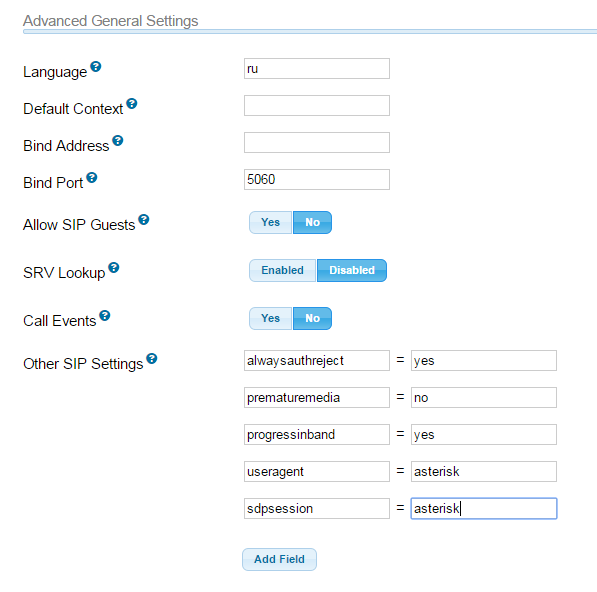
Advanced General Settings
Bind Address
IP адрес на котором ‘слушаются’ входящие вызовы. Если указано 0.0.0.0, то будут «прослушиваться» все доступные IP адреса. Рекомендуется оставить это поле ПУСТЫМ.
Bind Port
Входящий порт на котором Asterisk будет слушать SIP сообщения. Стандартный порт 5060. Например, если вы назначите порт 5666, входящие SIP сообщения на другие порты будут просто игнорироваться. Рекомендуется отставить это поле пустым.
Allow SIP Guests
Разрешить неавторизованные SIP вызовы. Звучит опасно, но на самом деле позволяет вызывать абонента Asterisk незарегистрированному абоненту по SIP URI: user@asterisk_domain.
Yes/No
Allow Anonymous Inbound SIP Calls
В данном случае рассматриваются анонимные SIP запросы, не имеющие определенного адресата. Если включить они попадут в контекст from-sip-exteral (если не задано другое в )
Yes/No
Генерировать события AMI на основании действий UA во время вызова (например HOLD).
Yes/No
Other SIP Settings
Добавьте кастомные установки, которые вам требуются.
Например:
alwaysauthreject = yes всегда отвечать на SIP запрос — SIP «401 Unauthorized»
- prematuremedia = no
- progressinband = yes
транслировать КПВ или сообщение из канала (например, по умолчанию, при вызове на занятый или отключенный мобильный телефон, Астериск сообщит что все канала заняты, что вводит пользователей в замешательство. Включенная установка progressinband позволит транслировать в канал сообщение о занятости или недоступности абонента от провайдера.
В данном модуле настраивается транспортный уровень драйвера pjsip.

2016/11/26
2016/11/26
Resolve updated configuration files
As packages are upgraded, new configuration files (with a .rpmnew extension) may be installed. These should be manually merged with the current configuration files as appropriate.
First, find and display the locations of new configuration files using the following search:
find / -name "*.rpmnew"
Example output (note the specific files listed will depend on which configuration files were updated):
/etc/rsyslog.conf.rpmnew
It is a good idea to compare the current version of the configuration file with the new version installed by the updated package and merge back changes into the current version of the configuration file . However, the current versions will contain customizations specific to FreePBX DIstro which should be preserved. If uncertain, leave the original configuration lines as is.
The imediff2 program is helpful in merging old and new config files together. The following commands download this program and place it in /usr/local/bin.
cd /tmp
wget http://alioth.debian.org/frs/download.php/2110/imediff2_1.1.2.tar.gz
tar xvfz imediff2_1.1.2.tar.gz
cp -a imediff2/imediff2 /usr/local/bin/
The following command will use imediff2 compare the existing configuration file /etc/rsyslog.conf with the new file /etc/rsyslog.conf.rpmnew and merge any desired changes back into the current version /etc/rsyslog.
Use the arrow keys to move between changed blocks and use the «a» and «b» keys to select which version to keep. The «a» version is the current (old) version of the file and the «b» version is the new version of the file. Comments are always save to update to new versions. Other changes are very package-specific and need to be evaluated on a case-by-case basis. As mentioned, keep the original «a» file contents if uncertain which version to keep. Press the «s» key to save the merged file over top of the original configuration file, or press «q» to quit without saving changes.
imediff2 -c --output=/etc/rsyslog.conf /etc/rsyslog.conf /etc/rsyslog.conf.rpmnew
After merging in the new file changes (if any), delete the .rpmnew version of the file to clean up.
rm --force /etc/rsyslog.conf.rpmnew
Any changed configuration files will not take effect until the related program is restarted.
A system reboot at this point is a good idea to ensure that all systems changes take effect and to test that a reboot brings up Asterisk as expected.
Upgrade using commercial System Administration module
If you have sysadmin module installed and have licensed your PBX with our License Server you can run the following script to auto update your system to the latest version.
/usr/sbin/sysadmin_update_system
Asterisk-gui — «прикручиваем» web-интерфейс к Asterisk
Опубликовано muff в Ср, 2010-09-01 19:09
Помогая знакомому разгребать «авгиевы конюшни», которые остались после предыдущего админа, перенастроил по ходу дел Asterisk. Однако, в связи с тем, что знакомый с FreeBSD только начинает дружить, решил «прикрутить» к Астариску веб-интерфейс. Итак, идем в порты и выполням установку:
| # cd /usr/ports/www/asterisk-gui/ && make install clean && rehash |
Установилось все довольно шустро. «Порадовали» также разработчики порта, которые не поленились вставить логотип Астериска в режиме ASCII-графики, который пробегает по экрану во время установки:
               .$$$$$$$$$$$$$$$=..
            .$7$7..          .7$$7:.
          .$$:.                 ,$7.7
        .$7.     7$$$$           .$$77
     ..$$.       $$$$$            .$$$7
    ..7$   .?.   $$$$$   .?.       7$$$.
   $.$.   .$$$7. $$$$7 .7$$$.      .$$$.
 .777.   .$$$$$$77$$$77$$$$$7.      $$$,
 $$$~      .7$$$$$$$$$$$$$7.       .$$$.
.$$7          .7$$$$$$$7:          ?$$$.
$$$          ?7$$$$$$$$$$I        .$$$7
$$$       .7$$$$$$$$$$$$$$$$      :$$$.
$$$       $$$$$$7$$$$$$$$$$$$    .$$$.
$$$        $$$   7$$$7  .$$$    .$$$.
$$$$             $$$$7         .$$$.
7$$$7            7$$$$        7$$$
 $$$$$                        $$$
  $$$$7.                       $$  (TM)
   $$$$$$$.           .7$$$$$$  $$
     $$$$$$$$$$$$7$$$$$$$$$.$$$$$$
       $$$$$$$$$$$$$$$$.
|
Приступаем к настройке. Первым делом включаем поддержку web-админки:
|
# cat /usr/local/etc/asterisk/http.conf enabled=yes |
Для того, чтобы изменения вступили в силу, перезапустим Asterisk:
|
# asterisk -r server*CLI> reload |
Задаем логин и пароль для Web-админки, добавив этот блок в конец файла /usr/local/etc/asterisk/manager.conf:
|
# cat /usr/local/etc/asterisk/manager.conf
displaysystemname = yes secret = admin_passwd_here |
Перезапускаем Астериск:
|
# asterisk -r server*CLI> reload |
Этап подготовки завершен. Пробуем подключиться к веб-интерфейсу. Ссылка будет следующая:
В результате в браузере можем насладиться окном авторизации:
После авторизации скрипт «познакомится» с конфигурацией и оборудованием, что занимает довольно много времени. В результате получаем следующий интерфейс управления:
В завершение статьи описание некоторых конфигурационных файлов:
Подготовка WEB сервера
Изменение конфигурации apache2, для корректной работы с русским языком, а так-же меняем пользователя www-data от имени которого стартует apache2 на пользователя asterisk
locale-gen ru_RU
perl -pi -e 's/#AddDefaultCharset UTF-8/AddDefaultCharset UTF-8/g' /etc/apache2/conf.d/charset
perl -pi -e 's/export APACHE_RUN_USER=www-data/export APACHE_RUN_USER=asterisk/g' /etc/apache2/envvars
perl -pi -e 's/export APACHE_RUN_GROUP=www-data/export APACHE_RUN_GROUP=asterisk/g' /etc/apache2/envvars
echo "ServerName localhost" >> /etc/apache2/conf.d/vhosts.conf
rm /var/lock/apache2/ -r
/etc/init.d/apache2 restart
Что такое Freepbx
FreePBX — это удобный GUI (графический интерфейс пользователя), который управляет Asterisk — самым популярным общедоступным программным обеспечением в области компьютерной телефонии. FreePBX является продуктом Open Source, он разработан тысячами добровольцев по всему миру.
На сегодня FreePBX загружен более чем 5 000 000 раз и обслуживает более чем 500 000 активных телефонных систем. Если Вы никогда не слышали про FreePBX, то, вероятно, будете удивлены ее возможностями для Вашего бизнеса.
FreePBX — это основанный на web интерфейс, который позволяет управлять самым популярным на сегодняшний день сервером ip телефонии asterisk. FreePBX выпускается под лицензией GNU и может свободно использоваться конечными пользователями без какого-либо ограничения. Данный продукт является компонентом FreePBX Distro и некоторых других дистрибутивов.
Первый релиз системы 0.2 (28 ноября 2004 года) был назван AMP (Asterisk Management Portal). Но имя пришлось изменить, так как Asterisk является зарегистрированной торговой маркой Digium corporation.
С тех пор вышло множество обновлений, поддерживающие новые версии Astersik, добавлены новые меню и поддержка голосовой почты, очереди звонков, факсов, различных языков, устройств DAHDI и папок пользователей.
Поддерживаемое оборудование включает в себя устройства компаний Aastra Technologies, Algo, AND, AudioCodes, Cisco Systems, Cyberdata, Digium, Grandstream, Mitel, Panasonic, Polycom, Sangoma, Snom, Xorcom, and Yealink.
Verification of desired version
cat /etc/asterisk/freepbxdistro-version
1.818.210.58-1
Quiesce the current system to be upgraded
- Ensure the current system is in a maintenance window – the current server will be unavailable for normal use from this point on
- Disable SIP and IAX trunks on the current system using Connectivity > Trunks > Disable Trunk to ensure the current FreePBX install does not try to connect to trunk providers after this point
- Ensure that no files on the system can change after this point, such as new voicemail messages being left. The recommended option is to change the IP address of the old system to a new value to ensure it is not reachable at its old address but still available on the network.
Back up the current (old) system to be upgraded
For example:
- Create a new backup job called «freepbxmigrationbackup»
- The items in the «Full Backup», «System Audio» and «Voice Mail» backup templates should all be included in this backup
- Backup to the storage location «Local Storage (local)»
- Do not define any schedule for the backup
- Save the backup job
- Select the new backup job «freepbxmigrationbackup» on the right and click the «and Run» button to run the backup immediately
Copy the newly created backup file /var/spool/asterisk/backup/freepbxmigrationbackup/(file).tgz on the old FreePBX system to an accessible network storage location, a USB stick, etc.
Old server hardware migration
The old server may have internal VoIP hardware that needs to be moved to the new server and configured there. This process is not covered in this wiki page.
Restore the FreePBX backup on the new system
On the new FreePBX system, restore the backup file.
Log into the FreePBX web console on the new system.
- Admin > Backup & Restore
- Restore
- Browse… > select the freepbxmigrationbackup .tgz backup file created above
- Go!
- Select files and databases to restore:
- /etc and all subdirectories/files: Enabled
- /var and all subdirectories/files: Enabled
- PBX Settings: Enabled
- CDR’s: Enabled
- Restore
- (Files and settings will be restored)
- Observe the restore log for any error messages
- Close the restore window when the restore is complete. The last line of the restore log should be «Done!»
- Select files and databases to restore:
- Restore
Specific Update Notes
-
upgrade-6.12.65-14.sh
-
Delete the default package fail2ban configuration file. FreePBX Distro generates a customized version of this file.
rm /etc/fail2ban/jail.local.rpmnew
-
MySQL activity logging to /var/log/mysql/mysql.log is disabled in this release. This MySQL log file can be quite large, depending on server usage loads. Delete this file after the update to reclaim this disk space.
rm /var/log/mysql/mysql.log
-
- upgrade-6.12.65-17.sh
-
upgrade-10.13.66-1.sh
The upgrade to 10.13.66 requires the ability for the MySQL root user to login to the database without a password. This is the default case. This can be tested by running «mysql» as the OS root user and see if the login happens without any password prompt. If you have set a password for the MySQL root user, create a /root/.my.cnf to supply the password so MySQL can be accessed without a password prompt. Ensure this file is only readable by the root user as it will have the password in plain text. Do this before running the upgrade script.
user=root
password=mysecret# set the file to be read/write for root only
chmod 600 /root/.my.cnf -
- Consider switching to Asterisk ver. 13 with asterisk-version-switch. Asterisk ver. 13 is the recommended version to use, and some features (such as presence state) are not supported on Asterisk 11.
- After completing the upgrade to 10.13.66-1, continue with applying subsequent updates to the 10.13.66 track at FreePBX-Distro-10.13.66 to get fully current
- Disable and then uninstall and remove obsolete modules such as «FreePBX ARI Framework» (the old user web GUI) and «FreePBX FOP Framework» (the old Flash Operator Panel). Uninstalling the «FreePBX ARI Framework» is needed as the uninstall creates a Web forward from the HTTP …/recordings URL to send users to the new …/ucp (User Control Panel) URL.
- Log into the new FreePBX 13 web GUI and address any warnings or notifications in the web GUI
CentOS is a Trademark of Red Hat and we do not claim to have any relationship with either Red Hat or CentOS
Asterisk and AsteriskNOW are registered trademarks of Digium Inc.
The Easy Way (use a Distro)
There are a number of distributions («Distros») available that will automatically install include FreePBX, Linux, and all the other components you need. When you use a distribution, you avoid having to learn how to install, compile, and configure each of these required components. A good distribution comes with everything you need to get started.
For information on the release versions and how to upgrade the FreePBX Distro read Upgrading the FreePBX Distro.
Be sure not to confuse «FreePBX» (which is a program) with the FreePBX Distro (which is a distribution that includes FreePBX and all the other stuff you need).