Как пользоваться wireshark для анализа трафика
Содержание:
- Gotchas
- Основные возможности Wireshark
- Установка и настройка
- Beginner?
- Использование фильтров Wireshark
- Other Alternatives
- Список пакетов
- Projects
- Bit field operations
- 3 Как включить интерфейсы Wireshark, если они недоступны
- Logical expressions
- FILTER FIELD REFERENCE
- NOTES
- Что такое Wireshark
- Development
- Статистика
- Preference Settings
- Пакетные байты
- Правила цвета
Gotchas
Some filter fields match against multiple protocol fields. For example, «ip.addr» matches against both the IP source and destination addresses in the IP header. The same is true for «tcp.port», «udp.port», «eth.addr», and others. It’s important to note that
ip.addr == 10.43.54.65
is equivalent to ip.src == 10.43.54.65 or ip.dst == 10.43.54.65
This can be counterintuitive in some cases. Suppose we want to filter out any traffic to or from 10.43.54.65. We might try the following:
ip.addr != 10.43.54.65
which is equivalent to ip.src != 10.43.54.65 or ip.dst != 10.43.54.65
This translates to «pass all traffic except for traffic with a source IPv4 address of 10.43.54.65 and a destination IPv4 address of 10.43.54.65», which isn’t what we wanted.
Instead we need to negate the expression, like so:
! ( ip.addr == 10.43.54.65 )
which is equivalent to ! (ip.src == 10.43.54.65 or ip.dst == 10.43.54.65)
This translates to «pass any traffic except with a source IPv4 address of 10.43.54.65 or a destination IPv4 address of 10.43.54.65», which is what we wanted.
This can also happen if, for example, you have tunneled protocols, so that you might have two separate IPv4 or IPv6 layers and two separate IPv4 or IPv6 headers, or if you have multiple instances of a field for other reasons, such as multiple IPv6 «next header» fields.
If you have a filter expression of the form name op value, where name is the name of a field, op is a comparison operator such as == or != or < or…, and value is a value against which you’re comparing, it should be thought of as meaning «match a packet if there is at least one instance of the field named name whose value is (equal to, not equal to, less than, …) value». The negation of that is «match a packet if there are no instances of the field named name whose value is (equal to, not equal to, less than, …) value»; simply negating op, e.g. replacing == with != or < with >=, give you another «if there is at least one» check, which is not the negation of the original check.
Основные возможности Wireshark
Перед тем, как переходить к рассмотрению способов анализа трафика, нужно рассмотреть, какие возможности поддерживает программа более подробно, с какими протоколами она может работать и что делать. Вот основные возможности программы:
- Захват пакетов в реальном времени из проводного или любого другого типа сетевых интерфейсов, а также чтение из файла;
- Поддерживаются такие интерфейсы захвата: Ethernet, IEEE 802.11, PPP и локальные виртуальные интерфейсы;
- Пакеты можно отсеивать по множеству параметров с помощью фильтров;
- Все известные протоколы подсвечиваются в списке разными цветами, например TCP, HTTP, FTP, DNS, ICMP и так далее;
- Поддержка захвата трафика VoIP-звонков;
- Поддерживается расшифровка HTTPS-трафика при наличии сертификата;
- Расшифровка WEP-, WPA-трафика беспроводных сетей при наличии ключа и handshake;
- Отображение статистики нагрузки на сеть;
- Просмотр содержимого пакетов для всех сетевых уровней;
- Отображение времени отправки и получения пакетов.
Программа имеет множество других функций, но это были те основные, которые могут вас заинтересовать.
Установка и настройка
Скачать Wireshark можно с официального сайта разработчика. Программа совершенно бесплатна
Стоит обратить внимание на то, что последняя версия (2.0.5) не работает с Wi-Fi адаптерами. Поэтому, если вам нужно анализировать трафик беспроводного соединения, следует скачать более старую версию
Установка утилиты стандартна и не вызовет никаких проблем даже у новичков. В инсталляторе все понятно, хоть он и на английском. Кстати, Wireshark на русском языке в природе не существует, поэтому для того, чтобы успешно справляться с этим софтом придется напрячь память и вспомнить английский. В принципе, для простого захвата и просмотра TCP пакетов ничего сверхъестественного не понадобится. Хватит и школьного уровня английского.
Итак, первое, что мы видим после запуска установленной программы – главное окно. Для неподготовленного пользователя оно может показаться непонятным и страшным.

Ничего страшного в нем нет. В этом вы сейчас убедитесь. Для начала работы нужно сначала выбрать источник, из которого будет производиться захват TCP пакетов. Перехват может осуществляться как с Ethernet подключения, так и с WLAN адаптера. В качестве примера рассмотрим вариант с WLAN. Для настройки нужно зайти в пункт «Capture», подпункт «Options». В открывшемся окне следует выбрать ваш беспроводной адаптер и отметить его галочкой. Для начала захвата трафика достаточно нажать кнопку «Start».

После нажатия «Start» начнется анализ и захват пакетов. В окне появится много непонятных букв и цифр. Некоторые из пакетов имеют собственную цветовую маркировку. Для того, чтобы хоть что-то понять, нужно определить какой цвет к чему относится. Зеленый – TCP трафик, темно-синий – DNS, светло-синий – UDP и черный – пакеты TCP с ошибками. Теперь разобраться в этой горе данных проще.

Для остановки процесса перехвата достаточно нажать кнопку «Stop», которая помечена красным прямоугольником. Теперь можно выбрать интересующий вас пакет и просмотреть его. Для этого нужно щелкнуть по пакету правой клавишей мыши и в появившемся меню выбрать пункт «Show packet in new window». Тут же появится куча непонятных букв и цифр.
Но при углубленном изучении представленной информации можно понять, откуда и куда шел пакет и из чего он состоял. Для того чтобы просмотреть данные о TCP пакетах позднее, нужно использовать функцию сохранения захваченной информации. Она находится в пункте меню «File», подпункт «Save as». Потом можно будет загрузить информацию из файла и спокойно просмотреть ее.

Beginner?
If you are new to Wireshark development, please set up your build environment first:
-
get the source code from the Wireshark development webpage
-
Win32: the Developer’s Guide is currently invaluable for setting up a Win32 development environment
-
Unix-like: you may find information in the README.xxx file suitable for your target platform — in the root directory of the Wireshark sources
-
Required Libraries and Packages: for essential and optional external dependencies on Unix and Windows, see the Library reference in the Wireshark Developer’s Guide
Now it’s time to tweak the code:
-
doc/README.developer the best manual about Wireshark dissector development so far, you will also find that one in the documentation directory of the Wireshark sources — please read and thoroughly understand all of the «Portability» and «Robustness» sections before writing any Wireshark code!
-
… of course you should have a look at the Wireshark sources itself!
Использование фильтров Wireshark
Одним из наиболее важных наборов функций в Wireshark является возможность фильтрации, особенно когда вы имеете дело с файлами, имеющими значительный размер. Фильтры захвата можно установить перед фактом, указав Wireshark только запись тех пакетов, которые соответствуют вашим указанным критериям.
Фильтры также могут быть применены к уже созданному файлу захвата, чтобы были показаны только определенные пакеты. Они называются фильтрами отображения.
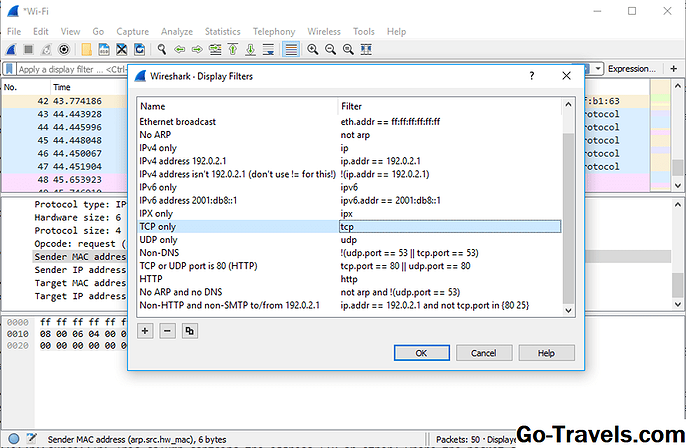
По умолчанию Wireshark предоставляет большое количество предопределенных фильтров, позволяя сузить количество видимых пакетов всего несколькими нажатиями клавиш или щелчками мыши. Чтобы использовать один из этих существующих фильтров, поместите свое имя в Применить фильтр отображения поле ввода, расположенное непосредственно под панелью инструментов Wireshark или в Введите фильтр захвата поле ввода, расположенное в центре экрана приветствия.
Существует несколько способов достижения этого. Если вы уже знаете имя своего фильтра, введите его в соответствующее поле. Например, если вы хотите отображать только TCP-пакеты, вы вводите ТСР, Функция автозаполнения Wireshark показывает предлагаемые имена при вводе текста, что упрощает поиск правильного прозвища для фильтра, который вы ищете.
Другой способ выбрать фильтр — щелкнуть значок закладки, расположенный в левой части поля ввода. Это представляет собой меню, содержащее некоторые из наиболее часто используемых фильтров, а также возможность Управление фильтрами захвата или же Управление отображаемыми фильтрами, Если вы решите управлять любым типом, появится интерфейс, позволяющий добавлять, удалять или редактировать фильтры.
Вы также можете получить доступ к ранее использованным фильтрам, выбрав стрелку вниз в правой части поля ввода, чтобы отобразить раскрывающийся список истории.
После установки фильтры захвата применяются, как только вы начинаете запись сетевого трафика. Чтобы применить фильтр отображения, нажмите кнопку со стрелкой в правой части поля ввода.
Other Alternatives
Add a route to your local machine going through the network gateway:
route add <your_IP> mask 255.255.255.255 <the_gateway> metric 1
with <your_IP> being different from 127.0.0.1. It should (has to) be the result of ipconfig command (ip address field) <the_gateway> has to be the default gateway field taken from ipconfig /all result.
Doing so, every network traffic from your machine to itself will use the physical network interface, it will then go to the gateway, back to you. Therefor, you will see each packet twice, but it can be filtered on the view.
Be careful, since your machine will use the actual network to talk to itself, it may overload the network. It may be wise to remove the new route once you are done with the tests:
route delete <your_IP>
Proxocket — A Winsock Proxy Sniffer Written by Luigi Auriemma, this great tool appears to be a Layered Service Provider that can be used to capture calls between an application and the Winsock functions in Windows. By doing this, one is able to effectively capture loopback traffic on a per-process basis.
My own experience with proxocket is as follows: After installing the ws2_32.dll from proxocket into a directory containing 3 binaries that communicate with each other over the loopback interface and starting them all up, it generated 3 separate capture files, one for each process, which I was then able to merge together into a single capture file using mergecap. After filtering out the duplicate packets in the file, which contained the source IP address of 0.0.0.0, I had a pretty good capture file containing loopback traffic on Windows. Some packets were clearly ordered incorrectly, but it was easy enough for me to spot them and tell what was going on.
While certainly not as good/easy as capturing loopback traffic on a *NIX platform, prior to using RawCap, this was the best way for me to obtain loopback traffic on Windows. Having said that, after using RawCap, I don’t see why anyone would want to use this.
Список пакетов
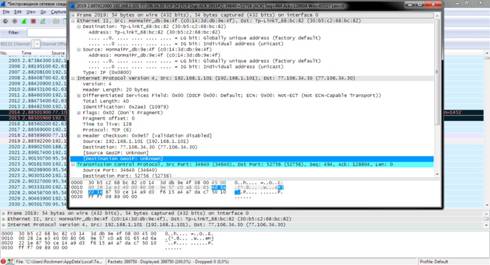
Панель списка пакетов, расположенная в верхней части окна, отображает все пакеты, найденные в активном файле захвата. Каждый пакет имеет свою собственную строку и соответствующий ей номер, вместе с каждой из этих точек данных.
Когда пакет выбран в верхней панели, вы можете заметить, что в первом столбце появляется один или несколько символов. Открытые или закрытые скобки и прямая горизонтальная линия указывают, являются ли пакеты или группы пакетов частью одного и того же повторного разговора в сети. Сломанная горизонтальная линия означает, что пакет не является частью упомянутого разговора.
Projects
Design ideas
-
WiretapPcapng Changes to wiretap to support pcapng
-
HighSpeedCapturing High speed capturing improvements
-
DecryptionBlock Define a pcapng decryption block and use it to save decryption information in the file.
-
PrefBlock Define a pcapng block to store the preference settings needed to view the file.
-
PrivacySettings Add privacy settings to determine what to put in a pcapng file.
-
Reduce memory footprint Ideas on how to find the memory hogs and reduce the memory usage
In progress
-
/CustomColumnfication An ongoing project concerning predefined columns -> custom column migration
-
/PrivilegeSeparation: A proposal to add privilege separation to Wireshark
-
Mate: Meta Analysis and Tracing Engine
-
/Security: Efforts to make Wireshark more secure
-
/ExpertInfo: a better «user display» of network misbehaviour
-
/PacketInput: how to get packet data into Wireshark in some «unusual» ways
-
/OptimizePacketList: the packet list isn’t optimized for the way we use it, could make a huge difference for large capture files
-
/CSVExport: Formats and problems with exporting into the CSV format
-
/multithreading: a list of what needs to be done in order to achieve it
-
/SNMP: reworking of OID handling and SNMP dissector
-
/Optimization: A patch for a faster but maybe slightly broken wireshark
-
/FastFiltering: A patch for fast packet filtering interactively
-
/PcapNg: Read/Write the «PCAP Next Generation Dump File Format» or pcapng
-
Python : Extending Wireshark with Python
-
SharkTools: A project that provides «matshark» and «pyshark», which integrate Wireshark’s packet dissection engine into Matlab and Python.
Completed
-
/DropWin32GTK1: Thoughts about dropping GTK1 support on Win32
-
/PatchHandling: Changing patch handling policy
-
/Examples: Example files, which are used by the various installers as default files
-
ReplaceDeprecatedGtkGLibFunctionUsage: An ongoing project to replace use of deprecated GTK and GLib functions.
-
GoingGTK3: A project to prepare the Shark to migrate from GTK+ 2 to GTK+ 3
-
/QtShark: Qt based version of Wireshark.
-
/Update: Check version and Update Wireshark on a frequent basis
Bit field operations
It is also possible to define tests with bit field operations. Currently the following bit field operation is supported:
The bitwise AND operation allows testing to see if one or more bits are set. Bitwise AND operates on integer protocol fields and slices.
When testing for TCP SYN packets, you can write:
That expression will match all packets that contain a «tcp.flags» field with the 0x02 bit, i.e. the SYN bit, set.
Similarly, filtering for all WSP GET and extended GET methods is achieved with:
When using slices, the bit mask must be specified as a byte string, and it must have the same number of bytes as the slice itself, as in:
3 Как включить интерфейсы Wireshark, если они недоступны
При запуске программы вы можете увидеть такое сообщение. Это означает, что программа не видит ни одного вашего подключения: ни по кабелю, ни по беспроводному соединению.
Первое, что нужно сделать – перезагрузить компьютер. Программа начинает функционировать только после перезапуска.
Вторая возможная и самая распространенная причина – у вас не скачан WinPcap. Это бесплатные библиотеки от Windows, которые нужны программе Wireshark. Скачайте их в сети интернет, перезагрузите компьютер и попробуйте снова.
Под статьей вы найдете объемное видео, которое расскажет вам о более глубоком интерфейсе программы.

Logical expressions
Tests can be combined using logical expressions. These too are expressible in C-like syntax or with English-like abbreviations:
Expressions can be grouped by parentheses as well. The following are all valid display filter expressions:
Remember that whenever a protocol or field name occurs in an expression, the «exists» operator is implicitly called. The «exists» operator has the highest priority. This means that the first filter expression must be read as «show me the packets for which tcp.port exists and equals 80, and ip.src exists and equals 192.168.2.1». The second filter expression means «show me the packets where not (llc exists)», or in other words «where llc does not exist» and hence will match all packets that do not contain the llc protocol. The third filter expression includes the constraint that offset 199 in the frame exists, in other words the length of the frame is at least 200.
A special caveat must be given regarding fields that occur more than once per packet. «ip.addr» occurs twice per IP packet, once for the source address, and once for the destination address. Likewise, «tr.rif.ring» fields can occur more than once per packet. The following two expressions are not equivalent:
The first filter says «show me packets where an ip.addr exists that does not equal 192.168.4.1». That is, as long as one ip.addr in the packet does not equal 192.168.4.1, the packet passes the display filter. The other ip.addr could equal 192.168.4.1 and the packet would still be displayed. The second filter says «don’t show me any packets that have an ip.addr field equal to 192.168.4.1». If one ip.addr is 192.168.4.1, the packet does not pass. If neither ip.addr field is 192.168.4.1, then the packet is displayed.
It is easy to think of the ‘ne’ and ‘eq’ operators as having an implicit «exists» modifier when dealing with multiply-recurring fields. «ip.addr ne 192.168.4.1» can be thought of as «there exists an ip.addr that does not equal 192.168.4.1». «not ip.addr eq 192.168.4.1» can be thought of as «there does not exist an ip.addr equal to 192.168.4.1».
Be careful with multiply-recurring fields; they can be confusing.
Care must also be taken when using the display filter to remove noise from the packet trace. If, for example, you want to filter out all IP multicast packets to address 224.1.2.3, then using:
may be too restrictive. Filtering with «ip.dst» selects only those IP packets that satisfy the rule. Any other packets, including all non-IP packets, will not be displayed. To display the non-IP packets as well, you can use one of the following two expressions:
The first filter uses «not ip» to include all non-IP packets and then lets «ip.dst ne 224.1.2.3» filter out the unwanted IP packets. The second filter has already been explained above where filtering with multiply occurring fields was discussed.
FILTER FIELD REFERENCE
The entire list of display filters is too large to list here. You can can find references and examples at the following locations:
-
The online Display Filter Reference: https://www.wireshark.org/docs/dfref/
-
Help:Supported Protocols in Wireshark
-
on the command line
-
The Wireshark wiki: https://wiki.wireshark.org/DisplayFilters
NOTES
The wireshark-filters manpage is part of the Wireshark distribution. The latest version of Wireshark can be found at https://www.wireshark.org.
Regular expressions in the «matches» operator are provided by GRegex in GLib. See https://developer.gnome.org/glib/2.32/glib-regex-syntax.html or https://www.pcre.org/ for more information.
This manpage does not describe the capture filter syntax, which is different. See the manual page of pcap-filter(7) or, if that doesn’t exist, tcpdump(8), or, if that doesn’t exist, https://wiki.wireshark.org/CaptureFilters for a description of capture filters.
Display Filters are also described in the User’s Guide: https://www.wireshark.org/docs/wsug_html_chunked/ChWorkBuildDisplayFilterSection.html
Что такое Wireshark
Сия утилита предназначена для контроля интернет трафика. Она перехватывает TCP пакеты, которые были приняты компьютером или посланы с него. Функционал программы настолько богат, что простым перехватом дело не ограничивается. Можно просматривать содержимое пакетов, искать ошибки и так далее. Кроме того, с помощью WS можно вытащить из пакетов практически любой файл и просмотреть его. Чтобы лучше понять, что это за программа, нужно выделить ее основные преимущества. Итак, плюсы:
- кроссплатформенность (есть версии для Linux, Mac, Unix);
- утилита совершенно бесплатна;
- обладает широким функционалом;
- гибкость настройки;
- возможность фильтрации трафика;
- создание собственных фильтров;
- перехват пакетов в реальном времени.
Преимуществ у данной утилиты действительно много. А вот недостатков как таковых нет вообще. Недаром Wireshark считается лучшей в своем роде для захвата и анализа TCP пакетов. Теперь нужно немного разобраться в самой программе.
Development
-
CreatingPatches: Tips on creating patches before submitting them
-
/SubmittingPatches: Introduction to using Git & Gerrit to submit and review patches
-
/SecureProgramming How to write more secure code, e.g. replace insecure ANSI-C calls by more secure ones
-
/CommonProblems: Some common problems while developing Wireshark
-
/Tips: Some selected wisdom to ease development/debugging
-
/FilenameEncoding: the various Unicode and code page encodings of filenames in GLib
-
Lua: Extending Wireshark with the extensible extension language
-
/LibpcapFileFormat A libpcap file format description
-
/Canary Finding and fixing memory over- and under-runs with canaries
-
Generic dissector (http://wsgd.free.fr/) : display clearly your data inside wireshark without any code
-
pyreshark: A Wireshark plugin providing a simple interface for writing dissectors in Python.
-
/Support_library_version_tracking A page for tracking what OS distributions came with what versions of various libraries with which Wireshark is built
-
/WindowsLibs Describes how Windows libraries are built and the procedure for updating those.
-
/StringHandling How string handling should work in Wireshark (ie encoding support, how to deal with invalid strings, etc)
Статистика

В дополнение к подробной информации о данных вашей сети, приведенной в главном окне Wireshark, можно найти несколько других полезных показателей Статистика выпадающее меню находится в верхней части экрана. К ним относятся информация о размере и времени о самом файле захвата, а также десятки диаграмм и графиков, относящихся к теме из разбиений по цепочке пакетов, для загрузки распределенных HTTP-запросов.
Фильтры отображения могут применяться ко многим из этих статистических данных через их интерфейсы, и результаты могут быть экспортированы в несколько распространенных форматов файлов, включая CSV, XML и TXT.
Preference Settings
Go to Edit -> Preferences. Open the Protocols tree and select TLS. Alternatively, select a TLS packet in the packet list, right-click on the TLS layer in the packet details view and open the Protocol preferences menu.
The notable TLS protocol preferences are:
- (Pre)-Master-Secret log filename (tls.keylog_file): path to read the TLS key log file for decryption.
-
RSA keys list: opens a dialog to configure RSA private keys for decryption. Deprecated in favor of the Preferences -> RSA Keys dialog.
- Pre-Shared-Key: used to configure the decryption key for PSK cipher suites. Not generally used.
- TLS debug file (tls.debug_logfile): path to write internal details about the decryption process. Will contain the results of decryption and the keys that were used in this process. This can be used to diagnose why decryption fails.
The following TCP protocol preferences are also required to enable TLS decryption:
- Allow subdissector to reassemble TCP streams. Enabled by default.
- Reassemble out-of-order segments (since Wireshark 3.0, disabled by default).
Starting with Wireshark 3.0, a new RSA Keys dialog can be found at Edit -> Preferences -> RSA Keys. In this dialog, use the Add new keyfile… button to select a file. You will be prompted for a password if necessary. The Add new token… button can be used to add keys from a HSM which might require using Add new provider… to select select a DLL/.so file, and additional vendor-specific configuration.
The RSA key file can either be a PEM format private key or a PKCS#12 keystore (typically a file with a .pfx or .p12 extension). The PKCS#12 key is a binary file, but the PEM format is a text file which looks like this:
——BEGIN PRIVATE KEY——
MIIEvgIBADANBgkqhkiG9w0BAQEFAASCBKgwggSkAgEAAoIBAQDReQzlKVeAK8b5
TRcRBhSi9IYwHX8Nqc8K4HeDRvN7HiBQQP3bhUkVekdoXpRLYVuc7A8h1BLr93Qw
…
KOi8FZl+jhG+p8vtpK5ZAIyp
——END PRIVATE KEY——
The deprecated RSA keys list dialog may be removed at some point. To configure keys, use the RSA keys dialog instead. To change the protocol for decrypted network data, right-click on a TLS packet and use Decode As to change the Current protocol for the TLS port. The IP address and Port fields are unused.
Пакетные байты
В нижней части находится панель байтов пакетов, которая отображает необработанные данные выбранного пакета в шестнадцатеричном представлении.Этот шестнадцатеричный дамп содержит 16 шестнадцатеричных байтов и 16 байтов ASCII вместе со смещением данных.
Выбор определенной части этих данных автоматически выделяет соответствующий раздел в области сведений о пакете и наоборот. Любые байты, которые не могут быть напечатаны, вместо этого представлены периодом.
Вы можете отображать эти данные в битовом формате, а не в шестнадцатеричном виде, щелкнув правой кнопкой мыши в любом месте области и выбрав соответствующую опцию из контекстного меню.
Правила цвета
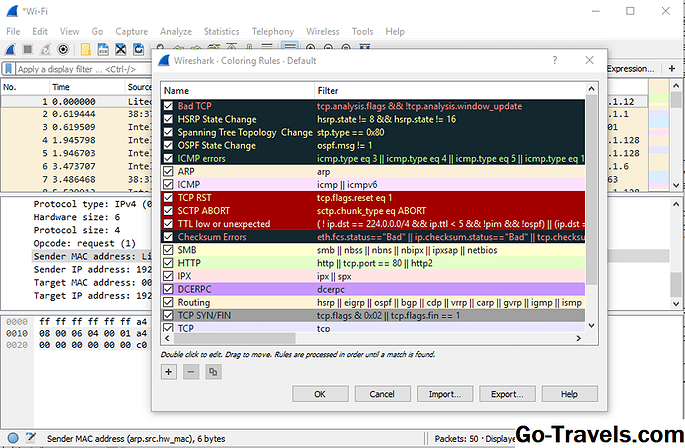
В то время как фильтры захвата и отображения Wireshark позволяют вам ограничить, какие пакеты записаны или отображены на экране, его функциональность раскраски делает шаг вперед, позволяя легко различать разные типы пакетов на основе их индивидуального оттенка. Эта удобная функция позволяет быстро находить определенные пакеты в сохраненном наборе по их цвету строк в панели списка пакетов.
Wireshark поставляется с 20 встроенными правилами раскраски по умолчанию, каждый из которых можно редактировать, отключать или удалять, если хотите. Вы также можете добавлять новые фильтры на основе оттенков через интерфейс правил раскраски, доступный из Посмотреть меню. Помимо определения имени и критериев фильтрации для каждого правила, вам также предлагается связать как цвет фона, так и цвет текста.
Пакетная раскраска может быть отключена и включена через Распаковать список пакетов вариант, также найденный в Посмотреть меню.