Joshaven potter
Содержание:
Port Knocking
Чуть выше мы говорили об ограничении доступа к управляющим службам роутера только с определенных адресов
Это очень важно: протокол Winbox далек от идеала и есть вероятность, что в нем еще будут находить дыры. Но часто приходится подсоединяться к роутеру из гостиниц или кафе, и невозможно предусмотреть все адреса, с которых подключишься
Среди админов распространена техника Port Knocking. Изначально порт закрыт для всех. Но стоит снаружи выполнить какую-то последовательность действий, как для твоего IP открываются все порты для управления. Этот набор действий может быть очень сложным, и подобрать его нереально. Рассмотрим пример:
- изначально все порты управления закрыты для всех, кроме списка разрешенных;
- если на порт роутера 1234 попадает TCP-сегмент, затем два на порт 4321 и один на порт 5678, то адрес источника заносится в список разрешенных на сутки.
Реализовать эту последовательность действий поможет следующий скрипт.
Правила 3–6 () выполняют описанную выше логику. Первое правило разрешает доступ к управлению роутером только адресам из списка , который заполняется на этапах 3–6. Второе правило запрещает доступ всем. Первые два правила вынесены наверх для того, чтобы избежать ненужного прохождения менеджмента трафика по четырем правилам с логикой и тем самым снизить нагрузку на CPU.
Но провернуть подобную операцию с Windows не так просто: из стандартного набора программ выпилили Telnet, а качать сторонний софт не всегда возможно. Зато любая ОС позволяет менять размер ICMP-пакета при пинге. Этим мы и воспользуемся. Изменим условия:
- изначально все порты управления закрыты для всех, кроме списка разрешенных;
- если на роутер попадает ICMP Request размером 345 байт, затем два размером 543 и один 678 байт, то адрес источника заносится в список разрешенных на сутки.
Для этого всего лишь поменяем предыдущие правила:
- Установим прокол ICMP.
- На вкладке Advanced зададим размер Packet Size.
INFO
Не забывай, что размер пакета, указанный в пинге, и размер пакета, долетевшего до роутера, — это разные значения. В Linux к ICMP прибавляется 28 байт заголовков, то есть, чтобы отправить пакет размером 345 байт, нужно в пинге указать размер 317. У Windows цифры другие — она по-своему считает заголовки.
Wireless
RouterOS поддерживает белые и черные списки Wi-Fi. Для этого есть список Wireless Access List. Просто добавь туда устройства, которые не имеют права подключаться к сети, а потом сними флажки Authentication и Forwarding. Еще для этих целей можно использовать команду .
Настройка черного списка Wi-Fi
Описанный выше случай будет работать как Blacklist. Чтобы преобразовать его в Whitelist, нужно поставить указанные флажки и изменить тип работы интерфейса Wireless с помощью команды .
Настройка белого списка
Флажок Authentication отвечает за аутентификацию клиентов. Если он установлен для определенного интерфейса, аутентификация разрешена всем, кроме тех устройств, которые перечислены в списке доступа без флажка. Если на интерфейсе флажок не установлен, то подключиться к сети могут лишь те, кто присутствует в списке доступа с флажком.
Настройка Forwarding отвечает за передачу данных между клиентами одной подсети. Обычно ее не стоит трогать, но, если ты строишь, к примеру, hotspot-сеть, клиенты которой будут ходить только во внешние сети (то есть внутреннее взаимодействие им не нужно), отключи данную опцию — это улучшит качество связи.
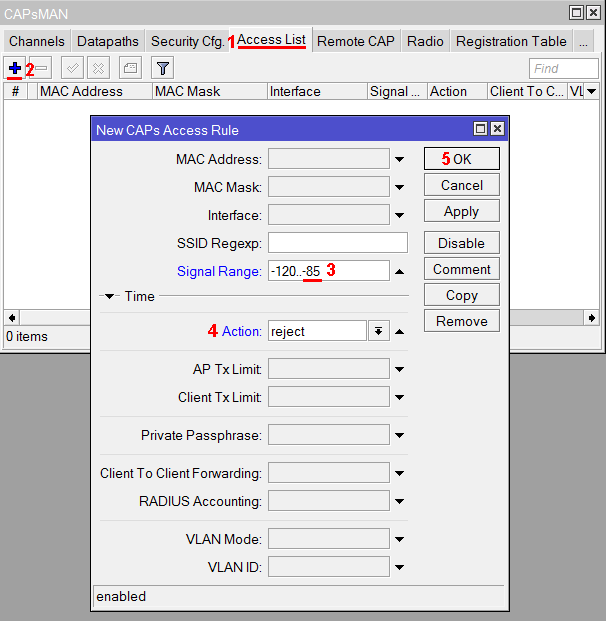
С помощью Wireless Access List можно настроить сложную логику работы клиентов: по уровню сигнала, времени суток, ограничить скорость каждого клиента или загнать его в определенный VLAN без дополнительных телодвижений. Очень рекомендую познакомиться с этим инструментом поближе.
INFO
А еще MikroTik умеет делать SSID в виде эмодзи, например так: . Для этого нужно перевести символы в Unicode с помощью инструмента вроде такого и вставить полученную строку в SSID.
Настройка интернета в микротик
Пришло время подключить наш роутер к провайдеру и настроить интернет. Вариантов это сделать масса, я расскажу о двух самых популярных:
- Провайдер завел вам кабель, и вы получаете все настройки по DHCP.
- Провайдер выдал вам настройки, и вы должны их ввести вручную.
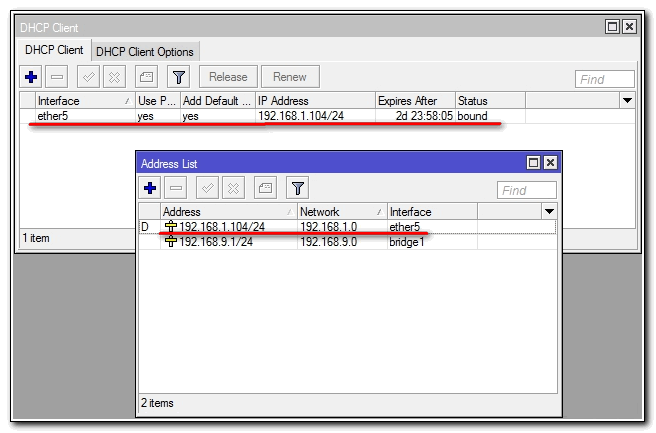
И так, подключаем провод в 5 торт (как писалось выше я буду использовать его), идем в раздел IP -> DHCP Client выбираем в Interface наш порт, проверяем чтобы галочки все стояли как на скриншоте и Add Default Route было выбрано yes.

Проверить правильность настройки можно тут же или в разделе IP-> Addresses, если получил ip то мы молодцы.
Вариант номер 2. Настройки от провайдера нужно ввести вручную, имеют они следующий вид:
- IP адрес 192.168.1.104
- Маска 255.255.255.0
- Шлюз 192.168.1.1
- DNS 192.168.1.1
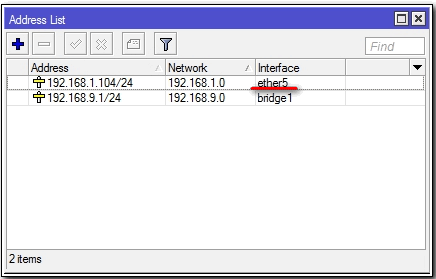
Первое, указываем ip в том же разделе, как и при указании статического адреса. Только тут мы выбираем интерфейс ether5 – 192.168.1.104/24.
Второе, нужно указать шлюз по умолчанию (то есть адрес куда mikrotik будет оправлять все запросы если сам ответа не знает, а это все что мы ищем в интернете). Идем в IP -> Routes и через + добавляем новый маршрут как показано на рисунке.

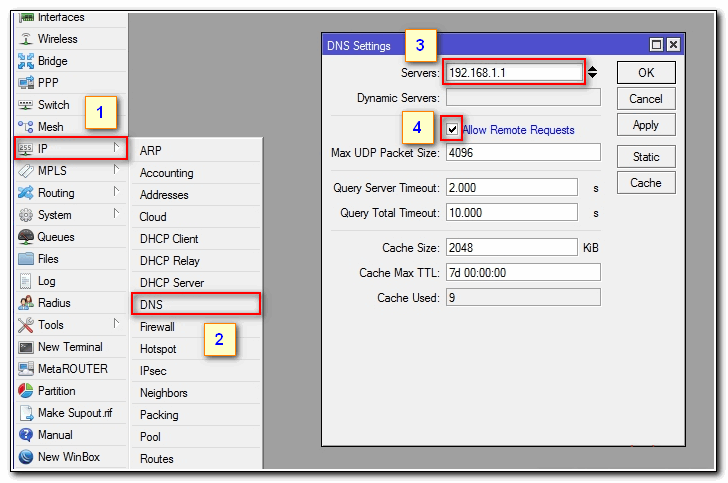
Третье, указываем DNS сервер (это специальный узел, который сопоставляет ip с адресами, например, vk.ru = 89.111.176.202). Идем IP -> DNS и в поле Servers вводим его адрес.
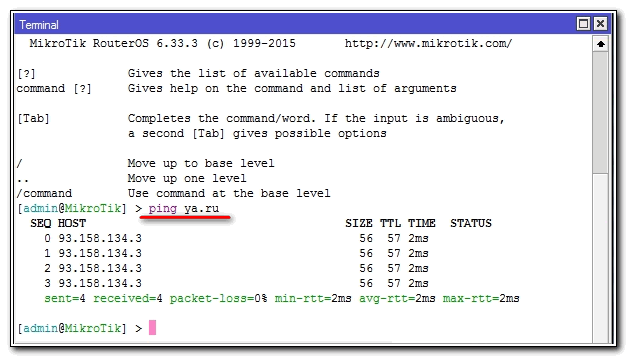
Конфигурирование провайдерского интернета закончено, давайте проверим все ли сделано правильно используя утилиту ping на ya.ru.
На этом настройка mikrotik не закончена, для того чтобы устройства из локальной сети могли выходить в интернет нужно еще сделать одну вещь.
RouterOS version release chains
When upgrading RouterOS, you can choose a release chain from which to install the new packages. For mission critical installations, bugfixes-only release chain is suggested, as it does not include freshly added new features and is kept for a long time on the download page, with only critical fixes applied to it.
- Bugfixed-only version is the most stable release without new features, just most important fixes. Updated rarely, only when a critical issue is found in a bugfixes-only release.
- Current includes the same fixes plus improvements and new features. Once a current release has been tested for several months, it is promoted to bugfix-only and is no longer updated with features.
- Release candidate released a few times per week. Includes newest features, released without intensive testing. Not recommended for production.
Note: Since RouterOS v6.44beta6 release channels have been renamed — «bugfix» to «long-term», «current» to «stable» and «release candidate» to «testing».
Настройка локальной сети
Первым делом давайте создадим локальную сеть для нашего офиса или дома. Особенностью микротик является то что все порты у него равны, то есть нет определенно выделенного порта под интернет, а другие под локалку. Мы можем сами выбирать как нам угодно, для этого есть механизм «Bridge». Простым языком Бридж это – объединение физических портов в пул логических (грубо говоря в один широковещательный домен). Замечу что Wi-Fi является тоже интерфейсов и если мы хотим, чтоб в нем была та же LAN сеть что и в портах, его также нужно добавить в Bridge.
В моем примере я сделаю WAN порт пятым, а все остальные объединим в бридж, и они будет в роли свитча.


- Переходим в нужный раздел;
- Создаем сам бридж;
- Сохраняем.
Все настройки в данном месте у микротика можно оставить по умолчанию, на ваше усмотрение поменяйте название на более понятное, например, «bridge_lan». Переходим на следующую вкладку «port» и добавляем через кнопку плюс все порты кроме ether5.

Первый этап конфигурирования интерфейсов на уровне портов закончен, теперь у нас в ether1,2,3,4 и wlan1 единый широковещательный домен, а ether5 для подключения к провайдеру.
Downgrading
- How can I downgrade the MikroTik RouterOS installation to an older version?
- You can downgrade by reinstalling the RouterOS from any media. The software license will be kept with the HDD as long as the disk is not repartitioned/reformatted. The configuration of the router will be lost (it is possible to save the old configuration, but this option has unpredictable results when downgrading and it is not recommended to use it).
- Another way is to use the /system package downgrade command. This works only if you downgrade to 2.7.20 and not lower. Upload the older packages to the router via FTP and then use the /system package downgrade command.
Working with packages
Menu: /system package
Commands executed in this menu will take place only on restart of the router. Until then, user can freely schedule or revert set actions.
| Command | Desciption |
|---|---|
| disable | schedule the package to be disabled after the next reboot. No features provided by the package will be accessible |
| downgrade | will prompt for the reboot. During the reboot process will try to downgrade the RouterOS to the oldest version possible by checking the packages that are uploaded to the router. |
| outputs information about the packages, like: version, package state, planned state changes etc. | |
| enable | schedule package to be enabled after the next reboot |
| uninstall | schedule package to be removed from the router. That will take place during the reboot. |
| unschedule | remove scheduled task for the package. |
General Commands
There are some commands that are common to nearly all menu levels, namely: print, set, remove, add, find, get, export, enable, disable, comment, move. These commands have similar behavior throughout different menu levels.
-
add — this command usually has all the same arguments as set, except the item number argument. It adds a new item with the values you have specified, usually at the end of the item list, in places where the order of items is relevant. There are some required properties that you have to supply, such as the interface for a new address, while other properties are set to defaults unless you explicitly specify them.
- Common Parameters
- copy-from — Copies an existing item. It takes default values of new item’s properties from another item. If you do not want to make exact copy, you can specify new values for some properties. When copying items that have names, you will usually have to give a new name to a copy
- place-before — places a new item before an existing item with specified position. Thus, you do not need to use the move command after adding an item to the list
- disabled — controls disabled/enabled state of the newly added item(-s)
- comment — holds the description of a newly created item
- Return Values
- Common Parameters
edit — this command is associated with the set command. It can be used to edit values of properties that contain large amount of text, such as scripts, but it works with all editable properties. Depending on the capabilities of the terminal, either a fullscreen editor, or a single line editor is launched to edit the value of the specified property.
- find — The find command has the same arguments as set, plus the flag arguments like disabled or active that take values yes or no depending on the value of respective flag. To see all flags and their names, look at the top of print command’s output. The find command returns internal numbers of all items that have the same values of arguments as specified.
-
move — changes the order of items in list.
- Parameters
- first argument specifies the item(-s) being moved.
- second argument specifies the item before which to place all items being moved (they are placed at the end of the list if the second argument is omitted).
- Parameters
-
print — shows all information that’s accessible from particular command level. Thus, /system clock print shows system date and time, /ip route print shows all routes etc. If there’s a list of items in current level and they are not read-only, i.e. you can change/remove them (example of read-only item list is /system history, which shows history of executed actions), then print command also assigns numbers that are used by all commands that operate with items in this list.
- Common Parameters
- from — show only specified items, in the same order in which they are given.
- where — show only items that match specified criteria. The syntax of where property is similar to the find command.
- brief — forces the print command to use tabular output form
- detail — forces the print command to use property=value output form
- count-only — shows the number of items
- file — prints the contents of the specific submenu into a file on the router.
- interval — updates the output from the print command for every interval seconds.
- oid — prints the OID value for properties that are accessible from SNMP
- without-paging — prints the output without stopping after each screenful.
- Common Parameters
- remove — removes specified item(-s) from a list.
- set — allows you to change values of general parameters or item parameters. The set command has arguments with names corresponding to values you can change. Use ? or double to see list of all arguments. If there is a list of items in this command level, then set has one action argument that accepts the number of item (or list of numbers) you wish to set up. This command does not return anything.
Importing Configuration
Command name: /import
The root level command /import executes a script stored in the specified file. It will add the configuration from the specified file to an existing configuration. This file may contain any console commands, including scripts. Can be used to restore configuration or parts of it after configuration loss.
Automatic Import
In RouterOS it is possible to automatically execute scripts — your script file has to be named anything.auto.rsc — once this file is uploaded using FTP to the router, it will automatically be executed, just like with the ‘/import’ command. This method only works with FTP.
Once the file is uploaded, it is automatically executed. Information about the success of the commands that were executed is written to anything.auto.log
Example
To load the saved export file use the following command:
 > import address.rsc
Opening script file address.rsc

Script file loaded and executed successfully
 >
Import troubleshooting
Configuration parts to watch out for in exported .rsc files
Things that should be removed from export files that were created with: «/export», before attempting import on new device.
Interface renaming that is in conflict with default ethernet naming scheme.
/interface ethernet
set  auto-negotiation=no name=ether1-gateway
set  name=ether2
set  name=ether3
set  name=ether4
set  name=ether5
set  name=ether6
set  name=ether7
set  name=ether8
- In older version exports default entries might show with «add» instead of «set» command. That should be edited before import to avoid errors.
- Check if interface/module: ether/wlan/modem/com/etc count match on new and old device. If there will some missing that will end up in error during .rsc import.
In case of problematic import, attempt the following:
- Reset the configuration on that device.
- Run import command again with «verbose=yes» argument. It will stop also stop import process on problem which you already encountered, but will also show place where export failed. That way showing you place where things need to be edited in .rsc import file
Startup delay
If your configuration relies on interfaces that might not yet have started up upon command execution, it is suggested to introduce delays, or to monitor until all needed interfaces are available. This example script allows you to set how many interfaces you are expecting, and how long to wait until they become available:
{
:local i 0
#Number of interfaces. It is necessary to reconfigure this number for each device (/interface print count-only)
:local x 10
#Max time to wait
:local t 30
while ($i < $t && [:len ] < $x) do={
:put $i
:set $i ($i + 1)
:delay 1
}
if ($i = $t) do={
:log warning message="Could not load all physical interfaces"
} else={
#Rest of your script
}
}
Starting the Winbox

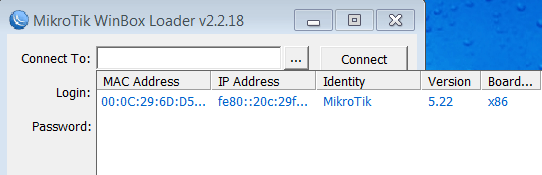
When winbox.exe is downloaded, double click on it and winbox loader window will pop up:
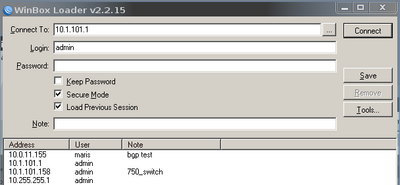
To connect to the router enter IP or MAC address of the router, specify username and password (if any) and click on Connect button. You can also enter the port number after the IP address, separating them with a colon, like this 192.168.88.1:9999. The port can be changed in RouterOS services menu.
Note: It is recommended to use IP address whenever possible. MAC session uses network broadcasts and is not 100% reliable.
You can also use neighbor discovery, to list available routers by clicking on button:
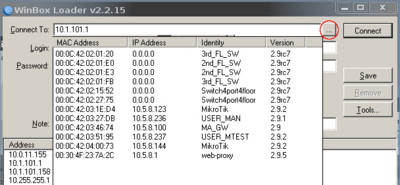
From list of discovered routers you can click on IP or MAC address column to connect to that router. If you click on IP address then IP will be used to connect, but if you click on MAC Address then MAC address will be used to connect to the router.
Note: Neighbor discovery will show also devices which are not compatible with Winbox, like Cisco routers or any other device that uses CDP (Cisco Discovery Protocol)
Description of buttons and fields of loader screen
- — discovers and shows MNDP (MikroTik Neighbor Discovery Protocol) or CDP (Cisco Discovery Protocol) devices.
- Connect — Connect to the router
- Save — Save address, login, password and note. Saved entries are listed at the bottom of loader window.
- Remove — Remove selected entry from saved list
- Tools… — Allows to run various tools: removes all items from the list, clears cache on the local disk, imports addresses from wbx file or exports them to wbx file.
- Connect To: — destination IP or MAC address of the router
- Login — username used for authentication
- Password — password used for authentication
- Keep Password — if unchecked, password is not saved to the list
- Secure Mode — if checked, winbox will use TLS encryption to secure session
- Load Previous Session — if checked, winbox will try to restore all previously opened windows.
- Note — description of the router that will be saved to the list.
Warning: Passwords are saved in plain text. Anyone with access to your file system will be able to retrieve passwords.
It is possible to use command line to pass connect to user and password parameters automatically:
winbox.exe ]]
For example (with no password):
winbox.exe 10.5.101.1 admin ""
Will connect to router 10.5.101.1 with username «admin»without password.
IPv6 connectivity
Starting from v5RC6 Winbox supports IPv6 connectivity. To connect to the routers IPv6 address, it must be placed in square braces the same as in web browsers when connecting to IPv6 server.
Example:

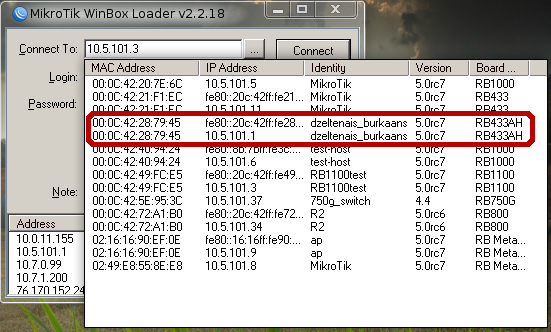
Winbox neighbor discovery is now capable of discovering IPv6 enabled routers. As you can see from the image below, there are two entries for each IPv6 enabled router, one entry is with IPv4 address and another one with IPv6 link-local address. You can easily choose to which one you want to connect:
Bandwidth Management Related Questions
- How can I controll bandwidth(bandwidth shaping)in Bridge mode?
- In enable use-ip-firewall.
- Can I use MikroTik as a bridge and a traffic shaper in one machine?
- Yes. You can use all the extensive queue management features. Set the queue to the interface where the traffic is actually leaving the router, when passing through the router. It is not the bridge interface! The queue on the bridge interface is involved only for the traffic generated from the router.
- Can I limit bandwidth based on MAC addresses?
- For download:
   1. connection-mark all packets from the MAC of each client with different marks
   for each client using action=passthrough:
   /ip firewall mangle add chain=prerouting src-mac-address=11:11:11:11:11:11 \
   action=mark-connection new-connection-mark=host11 passthrough=yes
   2. Remark these packets with flow-mark (again different flow-marks for each connection-marks):
   /ip firewall mangle add chain=prerouting connection-mark=host11 new-packet-mark=host11
3. We can use these flow-marks in queue trees now.
- While this solution should function, it is fundamentally flawed as the first packet of each connection destined to these clients will not be taken into account.
- For upload:
    ip firewall mangle> add chain=prerouting src-mac-address=11:11:11:11:11:11 \
   action=mark-packet new-packet-mark=upload
Router services
All production routers have to be administred by SSH, secured Winbox or HTTPs services. Use the latest Winbox version for secure access. Note, that in newest Winbox versions, «Secure mode» is ON by default, and can’t be turned off anymore.

RouterOS services
Most of RouterOS administrative tools are configured at
/ip service print
Keep only secure ones,
/ip service disable telnet,ftp,www,api,api-ssl
/ip service print
and also change the default port, this will immediately stop most of the random SSH bruteforce login attempts:
/ip service set ssh port=2200
/ip service print
Additionaly each /ip service entity might be secured by allowed IP address (the address service will reply to)
/ip service set winbox address=192.168.88.0/24
RouterOS MAC-access
RouterOS has built-in options for easy management access to network devices. The particular services should be shutdown on production networks.
Disable mac-telnet services,
/tool mac-server set allowed-interface-list=none
/tool mac-server print
MAC-Winbox
Disable mac-winbox services,
/tool mac-server mac-winbox set allowed-interface-list=none
/tool mac-server mac-winbox print
MAC-Ping
Disable mac-ping service,
/tool mac-server ping set enabled=no
/tool mac-server ping print
Neighbor Discovery
MikroTik Neighbor discovery protocol is used to show and recognize other MikroTik routers in the network, disable neighbor discovery on all interfaces,
/ip neighbor discovery-settings set discover-interface-list=none
Bandwidth server
Bandwidth server is used to test throughput between two MikroTik routers. Disable it in production enironment.
/tool bandwidth-server set enabled=no
DNS cache
Router might have DNS cache enabled, that decreases resolving time for DNS requests from clients to remote servers. In case DNS cache is not required on your router or another router is used for such purposes, disable it.
/ip dns set allow-remote-requests=no
Other clients services
RouterOS might have other services enabled (they are disabled by default RouterOS configuration).
MikroTik caching proxy,
/ip proxy set enabled=no
MikroTik socks proxy,
/ip socks set enabled=no
MikroTik UPNP service,
/ip upnp set enabled=no
MikroTik dynamic name service or ip cloud,
/ip cloud set ddns-enabled=no update-time=no
/ip ssh set strong-crypto=yes