Mikrotik настраиваем filter firewall часть 1
Содержание:
Почему MikroTik Cap AC(RBcAPGi-5acD2nD)
С обзором точки доступа можно ознакомится в статье “Обзор MikroTik cAP ac →“, но если сжато, то точка доступа становится решением потому что:
- Это MikroTik, а значит поддержка WiFi роуминга с применение контроллера CAPsMAN;
- Поддерживает стандарт AC на частоте 5Ггц: больше скорости, лучше сигнал, больше клиентов;
- Имеет второй интерфейс Ethernet Poe, который можно использоваться по любому назначению: подключение ПК, IP видеокамеры, IP телефона и прочих устройств;
- Лидер в выборе цена\производительность в сегменте точек доступа WiFi с использованием внешних контроллеров.
Мы поможем настроить: маршрутизатор(роутер), точку доступа или коммутатор.
Заказать
Настройка WiFi в MikroTik Cap AC
Тестовый стенд по настройке точки доступа WiFi MikroTik Cap AC будет включать подготовленный заранее контроллер CAPsMAN, с настройкой которого можно ознакомиться в инструкции “Настройка MikroTik CapsMan WiFi, бесшовный WiFi роуминг →“.
Настройка находится в System→Reset Configuration
/system reset-configuration no-defaults=yes skip-backup=yes
После перезагрузки точка доступа не будет иметь конфигурации по умолчанию, т.е. она будет абсолютно пустой.
Настройка находится в Bridge→Bridge(Ports)
/interface bridge admin-mac=74:4D:28:CF:43:26 auto-mac=no add name=bridge1

/interface bridge port add bridge=bridge-1 hw=yes interface=ether1
/interface bridge port add bridge=bridge-1 interface=wlan1
/interface bridge port add bridge=bridge-1 interface=wlan2
Настройка находится в IP→DHCP client
/ip dhcp-client
add add-default-route=no dhcp-options=hostname,clientid disabled=no interface=bridge1
После таких настроек точка доступа будет подключена к локальной сети: ей будет выдан IP адрес, она будет иметь выход в интернет(), а также обнаружит контроллер CAPsMAN по соответствующему запросу.
Настройка MikroTik Cap AC в качестве отдельной WiFi точки доступа
Это конфигурация актуальна, если у вас в сети отсутствуют контроллер MikroTik CAPsMAN, а в качестве роутера выступает обычный роутер типа Asus, Tp-Link, Netis. Рассматриваемая точка доступа MikroTik Cap AC имеет два модуля WiFi, работающих на частоте 2,4 и 5ГГц, поэтому со стороны WinBox нужно настроить каждый интерфейс.
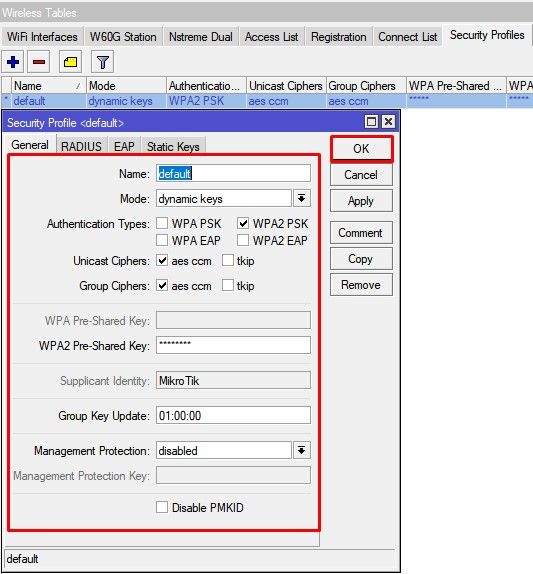
Настройка находится в Wireless->Security Profiles
/interface wireless security-profiles
set  authentication-types=wpa2-psk eap-methods="" \
group-key-update=1h mode=dynamic-keys supplicant-identity=MikroTik \
wpa2-pre-shared-key=12345678
Роутер и WiFi точка доступа не будет блокировать настройку конфигурации WiFi если задать одно SSID имя. WiFi сигналы будут распространяться на абсолютно разные антеннах и в разных частотных диапазонах.
Настройки находятся Wireless->WiFi Interfaces
/interface wireless
set  band=2ghz-b/g/n channel-width=20/40mhz-Ce \
disabled=no distance=indoors frequency=auto mode=ap-bridge ssid=Mikrotik \
wireless-protocol=802.11
Настройки находятся Wireless->WiFi Interfaces
/interface wireless
set  band=5ghz-a/n/ac channel-width=\
    20/40/80mhz-Ceee disabled=no frequency=auto mode=ap-bridge \
    security-profile=profile1 ssid=TopNet
Подключение MikroTik Cap AC к CAPsMAN, “бесшовный роуминг”
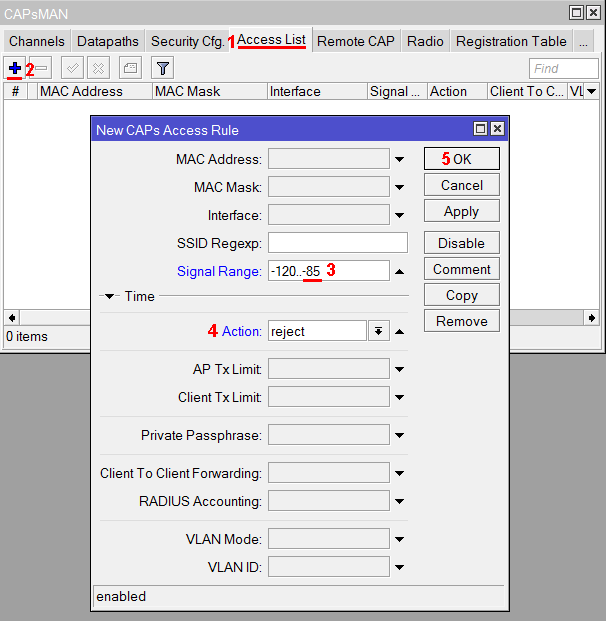
Все настройки по конфигурированию WiFi производятся на контроллере CAPsMAN, с настройками которого можно ознакомиться в статье “Настройка MikroTik CapsMan WiFi, бесшовный WiFi роуминг →“. Со стороны MikroTik Cap AC нужно подключить её к CAPsMAN-у, указав следующие настройки:
Настройка находится в Wireless→WiFi Interfaces→CAP
/interface wireless cap
set bridge=bridge1 caps-man-addresses=192.168.192.192 enabled=yes interfaces=wlan1,wlan2
Interfaces – перечень интерфейсов, на которые будут распространяться настройки CAPsMAN;
Discovery Interfaces – интерфейс, через который отправится широковещательный запрос на поиск контроллера CAPsMAN;
CAPsMAN Address – явное указание IP адреса CAPsMAN;
Bridge – бридж, в который будут добавлены новые интерфейсы WiFi в соответствии с настройками в Provisioning Action.
Stats
will show additional read-only properties
| Property | Description |
|---|---|
| bytes (integer) | Total amount of bytes matched by the rule |
| packets (integer) | Total amount of packets matched by the rule |
By default print is equivalent to print static and shows only static rules.
 /ip firewall mangle> print stats
Flags: X - disabled, I - invalid, D - dynamic
 #   CHAIN              ACTION                  BYTES           PACKETS
 0   prerouting         mark-routing            17478158        127631
 1   prerouting         mark-routing            782505          4506
To print also dynamic rules use print all.
 /ip firewall mangle> print all stats
Flags: X - disabled, I - invalid, D - dynamic
 #   CHAIN              ACTION                  BYTES           PACKETS
 0   prerouting         mark-routing            17478158        127631
 1   prerouting         mark-routing            782505          4506
 2 D forward            change-mss              0               0
 3 D forward            change-mss              0               0
 4 D forward            change-mss              0               0
 5 D forward            change-mss              129372          2031
Or to print only dynamic rules use print dynamic
 /ip firewall mangle> print stats dynamic
Flags: X - disabled, I - invalid, D - dynamic
 #   CHAIN              ACTION                  BYTES           PACKETS
 0 D forward            change-mss              0               0
 1 D forward            change-mss              0               0
 2 D forward            change-mss              0               0
 3 D forward            change-mss              132444          2079
General
Sub-menu level:
On RouterBOARD devices, the following menu exists which gives you some basic information about your device:
 /system routerboard> print
       routerboard: yes
             model: 433
     serial-number: 185C01FCA958
  current-firmware: 3.25
  upgrade-firmware: 3.25
Properties
All properties are read-only
| Property | Description |
|---|---|
| model (string) | If this device is a MikroTik RouterBOARD, this describes the model name |
| serial-number (string) | Serial number of this particular device |
| current-firmware (string) | The version of the RouterBOOT loader that is currently in use. Not to be confused with RouterOS operating system version |
| upgrade-firmware (string) | RouterOS upgrades also include new RouterBOOT version files, but they have to be applied manually. This line shows if a new RouterBOOT file has been found in the device. The file can either be included via a recent RouterOS upgrade, or a FWF file which has been manually uploaded to the router. In either case, the newest found version will be shown here |
Upgrading RouterBOOT
RouterBOOT upgrades usually include minor improvements to overall RouterBOARD operation. It is recommended to keep this version upgraded.
If you see that upgrade-firmware value is bigger than current-firmware, you simply need to perform the upgrade command, accept it with y and then reboot with /system reboot
  /system routerboard> upgrade
 Do you really want to upgrade firmware? [y/n]
 y
 echo: system,info,critical Firmware upgraded successfully, please reboot for changes to take effect!
After rebooting, the current-firmware value should become identical with upgrade-firmware
Reset button additional functionality is supported by all MikroTik devices running RouterOS
Some RouterBOARD devices have a mode button that allows you to run any script when the button it pushed.
The list of supported devices:
- RBcAP-2nD (cAP)
- RBcAPGi-5acD2nD (cAP ac)
- RBwsAP5Hac2nD (wsAP ac lite)
- RB750Gr3 (hEX)
- RB760iGS (hEX S)
- RB912R-2nD (LtAP mini, LtAP mini LTE/4G kit)
- RBD52G-5HacD2HnD (hAP ac^2)
- RBLHGR (LHG LTE/4G kit)
- RBSXTR (SXT LTE/4G kit)
- CRS328-4C-20S-4S+RM
- CRS328-24P-4S+RM
- CCR1016-12G r2
- CCR1016-12S-1S+ r2
- CCR1036-12G-4S r2
- CCR1036-8G-2S+ r2
- RBD53G-5HacD2HnD (Chateau)
- RBD53GR-5HacD2HnD (hAP ac^3)
| Property | Description |
|---|---|
| enabled (no | yes; Default: no) | Disable or enable the operation of the button |
| hold-time (time interval Min..Max; Default: ) | HoldTime ::= Button functionality can be called if button is pressed for a certain period of time: Min..Max Min — 0s..1m (time interval), Max — 0s..1m (time interval) (available only starting from RouterOS 6.47beta60) |
| on-event (string; Default: ) | Name of the script that will be run upon pressing the button. The script must be defined and named in the «/system scripts» menu |
Example
With mode button:
 /system script add name=test-script source={:log info message=("1234567890");}
 /system routerboard mode-button set on-event=test-script enabled=yes
Upon pressing the button, the message 1234567890 will be logged in the system log.
Warning: Starting from RouterOS 6.47beta60 reset-button functionality and hold-time option has been added
Example for RouterOS version over 6.47beta60:
 /system script add name=test-script2 source={:log info message=("test2");}
 /system routerboard mode-button set on-event=test-script2 hold-time=3..5 enabled=yes
Reset button works in same way, but menu is moved under :
Basic examples
CLI Disctinctive
There is a bit different interpretation in each section with the similar configuration.
For example, with the following configuration line you will match packets where tcp-flags does not have SYN, but has ACK flags:
/p firewall filter add chain=forward protocol=tcp tcp-flags=!syn,ack
But with this configuration you will match all connections which state is not NEW or RELATED.
/ip firewall filter add action=accept chain=forward connection-state=!new,related
Both configure similarly.
Router protection
Lets say our private network is 192.168.0.0/24 and public (WAN) interface is ether1. We will set up firewall to allow connections to router itself only from our local network and drop the rest. Also we will allow ICMP protocol on any interface so that anyone can ping your router from internet.
/ip firewall filter
add chain=input connection-state=invalid action=drop \
	comment="Drop Invalid connections"
add chain=input connection-state=established action=accept \
	comment="Allow Established connections"
add chain=input protocol=icmp action=accept \
	comment="Allow ICMP"
add chain=input src-address=192.168.0.0/24 action=accept \
	in-interface=!ether1
add chain=input action=drop comment="Drop everything else"
Customer protection
To protect the customer’s network, we should check all traffic which goes through the router and block unwanted. For icmp, tcp, udp traffic we will create chains, where will be dropped all unwanted packets:
/ip firewall filter
add chain=forward protocol=tcp connection-state=invalid \
 	action=drop comment="drop invalid connections"
add chain=forward connection-state=established action=accept \
 	comment="allow already established connections"
add chain=forward connection-state=related action=accept \
 	comment="allow related connections"
Block «bogon» IP addresses
add chain=forward src-address=0.0.0.0/8 action=drop
add chain=forward dst-address=0.0.0.0/8 action=drop
add chain=forward src-address=127.0.0.0/8 action=drop
add chain=forward dst-address=127.0.0.0/8 action=drop
add chain=forward src-address=224.0.0.0/3 action=drop
add chain=forward dst-address=224.0.0.0/3 action=drop
Make jumps to new chains:
add chain=forward protocol=tcp action=jump jump-target=tcp
add chain=forward protocol=udp action=jump jump-target=udp
add chain=forward protocol=icmp action=jump jump-target=icmp
Create tcp chain and deny some tcp ports in it:
add chain=tcp protocol=tcp dst-port=69 action=drop \
 	comment="deny TFTP"
add chain=tcp protocol=tcp dst-port=111 action=drop \
 	comment="deny RPC portmapper"
add chain=tcp protocol=tcp dst-port=135 action=drop \
 	comment="deny RPC portmapper"
add chain=tcp protocol=tcp dst-port=137-139 action=drop \
 	comment="deny NBT"
add chain=tcp protocol=tcp dst-port=445 action=drop \
 	comment="deny cifs"
add chain=tcp protocol=tcp dst-port=2049 action=drop comment="deny NFS"
add chain=tcp protocol=tcp dst-port=12345-12346 action=drop comment="deny NetBus"
add chain=tcp protocol=tcp dst-port=20034 action=drop comment="deny NetBus"
add chain=tcp protocol=tcp dst-port=3133 action=drop comment="deny BackOriffice"
add chain=tcp protocol=tcp dst-port=67-68 action=drop comment="deny DHCP"
Deny udp ports in udp chain:
add chain=udp protocol=udp dst-port=69 action=drop comment="deny TFTP"
add chain=udp protocol=udp dst-port=111 action=drop comment="deny PRC portmapper"
add chain=udp protocol=udp dst-port=135 action=drop comment="deny PRC portmapper"
add chain=udp protocol=udp dst-port=137-139 action=drop comment="deny NBT"
add chain=udp protocol=udp dst-port=2049 action=drop comment="deny NFS"
add chain=udp protocol=udp dst-port=3133 action=drop comment="deny BackOriffice"
Allow only needed icmp codes in icmp chain:
add chain=icmp protocol=icmp icmp-options=0:0 action=accept \
 	comment="echo reply"
add chain=icmp protocol=icmp icmp-options=3:0 action=accept \
 	comment="net unreachable"
add chain=icmp protocol=icmp icmp-options=3:1 action=accept \
 	comment="host unreachable"
add chain=icmp protocol=icmp icmp-options=3:4 action=accept \
 	comment="host unreachable fragmentation required"
add chain=icmp protocol=icmp icmp-options=8:0 action=accept \
 	comment="allow echo request"
add chain=icmp protocol=icmp icmp-options=11:0 action=accept \
 	comment="allow time exceed"
add chain=icmp protocol=icmp icmp-options=12:0 action=accept \
 	comment="allow parameter bad"
add chain=icmp action=drop comment="deny all other types"


