Industrialcraft 2/терраформер
Содержание:
- » Resource Data
- » Resource Syntax
- » Map value overrides
- » Operation Timeouts
- » Plugin Binaries
- » The Core Workflow Enhanced by Terraform Cloud
- » Adding credentials
- » Arguments and Blocks
- » Syncing
- » Custom Validation Rules
- » When to write a module
- » Frequently Asked Questions
- » Working as a Team
- » How to use Provisioners
- » Providers in the Terraform Registry
- » Attributes Reference
- » HTTP URLs
- » Using Workspaces
- » Workspace Internals
- » Explicit Provider Source Locations
- » Safer terraform plan Behavior
- » Destroy-time provisioners may not refer to other resources
» Resource Data
The parameter to provider configuration as well as all the CRUD operations
on a resource is a
.
This structure is used to query configurations as well as to set information
about the resource such as its ID, connection information, and computed
attributes.
The API documentation covers ResourceData well, as well as the core providers
in Terraform.
Partial state deserves a special mention. Occasionally in Terraform, create or
update operations are not atomic; they can fail halfway through. As an example,
when creating an AWS security group, creating the group may succeed,
but creating all the initial rules may fail. In this case, it is incredibly
important that Terraform record the correct partial state so that a
subsequent fixes this resource.
Most of the time, partial state is not required. When it is, it must be
specifically enabled. An example is shown below:
In the example above, it is possible that setting the succeeds,
but setting the fails. In this scenario, we want to make sure
that only the state of the is updated. To do this the
and functions are used.
toggles partial-state mode. When disabled, all changes are merged
into the state upon result of the operation. When enabled, only changes
enabled with are merged in.
tells Terraform what state changes to adopt upon completion
of an operation. You should call with every key that is safe
to merge into the state. The parameter to is a prefix, so
if you have a nested structure and want to accept the whole thing,
you can just specify the prefix.
» Resource Syntax
Resource declarations can include a number of advanced features, but only
a small subset are required for initial use. More advanced syntax features,
such as single resource declarations that produce multiple similar remote
objects, are described later in this page.
A block declares a resource of a given type («aws_instance»)
with a given local name («web»). The name is used to refer to this resource
from elsewhere in the same Terraform module, but has no significance outside
that module’s scope.
The resource type and name together serve as an identifier for a given
resource and so must be unique within a module.
Within the block body (between and ) are the configuration arguments
for the resource itself. Most arguments in this section depend on the
resource type, and indeed in this example both and are
arguments defined specifically for the resource type.
Note: Resource names must start with a letter or underscore, and may
contain only letters, digits, underscores, and dashes.
» Map value overrides
Previously, individual elements in a map could be overridden by using a dot notation. For example, if the following variable was declared:
The key «us-west-2» could be overridden using (or equivalent in an environment variable or file). The syntax for this has now changed — instead maps from the command line will be merged with the default value, with maps from flags taking precedence. The syntax for overriding individual values is now:
This will give the map the effective value:
It’s also possible to override the values in a variables file, either in any file, an file, or specified using the flag.
» Operation Timeouts
Some resource types provide a special nested block argument that
allows you to customize how long certain operations are allowed to take
before being considered to have failed.
For example,
allows configurable timeouts for , and operations.
Timeouts are handled entirely by the resource type implementation in the
provider, but resource types offering these features follow the convention
of defining a child block called that has a nested argument
named after each operation that has a configurable timeout value.
Each of these arguments takes a string representation of a duration, such
as for 60 minutes, for ten seconds, or for two hours.
The set of configurable operations is chosen by each resource type. Most
resource types do not support the block at all. Consult the
documentation for each resource type to see which operations it offers
for configuration, if any.
» Plugin Binaries
Before v0.7, Terraform’s built-in plugins for providers and provisioners were each distributed as separate binaries.
These binaries needed to all be extracted to somewhere in your or in the directory for Terraform to work.
As of v0.7, all built-in plugins ship embedded in a single binary. This means that if you just extract the v0.7 archive into a path, you may still have the old separate binaries in your . You’ll need to remove them manually.
For example, if you keep Terraform binaries in you can clear out the old external binaries like this:
External plugin binaries continue to work using the same pattern, but due to updates to the RPC protocol, they will need to be recompiled to be compatible with Terraform v0.7.x.
» The Core Workflow Enhanced by Terraform Cloud
While the above described workflows enable the safe, predictable, and
reproducible creating or changing of infrastructure, there are multiple
collaboration points that can be streamlined, especially as teams and
organizations scale. We designed Terraform Cloud to support and enhance
the core Terraform workflow for anyone collaborating on infrastructure, from
small teams to large organizations. Let’s look at how Terraform Cloud makes
for a better experience at each step.
Write
Terraform Cloud provides a centralized and secure location for storing
input variables and state while also bringing back a tight feedback loop for
speculative plans for config authors. Terraform configuration interacts with
Terraform Cloud via the «remote» backend.
Once the backend is wired up, a Terraform Cloud API key is all that’s
needed by team members to be able to edit config and run speculative plans
against the latest version of the state file using all the remotely stored
input variables.
With the assistance of this plan output, team members can each work on
authoring config until it is ready to propose as a change via a pull request.
Plan
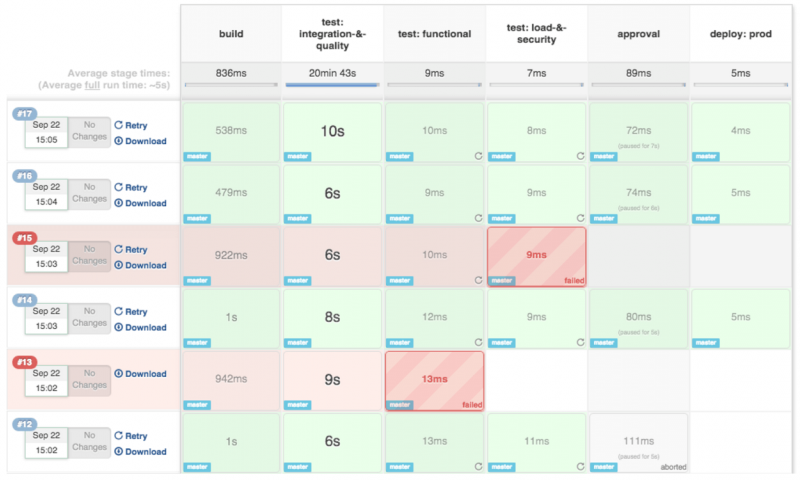
Once a pull request is ready for review, Terraform Cloud makes the process
of reviewing a speculative plan easier for team members. First, the plan is
automatically run when the pull request is created. Status updates to the pull
request indicate while the plan is in progress.
Once the plan is complete, the status update indicates whether there were any
changes in the speculative plan, right from the pull request view.

For certain types of changes, this information is all that’s needed for a team
member to be able to approve the pull request. When a teammate needs to do a
full review of the plan, clicking the link to Terraform Cloud brings up a
view that allows them to quickly analyze the full plan details.
This page allows the reviewer to quickly determine if the plan is matching the
config author’s intent and evaluate the risk of the change.
Apply
After merge, Terraform Cloud presents the concrete plan to the team for
review and approval.
The team can discuss any outstanding questions about the plan before the change
is made.
Once the Apply is confirmed, Terraform Cloud displays the progress live
to anyone who’d like to watch.
» Adding credentials
In order to make requests against the GCP API, you need to authenticate to prove
that it’s you making the request. The preferred method of provisioning resources
with Terraform is to use a GCP service account,
a «robot account» that can be granted a limited set of IAM permissions.
From the service account key page in the Cloud Console
choose an existing account, or create a new one. Next, download the JSON key
file. Name it something you can remember, and store it somewhere secure on your
machine.
You supply the key to Terraform using the environment variable
, setting the value to the location of the file.
If you choose to use -generated credentials, and you encounter
quota or billing issues which don’t seem to apply to you, you may want to set
to in the provider block — see the
provider reference for more information.
Remember to add this line to a startup file such as or
to store your credentials across sessions!
» Arguments and Blocks
The Terraform language syntax is built around two key syntax constructs:
arguments and blocks.
Arguments
An argument assigns a value to a particular name:
The identifier before the equals sign is the argument name, and the expression
after the equals sign is the argument’s value.
The context where the argument appears determines what value types are valid
(for example, each resource type has a schema that defines the types of its
arguments), but many arguments accept arbitrary
expressions, which allow the value to
either be specified literally or generated from other values programmatically.
Note: Terraform’s configuration language is based on a more general
language called HCL, and HCL’s documentation usually uses the word «attribute»
instead of «argument.» These words are similar enough to be interchangeable in
this context, and experienced Terraform users might use either term in casual
conversation. But because Terraform also interacts with several other things
called «attributes» (in particular, Terraform resources have attributes like
that can be referenced from expressions but can’t be assigned values in
configuration), we’ve chosen to use «argument» in the Terraform documentation
when referring to this syntax construct.
Blocks
A block is a container for other content:
A block has a type ( in this example). Each block type defines
how many labels must follow the type keyword. The block type
expects two labels, which are and in the example above.
A particular block type may have any number of required labels, or it may
require none as with the nested block type.
After the block type keyword and any labels, the block body is delimited
by the and characters. Within the block body, further arguments
and blocks may be nested, creating a hierarchy of blocks and their associated
arguments.
The Terraform language uses a limited number of top-level block types, which
are blocks that can appear outside of any other block in a configuration file.
Most of Terraform’s features (including resources, input variables, output
values, data sources, etc.) are implemented as top-level blocks.
» Syncing
In the default configuration, Terraform stores the state in a file in the
current working directory where Terraform was run. This is okay for getting
started, but when using Terraform in a team it is important for everyone
to be working with the same state so that operations will be applied to the
same remote objects.
Remote state is the recommended solution
to this problem. With a fully-featured state backend, Terraform can use
remote locking as a measure to avoid two or more different users accidentally
running Terraform at the same time, and thus ensure that each Terraform run
begins with the most recent updated state.
» Custom Validation Rules
This feature was introduced in Terraform CLI v0.13.0.
In addition to Type Constraints as described above, a module author can specify
arbitrary custom validation rules for a particular variable using a
block nested within the corresponding block:
The argument is an expression that must use the value of the
variable to return if the value is valid, or if it is invalid.
The expression can refer only to the variable that the condition applies to,
and must not produce errors.
If the failure of an expression is the basis of the validation decision, use
the function to detect such errors. For example:
If evaluates to , Terraform will produce an error message
that includes the sentences given in . The error message string
should be at least one full sentence explaining the constraint that failed,
using a sentence structure similar to the above examples.
» When to write a module
In principle any combination of resources and other constructs can be factored
out into a module, but over-using modules can make your overall Terraform
configuration harder to understand and maintain, so we recommend moderation.
A good module should raise the level of abstraction by describing a new concept
in your architecture that is constructed from resource types offered by
providers.
For example, and are both resource types belonging to
the AWS provider. You might use a module to represent the higher-level concept
«HashiCorp Consul cluster running in AWS» which
happens to be constructed from these and other AWS provider resources.
We do not recommend writing modules that are just thin wrappers around single
other resource types. If you have trouble finding a name for your module that
isn’t the same as the main resource type inside it, that may be a sign that
your module is not creating any new abstraction and so the module is
adding unnecessary complexity. Just use the resource type directly in the
calling module instead.
» Frequently Asked Questions
Why do I see during init?
Provider source addresses starting with are a special
way Terraform marks legacy addresses where the true namespace is unknown. For
providers that were automatically-installable in Terraform 0.12, Terraform 0.13
can automatically determine the new addresses for these using a lookup table in
the public Terraform Registry. That lookup table is accessed by using the
special namespace .
When you run , terraform generates a list of required providers based on
both the configuration and state. Legacy-style providers — such as providers in
a statefile written with Terraform v0.12 — don’t have a namespace, so terraform
uses the placeholder namespace to query the registry. That is why you may
see output like this during your first :
Terraform found providers and in the statefile without a
namespace. Terraform also found and in the
configuration files. Providers in configuration are automatically assumed to be
default (HashiCorp) providers, while providers found in state are first looked
up in the registry.
While this does not cause any problems for Terraform, it has been confusing. You
may circumvent this by using the subcommand
to tell Terraform exactly what provider addresses are required in state.
Continuing from the example above, the following commands tell Terraform the
source address for the and providers:
If you are seeing these messages with errors, and are using in-house or
locally-installed providers, please see the section on .
» Working as a Team
Once multiple people are collaborating on Terraform configuration, new steps
must be added to each part of the core workflow to ensure everyone is working
together smoothly. You’ll see that many of these steps parallel the workflow
changes we make when we work on application code as teams rather than as
individuals.
Write
While each individual on a team still makes changes to Terraform configuration
in their editor of choice, they save their changes to version control branches
to avoid colliding with each other’s work. Working in branches enables team
members to resolve mutually incompatible infrastructure changes using their
normal merge conflict workflow.
Running iterative plans is still useful as a feedback loop while authoring
configuration, though having each team member’s computer able to run them
becomes more difficult with time. As the team and the infrastructure grows, so
does the number of sensitive input variables (e.g. API Keys, SSL Cert Pairs)
required to run a plan.
To avoid the burden and the security risk of each team member arranging all
sensitive inputs locally, it’s common for teams to migrate to a model in which
Terraform operations are executed in a shared Continuous Integration (CI)
environment. The work needed to create such a CI environment is nontrivial, and
is outside the scope of this core workflow overview, but a full deep dive on
this topic can be found in our
Running Terraform in Automation
guide.
This longer iteration cycle of committing changes to version control and then
waiting for the CI pipeline to execute is often lengthy enough to prohibit using
speculative plans as a feedback loop while authoring individual Terraform
configuration changes. Speculative plans are still useful before new Terraform
changes are applied or even merged to the main development branch, however, as
we’ll see in a minute.
Plan
For teams collaborating on infrastructure, Terraform’s plan output creates an
opportunity for team members to review each other’s work. This allows the team
to ask questions, evaluate risks, and catch mistakes before any potentially
harmful changes are made.
The natural place for these reviews to occur is alongside pull requests within
version control—the point at which an individual proposes a merge from their
working branch to the shared team branch. If team members review proposed
config changes alongside speculative plan output, they can evaluate whether the
intent of the change is being achieved by the plan.
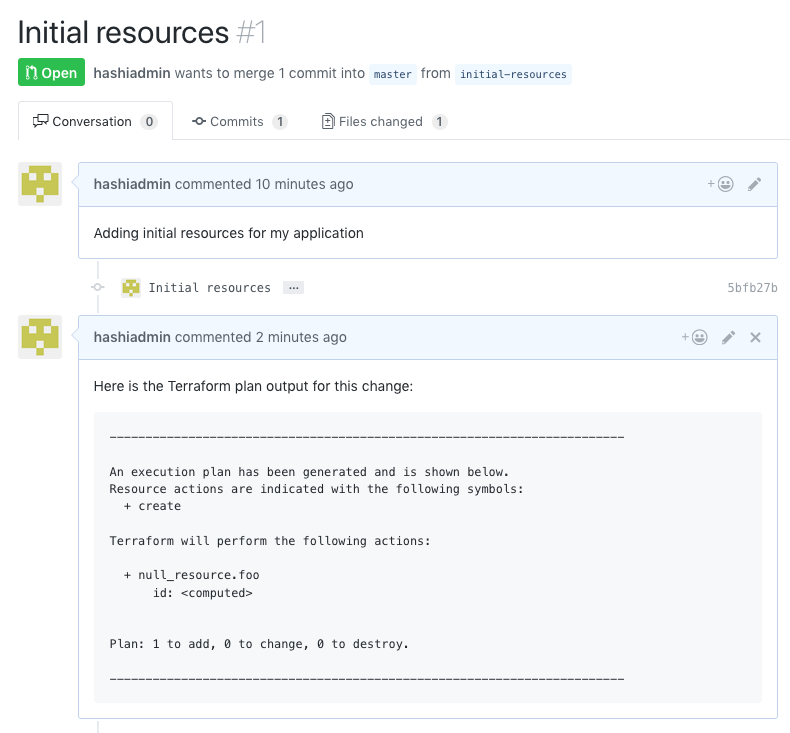
The problem becomes producing that speculative plan output for the team to
review. Some teams that still run Terraform locally make a practice that pull
requests should include an attached copy of speculative plan output generated
by the change author. Others arrange for their CI system to post speculative
plan output to pull requests automatically.
In addition to reviewing the plan for the proper expression of its author’s
intent, the team can also make an evaluation whether they want this change to
happen now. For example, if a team notices that a certain change could result
in service disruption, they may decide to delay merging its pull request until
they can schedule a maintenance window.
Apply
Once a pull request has been approved and merged, it’s important for the team
to review the final concrete plan that’s run against the shared team branch and
the latest version of the state file.
This plan has the potential to be different than the one reviewed on the pull
request due to issues like merge order or recent infrastructural changes. For
example, if a manual change was made to your infrastructure since the plan was
reviewed, the plan might be different when you merge.
It is at this point that the team asks questions about the potential
implications of applying the change. Do we expect any service disruption from
this change? Is there any part of this change that is high risk? Is there
anything in our system that we should be watching as we apply this? Is there
anyone we need to notify that this change is happening?
Depending on the change, sometimes team members will want to watch the apply
output as it is happening. For teams that are running Terraform locally, this
may involve a screen share with the team. For teams running Terraform in CI,
this may involve gathering around the build log.
Just like the workflow for individuals, the core workflow for teams is a loop
that plays out for each change. For some teams this loop happens a few times a
week, for others, many times a day.
» How to use Provisioners
Note: Provisioners should only be used as a last resort. For most
common situations there are better alternatives. For more information, see
the sections above.
If you are certain that provisioners are the best way to solve your problem
after considering the advice in the sections above, you can add a
block inside the block of a compute instance.
The provisioner requires no other configuration, but most other
provisioners must connect to the remote system using SSH or WinRM.
You must include a block so that Terraform
will know how to communicate with the server.
Terraform includes several built-in provisioners; use the navigation sidebar to
view their documentation. You can also install third-party provisioners in
.
All provisioners support the and meta-arguments, which
are described below (see
and ).
The Object
Expressions in blocks cannot refer to their parent resource by
name. Instead, they can use the special object.
The object represents the provisioner’s parent resource, and has all of
that resource’s attributes. For example, use to reference an
‘s attribute.
Technical note: Resource references are restricted here because
references create dependencies. Referring to a resource by name within its own
block would create a dependency cycle.
» Providers in the Terraform Registry
The Terraform Registry
is the main directory of publicly available Terraform providers, and hosts
providers for most major infrastructure platforms.
Once you’ve found a provider you want to use, you can require it in your
Terraform configuration and start using the resource types it provides.
Terraform can automatically install providers from the Terraform Registry when
you run .
- To find providers for the infrastructure platforms you use, browse
the providers section of the Terraform Registry. - For details about how to use providers in your Terraform configurations, see
Provider Requirements and
Provider Configuration.
Provider Documentation
Every Terraform provider has its own documentation, describing its resource
types and their arguments.
The Terraform Registry is also the main home for provider documentation.
When viewing a provider’s page on the Terraform Registry, you can click the
«Documentation» link in the header to browse its documentation. Provider
documentation in the registry is versioned, and you can use the dropdown version
menu in the header to switch which version’s documentation you are viewing.
» Attributes Reference
In addition to the arguments listed above, the following computed attributes are
exported:
-
— an identifier for the resource with format
-
— The IP address of this cluster’s Kubernetes master.
-
— List of instance group URLs which have been assigned
to the cluster. -
— The fingerprint of the set of labels for this cluster.
-
— Duration of the time window, automatically chosen to be
smallest possible in the given scenario.
Duration will be in RFC3339 format «PTnHnMnS». -
— Base64 encoded public certificate
used by clients to authenticate to the cluster endpoint. -
— Base64 encoded private key used by clients
to authenticate to the cluster endpoint. -
— Base64 encoded public certificate
that is the root of trust for the cluster. -
— The current version of the master in the cluster. This may
be different than the set in the config if the master
has been updated by GKE. -
— (Beta) The IP address range of the Cloud TPUs in this cluster, in
CIDR
notation (e.g. ). -
— The IP address range of the Kubernetes services in this
cluster, in CIDR
notation (e.g. ). Service addresses are typically put in the last
from the container CIDR.
» HTTP URLs
When you use an HTTP or HTTPS URL, Terraform will make a request to
the given URL, which can return another source address. This indirection
allows using HTTP URLs as a sort of «vanity redirect» over a more complicated
module source address.
Terraform will append an additional query string argument to
the given URL before sending the request, allowing the server to
optionally return a different result when Terraform is requesting it.
If the response is successful (-range status code), Terraform looks in
the following locations in order for the next address to access:
-
The value of a response header field named .
-
If the response is an HTML page, a element with the name :
In either case, the result is interpreted as another module source address
using one of the forms documented elsewhere on this page.
If an HTTP/HTTPS URL requires authentication credentials, use a
file in your home directory to configure these. For information on this format,
see the documentation for using it in .
Fetching archives over HTTP
As a special case, if Terraform detects that the URL has a common file
extension associated with an archive file format then it will bypass the
special redirection described above and instead just use
the contents of the referenced archive as the module source code:
The extensions that Terraform recognizes for this special behavior are:
- and
- and
- and
If your URL doesn’t have one of these extensions but refers to an archive
anyway, use the argument to force this interpretation:
» Using Workspaces
Terraform starts with a single workspace named «default». This
workspace is special both because it is the default and also because
it cannot ever be deleted. If you’ve never explicitly used workspaces, then
you’ve only ever worked on the «default» workspace.
Workspaces are managed with the set of commands. To
create a new workspace and switch to it, you can use ;
to switch workspaces you can use ; etc.
For example, creating a new workspace:
As the command says, if you run , Terraform will not see
any existing resources that existed on the default (or any other) workspace.
These resources still physically exist, but are managed in another
Terraform workspace.
» Workspace Internals
Workspaces are technically equivalent to renaming your state file. They
aren’t any more complex than that. Terraform wraps this simple notion with
a set of protections and support for remote state.
For local state, Terraform stores the workspace states in a directory called
. This directory should be treated similarly to
local-only ; some teams commit these files to version
control, although using a remote backend instead is recommended when there are
multiple collaborators.
For remote state, the workspaces are stored
directly in the configured backend. For example, if you
use Consul, the workspaces are stored
by appending the workspace name to the state path. To ensure that
workspace names are stored correctly and safely in all backends, the name
must be valid to use in a URL path segment without escaping.
The important thing about workspace internals is that workspaces are
meant to be a shared resource. They aren’t a private, local-only notion
(unless you’re using purely local state and not committing it).
The «current workspace» name is stored only locally in the ignored
directory. This allows multiple team members to work on
different workspaces concurrently. The «current workspace» name is not
currently meaningful in Terraform Cloud workspaces since it will always
have the value .
» Explicit Provider Source Locations
Prior versions of Terraform have supported automatic provider installation only
for providers packaged and distributed by HashiCorp. Providers built by the
community have previously required manual installation by extracting their
distribution packages into specific local filesystem locations.
Terraform v0.13 introduces a new hierarchical namespace for providers that
allows specifying both HashiCorp-maintained and community-maintained providers
as dependencies of a module, with community providers distributed from other
namespaces on Terraform Registry from a
third-party provider registry.
In order to establish the hierarchical namespace, Terraform now requires
explicit source information for any providers that are not HashiCorp-maintained,
using a new syntax in the nested block inside the
configuration block:
If you are using providers that now require an explicit source location to be
specified, will produce an error like the following:
As mentioned in the error message, Terraform v0.13 includes an automatic
upgrade command
that is able to automatically generate source addresses for unlabelled
providers by consulting the same lookup table that was previously used for
Terraform v0.12 provider installation. This command will automatically modify
the configuration of your current module, so you can use the features of your
version control system to inspect the proposed changes before committing them.
We recommend running even if you don’t see the message,
because it will generate the recommended explicit source addresses for
providers in the «hashicorp» namespace.
For more information on declaring provider dependencies, see
Provider Requirements.
That page also includes some guidance on how to write provider dependencies
for a module that must remain compatible with both Terraform v0.12 and
Terraform v0.13; the result includes a conservative
version constraint for Terraform v0.13 or later, which you can weaken to
if you follow the guidelines in
.
Each module must declare its own set of provider requirements, so if you have
a configuration which calls other modules then you’ll need to run this upgrade
command for each module separately.
The
includes an example of running the upgrade process across all directories under
a particular prefix that contain files using some common Unix command line
tools, which may be useful if you want to upgrade all modules in a single
repository at once.
After you’ve added explicit provider source addresses to your configuration,
run again to re-run the provider installer.
Action: Either run for each of your modules, or manually update the provider declarations to use explicit source addresses.
The upgrade tool described above only updates references in your configuration.
The Terraform state also includes references to provider configurations which
need to be updated to refer to the correct providers.
Terraform will automatically update provider configuration references in the
state the first time you run after upgrading, but it relies
on information in the configuration to understand which provider any
existing resource belongs to, and so you must run at least
once (and accept any changes it proposes) before removing any blocks
from your configuration after upgrading.
If you are using Terraform Cloud or Terraform Enterprise with the VCS-driven
workflow (as opposed to CLI-driven runs), refer to
The UI- and VCS-driven Run Workflow to learn how
to manually start a run after you select a Terraform v0.13 release for your
workspace.
If you remove a block (or a block for a module that
contains blocks) before the first , you may see
a message like this reflecting that Terraform cannot determine which provider
configuration the existing object ought to be managed by:
In this specific upgrade situation the problem is actually the missing
block rather than the missing block: Terraform would
normally refer to the configuration to see if this resource has an explicit
argument that would override the default strategy for selecting
a provider. If you see the above after upgrading, re-add the resource mentioned
in the error message until you’ve completed the upgrade.
Action: After updating all modules in your configuration to use the new provider requirements syntax, run to create a new state snapshot containing the new-style provider source addresses that are now specified in your configuration.
» Safer terraform plan Behavior
Prior to v0.7, the command had the potential to write updates to the state if changes were detected during the Refresh step (which happens by default during ). Some configurations have metadata that changes with every read, so Refresh would always result in changes to the state, and therefore a write.
In collaborative environments with shared remote state, this potential side effect of would cause unnecessary contention over the state, and potentially even interfere with active operations if they were happening simultaneously elsewhere.
Terraform v0.7 addresses this by changing the Refresh process that is run during to always be an in-memory only refresh. New state information detected during this step will not be persisted to permanent state storage.
If the flag is used to produce a Plan File, the updated state information will be encoded into that file, so that the resulting operation can detect if any changes occurred that might invalidate the plan.
For most users, this change will not affect your day-to-day usage of Terraform. For users with automation that relies on the old side effect of , you can use the command, which will still persist any changes it discovers.
» Destroy-time provisioners may not refer to other resources
Destroy-time provisioners allow introducing arbitrary additional actions into
the destroy phase of the resource lifecycle, but in practice the design of this
feature was flawed because it created the possibility for a destroy action
of one resource to depend on a create or update action of another resource,
which often leads either to dependency cycles or to incorrect behavior due to
unsuitable operation ordering.
In order to retain as many destroy-time provisioner capabilities as possible
while addressing those design flaws, Terraform v0.12.18 began reporting
deprecation warnings for any block setting whose
configuration refers to any objects other than , , and .
Addressing the flaws in the destroy-time provisioner design was a pre-requisite
for new features in v0.13 such as module , so Terraform v0.13
concludes the deprecation cycle by making such references now be fatal errors:
Some existing modules using resource or other references inside destroy-time
provisioners can be updated by placing the destroy-time provisioner inside a
resource and copying any data needed at destroy time into
the map to be accessed via :
In the above example, the map is effectively
acting as a temporary «cache» for the instance’s private IP address to
guarantee that a value will be available when the provisioner runs, even if
the object itself isn’t currently available.
The provisioner’s configuration can refer to that value via
, whereas referring directly to in that
context is forbidden.
,
so we recommend avoiding both create-time and destroy-time provisioners wherever
possible. Other options for destroy-time actions include using to
run commands within your virtual machines during shutdown or using virtual
machine lifecycle hooks provided by your chosen cloud computing platform,
both of which can help ensure that the shutdown actions are taken even if the
virtual machine is terminated in an unusual way.
Action: If you encounter the «Invalid reference from destroy provisioner» error message after upgrading, reorganize your destroy-time provisioners to depend only on self-references, and consider other approaches if possible to avoid using destroy-time provisioners at all.