Node-red-vis 0.4.2
Содержание:
- Install
- Начнем с базиса
- Runtime features
- Layout
- Step 5 — Securing Node-RED and Wrapping Up
- Editor Updates
- The all in one Modbus TCP and Serial contribution package for Node-RED.
- Nodes in this package
- How to create a node from WoT Thing Description
- 1: Установка Node.js и npm
- Layout
- Урок информатики
- Node updates
- Step 2 — Installing Node-RED
- send commands to ui-table
- Getting Started with Node-RED
- Step 4 — Setting Up Nginx
- Step 3 — Launching Node-RED on Startup
- Developers/Contributors
- 2: Установка Node-RED
Install
Run the following command in the root directory of your Node-RED install
Run the following command for global install
try these options on npm install to build, if you have problems to install
modbus-serial, serialport and jsmodbus
The serialport optional dependency is just to list all ports on your system in the client configuration.
It is not the serialport version to work with Modbus at runtime.
For that check the modbus-serial or jsmodbus package.json, please!
The modbus-serial supports and works for TCP connections in that package, too.
The jsmodbus package is just to provide a simple Modbus Server node.
All Modbus commands running on modbus-serial.
TCP or Serial testing
If you get in trouble with TCP connections, then check and test with just modbus-serial first, please!
If you get in trouble with Serial connections, then check with just serialport first, please!
Начнем с базиса
Запомним для начала, что Node-RED, наверное, самый гибкий инструмент, который не потребует в большинстве случаев знания какого-либо языка программирования (но знаний JavaScript будет большим плюсом — кстати это наверное самый просто и быстроизучаемый язык).
Исходя из этого, нам нужно знать главные несколько правил: все алгоритмы, как и на уроках информатики создаются на основе разного вида «кубиков». Только если при рисовании алгоритмов на информатики у нас были квадратики, ромбики, кружочки и т.д., то здесь «кубики» различаются цветом.
Напомним, как выглядит обычный визуализированный алгоритм.
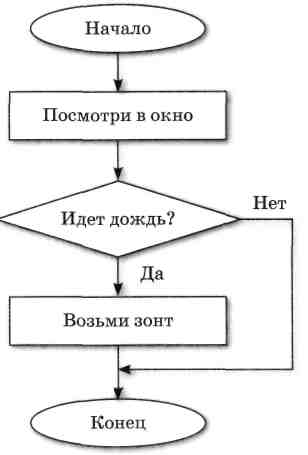
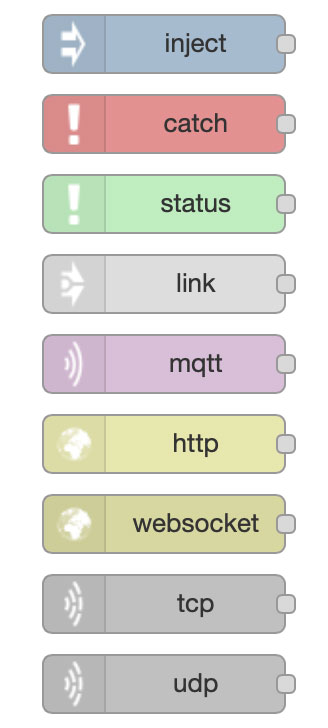
А вот так выглядят «кубики» из Node-RED.
Runtime features
node-red-admin built-in
The command-line tool has existed since the start of the project,
but it isn’t something widely known about or used. It can be used to remotely
administer a Node-RED runtime.
To make it more useful, it is now integrated into the command. You run it with:
One of the useful commands it provides is a way to hash passwords suitable for
. It prompts you for the password you want to use and it gives you
back the hash you can paste into your settings file.
The other commands let you list what nodes are installed, enable/disable them,
install new ones or remove old ones. You can also search the flow library.
Overriding individual settings
The command now supports the option to override individual settings.
For example, to temporarily run with a different level of logging you can use:
setting
We’ve had the option for a while now — allowing a custom
middleware to be added to the HTTP In node routes. This release adds
that does the same thing for all of the admin routes,
which includes the editor itself. This can be used, for example, to add custom
http headers to all admin requests. Not something most end users need, but has
been a requirement from those who embed the editor into their own applications.
Custom token handling
now supports a custom function that can be used to validate any auth token passed to the admin api. This opens up some more flexible options to integrate Node-RED admin security with other authentication systems.
Installing nodes from other locations
The admin api for installing new nodes has been extended to support a ‘url’
parameter — which should be a full url to a containing the node to install.
This hasn’t been written up in the docs yet, but for now, you can read the original
design note
Refreshing HTTPS certificates
The runtime can now be configured to periodically refresh its https certificates.
This feature requires Node.js 12 or later.
The default with examples for how to configure this.
Layout
The dashboard layout should be considered as a grid.
Each group element has a width — by default 6 ‘units’ (a unit is 48px wide by default with a 6px gap).
Each widget in the group also has a width — by default, ‘auto’ which means it will fill the width of the group it is in, but you can set it to a fixed number of units.
The layout algorithm of the dashboard always tries to place items as high and to the left as they can within their container — this applies to how groups are positioned on the page, as well as how widgets are positioned in a group.
Given a group with width 6, if you add six widgets, each with a width of 2, then they will be laid out in two rows — three widgets in each.
If you add two groups of width 6, as long as your browser window is wide enough, they will sit alongside each other. If you shrink the browser, at some point the second group will shift to be below the first, in a column.
It is advisable to use multiple groups if possible, rather than one big group, so that the page can dynamically resize on smaller screens.
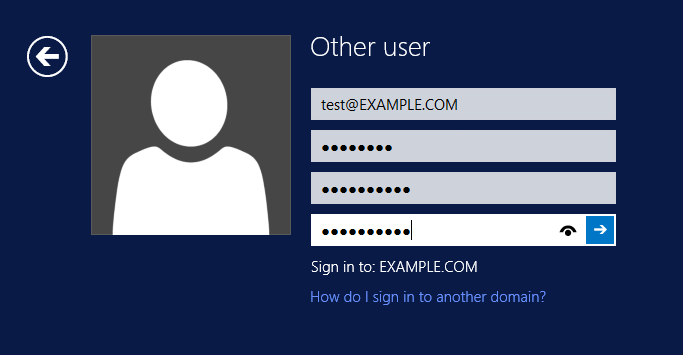
Step 5 — Securing Node-RED and Wrapping Up
Now that our connection is secure, let’s add a password to the Node-RED admin. Instead of putting a bare password right into our settings file, we first make a one-way cryptographic hash of it, and use that instead. We’ll use to create the hash:
You will be prompted for a password. Type it in, press , and a hash will be printed on screen. Copy that to your clipboard and open the Node-RED settings file.
Scroll down and uncomment the block (by removing the “// ” in front of each line). Change to whatever you like, and paste the hash into the field.
settings.js
While we’ve got the file open, uncomment the line as well by removing the at the front of the line.
settings.js
This means Node-RED will only listen on the local interface, and wont be reachable directly by the outside world (it will only be accessed through the Nginx proxy). You can now save and close the file.
Update the firewall one last time, just to make sure Node-RED is never directly accessible.
Finally, restart Node-RED.
Navigate to and you’ll see a login screen instead of the main editing interface.
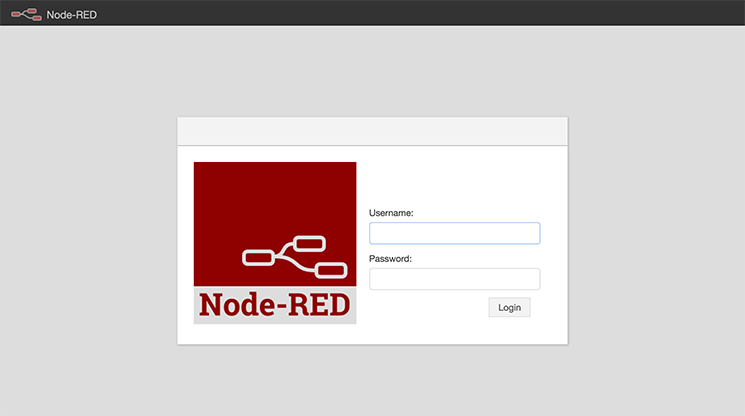
If your site is showing a login screen and an connection, you’ve set everything up correctly.
Editor Updates
The info sidebar now includes a tree-view of your flows — we call it the outliner.
This gives another way to navigate your flows and quickly find things.
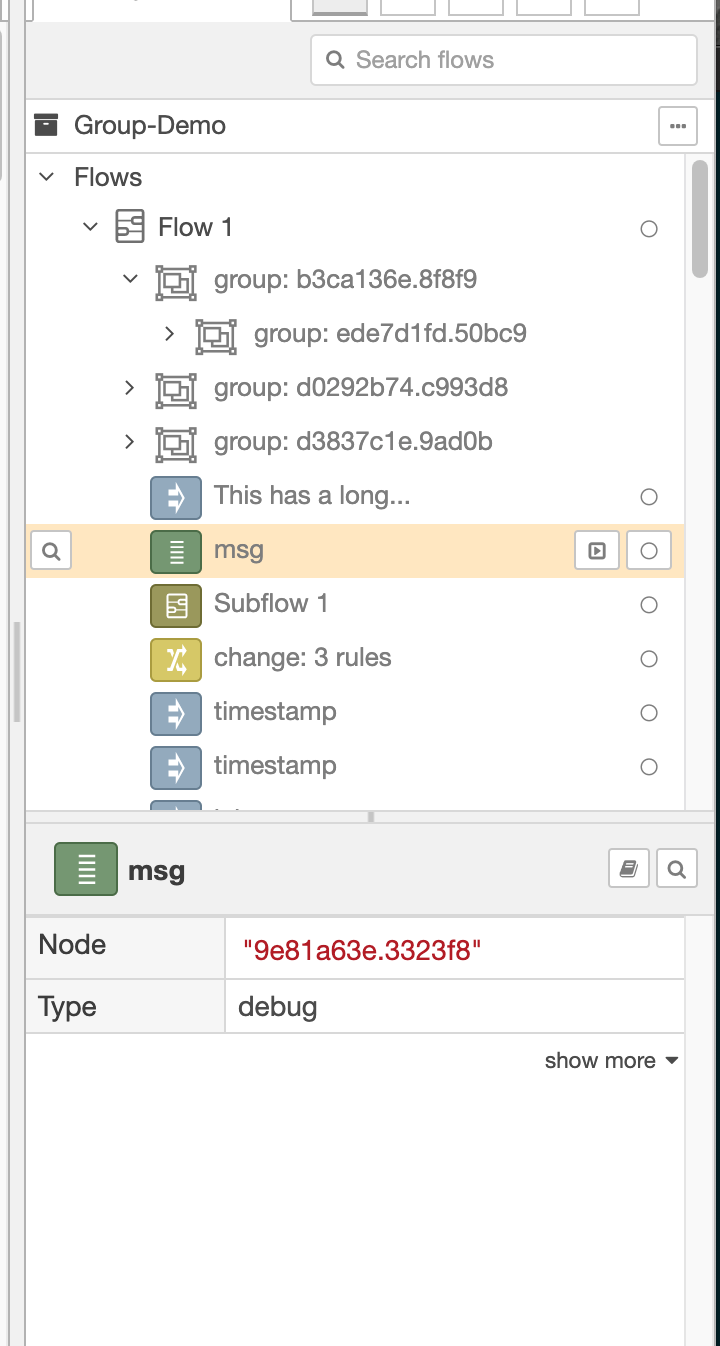
Each node has a button that takes you to it in the workspace, a button to
enable/disable it and, in the case of the Inject and Debug nodes, a button to
trigger their action. Double-clicking on a node will bring up its edit dialog.
To make room for the outliner, the help section of the sidebar has now moved
to its own sidebar tab. The added benefit of putting the help in its own tab
is you can now browse all of the available help topics without having to select
a node of the right type in the workspace.
It will also give us a space to add other help topics in the editor in the future.
Grouping nodes
To help organise your flows you can now group your nodes in the editor.
The group can have a custom border and background colour and an optional label.

Groups are added to the flow as a new type of node. As people start using them,
it will make it harder to share flows with users who haven’t yet upgraded.
To help out, we’ve published
which registers a node type but does absolutely nothing. Installing this
module will allow older versions of Node-RED to import flows that include a
group — although they won’t see the groups in the editor. And the module knows
not to register itself when it isn’t needed, so there’s no issue upgrading to 1.1
with it installed.
The all in one Modbus TCP and Serial contribution package for Node-RED.
Node-RED contribution package for Modbus
Based on modbus-serial with TCP, C701, Telnet, Serial, RTU buffered, and ASCII
- stress tested with Node-RED v1.0.4 and Node.js LTS
- works with queueing per unit and round robin scheduling
Node-RED v1.x versions:
- Node.JS 14.x is beta supported with v5.x
- Node.JS 12.x is supported with v5.x
- Node.JS 10.x is supported with v5.x
Node-RED v0.x versions:
- Node.JS 10.x is supported with v4.x
- Node.JS 8.x is supported with v3.x
- Node.JS 6.x is supported with v2.x
- Node.JS 4.x is supported with v1.x
If you like that contributor’s package for Modbus, then please give us your star at GitHub !
Nodes in this package
General information
- If is set to for a node, Google SmartHome is not going to be able to control the node. It will also show as in the Google Home app.
- The nodes will do their best to convert incoming payload data to the required type. You can send a string of e.g. and it will be converted to .
- Topics must be either as stated below or prepended with one or more . E.g. . The nodes only looks for the part after the last , if any.
— Light On/Off (a light that can be switched on and off only)
can be , or something else.
If is then must be boolean and tells the state of the light.
If is then must be boolean and tells the online state of the light.
If is something else then must be an object and tells all the states of the light.
— Dimmable Light
can be , , or something else.
If is then must be boolean and tells the state of the light.
If is then must be boolean and tells the online state of the light.
If is then must be a number and tells the brightness of the light. Range is 0 through 100.
If is something else then must be an object and tells all the states of the light.
— Color Temperature Light
can be , , , or something else.
If is then must be boolean and tells the state of the light.
If is then must be boolean and tells the online state of the light.
If is then must be a number and tells the brightness of the light. Range is 0 through 100.
If is then must be a number and tells the color temperature of the light. Range is 2000 through 6000.
If is something else then must be an object and tells all the states of the light.
Example flow:
— Color (HSV) Light
can be , , , , , or something else.
If is then must be boolean and tells the state of the light.
If is then must be boolean and tells the online state of the light.
If is then must be a number and tells the brightness of the light. Range is 0 through 100.
If is then must be a number and tells the hue of the light. Range is 0.0 through 360.0.
If is then must be a number and tells the saturation of the light. Range is 0.0 through 100.0.
If is then must be a number and tells the value of the light. Range is 0.0 through 100.0.
If is something else then must be an object and tells all the states of the light.
— Color (RGB) Light
can be , , , or something else.
If is then must be boolean and tells the state of the light.
If is then must be boolean and tells the online state of the light.
If is then must be a number and tells the brightness of the light. Range is 0 through 100.
If is then must be a number and tells the RGB values of the light. Range is 0 through 16777215.
Hint: red = 16711680, green = 65280, blue = 255.
If is something else then must be an object and tells all the states of the light.
— Outlet
can be , or something else.
If is then must be boolean and tells the state of the outlet.
If is then must be boolean and tells the online state of the outlet.
If is something else then must be an object and tells both the on state as well as the online state of the outlet.
Example flow:
— Thermostat
can be , or something else.
If is then must be a float and indicates the current ambient (room) temperature.
If is then must be a float and indicates the target temperature of the thermostat.
If is then must be boolean and tells the online state of the thermostat.
If is something else then must be an object and tells the online state, ambient and target temperature of the thermostate.
Example flow:
— Window
can be , or something else.
If is then must be integer and indicates the percentage that the window is opened where 0 is closed and 100 is fully open.
If is then must be boolean and tells the online state of the window.
If is something else then must be an object and tells both the open state as well as the online state of the window.
Example flow:
— Scene
Messages sent to this node is simply passed through. One cannot tell Google SmartHome to activate a scene, they tell us.
— Vacuum
can be , or something else.
If is then must be boolean and and tells the state of the vacuum.
If is then must be boolean and tells the online state of the vacuum.
If is something else then must be an object and tells both the on state as well as the online state of the vacuum.
— Fan
can be , or something else.
If is then must be boolean and and tells the state of the fan.
If is then must be boolean and tells the online state of the fan.
If is something else then must be an object and tells both the on state as well as the online state of the fan.
— Management
can be , or .
is not used for anything.
is used to stop then start the built-in webserver. Can be used when your SSL certificate has been renewed and needs to be re-read by the webserver.
will force an update of all states to Google. Mostly usefull for debugging.
will request Google to sync to learn about new or changed devices. This usually happens automatically.
How to create a node from WoT Thing Description
You can specify the URL or file path of a Thing Description (TD) as the first argument of the node-red-nodegen command. If you use the URL for retrieve a TD, or the file whose extension isn’t «.jsonld», you should specify the option. And, if you get a TD using URL, you can also specify option to get a TD of the specific language, if exist.
(1) Generate node using node-red-nodegen command
Node-RED users typically import the generated node to the palette of Node-RED flow editor using the following procedures.
(2) Change current directory to Node-RED home directory (Typically, Node-RED home directory is «.node-red» under the home directory)
(3) Locally install the module
(4) Start Node-RED
-> You can see the generated node on the palette (in an «Web of Things» category, if not specified by command-line option) of the Node-RED flow editor.
(6) Drag and drop the generated node to the workspace
(7) Configure the node
- Interaction: which interaction do you want to use?
- Name: what is the name of the interaction?
- Access: when you use a property, what kind of interaction do you want? (Read/Write/Observe)
- Form: which pair of authentication method and end point do you want to use?
- Token or Username/Password: if the end point needs credential for access, specify it.
- Node name: you can specify the display name of the node
(8) Create a flow on the Node-RED flow editor
- Property:
- To read a property, send any message to the node, and the result will emitted as msg.payload.
- To write to property, send the value to be written as msg.payload.
- When you observe a property, the node periodically emits the property value as msg.payload.
- Action:
- Event:
(9) Run the flow
Module name
Node generator uses «node-red-contrib-» as the default prefix for the module, and default node name is created from «name» property in TD.
If you want to change the default module name, you can specify the module name using or option.
Node name
In the case of the node generated from Thing Description, «name» property in TD is used as the generated node’s name.
Node generator will replace uppercase characters and spaces with hyphens to convert appropriate name for npm module and Node-RED node.
If you want to change the default name, you can set the node name using option.
If «name» property contains a double-byte character instead of alphabet and number, you need to specify the node name using option in order for Node generator to generate the name correctly.
Version
By default, Node generator uses «version» property as the module version number.
When you update the version number of the module without incrementing the version number in Thing Description, you need to specify option.
A conflict error will occur when you publish a module that has the same version number as the previously published module when using «npm publish» command.
In this case, the option needs to be specified to update the version number of the module.
Keywords
is a useful options for keywords of the module in the flow library.
On the flow library website, visitors can search the module using keywords.
For example, if you want to use «lamp» as a keyword, you can specify the word using option.
By default, Node generator uses «node-red-nodegen» as a keywords.
To add more than two keywords, you can also use comma-separated keywords.
If «—keywords node-red» is specified when you publish the generated node, your node will be registered on the flow library and you can install the node via Node-RED flow editor.
Category
On the palette of Node-RED flow editor, the generated node is in «Web of Things» category by default.
To change the category, you can use option.
For example, the node generated from the following command can be viewed in the «analysis» category on the Node-RED flow editor.
Node color
By default, Node generator uses default node color defined in the node templates. If you need to change it, you can use the option of the command line. The option value should be the sequence of the hexadecimal numbers («RRGGBB» formats) which represents node color.
Node information in info tab
Node generator automatically generates the node information in the info tab using the following properties in Thing Description
- description: Node description:
- title/description/forms in properties/actions/events: Interaction description
- support: Support Information
- links: References
If you want to modify node information in info tab, you can manually edit the generated HTML file.
README
To explain the details of the node, you can write documentation in a README.md file.
The documentation will be used in the flow library website if you publish your node on the flow library.
The Node generator outputs the template file of README.md so you can just modify it.
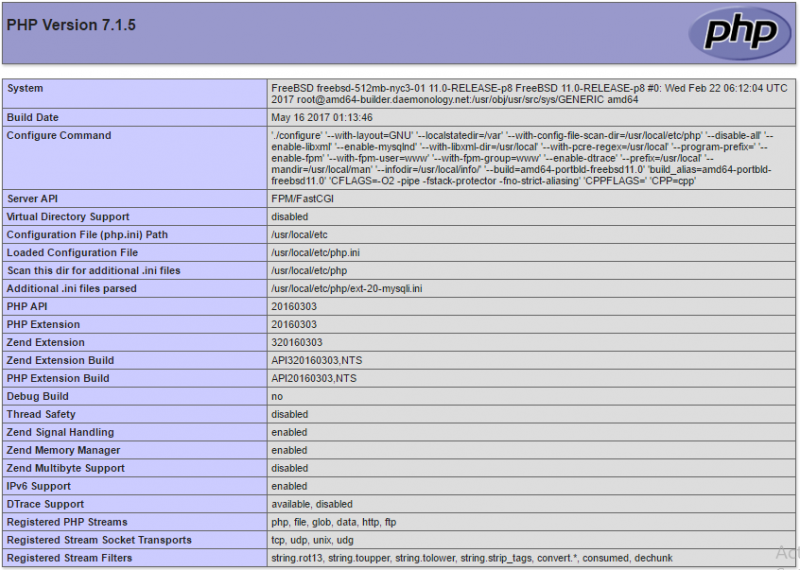
1: Установка Node.js и npm
Команда установит Node.js v4.2.x LTS (эта версия будет поддерживаться компанией Node.js Foundation в течение 30 месяцев с момента выхода 12 октября 2015 года).
Примечание: Обязательно нужно установить версию –legacy, как показано в команде, поскольку стартовые скрипты Node-RED требуют, чтобы бинарный файл Node.js назывался node, а не nodejs. В противном случае возникнет конфликт имён.
Убедитесь, что установка прошла успешно:
Команда вернёт номер версии Node.js:
Пакетный менеджер npm (Node Package Manager) позволяет устанавливать и управлять пакетами Node.js. С его помощью можно установить и Node-RED. Установите npm:
Убедитесь, что установка прошла успешно, запросив версию npm:
Если команда вернула номер версии, а не ошибку, можно переходить к следующему этапу.
Layout
The dashboard layout should be considered as a grid.
Each group element has a width — by default 6 ‘units’ (a unit is 48px wide by default with a 6px gap).
Each widget in the group also has a width — by default, ‘auto’ which means it will fill the width of the group it is in, but you can set it to a fixed number of units.
The layout algorithm of the dashboard always tries to place items as high and to the left as they can within their container — this applies to how groups are positioned on the page, as well as how widgets are positioned in a group.
Given a group with width 6, if you add six widgets, each with a width of 2, then they will be laid out in two rows — three widgets in each.
If you add two groups of width 6, as long as your browser window is wide enough, they will sit alongside each other. If you shrink the browser, at some point the second group will shift to be below the first, in a column.
It is advisable to use multiple groups if possible, rather than one big group, so that the page can dynamically resize on smaller screens.
Урок информатики
А вот так выглядит описанный выше алгоритм с помощью этих кубиков

Давайте теперь разберем этот пример:
- Синий блок «Начало» — это наш блок с входными данными. В нашем примере это блок с помощью которого вы можете передать любые статичные данные. Чаще всего вы будете использовать этот блок, чтобы передать в ваш алгоритм какие-нибудь статичные данные, допустим, для проверки нарисованного вами алгоритма.
- Оранжевые блоки в нашем алгоритме выполняют некоторые действия. Допустим вы получили от вашего устройства значение «1», а в homekit вы хотите, чтобы это означало «включено», как раз с помощью таких блоков вы и пишите «преврати значение 1 в значение включено»
- Желтый блок — это условие. Один из наиболее используемых блоков в создании своего homekit устройства или автоматизаций. Аналогом этого блока можно придумать выражение «если так, то сделай так, а если вот так, то сделай вот так».
- Зеленый блок — это выходные данные. В данном случае это блок дебага. Опять же он используется для того, чтобы убедиться, что по итогам выполненного алгоритма вы получили то, что хотели.
Те «кубики», которые я описал выше — это стандартный набор блоков, доступный при базовой установки. Но для того, чтобы интегрировать наш Node-RED с вашими системами умного дома, вам потребуются кастомные плагины («паллеты»). Допустим для HomeKit используется плагин homekit-bridged, а для связи с home-assistant — этот.
Node updates
JSONata support
We’ve added support for the Moment date/time library within JSONata expressions via the function.
This adds some long needed timezone awareness into the core of Node-RED. For example, you can get the current time in Auckland with the expression:
If you wanted to get the time 2 hours from now, you can do:
It can also do a much better job of parsing dates:
We’re considering making the Moment library available as a default built-in of the Function node as well, but that will
be a future release.
The Inject node can now set any properties on the message it sends — you aren’t limited to just and .

Function node lifecycle
The Function node now lets you provide code that should be run when the node is
deployed and when it is being stopped. This lets you initialise any state in the
node before it starts handling any messages. Note that each piece of code is in
a separate scope — you cannot declare variables in one and access them in the others.
You need to use to pass things between them.
The main Function has also been made a proper async Function so you can use at the top level, if that’s your sort of thing.

Debug node status
The Debug node can now set its status message independently of what it passes
to the Debug sidebar. Useful if you want to Debug a shorter summary to status,
whilst showing more complete information in the sidebar where there is more space.
Whilst talking about the Debug node, we’ve added a number of actions in the editor
to help activate/deactive lots of nodes in one go.
You can searching for them in the Action List ( or )
and you can assign keyboard shortcuts to them:
Trigger node
The Trigger node can now optionally send its ‘second message’ on a separate output.
If you want it to handle separate streams of messages, you are no longer tied
to using to identify the streams — you can use any message property.
Step 2 — Installing Node-RED
Use to install and a helper utility called .
normally installs its packages into your current directory. Here, we use the flag to install packages ‘globally’ so they’re placed in standard system locations such as . The flag helps us avoid some errors that can pop up when tries to compile native modules (modules written in a compiled language such as C or C++ vs. JavaScript).
After a bit of downloading and file shuffling, you’ll be returned to the normal command line prompt. Let’s test our install.
First, we’ll need to open up a port on our firewall. Node-RED defaults to using port , so let’s allow that.
And now launch Node-RED itself. No is necessary, as port is high enough to not require root privileges.
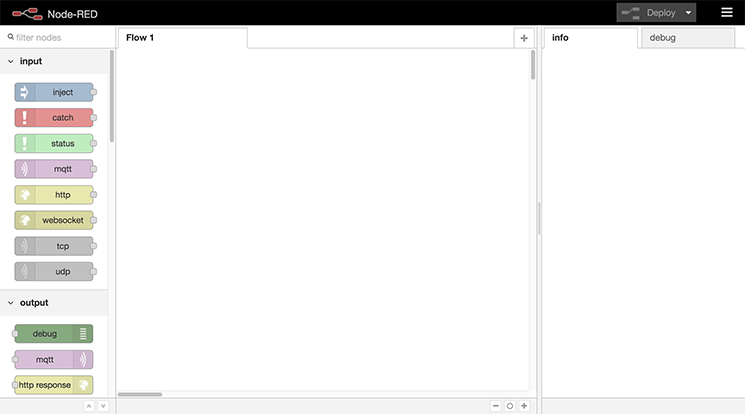
Some “Welcome to Node-RED” messages will print to the terminal. On your computer, point a web browser to port of the server. In our example, that’s . The main admin interface of Node-RED will load.
If it worked, you can type in your terminal to shut down Node-RED and return to the command prompt. We’ve installed Node-RED successfully and tested it out, so next, we’ll set it up to launch during system startup.
send commands to ui-table
Instead of sending an array to ui-table this node to replace the complete table data ui-table also accepts an object as payload to send commands. Beside data manipulation you can and do many other things with commands. The object must have the following properties
- a valid tabulator function such as , or
- (optional) array of arguments for that function
- (optional) a boolean value. if the function should return a promise message. See tabulator documentation which commands will return promises
example
By sending only changed or new data to ui-table it is possible to update the table very fast by only sending the new data down to cell level. Or huge amounts of data could be sent like logs.
important notices
Data which is sent to ui-table through commands is not cached by ui-table! The flow has to take care to update the table for new clients connection or dashboard tab changes!
Tabulator does not limit the amount of data it holds. It is quite efficient in showing tables with a couple of thousand rows. If it the data exceeds the capabilities of the clients browser it will crash with an out of memory error without notice.
Example flow «4 sending commands.json» file can be found in the examples folder or installed directly using menu/import/examples/ui-table.
This flow shows a basic implementation how the flow can keep a cached copy of all table data and add/delete or update selective rows.
Most nodes have info text available in the info/help tab.
Getting Started with Node-RED
Node-RED is built on Node.js. To install Node-RED, you will need to have both Node.js and NPM installed. With NPM, it is super easy to install Node-RED:
Node-RED’s flow editor is a web browser based application. To be able to use it, run Node-RED:
&hellip and navigate to http://localhost:1880.
Hello, World!
What beginner’s programming tutorial is complete without learning to say “Hello, world”? Let us start by trying out exactly that:
- Drag and drop an inject node on the flow editor. Then double click and set up the payload as string and write “Hello world”.
- Drag and drop a debug node, the same way as you did with the inject one.
- Wire them together.
- Click on the “Deploy” button on the right corner.
- Click on the blue button just left of the inject node.
Try it. You will see something like this:
Just JavaScript
With Node-RED, you are not limited to just simple nodes and functionalities. As Node-RED is built on Node.js, it’s all powered by JavaScript. Nodes are, indeed, Node.js modules. They can be found in http://flows.nodered.org/, so to add them to your left panel you can just “npm install” them. In fact, you can develop your own flow and upload them to the flow repository. Applications can be as complex as you want, because you are able to type JavaScript in function nodes within the code editor that Node-RED provides.
Since the platform is based on Node.js, it takes advantage of the same event-driven, non-blocking model. So an application built on Node-RED can be run on low cost hardware like the Raspberry Pi, as well as in the cloud.
Step 4 — Setting Up Nginx
We’re going to use Nginx to proxy the Node-RED service. This means Nginx will handle all of the SSL connections on port (using the Let’s Encrypt certificates you previously set up), and then pass the traffic along to Node-RED.
Oopen a new Nginx configuration for the site.
Copy and paste the following, changing the server name and certificate paths:
/etc/nginx/sites-enabled/node-red.example.com
Save and close the file. Let’s explain what this file does.
The first three lines tell Nginx what ports to listen on, and what domain name to respond to. The and lines point to the certificates we retrieved from Let’s Encrypt. The remaining lines choose protocols, ciphers, and options that are more secure than the defaults.
starts the block where we actually define our Node-RED proxy.
/etc/nginx/sites-enabled/node-red.example.com
This block will match any plain, non-secure http connections, and redirect them to the https version of the site.
/etc/nginx/sites-enabled/node-red.example.com
We point to our Node-RED service here. It is available on , at port , so we pass connections to it there. The remainder of this block of configuration sets some headers that are important for proper proxy functioning. The and headers are especially important for handling Node-RED’s websocket connections.
Finally, we have a block to make sure the Let’s Encrypt challenge responses continue to be fetched from Nginx’s default web root:
/etc/nginx/sites-enabled/node-red.example.com
Reload Nginx to pick up the new configuration.
Finally, start Node-RED again.
Once again, navigate to your server: . You should be redirected to (note the ) and see the Node-RED admin interface. This means we’re now proxying Node-RED through Nginx. We just have a few more tweaks to lock down Node-RED, and then we’ll be finished.
Step 3 — Launching Node-RED on Startup
In order to start Node-RED automatically on startup, we’ll need to install a file instead of the more traditional init script. This is because Ubuntu 16.04 is the first LTS release that uses for its init system. You can find a summary of this and other Ubuntu 16.04 changes in What’s New in Ubuntu 16.04.
Open a blank service file called .
Copy and paste in the following, then save and close the file.
/etc/systemd/system/node-red.service
A full explanation of systemd service files is beyond this tutorial, but you can learn more by reading Systemd Essentials: Working with Services, Units, and the Journal.
That said, let’s break down some of the sections in our service file:
/etc/systemd/system/node-red.service
This describes our service and indicates that it should be started after networking and syslog are functioning.
/etc/systemd/system/node-red.service
is the command needed to start our service. We call instead of plain so we can pass some memory-saving options to Node.js. This should allow it to run well on any reasonably sized server, depending of course on how many flows you create in Node-RED (and how complicated they are). means systemd will try to restart Node-RED if it crashes, and tells systemd the best way to quit Node-RED when it needs to shut down or restart the process.
/etc/systemd/system/node-red.service
This sets the label used when logging, and logs all output to the syslog service.
/etc/systemd/system/node-red.service
We want to run Node-RED as our non-root user. The lines above tell systemd to launch Node-RED using our user and group, and from within our home directory.
/etc/systemd/system/node-red.service
indicates the targets our service should run under. In this case, when Ubuntu boots into multi-user mode, it will know to also launch our Node-RED service. Muti-user mode is the default startup target.
Now that our service file is installed and understood, we need to enable it. This will enable it to execute on startup.
Let’s manually start the service now to test that it’s still working.
Point a browser back at the server’s port and verify that Node-RED is back up. If it is, shut it back down until we secure the install in the next step.
Developers/Contributors
- Julian Knight — the designer and main author.
- Colin Law — many thanks for testing, corrections and pull requests.
- Steve Rickus — many thanks for testing, corrections and contributed code.
- Ellie Lee — many thanks for the PR fixing duplicate msgs.
- Thomas Wagner — thanks for the steer and PR on using projects folder if active.
- Arlena Derksen — thanks for suggestions, bug checks and Issue #59/PR #60.
- cflurin — thanks for the cache example.
- Scott Page — IndySoft — thanks for Issue #73/PR #74.
- Stephen McLaughlin — Steve-Mcl — thanks for the fix for Issue #71
Please also check out my blog, Much Ado About IT, it has information about all sorts of topics, mainly IT related, including Node-RED.
2: Установка Node-RED
Установите Node-RED и вспомогательную утилиту node-red-admin.
Менеджер npm обычно устанавливает пакеты в текущий каталог. В данной команде использован флаг –g (globally), который выполнит глобальную установку указанных пакетов и поместит их в стандартный каталог системы, например в /usr/local/bin. Флаг —unsafe-perm помогает избежать некоторых ошибок, которые могут возникнуть при попытке npm скомпилировать встроенные модули (написанные на компилируемых языках, например C или C ++).
Установка займёт некоторое время, после чего вы вернётесь в обычную командную строку. Пора протестировать установку.
Для начала откройте порт в брандмауэре.
По умолчанию Node-RED использует порт 1880.
Теперь попробуйте запустить Node-RED.
Примечание: Не забудьте заменить условный домен.
На экране появится интерфейс администратора Node-RED.
Если всё работает должным образом, нажмите CTRL+C, чтобы остановить Node-RED и вернуться в командную строку.