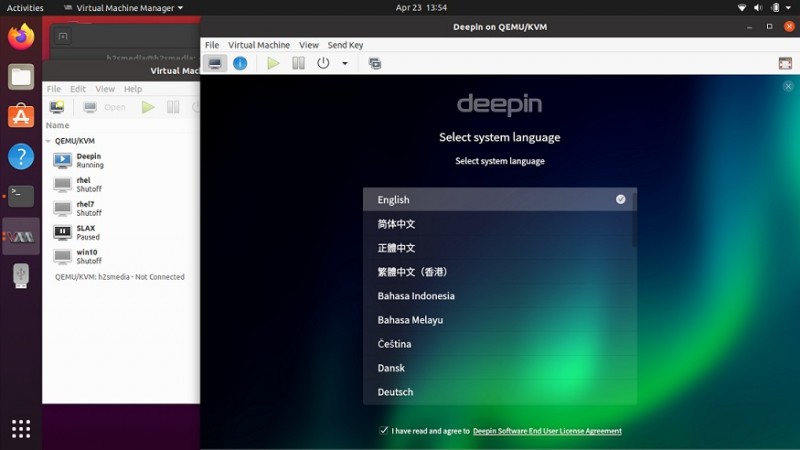
Настройка vpn на ubuntu server (способ второй)
Содержание:
- Introduction
- AirVPN
- Install and activate the app
- A note on OpenVPN
- Step 14: Revoking Client Certificates
- Step 10: Create Client Configuration Infrastructure
- Best Free VPNs for Linux In A Glimpse
- Шаг 3 — Импорт ресурсов в Terraform
- Network Manager импорт из файла
- Настройка VPN-сервера Linux с Сервером Доступа OpenVPN
- Step 13: Test Your VPN Connection
- Step 8: Adjust the Server Networking Configuration
- Шаг 1 — Установка PPTP
- Which Linux distro is best for privacy?
Introduction
Ubuntu is a free, open source, most popular and most widely used Linux-based operating system in the market. It is simple, user-friendly and very similar to Windows and Mac.
Ubuntu is the most secure operating system now a day. But, if you want to access the web and your data is encrypted, you will need to install a virtual private network (VPN) on your system.
VPN creates a secure tunnel to browse the internet with privacy and proxy your location without restrictions.
Today, there are lot of free and commercial VPN available in the market. Paid VPN are more reliable and offers a lot of features.
But, there are also a few free and good VPN available at no cost.
In this tutorial, we will discuss the features of some free VPN available in the market.
AirVPN
AirVPN has a great Linux GUI Client and offers military-grade encryption.

Apps Available:
- PC
- Mac
- IOS
- Android
- Linux
AirVPN offers native Linux apps for Debian/Ubuntu and openSUSE/Fedora, including Kali Linux. These can be used through either the command line or a GUI. You won’t find more comprehensive security settings on a VPN client. AirVPN lets users activate a kill switch, connect using OpenVPN over SSH and SSL, and forward traffic through several alternative ports. Prices are mid-range.
Pros:
- Highly configurable, works well with Tor and even has a Linux app
- Has no monitoring nor logging of your online activities
Cons:
- Mainly suited to users that are comfortable with advanced configurations
- Small server count
- Open source project means support is mainly limited to documentation and forums
Stay tuned for our full review of AirVPN.
Install and activate the app
Install the app
Note: If you cannot install the app directly with the GUI, you can .
In the browser that you used for downloading the installer, click the downward arrow icon and select the installer file.
Click Install.
Enter your password, then click Authenticate.
The installation will start immediately.
After the installation is complete, go to the Terminal.
In the Terminal window, run:
Command line install for the app
In the Terminal window, run:
Depending on your distribution, run one of the following commands:
Ubuntu / Debian:
Fedora / CentOS:
or
Arch:
Enter your user password to install the file.
For Arch, enter y to proceed with the installation.
Activate the app
Open a new Terminal. Run:
Paste the activation code you found . Note the code won’t appear on the screen. Press Enter.
You can help improve ExpressVPN by sharing anonymized diagnostic reports. Enter Y to accept or n to decline.
If you want to opt out of sending diagnostics to ExpressVPN in the future, run:
Need help? .
A note on OpenVPN
Even if a VPN provider doesn’t make a dedicated native client for your Linux distro, almost all of them will provide configuration files that work with OpenVPN. All you need to do is download a config file for each server you want to connect to. This can get tedious if you like to have a lot of options, but it’s perfectly feasible.
OpenVPN is great, but the generic client isn’t as packed with features like DNS leak prevention and internet kill switches. Again, you can find scripts and packages that will take care of these for you, but we prefer the convenience of clients with all this stuff built in.
How to install and connect to OpenVPN on Linux Terminal
Here we’ll show you how to install the OpenVPN client on Ubuntu. Other distros, such as Mint and CentOS, should work similarly, but the commands might vary slightly.
- Open a terminal
- Type sudo apt-get install -y openvpn and hit Enter
- Type your admin password and hit Enter
- Type y and hit Enter to accept all dependencies and complete the installation.
- Enter sudo apt-get install network-manager network-manager-openvpn network-manager-openvpn-gnome and hit Enter
- Enter sudo apt-get install openvpn easy-rsa
Note that on newer versions of Ubuntu, you may need to swap out the “apt-get” part of the commands with “yum”.
Once OpenVPN is installed, you need config files. Usually you can download .ovpn config files from your VPN provider’s website. Each config file is associated with a particular server and location so grab a few of them for each location you want to connect to. Make sure to have backups in case a server goes down.
To connect via command line, which should work across most distros:
- With OpenVPN installed, type sudo openvpn –config in the terminal and hit Enter
- Drag and drop the .ovpn config file for the server you want to connect to into the terminal. The correct path will be automatically captured.
- Hit Enter and wait for the “Initialization Sequence Completed” message. You are now connected to the VPN. You can minimize the terminal window, but closing it will disconnect you from the VPN.
This is just one way to connect. You can also try the Ubuntu Network Manager or the OpenVPN GUI. These may require CA certificates and/or private keys from your VPN, so make sure those are available from the provider’s website.
Step 14: Revoking Client Certificates
Occasionally, you may need to revoke a client certificate to prevent further access to the OpenVPN server.
To do so, enter your CA directory and re-source the file:
Next, call the command using the client name that you wish to revoke:
This will show some output, ending in . This is normal and the process should have successfully generated the necessary revocation information, which is stored in a file called within the subdirectory.
Transfer this file to the configuration directory:
Next, open the OpenVPN server configuration file:
At the bottom of the file, add the option, so that the OpenVPN server checks the certificate revocation list that we’ve created each time a connection attempt is made:
/etc/openvpn/server.conf
Save and close the file.
Finally, restart OpenVPN to implement the certificate revocation:
The client should now longer be able to successfully connect to the server using the old credential.
To revoke additional clients, follow this process:
- Generate a new certificate revocation list by sourcing the file in the directory and then calling the script on the client name.
- Copy the new certificate revocation list to the directory to overwrite the old list.
- Restart the OpenVPN service.
This process can be used to revoke any certificates that you’ve previously issued for your server.
Step 10: Create Client Configuration Infrastructure
Next, we need to set up a system that will allow us to create client configuration files easily.
Creating the Client Config Directory Structure
Create a directory structure within your home directory to store the files:
Since our client configuration files will have the client keys embedded, we should lock down permissions on our inner directory:
Creating a Base Configuration
Next, let’s copy an example client configuration into our directory to use as our base configuration:
Open this new file in your text editor:
Inside, we need to make a few adjustments.
First, locate the directive. This points the client to our OpenVPN server address. This should be the public IP address of your OpenVPN server. If you changed the port that the OpenVPN server is listening on, change to the port you selected:
~/client-configs/base.conf
Be sure that the protocol matches the value you are using in the server configuration:
~/client-configs/base.conf
Next, uncomment the and directives by removing the “;”:
~/client-configs/base.conf
Find the directives that set the , , and . Comment out these directives since we will be adding the certs and keys within the file itself:
~/client-configs/base.conf
Mirror the and settings that we set in the file:
~/client-configs/base.conf
Next, add the directive somewhere in the file. This must be set to “1” to work with the server:
~/client-configs/base.conf
Finally, add a few commented out lines. We want to include these with every config, but should only enable them for Linux clients that ship with a file. This script uses the utility to update DNS information for Linux clients.
~/client-configs/base.conf
If your client is running Linux and has an file, you should uncomment these lines from the generated OpenVPN client configuration file.
Save the file when you are finished.
Creating a Configuration Generation Script
Next, we will create a simple script to compile our base configuration with the relevant certificate, key, and encryption files. This will place the generated configuration in the directory.
Create and open a file called within the directory:
Inside, paste the following script:
~/client-configs/make_config.sh
Save and close the file when you are finished.
Mark the file as executable by typing:
Best Free VPNs for Linux In A Glimpse
- Surfshark – Optimized for Linux with the secure WireGuard, OpenVPN, & IKEv2 protocols, fast speeds, and unblocking strength for Netflix, BBC iPlayer etc. Fully refundable within 30 days.
- Windscribe – 10 server locations for Linux Fedore, Debian, Ubuntu & more with 10 GB/month data limit.
- ProtonVPN – Supports various Linux distros with command-line interface clients, unlimited bandwidth, & Netflix compatibility.
- TunnelBear – Good logging policy and encryption but limited Linux support with only 500MB/month data cap.
- Hide.Me – 10 GB/month limit with 5 server locations and moderate compatibility with Linux.
Шаг 3 — Импорт ресурсов в Terraform
На этом шаге вы импортируете ресурсы DigitalOcean в Terraform. Используйте для определения идентификационных номеров дроплетов, прежде чем начать импорт ресурсов. Также вы можете проверить конфигурацию импорта с помощью команд и .
Для начала экспортируйте токен доступа DigitalOcean как переменную среды, которая будет использоваться Terraform во время выполнения.
Экспортируйте ее как переменную среды текущего сеанса оболочки с помощью следующей команды:
Чтобы импортировать существующие дроплет и брандмауэр, вам потребуются их идентификационные номера. Вы можете использовать , интерфейс командной строки DigitalOcean API. Запустите следующую команду для вывода списка дроплетов и получения доступа к их идентификаторам:
Результат будет выглядеть примерно так:
Теперь вы импортируете существующий дроплет и брандмауэр в Terraform:
Мы используем флаг , чтобы задать токен доступа DigitalOcean, который вы ранее экспортировали в сеанс оболочки. Это требуется, чтобы DigitalOcean API мог проверить вашу личность и применить изменения к инфраструктуре.
Теперь запустите эту же команду для вашего брандмауэра:
Команда позволяет проверить, был ли импорт выполнен успешно. Эта команда позволяет получить удобочитаемые данные по состоянию инфраструктуры. Ее можно использовать для проверки плана, чтобы обеспечить выполнение желаемых изменений, или для проверки текущего состояния с точки зрения Terraform.
В этом контексте state означает сопоставление ресурсов DigitalOcean с записанной конфигурацией Terraform и отслеживание метаданных. Это позволяет подтвердить отсутствие различий между существующими ресурсами DigitalOcean, которые вы хотите импортировать, и ресурсами, которые отслеживает Terraform:
Вывод будет выглядеть следующим образом:
В результатах вы увидите два ресурса совместно с атрибутами.
После импорта дроплета и брандмауэра в состояние Terraform необходимо убедиться, что конфигурации представляют текущее состояние импортируемых ресурсов. Для этого следует указать Droplet и его . Эти два значения можно увидеть в результатах выполнения команды для ресурса .
Откройте файл :
В этом обучающем руководстве:
- Образ операционной системы, используемый для нашего дроплета: .
- Регион, где находится ваш дроплет: .
- Тег существующего дроплета: .
Дроплет, импортированный с помощью конфигурации в , будет выглядеть следующим образом:
digitalocean_droplet.tf
Далее вы добавите правила брандмауэра. В нашем примере для входящего трафика открыты порты , и . Все порты открыты для исходящего трафика. Вы можете изменить конфигурацию в зависимости от состава и количества открытых портов.
Откройте файл :
Добавьте следующую конфигурацию:
digitalocean_firewall.tf
Эти правила воспроизводят состояние существующего образца брандмауэра. Если вы хотите ограничить трафик для других IP-адресов, портов или протоколов, вы можете изменить файл для соответствия настройкам вашего брандмауэра.
После обновления файлов Terraform используйте команду , чтобы увидеть, соответствуют ли внесенные изменения состоянию существующих ресурсов в DigitalOcean.
Команда используется для пробного прогона. С ее помощью вы можете проверить, соответствуют ли вносимые Terraform изменения желаемым. Эту команду всегда полезно запускать для подтверждения перед применением изменений.
Запустите команду со следующим синтаксисом:
Вы увидите следующие результаты:
Вы успешно импортировали существующие ресурсы DigitalOcean в Terraform и теперь можете вносить через Terraform изменения в инфраструктуру без риска случайного удаления или изменения существующих ресурсов.
Network Manager импорт из файла
Все что было описано выше, можно сделать проще. Создайте файл client.ovpn в каталоге /etc/openvpn и добавьте в него нужные настройки (конфиг клиента).
nano /etc/openvpn/client.ovpn
Содержимое файла client.ovpn.
# Работать в режиме клиента
client

# IP-адрес и порт VPN сервера
# ХХ.ХХ.ХХ.ХХ заменить на ip-адрес своего сервера
remote XX.XX.XX.XX 443

# Протокол передачи трафика
proto udp
# Сетевой интерфейс
dev   tun

# Ключи и сертификаты клиента
ca   /etc/openvpn/client-keys/ca.crt
key  /etc/openvpn/client-keys/client.key
cert /etc/openvpn/client-keys/client.crt

# HMAC ключ и алгоритм хэширования ключа
tls-auth /etc/openvpn/client-keys/ta.key 1
auth SHA512

# Проверка серверных сертификатов
remote-cert-tls server

# Не сохранять пароли в виртуальной памяти
auth-nocache

# Алгоритм шифрования
cipher AES-256-CBC

# Использовать сжатие трафика
comp-lzo

# Использовать размер MTU по умолчанию
mssfix 0

# Если клиент на основе CentOS, то group nobody
# Если клиент на основе Debian/Ubuntu, то group nogroup
user root
group nogroup

# При перезапуске не изменять tun / не перепроверять ключи
persist-key
persist-tun

# Лог-файлы
log    /var/log/openvpn/client.log
status /var/log/openvpn/client-status.log
# Подробность логов
verb 3
# Запись не более 20-и одинаковых сообщений
mute 20
Кликните по сетевому соединению, рядом с часами, выберите «Параметры сети».

В окне «Сеть» нажмите плюсик под списком соединений, выберите VPN подключение.
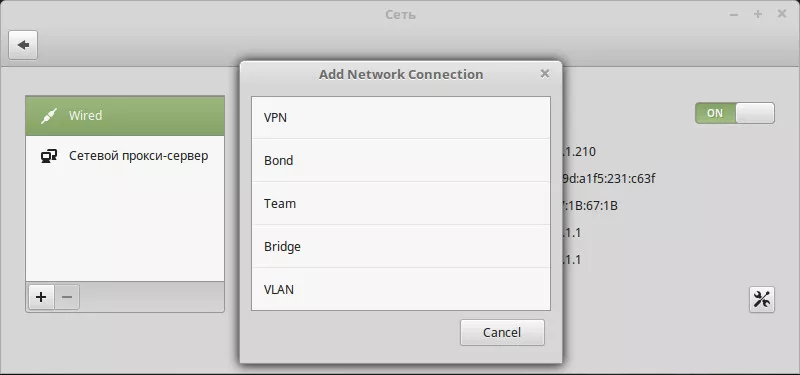
Тип VPN подключения выбираем — Import from file.
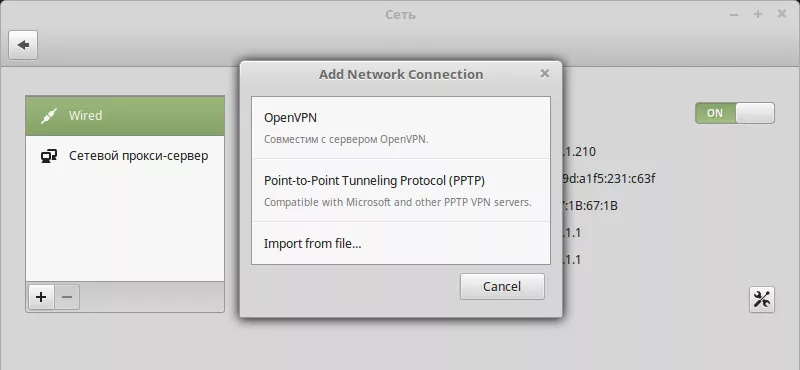
Выберите созданный файл client.ovpn и нажмите Open.
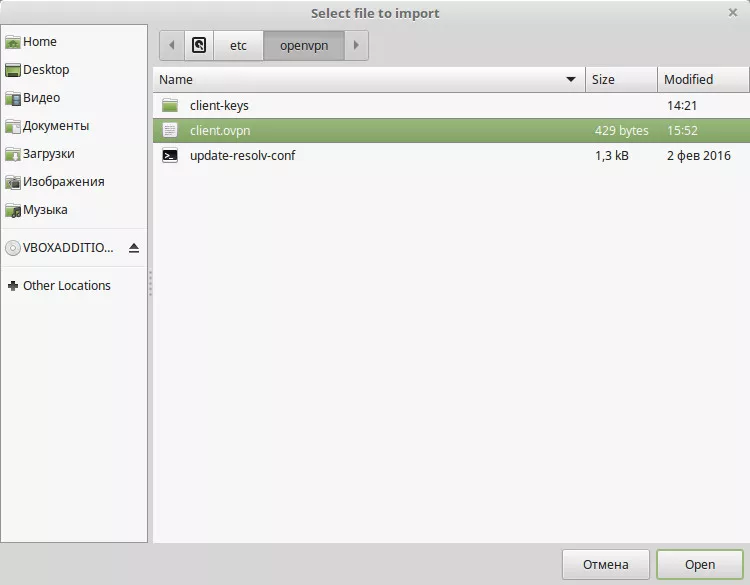
Настройки будут импортированы и автоматически применены. Новое соединение будет носить имя файла из которого происходил импорт.
Кликните по сетевому соединению и активируйте подключение.
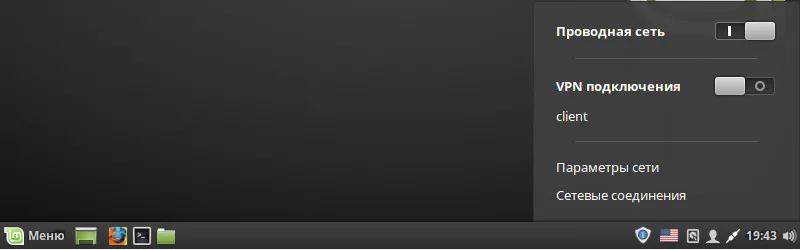
После активации появится сообщение что соединение установлено, можно начинать работу.
Настройка VPN-сервера Linux с Сервером Доступа OpenVPN
Во-первых, давайте обновим систему. Для CentOS:
Для Ubuntu и Debian обновите индексы, используя:
Для установки OpenVPN вам потребуется пакет net-tools. Установите его, если он не был предварительно установлен. Пакет net-tools содержит ifcfg, необходимый для установки сервера OpenVPN.
Вы можете установить его для CentOS, используя:
Для Ubuntu и Debian используйте следующую команду:
Вы можете скачать клиент OpenVPN для вашего дистрибутива с веб-сайта OpenVPN. Получить ссылку можно здесь и использовать её вместе с командой curl. Пример команды curl для Ubuntu показан ниже:
Команда curl для CentOS:
Здесь вы можете добавить URL к вашему дистрибутиву. Убедитесь, что загружена правильная установка, напечатав контрольную сумму файла SHA256. Для этого используйте следующую команду:
Эта команда распечатает контрольную сумму:
Вы можете сравнить контрольную сумму загруженного бинарного файла с контрольной суммой, представленной на сайте. Если контрольная сумма совпадает, установите ранее загруженный бинарный файл.
Для установки в CentOS используйте:
Аналогично, для установки в Ubuntu и Debian введите следующую команду в командной строке:
Установка OpenVPN займёт некоторое время. После завершения установки вы увидите интерфейс Администратора и детали интерфейса Клиента. Пользователь openvpn будет создан по умолчанию во время установки. Вы можете задать пароль для этого пользователя, используя:
Это действие установит новый пароль. Запомните его, так как он будет использоваться для входа в систему. Используйте URL администратора для входа и завершения процесса установки OpenVPN. В нашем случае URL администратора – https://31.220.111.160:943/admin. Обычно URL – это просто ваш VPS-адрес, порт: 943 с /admin в конце, как в примере.
Вы увидите следующий экран:
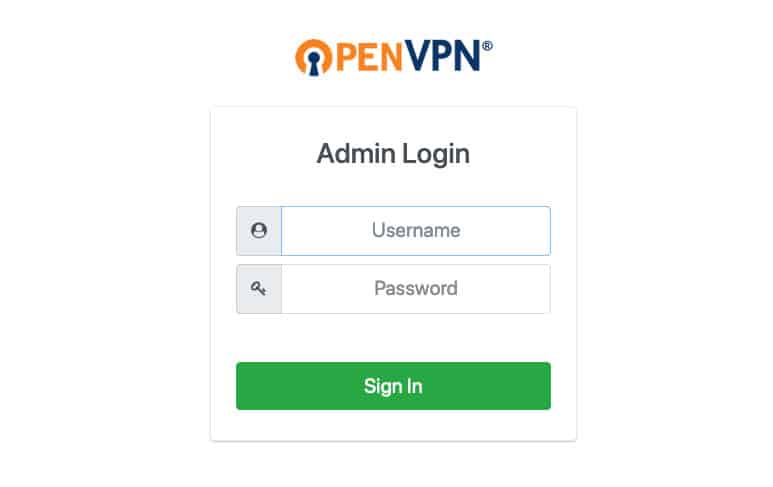
Имя пользователя, как упоминалось ранее, openvpn, а пароль – тот, который вы только что установили для этого пользователя. Как только вы войдёте в систему, вы увидите страницу с условиями. Прочитайте их и нажмите кнопку Agree (Cогласен), чтобы продолжить. На следующей странице, вы найдёте информацию о настройках и состоянии сервера.
Настройки по умолчанию вполне адекватны и позволяют MacOS, Linux, Windows, Android и iOS подключиться к VPN-серверу Linux. Если вы хотите изменить какие-либо настройки, обязательно нажмите Apply (Применить) и Update Running Server (Обновить запущенный сервер), чтобы активировать изменения.
Это завершает установку по умолчанию. Далее мы настроим туннель OpenVPN.
Step 13: Test Your VPN Connection
Once everything is installed, a simple check confirms everything is working properly. Without having a VPN connection enabled, open a browser and go to DNSLeakTest.
The site will return the IP address assigned by your internet service provider and as you appear to the rest of the world. To check your DNS settings through the same website, click on Extended Test and it will tell you which DNS servers you are using.
Now connect the OpenVPN client to your Droplet’s VPN and refresh the browser. The completely different IP address of your VPN server should now appear. That is now how you appear to the world. Again, DNSLeakTest’s Extended Test will check your DNS settings and confirm you are now using the DNS resolvers pushed by your VPN.
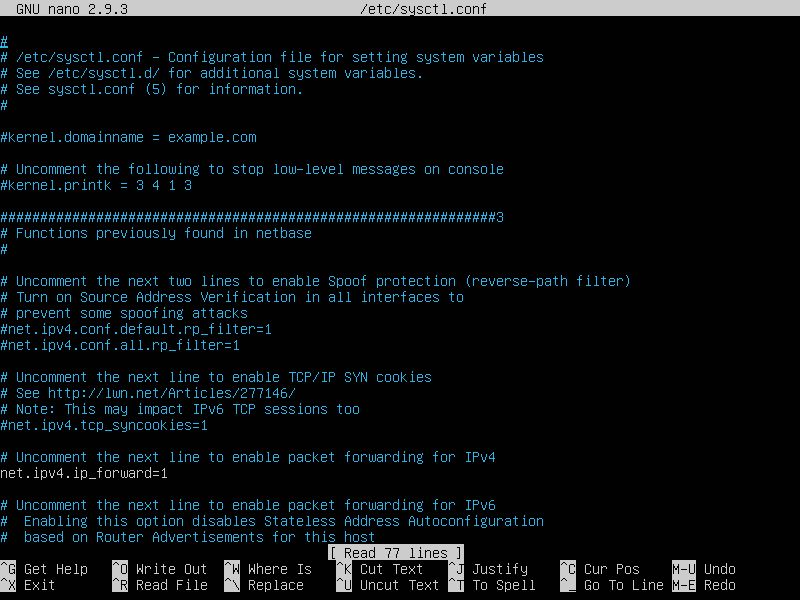
Step 8: Adjust the Server Networking Configuration
Next, we need to adjust some aspects of the server’s networking so that OpenVPN can correctly route traffic.
Allow IP Forwarding
First, we need to allow the server to forward traffic. This is fairly essential to the functionality we want our VPN server to provide.
We can adjust this setting by modifying the file:
Inside, look for the line that sets . Remove the “#” character from the beginning of the line to uncomment that setting:
/etc/sysctl.conf
Save and close the file when you are finished.
To read the file and adjust the values for the current session, type:
Adjust the UFW Rules to Masquerade Client Connections
If you followed the Ubuntu 16.04 initial server setup guide in the prerequisites, you should have the UFW firewall in place. Regardless of whether you use the firewall to block unwanted traffic (which you almost always should do), we need the firewall in this guide to manipulate some of the traffic coming into the server. We need to modify the rules file to set up masquerading, an concept that provides on-the-fly dynamic NAT to correctly route client connections.
Before we open the firewall configuration file to add masquerading, we need to find the public network interface of our machine. To do this, type:
Your public interface should follow the word “dev”. For example, this result shows the interface named , which is highlighted below:
When you have the interface associated with your default route, open the file to add the relevant configuration:
This file handles configuration that should be put into place before the conventional UFW rules are loaded. Towards the top of the file, add the highlighted lines below. This will set the default policy for the chain in the table and masquerade any traffic coming from the VPN:
Note: Remember to replace in the line below with the interface you found in the above command.
/etc/ufw/before.rules
Save and close the file when you are finished.
We need to tell UFW to allow forwarded packets by default as well. To do this, we will open the file:
Inside, find the directive. We will change the value from to :
/etc/default/ufw
Save and close the file when you are finished.
Open the OpenVPN Port and Enable the Changes
Next, we’ll adjust the firewall itself to allow traffic to OpenVPN.
If you did not change the port and protocol in the file, you will need to open up UDP traffic to port 1194. If you modified the port and/or protocol, substitute the values you selected here.
We’ll also add the SSH port in case you forgot to add it when following the prerequisite tutorial:
Now, we can disable and re-enable UFW to load the changes from all of the files we’ve modified:
Our server is now configured to correctly handle OpenVPN traffic.
Шаг 1 — Установка PPTP
Вам необходимо выбрать один сервер, который будет отвечать за раздачу IP-адресов другим серверам и авторизацию всех Ваших серверов в Вашей VPN. Он и станет Вашим PPTP-сервером.
На CentOS 6 x64:
На Ubuntu 12.10 x64:
Теперь необходимо отредактировать файл , добавив в него следующие строчки:
В данном случае, — это IP-адрес вашего сервера, а — IP-адреса, которые будут присваиваться клиентам, которые в ним соединяются.
Затем Вам необходимо настроить авторизацию для PPTP путем добавления пользователей и их паролей. Просто добавьте их в :
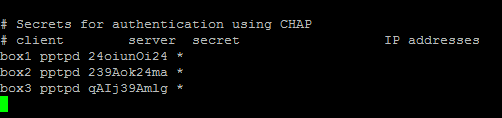
Здесь — это имя пользователя (логин), — тип сервиса (в нашем примере — pptpd), — пароль, а в указывается, какие IP-адреса могут авторизоваться (с данным логином и паролем). Установив в поле IP-адресов звёздочку Вы указываете, что данная пара логин/пароль должна приниматься с любого IP.
Which Linux distro is best for privacy?
If you’re concerned about privacy, switching from MacOS or Windows to any open-source Linux distro is already a step in the right direction. Apple and Microsoft both collect personal data from users on their respective operating systems. Both companies are known to cooperate with law enforcement and intelligence agencies like the NSA. Microsoft uses customers’ data to sell ads. Both OSes are closed source, meaning the public cannot peak at the source code to see where vulnerabilities or backdoors lie.
Linux, on the other hand, is open source and frequently audited by the security community. While Ubuntu once flirted with Amazon to monetize users, it and other distros are generally not out to make a buck by selling your data to third parties.
Not all Linux distros are created equally, however, and some are more secure than others. If you’re looking for a distro that functions as a day-to-day desktop replacement but is also built with privacy and security in mind, we recommend Ubuntu Privacy Remix. UPR is a Debian-based Ubuntu build that stores all user data on encrypted removable media, such as an external hard drive. The “non-manipulatable” OS is supposedly immune to malware infection.
You’ll still need a VPN to encrypt your internet connection. Most of the apps from the VPN providers above should work fine on UPR.
If UPR isn’t enough and you want to use your computer with complete anonymity, we recommend TAILS. Short for The Amnesiac Incognito Live System, TAILS is a Linux distro built by the same people who created the Tor network. TAILS is a live OS designed to be installed on and run from a USB drive or CD. It’s a hardened version of Linux that routes all internet traffic through the Tor network. It leaves no trace of ever being used after removing it from the device.