Using docker with pipeline
Содержание:
- Create a simple Pipeline
- Install Build Pipeline Plugin in Jenkins
- Running Gradle tasks with Jenkins Pipeline
- Implementing Git Flow
- Build steps
- Running Jenkins pipeline
- Jenkins Pipeline Concepts
- Slack Notification Plugin
- Email Extension Plugin
- Minimal Jenkins configuration
- Multibranch Pipeline
- Running a pipeline build
- What is Jenkins Pipeline?
- Why Use Jenkin’s Pipeline?
- What is a JenkinsFile?
- How to Create Jenkins Pipeline
- Accessing credentials using the Jenkins Credentials Binding Plugin
- Executors and Workspaces
- Restarting or Rerunning a Pipeline
- Advanced Usage with Scripted Pipeline
- Why use Groovy?
- Loading scripts
- Deploying to Wildfly using the Gradle Cargo Plugin
Create a simple Pipeline
-
Click New Item, name it , select Pipeline as the type and click OK
-
Enter the following script in the Pipeline section:
-
Click Save and then Build Now
-
Click on build #1 in the Build History and then Console Output
What did I just do?
You executed a Groovy script using the Jenkins Pipeline DSL. The method simply outputs a message to the console. Because it’s Groovy, you could have done something like this:
However, calls like this are not permitted when running inside the Groovy Sandbox. You need to explicitly approve these method calls on the In-process Script Approval page.
Groovy Sandbox and Script Approval
At some point you may want to use a Groovy language feature which is not allowed in the Groovy Sandbox. When that happens, you’ll be greeted by a , such as:
Fortunately there’s a way to whitelist methods on the In-process Script Approval page.
-
Go to Manage Jenkins > In-process Script Approval
-
Review the pending signatures and click Approve to add them to the whitelist
-
Re-run your job; it should no longer fail (for this particular method call)
Some new terms
- DSL
- Domain Specific Language; a set of methods specific to a domain, in this case build pipelines
- Groovy
- A modern JVM language compatible with Java; in this case interpreted as script (not compiled)
- Sandbox
- A closed environment which can safely execute arbitrary code
Install Build Pipeline Plugin in Jenkins
With the build pipeline plugin, you can create a pipeline view of incoming and outgoing jobs, and create triggers which require manual intervention.
Here is how you can install the build pipeline plugin in your Jenkins:
Step 1) The settings for the plugin can be found under Manage Jenkins > Manage Plugins.

If you have already installed the plugin, it is shown under the installed tab.

Step 2) If you do not have the plugin previously installed, it shows up under the Available tab.
Once you have successfully installed the build pipeline plugin in your Jenkins, follow these steps to create your Jenkins pipeline:
Running Gradle tasks with Jenkins Pipeline
The first thing you need to decide is whether you want to install Gradle as a tool within Jenkins, or use the Gradle Wrapper script in your repository.
Gradle Wrapper
The recommended way is to always use the Gradle Wrapper using the script in the root of your repository, which will automatically install the required version. First install the wrapper by running the task inside your project:
The following files are created by the wrapper task:
- gradle/wrapper/gradle-wrapper.jar
- gradle/wrapper/gradle-wrapper.properties
- gradlew
- gradlew.bat
You need to push the files to the remote tracking branch so Jenkins can access them:
Then you can access the Gradle Wrapper like this from your Jenkinsfile:
You probably should create a friendly method to wrap the call:
Gradle plugin
Alternatively, you can manage the Gradle installation within Jenkins using the Gradle plugin.
-
Go to Manage Jenkins > Manage Plugins and install (without restart)
-
Go to Manage Jenkins > Configure System
-
At Gradle, click Add Gradle
- Name: gradle
- Install automatically (from gradle.org): checked
- Version: 2.10
You can access this installation from your Jenkinsfile via the method, for example:
Wrapped in a friendly method:
Multiple versions of Gradle
The Gradle plugin allows you to add multiple Gradle versions using different names, so your build script can target a specific version using the parameter of the method:
Implementing Git Flow
Git Flow is a branching workflow for Git which defines the following branches:
- for feature branches; merge back into
- for ongoing development work
- to prepare production releases; merge back into and tag
- for production-ready releases
- to patch quickly; merge back into and tag
Depending on the branch name we may want to run different build steps. A clean way to do this is to create seperate methods for each type of branch and use a simple if/else to call the correct one:
Build steps
Each build step may result in a failed build, produce artifacts, etc. For example, running a test produces test reports, but also fails the build if one or more tests fail. In the next sections there are some (opinionated) implementations of build steps. On a high level, your build for a specific branch may look like this:
All implementations invoke the Gradle Wrapper via the method:
Running Jenkins pipeline
Click on Run to run the Jenkins pipeline. It will look something like this:

In the example above, we are demonstrating a simple «helloworld.java» program. But in real time projects, you will be responsible for creating and building complex pipelines in Jenkins. See below for a sample pipeline view.

Best Practices using Jenkins Pipeline:
- Use the genuine Jenkins Pipeline
- Develop your pipeline as code
- Any non-setup work in your pipeline should occur within a stage block.
- Any material work in a pipeline must be performed within a node block.
- Don’t use input within a node block.
- Never set environment variables with env global variable
- Wrap your inputs in a timeout
Jenkins Pipeline Concepts
| Term | Description |
| Pipeline | The pipeline is a set of instructions given in the form of code for continuous delivery and consists of instructions needed for the entire build process. With pipeline, you can build, test, and deliver the application. |
| Node | The machine on which Jenkins runs is called a node. A node block is mainly used in scripted pipeline syntax. |
| Stage | A stage block contains a series of steps in a pipeline. That is, the build, test, and deploy processes all come together in a stage. Generally, a stage block is used to visualize the Jenkins pipeline process. |
| Step | A step is nothing but a single task that executes a specific process at a defined time. A pipeline involves a series of steps. |
Slack Notification Plugin
: Send Slack Message
Simple step for sending a Slack message to specified channel.
Use the advanced settings to override the Slack Plugin global configuration to include:
and
.
Please see the Slack Plugin global configuration for more details on the fields. Usage Example:
- (optional)
-
(optional)
Allows overriding the Slack compatible app URL specified in the global configuration.
Type: String
- (optional)
-
(optional)
Bot user option indicates the token belongs to a custom Slack app bot user in Slack.
If the notification will be sent to a user via direct message, the default integration sends it via @slackbot, use this option if you want to send messages via a bot user.
Type: boolean
-
(optional)
Allows overriding the Slack Plugin channel specified in the global configuration. Multiple channels may be provided as a comma, semicolon, or space delimited string.
Type: String
-
(optional)
An
optional value that can either be one of
good,
warning,
danger, or any
hex color code (eg. #439FE0). This value is used to color the border along the left side of the message attachment.Type: String
-
(optional)
If set to true, then the step will abort the Workflow run if there is an error sending message.
Type: boolean
-
(optional)
Choose a custom emoji to use as the bot’s icon in Slack, requires using a bot user
Type: String
-
(optional)
This is the main text in a message attachment, and can contain standard message markup. The content will automatically collapse if it contains 700+ characters or 5+ linebreaks, and will display a «Show more…» link to expand the content. Message may include global variables, for example environment and currentBuild variables:
Type: String
-
(optional)
Notify committers via direct message in addition to specified channels, requires using a bot user
Type: boolean
- (optional)
- (optional)
-
(optional)
Allows overriding the Slack Plugin Integration Team Domain specified in the global configuration.
Type: String
-
(optional)
Allows updating an existing message instead of posting a new one.
Type: String
-
(optional)
Allows overriding the Slack Plugin Integration Token specified in the global configuration.
Type: String
-
(optional)
The ID for the integration token from the Credentials plugin to be used to send notifications to Slack. The «Kind» of the credential must be «Secret text.» If both «Integration Token» and «Integration Token Credential ID» are set, the «Integration Token Credential ID» will take precedence for security reasons.
This overrides the global setting.
Type: String
-
(optional)
Choose a custom username to use as the bot’s name, requires using a bot user
Type: String
: Upload file to slack
-
File path to search in to upload the file. Globs are accepted but only the first file found will be uploaded.
Type: String
-
(optional)
Allows overriding the Slack Plugin channel specified in the global configuration. Multiple channels may be provided as a comma separated string.
Type: String
-
(optional)
The ID for the bot user token from the Credentials plugin to be used to send notifications to Slack. The «Kind» of the credential must be «Secret text.»
This overrides the global setting.
The user token must be the bot user oauth token
Type: String
-
(optional)
A comment that will be added by the bot when the file is uploaded
Type: String
: Resolve Slack UserId from Email Address
-
Type: String
-
(optional)
Bot user option indicates the token belongs to a custom Slack app bot user in Slack.
If the notification will be sent to a user via direct message, the default integration sends it via @slackbot, use this option if you want to send messages via a bot user.
Type: boolean
-
(optional)
The ID for the integration token from the Credentials plugin to be used to send notifications to Slack. The «Kind» of the credential must be «Secret text.»
This overrides the global setting.
Type: String
: Resolve Slack UserIds from Changeset Authors
-
(optional)
Bot user option indicates the token belongs to a custom Slack app bot user in Slack.
If the notification will be sent to a user via direct message, the default integration sends it via @slackbot, use this option if you want to send messages via a bot user.
Type: boolean
-
(optional)
The ID for the integration token from the Credentials plugin to be used to send notifications to Slack. The «Kind» of the credential must be «Secret text.»
This overrides the global setting.
Type: String
Email Extension Plugin
: Extended Email
- (optional)
- (optional)
- (optional)
- (optional)
- (optional)
- (optional)
- (optional)
-
(optional)
Array/ListNested Choice of Objects -
Sends email to the list of users who committed a change since the last non-broken build till now. This list at least always include people who made changes in this build, but if the previous build was a failure it also includes the culprit list from there.
-
Sends email to all the people who caused a change in the change set.
-
Sends email to the list of users suspected of causing a unit test to begin failing. This list includes committers and requestors of the build where the test began to fail, and those for any consecutive failed builds prior to the build in which the test began to fail.
Build Number 1 2 3 4 5 Requestor Alice Alice Committers BobClay ClayDan BobEd Ed foo Failed Failed Passed N/A Failed bar Failed Failed Passed N/A Passed baz Passed Failed Failed N/A Passed qux Passed Passed Failed N/A Passed new N/A Failed Suspects Alice (foo, bar) Alice (foo, bar)Bob (baz)Clay (baz) Bob (baz)Clay (baz, qux)Dan (qux) N/A(build failed) Alice (foo, new)Bob (foo, new)Ed (foo, new) -
Sends email to the list of users suspected of causing the build to begin failing.
-
Sends email to the list of recipients defined in the «Project Recipient List.»
-
Sends email to the user who initiated the build.
-
Sends email to the list of users who committed changes in upstream builds that triggered this build.
(optional)
(optional)
(optional)
: Extended Email Recipients
-
Array/ListNested Choice of Objects
-
Sends email to the list of users who committed a change since the last non-broken build till now. This list at least always include people who made changes in this build, but if the previous build was a failure it also includes the culprit list from there.
-
Sends email to all the people who caused a change in the change set.
-
Sends email to the list of users suspected of causing a unit test to begin failing. This list includes committers and requestors of the build where the test began to fail, and those for any consecutive failed builds prior to the build in which the test began to fail.
Build Number 1 2 3 4 5 Requestor Alice Alice Committers BobClay ClayDan BobEd Ed foo Failed Failed Passed N/A Failed bar Failed Failed Passed N/A Passed baz Passed Failed Failed N/A Passed qux Passed Passed Failed N/A Passed new N/A Failed Suspects Alice (foo, bar) Alice (foo, bar)Bob (baz)Clay (baz) Bob (baz)Clay (baz, qux)Dan (qux) N/A(build failed) Alice (foo, new)Bob (foo, new)Ed (foo, new) -
Sends email to the list of users suspected of causing the build to begin failing.
-
Sends email to the list of recipients defined in the «Project Recipient List.»
-
Sends email to the user who initiated the build.
-
Sends email to the list of users who committed changes in upstream builds that triggered this build.
Minimal Jenkins configuration
If you’ve selected the recommended plugins during installation of Jenkins you’re all set. If you opted to install none, you need to do the following.
-
Go to Manage Jenkins > Manage Plugins
-
On the Available tab and select the following plugins (use the filter box on the top right):
- Pipeline
- Git plugin
-
Click Install without restart
-
Go back to Manage Plugins. On the Updates tab, select all and click Download now and install after restart
This will update the default plugins, install several new plugins and create a new job type called Pipeline. After Jenkins is finished restarting you are good to go.
Multibranch Pipeline
A Multibranch Pipeline is a job type that scans all branches in a given repository for a Jenkinsfile. It automatically creates jobs for each branch inside a folder and executes Jenkinsfile for each job. This is useful in common branching workflows such as Git Flow which has naming conventions for branches, such as the prefix for feature-branches.
-
Go to Manage Jenkins > Manage Plugins and install the plugin (without restart)
-
Click New Item, name it , select Multibranch Pipeline as the type and click OK
-
At Branch Sources click Add source, Git
- Project Repository: https://bitbucket.org/your-account/your-repo.git
- Set credentials if this is not a public repository
-
Click Save
The plugin will automatically scan the repository for branches and create jobs; refresh the page if necessary to reveal them. After creating the jobs they will be automatically executed.
When one of the jobs fails, this could again be a script call signature that should be whitelisted. Go to /scriptApproval/ again to approvie the signature.
Running a pipeline build
Step 1) For running a pipeline build, you need to chain your jobs first. For this, go to your first job and click on configure.

Step 2) Now, under Build Triggers, check the Build after other projects are built option.

Thus, a chain for all your jobs has been created.
Step 3) Install the Build Pipeline view plugin if you don’t have it installed already.
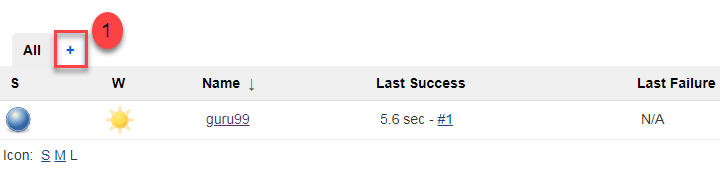
Step 4) Go to your Jenkins dashboard and create a view by clicking on the «+» button. Select the Build Pipeline View option and click OK.

Step 5) Under Pipeline view configuration, locate Pipeline Flow.
Under Pipeline flow, select the initial job to run. Now choose the job which has chains to other jobs, as shown in Step 1 and Step 2.
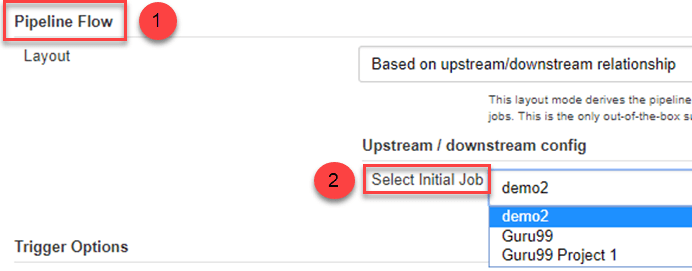
Here we have selected Guru99 Project 1 as the initial job, chained to other jobs. So, one by one, the jobs will run in the pipeline.
When the Jenkins pipeline is running, you can check its status with the help of Red and Green status symbols. Red means the pipeline has failed, while green indicates success.
In this example, we see that the button is green. Hence, the pipeline is successful.

What is Jenkins Pipeline?
In Jenkins, a pipeline is a group of events or jobs which are interlinked with one another in a sequence.
In simple words, Jenkins Pipeline is a combination of plugins that support the integration and implementation of continuous delivery pipelines using Jenkins. A pipeline has an extensible automation server for creating simple or complex delivery pipelines «as code,» via pipeline DSL (Domain-specific Language).
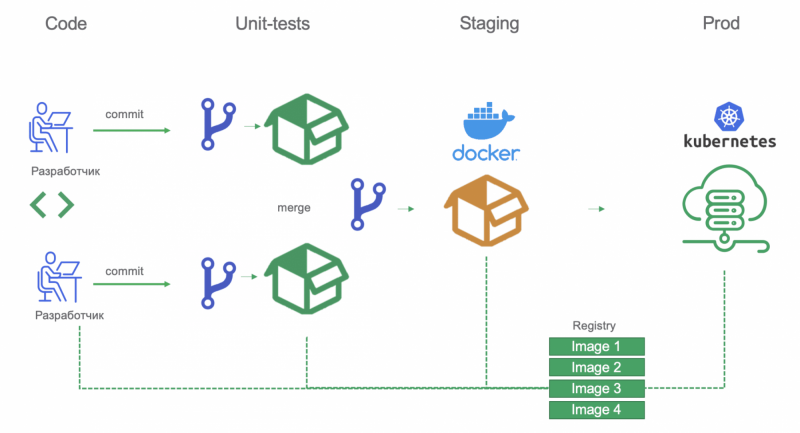
What is Continuous Delivery Pipelines? How it Works?
In a Jenkins pipeline, every job or event has some sort of dependency on at least one or more events.

The picture above represents a continuous delivery pipeline in Jenkins. It contains a group of states called build, deploy, test and release. These events are interlinked with each other. Every state has its events, which work in a sequence called a continuous delivery pipeline.
A continuous delivery pipeline is an automated expression to display your process for getting software for version control. Thus, every change made in your software goes through a number of complex processes on its way to being released. It also involves developing the software in a reliable and repeatable manner, and progression of the built software through multiple stages of testing and deployment.
In this tutorial, you will learn
Why Use Jenkin’s Pipeline?
Jenkins is an open continuous integration server which has the ability to support the automation of software development processes. You can create multiple automation jobs with the help of use cases, and run them as a Jenkins pipeline.
Here are the reasons why you use should use Jenkins pipeline:
- Jenkins pipeline is implemented as a code which allows multiple users to edit and execute the pipeline process.
- Pipelines are robust. So if your server undergoes an unforeseen restart, the pipeline will be automatically resumed.
- You can pause the pipeline process and make it wait to resume until there is an input from the user.
- Jenkins Pipelines support big projects. You can run multiple jobs, and even use pipelines in a loop.
What is a JenkinsFile?
Jenkins pipelines can be defined using a text file called JenkinsFile. You can implement pipeline as code using JenkinsFile, and this can be defined by using a domain specific language (DSL). With JenkinsFile, you can write the steps needed for running a Jenkins pipeline.
The benefits of using JenkinsFile are:
- You can create pipelines automatically for all branches and execute pull requests with just one JenkinsFile.
- You can review your code on the pipeline
- You can audit your Jenkins pipeline
- This is the singular source for your pipeline and can be modified by multiple users.
JenkinsFile can be defined by either Web UI or with a JenkinsFile.
Declarative versus Scripted pipeline syntax:
There are two types of syntax used for defining your JenkinsFile.
- Declarative
- Scripted
Declarative:
Declarative pipeline syntax offers an easy way to create pipelines. It contains a predefined hierarchy to create Jenkins pipelines. It gives you the ability to control all aspects of a pipeline execution in a simple, straight-forward manner.
Scripted:
Scripted Jenkins pipeline runs on the Jenkins master with the help of a lightweight executor. It uses very few resources to translate the pipeline into atomic commands. Both declarative and scripted syntax are different from each other and are defined totally differently.
How to Create Jenkins Pipeline
Once you are logged in to your Jenkins dashboard:
Step 1) Click on the «+» button on the left-hand side of your Jenkins dashboard to create a pipeline.
Step 2)
- You will be asked to give a name to the pipeline view. We shall call it «Guru99 Pipeline» for the duration of this demo.
- Select Build a pipeline view under options
- Click ok
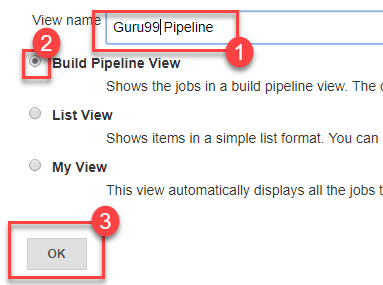
Step 4) In the next page, you will be asked for some more details to configure your Jenkins pipeline. Just accept the default settings, and make sure you choose the first job under the settings.
Click on Apply and then OK.

This will show you the sample pipeline view of your item, as given below:

Accessing credentials using the Jenkins Credentials Binding Plugin
Storing usernames and passwords in version control is really bad. Storing them in Jenkins environment variables is not much better. Jenkins has a “Credentials” database which makes it easy to re-use them and offers a tiny bit of additional protection. The step allows for a “safe” way to limit the exposure of these usernames and passwords in a build script.
To avoid echoing the password to the console you should prefix shell scripts with to disable xtrace:
Further reading:
- 2014/07/22 Injecting Secrets into Jenkins Builds Using the Credentials Plugin (CloudBees Blog)
- 2015/01/20 Pipeline integration for Credentials Binding Plugin (CloudBees Blog)
- 2016/01/27 Injecting Secrets into Jenkins Build Jobs (CloudBees Support)
Executors and Workspaces
Configure the job (or create a new one) and change the script to the following. The method allocates an executor and creates a (temporary) workspace.
If you don’t specify a name or label for the node, any available node may be selected. This example selects a specific type of node:
Some new terms
- Node
- The Jenkins Master or a Jenkins Slave (to which Jenkins Master delegates builds; see: Distributed builds)
- Workspace
- A directory on the server where your job is allowed to store and manage files, such as source code checked out from a version control system (VCS). Any files (artifacts) you wish to keep after the job finishes need to be archived
Restarting or Rerunning a Pipeline
There are a number of ways to rerun or restart a completed Pipeline.
Restart from a Stage
You can restart any completed Declarative Pipeline from any
top-level stage which ran in that Pipeline. This allows you to rerun a Pipeline from a stage which failed due to
transient or environmental considerations, for example. All inputs to the Pipeline will be the same. This includes
SCM information, build parameters, and the contents of any step calls in the original Pipeline, if specified.
How to Use
No additional configuration is needed in the Jenkinsfile to allow you to restart stages in your Declarative Pipelines.
This is an inherent part of Declarative Pipelines and is available automatically.
Restarting from the Classic UI
Once your Pipeline has completed, whether it succeeds or fails, you can go to the side panel for the run in the classic
UI and click on «Restart from Stage».
You will be prompted to choose from a list of top-level stages that were executed in the original run, in the order
they were executed. Stages which were skipped due to an earlier failure will not be available to be restarted, but
stages which were skipped due to a condition not being satisfied will be available. The parent stage for a
group of stages, or a group of nested to be run sequentially will also not be available — only
top-level stages are allowed.
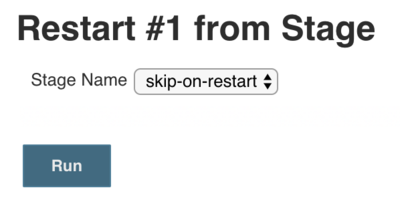
Once you choose a stage to restart from and click submit, a new build, with a new build number, will be started. All
stages before the selected stage will be skipped, and the Pipeline will start executing at the selected stage. From
that point on, the Pipeline will run as normal.
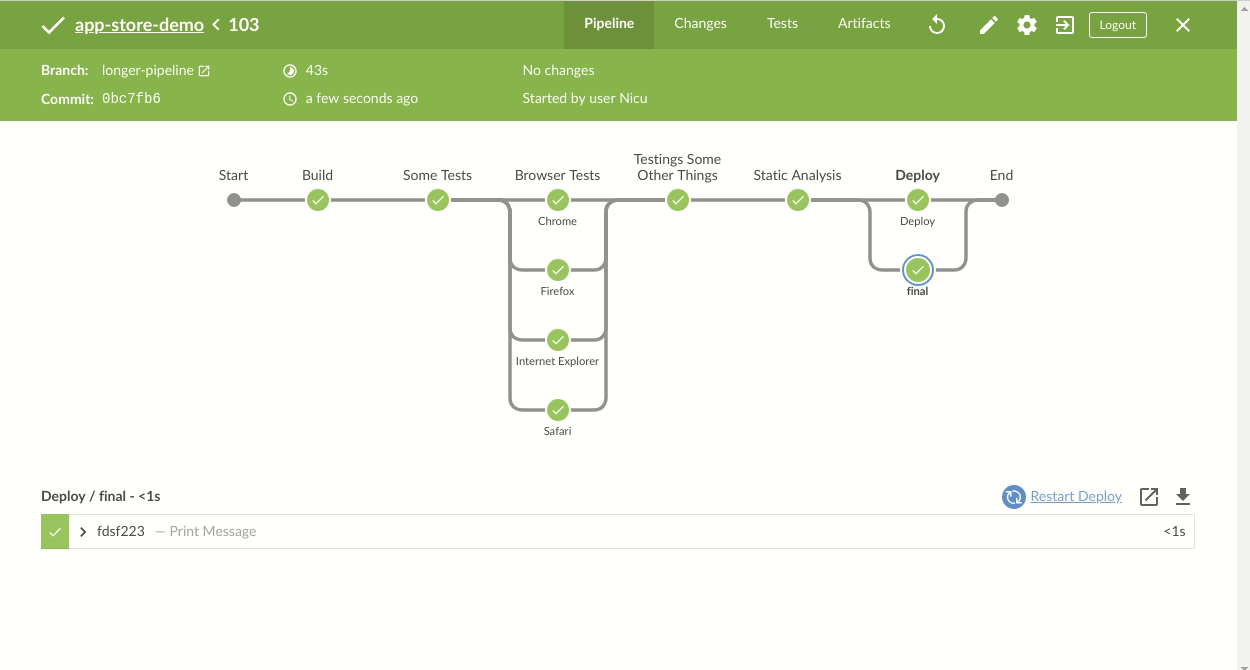
Restarting from the Blue Ocean UI
Restarting stages can also be done in the Blue Ocean UI. Once your Pipeline has completed, whether it succeeds
or fails, you can click on the node which represents the stage. You can then click on the link for
that stage.
Preserving `stash`es for Use with Restarted Stages
Normally, when you run the step in your Pipeline, the resulting stash of artifacts is cleared when the
Pipeline completes, regardless of the result of the Pipeline. Since artifacts aren’t accessible outside of the
Pipeline run that created them, this has not created any limitations on usage. But with Declarative stage restarting,
you may want to be able to artifacts from a stage which ran before the stage you’re restarting from.
To enable this, there is a job property that allows you to configure a maximum number of completed runs whose
artifacts should be preserved for reuse in a restarted run. You can specify anywhere from 1 to 50 as the
number of runs to preserve.
This job property can be configured in your Declarative Pipeline’s section, as below:
| 1 | The default number of runs to preserve is 1, just the most recent completed build. |
| 2 | If a number for outside of the range of 1 to 50 is specified, the Pipeline will fail with a validation error. |
When a Pipeline completes, it will check to see if any previously completed runs should have their artifacts
cleared.
Advanced Usage with Scripted Pipeline
Running «sidecar» containers
Using Docker in Pipeline can be an effective way to run a service on which the
build, or a set of tests, may rely. Similar to the
sidecar
pattern, Docker Pipeline can run one container «in the background», while
performing work in another. Utilizing this sidecar approach, a Pipeline can
have a «clean» container provisioned for each Pipeline run.
Consider a hypothetical integration test suite which relies on a local MySQL
database to be running. Using the method, implemented in the
Docker Pipeline plugin’s support for Scripted Pipeline,
a can run MySQL as a sidecar:
This example can be taken further, utilizing two containers simultaneously.
One «sidecar» running MySQL, and another providing the , by using the Docker
container links.
The above example uses the object exposed by , which has the
running container’s ID available via the property. Using the container’s
ID, the Pipeline can create a link by passing custom Docker arguments to the
method.
The property can also be useful for inspecting logs from a running Docker
container before the Pipeline exits:
Building containers
In order to create a Docker image, the Docker Pipeline
plugin also provides a method for creating a new image, from a
in the repository, during a Pipeline run.
One major benefit of using the syntax is that a
Scripted Pipeline can use the return value for subsequent Docker Pipeline
calls, for example:
The return value can also be used to publish the Docker image to
Docker Hub,
or a ,
via the method, for example:
One common usage of image «tags» is to specify a tag for the most
recently, validated, version of a Docker image. The method accepts an
optional parameter, allowing the Pipeline to push the with
different tags, for example:
The method builds the in the current directory by
default. This can be overridden by providing a directory path
containing a as the second argument of the method, for example:
| 1 | Builds from the Dockerfile found at . |
It is possible to pass other arguments to
docker build
by adding them to the second argument of the method.
When passing arguments this way, the last value in the that string must be
the path to the docker file and should end with the folder to use as the build context)
This example overrides the default by passing the
flag:
| 1 | Builds from the Dockerfile found at . |
Using a remote Docker server
By default, the Docker Pipeline plugin will communicate
with a local Docker daemon, typically accessed through .
To select a non-default Docker server, such as with
Docker Swarm,
the method should be used.
By passing a URI, and optionally the Credentials ID of a Docker Server
Certificate Authentication pre-configured in Jenkins, to the method with:
|
and will not work properly with a Docker Swarm server out For to work, the Docker server and the Jenkins agent must use the Currently neither the Jenkins plugin nor the Docker CLI will automatically When Jenkins detects that the agent is itself running inside a Docker Additionally some versions of Docker Swarm do not support custom Registries. |
Using a custom registry
By default the Docker Pipeline integrates assumes the
default Docker Registry of
Docker Hub.
In order to use a custom Docker Registry, users of Scripted Pipeline can wrap
steps with the method, passing in the custom Registry URL, for
example:
For a Docker Registry which requires authentication, add a «Username/Password»
Credentials item from the Jenkins home page and use the Credentials ID as a
second argument to :
Why use Groovy?
Here are the major reasons why you should consider using Groovy, a commonplace option for creating pipeline files.
1. As we said earlier, Groovy is an agile and dynamic language. It has seamless integration with all existing Java objects and libraries.
Groovy is Java without types, so without defining the basic data types like int, float, String, etc. Basically it’s the same as Java: without specifying a type. Groovy will judge the type based on the value of the object.
2. In Groovy, the ‘for’ loop becomes more concise and easier to read. Groovy loop statements support: while, for, for-in, break, continue, and the whole is consistent with Java.
For example:
0..5 indicates that the integers 0,1,2,3,4,5 are included
0..<5 means 0,1,2,3,5 and a..d means a,b,c,d:
Groovy also supports default parameter values:
3. In Groovy, we can use scopes to define Collections or .
The search method in Groovy is also more flexible
Groovy also allows you to add or remove collections from collections.
When adding elements to a collection, we can use the following methods
4. A further benefit to Groovy is its Operators:
Groovy arithmetic operators, logical operators, relational operators and bitwise operators are all consistent with languages like nodeJS. Groovy’s == is equivalent to the equals methods in Java .
5. methods available in Groovy are another benefit.
Add( ) Append the new value to the end of this list.
Get( ) Returns the element at the specified position in this list.
Contains( ) Returns true if this list contains the specified value.
Minus( ) Create a new list of original elements that removes the specified element
Plus ( ) Create a new list of the original list elements and the specified elements.
Pop( ) Remove the last item from this list
Remove( ) Remove elements from the specified position in the list
Reverse() Create a new list that is the opposite of the original list’s elements
Size( ) Get the number of elements in this list.
Sort( ) Returns a sorted copy of the original list.
6. In any other object-oriented language, there are concepts of objects and classes to represent the object-oriented nature of a programming language. Groovy implicitly creates getters, setter methods, and provides constructors with arguments.
7. is the same as Java, using try, catch to catch exceptions in Groovy
There are lots of Advanced topics (JSON operation, Methods, Maps etc etc) in Groovy which can be referred to in official Apache Documentation
Groovy also combines the features of Python, Ruby and other scripting languages. It does a lot of syntactic sugar in grammar. When it comes to Java development, there is a lot of code that must be written in Java which can be omitted in Groovy as seen from the previous snippets.
To conclude: the key benefit of Groovy is that you can write the same function with less code, which in my mind means more concise and meaningful code compared to Java.
Loading scripts
The Pipeline DSL allows you to load other scripts, enabling sharing of build logic. Optionally the script can return a reference to itself, allowing you to store the script in a variable for later use.
-
Configure the job and change the script to the following. The created script is executed immediately after loading.
-
Configure the job and change the script to the following. The created script defines a method. The statement gives a reference to the Groovy Script Object to the caller, which can invoke it at any time.
Loading a script from another Git repository
This requires the Pipeline Remote File Loader plugin. The example assumes you have a repository somewhere that contains a file, which you want to download to your Jenkins workspace.
-
Go to Manage Jenkins > Manage Plugins and install (without restart)
-
Configure a Pipeline job and set the Pipeline script to the following:
Deploying to Wildfly using the Gradle Cargo Plugin
The simple variant that builds the WAR and deploys it to a remote Wildfly:
Gradle build configuration
This configuration deploys to a remote Wildfly (or JBoss EAP 7) server. It needs to download two dependencies so you need to configure both and .
Capturing Wildfly’s server.log
Sometimes the deployment task fails but the Jenkins console contains no hints on what went wrong. And even if the deployement was successful, you may want to look in Wildfly’s . The following method archives the last 1.000 lines:
Then you can do this, which always captures the log:
Or this, which only captures it on error:
For example: