Strongswan
Содержание:
- 5.2.0
- Version 5.2.0
- End Entity Certificates
- Step 3 — Generating a Certificate for the VPN Server
- Step 2 — Creating a Certificate Authority
- Step 5 — Configuring VPN Authentication
- Аутентификация через Active Directory
- HOWTOs
- Remote Access Configurations
- Removed plugins
- Step 5 — Configuring VPN Authentication
- Site-to-Site Configurations
- Step 4 — Configuring StrongSwan
- Authentication Basics
- PKI
- C) Authentication using EAP-MSCHAP v2
5.2.0
09.07.2014
Major Release
100%
21 issues
(21 closed
—
0 open)
Version 5.2.0
strongSwan has been ported to the Windows platform. Using a MinGW toolchain, many parts of the strongSwan codebase run natively on Windows 7 / 2008 R2 and newer releases.
charon-svc implements a Windows IKE service based on libcharon, the kernel-iph and kernel-wfp plugins act as networking and IPsec backend on the Windows platform.socket-win provides a native IKE socket implementation, while winhttp fetches CRL and OCSP information using the WinHTTP API.
The new vici plugin provides a Versatile IKE Configuration Interface for charon. Using the stable IPC interface, external applications can configure, control and monitor the IKE daemon. Instead of scripting the ipsec tool and generating ipsec.conf, third party applications can use the new interface for more control and better reliability.
Built upon the libvici client library, swanctl implements the first user of the VICI interface. Together with a swanctl.conf configuration file, connections can be defined, loaded and managed. swanctl provides a portable, complete IKE configuration and control interface for the command line. Examples: http://www.strongswan.org/uml/testresults/swanctl/
The SWID IMV implements a JSON-based REST API which allows the exchange of SWID tags and Software IDs with the strongTNC policy manager.
The SWID IMC can extract all installed packages from the dpkg (Debian, Ubuntu, etc.), rpm (Fedora, RedHat, etc.), or pacman (Arch Linux, Manjaro, etc.) package managers, respectively, using the swidGenerator which generates SWID tags according to the new ISO/IEC 19770-2:2014 standard.
All IMVs now share the access requestor ID, device ID and product info of an access requestor via a common imv_session object.
The Attestation IMC/IMV pair supports the IMA-NG measurement format introduced with the Linux 3.13 kernel.
The aikgen tool generates an Attestation Identity Key bound to a TPM.
Implemented the PT-EAP transport protocol (RFC 7171) for Trusted Network Connect.
The ipsec.conf replay_window option defines connection specific IPsec replay windows. Original patch courtesy of Zheng Zhong and Christophe Gouault from 6Wind.
The custom parser for strongswan.conf has been replaced with one based on flex/bison. It adds support for quoted strings (with escape sequences), unlimited includes, more relaxed newline handling, better syntax error reporting, and a distinction between empty and unset values (key=»» vs. key=).
The parser for ipsec.conf in starter has been rewritten. It allows overriding options in all included sections (also=) not only in %default, options defined in included sections can also be cleared again. Other improvements, like quoted strings, unlimited includes, and better whitespace/comment handling have been implemented as well.
Support for late IKEv1 connection switching based on the XAuth username has been added.
Added support to parse SSH public keys from files configured in left|rightsigkey.
RDNs in Distinguished Names parsed from strings must now either be separated by a comma or a slash, not both. If the DN starts with a slash (or whitespace and a slash) slashes will be assumed as separator, commas otherwise.
The algorithm order in the default IKE proposal is again like it was before 5.1.1 (a4844dbc8f15).
Scalability of half-open IKE_SA and log level checks have been improved (502eeb7f76d2).
Added a workaround for Sonicwall boxes that send ID/HASH payloads unencrypted during IKEv1 Main Mode (c4c9d291d2aa).
Support for IPComp was added to the kernel-pfkey plugin (FreeBSD, Mac OS X, Linux), patch courtesy of Francois ten Krooden (6afa7761a540).
Passthrough policies are installed with strictly higher priorities than IPsec policies, which was not always the case previously, depending on the traffic selectors.
The kernel-netlink plugin now follows RFC 6724 when selecting IPv6 source addresses (#543).
stroke and starter now use the .plugins.stroke.socket option to determine the socket to communicate with the daemon. A —daemon option has been added to stroke.
The —disable-tools ./configure option has been replaced with the —disable-pki and —disable-scepclient options.
A handle_vips() hook has been added similar to assign_vips(), but for clients handling virtual IPs and other configuration attributes (31f26960761c).
End Entity Certificates
For each peer, i.e. for all VPN clients and VPN gateways in your network, generate an individual private key and issue a matching certificate using your new CA:
pki --gen > peerKey.der

pki --issue --in peerKey.der --type priv --cacert caCert.der --cakey caKey.der \
            --dn "C=CH, O=strongSwan, CN=peer" --san peer > peerCert.der

or when using older versions

pki --pub --in peerKey.der | pki --issue --cacert caCert.der --cakey caKey.der \
                                         --dn "C=CH, O=strongSwan, CN=peer" --san peer > peerCert.der
The second command extracts the public key and issues a certificate using your CA.
Again, adjust the DN and SAN to your needs ().
If you want to add subjectAltName extensions to your certificates use the —san option (can be provided multiple times), for instance, or . It is recommended to include the hostname of a gateway as subjectAltName in its certificate.
Depending on your clients there may be additional requirements imposed on gateway certificates, for instance, the Windows 7 certificate requirements or those for .
Distribute each private key and matching certificate to the corresponding peer.
Step 3 — Generating a Certificate for the VPN Server
We’ll now create a certificate and key for the VPN server. This certificate will allow the client to verify the server’s authenticity.
First, create a private key for the VPN server with the following command:
Then create and sign the VPN server certificate with the certificate authority’s key you created in the previous step. Execute the following command, but change the Common Name (CN) and the Subject Alternate Name (SAN) field to your VPN server’s DNS name or IP address:
Copy the certificates to a path which would allow StrongSwan to read the certificates:
Finally, secure the keys so they can only be read by the root user.
In this step, we’ve created a certificate pair that would be used to secure communications between the client and the server. We’ve also signed the certificates with our root key, so the client will be able to verify the authenticity of the VPN server. Now that we’ve got all the certificates ready, we’ll move on to configuring the software.
Step 2 — Creating a Certificate Authority
An IKEv2 server requires a certificate to identify itself to clients. To help create the required certificate, the package comes with a utility called to generate a Certificate Authority and server certificates.
To begin, let’s create a few directories to store all the assets we’ll be working on. The directory structure matches some of the directories in , where we will eventually move all of the items we create:
Then lock down the permissions so that our private files can’t be seen by other users:
Now that we have a directory structure to store everything, we can generate a root key. This will be a 4096-bit RSA key that will be used to sign our root certificate authority.
Execute these commands to generate the key:
Following that we can move on to creating our root certificate authority, using the key that we just generated to sign the root certificate:
The flag is used to ensure that the certificate authority’s root certificate will be valid for 10 years. The root certificate for an authority does not change typically, since it would have to be redistributed to every server and client that rely on it, so 10 years is a safe default expiry value.
You can change the distinguished name (DN) value to something else if you would like. The common name (CN field) here is just the indicator, so it doesn’t have to match anything in your infrastructure.
Now that we’ve got our root certificate authority up and running, we can create a certificate that the VPN server will use.
Step 5 — Configuring VPN Authentication
Our VPN server is now configured to accept client connections, but we don’t have any credentials configured yet. We’ll need to configure a couple things in a special configuration file called :
- We need to tell StrongSwan where to find the private key for our server certificate, so the server will be able to authenticate to clients.
- We also need to set up a list of users that will be allowed to connect to the VPN.
Let’s open the secrets file for editing:
First, we’ll tell StrongSwan where to find our private key and how to parse it.
/etc/ipsec.secrets
Make sure that the line begins with the character and that there is a space after it so that the entire line reads .
Then, we’ll define the user credentials. You can make up any username or password combination that you like:
/etc/ipsec.secrets
Save and close the file. Now that we’ve finished working with the VPN parameters, we’ll restart the VPN service so that our configuration is applied:
Now that the VPN server has been fully configured with both server options and user credentials, it’s time to move on to configuring the most important part: the firewall.
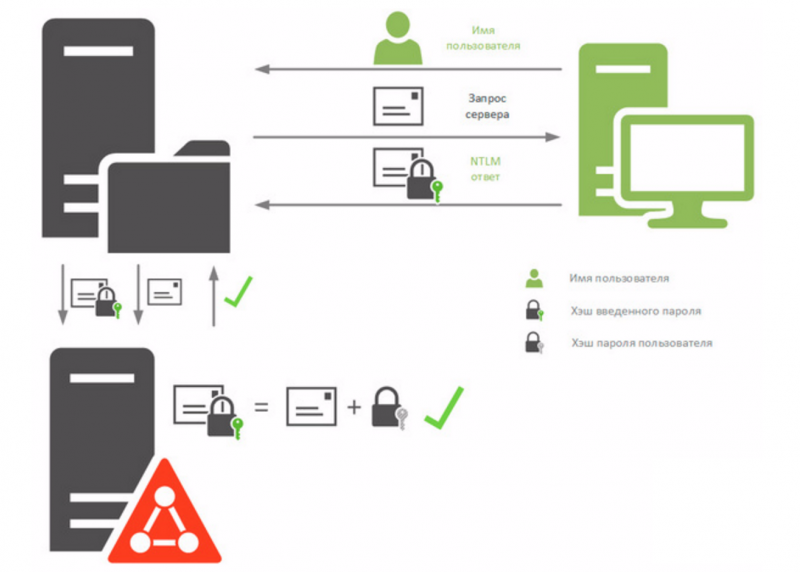
Аутентификация через Active Directory
Проверка подлинности через активный каталог от Microsoft в xl2tp выполняется с помощью winbind и samba.
Подготовка сервера
Для корректной работы сервера с Active Directory необходимо задать ему имя (hostname), которое будет доступно в DNS. Также на сервере должно быть задано точное время.
1. Необходимо убедиться, что сервер доступен по своему доменному имени. Если серверу так и не было задано вменяемого имени, вводим команду:
hostnamectl set-hostname vpn.dmosk.local
* где vpn — имя сервера; dmosk.local — домен.
После добавляем в DNS наш сервер VPN. Ждем минут 15 (если у нас используется доменная инфраструктура с несколькими сайтами, иначе ждать не нужно).
2. Задаем временную зону:
\cp /usr/share/zoneinfo/Europe/Moscow /etc/localtime
* в данном примере мы задаем зону по московскому времени.
Устанавливаем утилиту для синхронизации времени, разрешаем запуск демона и стартуем его.
yum install chrony
systemctl enable chronyd
systemctl restart chronyd
Присоединяем сервер к домену
Устанавливаем необходимые компоненты:
dnf install samba-client samba-winbind samba-winbind-clients krb5-workstation
Открываем конфигурационный файл samba:
vi /etc/samba/smb.conf
В разделе редактируем следующие опции:
workgroup = DMOSK
security = ads
* где DMOSK — NETBIOS имя домена; ads — указывает, что для samba будет использоваться модель безопасности LDAP Active Directory.
Также в добавим следующие строки:
kerberos method = secrets and keytab
realm = DMOSK.LOCAL
winbind enum groups = Yes
winbind enum users = Yes
idmap config * : rangesize = 1000000
idmap config * : range = 1000000-19999999
idmap config * : backend = autorid
* где:
- kerberos method — метод проверки kerberos. В данном примере сначала используется secretts.tdb, а затем системная таблица ключей.
- realm — сервер Active Directory. В нашем примере прописан домен, так как по нему можно обратиться к любому из серверов AD.
- winbind enum groups — задает пределы перечисления групп через setgrent(), getgrent() и endgrent().
- winbind enum users — задает пределы перечисления пользователей через setpwent(), getpwent()и endpwent().
- idmap config * : rangesize — определяет количество доступных uids и gids в каждом доменном диапазоне.
- idmap config * : range — определяет доступные совпадающие диапазоны uid и gid, для которых серверная часть является авторитетной.
- idmap config * : backend — задает idmap плагин для использования в качестве SID/uid/gid подсистемы
Вводим сервер в домен:
net ads join -U Administrator@dmosk.local
* где Administrator — учетная запись пользователя AD с правами на ввод компьютеров в домен; dmosk.local — наш домен.
Мы должны увидеть, примерно, следующее:
Using short domain name — DMOSK
Joined ‘SAMBA’ to dns domain ‘dmosk.local’
Разрешаем автозапуск winbind и стартуем его:
systemctl enable winbind —now
Выбираем профиль для аутентификации:
authselect select winbind —force
Проверяем, что наш сервер может получить список пользователей Active Directory:
wbinfo -u
… и групп:
wbinfo -g
Если мы увидели список пользователей и групп, то присоединение сервера к домену завершено.
После проверяем, что аутентификация в AD через модуль ntlm_auth работает корректно:
ntlm_auth —request-nt-key —domain=DMOSK.LOCAL —username=Administrator
* где DMOSK.LOCAL — наш домен; Administrator — пользователь, под которым будем логиниться для проверки работы модуля.
Настройка PPP для аутентификации через AD
Открываем конфигурационный файл options.xl2tpd:
vi /etc/ppp/options.xl2tpd
Добавляем в самый низ:
…
plugin winbind.so
ntlm_auth-helper ‘/usr/bin/ntlm_auth —helper-protocol=ntlm-server-1 —require-membership-of=»DMOSK\\VPN Users»‘
* где VPN Users — группа в AD, пользователи который будут иметь возможность использовать VPN.
Перезапускаем xl2tpd:
systemctl restart xl2tpd
Проверка
В Active Directory добавляем группу VPN Users (если еще нет). Группа должна быть локальная в домене. В группу добавим пользователей, которым хотим дать доступ для VPN-подключения.
В настройках подключения к серверу меняем пользователя и пароль на доменные.
HOWTOs
- Configuring rekeying and reauthentication
- Parallel IPsec processing using pcrypt
- Information about route based VPNs (Virtual Tunnel Interfaces (VTIs))
- NetworkManager client setup
- Authenticate road warriors using EAP-GTC and a PAM service
- Use a RADIUS AAA server to authenticate clients with EAP
- EAP-TLS certificate authentication
- Configure a failsafe strongSwan High Availability cluster
- Setting-up a simple CA using the strongSwan PKI tool
- CA management made easy using GUIs
- Post-Quantum Bimodal Lattice Signature Scheme (BLISS) HOWTO
- Hash-and-URL HOWTO
- SQLite HOWTO
- Logger configuration HOWTO
- Job priority management HOWTO
- IKE_SA lookup tuning HOWTO
- Mobile IPv6 HOWTO
- Smartcard HOWTO
- Using TPM 2.0 keys with the strongSwan PKI tool and IKE daemon
- Trusted Network Connect (TNC) HOWTO
- Android BYOD Security based on TNC
- TNC IF-MAP HOWTO
- strongTNC Policy Manager HOWTO
- Linux Integrity Measurement Architecture (IMA)
- Setting up a VPN into the Amazon Public Cloud’s VPC
- Running strongSwan in Network Namespaces on Linux
Remote Access Configurations
In this section we present example configurations for common remote access use cases. In these so called roadwarriorscenarios mobile clients will be able to connect to a remote network.
Because these clients most likely connect from unknown IP addresses the gateway will use right=%any to literally acceptconnections from anywhere. To simplify routing traffic back to the clients and because roadwarriors are often locatedbehind one or more NAT devices, the use of virtual IP addresses is necessary.
The virtual IPs can either be from a distinct subnet or actually from the subnet behind the gateway (by use of thefarp and optionally the dhcp plugins).
Whether roadwarriors will send all traffic to the gateway or use split-tunneling, that is, only send traffic for specificdestinations through the tunnel, is also something to consider. It is explained more detailed in Forwarding andSplit-Tunneling.
The above page also explains how traffic is forwarded to hosts behind the gateway.
IKEv2 (Windows 7/8, Linux, Android 4+, Mac OS X, iOS 8+)
The gateway configurations shown in the Windows 7 section of the wiki may be used for all IKEv2 clients. In both usecases presented there the gateway is authenticated with a certificate, while the clients will either authenticate themselveswith certificates, or use username and password. Both configurations may be implemented on a gateway to leave it to theclients to select an authentication method.
With the eap-radius plugin the user authentication may be delegated to a RADIUS server (e.g. an existing Active Directory DC).
Both the strongSwan VPN Client for Android 4 and newer and the strongSwan NetworkManager plugin may beused with either of these configs.
For Linux roadwarriors that don’t want or can’t use the NetworkManager plugin this client config may be used. Alternatively, the charon-cmd command line IKE client provides a simple means to establish roadwarrior connections since 5.1.0.
supports IKEv2 and simple EAP authentication.
With iOS 8 and Mac OS X 10.10 (Yosemite) Apple introduced support for IKEv2 in their clients. A GUI to configure such connectionsis currently not provided, so it’s necessary to write (or generate) custom configuration profiles.
IKEv1 (iOS, Mac OS X, Android, Windows)
The configuration presented on the iOS and Mac OS X page should work for all IKEv1 clients that support XAuth.
For Windows hosts before Windows 7 it is recommended to use a third-party IPsec client like Shrew instead of thebuilt-in IKEv1/L2TP client.
Instead of generating a private key and certificate pair for each client you may also use the same key/certificate pair forall clients. The actual client authentication will then be based on XAuth (this is similar to hybrid authentication, but also worksfor clients that don’t support it, or implement it incorrectly, like some iOS versions did). Even though the private key/certificatepair is «public», this still ensures proper authentication of the gateway, but might simplify deployment to clients.
XAuth with PSK may also be used (see #218) but is not recommended for larger deployments.
The XAuth credentials provided by the clients may be verified against the same RADIUS server used for IKEv2 clients withthe help of the xauth-eap plugin.
Removed plugins
| Plugin Name | E | S | Description |
| pluto plugins | |||
| xauth | x | s | XAUTH authentication (removed with 5.0.0) |
| libhydra plugins | |||
| All plugins were moved to libcharon with 5.4.0 (attr, attr-sql and resolve already with 5.3.0) | |||
| kernel-klips | e | IPsec kernel interface to an older KLIPS version (removed with 5.2.0) | |
| libcharon plugins | |||
| android | s | Android configuration/control backend, worked with the Android VPN applet patch. It was removed with 5.0.3. The DNS handler was moved to a separate plugin. | |
| nm | s | NetworkManager configuration/control backend, works with NetworkManager strongSwan applet. Contained in a separate executable since 5.0.0 | |
| socket-raw | x | s | RAW socket allowing charon to run parallel with pluto, enabled if pluto enabled (removed with 5.0.1) |
Step 5 — Configuring VPN Authentication
Our VPN server is now configured to accept client connections, but we don’t have any credentials configured yet, so we’ll need to configure a couple things in a special configuration file called :
- We need to tell StrongSwan where to find the private key for our server certificate, so the server will be able to encrypt and decrypt data.
- We also need to set up a list of users that will be allowed to connect to the VPN.
Let’s open the secrets file for editing:
First, we’ll tell StrongSwan where to find our private key.
/etc/ipsec.secrets
Then we’ll create the user credentials. You can make up any username or password combination that you like, but we have to tell StrongSwan to allow this user to connect from anywhere:
/etc/ipsec.secrets
Save and close the file. Now that we’ve finished working with the VPN parameters, we’ll reload the VPN service so that our configuration would be applied:
Now that the VPN server has been fully configured with both server options and user credentials, it’s time to move on to configuring the most important part: the firewall.
Site-to-Site Configurations
For site-to-site connections you may refer to the configuration examples. Out test suites for all features can be found here.
The most important difference compared to the remote access case is that the initiator will not request a virtual IP addressbut instead use leftsubnet to tunnel traffic from one or more local subnets. For IKEv2 multiple subnets (in CIDR notation) canbe added to left|rightsubnet, separated by commas. If IKEv1 is used a separate conn section has to be added for eachcombination of left and right subnet as only the first subnet in left|rightsubnet will be used (using either conn %default or thealso keyword can reduce each of these configs to a few lines).
One thing that often confuses users new to IPsec is that testing a net-to-net scenario from either of the gateways often requiresone to select the source address used specifically (e.g. with ) because the external IP of either gateway might not beincluded in the tunneled subnets. If that is something you require either add the external IPs to the list of subnets in left|rightsubnetor add a specific host-to-host config.
Step 4 — Configuring StrongSwan
StrongSwan has a default configuration file with some examples, but we will have to do most of the configuration ourselves. Let’s back up the file for reference before starting from scratch:
Create and open a new blank configuration file by typing:
First, we’ll tell StrongSwan to log daemon statuses for debugging and allow duplicate connections. Add these lines to the file:
/etc/ipsec.conf
Then, we’ll create a configuration section for our VPN. We’ll also tell StrongSwan to create IKEv2 VPN Tunnels and to automatically load this configuration section when it starts up. Append the following lines to the file:
/etc/ipsec.conf
We’ll also configure dead-peer detection to clear any “dangling” connections in case the client unexpectedly disconnects. Add these lines:
/etc/ipsec.conf
Then, we’ll configure the server (left) side IPSec parameters. Add this to the file:
/etc/ipsec.conf
Note: When configuring the server ID (), only include the character if your VPN server will be identified by a domain name:
If the server will be identified by its IP address, just put the IP address in:
Next, we can configure the client (right) side IPSec parameters, like the private IP address ranges and DNS servers to use:
/etc/ipsec.conf
Finally, we’ll tell StrongSwan to ask the client for user credentials when they connect:
/etc/ipsec.conf
The configuration file should look like this:
/etc/ipsec.conf
Save and close the file once you’ve verified that you’ve configured things as shown.
Now that we’ve configured the VPN parameters, let’s move on to creating an account so our users can connect to the server.
Authentication Basics
To ensure that the peer with which an IKE_SA is established is really who it claims to be it has to be authenticated.
strongSwan provides several methods to do this:
-
Public Key Authentication: This uses RSA, ECDSA or EdDSA X.509 certificates to verify the authenticity of the peer.
- Certificates can be self-signed (in which case they have to be installed on all peers), or signed by a commonCertificate Authority (CA). The latter simplifies deployment and configuration a lot as the gateway onlyneeds the CA certificate to authenticate all peers that provide a valid certificate signed by that CA.
- Certificate Revocation Lists (CRLs) or the Online Certificate Status Protocol (OCSP) may beused to verify the validity of certificates.
- To securely store private keys smart cards may be used via the PKCS#11 plugin.
- In order to prevent man-in-the-middle attacks the identity claimed by the peer has to be confirmed bythe certificate, either by the subject or a subjectAltName extension.
-
Pre-Shared-Key (PSK): A pre-shared-key is an easy to deploy option but it requires strong secrets
If the PSK is known to many users (which is often the case with IKEv1 XAuth with PSK) any user who knowsthe secret could impersonate the gateway. Therefore this method is not recommended for large scaledeployments.
to be secure.
-
Extensible Authentication Protocol (EAP): This covers several possible authentication methods, some arebased on username/password authentication (EAP-MD5, EAP-MSCHAPv2, EAP-GTC) or on certificates (EAP-TLS),some can even tunnel other EAP methods (EAP-TTLS, EAP-PEAP).
- The actual authentication of users may be delegated to a RADIUS server with the eap-radius plugin.
- EAP authentication can only be used with IKEv2 and for some methods with IKEv1 using the xauth-eap plugin.
- eXtended Authentication (XAuth): XAuth provides a flexible authentication framework within IKEv1. It is mainlyused for username/password based authentication. Also, it is generally used as a second authentication methodafter a mutual authentication with either certificates or PSK. With IKEv1 hybrid authentication is is, however,possible to authenticate the gateway with a certificate and use only XAuth to authenticate the client.
With IKEv2 it is possible to use multiple authentication rounds, for instance, to first authenticate the «machines» withcertificates and then the «user» with an username/password-based authentication scheme (e.g EAP-MSCHAPv2). It is alsopossible to use asymmetric authentication, for instance, by authenticating the gateway with a certificate and the clientwith a username/password-based EAP method (in the first authentication round). Please be aware that not all IKEv2implementations support this extension (RFC 4739).
Again, our website provides dozens of configuration examples covering these and other authentication options.
PKI
To use certificate based authentication you’ll need to create either self-signed certificates or setup a whole public-keyinfrastructure (PKI), consisting of a Certificate Authority (CA), optional intermediate CAs and end-entity certificates pluscertificate revocation lists (CRL) or other methods like OCSP to verify the validity of certificates.
One of the easiest ways to generate certificates is to use the ipsec pki utility. Since setting up a whole PKI can be quitecomplex, we only provide instructions to get you started.
OpenSSL is also a widespread alternative to generate certificates, as are several GUI based CA management utilities.Commercial CA management tools like Microsoft’s are also often used for large scale CAs.
Certificate requirements
- The generated leaf (end) certificates need to authenticate the corresponding peer’s IKE ID for authentication to succeed.
- To authenticate against another instance of strongSwan using a or several certificates (if attribute certificates are used), the certificate must authenticate the ID that the host sends (so Alice tries to authenticate against Bob as Alice (herself), so Alice’s certificate has to have at least a SAN field with the correct type (FQDN) and value «Alice» or the DN (not CN!) has to be «Alice». In other words, you can use the complete DN or any of the SAN fields’ values (assuming the type is correct. See for details) as an ID.
- Additionally, the certificate has to be trusted by Bob by, for example, it being known beforehand as valid to Bob or the certificate being authenticated/issued by a certificate authority that Bob trusts.
- For authentication to succeed, the other peer has to possess the complete chain of the certificate (from root certificate (the root CA) to the leaf certificate (the host’s certificate) with all intermediate certificates (all intermediate CAs). This is done by sending any intermediate certificates to the remote host.
The requirements for certificate authentication with other IKE implementations (implementations of other vendors, like Apple or Microsoft/Windows) are mentioned in the respective articles in the .
Notes regarding certificates
Because a foreign root certificate is not automatically trusted, a certificate’s root certificate is not sent to another host. That other host already has to have that root certificate available in the first place for authentication to succeed.
- You set leftsendcert=always in the conn that is used
- The remote peer requested a certificate issued by a trusted CA by sending a CERTREQ payload to the local peer that indicates one of the CAs in the path from the local host’s certificate to its root certificate.
C) Authentication using EAP-MSCHAP v2
In order to prevent man-in-the-middle attacks the strongSwan VPN gateway always authenticates itself with an X.509 certificate using a strong RSA/ECDSA signature. After a secure communication channel has been set up by the IKEv2 protocol, the Windows clients authenticate themselves using the EAP-MSCHAPv2 protocol based on user name, optional windows domain and user password. As an EAP identity exchange is needed for this to work, make sure to have the eap-identity plugin loaded.
EAP-MSCHAPv2 requires MD4 to generate the NT-Hashes, so either the md4 plugin or one of the crypto library wrappers (OpenSSL, Gcrypt) is required. This is not needed if the authentication is delegated to an AAA server via eap-radius plugin.
Some Windows clients will always send a domain part in the user name field (e.g. ). Depending on the backend used to authenticate the users the domain part may have to be stripped away (see for an example regarding FreeRADIUS), or be included when defining the credentials (e.g. in EAP secrets in ipsec.secrets).
Important: strongSwan releases before 4.3.1 are not compatible with Windows 7 RC (Build 7100) or later, because Microsoft’s EAP-MSCHAPv2 implementation changed from Beta to Release Candidate.