Экстренный vpn сервер openconnect с двухфакторной авторизацией на centos 8
Содержание:
- Отчёт: география и посещаемость сайта
- Fixing DTLS Handshake Failure
- Разделение трафика с помощью vpn-slice
- How the VPN works
- v0.4.0
- DESCRIPTION
- Other hits
- Таблица маршрутизации
- Usage
- Автоматический ввод фиксированной части пароля
- v0.3.4
- Install vpnc-script
- Искать адреса всех поддоменов в DNS, который отдала VPN
- Configure Firewall for IP Masquerading
Отчёт: география и посещаемость сайта
Отчёт в графической форме показывает объём посещений сайта dcp.sovserv.ru, в динамике, с привязкой к географическому размещению активных пользователей данного сайта.
Отчёт доступен для сайтов, входящих в TOP-100000 рейтинга Alexa. Для всех остальных сайтов отчёт доступен с некоторыми ограничениями.
Alexa Rank – рейтинговая система оценки сайтов, основанная на подсчете общего количества просмотра страниц и частоты посещений конкретного ресурса. Alexa Rank вычисляется исходя из показателей за три месяца. Число Alexa Rank – это соотношение посещаемости одного ресурса и посещаемости прочих Интернет-порталов, поэтому, чем ниже число Alexa Rank, тем популярнее ресурс.
Fixing DTLS Handshake Failure
On Ubuntu 16.04 and Ubuntu 18.04, ocserv daemon does not respect “listen-host” value from configuration file, which will cause the following error when clients connect to VPN server.
DTLS handshake failed: Resource temporarily unavailable, try again.
To fix this error, we need to edit the ocserv.service file. We first copy the original file in directory to directory, then edit it, because we don’t want new version of ocserv package to override our modifications. (To learn more about systemd unit files, run .)
sudo cp /lib/systemd/system/ocserv.service /etc/systemd/system/ocserv.service
sudo nano /etc/systemd/system/ocserv.service
Comment out the following two lines.
Requires=ocserv.socket

Also=ocserv.socket
Save and close the file. Then reload systemd
sudo systemctl daemon-reload
Stop ocserv.socket and disable it.
sudo systemctl stop ocserv.socket

sudo systemctl disable ocserv.socket
Restart ocserv service.
sudo systemctl restart ocserv.service
The ocserv systemd service won’t output any message if it fails to restart, so we need to check the status to make sure it’s actually running.
systemctl status ocserv
Разделение трафика с помощью vpn-slice
А дальше утилиту надо применить, с помощью ключа —script указав openconnect, что вместо стандартного скрипта нужно использовать vpn-slice
В —script передаётся строка с командой, которую нужно вызвать вместо скрипта. ./bin/vpn-slice — путь к исполняемому файлу vpn-slice 192.168.430.0/24 — маска адресов, по которым следует ходить в vpn. Тут, имеется в виду что если адрес начинается с 192.168.430 — то ресурс с этим адресом нужно искать внутри vpn
Теперь ситуация должна быть почти нормальной. Почти. Теперь можно зайти на хабр и можно зайти на внутрикорпоративный ресурс по ip, но нельзя зайти на внутрикорпоративный ресурс по символьному имени. Если прописать соответствие символьного имени и адреса в hosts — всё должно заработать. И работать, пока ip не поменяется. Линукс теперь умеет ходить в интернет или во внутрикорпоративную сеть в зависимости от ip. Но для определения адреса по прежнему используется не корпоративный DNS.
Проблема ещё может проявляться в таком виде — на работе всё нормально, а дома на внутрикорпоративные ресурсы можно зайти только по ip. Это потому что когда ты подключен к корпоративному Wi-Fi, то DNS используется тоже корпоративный, и в нём символьные адреса из VPN ресолвятся, несмотря на то что пройти по такому адресу без использования VPN по прежнему нельзя.
How the VPN works
This VPN is based on HTTPS and ESP, with routing and
configuration information distributed in XML format.
GlobalProtect mode is requested by adding --protocol=gp
to the command line:
openconnect --protocol=gp vpn.example.com
GlobalProtect portals and gateways
GlobalProtect VPNs actually contain two different server
interfaces: portals and gateways. Most VPNs have one portal server and
one or more gateway servers; the server hosting the portal interface
often hosts a gateway interface as well, but not always. The portal
interface mostly sends centrally-imposed security/lockdown settings
for the official client software to follow. The only information sent
by the portal that’s clearly useful to a VPN client like OpenConnect
(which tries to give full control to the end user) is the list of
gateways.
Some GlobalProtect VPNs are configured in such a way that the
client must authenticate to the portal before it can access the
gateway, while with other VPNs no interaction with the portal is
necessary. In order to replicate the behavior of the official
clients, OpenConnect first attempts to connect to the portal interface
of the specified server.
- If --usergroup=gateway is specified (or, equivalently,
/gateway is appended to the server URL, e.g.
https://vpn.company.com/gateway), then OpenConnect will
attempt to skip the portal interface and connect immediately to the
gateway interface. This is useful if the GlobalProtect VPN portal is
misconfigured, such as by not offering the desired gateway server in
the list it provides. - If connecting to the portal interface yields a choice of
multiple gateways, --authgroup=GatewayName tells OpenConnect
which one to choose.
Authentication
To authenticate, you connect to the secure web server (POST
/ssl-vpn/login.esp), provide a username, password, and (optionally) a
certificate, and receive an authcookie. The username, authcookie, and a
couple other bits of information obtained at login are combined into the
OpenConnect cookie.
Tunnel configuration
To connect to the secure tunnel, the cookie is used to read routing and
tunnel configuration information (POST /ssl-vpn/getconfig.esp).
Next, a HIP report (security scanner report) is
generated by the client and submitted to the server, if required.
Finally, either an HTTPS-based or ESP-based tunnel is setup:
- The cookie is used in a non-standard HTTP request (GET
/ssl-tunnel-connect.sslvpn, which acts more like a
CONNECT). Arbitrary IP packets can be passed over the
resulting tunnel. - The ESP keys provided by the configuration request are used to set up
a UDP-encapsulated
ESP tunnel.
Since TCP over
TCP is very suboptimal, OpenConnect tries to always use ESP-over-UDP,
and will only fall over to the HTTPS tunnel if that fails, or if disabled
via the --no-dtls argument.
v0.4.0
Upgrade Notes
Use the —authenticate command line argument instead
of—auth-only. The latter argument has been removed from this
version of openconnect-sso.
As it is now possible to choose between a bundled or preinstalled
version of Qt, that means that PyQt5 is no longer a required
dependency. To keep installing openconnect-sso with all its
dependencies:
$ pip install —user —upgrade «openconnect-sso»
To use the systemwide installation of PyQt5 and PyQtWebEngine
install them via your distribution’s package manager:
# apt install python-pyqt5 python3-pyqt5.qtwebengine
Then install openconnect-sso:
$ pip install —user —upgrade openconnect-sso
DESCRIPTION
The program
openconnect connects to VPN servers which use
standard TLS/SSL, DTLS, and ESP protocols for data
transport.
It was
originally written to support Cisco «AnyConnect»
VPN servers, and has since been extended with experimental
support for Juniper Network Connect
(—protocol=nc) and Junos Pulse VPN
servers (—protocol=pulse) and PAN
GlobalProtect VPN servers
(—protocol=gp).
The connection
happens in two phases. First there is a simple HTTPS
connection over which the user authenticates somehow —
by using a certificate, or password or SecurID, etc. Having
authenticated, the user is rewarded with an authentication
cookie which can be used to make the real VPN
connection.
The second
phase uses that cookie to connect to a tunnel via HTTPS, and
data packets can be passed over the resulting connection.
When possible, a UDP tunnel is also configured: AnyConnect
uses DTLS, while Juniper and GlobalProtect use
UDP-encapsulated ESP. The UDP tunnel may be disabled with
—no-dtls, but is preferred when
correctly supported by the server and network for
performance reasons. (TCP performs poorly and unreliably
over TCP-based tunnels; see
http://sites.inka.de/~W1011/devel/tcp-tcp.html.)
Other hits
Package libopenconnect-dev
-
xenial (16.04LTS) (libdevel):
open client for Cisco AnyConnect VPN — development files7.06-2build2: amd64 arm64 armhf i386 powerpc ppc64el s390x
-
bionic (18.04LTS) (libdevel):
open client for Cisco AnyConnect VPN — development files7.08-3: amd64 arm64 armhf i386 ppc64el s390x
-
bionic-updates (libdevel):
open client for Cisco AnyConnect VPN — development files7.08-3ubuntu0.18.04.1: amd64 arm64 armhf i386 ppc64el s390x
-
eoan (19.10) (libdevel):
open client for Cisco AnyConnect, Pulse, GlobalProtect VPN — development files8.02-1build1: amd64 arm64 armhf i386 ppc64el s390x
-
focal (20.04LTS) (libdevel):
open client for Cisco AnyConnect, Pulse, GlobalProtect VPN — development files8.05-1: amd64 arm64 armhf ppc64el s390x
-
groovy (libdevel):
open client for Cisco AnyConnect, Pulse, GlobalProtect VPN — development files8.10-1: amd64 arm64 armhf ppc64el s390x
Package libopenconnect5
-
xenial (16.04LTS) (libs):
open client for Cisco AnyConnect VPN — shared library7.06-2build2: amd64 arm64 armhf i386 powerpc ppc64el s390x
-
bionic (18.04LTS) (libs):
open client for Cisco AnyConnect VPN — shared library7.08-3: amd64 arm64 armhf i386 ppc64el s390x
-
bionic-updates (libs):
open client for Cisco AnyConnect VPN — shared library7.08-3ubuntu0.18.04.1: amd64 arm64 armhf i386 ppc64el s390x
-
eoan (19.10) (libs):
open client for Cisco AnyConnect, Pulse, GlobalProtect VPN — shared library8.02-1build1: amd64 arm64 armhf i386 ppc64el s390x
-
focal (20.04LTS) (libs):
open client for Cisco AnyConnect, Pulse, GlobalProtect VPN — shared library8.05-1: amd64 arm64 armhf ppc64el s390x
-
groovy (libs):
open client for Cisco AnyConnect, Pulse, GlobalProtect VPN — shared library8.10-1: amd64 arm64 armhf ppc64el s390x
Package libopenconnect5-dbg
xenial (16.04LTS) (debug):
debugging symbols for the libopenconnect5 shared library
7.06-2build2: amd64 arm64 armhf i386 powerpc ppc64el s390x
Package network-manager-openconnect
-
xenial (16.04LTS) (net):
network management framework (OpenConnect plugin)1.0.2-1build1: amd64 arm64 armhf i386 powerpc ppc64el s390x
-
xenial-updates (net):
network management framework (OpenConnect plugin)1.2.0-0ubuntu0.16.04.1: amd64 arm64 armhf i386 powerpc ppc64el s390x
-
bionic (18.04LTS) (net):
network management framework (OpenConnect plugin core)1.2.4-1: amd64 arm64 armhf i386 ppc64el s390x
-
bionic-updates (net):
network management framework (OpenConnect plugin core)1.2.4-1ubuntu1: amd64 arm64 armhf i386 ppc64el s390x
-
eoan (19.10) (net):
network management framework (OpenConnect plugin core)1.2.4-2ubuntu1: amd64 arm64 armhf i386 ppc64el s390x
-
focal (20.04LTS) (net):
network management framework (OpenConnect plugin core)1.2.6-1: amd64 arm64 armhf ppc64el s390x
-
groovy (net):
network management framework (OpenConnect plugin core)1.2.6-1: amd64 arm64 armhf ppc64el s390x
Package network-manager-openconnect-gnome
-
xenial (16.04LTS) (net):
network management framework (OpenConnect plugin GNOME GUI)1.0.2-1build1: amd64 arm64 armhf i386 powerpc ppc64el s390x
-
xenial-updates (net):
network management framework (OpenConnect plugin GNOME GUI)1.2.0-0ubuntu0.16.04.1: amd64 arm64 armhf i386 powerpc ppc64el s390x
-
bionic (18.04LTS) (net):
network management framework (OpenConnect plugin GNOME GUI)1.2.4-1: amd64 arm64 armhf i386 ppc64el s390x
-
bionic-updates (net):
network management framework (OpenConnect plugin GNOME GUI)1.2.4-1ubuntu1: amd64 arm64 armhf i386 ppc64el s390x
-
eoan (19.10) (net):
network management framework (OpenConnect plugin GNOME GUI)1.2.4-2ubuntu1: amd64 arm64 armhf i386 ppc64el s390x
-
focal (20.04LTS) (net):
network management framework (OpenConnect plugin GNOME GUI)1.2.6-1: amd64 arm64 armhf ppc64el s390x
-
groovy (net):
network management framework (OpenConnect plugin GNOME GUI)1.2.6-1: amd64 arm64 armhf ppc64el s390x
Package openconnect-dbg
xenial (16.04LTS) (debug):
debugging symbols for the OpenConnect VPN client
7.06-2build2: amd64 arm64 armhf i386 powerpc ppc64el s390x
Таблица маршрутизации
Это, упрощённо говоря, такая таблица в первой колонке которой содержится с чего должен начинаться адрес, по которому хочет пройти линукс, а во второй через какой сетевой адаптер по этому адресу пройти. На самом деле колонок больше, но сути это не меняет.
Для того, чтобы посмотреть таблицу маршрутизации нужно выполнить команду ip route
Тут каждая строчка отвечает за то, куда надо пройти для того, чтобы послать сообщение по какому-то адресу. Первым идёт описание с чего должен начинаться адрес. Для того, чтобы понять как определить, что 192.168.0.0/16 означает, что адрес должен начинаться с 192.168 нужно погуглить что такое маска ip адреса. После dev находится имя адаптера в который надо слать сообщение.
Для VPN линукс сделал виртуальный адаптер — tun0. За то, чтобы трафик для всех адресов начинающихся с 192.168 шёл через него отвечает строка
Ещё посмотреть на текущее состояние таблицы маршрутизации можно с помощью команды route -n (ip адреса талантливо анонимизированы) Эта команда выдаёт результаты в другом виде и вообще deprecated, но её выхлоп часто попадается в мануалах в интернете и надо уметь его читать.
С чего должен начинать ip адрес для маршрута можно понять из комбинации колонок Destination и Genmask. Те части ip адреса, которым в Genmask соответствуют цифры 255, учитываются, а те, где там 0 — нет. То есть комбинация Destination 192.168.0.0 и Genmask 255.255.255.0 означает, что если адрес начинается с 192.168.0, то запрос к нему пойдёт по этом маршруту. А если Destination 192.168.0.0 но Genmask 255.255.0.0, то по этому маршруту пойдут запросы к адресам, которые начинаются с 192.168
Для того, чтобы разобраться, что на самом деле делает vpn-slice я решил посмотреть на состояния таблиц до и после
Usage
See . Simply run openconnect as root and enter your username and password when prompted:
# openconnect vpnserver
More advanced invocation with username and password. Input the password after running the command.
# openconnect -u user --passwd-on-stdin vpnserver
Often VPN providers are offering different authentication groups for different access configurations like for example for a full tunnel or split tunnel connection. To show the different offered auth-groups and to get more information about the connection to the server in general use:
# openconnect --authenticate vpnserver
# openconnect --csd-wrapper=/usr/lib/openconnect/csd-post.sh vpnserver
Juniper Pulse Client
In order to connect to a Pulse Connect Secure server you need to know the SHA-1 of its certificate.
# openconnect --servercert=sha1:<HASH> --authgroup="single-Factor Pulse Clients" --protocol=nc <VPN_SERVER_ADDRESS>/dana-na/auth/url_6/welcome.cgi --pid-file="/var/run/work-vpn.pid" --user=<USERNAME>
Split routing
Split routing can be achieved using AUR in place of vpnc-script, so that you can selectively access hosts over the VPN but otherwise remain on your own LAN. Example:
   sh
   # openconnect gateway.bigcorp.com -u user1234 \
       -s 'vpn-slice 192.168.1.0/24 hostname1 alias2=alias2.bigcorp.com=192.168.1.43'
   $ cat /etc/hosts
   ...
   192.168.1.1 dns0.tun0					# vpn-slice-tun0 AUTOCREATED
   192.168.1.2 dns1.tun0					# vpn-slice-tun0 AUTOCREATED
   192.168.1.57 hostname1 hostname1.bigcorp.com		# vpn-slice-tun0 AUTOCREATED
   192.168.1.43 alias2 alias2.bigcorp.com		# vpn-slice-tun0 AUTOCREATED
Автоматический ввод фиксированной части пароля
К текущему моменту вы скорее всего уже ввели пароль не менее пяти раз и эта процедура вас уже изрядно утомила. Во-первых, потому что пароль длинный, во-вторых потому что при вводе нужно уложиться в фиксированный временной промежуток
Окончательное решения проблемы в статью не вошло, но можно сделать так, чтобы фиксированную часть пароля не пришлось вводить по многу раз.
Положим, фиксированная часть пароля — fixedPassword, а часть из Google Authenticator 567 987. Весь пароль целиком openconnect можно передать через стандартный ввод с помощью аргумента —passwd-on-stdin .
Теперь можно постоянно возвращаться к последней введённой команде и менять там только часть из Google Authenticator.
v0.3.4
Prelude
It is strongly suggested to remove the section from
the configuration file or delete the entire file located at (most probably). The fix of involves an
update of the auto-fill rules but unfortulately they are persisted when
the application is first started. Removing them from the configuration
forces the updated set of rules to be written in the configuration.
Bug Fixes
The embedded browser will now stop and waits for user input when the
previously stored credentials are invalid. This still not the proper
solution as saved credentials are not updated in that case but at
least the infinite login loop is circumvenied.
A potential crash upon closing the browser window is fixed. The
issue was caused by the mismatch between Python’s and Qt’s memory
management model.
Install vpnc-script
OpenConnect should be given a default vpnc-script
for network configuration (routing and DNS) at compile-time. This can be overriden
at runtime (with --script).
The configure script will check whether /etc/vpnc/vpnc-script
exists and can be executed, and will fail if not. If you don’t already have
a copy then you should install one. It might be in a separate vpnc-script
package for your operating system, it might be part of their vpnc package,
and there’s one linked from from the vpnc-script page,
if you need to download it manually. Install it as /etc/vpnc/vpnc-script.
If you do not want to use the standard location, you can configure OpenConnect to
use a different location by default. When running the ./configure script
in the instructions below, you can append an argument such as --with-vpnc-script=/where/I/put/vpnc-script to its command line. Note that the path you give will not be checked; the script doesn’t have to be present when you build OpenConnect. But of course OpenConnect won’t work very
well without it, so you’ll still have to install it later.
Искать адреса всех поддоменов в DNS, который отдала VPN
Если адресов внутри сети немного, то подход с автоматической модификацией файла hosts вполне рабочий. Но если ресурсов в сети много, то вам постоянно надо будет добавлять в скрипт строки вроде zoidberg.test.evilcorp.com zoidberg это так зовут один из тестовых стендов.
Но теперь, когда мы немного понимаем что к чему эту необходимость можно устранить.
Если после поднятия VPN посмотреть в /etc/hosts, то можно увидеть, вот такую строку
Да и в resolv.conf была добавлена новая строка. Короче, vpn-slice каким-то образом определила где находится dns сервер для vpn.
Теперь надо сделать так, чтобы для того, чтобы узнать ip адрес доменного имени, кончающегося на evilcorp.com, линукс ходил в корпоративный dns, а если надо что-то другое, то в дефолтный.
Я довольно долго гуглил и обнаружил, что такая функциональность есть в убунте из коробки. Имеется в виду возможность использовать для ресолва имён локальный dns сервер dnsmasq.
То есть можно сделать так, чтобы за ip адресами линукс всегда ходил в локальный dns сервер, который в свою очередь, в зависимости от доменного имени, будет искать ip на соответствующем внешнем dns сервере.
Для управления всем, связанным с сетями и сетевыми соединениями, в убунте используется NetworkManager, а графический интерфейс для выбора, например, вайфай соединения — просто фронт к нему.
Нам надо будет полазить в его конфигурации.
- Создать файл в /etc/NetworkManager/dnsmasq.d/evilcorp
Обратите внимание на точку перед evilcorp. Она сигнализирует dnsmasq, что все поддомены evilcorp.com надо искать именно в корпоративном dns
- Сказать NetworkManager, что для разрешения имён надо использовать dnsmasq
Конфигурация network-manager находится в /etc/NetworkManager/NetworkManager.conf Надо добавить туда:
- Перезапустить NetworkManager
Теперь, после подключения к VPN с помощью связки openconnect и vpn-slice, ip будет нормально опредёляться, даже если не добавлять символьные адреса в аргументы к vpnslice.
Configure Firewall for IP Masquerading
We need to set up IP masquerading in the server firewall, so that the server becomes a virtual router for VPN clients. I will use UFW, which is a front end to the iptables firewall. Install UFW on Ubuntu with:
sudo apt install ufw
First, you need to allow SSH traffic.
sudo ufw allow 22/tcp
Then edit file.
sudo nano /etc/default/ufw
Change the default forward policy from “DROP” to “ACCEPT”.
DEFAULT_FORWARD_POLICY="ACCEPT"
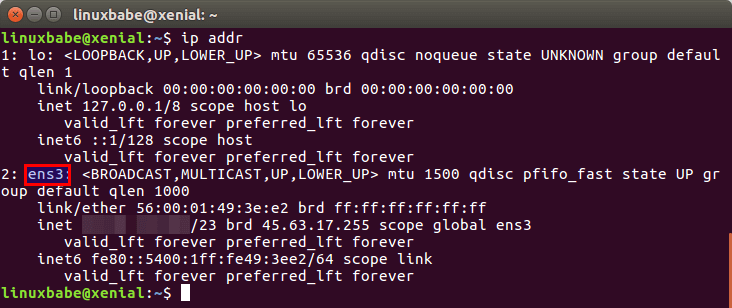
Save and close the file. Next, find the name of your server’s main network interface.
ip addr
As you can see, it’s named on my Ubuntu server.
To configure IP masquerading, we have to add iptables command in a UFW configuration file.
sudo nano /etc/ufw/before.rules
By default, there are some rules for the table. Add the following lines at the end of this file. Replace with your own network interface name.
# NAT table rules
*nat
:POSTROUTING ACCEPT
-A POSTROUTING -o ens3 -j MASQUERADE

# End each table with the 'COMMIT' line or these rules won't be processed
COMMIT
In Nano text editor, you can go to the end of the file by pressing , then pressing .
The above lines will append (-A) a rule to the end of of POSTROUTING chain of nat table. It will link your virtual private network with the Internet. And also hide your network from the outside world. So the Internet can only see your VPN server’s IP, but can’t see your VPN client’s IP, just like your home router hides your private home network.
Save and close the file. Then enable UFW.
sudo ufw enable
If you have enabled UFW before, then you can use systemctl to restart UFW.
sudo systemctl restart ufw
Now if you list the rules in the POSTROUTING chain of the NAT table by using the following command:
sudo iptables -t nat -L POSTROUTING
You can see the Masquerade rule.