Linux/unix user administration tutorial: adduser, usermod, userdel
Содержание:
- useradd command
- Create a User with an Expiry Date
- How To Grant Different User Permissions
- Create a User with Specific Group
- How To Grant a User Sudo Privileges
- How to Create a User
- Delete a User on Debian 9
- How To View Available Users on a VPS
- 4. Switch to the sudo user
- 5. Verify the sudo user
- Add a new Linux User to a Group.
- User Details Listing
- How To Grant a User Sudo Privileges
- How To Add a User
- Step 6 — Securing Transactions
- How to add user via command line
- Step 2 — Opening the Firewall
- Create a User with Home Directory
- How To Add a User
- Step 2 — Opening the Firewall
- Import Users from G Suite
- What Groups Are Used for in Linux
- How To Delete a User
- Adding users to the usergroups
- Creating a User
- What Is Sudo and What Is the Sudoers List?
- Import users from .csv file
useradd command
In Linux, you can create user accounts with useradd / adduser command. The useradd command is a low-level utility which is used for creating user accounts in Linux and other Unix like operating systems.
The adduser command is just a symbolic link to useradd, so it will work similar to useradd command.
In Ubuntu / Debian, the adduser command may behave differently as useradd and adduser are two seperate commands.
Syntax:
useradd user_name
When then the useradd command is issued, the useradd command creates a new user account using options specified by you in the command line and default values specified in /etc/default/useradd file.
Also, the useradd command edits /etc/passwd, /etc/shadow and /etc/group to put an entry of user details and configurations (User and Group IDs, password policies, encryption method), by reading the contents of /etc/login.defs file.
The default values in this file may differ depending on the Linux distribution. For example, useradd command in Ubuntu does not create the user’s home directory by default if you do not specify options in the command line. Whereas in RHEL, the useradd command creates the home directory for a new user.
Create a User with an Expiry Date
This option is useful when you want to create a temporary user who will have access to the system only for a period of time. By default, when a useradd command issued without any options, the user will be created with account never expire value.
The -e option allows setting the expiry date for the user. The date must be specified in YYYY-MM-DD format.
To create a new user user_name with an expiry date set to May 1st, 2019, you can use.
useradd -e 2019-05-01 user_name
Verify the user’s expiration date using the chage command.
chage -l user_name
Output:
Last password change                                    : Apr 16, 2019
Password expires                                        : never
Password inactive                                       : never
Account expires                                         : May 01, 2019
Minimum number of days between password change          : 0
Maximum number of days between password change          : 99999
Number of days of warning before password expires       : 7
How To Grant Different User Permissions
Here is a short list of other common possible permissions that users can enjoy.
- ALL PRIVILEGES- as we saw previously, this would allow a MySQL user full access to a designated database (or if no database is selected, global access across the system)
- CREATE- allows them to create new tables or databases
- DROP- allows them to them to delete tables or databases
- DELETE- allows them to delete rows from tables
- INSERT- allows them to insert rows into tables
- SELECT- allows them to use the command to read through databases
- UPDATE- allow them to update table rows
- GRANT OPTION- allows them to grant or remove other users’ privileges
To provide a specific user with a permission, you can use this framework:
If you want to give them access to any database or to any table, make sure to put an asterisk (*) in the place of the database name or table name.
Each time you update or change a permission be sure to use the Flush Privileges command.
If you need to revoke a permission, the structure is almost identical to granting it:
Note that when revoking permissions, the syntax requires that you use , instead of as we used when granting permissions.
You can review a user’s current permissions by running the following:
Just as you can delete databases with DROP, you can use DROP to delete a user altogether:
To test out your new user, log out by typing:
and log back in with this command in terminal:
Create a User with Specific Group
Users are often grouped together with the Linux group. The Linux groups help us to define privileges like read, write or execute to all users within that group for a particular resource. Linux group has its own identification number GID.
When a useradd command is executed without any options, it creates a group with the same as the username and same GID as UID.
Use the -g option to create a user with a specific GID. You can either specify the group name or the GID.
Group Name
useradd -g users user_name
The group name or GID must already exist.
Verify that the user’s GID is 500 using the id command.
id user_name
Output:
uid=1001(user_name) gid=100(users) groups=100(users)
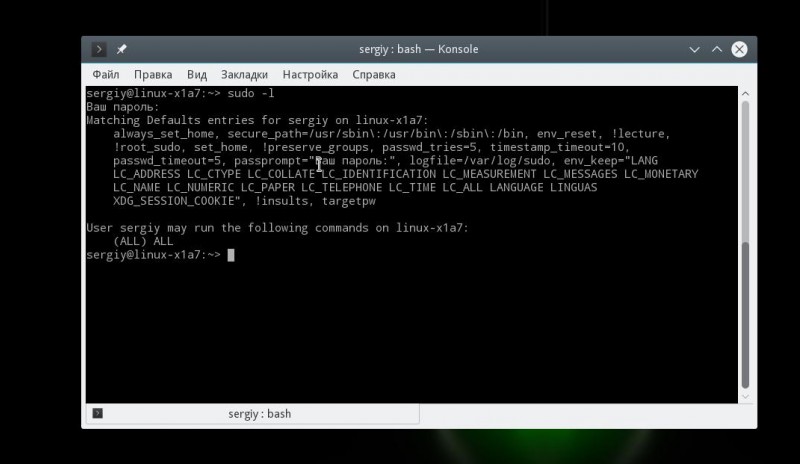
How To Grant a User Sudo Privileges
If your new user should have the ability to execute commands with root (administrative) privileges, you will need to give the new user access to .
We can do this by using the command, which opens the appropriate configuration file in your editor. This is the safest way to make these changes.
If you are currently signed in as the root user, type:
If you are signed in using a non-root user with sudo privileges, type:
Search for the line that looks like this:
Below this line, copy the format you see here, changing only the word “root” to reference the new user that you would like to give sudo privileges to:
<pre>
root ALL=(ALL:ALL) ALL
<span class=“highlight”>newuser</span> ALL=(ALL:ALL) ALL
</pre>
You should add a new line like this for each user that should be given full sudo privileges. When you are finished, you can save and close the file by hitting , followed by “Y”, and then hit “ENTER” to confirm.
Now, your new user is able to execute commands with administrative privileges.
When signed in as the new user, you can execute commands as your regular user by typing commands as normal:
You can execute the same command with administrative privileges by typing ahead of the command:
You will be prompted to enter the password of the regular user account you are signed in as.
How to Create a User
The following command adds a new user named test to your system.
The basic command to create a user (named test) would be:
useradd test
You’ll need priviledges to /etc/password to do this; as such, you’ll like sudo the above command:
s
What happens when this command is run depends on the contents of the configuration file located in /etc/default/useradd.
To view the contents of /etc/default/useradd, run the following command:
sudo nano /et
The configuration file sets a default shell which in Ubuntu is bin/sh. All the other options are commented out.
The commented-out options allow you to set a default home folder, a group, the number of days after the password has expired before the account becomes disabled, and a default expiry date.
The important thing to glean from the above information is that running the useradd command without any switches may produce different results on different distributions and it is all to do with the settings in the /etc/default/useradd file.
The sudo utility is not installed on every distribution. If it’s not installed, log in to an account with appropriate permissions for creating users.
Delete a User on Debian 9
Once you no longer need the user we have created, we can delete it with the deluser command.
Let’s say we want to delete the user “newuser”. You can run the following command to do this:
deluser newuser
However, this will not delete the user’s home directory. If you want to delete the user’s home directory as well, you should run the following command:
deluser --remove-home newuser
The user is now completely removed from our system.
This is all you need to know when it comes to creating and deleting a user on Debian 9.
Of course, you don’t have to create and delete users on Debian 9, if you use one of our managed VPS Hosting services, in which case you can simply ask our expert Linux admins to help you create a new or delete an existing user on Debian 9. They are available 24×7 and will take care of your request immediately.
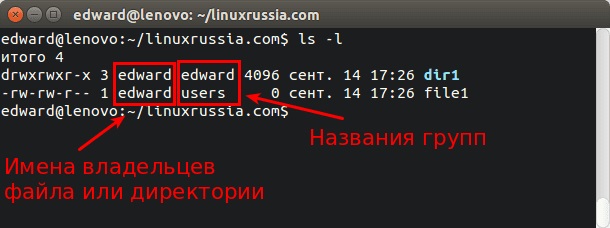
How To View Available Users on a VPS
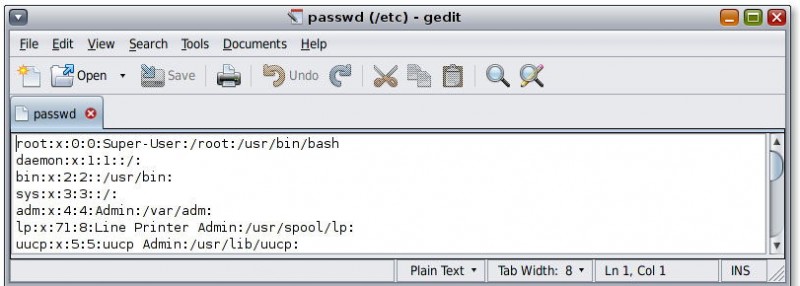
Every user on a Linux system, whether created as an account for a real human being or associated with a particular service or system function, is stored in a file called «/etc/passwd».
The «/etc/passwd» file contains information about the users on the system. Each line describes a distinct user.
Have a look by entering:
less /etc/passwd
root:x:0:0:root:/root:/bin/bash
daemon:x:1:1:daemon:/usr/sbin:/bin/sh
bin:x:2:2:bin:/bin:/bin/sh
sys:x:3:3:sys:/dev:/bin/sh
sync:x:4:65534:sync:/bin:/bin/sync
games:x:5:60:games:/usr/games:/bin/sh
. . .
Each line is broken up into fields. These fields are delimited by the colon (:) character.
The only field that we are really interested in at the moment is the first one. Each is an independent username.
We can get this list without wading through the entire «/etc/passwd» by typing:
cut -d : -f 1 /etc/passwd
root
daemon
bin
sys
sync
games
. . .
You probably recognize «root» as the administrative user. Towards the end, you may see the user you are logged in as.
In between, you will probably see a number of other users whose usage seems at least somewhat clear. For instance, «www-data» is configured as the owner of web server processes.
This is done to separate functional privileges. That way, if an account is compromised or misused, the affect will be isolated.
You can learn more about the fields in «/etc/passwd» by clicking here.
4. Switch to the sudo user
Now, switch to that user:
su - newuser
and run a command that a normal system user is not allowed to, such as the one below:
apt-get update && apt-get upgrade
The command above upgrades all the system software to the latest version and you will get the following output:
~$ apt-get update && apt-get upgrade
Reading package lists... Done
W: chmod 0700 of directory /var/lib/apt/lists/partial failed - SetupAPTPartialDirectory (1: Operation not permitted)
E: Could not open lock file /var/lib/apt/lists/lock - open (13: Permission denied)
E: Unable to lock directory /var/lib/apt/lists/
W: Problem unlinking the file /var/cache/apt/pkgcache.bin - RemoveCaches (13: Permission denied)
W: Problem unlinking the file /var/cache/apt/srcpkgcache.bin - RemoveCaches (13: Permission denied)
5. Verify the sudo user
Try the same command now with
sudo apt-get update && sudo apt-get upgrade
You will be prompted for the password. Enter the password you specified when creating the system user to proceed. If you have done everything correctly, the software index will be updated and all your system software will be upgraded.
Congratulations, now you have sudo user which you can use to manage your Ubuntu VPS.
Of course, you don’t have to create a sudo user on Ubuntu, if you use one of our Ubuntu VPS Hosting services, in which case you can simply ask our expert Linux admins to create a sudo user on Ubuntu for you. They are available 24×7 and will take care of your request immediately.
PS. If you liked this post on how to create a sudo user on Ubuntu 16.04, please share it with your friends on the social networks using the buttons on the left or simply leave a reply below. Thanks.
Add a new Linux User to a Group.
A Linux user can have one primary group and one or more secondary groups. The groups can be set as parameters of the adduser command when you create the user.
All commands have to be executed as root user. On Ubuntu, please prepend the word «sudo » to all commands or run «sudo su» to become root user.
As a first step, I will add a new group named «family» and a second group «friends»:
groupadd family
groupadd friends
Then I will add a new user «tom» to our group «family». The family group will be added as a secondary group by using the -G parameter.
useradd -G family tom
Tom is now a member of the family group. The -G parameter allows it to list several groups separated by comma. To add the user tom into the family and friends group, use this command:
useradd -G family,friends tom
Please note that our new Linux user tom has no password yet, so he can’t login. To set a password for this user, run:
passwd tom
And enter the new password twice when the command requests it.
In the above example, we added the user tom to a secondary group, the adduser command has created a new primary group with the name of the user automatically and assigned this group as a primary group.
- Username: tom
- Primary Group: tom
- Secondary Group: family (or family + friends if you followed the second example)
Maybe you want that tom gets family as his primary group and friends as his secondary group? Then use this command instead:
useradd -g family -G friends tom
to create the user tom. the -g switch tells the useradd command to use family as the primary group. There is no group tom in this case.
Use man (manpage) command to get a detailed description of all command line options for useradd:
man useradd
User Details Listing
You can view a list of all the users that are created in your organization by logging in to mailadmin.zoho.com and navigating to the User Details section. Alternatively, you can also access the User Details menu using link.
You can search for specific users using the search toolbar on the top right corner of the Groups page.
Users can also be filtered by the role assigned to them using the Filters option on the top right corner of the page. Further, you can also view the list of users associated with a particular domain by choosing the relevant domain from the Filters listing.

Export User(s):
In case you need to export user details you can make use of the Export User(s) option from the Users listing page. You will be able to find three options in the export menu.
- If you click the Export User option, all users associated with your organization will get exported as a .csv file.
- If you have selected certain groups using the checkbox, and click the Export User option, you will find an additional Export selected Users option. This will export only the users that you have selected.
- If you filtered groups by domain, and then select the Export User option, you will find an additional Export all filtered Users option. This will export all the users created for the selected domain.
Password Encryption
The exported contacts are saved as .csv file. While exporting, you can choose to encrypt the .csv file with a password for the security of your data. After you click on Export, an Encrypt Password pop-up will appear. Select the Encrypt with Password checkbox in the pop-up to add a password protection to your file.
Note:
The .csv file will be exported as a Zip file. You need to unzip the exported file in order to access the .csv file.
How To Grant a User Sudo Privileges
If your new user should have the ability to execute commands with root (administrative) privileges, you will need to give the new user access to . Let’s examine two approaches to this problem: Adding the user to a pre-defined user group, and specifying privileges on a per-user basis in ’s configuration.
Add the New User to the Sudo Group
By default, on Ubuntu 16.04 systems is configured to extend full privileges to any user in the sudo group.
You can see what groups your new user is in with the command:
By default, a new user is only in their own group, which is created at the time of account creation, and shares a name with the user. In order to add the user to a new group, we can use the command:
The option here tells to add the user to the listed groups.
Test Your User’s Sudo Privileges
Now, your new user is able to execute commands with administrative privileges.
When signed in as the new user, you can execute commands as your regular user by typing commands as normal:
You can execute the same command with administrative privileges by typing ahead of the command:
You will be prompted to enter the password of the regular user account you are signed in as.
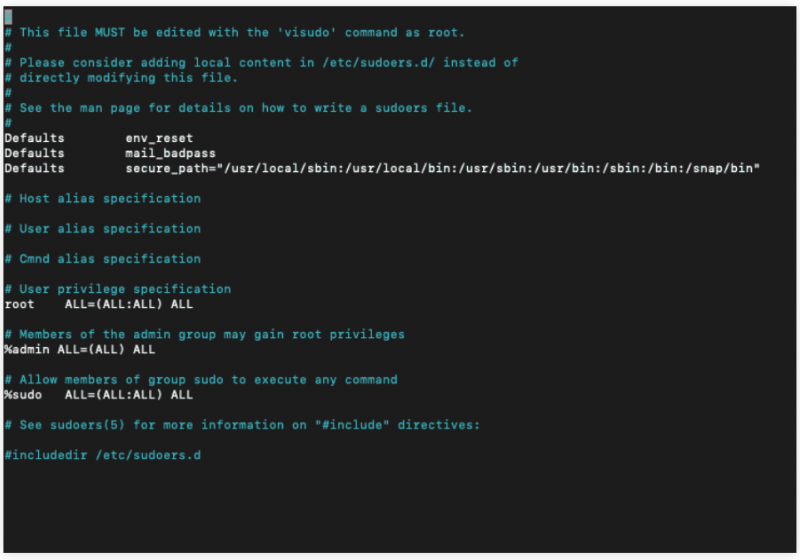
Specifying Explicit User Privileges in /etc/sudoers
As an alternative to putting your user in the sudo group, you can use the command, which opens a configuration file called in the system’s default editor, and explicitly specify privileges on a per-user basis.
Using is the only recommended way to make changes to , because it locks the file against multiple simultaneous edits and performs a sanity check on its contents before overwriting the file. This helps to prevent a situation where you misconfigure and are prevented from fixing the problem because you have lost privileges.
If you are currently signed in as root, type:
If you are signed in using a non-root user with privileges, type:
Traditionally, opened in the editor, which can be confusing for inexperienced users. By default on new Ubuntu installations, it should instead use , which provides a more familiar text editing experience. Use the arrow keys to move the cursor, and search for the line that looks like this:
/etc/sudoers
Below this line, copy the format you see here, changing only the word “root” to reference the new user that you would like to give sudo privileges to:
/etc/sudoers
You should add a new line like this for each user that should be given full sudo privileges. When you are finished, you can save and close the file by hitting Ctrl-X, followed by Y, and then Enter to confirm.
How To Add a User
If you are signed in as the root user, you can create a new user at any time by typing:
If you are signed in as a non-root user who has been given privileges, as demonstrated in the initial server setup guide, you can add a new user by typing:
Either way, you will be asked a series of questions. The procedure will be:
- Assign and confirm a password for the new user
- Enter any additional information about the new user. This is entirely optional and can be skipped by hitting Enter if you don’t wish to utilize these fields.
- Finally, you’ll be asked to confirm that the information you provided was correct. Enter Y to continue.
Your new user is now ready for use! You can now log in using the password you set up.
Note: Continue if you need your new user to have access to administrative functionality.
Step 6 — Securing Transactions
Since FTP does not encrypt any data in transit, including user credentials, we’ll enable TTL/SSL to provide that encryption. The first step is to create the SSL certificates for use with vsftpd.
We’ll use to create a new certificate and use the flag to make it valid for one year. In the same command, we’ll add a private 2048-bit RSA key. Then by setting both the and flags to the same value, the private key and the certificate will be located in the same file.
We’ll do this with the following command:
You’ll be prompted to provide address information for your certificate. Substitute your own information for the questions below:
For more detailed information about the certificate flags, see OpenSSL Essentials: Working with SSL Certificates, Private Keys and CSRs
Once you’ve created the certificates, open the configuration file again:
Toward the bottom of the file, you should two lines that begin with . Comment them out so they look like:
/etc/vsftpd.conf
Below them, add the following lines which point to the certificate and private key we just created:
/etc/vsftpd.conf
After that, we will force the use of SSL, which will prevent clients that can’t deal with TLS from connecting. This is necessary in order to ensure all traffic is encrypted but may force your FTP user to change clients. Change to :
/etc/vsftpd.conf
After that, add the following lines to explicitly deny anonymous connections over SSL and to require SSL for both data transfer and logins:
/etc/vsftpd.conf
After this we’ll configure the server to use TLS, the preferred successor to SSL by adding the following lines:
/etc/vsftpd.conf
Finally, we will add two more options. First, we will not require SSL reuse because it can break many FTP clients. We will require “high” encryption cipher suites, which currently means key lengths equal to or greater than 128 bits:
/etc/vsftpd.conf
When you’re done, save and close the file.
Now, we need to restart the server for the changes to take effect:
At this point, we will no longer be able to connect with an insecure command-line client. If we tried, we’d see something like:
Next, we’ll verify that we can connect using a client that supports TLS.
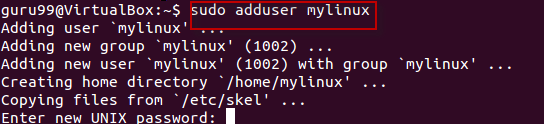
How to add user via command line
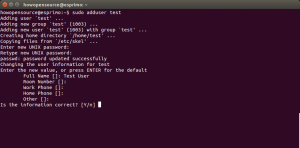
Let’s look into command than you need to execute in order to create a new user account. Here we will discuss different parameters that you need to pass to adduser command. Basically what you need to do is just to provide a login name for a new user. Then adduser command will ask you a couple of questions and will create new account with a new password and proper home directory.
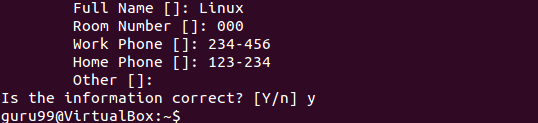
howopensource@esprimo:~$ sudo adduser test
Adding user `test' ...
Adding new group `test' (1004) ...
Adding new user `test' (1004) with group `test' ...
Creating home directory `/home/test' ...
Copying files from `/etc/skel' ...
Enter new UNIX password:
Retype new UNIX password:
passwd: password updated successfully
Changing the user information for test
Enter the new value, or press ENTER for the default
	Full Name []: Test Account
	Room Number []:
	Work Phone []:
	Home Phone []:
	Other []:
Is the information correct? [Y/n]
howopensource@esprimo:~$
If you want to add one existing user to an existing group then adduser command must be called with a two parameters. First one is a user and second one is a group to which to add specified user. Here is an example how to add newly created user to sudo group.
Advertisements
howopensource@esprimo:~$ sudo adduser test sudo
Adding user `test' to group `sudo' ...
Done.
howopensource@esprimo:~$
There a couple of different options and parameters that you can specify to command adduser when you have to accomplish different tasks. But we are not going to discuss them here.
Step 2 — Opening the Firewall
Let’s check the firewall status to see if it’s enabled. If it is, we’ll ensure that FTP traffic is permitted so firewall rules don’t block our tests. This guide assumes that you have UFW installed, following Step 4 in the .
Check the firewall status:
In this case, only SSH is allowed through:
You may have other rules in place or no firewall rules at all. Since only SSH traffic is permitted in this case, we’ll need to add rules for FTP traffic.
Let’s open ports and for FTP, port for when we enable TLS, and ports for the range of passive ports we plan to set in the configuration file:
Check the firewall status:
Your firewall rules should now look like this:
With installed and the necessary ports open, let’s move on to creating a dedicated FTP user.
Create a User with Home Directory
As I said earlier, the home directory for a new user may or may not be created when we use the useradd command with no options.
Use the -m option to ensure the home directory for the user is created while creating a new user.
useradd -m user_name
The above command creates the home directory /home/user_name for user user_name and copies files from /etc/skel directory to the user’s home directory.
ls -al /home/user_name
Output:
total 12
drwx------. 2 user_name user_name 62 Apr 15 23:21 .
drwxr-xr-x. 4 root root 37 Apr 15 23:21 ..
-rw-r--r--. 1 user_name user_name 18 Apr 10 2018 .bash_logout
-rw-r--r--. 1 user_name user_name 193 Apr 10 2018 .bash_profile
-rw-r--r--. 1 user_name user_name 231 Apr 10 2018 .bashrc
How To Add a User
If you are signed in as the user, you can create a new user at any time by typing:
<pre>
adduser <span class=“highlight”>newuser</span>
</pre>
If you are signed in as a non-root user who has been given privileges, as demonstrated in the initial server setup guide, you can add a new user by typing:
<pre>
sudo adduser <span class=“highlight”>newuser</span>
</pre>
Either way, you will be asked a series of questions. The procedure will be:
- Assign and confirm a password for the new user
- Enter any additional information about the new user. This is entirely optional and can be skipped by hitting “ENTER” if you don’t wish to utilize these fields.
- Finally, you’ll be asked to confirm that the information you provided was correct. Type “Y” to continue.
Your new user is now ready for use! You can now log in using the password you set up.
Note: Continue on if you need your new user to have access to administrative functionality.
Step 2 — Opening the Firewall
We’ll check the firewall status to see if it’s enabled. If so, we’ll ensure that FTP traffic is permitted so you won’t run into firewall rules blocking you when it comes time to test.
In this case, only SSH is allowed through:
You may have other rules in place or no firewall rules at all. Since only traffic is permitted in this case, we’ll need to add rules for FTP traffic.
We’ll need to open ports 20 and 21 for FTP, port 990 for later when we enable TLS, and ports 40000-50000 for the range of passive ports we plan to set in the configuration file:
Now our firewall rules looks like:
With installed and the necessary ports open, we’re ready to proceed to the next step.
Import Users from G Suite
If you’re migrating your account from G Suite to Zoho Mail, there is a provision to directly create user accounts in Zoho Mail, based on the data that is already existing in your G Suite organization account. Follow the below steps to import users from G Suite.
- Log in to the Zoho Mail Control Panel.
- Go to the User Details menu.
- From the Import User dropdown, select the From G Suite option.
- If you have not authenticated your Zoho Mail account to access G Suite, follow the below steps:
- Sign into your G Suite admin account, and follow the authentication details as given in the help page link.
- Once the authentication is done, enter the G Suite super admin email address and the service account email address in the respective fields. Upload the file that was downloaded onto your system in the product key file field, and click Verify.
- If you have already authenticated your G Suite account with Zoho Mail, you will directly see the Import Users page. Click the Import Users button.
- If you have multiple domains configured, you’ll be asked to choose the respective destination domains, where the users need to be created.
- After selecting the destination domains, click Next.
- Select the checkboxes respective to the users that you would like to create in Zoho Mail.
- On the right side of the window, enter a name for the Import in the Import Name field.
- Select whether you want to import user aliases and phone numbers.
- Enter a password for the users that you’re importing.
- Select whether you want to force users to change their passwords during their first login, and click Start Import.
- You can continuously monitor the progress of the import from the Import History section.
Note:
- The G Suite authorization is a one-time process, and it does not have to be repeated if it has already been done.
- The Import Users from G Suite feature is available only organizations that are using one of our paid plans.
What Groups Are Used for in Linux
A group in Linux is exactly what it sounds like: a collection of users. These are used for managing permissions across a number of users instead of modifying them on a per-user basis. It’s worth knowing your way around groups as this concept is used across Unix-like operating systems as a whole, not just Linux.
A user needs to belong to at least one group. This is the user’s primary group. A user can and usually does belong to other groups, known as secondary groups. There is often a limit on how many secondary groups a user can belong to, but this isn’t something you’ll run into often.
Of course, groups aren’t the only way to handle Linux permissions. For dealing with permissions on a per-user basis, see our guide to the chmod command.
The Chmod Command and Linux File Permissions Explained
If you want to manage file permissions properly on any Linux operating system, you need to know the chmod command.
How To Delete a User
In the event that you no longer need a user, it is best to delete the old account.
You can delete the user itself, without deleting any of his or her files by typing this as root:
<pre>
deluser <span class=“highlight”>newuser</span>
</pre>
If you are signed in as another non-root user with sudo privileges, you could instead type:
<pre>
sudo deluser <span class=“highlight”>newuser</span>
</pre>
If, instead, you want to delete the user’s home directory when the user is deleted, you can issue the following command as root:
<pre>
deluser –remove-home <span class=“highlight”>newuser</span>
</pre>
If you’re running this as a non-root user with sudo privileges, you would instead type:
<pre>
sudo deluser –remove-home <span class=“highlight”>newuser</span>
</pre>
If you had previously configured sudo privileges for the user you deleted, you may want to remove the relevant line again by typing:
Or use this if you are a non-root user with sudo privileges:
This will prevent a new user created with the same name from being accidentally given sudo privileges.
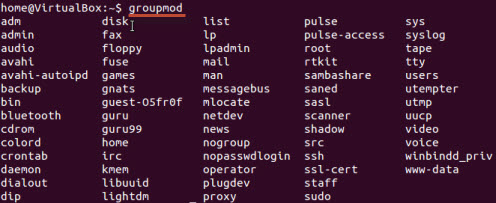
Adding users to the usergroups
You can view the existing groups on your Linux operating system by entering the following command:
groupmod "Press Tab key twice"
Now to add a user to a group, use the following syntax:
sudo usermod -a -G GROUPNAME USERNAME

The system would ask for authentication and then it would add the user to the group.
You can check whether the user is in a group by this command.

And it would show it as
Removing a user from Usergroup
Use the following syntax for removing a user.
sudo deluser USER GROUPNAME

The GUI method
If you do not want to run the commands in terminal to manage users and groups, then you can install a GUI add-on .
sudo apt-get install gnome-system-tools
Once done, type
users-admin
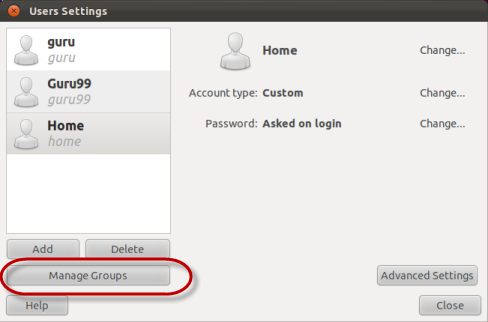
Check user settings, and a tab Manage Groups will appear-
Creating a User
In Linux, every user is assigned an individual account which contains all the files, information, and data of the user. You can create multiple users in a Linux operating system. The steps to creating a user are:
Using Terminal
Step 1) Use command sudo adduser
Step 2) Enter password for the new account and confirm

Step 3) Enter details of the new user and press Y
New account is created.
Using GUI
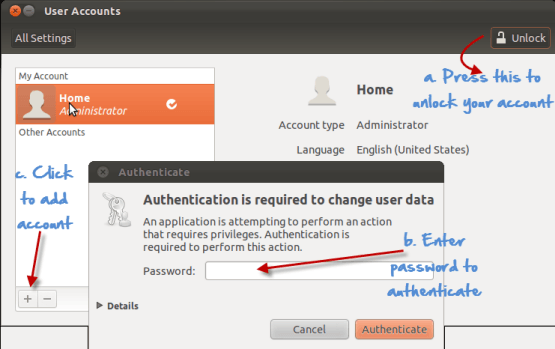
Step 1) Go to the system settings look for an icon which says ‘User Accounts’.
Step 2) Click on the unlock icon and enter a password when prompted, then click the plus sign.
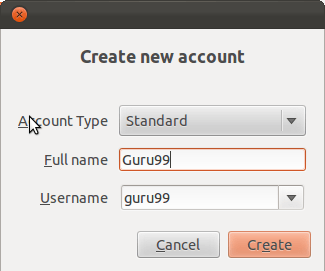
Step 3) A new window would pop up, asking you for adding information to the new user account.The account type offers two choices — standard and administration(Ubuntu Limitation). If you want the new user to have administrative access to the computer, select Administrator as the account type. Administrators can do things like add and delete users, install software and drivers, and change the date and time. Otherwise, choose standard.Fill in the full name, username and click on create.
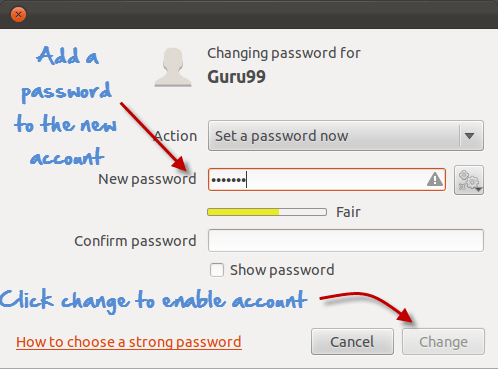
Step 4) The new account would show, but would be disabled by default.
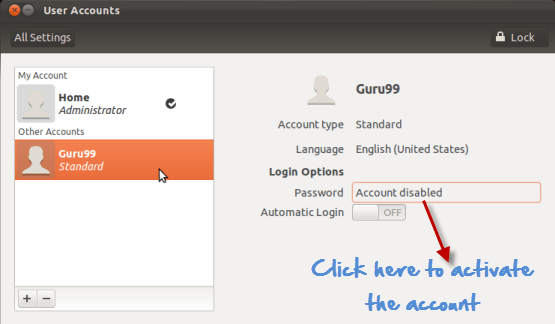
To activate it, click the password option and add a new password. Click change to enable the account.
What Is Sudo and What Is the Sudoers List?
It’s bad security practice to allow all user accounts on a system to enjoy administrator-level credentials because administrators install and uninstall software and change key system settings.
To show you an example of the sudo command in use, open a terminal window and run the following command:
apt-get install cowsay
A fairly cryptic message will be returned:
E: Could not open lock file /var/lib/dpkg/lock — open (13: Permission denied)E: Unable to lock the administration directory (/var/lib/dpkg/), are you root?
Now try the same command again but this time put the word sudo in front of it as follows:
sudo apt-get install cowsay
Enter your password, after which the cowsay application installs.
Cowsay is a small novelty application for the shell that prompts you to enter a message, which is spoken as a speech bubble by an ASCII-drawn cow.
When you first installed Ubuntu you were automatically set up as an administrator and therefore automatically added to what is known as the sudoers list. The sudoers list contains the names of all the accounts that are entitled to use the sudo command.
Import users from .csv file
To set up users in Zoho Mail by importing from a .csv file.
- Login to Control Panel (https://mailadmin.zoho.com/) as an Admin/ Super Admin.
- Click Control Panel, then select User Details.
- Select the Import from CSV option.
- Download the sample CSV file from the right side pane.
- In the sample CSV file, enter the users’ first name and last name in their respective columns, ‘username’ in the Name column and the ‘Password’ in the appropriate column.
- The other columns are optional, and you may provide the values based on your requirements. Once you have entered all the appropriate data, save the file in .csv format.
- Click Choose File, to select the file that you choose to import.
- Select the primary domain, for which the accounts will be created.
- Click on the ‘Force user(s) to change password during the first login’ checkbox if you want the password you have set to be changed by the user(s) on first logging in.
- If you have multiple domains and wish to have domain-based aliases, click More, to view and select the additional domains in your organization.
Note:
The option to Import Users using a .csv file will only be available for organizations that are using one of the paid plans.
Invite multiple users through their other existing email addresses:
For example, if you want to invite two users, paula@zoho.com and justinc@zoho.com, enter these values in the file like this: paula@zoho.com, justinc@zoho.com.
Click Choose File in the invite user option under CSV file, and select this text file, and then click Ok.
If a user already has a business account with Zoho, they won’t be able to join your organization. In this case, the user will need to remove their existing organization from their account.
Inviting users will avoid the loss of data if the user already has any other Zoho applications like CRM, Recruit etc linked to their account.