Mqtt broker
Содержание:
Publishing messages
There are number of ways you can publish messages in mqtt-spy & mqtt- spy-daemon:
| Mechanism | mqtt-spy | mqtt-spy-daemon |
|---|---|---|
| Manual | Yes | — |
| Publication scripts | Yes | Yes (see background scripts) |
| Parametrised publication scripts | Yes | Yes (via API) |
| Subscription scripts | Yes (see the Receiving messages section) | Yes (see the Receiving messages section) |
| Test cases | Yes (see the Automated testing section) | Yes (see the Automated testing section) |
When manually publishing messages in the “Publish message” pane, you are limited by what you can type in the provided fields.
For all the other mechanisms listed above, publications are done using user-provided script files (with .js extension).
Let’s look at some examples now.
Basic scripts
The simplest script file can look like this:
The above example is not much different from doing a manual publication though. The difference is when you want to either do something special to your message (e.g. generate a timestamp) and/or send multiple messages, e.g.:
Parametrised scripts
There are occasions however when you don’t want to predefine everything in the script, but only want to use it as a template for adding some extra info.
To achieve that in mqtt-spy:
- Create a script, e.g.
-
Then provide the topic and data you want to publish
-
Select the “Publish with script” menu item from the publication button’s menu:

4. Use the button to trigger a publication – the result will be a message with a timestamp populated by your parametrised script

To achieve parametrised publications using mqtt-spy-daemon, you can define a generic script, and then pass a map of arguments (key/value pairs) to the script using the daemon’s API.
Saving favourite messages as scripts
If you use certain combinations of topic & payload quite often, it might be worth saving your message as a script, so that you can reuse it at a later stage. This is available from the publication button’s menu. You can save either the current message or one of the last 10 messages.

Once a script has been generated from the populated fields, you can use it and edit it in the same way as any other scripts.
Advanced scripting
You might thinking OK, what else can I do using those publication scripts? Here are some ideas:
- use it as a means of favourite (most used) messages
- create a continuously running script with while(true) {…};
- perform sleeps to send messages at given intervals
- publish images or other large binary files
- perform a replay of previously recorded messages (message audit)
- publish in multiple threads
- run multiple scripts concurrently
- wrap your message payload in an envelope (e.g. JSON or XML-based)
- add application-level security: encode, encrypt or sign your payload
- call external programs, OS commands or 3rd party Java libraries that are present on the classpath
- combine all the above together!
For more information and more examples see the Scripted Publications wiki.
4: Автоматическое обновление сертификата
Сертификаты Let’s Encrypt действительны в течение 90 дней. По истечении этого срока пользователь должен обновить сертификат. Вы можете настроить автоматическое обновление сертификатов.
Чтобы ежедневно запускать команду для проверки и обновления сертификата, используйте cron. Откройте crontab в редакторе:
Выберите текстовый редактор. На экране появится crontab по умолчанию. Вставьте следующую строку в конец файла:
Часть строки «15 3 * * *» значит, что команду нужно запускать в 3:15 утра каждый день. Команда renew будет проверять все существующие сертификаты и обновлять их по мере необходимости (если до окончания срока действия остается меньше 30 дней). Флаг –noninteractive запускает процесс в немом режиме.
Флаг —post-hook «systemctl restart mosquitto» перезапустит Mosquitto, чтобы загрузить новый сертификат (только если сертификат был обновлен). Опции post-hook нет ни в одном клиенте Let’s Encrypt, кроме Certbot. Без неё вам пришлось бы самостоятельно перезапускать Mosquitto каждый день.
MQTT WebSocket Toolkit
Introduction to client
MQTT WebSocket Toolkit is a simple and easy-to-use online MQTT client test tool. It based on browser-side to use, only supports MQTT over WebSocket connection, and provides basic MQTT configuring connection settings.
The interface and interaction of MQTT WebSocket Toolkit still use the design and usage style of MQTT X. It publishes and receives messages in the form of message chat and allows establishing and connecting multiple clients at the same time and freely switches to communicate with each other, which improves the efficiency of the MQTT development test. When you need to test MQTT WebSocket connections, users do not need to download and install extra tools, so this tool is quick and available.
Features of client
- Online quickly access, without installing, and with the concise and easy-to-use interface
- Support MQTT over WebSockets
- Support for creating multiple clients, and can retain the information of the client until the next access.
Download client
Operating system: Windows, macOS, Linux, Chrome OS
Online address: MQTT WebSocket Toolkit
Project address: MQTT WebSocket Toolkit GitHub
Unique features
This brief section lists some of the unique features of mqtt-spy and what makes it different from other tools:
- Support for multiple concurrent connections
- Automatic reconnection and multiple server URIs
- Advanced TLS/SSL support with all common key store types: JKS, JCEKS, PKCS12 and BKS
- Summary of all topics & messages received for each of the subscriptions – with topic searching and filtering
- Browsing, searching and filtering on received messages – easily handling 100s of messages per second
- Message content formatting to support custom message envelopes (e.g. encoded, signed and/or encrypted payload)
- Message log – an audit file can be created for all received messages; this could be used for replay or off-line browsing and analysis
- Export of topics and messages, including support for large binary files
- Perspectives and customisable pane visibility (hidden, collapsed, expanded, detached to a separate window)
- Processing statistics – messages per second over 5s, 30s and 5m intervals, plus the overall number of topics and messages received
- Charts with pan and zoom – for message payloads and statistics
- Automated testing with test cases
Преимущества использования MQTT для устройств
- Является стандартом де-факто для современных облачных систем IoT (см обзор). Данный протокол поддерживается абсолютно всеми современными облачными и On Premises системами IoT
- Развитая экосистема opensource решений автоматизации и диспетчеризации, в том числе: OpenHab, Wiren Board, Node Red — (см. Обзор) — это позволяет оконечным устройствам легко использовать уже имеющееся ПО без необходимости разрабатывать Web- интерфейсы, мобильные приложения, Rule-engines и пр.
- ПО MQTT брокера, также, доступно в открытом исходном коде и портировано под основные ОС (https://mosquitto.org/)
- Поддержка данного протокола устройством позволяет использовать его совместно с большим кол-вом уже существующего ПО и легко интегрировать новые устройства
- Библиотеки для реализации клиентской части данного протокола, также, доступны в исходном коде и могут быть легко интегрированы в ваш проект
General Information
Welcome back for the 3rd (and final) blog post about the mqtt-spy “family”. This post covers some of the advanced features of the GUI-based mqtt-spy and the headless mqtt-spy-daemon:
- Scripted publications
- Message content formatting and support for custom message envelopes (e.g. encoded, signed and/or encrypted payload)
- Scripted subscriptions (with configurable handling of received messages, e.g. auto-reply)
- Scripted message searching
- Message audit – a log file can be created for all received messages; this could be used for replay (or off-line browsing )
- Automated testing with test cases
Installing MQTT with Docker Commands
Depending on your machine you may have an interface for you to add Docker containers. Synology has one, and the official Docker for Windows has one too. I prefer to setup Docker containers using the command line. The commands below should work on any system where you’ve already installed Docker.
For Synology users, there’s also one big advantage to using the command line. You can add some options to your Docker containers which the Synology Docker Package doesn’t allow, including automatic restarting of your MQTT broker if it goes down. Which can come in quite handy.
Setup your Synology NAS for Docker
Before you can run any Docker commands on your Synology NAS, you’ll need to have SSH configured, and root access (if you’re on DSM5). I cover this in my Home Assistant setup post, so be sure to check that out first if you haven’t already.
Read More
Let’s go ahead and paste this command into our terminal. I’ll break each option down.
Run MQTT Server
Shell
docker run —name mqtt —restart=always —net=host -tid -v /volume1/docker/mqtt/config:/mqtt/config:ro -v /volume1/docker/mqtt/log:/mqtt/log -v /volume1/docker/mqtt/data/:/mqtt/data/ toke/mosquitto
|
1 |
docker run—name mqtt—restart=always—net=host-tid-v/volume1/docker/mqtt/config/mqtt/configro-v/volume1/docker/mqtt/log/mqtt/log-v/volume1/docker/mqtt/data//mqtt/data/toke/mosquitto |
If you’re running using a Synology NAS on DSM6, be sure to prefix that command with sudo.
docker run tells Docker to run a container with the parameters we’re parsing.
—name mqtt The name flag will allow us to easily identify which container is running MQTT. This is useful if we need to do some commands against the container (like starting, stopping etc) later.
—restart=always This is a powerful and handy flag to set. This will tell Docker to keep trying to re-start the MQTT Broker if it crashes, or on boot of the system. (This is one of the flags you can’t set when using the Synology Docker DSM Interface).
—net=host Another important and powerful flag. This gives your MQTT Broker full network access. This allows you to use 127.0.0.1 as the IP address of your MQTT Broker in Home Assistant, if you followed my setup guide. (This is one of the flags you can’t set when using the Synology Docker DSM Interface).
-itd This is actually three commands in the one. The important one is d. This tells Docker to run in detached mode. Once Docker runs the container, our SSH session is returned to us. If we don’t specify this, we’ll see the output from the MQTT Broker in our SSH console.
-v /volume1/docker/mqtt/config:/mqtt/config:ro Here we’re creating some mount volumes with the various -v flags. This will allow configuration to persist across reboots, as well as data. So, if your MQTT Broker goes down, any persistent messages you may have sent over the Broker should come back up. You can place it in any folder you like. Whatever you choose to use, the folder must exist before you will be able to start the MQTT Broker. If you want to use the same folder as I did above, you can create it by running
mkdir-p/volume1/docker/mqtt/config
toke/mosquitto Finally this tells Docker which container to lookup on DockerHub. I’ve been using this image from Toke without issue for many months now.
First steps
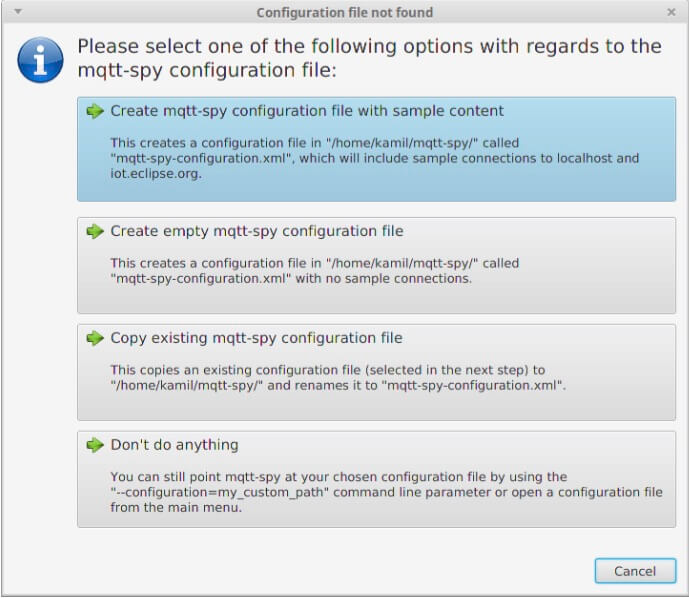
Every time you open mqtt-spy you are going to see the control panel (see below). It gives you a quick summary of the configuration that’s been loaded (first two sections), the update status (checked at start-up) and some basic statistics about usage.

When using mqtt-spy for the first time, it is recommended you create a configuration file with sample content – this will give you a list of public MQTT brokers/servers to which you can just connect and start experimenting with. You can also re-create the configuration file at any point from the “Configuration” menu.
Click on the “No configuration file found” info to bring the configuration wizard (or do if from the “Configuration” menu):
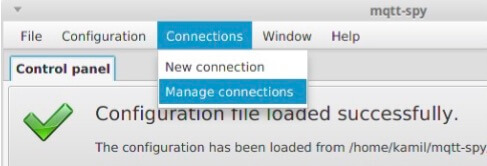
For new connections or to charge configuration of the existing ones go to the “Connections” menu.
Mosquito CLI
Introduction to client
Mosquitto is an open-sourced (EPL/EDL license) message broker. Mosquitto provides two command-line MQTT client tools, mosquitto_pub and mosquitto_sub by default after installation.
Mosquito CLI has multiple configuration options, supports connections through TLS certificate and a proxy server, supports debug mode, and can get more detailed message information in debug mode.
It is also very easy to use, only needs to provide a few parameters in the default usage environment to use:
## Enable debug mode to subscribe to testtopic/# topic
wivwiv-mac:workspace emqtt$ mosquitto_sub -t "testtopic/#" -d
Client mosqsub/66418-wivwiv-ma sending CONNECT
Client mosqsub/66418-wivwiv-ma received CONNACK
Client mosqsub/66418-wivwiv-ma sending SUBSCRIBE (Mid: 1, Topic: testtopic/#, QoS: )
Client mosqsub/66418-wivwiv-ma received SUBACK
Subscribed (mid: 1):
Client mosqsub/66418-wivwiv-ma received PUBLISH (d0, q0, r0, m0, 'testtopic/1', ... (5 bytes))
Hello

## Publish a message to testtopic / 1 topic
mosquitto_pub -t "testtopic/1" -m "Hello"
Features of client
- Thie lightweight command-line tool, support debug mode, easy to install
- Support encrypted and nonencrypted connecting to MQTTQ server
- Easy to test in the remote server
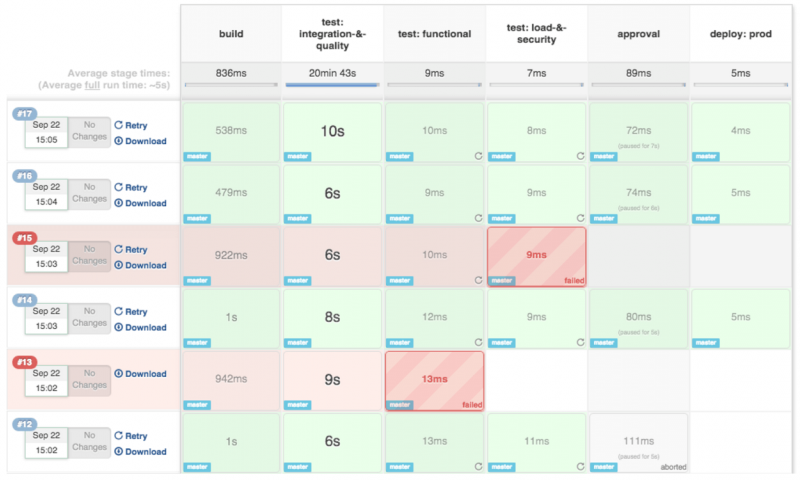
Statistics
There are three types of statistics that mqtt-spy gives you access to:
- Aggregated processing statistics — available on the Control Panel – keep clicking on the panel to wiz through all stats

- MQTT broker statistics — accessible through the connection tab’s context menu – these depend on the specific MQTT broker (some brokers don’t offer this feature so you might see nothing)

- Real-time processing statistics referred to as “load” – this is available for each of the subscriptions, and for all subscriptions combined – you will find it in the right hand side of the “Received messages summary” pane title – provided as an average over the last 5, 30 and 300 seconds

Step 6 — Configuring MQTT SSL
To enable SSL encryption, we need to tell Mosquitto where our Let’s Encrypt certificates are stored. Open up the configuration file we previously started:
Paste in the following at the end of the file, leaving the two lines we already added:
/etc/mosquitto/conf.d/default.conf
We’re adding two separate blocks to the config. The first, , updates the default MQTT listener on port , which is what we’ve been connecting to so far. is the standard unencrypted MQTT port. The portion of the line instructs Mosquitto to only bind this port to the localhost interface, so it’s not accessible externally. External requests would have been blocked by our firewall anyway, but it’s good to be explicit.
sets up an encrypted listener on port . This is the standard port for MQTT + SSL, often referred to as MQTTS. The next three lines, , , and , all point Mosquitto to the appropriate Let’s Encrypt files to set up the encrypted connections.
Save and exit the file, then restart Mosquitto to update the settings:
Update the firewall to allow connections to port .
Now we test again using , with a few different options for SSL:
Note that we’re using the full hostname instead of . Because our SSL certificate is issued for , if we attempt a secure connection to we’ll get an error saying the hostname does not match the certificate hostname (even though they both point to the same Mosquitto server).
enables SSL for , and tells it where to look for root certificates. These are typically installed by your operating system, so the path is different for Mac OS, Windows, etc. uses the root certificate to verify that the Mosquitto server’s certificate was properly signed by the Let’s Encrypt certificate authority. It’s important to note that and will not attempt an SSL connection without this option (or the similar option), even if you’re connecting to the standard secure port of .
If all goes well with the test, we’ll see hello again show up in the other terminal. This means your server is fully set up! If you’d like to extend the MQTT protocol to work with websockets, you can follow the final step.
Receiving messages
There are a couple of things you can do with messages received on the defined subscriptions:
| Functionality | mqtt-spy | mqtt-spy-daemon |
|---|---|---|
| Reformat all received messages on a connection | Yes – see the Formatting section | Yes – see the Formatting section |
| Run a script specific to the defined subscription | Yes | Yes |
| Perform a search | Yes – see the Searching section | — |
| Write received messages to a message audit (log) | Yes – see the Message audit section | Yes – see the Message audit section |
Formatting
In mqtt-spy and mqtt-spy-daemon “formatting” is a means of modifying the payload of all messages received on a connection. This can be used for supporting environments where all messages use one or combination of the following:
- Envelope (e.g. XML-based), and you just want to extract the body of the messages
- Encoding (e.g. HEX or Base64) or compression, where you want to see the decoded content
- Signature, to confirm it is a valid message
- Encryption, to automatically decrypt the payload
For basic requirements, it might be sufficient to use one of the default formatters:
- encode to HEX
- decode from HEX
- encode to Base64
- decode from Base64
For more advanced users it is recommend to use scripted formatters. For both mqtt-spy and mqtt-spy-daemon they are stored in the XML configuration (and are Base64 encoded). To make configuring and testing them easier, you can also define them via the mqtt-spy UI (Menu → Window → Open view → Formatters):

Sample formatting script:
Please note that each formatting script requires the format function, which returns the modified payload. You can access the received message using the receivedMessage object.
An optional before function can also be defined to set-up any additional resources for all subsequent calls to the format function.
On message scripts
The “on message” scripts are run specifically for each defined subscription.
The following methods are supported:
- before (optional), called shortly after creating the subscription; can be used for setting any additional resources for all subsequent calls to onMessage
- onMessage, called for each message received; use the receivedMessage object to access all its properties, e.g. topic, payload, QoS, retained
- after (optional), called when you unsubscribe; can be used for cleaning up any unwanted resources
Below is a sample subscription script that automatically sends a reply:
Sample use cases for having the “on message” script:
- custom logging
- auto-reply (see above)
- writing to a database (e.g. MongoDB)
- calling external programs, OS commands or 3rd party Java libraries that are present on the classpath
For more information and more examples see the Scripted Subscriptions wiki.