Ssh авторизация по ключу через putty
Содержание:
SSH Academy
IAM
IAM Zero Trust Framework
Gartner CARTA
Standing Privileges
Zero Standing Privileges (ZSP)
Ephemeral access
PrivX lean PAM
Identity management
Active Directory
Administrators
Domain administrators
Local administrators
Jump server
IAM Just in time
Just-in-time security tokens
Multi-Factor Authentication (MFA)
OpenID Connect (OIDC)
PAM (Privileged Access Management)
Legacy PAM
Password generator
Password strength
Password vaults
Privileged accounts
PASM
Privilege Elevation and Delegation Management
Privileged session management
Radius
Root accounts
Service accounts
System accounts
Sudo
Users
User IDs
Superuser
Vagrant
Cloud
Cloud applications
Cloud computing
Cloud computing characteristics
Cloud computing companies
Cloud computing definition
Cloud computing models
Cloud computing pros and cons
Cloud computing security
Cloud storage
Cloud technology
IaaS
PaaS
SaaS
SaaS companies
SaaS security
Secure Shell
Secure Shell
Secure Shell protocol
SSH software downloads
SSH certificate authentication
Ipsec
Network monitoring
Port 22
RCP
rlogin
RSH
SCP
Session key
Automated connections
SSH command
SSH configuration
SSHFS SSH File System
SSH for Windows
SSH servers
Tectia SSH Server
SSH server configuration
SSO using SSH agent
Telnet
WinSCP
SSH keys
CAC and PIV smartcards
OpenSSH key authorization
Passphrases
Passphrase generator
Copy ID
Host key
Authorized key
Authorized key file
SSH key basics
SSH key identities
SSH key management
Universal SSH Key Manager
SSH key proliferation
SSH keygen
SSH keys for SSO
Public key authentication
SSH compliance
SSH key compliance
Basel III
COBIT
Cybersecurity framework
Fips 140
Fips 199
Fips 200
GDPR
HIPAA
ISACA
ISACA SSH guide
ISO 27001
NERC-CIP
NIS directive
NIST 7966
NIST 7966 download
NIST 800-53
PCI-DSS
Sans Top 20
Sarbanes Oxley
sshd OpenSSH server process
PuTTY
PuTTY download
PuTTY manuals
PuTTY for Windows
PuTTY for Mac
PuTTY for Windows
PuTTY for Windows installation
PuTTY public keys
PuTTYgen for Linux
PuTTYgen for Windows
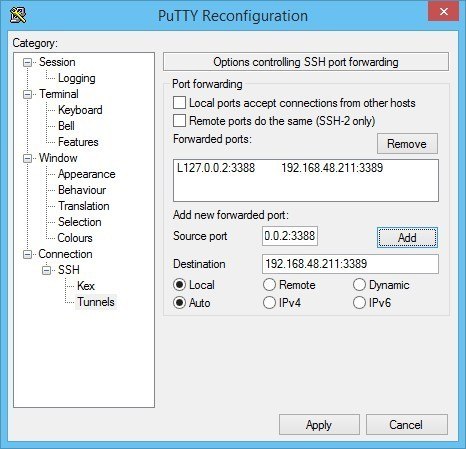
SSH tunneling example
The risk of unmanaged SSH keys
Unmanaged access exposes organizations to significant risks that could in the worst case bring down critical information systems for months. Unmanaged keys risk systemic failure of critical infrastructure, especially in a cyberwarefare scenarios.
Stolen and misused keys
There are far more SSH keys in circulation than anyone seems to believe. In one financial sector customer case we encountered 3 million keys (750,000 distinct keypairs) from 15,000 servers. In another case there were 4.5 million authorized keys from 100,000 servers. Typical numbers for Fortune 500 companies range from hundreds of thousands to millions — many times more than they have employees or system administrators with command line operating access.
With so many unmanaged keys the likelihood of keys being misused, stolen, or used as part of an attack is high. One single key can be enough to gain undetected access to critical systems and data.
The impact of compromise is very high
We have found that in several customer cases about 10% of the discovered keys grant root access. An attacker getting root means they can do anything on the server — including inject fraudulent data, subvert encryption software, install persistent malware, or outright destroy the system. Confidentiality, integrity, and continuity of operations are all compromised. Even if the key gives non-root access, local privilege escalation vulnerabilities can often result in the attacker gaining root access.
There is substantial risk that SSH keys can be used to spread an attack to a majority of all production servers in the organization. This could cause billions of dollars of damage to shareholders. Many companies use SSH keys to push data to disaster recovery sites and backup systems, exposing them to attacks as well.
When keys are used for file transfers between business partners, they may be used to spread the attack between organizations. Improperly configured SFTP file transfer connections may be used to log into other organizations using stolen keys. The keys may be used for stealing other authentication credentials or installing data collection software for furthering the attack in other ways.
For the modern society, cyberwarfare is a relevant risk, and a coordinated attack across critical infrastructure with the intention to destroy and confuse is a real possibility. Recently leaked CIA hacking tools were collecting SSH keys.
Полезные команды
Рассказать о всех командах Unix будет сложно, поэтому напишем лишь несколько полезных команд:
man
— выдаст подробную информацию по команде, например: man mv
Для выхода из man, т.е. из руководства по команде, нажмите q
(Q
uit — Выход).
—help
— также позволит посмотреть описание команды.
ls
— вывести список файлов;ls -la
— покажет все файлы (включая скрытые), размер файлов, владельца и группу владельца, права на них, дату последнего изменения;ls -lha
— то же, что предыдущая команда, только размер файлов будет показан в удобном виде;ls -lha | less
— позволит просматривать файлы постранично (если их много);
cd
— переход в выбранную директорию;cd ../
— переход на директорию выше;cd ~
— переход в корневую директорию;
mv
— переименовать и/или переместить;
rm
— удалить;
cp
— копировать;
>
— очистка файла. Например, можно применить к файлам логов (> access.log, > error.log, > combined.log);
mc
— запуск Midnight Commander — что-то вроде Norton Commander, в котором удобно работать с файлами, а также возможно работать с ними по sftp (ftp внутри ssh);
chmod
— установка прав на файл или директорию;
cat
-объединяет файл или несколько файлов, либо ввод со стандартного устройства ввода и выводит результат на стандартное устройство вывода;cat
— выведет на экран содержимое файла;cat | grep
— выведет на экран строки файла, включающие искомую строку;
mkdir
— создание директории (папки);
Сперва расскажем не много о том, что из себя представляет эта утилита и для чего она.
SSH
(англ. Secure Shell — «безопасная оболочка») — сетевой протокол прикладного уровня, позволяющий производить удалённое управление операционной системой и передачу файлов. Сходен по функциональности с протоколами Telnet
и rlogin
, но, в отличие от них, шифрует весь трафик, включая и передаваемые пароли. SSH
допускает выбор различных алгоритмов шифрования. SSH-клиенты
и SSH-серверы
имеются для большинства операционных систем.
PuTTy
— это популярный SSH-клиент
и Telnet
(Telnet
тот же SSH
, только без зашифрованной передачи данных (пакетов)), т.е. программа для безопасного подключения к удаленному компьютеру (или к серверу) и выполнения на нем различных команд. PuTTY
ведет логи, позволяет настраивать шрифты, цвета и разрешение консоли, допускает сохранение в своей памяти ключей авторизации, поддерживает работу через прокси-сервер. При этом утилита является бесплатной в распространении.
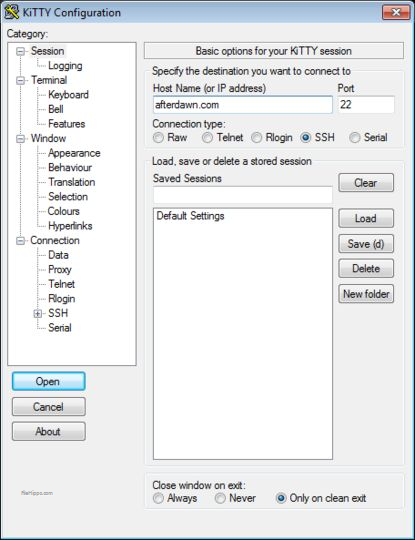
Ну допустим Вы скачали программу. Для начала работы запустите файл putty.exe
. Перед вами появится окно.
В поле Host Name(or IP address)
вводите имя вашего домена(например ginger.beget.ru) или IP
в зависимости от высланных Вам реквизитов доступа по SSH
-протоколу.Порт
оставляйте 22
. В поле Saved Sessions
введите любое имя сессии(коннекта). Например: ginger.beget.ru
. И нажмите Save
.
После этого войдите в SSH в меню слева и перед Вами появится окно. Выберите протокол SSH версии 2 only
. Чтобы соединиться с сервером, нажмите Open
.
Впринципе даже если Вы не выставили 2 only
и не написали название коннекта Saved Sessions
перед Вами появится окно следующего вида:
В поле login as
вводите высланный Вам логин для доступа по SSH и жмите Enter
. После чего появится надпись Password
. Вводите высланный Вам пароль для доступа по SSH. Не пугайтесь во время ввода пароля на экране ничего не отображается(ни звёздочек, ничего подобного). Просто после того как Вы закончили вводить пароль нажмите Enter
. Если логин и пароль введены верно произойдёт подключение к серверу и Вы попадете в командную строку Unix.
Рассказать о всех командах будет сложно поэтому напишим лишь несколько полезных команд:
man
— выдаст подробную информацию по команде.Например: man mv
ls
— список файлов;ls -lha
— покажет все файлы (включая скрытые), размер файлов, права на них, дату последнего изменения;ls -lha | less
— позволит просматривать файлы постранично (если их много);
mv
— переименовать и перенести
rm
— удалить
cp
— копировать
>
— очистка файла. Например можно применить к файлам логов.(> access.log, > error.log, > combined.log)
mc
— что-то вроде Нортон Командера, в котором удобно работать с файлами, а также возможно работать с ними по ftp (ftp внутри ssh)
Желаем удачи в работе!
PuTTY — бесплатный ssh клиент windows, который обеспечивает возможность подключиться к серверу по вышеуказанному протоколу, выполнять нужные команды. Где скачать, как произвести первоначальную настройку, подскажет, putty инструкция, приведенная ниже.
Disabling Password Authentication on your Server
If you were able to login to your account using SSH without a password, you have successfully configured SSH key-based authentication to your account. However, your password-based authentication mechanism is still active, meaning that your server is still exposed to brute-force attacks.
Before completing the steps in this section, make sure that you either have SSH key-based authentication configured for the root account on this server, or preferably, that you have SSH key-based authentication configured for an account on this server with access. This step will lock down password-based logins, so ensuring that you have will still be able to get administrative access is essential.
Once the above conditions are true, log into your remote server with SSH keys, either as root or with an account with privileges. Open the SSH daemon’s configuration file:
Inside the file, search for a directive called . This may be commented out. Uncomment the line and set the value to “no”. This will disable your ability to log in through SSH using account passwords:
Save and close the file when you are finished. To actually implement the changes we just made, you must restart the service.
On Ubuntu or Debian machines, you can issue this command:
On CentOS/Fedora machines, the daemon is called :
After completing this step, you’ve successfully transitioned your SSH daemon to only respond to SSH keys.
Windows
Создание SSH-ключей
Запустите программу, в открывшемся окне выберите «Type of key — SSH-2 RSA и нажмите «Generate».
Пока создается ключ, водите мышью в хаотичном порядке в пространстве под строкой загрузки для генерации случайных значений.
После того, как ключ будет создан, в окне программы вы сможете задать «Key passphrase» (кодовую фразу) для ключа. Это необязательно, вы можете оставить строку пустой
Если вы решите задать кодовую фразу, обратите внимание, что ее потребуется вводить при каждой авторизации по ключу.
Далее сохраните созданные ключи, нажав на кнопки «Save public key» и «Save private key», например, под именами id_rsa.pub и mykey.ppk. Также скопируйте и сохраните в любом текстовом файле содержимое окна «Public key for pasting…» — оно потребуется при копировании созданного ключа на сервер.
На этом процедура создания ключей завершена.
Копирование ключей на сервер
-
Подключитесь к серверу по SSH и выполните команду для создания на сервере директории и файла для хранения ключей:
mkdir ~/.ssh

chmod 0700 ~/.ssh

touch ~/.ssh/authorized_keys

chmod 0644 ~/.ssh/authorized_keys
-
Откройте созданный файл с помощью текстового редактора:
nano ~/.ssh/authorized_keys
- Вставьте в него скопированный на предыдущем шаге текст public key из окна PuTTYgen и сохраните файл.
- Запустите pageant — его иконка появится в трее. Щелкните по ней правой кнопкой мыши и выберите Add Key.
- В открывшемся окне укажите путь к приватному ключу mykey.ppk, сохраненному ранее, и нажмите Open. Если при создании ключа вы указывали кодовую фразу, pageant запросит ее на данном этапе.
-
Для проверки работы авторизации по ключу снова запустите утилиту PuTTY, подключитесь к вашему серверу и введите свой логин. Если все настроено корректно, вы увидите подобный вывод в окне консоли:
Authenticating with public key "rsa-key-20151220" from agent
SSH keys are authentication credentials
SSH (Secure Shell) is used for managing networks, operating systems, and configurations. It is also inside many file transfer tools and configuration management tools. Every major corporation uses it, in every data center.
SSH keys enable the automation that makes modern cloud services and other computer-dependent services possible and cost-effective. They offer convenience and improved security when properly managed.
Functionally SSH keys resemble passwords. They grant access and control who can access what. In identity and access management, they need similar policies, provisioning, and termination as user accounts and passwords. One cannot have confidentiality, integrity, or any guarantees of continued availability of systems without controlling SSH keys.
Technically the keys are cryptographic keys using a public key cryptosystem. However, functionally they are authentication credentials and need to be managed as such.
Authorized keys define who can access each system
Authorized keys are public keys that grant access. They are analogous to locks that the corresponding private key can open.
For more information, see the dedicated page on authorized keys.
Identity keys identify users and provide access
Identity keys are private keys that an SSH client uses to authenticate itself when logging into an SSH server. They are analogous to physical keys that can open one or more locks.
Authorized keys and identity keys are jointly called user keys. They relate to user authentication, as opposed to host keys that are used for host authentication.
For more information, see the dedicated page on identity keys.
Certificate-based user authentication
PKI certificates can also be used for authentication. In this case, the user still has a private key but also has a certificate associated with the key. The technology is supported in both Tectia SSH and OpenSSH, with some differences. For more information, see the dedicated page on certificate-based authentication in SSH.
Creating Host Keys
The tool is also used for creating host authentication keys. Host keys are stored in the directory.
Host keys are just ordinary SSH key pairs. Each host can have one host key for each algorithm. The host keys are almost always stored in the following files:
The host keys are usually automatically generated when an SSH server is installed. They can be regenerated at any time. However, if host keys are changed, clients may warn about changed keys. Changed keys are also reported when someone tries to perform a man-in-the-middle attack. Thus it is not advisable to train your users to blindly accept them. Changing the keys is thus either best done using an SSH key management tool that also changes them on clients, or using certificates.
Setting up public key authentication
Key based authentication in SSH is called public key authentication. The purpose of is to make setting up public key authentication easier. The process is as follows.
Generate an SSH Key
With OpenSSH, an SSH key is created using ssh-keygen. In the simplest form, just run and answer the questions. The following example illustates this.
Creating a key pair (public key and private key) only takes a minute. The key files are usually stored in the directory.
Copy the key to a server
Once an SSH key has been created, the command can be used to install it as an authorized key on the server. Once the key has been authorized for SSH, it grants access to the server without a password.
Use a command like the following to copy SSH key:
This logs into the server host, and copies keys to the server, and configures them to grant access by adding them to the authorized_keys file. The copying may ask for a password or other authentication for the server.
Only the public key is copied to the server. The private key should never be copied to another machine.
Test the new key
Once the key has been copied, it is best to test it:
The login should now complete without asking for a password. Note, however, that the command might ask for the passphrase you specified for the key.
Troubleshooting
There are a number of reasons why the test might fail:
-
The server might not be configured to accept public key authentication. Make sure /etc/ssh/sshd_config on the server contains . Remember to restart the sshd process on the server.
-
If trying to login as root, the server might not be configured to allow root logins. Make sure includes , , or . If it is set to , the key must be manually configured to use a forced command (see option in .
-
Make sure the client allows public key authentication. Check that /etc/ssh/config includes .
-
Try adding option to the command used for the test. Read the output to see what it says about whether the key is tried and what authentication methods the server is willing to accept.
-
OpenSSH only allows a maximum of five keys to be tried authomatically. If you have more keys, you must specify which key to use using the option to .
Копирование открытого ключа на сервер
Добавить открытый ключ на сервер можно несколькими способами.
Примечание: На каждый сервер можно добавить неограниченное количество SSH-ключей.
Добавить открытый ключ на сервер можно несколькими способами. Рассмотрим несколько из них, начиная с простейшего. Выберите самый удобный для вас метод и используйте его, чтобы добавить открытый ключ на сервер.
Копирование ключа с помощью ssh-copy-id
Если на локальном компьютере установлена утилита ssh-copy-id, с её помощью вы можете быстро добавить открытый ключ на удалённый сервер. Обычно (но не всегда) утилита ssh-copy-id включена в пакет OpenSSH.
Чтобы узнать, есть ли эта утилита на локальном компьютере, просто попробуйте запустить её. Если она не установлена, на экране появится ошибка:
Вы можете установить её или воспользоваться другим методом копирования ключа.
В команде ssh-copy-id нужно указать IP-адрес или доменное имя, а также имя пользователя, для которого нужно добавить эти SSH-ключи.
Команда может вернуть:
Это значит, что локальный компьютер не узнаёт удалённый сервер, потому что ранее SSH-ключи никогда не использовались при аутентификации. Чтобы продолжить, введите yes и нажмите RETURN.
Утилита сканирует локальную учетную запись пользователя в поисках открытого ключа, id_rsa.pub. Когда она найдёт нужный файл, она запросит пользователя удалённого сервера.
Введите пароль и нажмите RETURN. Утилита подключится к аккаунту пользователя на удалённом хосте и установит открытый ключ; это происходит путём копирования содержимого файла id_rsa.pub в файл .ssh/authorized_keys в домашнем каталоге удалённого пользователя.
Если копирование прошло успешно, на экране появится:
Теперь открытый ключ добавлен в файл authorized_keys удалённого пользователя, и сервер сможет принять закрытый ключ для аутентификации.
Примечание: Скопировав ключ на удалённый сервер, можете переходить к разделу «Аутентификация с помощью SSH-ключей».
Копирование ключа через SSH
Если на вашем сервере нет утилиты ssh-copy-id, но есть парольный SSH-доступ к серверу, вы можете установить открытый ключ с помощью SSH-клиента.
Для этого нужно вывести открытый ключ на локальном компьютере и передать его по SSH на удалённый сервер. На удалённом сервере нужно создать каталог ~/.ssh (если такого каталога нет), а затем добавить открытый ключ в файл authorized_keys в этом каталоге. Используйте перенаправление потока >>, чтобы вставить ключ в файл authorized_keys (если ранее вы добавляли SSH-ключи на удалённый сервер, такой файл уже существует; при этом ключи не будут переписаны новыми ключами).
Если вы не изменили название файла открытого ключа по умолчанию (id_rsa.pub), используйте эту команду:
Команда может вернуть такое сообщение:
Это значит, что локальный компьютер не узнаёт удалённый сервер, потому что ранее SSH-ключи никогда не использовались при аутентификации. Чтобы продолжить, введите yes и нажмите RETURN.
Команда запросит пароль удалённого пользователя:
Введите пароль и нажмите RETURN. Если команда выполнена успешно, она не вернёт никакого вывода. Ключ id_rsa.pub будет добавлен в файл authorized_keys.
Примечание: Скопировав ключ на удалённый сервер, можете переходить к разделу «Аутентификация с помощью SSH-ключей».
Копирование ключа вручную
Также вы можете добавить открытый ключ на удалённый сервер вручную. Для этого нужно авторизоваться на удалённом сервере как пользователь, для которого предназначен этот ключ.
Процесс не меняется: вам нужно взять открытый ключ на локальной машине и добавить его в .ssh/authorized_keys в домашнем каталоге удалённого пользователя.
Войдите на удалённый сервер:
При этом может появиться сообщение:
Это значит, что локальный компьютер не узнаёт удалённый сервер, потому что ранее SSH-ключи никогда не использовались при аутентификации. Чтобы продолжить, введите yes и нажмите RETURN.
После этого будет запрошен пароль удалённого пользователя:
Создайте каталог .ssh в домашнем каталоге удалённого пользователя, если такого каталога пока что нет:
Вернитесь на локальную машину и запросите открытый SSH-ключ:
Скопируйте вывод в буфер, затем откройте файл authorized_keys в текстовом редакторе:
Вставьте в него открытый ключ, а затем сохраните и закройте файл (Esc, a, a).
Открытый ключ SSH теперь добавлен на удалённый сервер.
SSH Academy
IAM
IAM Zero Trust Framework
Gartner CARTA
Standing Privileges
Zero Standing Privileges (ZSP)
Ephemeral access
PrivX lean PAM
Identity management
Active Directory
Administrators
Domain administrators
Local administrators
Jump server
IAM Just in time
Just-in-time security tokens
Multi-Factor Authentication (MFA)
OpenID Connect (OIDC)
PAM (Privileged Access Management)
Legacy PAM
Password generator
Password strength
Password vaults
Privileged accounts
PASM
Privilege Elevation and Delegation Management
Privileged session management
Radius
Root accounts
Service accounts
System accounts
Sudo
Users
User IDs
Superuser
Vagrant
Cloud
Cloud applications
Cloud computing
Cloud computing characteristics
Cloud computing companies
Cloud computing definition
Cloud computing models
Cloud computing pros and cons
Cloud computing security
Cloud storage
Cloud technology
IaaS
PaaS
SaaS
SaaS companies
SaaS security
Secure Shell
Secure Shell
Secure Shell protocol
SSH software downloads
SSH certificate authentication
Ipsec
Network monitoring
Port 22
RCP
rlogin
RSH
SCP
Session key
Automated connections
SSH command
SSH configuration
SSHFS SSH File System
SSH for Windows
SSH servers
Tectia SSH Server
SSH server configuration
SSO using SSH agent
Telnet
WinSCP
SSH keys
CAC and PIV smartcards
OpenSSH key authorization
Passphrases
Passphrase generator
Copy ID
Host key
Authorized key
Authorized key file
SSH key basics
SSH key identities
SSH key management
Universal SSH Key Manager
SSH key proliferation
SSH keygen
SSH keys for SSO
Public key authentication
SSH compliance
SSH key compliance
Basel III
COBIT
Cybersecurity framework
Fips 140
Fips 199
Fips 200
GDPR
HIPAA
ISACA
ISACA SSH guide
ISO 27001
NERC-CIP
NIS directive
NIST 7966
NIST 7966 download
NIST 800-53
PCI-DSS
Sans Top 20
Sarbanes Oxley
sshd OpenSSH server process
PuTTY
PuTTY download
PuTTY manuals
PuTTY for Windows
PuTTY for Mac
PuTTY for Windows
PuTTY for Windows installation
PuTTY public keys
PuTTYgen for Linux
PuTTYgen for Windows
SSH tunneling example
Authenticate to your Server Using SSH Keys
If you have successfully completed one of the procedures above, you should be able to log into the remote host without the remote account’s password.
The basic process is the same:
If this is your first time connecting to this host (if you used the last method above), you may see something like this:
This just means that your local computer does not recognize the remote host. Type “yes” and then press ENTER to continue.
If you did not supply a passphrase for your private key, you will be logged in immediately. If you supplied a passphrase for the private key when you created the key, you will be required to enter it now. Afterwards, a new shell session should be spawned for you with the account on the remote system.
If successful, continue on to find out how to lock down the server.