Терминальный сервер на ubuntu при помощи x2go
Содержание:
- Starting a session
- Customizing Debug Messages
- Conclusion
- Authentication
- Desktop Bindings for KDE/Plasma (v4.x)
- List of predefined X2Go session profiles
- Client Side
- Server
- Network setup
- Terminology compared to standard X11
- Getting started
- Overview
- Desktop Bindings
- Getting started (my first Session Profile)
- How to build X2Go KDrive
- Step 1 — Installing the Desktop Environment
Starting a session
You should now have a window similar to this:
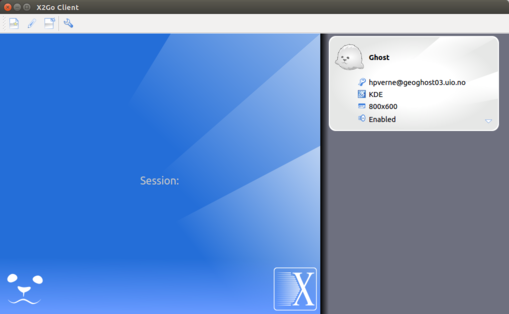
Click the grey blob with your newly created session. A new blob will appear in the blue area as x2go tries to start your session. A few things may happen first:
On Windows, you will be prompted to open the firewall. Click cancel, or see below.
You will be asked to accept the server’s host key. Do so.
Unless you have a functional ssh key live in the agent, you will be prompted for your password (or the key passphrase).
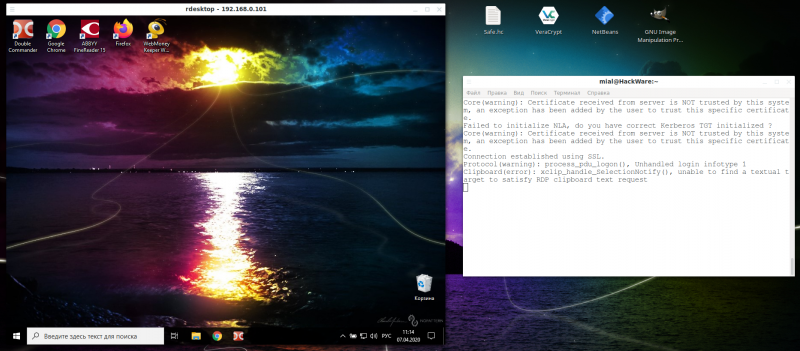
Then, the session should start. After a few seconds a new window will pop up, and Mate will be launched in this window. You should be able to find a menu and start terminal windows and other applications on the remote machine. It could eventually look like this (a very tiny desktop):
Back in the local x2goclient window, it should look something like this:
At the bottom there are there buttons (icons).
The circular one to the far right will kill the session. All programs running on the remote machine (in this session) will be killed, and unsaved data will be lost.
The two vertical lines will suspend the session. The programs will continue running, and you can resume the session later – on the same or a different x2go client.
Share a folder. This didn’t work for me.
The session can also be terminated by logging out of the remote session (i.e. Mate).
If you check the «show details» box, some text will appear. This can be useful for debugging problems.
Customizing Debug Messages
All X2go server scripts are ready for syslogging, though not all of them actually do log to syslog. If you want to add your own syslog messages for debugging purposes, please take a look at the code of files that already do report to syslog.\
Here is a little howto that explains how to add extra log output to X2go server scripts:
Logging in X2Go Server’s Perl Scripts
Whereever you want to write a line to syslog from an X2Go Server’s Perl script, place this command:
syslog('debug', '<My message to syslog...>');
Logging in X2Go Server’s Shell/Bash Scripts
Whereever you want to write a line to syslog from an X2Go Shell/Bash script, place this command:
$X2GO_LIB_PATH/x2gosyslog "$0" "debug" "<My message to syslog...>"
Logging in X2Go Session Broker’s Python Module
Whereever you want to write a line to from one of the python-x2gobroker module files, place this command:
# at the top of the module file:
from x2gobroker.loggers import logger_broker
#  then further below, wherever needed:
logger_broker.debug('<your message>')
Conclusion
In this tutorial you used X2Go to create a robust and remote GUI-environment for the Debian operating system. Here are a few additional ideas about how to use this desktop. You could centralize your development work by creating a git repository, installing an IDE/code editor like NetBeans or Eclipse, or configuring a web server for testing web applications. You could also enhance your remote desktop with a good backup scheme to make sure that your work environment and important data are safely preserved in case something ever goes wrong. With DigitalOcean, you can also snapshot your Droplets when you’re happy with a certain setup. This way, you can test risky changes and always come back to a known good state in case you break something.
If you’d like to learn more, visit X2Go’s official documentation website.
Authentication
X2Go Client in broker mode will authenticate twice. First, it will authenticate against the X2Go Session Broker, second, it will authenticate against one of the servers provided by the broker in form of X2Go session profiles. Dual authentication means: the user has to type his/her username and password twice.
A gain in usability cerainly is, if one manages to reduce these two authentication requests to one. How this can be achieved will be explained further below.
Authentication methods against X2Go Session Broker
In general, X2Go client can use different methods for authentication against an X2Go Session Broker.
With an HTTP(S) broker it could be username and password. With an SSH broker a SSH key based authentication is also possible.
Authentication methods against provided X2Go Servers
For authentication against X2Go Servers, SSH is used. With SSH you can use username and password authentication, SSH key authentication, GnuPG-Smartcard based authentication, etc.
Desktop Bindings for KDE/Plasma (v4.x)
X2Go bindings for KDE/Plasma offer an X2Go plasmoid for the Plasma desktop framework. The X2Go plasmoid adds additional X2Go-related functionality to your KDE/Plasma Desktop (package name: ).
Installation
Note: this package has undergone some renamings in 2011; from x2goplasmoid to x2goplasmoidbindings, to plasma-widget-x2go.
$ aptitude install plasma-widget-x2go
Usage
After the installation every KDE4/Plasma user on the server has the possibility to add the X2Go plasmoid applet to the desktop or to the taskbar (recommended). Note: the X2Go plasmoid is not available on the user desktops directly after installation, it has to be integrated into the desktop by each individual user.
Once the X2Go plasmoid has been added to desktop or taskbar, the plasmoid will notify you about newly mounted client-side shared folders. You will be able to launch KDE4’s file browser by left-clicking on one of these shares, you also have the possiblity to unmount/eject those shares.
At the bottom of the X2Go plasmoid’s applet box area, you have a link that allows you to suspend your current X2Go session.
, on the wishlist: Remove Suspend (to RAM) and Hibernate menu items from KDE4 start menu.
List of predefined X2Go session profiles
After successful authentication against the X2Go Session Broker, X2Go Client will request a list of predefined X2Go session profiles. This session profile list looks pretty much the same as the sessions file of X2Go Client. Check (under GNU/Linux) for reference.
Generic function: listSessions
A generic function, that sends X2Go session profiles to X2Go Client can look like this:
sub listSessions
{
  print "START_USER_SESSIONS\n
\n
\n
option1=value1\n
....
optionN=valueN\n

\n
option1=value1\n
....
optionN=valueN\n
\n
END_USER_SESSIONS\n";
}
Session Profile Format
The option keys and values are the same as in X2Go Client’s configuration file ().
The only difference occurs in the parameters and .
Furthermore, there are two extra parameters that are not supported in the file, but have a special functionality when X2Go Client is run in broker mode: and .
The session profile option: host
The parameter is not necessarily a hostname of an X2Go Server. The actual address of the server will be provided after the session profile has been selected by the user. Delaying the provision of the X2Go Server name makes sense in a cases where X2Go Session Broker is used as a load balancer.
In load balancing setups, the best server will be
chosen after selection of a session profile. Once the best server has been detected, it is sent to X2Go Client and X2Go Client uses this best server’s hostname for authentication and session startup.
When resuming an X2Go session, the broker will know the server that runs the suspended session and return that one, so that the user can continue his/her earlier session.
The session profile option: key
The parameter is simply ignored when returned via an X2Go Session Broker.
A valid SSH key (X2Go Client authenticates against X2Go Servers using SSH) can be provided to X2Go Client directly after the selection of a session profile.
However, you can set this parameter with some value to inform the Client, that passwordless authentication should be
tried, for example: .
The session profile option: usebrokerpass
The parameter is used to denote that requesting the user password for this session is not necessary, but that the X2Go Client should rather use the broker’s username and password tuple instead.
This can be useful if the X2Go Session Broker and the X2Go Server use the same authentication server (e.g. same LDAP db) and there is no need to ask the same password twice.
It is highly recommended to only use this feature on HTTPS brokers (i.e. with SSL encryption for the X2Go Client X2Go Session Broker communication) or SSH brokers.
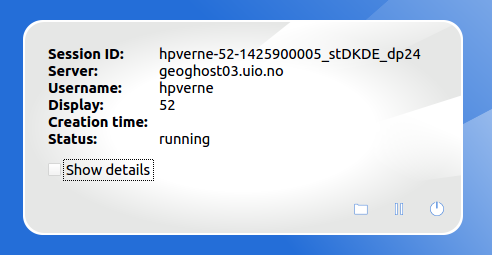
The session profile option: status
The parameter can be one of two values “S” or “R”. It can be used to tell X2Go Client that an instance (or instances) of this session profile are already running or are suspended on the server.
X2Go Client will display the status on the session profile card.
Client Side
To connect to another user’s desktop, use X2Go Client. For installation instructions refer to the download page.
Start the client.
Preparing the session:
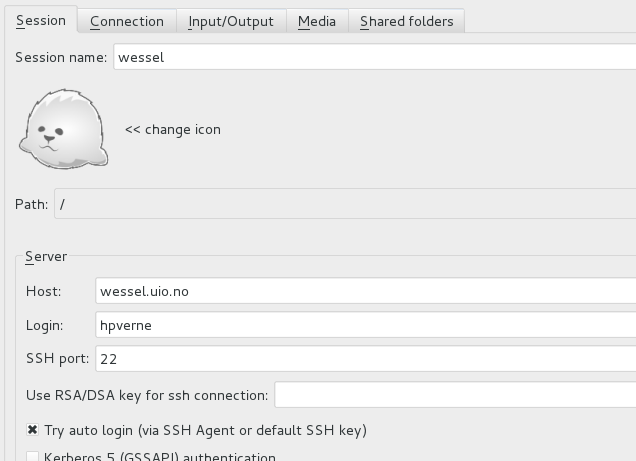
- Create a new session with “session | new session…”.
- Assign a session name.
- As ‘host name’ give the name of the machine, the session you want to connect to, is running on.
- As ‘user name’ give your account on the remote machine.
- As ‘session type’ choose ‘connection to local desktop’.
- Recommended: choose “full screen” on the settings tab. Otherwise, everything can become too small to read.
- Press ‘OK’ to save the session.
Making the connection:
- Activate the newly created session.
- Enter the password of your remote account, and start the session.
- You’ll be presented with a list of running sessions. Choose, which you want to connect to. (In most cases there will be only one session listed.)
After this you will login on the desktop of the other user. When your monitor is smaller than the other ones, it might be a bit difficult to read.
Be aware, that by selecting ‘shutdown’ within the shared desktop, the remote system will be turned off!
Server
Installation Ubuntu / Debian GNU/Linux
apt-get install apache2 x2goplugin-provider
This installs the necessary files and dependencies. The plugin is instantly usable on the server via . Using it on the server is not the desired scenario, so we need to change the configuration. The file lies at .
It is recommended to create a backup of the original file before modifying it.
Quick Setup
If you want a quick setup, e.g. for testing, best make backup of . The a bit more complicated, but robust way is described below.
cp usrsharex2gopluginx2goplugin.html usrsharex2gopluginx2goplugin.html.orig
The file’s content can then be modified to reflect your own requirements. At a minimum you should substitute with your server’s public IP / hostname. After that you can access X2Go via your browser:
This is the original content of the file:
- x2goplugin.html
-
<!DOCTYPE HTML PUBLIC "-//W3C//DTD HTML 4.01 Transitional//EN">
<html>
  <head>
    <title>X2Go Application Service<title>
  <head>
  <body onload="checkPlugin()">
    <div id="x2goplugin">
    <object
        src="location"
        type="application/x2go"
        name="x2goplugin"
        palette="background"
        height="100%"
        hspace="0"
        vspace="0"
        width="100%"
        x2goconfig="
session=X2Go-Demo-Session
server=localhost
user=
sshport=22
command=XFCE
rootless=false
sound=true
exportfs=true
speed=adsl
compression=16m-jpeg
quality=9
dpi=120
kbdlayout=
kbdtype=auto
showtoolbar=true
showstatusbar=true
usekbd=true
soundsystem=pulse
soundtunnel=true
defsndport=true
print=true
rootless=false
published=false
applications=WWWBROWSER, MAILCLIENT, OFFICE, TERMINAL
">
    <object>

    <div>
  <body>
<html>
Setup
You can certainly also move the file x2goplugin.html into . Then it is recommended to remove the link within , which is just a link to .
ls -al etcapache2conf.dx2goplugin.conf
lrwxrwxrwx 1 root root 33 Mär 22 23:42 etcapache2conf.dx2goplugin.conf -> ....x2gox2goplugin-apache.conf
root@x2goserver:etcapache2conf.d
cat etcx2gox2goplugin-apache.conf
Alias x2goplugin.html usrsharex2gopluginx2goplugin.html
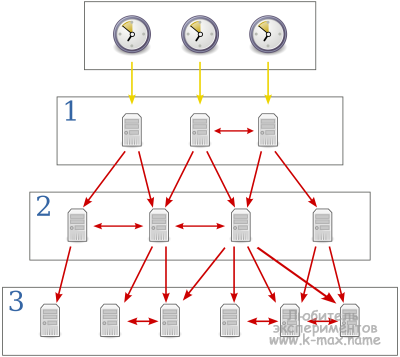
Network setup
X2Go TCE requires a local area network (LAN) that is at least switched at 100MB/s. The X2Go Thin Client chroot distribution is not designed to work over the internet or on low bandwidth connections, but the X2Go Thin Client can possibly give access to X2Go servers outside of your LAN infrastructure that is: X2Go Thin Clients can be used to work on X2Go servers on the WAN (e.g. on the internet, in a public cloud, etc.).
You can combine X2Go Server and X2Go PXE Server functionality on one system. However, for production setups we highly recommend that you dedicate a separate server as the PXE boot server for the X2Go TCE. If you have the chance of splitting these two functionalities up into two, this is a recommended way of setting up your X2Go Thin Client Environment.
Please refrain from installing the PXE boot environment for X2Go Thin Clients on your in-house production server, especially for testing X2Go TCE make it a separate system. Maybe you want to use virtualization (KVM, Xen, etc.) for setting up a test X2Go infrastructure with X2Go Thin Clients on your LAN.
A normal/recommended setup for testing/deploying X2Go TCE then is:
- X2Go server (Debian, Ubuntu, etc.)
- optional: a separate X2Go PXE server (Debian or Ubuntu)
- X2Go Thin Client hardware (can be everything from e.g. Pentium III, AMD Athlon upwards), main requirement is that the thin client hardware box contains a network card that is PXE/Etherboot capable
Terminology compared to standard X11
X2Go Client
The X2Go Client is the application that allows one to connect to a remote server and display a graphical desktop / application on the client machine. X2Go Client requires a local X11 server to display the remote sessions. On MS Windows such an X11 server is shipped with X2Go Client. On Linux, the client part of X2Go uses the local Xorg server, on Mac OS X, the XQuartz X11 server needs to be installed as an extra component.
X2Go Server
The machine that runs the X2Go server would be called the remote machine. Applications / session are started on this remote machine and the applications transfer their windows / desktops to the client.
Getting started
Installing the client
If you have a RHEL machine with Geo setup, the x2goclient is probably installed already.
Otherwise, you can ask your IT staff to do it. For RedHat/Fedora:
sudo yum install x2goclient
For Ubuntu-type distros:
sudo apt install x2goclient
For Windows, Mac or other Linux distros, download and install the client from the x2go homepage. (For temporary admin rights for Windows, please contact the IT staff.)
For Mac’s, you most likely also will need to install XQuartz.
Defining a session
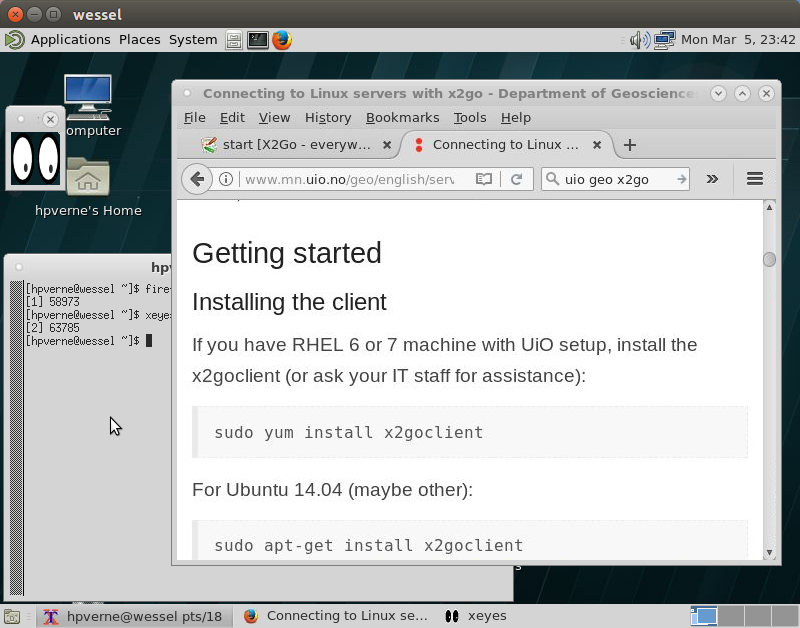
Start the client, either from the GUI or by giving the command «x2goclient» in a terminal window. Unfortunately, the configuration window looks a bit different for various versions of the client, so you might have to look around a bit for the options.
The client will offer to create a new session configuration:
Type in the following:
- The Session name, this is just an arbitrary name.
- The remote machine to connect to, wessel.uio.no is suggested.
- Your username on the remote machine.
- If you have set yourself up with ssh keys, you can check the box for «Try auto login».
For «Session types», select Custom desktop and type in /usr/bin/mate-session as «Command»:

MATE is a clone of Gnome2. It has a familiar user interface, and is recommend for most users.
Screen size
Look around in the tabs, you should find a place to choose initial size of the display. 800×600 is a good start, the size can be changed as the session is running.
To toggle fullscreen in a session, hit Ctrl-Alt-F, but you might be better off by simply maximising the x2go session window.
Keyboard
As for keyboard setting, try «Auto-detect» or «Keep current keyboard Settings». If you have an ordinary Norwegian keyboard and the default doesn’t work satisfactory, try layout = no and model = pc105/no.
Misc
Under the «Connection» tab, you can set connection speed. ADSL seems to work fine.
Please uncheck «Sound support»! It’s cool if it works, but it fills up the server logs with nonsense error messages.
Likewise, «Client side printing support» and «Shared folders» may or may not work. This depends (among other things) on your firewall settings.
You can change the «baby seal» image if you want to. Click it and select an image.
Remember to click OK.
Overview
X2Go enables you to access a graphical desktop of a computer over a low bandwidth (or high bandwidth) connection. 
X2Go is a solution, which some vendors vaguely call Remote Control. This is not to be confused with Microsoft Remote Desktop Connection, which is a competing Remote Desktop solution and protocol.
With X2Go, you mainly access Linux computers. The Linux computer you are accessing is the X2Go Server.
(There are ways to connect to a Windows computer as well; some of them are only available with the Linux X2Go Client.)
You can connect from a computer running Linux, Windows or Mac OS X. This computer is the X2Go Client.
Multiple users/clients can access a single X2Go Server at the same time, with each user/client having an individual Desktop session by default — however, Desktop sharing (Remote Assistance) is possible, too (see below).
Basic features of X2Go
- The ability to disconnect and reconnect to a session, even from another client
- Support for sound
- Support for as many simultaneous users as the computer’s resources will support (NX3 free edition limited you to 2.)
- Traffic is securely tunneled over SSH
- File Sharing from client to server
- Printer Sharing from client to server
- Easily select from multiple desktop environments (e.g., MATE, GNOME, KDE)
- The ability to access single applications by specifying the name of the desired executable in the client configuration or selecting one of the pre-defined common applications
Changes compared to NX3
- Improved support for sound via Pulseaudio
- Improved integration of (includes SSH proxy support)
- No special proxy user (nx) account is required with X2Go
Advanced features of X2Go
- Published Applications: This is similar to Citrix MetaFrame/Presentation Server/XenApp, where a server-side list of available applications is displayed on the client, and you can run any number of them from within the same session. Citrix does this as an extension of the regular menu on Windows, while for X2Go, you right-click on the X2Go icon in the status area, or select the application from a pop-up window.
- The ability to access a Windows computer that supports RDP via . The main advantage of accessing RDP this way is improved performance over low bandwidth connections.
- The Linux X2Go client can also serve as a graphical front-end to a client-side rdesktop/xfreerdp installation, so you don’t need an X2Go server at all if all you want to do is connect to an RDP server. Of course, X2Go-specific accelleration features are unavailable in that mode.
- X2Go Servers can provide XDCMP Query Hosts over low bandwidths.
- A Thin Client Environment is available.
- A Session Broker that supports centralized configuration and load balancing.
See this page for more advanced setups.
Desktop Bindings
X2Go Desktop Applet
- Status quo: for several desktop the X2Go project offers a desktop integration (=binding) package
- One that can be used as a template and reference is the package: plasma-widget-x2go. It provides a Plasma widget that can dock into KDE4’s panel and this widget then gives you control over your X2Go session
- Unfortunately, the Plasma X2Go widget is for KDE4 only and of no use to users GNOME, Unity, XFCE, etc.
- The idea: create a desktop independent applet that docks into the systems systray (or into the appindicator area). This applet then gives you control over your X2Go session from inside the X2Go session: unmount client-side folder, manage print job, suspend X2Go session, grant permission for desktop sharing, etc.
- Please use the tools and as reference and as a start point
- Implementation shall be in C++ using Qt4.
Getting started (my first Session Profile)
When you launch the for the first time, it will start the dialogue automatically.
When you open the graphical user interface of the x2goclient, you’ll be welcomed with a form to fill in your session details. The x2goclient manages sessions for each server you want to connect to. You can make settings for each one, and we’ll go through the first together.
- At first you’ll choose a name for you session. Choose something catchy, like “work-serverroom” or “home-garage”.
- Then you’ll need to enter how the server can be reached. You can enter an IP or a name for the host. If you choose a name, make sure it’s resolvable from where you’ll use the client.
- Now set the username with which you are able to connect to the server. The user must have the right to log in to the server by SSH.
- You can change the port for the server, but most probably it’s the default SSH port, 22.
- Now you can set, if you want to use RSA or DSA Keys, which one to use. For example: “/home/x2gouser/.ssh/id_rsa”
- You could also just use an SSH agent if you’ve got that available. On Linux, the standard ssh-agent, or any agent that is compatible with it, is used. On Windows, Pageant, or any agent that is compatible with it (like KeeAgent) is used.
- There is also the availability to use a proxy to connect to the x2goserver for which you could provide a set of different credentials and key to authenticate against.
- The field is used to select your desktop environment. If your environment is not on the list, use the “Custom Desktop” option, and specify the command that starts the desktop or VM on the remote side. You can also use a specific application provided by the remote side.
Newer versions of the GNOME 3 and UNITY desktop environments have compatibility issues with X2Go. See the page Desktop Environment Compatibility for more details.
The next Tab shows your connection settings:
- You can adjust the bandwidth you have to be used by the x2goclient.
- Also there is an option to actively adjust the compression methods for the image processing.
On the Settings tab you will be able to adjust your clients configuration for convenient day-to-day usage:
- A whole set of Display settings can be used to configure the display for this session permanently.
- You can set the exact keyboard layout and the language to be used for it.
- The audio settings enable you to use the remote audio system locally and hear what would normally be heard on the remote side.
- The last point in this tab enables the client side printing support to let you print locally from the remote side.
The last Tab for the session preferences is used to configure the folder sharing options:
You can use the x2goclient to share folders between the local client and the remote side you will connect to. This enables you to share documents and files between both sides.
We now went through all the settings available to the specific session. Press okay to save it and you’ll see it on the main window, in the session list.
How to build X2Go KDrive
download the x2gokdrive from git:
We assuming, that you are familiar with make, Xorg and know how to build software from sources.
You’ll need a xorg-server sources (1.19.2), zlib, libpng and libjpeg.
Configure Xorg to build xkdrive and start a build process (make). After that copy x2gokdrive directories in
, than change to and run . This should build x2gokdrive binary.
The simplest way to build x2gokdrive if you are using your system source packages. I’ll give some examples for Debian, SLE12sp1 and OpenSUSE Leap 42.3
Debian Stretch
-
Install apt-source, and get source for xorg-server
-
Go to the source directory and build it with
-
Copy x2gokdrive sources to
-
Create directory ‘x2gokdrive’ in
-
Link Makefile from to
-
Go to and run
SLES 12SP1 or OpenSUSE Leap 42.3
- Download xorg-server SRPM for your system and install it
- Install all dependencies you need to build xorg-server
- Build xorg-server from SPEC file
-
Copy x2gokdrive sources to
-
You’ll need apply a patch for your system: or
-
Build binary:
Step 1 — Installing the Desktop Environment
With your server up and your firewall configured, you are now ready to install the graphical environment for the X2Go server.
In this tutorial, you are installing XFCE as the desktop environment. XFCE doesn’t use fancy graphical effects like compositing, which makes it more compatible with X2Go and allows it to optimize screen updates. For reference, and (with compositing disabled) also work fine but you’ll have to change the command in this tutorial where you install the desktop environment. For example, instead of you would type .
There are two ways to easily install XFCE, but you only need to choose one—either the Minimal Desktop Environment or the Full Desktop Environment.
Install and configure the Full Desktop Environment. This is similar to what you would get if you installed Debian from a bootable DVD/USB memory stick to your local PC:
Minimal Desktop Environment: Alternately, if you want to install a small, core set of packages and then build on top of them by manually adding whatever you need afterward, you can use the metapackage.
A metapackage doesn’t contain software of its own, it just depends on other packages to be installed, allowing for an entire collection of packages to be installed at once without having to type each package name individually at the command line.
Install and all of the additional dependencies needed to support it:
Now that your graphical environment is installed, you will establish a way to view it remotely.