Сетевая безопасность: уровень проверки подлинности lan managernetwork security: lan manager authentication level
Содержание:
Принцип работы NTLM
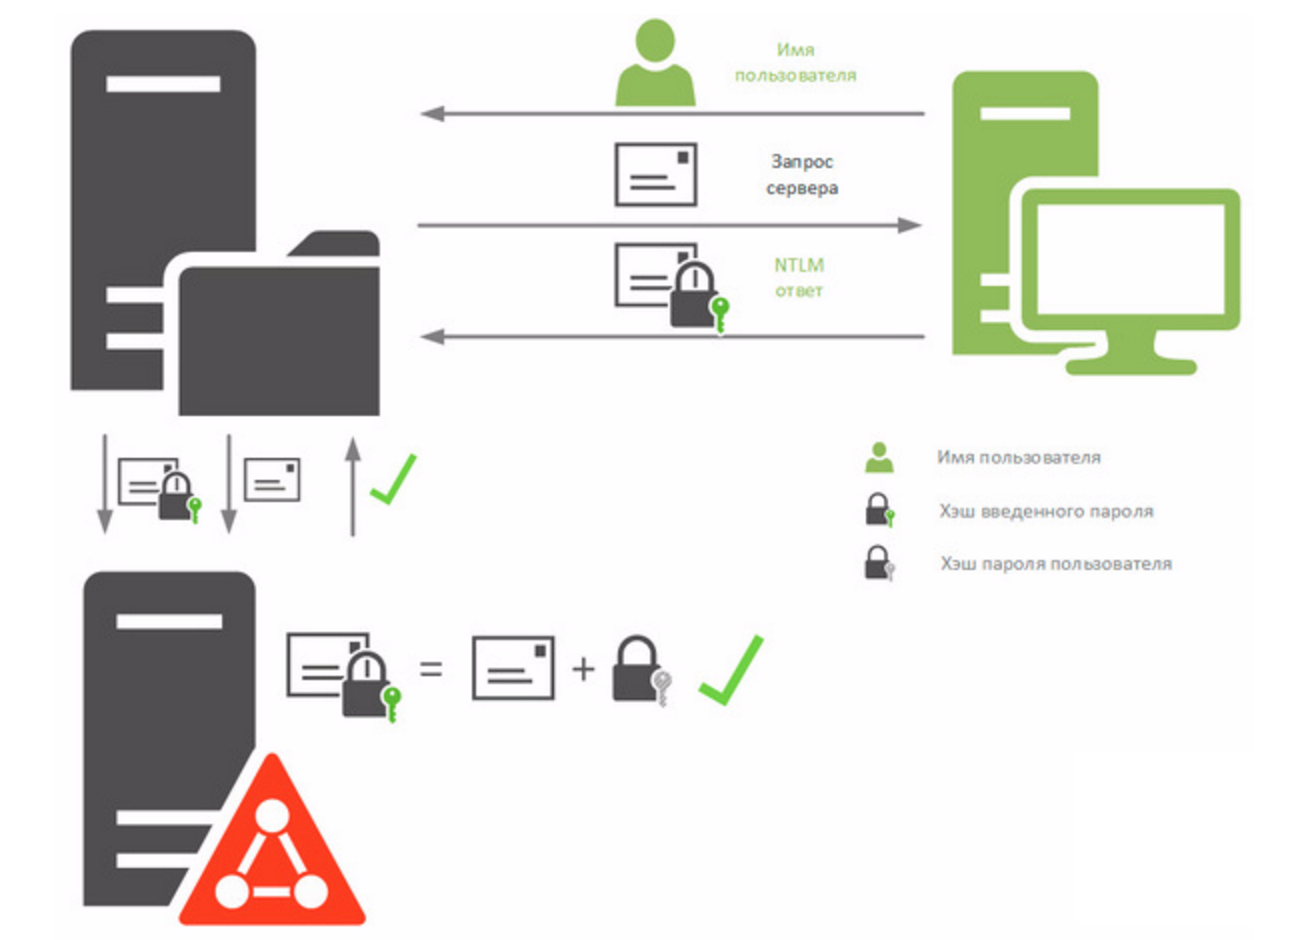
Принцип работы NTLM имеет много общего с LAN Manager и эти протоколы обратно совместимы, но есть и существенные отличия. NT-хэш формируется на основе пароля длиной до 128 символов по алгоритму MD4, пароль регистрозависимый и может содержать не только ACSII символы, но и Unicode, что существенно повышает его стойкость по сравнению с LM. Работа происходит следующим способом(рис.1):

Для получения доступа к ресурсу клиент направляет серверу запрос с именем пользователя. Сервер в ответ передает ему случайное число, называемое запросом сервера. Клиент зашифровывает данный запрос по алгоритму DES, используя в качестве ключа NT-хэш пароля, использую 40 или 56 битный ключ(хеш делится на три части и каждая часть шифрует запрос сервера отдельно), так как NT-хэш имеет 128 битную длину.
Зашифрованный хэшем пароля запрос сервера называется ответом NTLM и возвращается обратно серверу, сервер берет из SAM хэш пароля пользователя, чье имя было ему передано и выполняет те же самые действия с запросом сервера, и после сравнивает полученный результат с ответом от NTLM. При совпадении значений, аутентификация считается успешной, и это значит пользователь клиента действительно тот, за кого себя выдает.
При получении доступа третьими ресурсами схема изменяется(рис.2):
Получив запрос от клиента, сервер направляет ему запрос сервера, но получив NTLM-ответ он не имеет возможности посчитать значение для проверки у себя на стороне, так как у него нету хэша пароля доменного пользователя, и тогда он переадресует NTLM-ответ контроллеру домена и отправляет ему свой запрос сервера. Получив эти данные, контроллер домена извлекает хэш указанного пользователя и вычисляет на основе запроса сервера проверочную последовательность, которую уже и сравнивает с полученным NTLM-ответом. Если они равны, на сервер отправляется сообщение, что аутентификация успешно пройдена.
Несмотря на на что, протокол NTLM на сегодняшний день считается слабым. Слабое шифрование делает возможным достаточно быстро восстановить хэш пароля, а если использовался не только NTLM, а еще и LM-ответ, то и восстановить пароль.
Напоследок
Несмотря на то, что многие ассоциируют Lan Manager с чем-то древним и уже не используемым, используется он достаточно активно – поэтому его надо и настраивать, и оптимизировать, и защищать, и грамотно использовать только в нужных случаях, а не оставлять всё на самотёк. Такой подход порождает множество проблем в безопасности – ведь ломать-то будут не то, что админ штучно настроил, а самое слабое место. А если в сети ходит невнятная каша из протоколов аутентификации – то задача нарушителя сильно упрощается.
Надеюсь, что данная статья поможет вам в задаче улучшения безопасности корпоративной сети.
До новых встреч!
Introduction
You surely have seen SSO scenarios where users accessing ASP content do not need to authenticate but seem to be authenticated magically through their Windows logon context. You can use the same type of Single SignOn integrated authentication for your GLPI Windows clients in a domain.
This Howto uses Apache 2 and GLPI configured for external LDAP authentication with Active Directory. The user should use Internet Explorer for testing, however, recent Firefox versions also do support integrated authentication using NTLM.
The configuration where the described changes have been confirmed functioning is as follows:
— GLPI : 0.68.3 with AD authentication against a Windows Server 2003 directory
— Internet Explorer 6 SP2 or Internet Explorer 7
— Apache 2.2.3 / MySql : 5.0.24a / PHP 5.1.6
Описание уязвимости
В конкретном примере рассматривается частный случай атаки Pass the Hash, подробности о которой читай во врезке. Атаковать мы будем с помощью Office Open XML. Это формат хранения офисных документов, и представляет он собой не что иное, как обычный ZIP-архив, в который упакованы текст, графика и остальные данные. Нам необходимо заставить документ обратиться к удаленному (естественно, подконтрольному нам) SMB-серверу, перехватить трафик и выудить оттуда хешированные учетные данные. Для этого воспользуемся возможностью данного формата встраивать в тело документа текст из другого документа (субдокумента).
В частности, в MS Office имеется функция под названием , о которой и пойдет речь. Сама функция ничего особо злого в себе не несет, так как предназначена она для динамического обновления контента.
К примеру, возьмем два файла: doc1 и doc2. Вставим при помощи функции текст из doc1 в doc2. Изменим текст в doc1. Теперь при открытии файла doc2 он обратится к источнику текста и внесет те же самые изменения, а точнее — просто обновит содержимое.
Фокус в том, что мы можем модернизировать файл doc2 таким образом, чтобы он ссылался на файл на удаленном сервере (неважно, в локальной сети это будет или за NAT). На этот раз, открывая doc2, Word обратится по SMB-протоколу за содержимым, что позволит нам перехватить трафик и достать оттуда необходимые нам данные
Если файл будет недоступен, то документ просто не сможет обновиться.
Делать мы будем так, чтобы ссылка была вообще не на файл, а просто на сервер по SMB. На том конце, естественно, кто-то встретит нужные пакеты и получит заветный логин (в открытом виде) и NTLMv2-ответ (с которым в итоге и нужно развлекаться). При этом на стороне атакуемого не будет никакой подозрительной активности. Он просто открывает файл.
Pass the Hash
Суть атаки передачи хеша состоит в том, чтобы вынудить атакуемый компьютер отправить на сетевой узел, подконтрольный хакеру, запрос, содержащий хешированный пароль текущего пользователя. В данной статье рассматривается вариант с использованием ссылки на общий сетевой ресурс в «злонамеренно составленном» документе формата Office Open XML. При открытии файла автоматически выполнится попытка авторизации по SMB без Session Security Flag, для чего отправится стандартный запрос, содержащий зашифрованный NTLM-хеш пароля.
Разумеется, это справедливо только в том случае, если на компьютере жертвы используется SMB-NTLM. Если корпоративная сеть мигрирует на Kerberos, изменится система «запрос/ответ». В ней появится промежуточный сервер, поэтому таким способом хеш перехватить уже не удастся. Подробнее см. доклад c конференции Black Hat.
Configure
Follow these steps to configure Cypress to utilize this plugin:
Modify the file so it contains:
constntlmAuth=require("cypress-ntlm-auth/dist/plugin");module.exports=(on,config)=>{ config =ntlmAuth.initNtlmAuth(config);return config;};
(if you are using other plugins I trust you can merge this with your current file)
Note that once this code is in place, cypress must be started using the cypress-ntlm launcher.
If cypress is started without the launcher, the plugin will throw an error. To be able to run
cypress without the launcher, the plugin must be disabled (commenting out the call to is sufficient).
In the file add this line
import"cypress-ntlm-auth/dist/commands";
Add this to the scripts section:
"ntlm-proxy""ntlm-proxy &","cypress-ntlm""npm run ntlm-proxy && (cypress-ntlm open ; ntlm-proxy-exit)"
"ntlm-proxy""start /min \"ntlm-proxy\" cmd /c node_modules\\.bin\\ntlm-proxy","cypress-ntlm""npm run ntlm-proxy && (cypress-ntlm open & ntlm-proxy-exit)"
Whatever other variants for starting Cypress you may need (headless for CI for instance) can easily be added in a similar manner. Just replace ‘open’ with the arguments you need — any arguments that follow cypress-ntlm will be passed on to Cypress.
Configure DokuWiki to use NTLM authentication
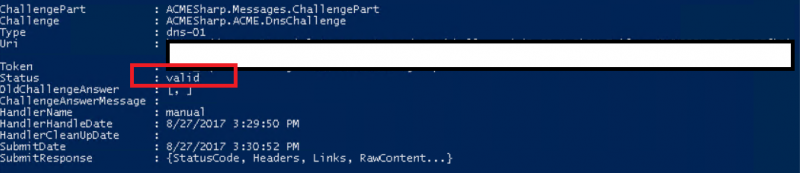
## Enable this to restrict editing to logged in users only
AuthType NTLM
NTLMAuth On
NTLMAuthoritative on

require valid-user
Make a copy of the acl.auth.php.dist file in the /conf directory, and rename it to acl.auth.php.
Edit the conf/dokuwiki.php file (or local.php if you use one) and set the authentication options as follows:
$conf'useacl'      = 1;               //Set this to 1 to enable ACLs
$conf'authtype'    = 'ntlm';          //Change this to 'ntlm'
$conf'passcrypt'   = 'md5';           //Change this to md5. It's smd5 by default
Modify the inc/auth.php file as follows (you’re adding a check for NTLM authentication)
// do the login either by cookie or provided credentials
if($conf'useacl'){
	if($auth){
		if (!isset($_REQUEST'u')) $_REQUEST'u' = '';
		if (!isset($_REQUEST'p')) $_REQUEST'p' = '';
		if (!isset($_REQUEST'r')) $_REQUEST'r' = '';
    // add this snippet
		if ($conf'authtype' == 'ntlm')
		{
			$_REQUEST'u' = getRemoteUserNice();
			$_REQUEST'p' = "";
			$_REQUEST'r' = "";
		}
    // end of snippet

		// if no credentials were given try to use HTTP auth (for SSO)
		if(empty($_REQUEST'u') && empty($_COOKIEDOKU_COOKIE) && !empty($_SERVER'PHP_AUTH_USER')){
			$_REQUEST'u' = $_SERVER'PHP_AUTH_USER';
			$_REQUEST'p' = $_SERVER'PHP_AUTH_PW';
		}
  }
}
Add the following code to your inc/common.php file, at the end of the file:
// this is a hack for ntlm_module (http://www.gknw.net/development/apache/apache-1.3/win32/modules/)
// for some reason it only sets env variable REMOTE_USER but not // $_SERVER

function getRemoteUser() {
  if ($_SERVER'REMOTE_USER')
    return $_SERVER'REMOTE_USER';
  return getenv('REMOTE_USER');
}

function niceNtlmUserName($userName)
{
  return preg_replace("/^.+\\\\/", "", $userName);
}

// NTLM user name is in the form "domain\\user", this
// function converts it to just "user"
function getRemoteUserNice()
{
    return  niceNtlmUserName(getRemoteUser());
}

//Setup VIM: ex: et ts=2 enc=utf-8 :
In the inc/auth folder, create a new file called ntlm.class.php. Copy the following code into it and save it.
<?php
/**
 * NTLM authentication backend
 *
 * To use it:
 * - install ntlm module (e.g. mod_ntlm-1.3.zip from
 *   http://www.gknw.net/development/apache/apache-1.3/win32/modules/
 * - add the following to the .htaccess of your dokuwiki directory:
AuthType NTLMNTLMAuth on
NTLMAuthoritative on
require valid-user
 *   this will only allowed logged in and authenticated users to
 *   access pages and puts the login of the user in $REMOTE_USER env
 *   variable. This code relies on that
 * @author     Krzysztof Kowalczyk : http://blog.kowalczyk.info
 */
class auth_ntlm extends auth_basic {

	function auth_ntlm() {

// we only accept page ids for auth_plain
if(isset($_REQUEST'u'))
  $_REQUEST'u' = cleanID($_REQUEST'u');
}
/**
 * Check user+password
 *
 * @author     Krzysztof Kowalczyk : http://blog.kowalczyk.info
 * @return  bool
 */
function checkPass($user,$pass) {

  if (!getenv('REMOTE_USER'))
    return false;
  return true;
}

/**
 * Return user info
 *
 * Returns info about the given user needs to contain
 * at least these fields:
 *
 * name string  full name of the user
 * mail string  email addres of the user
 * grps array   list of groups the user is in
 *
 * @author     Krzysztof Kowalczyk : http://blog.kowalczyk.info
 */
function getUserData($user) {
  global $conf;
  $userInfo'name' = niceNtlmUserName($user);
  $userInfo'mail' = $userInfo'name'.'@solvay.com';
  $userInfo'grps' = array($conf'defaultgroup');
  return $userInfo;
}

/**
 * Create a new User
 *
 * Returns false if the user already exists, null when an error
 * occured and the cleartext password of the new user if
 * everything went well.
 *
 * The new user HAS TO be added to the default group by this
 * function!
 *
 * @author     Krzysztof Kowalczyk : http://blog.kowalczyk.info
 */
function createUser($user,$pass,$name,$mail){
  return false;
}
}
//Setup VIM: ex: et ts=2 enc=utf-8 :
?>
Squid Configuration
As Samba-3.x has it’s own authentication helper there is no need to build any of the Squid authentication helpers for use with Samba-3.x (and the helpers provided by Squid won’t work if you do). You do however need to enable support for the NTLM scheme if you plan on using this. Also you may want to use the wbinfo_group helper for group lookups
--enable-auth="ntlm,basic"
--enable-external-acl-helpers="wbinfo_group"
Test Squid without auth
Before going further, test basic Squid functionality. Make sure squid is functioning without requiring authorization.
Test the helpers
Testing the winbind ntlm helper is not really possible from the command line, but the winbind basic authenticator can be tested like any other basic helper. Make sure to run the test as your cache_effective_user
# /usr/local/bin/ntlm_auth --helper-protocol=squid-2.5-basic
mydomain+myuser mypasswd
OK
The helper should return «OK» if given a valid username/password. + is the domain separator set in your smb.conf
squid.conf Settings
Add the following to enable both the winbind basic and ntlm authenticators. IE will use ntlm and everything else basic:
auth_param ntlm program /usr/local/bin/ntlm_auth --helper-protocol=squid-2.5-ntlmssp
auth_param ntlm children 30

# warning: basic authentication sends passwords plaintext
# a network sniffer can and will discover passwords
auth_param basic program /usr/local/bin/ntlm_auth --helper-protocol=squid-2.5-basic
auth_param basic children 5
auth_param basic realm Squid proxy-caching web server
auth_param basic credentialsttl 2 hours
And the following acl entries to require authentication:
acl AuthorizedUsers proxy_auth REQUIRED
..
http_access allow all AuthorizedUsers
Test Squid with auth
- Internet Explorer, Mozilla, Firefox:
Test browsing through squid with a NTLM capable browser. If logged into the domain, a password prompt should NOT pop up. Confirm the traffic really is being authorized by tailing access.log. The domain\username should be present.
-
Netscape, Mozilla ( < 1.4), Opera…:
Test with a NTLM non-capable browser. A standard password dialog should appear. Entering the domain should not be required if the user is in the default domain and «winbind use default domain = yes» is set in smb.conf. Otherwise, the username must be entered in «domain+username» format. (where + is the domain separator set in smb.conf)
If no usernames appear in access.log and/or no password dialogs appear in either browser, then the acl/http_access portions of squid.conf are not correct.
Note that when using NTLM authentication, you will see two «TCP_DENIED/407» entries in access.log for every request. This is due to the challenge-response process of NTLM.
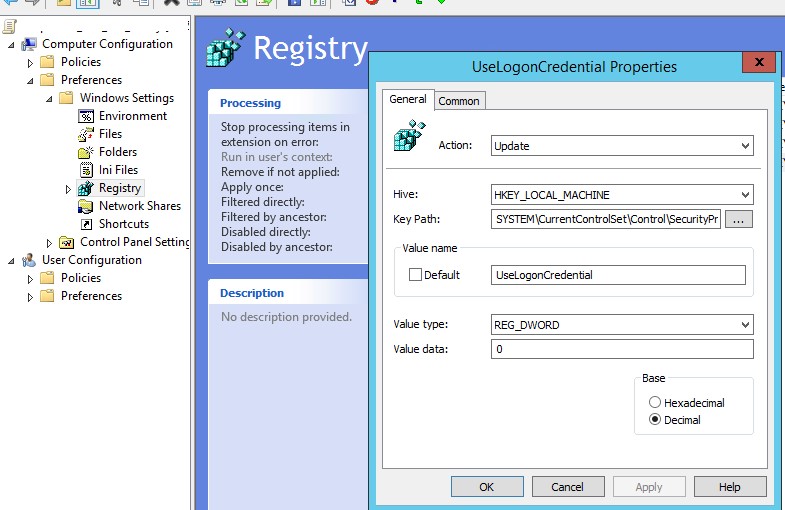
Отключение WDigest
Протокол WDigest появился в Windows XP и использовался для выполнения HTTP дайджест-аутентификации (HTTP Digest Authentication), особенностью которой являлось использование пароля пользователя в открытом виде. В Windows 8.1 and Server 2012 R2 добавилась возможность полного запрета хранения паролей в открытом виде в LSASS. Для запрета хранения WDigest в памяти, в этих ОС в ветке реестра HKEY_LOCAL_MACHINE\System\CurrentControlSet\Control\SecurityProviders\WDigest уже имеется DWORD32 параметр с именем UseLogonCredential и значением 0.
Если же нужно полностью отключить метод аутентификации WDigest, в этой же ветке (HKEY_LOCAL_MACHINE\System\CurrentControlSet\Control\SecurityProviders\WDigest) установите значение ключа Negotiate в .
Для поддержки этой возможности в Windows 7, 8 и Windows Server 2008 R2 / 2012 необходимо установить специальное обновление — KB2871997, а потом выставить эти же ключи реестра. В доменной среде параметры реестра проще всего распространить с помощью групповой политики.
Совет. При отказе от хранения WDigest в памяти, в первую очередь стоит протестировать корректность авторизации пользователей и приложений на IIS серверах.
Introduction
This is an attempt at documenting the undocumented NTLM authentication
scheme used by M$’s browsers, proxies, and servers (MSIE and IIS); this
scheme is also sometimes referred to as the NT challenge/response (NTCR)
scheme. Most of the info here is derived from three sources (see also the
section at the end of this document):
Paul Ashton’s work on the NTLM security holes,
the encryption
documentation from Samba, and network snooping.
Since most of this info is reverse-engineered it is bound to contain
errors; however, at least one client and one server have been implemented
according to this data and work successfully in conjunction with M$’s
browsers, proxies and servers.
Note that this scheme is not as secure as Digest and some other
schemes; it is slightly better than the Basic authentication scheme,
however.
Also note that this scheme is not an http authentication
scheme — it’s a connection authentication scheme which happens to (mis-)use
http status codes and headers (and even those incorrectly).
Resources
- LM authentication in SMB/CIFS
- A document on cracking NTLMv2 authentication
-
http://www.blackhat.com/presentations/win-usa-02/urity-winsec02.ppt
- Squid’s NLTM authentication project
-
http://squid.sourceforge.net/ntlm/
- Encryption description for Samba
-
http://de.samba.org/samba/ftp/docs/htmldocs/ENCRYPTION.html
- Info on the MSIE security hole
-
http://oliver.efri.hr/~crv/security/bugs/NT/ie6.html
- FAQ: NT Cryptographic Password Attacks & Defences
-
http://www.ntbugtraq.com/default.asp?sid=1&pid=47&aid=17
- M$’s hotfix to disable the sending of the LanManager response
-
ftp://ftp.microsoft.com/bussys/winnt/winnt-public/fixes/usa/NT40/hotfixes-postSP3/lm-fix
- A description of M$’s hotfix
-
http://www.tryc.on.ca/archives/bugtraq/1997_3/0070.html
LmCompatibilityLevel
Welche “LmCompatibilityLevel” gibt es? Es gibt verschiedene LmCompatibilityLevel die verwendet, beziehungsweise konfiguriert werden können. Hier wird unterschieden, welche Authentifizierungs-Mechanismen der Client verwendet. Hier wird zwischen LM-, NTLM- und NTLMv2 Authentifizierungen unterschieden. Wir empfehlen die NTLMv2 aktivieren zu lassen, da diese die höchste Sicherheit bietet. Es gibt sechs Stufen, wobei Stufe 5 die höchste Sicherheit bietet. Hier findet ihr die verschiedenen LmCompatibilityLevel:
Level / Stufe
Bedeutung
Clients nutzen die LM- und NTLM-Authentifizierung, aber NIE die NTLMv2-Authentifizierung. Domänencontroller akzeptieren LM-, NTLM- und NTLMv2-Authentifizierung.
1
Clients nutzen die LM- und NTLM-Authentifizierung sowie die NTLMv2-Authentifizierung wenn es vom Server unterstützt wird. Domänencontroller akzeptieren LM-, NTLM- und NTLMv2-Authentifizierung.
2
Clients nutzen nur die NTLM- und NTLMv2-Authentifizierung. Domänencontroller akzeptieren LM-, NTLM- und NTLMv2-Authentifizierung.
3
Clients nutzen nur die NTLMv2-Authentifizierung. Domänencontroller akzeptieren LM-, NTLM- und NTLMv2-Authentifizierung.
4
Clients nutzen nur die NTLMv2-Authentifizierung. Domänencontroller lehnen LM-Authentifizierung ab und akzeptieren nur NTLM- und NTLMv2-Authentifizierung.
5
Clients nutzen nur die NTLMv2-Authentifizierung. Domänencontroller lehnen LM- und NTLM-Authentifizierung ab und akzeptieren nur NTLMv2-Authentifizierung.
Achtung! Mit Stufe 4 und 5 sollte vorsichtig umgegangen werden, da der Domain Controller die anderen Verbindungen ablehnt.
Notes
The ntlm-proxy process is intended to be used only by Cypress, and should be terminated after Cypress exits. This requires that the ntlm-proxy-exit launcher is executed, as in the examples above. Otherwise it will stay in the background indefinitely (or until a new ntlm-proxy is started).
In versions 0.4.0 and earlier, the proxy was terminated automatically on signals when Cypress exited. However, this approach has no support on Windows (no decent signal handling) — hence it was removed for consistent behavior across platforms.
The http-mitm-proxy library will create a .http-mitm-proxy folder with generated certificates. This improves performance when re-running tests using the same sites. It is recommended to add this folder to your .gitignore so the certificates don’t end up in your repo.
The NTLM proxy will accept self-signed certificates for sites that are served from localhost. This is convenient for testing local development builds without requiring a full CA chain for the certificates, while still requiring proper certificates from external servers.
Getting certificates right can be a burden. When accessing a HTTPS site, the site certificate is validated by ntlm-proxy (just like web browsers do). If the validation fails, the proxy will return an error code (504).
Many corporate intranets utilize SSL inspection, which means that your HTTPS traffic is decrypted, inspected, and then encrypted with an internal corporate certificate. Since Node doesn’t trust the corporate certificates CA, it will raise an error. Download the certificate to your machine and set the environment variable to the full path to the certificate file. This will make Node trust it as a CA.
If you are unable to resolve the certificate issues you can use the standard Node workaround by setting the environment variable before starting ntlm-proxy. If you are running Node 11 or later, you will (rightfully) get a warning when doing this, since disabling the certificate validation makes your machine more vulnerable to MITM attacks. When used only in a development environment and only for testing an internal site, the risk is significantly reduced — but I would still strongly recommend resolving the certificate issues instead of relying on the workaround.
Samba Configuration
For full details on how to configure Samba and joining a domain please see the Samba documentation. The Samba team has quite extensive documentation both on how to join a NT domain and how to join a Active Directory tree.
Samba must be built with these configure options:
--with-winbind
and is normally enabled by default if you installed Samba from a prepackaged distribution.
Then follow the Samba installation instructions. But please note that neither nsswitch or the pam modules needs to be installed for Squid to function, these are only needed if you want your OS to integrate with the domain for UNIX accounts. (Note that if PAM is configured to authenticate against Active Directory, so that AD controls access to your Unix accounts etc., it may be prudent to have Squid authenticate against PAM as well. PAM can send Squid’s authentication requests to Active Directory. This approach keeps all authentication running through PAM, centralizing administration.)
Test Samba’s winbindd
Edit smb.conf for winbindd functionality. The following entries in the section of smb.conf may be used as a template.
workgroup = mydomain
password server = myPDC
security = domain
winbind uid = 10000-20000
winbind gid = 10000-20000
winbind use default domain = yes
Join the NT domain as outlined in the winbindd man page for your version of samba.
Start nmbd (required to insure proper operation).
Start winbindd.
Test basic winbindd functionality «wbinfo -t»:
# wbinfo -t
Secret is good
Test winbindd user authentication:
# wbinfo -a mydomain\\myuser%mypasswd
plaintext password authentication succeeded
error code was NT_STATUS_OK (0x0)
challenge/response password authentication succeeded
error code was NT_STATUS_OK (0x0)
both plaintext and challenge/response should return
«succeeded.» If there is no «challenge/response» status returned then Samba was not built with «—with-winbind-auth-challenge» and cannot support ntlm authentication.
SMBD and Machine Trust Accounts
The Samba team has incorporated functionality to change the machine trust account password in the new «net» command. A simple daily cron job scheduling «net rpc changetrustpw» is all that is needed, if anything at all.
winbind privileged pipe permissions
ntlm_auth requires access to the privileged winbind pipe in order to function properly. You enable this access by adding the security user Squid runs as to the winbindd_priv group.
gpasswd -a proxy winbindd_priv
-
Remove the cache_effective_group setting in squid.conf, if present. This setting causes squid to ignore the auxiliary winbindd_priv group membership.
the default user Squid is bundled as nobody though some distribution packages are built with squid or proxy or other similar low-access user.
-
on Debian an Ubuntu systems there may also be a /var/lib/samba/winbindd_privileged directory created by the winbind and ntlm_auth tools with root ownership. The group of that folder needs to be changed to match the /var/run/samba/winbindd_privileged location.