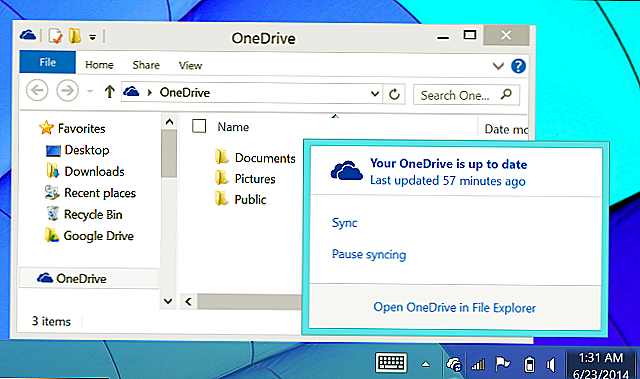
Laps: управление паролями локальных администраторов на компьютерах домена
Содержание:
- Другой вариант
- Part 2. Four Ways to Bypass Windows 7 Password If You Don’t Have Administrator Privilege
- Утилита LAPS — Local Administrator Password Solution
- PLDT Default password
- Weitere Links
- LAPS DLL
- Other Methods to Reset Windows Passwords
- Option 1: Windows 7 Password Reset in Safe Mode via Administrator
- Как разблокировать компьютер и восстановить пароль Windows 7 или 10 с установочного диска?
- History of the Windows Administrator Account
- PLDT Superadmin Username and password
- Beyond the Default Administrator Password in Windows
- Утилита
- Если нет доступа к системе
- Troubleshooting
Другой вариант
Есть еще способы войти в запароленную учетную запись. Дело в том, что сброс пароля администратора Windows 7 можно провести непосредственно из консоли, запущенной под администратором. Сейчас вам будет предложен достаточно сложный способ, но позволяющий оставить небольшую лазейку на будущее.
Наверное, вы сталкивались с программой, отвечающей за залипание клавиш? Когда вы много раз подряд нажимаете на «шифт» или «альт», вам приходит сообщение с предложением отключить залипание. Дело в том, что данная функция работает и в меню выбора пользователя, когда мы только включили компьютер. Так что если заменить её на что-нибудь полезное, мы могли бы извлечь из этого выгоду. Например, вызов командной строки.
Для этого повторяем действия предыдущего пункта и входим в меню установки операционной системы. Запускаем командную строку. По умолчанию ваша операционная система должна быть установлена на том «С:\». Если же нет, просто замените её на нужную букву. После запуска строки вводим последовательность команд.
- «Copy C:\windows\system32\sethc.exe C:\» — создаётся копия файла с кодом, реагирующим на залипание.
- «Copy C:\windows\system32\cmd.exe C:\windows\system32\sethc.exe» — копируем содержимое файла, запускающего командную строку, в файл «залипания».
После ввода последней команды необходимо сделать рестарт персонального компьютера (ноутбука). В меню выбора пользователя, когда у вас попросят ввести пароль, активируем функцию залипания быстрым нажатием нескольких клавиш. Запустится командная строка, и в ней вводим команду «net user UserName NewPassword». Как нетрудно догадаться, вместо UserName нужно указать имя вашего пользователя, а вместо второго параметра новый пароль. После этого вы сможете войти именно в ваш аккаунт на персональном компьютере. Если вы захотите вернуть всё на место, можете включить командную строку из-под «винды» и ввести «copy C:\sethc.exe C:\windows\system32\sethc.exe».
Но как провести сброс пароля администратора Windows 7 без диска?
Part 2. Four Ways to Bypass Windows 7 Password If You Don’t Have Administrator Privilege
With no longer administrator privileges, it will be little tricky to reset admin password on Windows 7. Tricky doesn’t mean it’s impossible. Where there is will there is a way. There are multiple methods to reset admin password on Windows 7 without admin privileges, which are widely used.
Solution 1. Bypass Windows 7 Admin Password with Recovery Utility
If you are not interested in the above solution, this one might. PassFab 4WinKey is a 3rd-party software that will help you reset admin password on Windows 7. It’s too easy and time saving. It’s not technical anyone can use PassFab 4WinKey easily. You just need to follow the user guide below.
Free Download
For Win 10/8.1/8/7/XP
Secure Download
Free Download For macOS 10.15 and below
Secure Download
- Step 1. Get 4WinKey software and execute it.
- Step 2. As 4WinKey starts it will ask you to choose media to burn it on. You can use USB/DVD/CD to burn on. We use USB here as an example.
- Step 3. For USB you should not have anything on it as it will ask you to format it. No matter what you have to choose «Next».
- Step 4. You will be notified by successful message as burning completes.
- Step 5.Now, insert the bootable disk into your locked computer. Restart the computer and press «F12» to enter boot menu. Then, select your disk and exit.
- Step 6.Now, you will see 4WinKey interface. Choose Windows system > Remove account password to bypass Windows 7 administrator password.
- Step 7. Wait for a minute, your password will be removed. Then, plug out usb disk and reboot your computer.
Here is a video guide about how to reset Windows 7 admin password.
Free Download
For Win 10/8.1/8/7/XP
Secure Download
Free Download For macOS 10.15 and below
Secure Download
Solution 2. Windows 7 Admin Password Bypass with Reset Disk
Password reset disk is the first option to reset Windows 7 admin password without admin privileges but for that, you need password reset disk also. If you have got one then follow the following steps, if not skip this solution and move on to next solution.
- Step 1. Turn on your PC and enter anything in password field and press «Enter».
- Step 2. An error message of «Incorrect Password» will be shown, press «Enter» again.
- Step 3. As you see «Reset Password» link, plug-in your USB and click «Reset Password».
- Step 4. If USB contain password information a password recovery wizard will appear, click «Next».
- Step 5. Select USB drive name from the dropdown list and click «Next».
- Step 6. Now enter and re-enter your new password and click «Next».
Your password has been successfully changed you can now reboot your system and login with new password.
Solution 3. Bypass Administrator Password Windows 7 via System Repair Disc
This solution will be needing any media (USB, CD, DVD) booted with Windows 7. Only then this procedure is possible. Now if you got one lets proceed further. Go step by step.
- Step 1. Boot your system from CD/DVD/USB.
- Step 2. As Windows Installer Screen appears select the require information and press «Next».
- Step 3. On left bottom corner you will see «Repair Your Computer». Select that option.
- Step 4. Wait for a while until it finds your installed windw.
- Step 5. Select and note your Window’s drive (For multiple Windows) and click «Next».
- Step 6. Now from the System Recovery Options select «Command Prompt».
-
Step 7. Once CMD opens Execute Both of the command mentioned below one after other.
- Step 8. Type «Yes» and Press Enter.
- Step 9. Remove the media and restart your system.
- Step 10. On logon screen on bottom left corner select click «Ease Access» which will open CMD.
- Step 11. Now type following command and press Enter: «net user».
- Step 12. Your account name will appear with other information as well. Now type following command and press enter: «net user account_name» (account_name the name appears on screen, in my case its admin) and press enter.
- Step 13. You will be asked to type and retype your new password. Type password and close CMD.
Now you can login with your new password.
Solution 4. Bypass Win 7 Admin Password with Command Prompt
Windows 7 has this feature to reset password using command prompt in safe mode and it has built-in Administrator Account which has no password .You just need to access that. Don’t worry if you don’t know the procedure, we will guide you.
- Step 1. Boot your system and Press «F8» on boot. This will open Advance Boot Options.
- Step 2. Look for «Safe Mode with Command Prompt» and select that option.
- Step 3. As your system starts in safe mode, it will pop-up Command Prompt with admin rights.
-
Step 4. Now type the command below and press enter:
- Step 5. Use your account’s username in place of user name and new password in place of new_password.
This will change your Local account password and now you can login with new password.
Утилита LAPS — Local Administrator Password Solution
Важно. Ранее утилита LAPS называлась AdmPwd, но в 2015 года Microsoft анонсировала LAPS, переведя ее из раздела сторонних скриптов в официально поддерживаемое решение
Утилита LAPS (Local Administrator Password Solution) позволяет централизованной управлять паролями администраторов на всех компьютерах домена и хранить информацию о пароле и дате его смены непосредственно в объектах типа Computer в Active Directory.
Функционал LAPS основан на использовании специального функционала GPO, который основан на Group Policy Client Side Extension (CSE) и представлеяет собой небольшой модуль, который устанавливается на рабочие станции. Данное расширение GPO используется для генерации уникального пароля локального администратора (SID — 500) на каждом компьютере домена. Пароль администратора автоматически меняется с указанной периодичностью (по-умолчанию, каждые 30 дней). Значение текущего пароля хранится в конфиденциальном атрибуте учетной записи компьютера в Active Directory, доступ на просмотр содержимого атрибута регулируется группами безопасности AD.
Скачать LAPS и документацию к ней можно с этой страницы: https://www.microsoft.com/en-us/download/details.aspx?id=46899
Дистрибутив LAPS доступен в виде двух версий установочных msi файлов: для 32 (LAPS.x86.msi) и 64 (LAPS.x64.msi) битных систем.
Архитектура LAPS состоит из 2 частей. Модуль управления устанавливается на машине администратора, а клиентская часть устанавливается на серверах и ПК, на которых нужно регулярно менять пароль локального администратора.Совет. Перед развертыванием LAPS в продуктивном домене рекомендуем попробовать его в тестовой среде, т.к. как минимум потребуется расширение схемы AD (необратимое).
Запустите MSI файл утилиты на компьютере администратора, выберите все компоненты для установки (требуется наличие как минимум .Net Framework 4.0 – Как узнать какие версии .Net установлены). Пакет состоит из двух частей:
- AdmPwd GPO Extension –исполняемая часть LAPS, которая устанавливается на компьютеры клиентов и осуществляет генерацию, сохранение пароля в домене согласно настроенной политики;
- И компоненты управления LAPS (Management Tools):
- Fat client UI – утилита для просмотра пароля администратора;
- PowerShell module – модуль PowerShell для управления LAPS;
- GPO Editor templates – административные шаблоны для редактора групповой политики.
Установка LAPS максимально простая и не должна вызывать каких-либо проблем.
PLDT Default password
So, let’s start with this oldest default password and username that’s still in use today. This PLDT primary admin password will help you access the necessary settings of your modem/router. However, not all features are present in basic admin, like port forwarding and other advance features. Nonetheless, this admin username & password will work on all PLDT DSL, VDSL and PLDT Fibr routers. It’s a good consolation, at least.
PLDT IP Address: 192.168.1.1Admin PLDT Username: adminPLDT Admin Password: 1234 or admin
Advertisements
For other PLDT products such as; Ultera and Smartbro, each has its unique admin usernames and passwords.
Tips:The Ultera WiFi modem/router has unique IP addresses out of all PLDT products. These are 192.168.15.1 and 192.168.22.1.
PLDT Ultera White 4G LTE Gateway (Greenpacket OT-350)Ultera IP Address (router settings): 192.168.1.15Username: homeulteraPassword: homeultera Ultera IP Address (WiFi settings): 192.168.22.1Username: homebroPassword: homebro
PLDT Ultera Black Modem/RouterIP Address: 192.168.22.1Username: voipPassword: 1234
Weitere Links
- Technet: Local Administrator Password Solution
https://technet.microsoft.com/en-us/mt227395.aspx - MS14-025 — Das Ende der gespeicherten Passwörter
http://matthiaswolf.blogspot.de/2014/05/ms14-025-das-ende-der-gespeicherten.html - Microsoft-Sicherheitsempfehlung: ocal Administrator
Password Solution (LAPS) ist jetzt verfügbar: 1. Mai 2015
https://support.microsoft.com/de-de/help/3062591/microsoft-security-advisory-local-administrator-password-solution-laps - Local Administrator Password Solution
https://technet.microsoft.com/en-us/mt227395.aspx - IT-Pirate:Microsoft Local Administrator Password Solution
(LAPS)
https://de.it-pirate.eu/microsoft-local-administrator-password-solution-laps/ - LAPS – lokales Admin-Passwort endlich sicher
https://www.faq-o-matic.net/2015/07/01/laps-lokales-admin-passwort-endlich-sicher/ - MS14-025 — Das Ende der gespeicherten Passwörter
http://matthiaswolf.blogspot.de/2014/05/ms14-025-das-ende-der-gespeicherten.html - Microsoft Security Bulletin MS14-025 — Important
Vulnerability in Group Policy Preferences Could Allow Elevation
of Privilege (2962486)
https://technet.microsoft.com/en-us/library/security/ms14-025.aspx - Local Administrator Password Solution (LAPS)
https://www.infrastrukturhelden.de/microsoft-infrastruktur/microsoft-windows/server/local-administrator-password-solution-laps.html
LAPS DLL
Now that the OU and permissions have been set up, the admpwd.dll file needs to be installed onto all the machines in the OU that have the LAPS GPO assigned to it. There are two ways of doing this. First, you can simply select the admpwd dll extension from the LAPS MSI file.
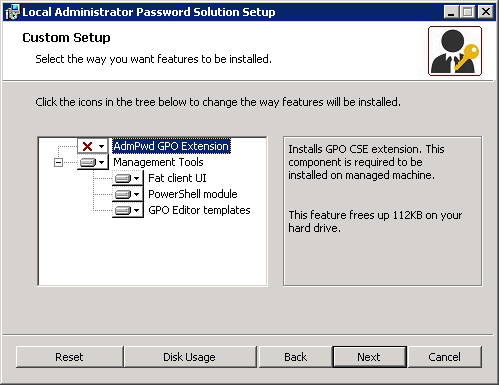
Or, you can copy the DLL (admpwd.dll) to a location on the path, such as «%windir%\system32», and then issue a command. This process can also be included into a GPO start-up script or a golden image for future deployments.
Now that the DLL has been installed on the client, a should allow the locally installed DLL to do its job and push the password into AD for future retrieval.
Retrieving passwords is straight forward. If the user in question has at least the LAPS read permission, they can use the LAPS GUI to retrieve the password.
The LAPS GUI can be installed by running the setup process and ensuring that “Fat Client UI” is selected. Once installed, it can be run just by launching the “LAPS UI.” Once launched, just enter the name of the computer you want the local admin password for and, if the permissions are set up correctly, you will see the password displayed.
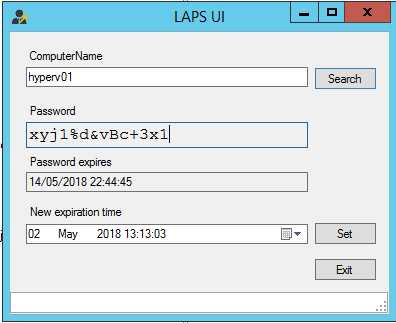
If you do not, check that that the GPO is being applied and that the permissions are set for the OU where the user account is configured.
Other Methods to Reset Windows Passwords
We’ve looked at the best solutions to reset a forgotten admin password in each current version of Windows. However, there are some other methods you should know about.
Use a Password Reset Disk
Every Windows version supports the creation of password reset disks. These allow you to set up a flash drive to act as a backup key to unlock your account. Because you need to set them up before you get locked out, we didn’t mention them above.
However, once you’ve recovered your account, it’s a good idea to make a password reset disk so you don’t have to jump through hoops in the future. To do this, first connect a removable device to your PC, like a USB flash drive. Then search for password reset in the Start Menu and you should see a Create a password reset disk entry.
Select this, then walk through the steps to create the drive. You’ll need your current account password to complete this.
Once you have this, you should keep it safe. Anyone with access to the reset disk could use it to get into your account, so make sure you don’t let it fall into the wrong hands.
Try Password Cracking Software
Image Credit: Wikimedia Commons
As a last resort, you can try using a tool designed to crack passwords. Ophcrack is one well-known utility.
However, there’s no guarantee that this will work. The software is much more efficient at cracking Windows XP passwords. Its Live CD version is designed for Windows Vista and 7; it doesn’t mention Windows 10, so support may be unofficial.
Additionally, the rainbow tables used to crack passwords in this way are better for breaking short, weak passwords. If your admin password is long and complex, it could take ages to recover with this method.
If you can’t crack your password, the next best solution is removing it altogether. Unfortunately, most tools for this are outdated and don’t support Windows 10, or cost money.
That being said, if you’re on Windows 8.1 or earlier, Offline NT Password And Registry Editor is worth a try. It will remove an account password for you, so you can set a new one. Just note that doing this will result in you losing access to any files you encrypted using Windows.
You’ll find a lot of software advertising the ability to crack your password or remove it for a fee. If the free tools and methods fail, it’s up to you whether you think these are worth it.
Option 1: Windows 7 Password Reset in Safe Mode via Administrator
When Windows 7 was installed completely, a built-in administrator was created at the same time. The Administrator account has no password unless you create one for it. So it is possible to reset Windows 7 forgotten admin password if you can access Windows 7 computer with built-in administrator in Safe Mode. Now we will try to login Windows 7 with the built-in administrator and reset forgotten administrator password.
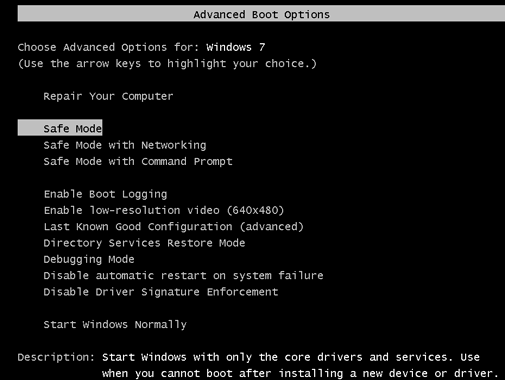
- 1. Boot or reboot your Windows 7 PC or laptop.
- 2. Press F8 repeatedly until the Windows Advanced Options Menu screen appears.
- 3. Select Safe Mode in the coming screen, and then Press Enter.
- 4. Log in Windows 7 with Administrator account when you see login screen.
- 5. Click Start open the control panel users accounts, and select locked administrator to reset its password. Or run command prompt as administrator to reset Windows 7 password with net user command.
Как разблокировать компьютер и восстановить пароль Windows 7 или 10 с установочного диска?
Теперь рассмотрим более сложные способы, для которых нам потребуется установочная флешка или диск. Они работают одинаково хорошо как на Windows 7, так и 10 или 8. И хоть эти операционные системы и отличаются друг от друга, но методы сброса пароля подходят одни и те же.
Итак, нам понадобится установочный CD с системой. Откуда его взять?
- Во-первых, если вы покупали Windows отдельно и потом ставили на свой «голый» компьютер, то у вас он должен где-то быть — поищите на полках и в ящиках.
- Во-вторых, в случае, если на ноутбуке уже был установлен Виндоус, то к нему тоже должен был прилагаться восстановительный диск с драйверами и системой.
- Наконец, если оригинального никакого нет, то подойдет цифровой дистрибутив вашей версии операционной системы, который легко можно найти в интернете и записать на болванку.
Итак, перезагружаем компьютер и когда появятся первые надписи на черном экране заходим в BIOS. На разных моделях компьютеров и ноутбуков он вызывается различными клавишами — могут быть F2, F10, Del. Она указана в строке «Press … To Run Setup»
В меню «Boot», задаем приоритет загрузки с DVD или с USB-HDD, в зависимости от того, на какой носитель вы записали установочные файлы системы.
Перезагружаемся и ждем, пока программа соберет сведения о всех устройствах и выдаст меню выбора режима установки, из которого нам нужно будет выбрать «Командную строку».
Набираем здесь команду «REGEDIT» и попадаем в редактор реестра Windows. Щелчком левой кнопки мыши выделяем строку «HKEY_LOCAL_MACHINE», открываем в меню пункт «Файл» и выбираем «Загрузить куст…»
Откроется проводник, в котором надо найти на диске с установленной ОС Windows следующую папку:
и в ней найти файл «SYSTEM».
Открываем его и в появившемся окне со строкой вводим произвольное значение, например «888». Далее находим раздел «Setup», кликаем по нему и находим два значения:
- В «CmdLine» вводим cmd.exe и жмем ОК.
- В «SetupType» заменяем 0 на 2 и также подтверждаем «ОК».
После этого опять «Выгружаем куст» и перезапускаем компьютер из командной строки.
Далее загружаем как обычно, но перед самим логином появится снова командная строка, в которой вводим команду на создание нового пароля пользователя:
Новый пароль для компьютера должен состоять из цифр и букв без пробелов. В случае отсутствия администраторской учетной записи, ее здесь же можно создать. Для этого для русифицированной версии Windows даем следующие команды.
Создаем нового пользователя:
Добавляем его в администраторы:
И удаляем его же из группы простых пользователей:
После чего закрываем командную строку, попадаем на экран авторизации и вводим новый пароль.
Для большей наглядности привожу в помощь видео ролик:
History of the Windows Administrator Account
Your first instinct when you forget your own account password might be to look for the default Windows admin password. However, in Windows Vista and later, there actually is no accessible system-wide Administrator account by default. This is a security measure to protect your computer.
Windows XP had an additional Administrator account that sat alongside your usual accounts. The problem was that most people left the password for this account blank, meaning that anyone with access to a computer and a little know-how could log into a machine with full administrator permissions.
This was even more of an issue if you used the Administrator account all the time, as any malware had free reign to do whatever it wanted.
Modern-Day Admin Accounts
Starting in Windows Vista, Microsoft disabled the built-in Admin account by default. Instead, it featured User Account Control, a feature still around in Windows 10 today. This allows you to temporarily grant admin permissions while using any account, as long as you have an admin’s password.
Thus, there’s no Windows default administrator password you can dig up for any modern versions of Windows. While you can enable the built-in Administrator account again, we recommend that you avoid doing so. That account runs with admin permissions all the time, and never asks for confirmation for sensitive actions. This makes it a bigger security risk, where malware can more easily execute.
Windows Administrator Account: Everything You Need to Know
Starting with Windows Vista, the built-in Windows Administrator account is disabled by default. You can enable it, but do so at your own risk! We show you how.
Besides, you need admin permissions to enable the default Administrator account, meaning that it’s not a solution if you forgot your own admin password. Instead, let’s look at how to reset an admin password in Windows 10, 8, and 7.
PLDT Superadmin Username and password
Superadmin is a Device Management account that has only 4 features (restore all, enable/disable of TelNet switch, web admin switch and Omci Debug switch) but crucial.
Important! To all PLDT ONU modem/router users, You will never be able to access adminpldt if the web admin switch in the Debug switch is not enabled. It will return an “admin unavailable error”.
Advertisements
ONU PLDT Fibr AN5506-04-FAT, AN5506-04-FA (RP2627), AN5506-04-F (RP2658)software version.IP Address: https://192.168.1.1/fhUsername: fiberhomesuperadmin(nPassword: sfuhgu
ONU Black Fiberhome AN5506-04-F (RP2613) firmware.IP Address: https://192.168.1.1/fhUsername: admin1234(nPassword: admin1234
Beyond the Default Administrator Password in Windows
We’ve taken a look at the default Windows admin password across versions, along with how to recover your password on Windows 10, Windows 8, and Windows 7. Chances are that one of the above methods will work for you, and you’ll be able to regain admin privileges on your own PC.
For more on Windows account security, see our breakdown of User Account Control and admin rights on Windows 10.
The 100 Most Popular Emojis Explained
There are so many emojis, it can be difficult to know what they all mean. Here are the most popular emojis explained.
About The Author
Ben is a Deputy Editor and the Onboarding Manager at MakeUseOf. He left his IT job to write full-time in 2016 and has never looked back. He’s been covering tech tutorials, video game recommendations, and more as a professional writer for over six years.
More About Ben Stegner
Утилита
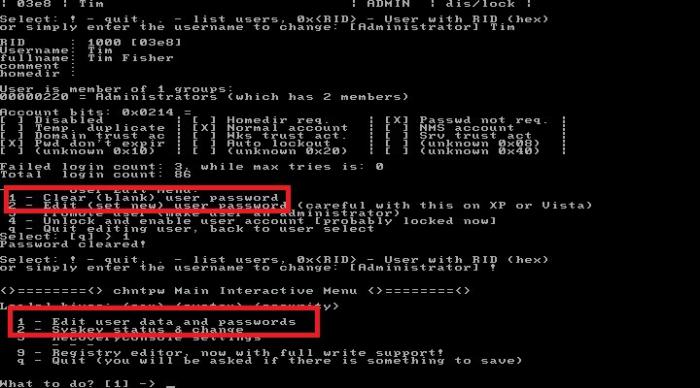
В случае, когда дистрибутив операционной системы отсутствует, всегда есть возможность сбросить пароль специальной утилитой. Вам понадобится программа для сброса пароля администратора Windows 7. Например, Offline NT Password and Registry Editor. Записываем её на диск или флешку и перезагружаем компьютер, выбрав при этом загрузку с внешнего носителя. Сброс пароля администратора Windows 7 с флешки достаточно прост в освоении, если вы умеете читать и знаете английский. Итак, начинаем.
- После запуска перед вами появится таблица с жеткими дисками. Вводим номер того, на котором установлена ОС.
- Определяем путь до файла учетных записей SAM. «С:/Windows/System32/config».
- Вводим два раза подряд «1».
- Выбираем в таблице нужного нам пользователя. Программа для сброса пароля администратора работает только с латынью, поэтому, если имя отображается некорректно, можете ввести его RID идентификатор в формате 0xRID.
- В очередной раз вводим «1».
- Далее последовательность команд: выход, сохранить изменения, не продолжать работу.
- Перезагружаем компьютер нажатием «контрл-альт-делит».
Программа для сброса пароля администратора Windows 7 сделала своё дело. Вы можете входить в свои «владения» на компьютере.
Если нет доступа к системе
Второй вариант более печальный: пользователь не может убрать пароль, потому что он его и не помнит. В результате войти в «Семерку» невозможно, что сразу ограничивает наши возможности.
Загрузочный диск
Попробуем снять защиту через флешку или установочный диск с операционной системой. Вместе с инсталлятором в образе Windows имеется специальная утилита для восстановления. В нее входят командная строка, возврат к контрольной точке и многое другое. Вместо установщика можно использовать флешку или диск с утилитой LiveCD.
Сначала вам нужно подключить устройств в USB-порт и перезагрузить компьютер. На первом экране при включении нужно нажать на клавишу F2 или ту, которая предназначена для вашей материнской платы. После этого появится меню BIOS. Внешний вид «БИОСа» может несколько отличаться от представленного на скриншотах. Однако меню «Boot» есть везде.
С помощью стрелок на клавиатуре перемещаемся во вкладку «Boot»:
Здесь заходим в раздел «Hard Drive» и с помощью клавиши — выставляем порт с подключенной флешкой на первое место. Для сохранения изменений и выхода нужно нажать на F10.
В результате после загрузки появится меню LiveCD или установочного диска. В случае со вторым нужно нажать на «Восстановление системы». В следующем меню находятся средства для восстановления доступа к ОС и работоспособности ПК в целом. Нас интересует последний пункт – это «Командная строка».
Далее, необходимо выполнить следующие действия:
- Ввести команду regedit, чтобы запустить реестр.
- Теперь нужно выбрать ветку «HKEY_LOCAL_MACHINE» и в меню «Файл» выбрать пункт «Загрузить куст».
- Появится диспетчер папок, в котором нужно перейти к файлу «SYSTEM». Он располагается на системном разделе локального диска в Windows/system32/config. Если выбрать неверное расположение, то ничего не получится.
- Теперь нужно ввести произвольное имя нового раздела. Например, «111».
- Теперь заходим в ветку «Setup» и в правой части открываем параметр «CmdLine». В нем нужно поставить значение «exe».
- В параметре «SetupType» необходимо задать установку «2».
- Все изменения реестр запоминает и сохраняет автоматически. Теперь осталось выделить созданный нами раздел «111» и в меню «Файл» нажать на «Выгрузить куст».
- Затем нужно разрешить выгрузку кнопкой «Да».
- Теперь нужно закрыть редактор реестра, выполнить отключение загрузочного диска, а в меню восстановления нажать на «Перезагрузка».
- После загрузки начальный экран показывает окно командной строки. Вы уже знаете, как ею пользоваться по первой инструкции в начале статьи. Введите команду для сброса пароля и нажмите Enter. Также через это окно доступно создание новой защитной комбинации.
- Готово! Обход защиты успешно выполнен, пароль удален, а вы можете продолжить работу с компьютером!
Сторонний софт
Что делать, если не удалось сбить защиту предыдущими методами, а зайти в «Винду» все же нужно? Тогда попробуйте скинуть сохраненные параметры через специальную программу. Она позволить вернуть полный доступ к ОС. Например, загрузочный диск с утилитой Ophcrack. Выше мы рассказывали об использовании ее из-под Windows.
Однако программу также можно загружать из «БИОС». Для этого скачайте LiveCD версию с официального сайта и запишите на флешку. Также можно воспользоваться аналогичным приложением Offline NT Password and Registry editor. Данный способ не поможет только в том случае, если у вас слетел драйвер для работы с жестким диском. В этом случае ПК может заблокировать утилиту.
Troubleshooting
Like anything, LAPS can cause a few quirks. The two most common quirks I see include when staff with permissions cannot view passwords and client machines do not update the password as required.
The first thing to check is that the admpwd.dll file is installed and registered. Then, check that the GPO is applying to the server that you’re trying to change the local admin password on with the command . I always like to give applications like LAPS their own GPO to make this sort of troubleshooting much easier.
Next, check that the GPO is actually turned on. One of the oddities of LAPS is that it is perfectly possible to set everything in the GPO and assign the GPO to an OU, but it will not do anything unless the “Enable Local password management” option is enabled.
If there are still problems, double check that the permissions that have been assigned. LAPS won’t error out, but the LAPS GUI will just show a blank for the password, which could mean that either the password has not been set or that the permissions have not been set correctly.
You can double check permissions using the extended attribute section of windows permissions. You can access this by launching Active Directory users and computers -> Browse to the computer object -> Properties -> Security -> Advanced
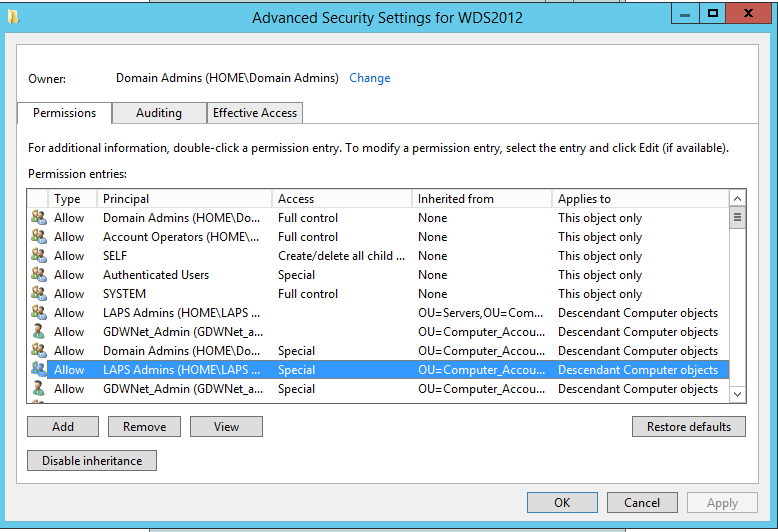
Double click on the security principal:

Scroll down and check that both Read ms-Mcs-AdmPwd and Write ms-Mcs-admpwd are ticked.
In summary, LAPS works very well and it is a great tool for deployment to servers, especially laptops and the like. It can be a little tricky to get working, but it is certainly worth the time investment.
See more
- Learn the basics of AD with our Active Directory 101 webinar
- Learn to manage AD through PowerShell and UI with our Active Directory and virtualization webinar
- Learn to backup, restore and automatically deploy AD with our Active Directory & Backup webinar
GD Star Rating
Microsoft LAPS deployment and configuration guide, 4.0 out of 5 based on 15 ratings
