Контроллер домена на ubuntu 18.04
Содержание:
- 1.7. What is the difference between LDAPv2 and LDAPv3?
- 6.1. Configuration File Format
- Secure Apache
- Step 3 — Logging into the phpLDAPadmin Web Interface
- 1.6. What about X.500?
- SSSD and KDC spoofing
- 6.1. Формат конфигурационного файла
- Шаг 2. Установка smbldap-tools
- If you use Nginx
- 1.1. What is a directory service?
- 2.-Basic configuration of the service
- 1: Установка и настройка сервера LDAP
- Шаг 5. Запуск Samba-сервера
- 1.2. What is LDAP?
- Step 1 — Installing and Configuring the LDAP Server
- Add Organizational Units, Groups, and Users
1.7. What is the difference between LDAPv2 and LDAPv3?
LDAPv3 was developed in the late 1990’s to replace LDAPv2. LDAPv3 adds the following features to LDAP:
- Strong authentication and data security services via SASL
- Certificate authentication and data security services via TLS (SSL)
- Internationalization through the use of Unicode
- Referrals and Continuations
- Schema Discovery
- Extensibility (controls, extended operations, and more)
LDAPv2 is historic (RFC3494). As most so-called LDAPv2 implementations (including slapd(8)) do not conform to the LDAPv2 technical specification, interoperability amongst implementations claiming LDAPv2 support is limited. As LDAPv2 differs significantly from LDAPv3, deploying both LDAPv2 and LDAPv3 simultaneously is quite problematic. LDAPv2 should be avoided. LDAPv2 is disabled by default.
6.1. Configuration File Format
The slapd.conf(5) file consists of three types of configuration information: global, backend specific, and database specific. Global information is specified first, followed by information associated with a particular backend type, which is then followed by information associated with a particular database instance. Global directives can be overridden in backend and/or database directives, and backend directives can be overridden by database directives.
Blank lines and comment lines beginning with a ‘#‘ character are ignored. If a line begins with whitespace, it is considered a continuation of the previous line (even if the previous line is a comment).
The general format of slapd.conf is as follows:
        # global configuration directives
        <global config directives>

        # backend definition
        backend <typeA>
        <backend-specific directives>

        # first database definition & config directives
        database <typeA>
        <database-specific directives>

        # second database definition & config directives
        database <typeB>
        <database-specific directives>

        # second database definition & config directives
        database <typeA>
        <database-specific directives>

        # subsequent backend & database definitions & config directives
        ...
A configuration directive may take arguments. If so, they are separated by whitespace. If an argument contains whitespace, the argument should be enclosed in double quotes "like this". If an argument contains a double quote or a backslash character `\‘, the character should be preceded by a backslash character `\‘.
The distribution contains an example configuration file that will be installed in the /usr/local/etc/openldap directory. A number of files containing schema definitions (attribute types and object classes) are also provided in the /usr/local/etc/openldap/schema directory.
Secure Apache
The first thing we should do is enable the SSL module in Apache. We can do this by typing:
This will enable the module, allowing us to use it. We still need to configure Apache to take advantage of this though.
Currently, Apache is reading a file called for regular, unencrypted HTTP connections. We need to tell it to redirect requests for our phpLDAPadmin interface to our HTTPS interface so that the connection is encrypted.
When we redirect traffic to use our SSL certificates, we’ll also implement the password file to authenticate users. While we’re modifying things, we’ll also change the location of the phpLDAPadmin interface itself to minimize targeted attacks.
Modify the phpLDAPadmin Apache Configuration
The first thing we will do is modify the alias that is set up to serve our phpLDAPadmin files.
Open the file with root privileges in your text editor:
This is the place where we need to decide on the URL location where we want to access our interface. The default is , but we want to change this to cut down on random login attempts by bots and malicious parties.
For this guide, we’re going to use the location , but you should choose your own value.
We need to modify the line that specifies the . This should be in an block. When you are finished, it should look like this:
<pre>
<IfModule mod_alias.c>
Alias <span class=“highlight”>/superldap</span> /usr/share/phpldapadmin/htdocs
</IfModule>
</pre>
When you are finished, safe and close the file.
Configure the HTTP Virtual Host
Next, we need to modify our current Virtual Hosts file. Open it with root privileges in your editor:
Inside, you’ll see a rather bare configuration file that looks like this:
<pre>
<VirtualHost *:80>
ServerAdmin webmaster@localhost
DocumentRoot /var/www/html
ErrorLog ${APACHELOGDIR}/error.log
CustomLog ${APACHELOGDIR}/access.log combined
</VirtualHost>
</pre>
We want to add information about our domain name or IP address to define our server name and we want to set up our redirect to point all HTTP requests to the HTTPS interface. This will match the alias we configured in the last section.
The changes we discussed will end up looking like this. Modify the items in red with your own values:
<pre>
<VirtualHost *:80>
ServerAdmin webmaster@<span class=“highlight”>serverdomainorIP</span>
DocumentRoot /var/www/html
<span class=“highlight”>ServerName serverdomainorIP</span>
<span class=“highlight”>Redirect permanent /superldap https://server_domain_or_IP/superldap</span>
ErrorLog ${APACHELOGDIR}/error.log
CustomLog ${APACHELOGDIR}/access.log combined
</VirtualHost>
</pre>
Save and close the file when you are finished.
Configure the HTTPS Virtual Host File
Apache includes a default SSL Virtual Host file. However, it is not enabled by default.
We can enable it by typing:
This will link the file from the directory into the directory. We can edit this file now by typing:
This file is a bit more involved than the last one, so we will only discuss the changes that we have to make. All of the changes below should go within the Virtual Host block in the file.
First of all, set the value to your server’s domain name or IP address again and change the directive as well:
<pre>
ServerAdmin webmaster@<span class=“highlight”>serverdomainorIP</span>
<span class=“highlight”>ServerName serverdomainorIP</span>
</pre>
Next, we need to set the SSL certificate directives to point to the key and certificate that we created. The directives should already exist in your file, so just modify the files they point to:
<pre>
SSLCertificateFile <span class=“highlight”>/etc/apache2/ssl/apache.crt</span>
SSLCertificateKeyFile <span class=“highlight”>/etc/apache2/ssl/apache.key</span>
</pre>
The last thing we need to do is set up the location block that will implement our password protection for the entire phpLDAPadmin installation.
We do this by referencing the location where we are serving the phpLDAPadmin and setting up authentication using the file we generated. We will require anyone attempting to access this content to authenticate as a valid user:
<pre>
<span class=“highlight”><Location /superldap></span>
<span class=“highlight”>AuthType Basic</span>
<span class=“highlight”>AuthName “Restricted Files”</span>
<span class=“highlight”>AuthUserFile /etc/apache2/htpasswd</span>
<span class=“highlight”>Require valid-user</span>
<span class=“highlight”></Location>
</pre>
Save and close the file when you are finished.
Restart Apache to implement all of the changes that we have made:
We can now move on to the actual interface.
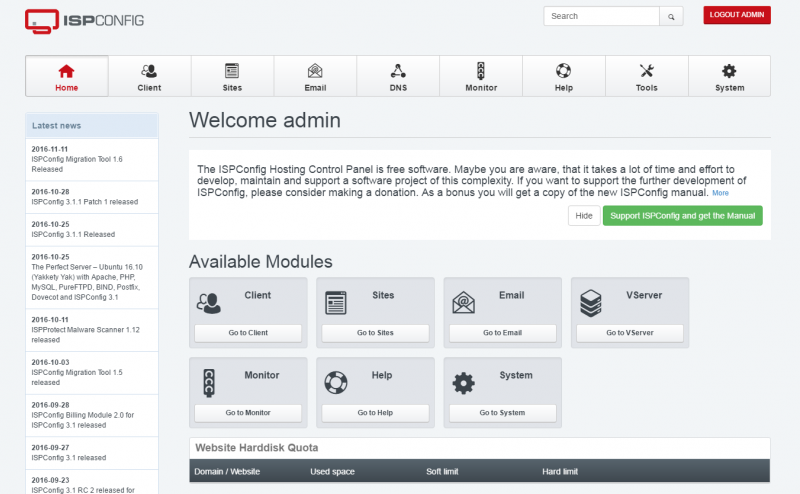
Step 3 — Logging into the phpLDAPadmin Web Interface
Having made the necessary configuration changes to phpLDAPadmin, we can now begin to use it. Navigate to the application in your web browser. Be sure to substitute your domain for the highlighted area below:
The phpLDAPadmin landing page will load. Click on the login link in the left-hand menu on the page. A login form will be presented:

The Login DN is the username that you will be using. It contains the account name as a section, and the domain name you selected for the server broken into sections as described in previous steps. The default admin account that we set up during install is called admin, so for our example we would type in the following:
After entering the appropriate string for your domain, type in the admin password you created during configuration, then click the Authenticate button.
You will be taken to the main interface:

At this point, you are logged into the phpLDAPadmin interface. You have the ability to add users, organizational units, groups, and relationships.
LDAP is flexible in how you can structure your data and directory hierarchies. You can create whatever kind of structure you’d like and also create rules for how they interact.
Since this process is the same on Ubuntu 16.04 as it was on previous versions, you can follow the steps laid out in the Add Organizational Units, Groups, and Users section of the .
Those steps will work well on this installation of phpLDAPadmin, so follow along to get some practice working with the interface and learning how to structure your data.
Now that we’ve logged in and familiarized ourselves with the web interface, let’s take a moment to provide more security to our LDAP server.
1.6. What about X.500?
Technically, LDAP is a directory access protocol to an X.500 directory service, the OSI directory service. Initially, LDAP clients accessed gateways to the X.500 directory service. This gateway ran LDAP between the client and gateway and X.500’s Directory Access Protocol (DAP) between the gateway and the X.500 server. DAP is a heavyweight protocol that operates over a full OSI protocol stack and requires a significant amount of computing resources. LDAP is designed to operate over TCP/IP and provides most of the functionality of DAP at a much lower cost.
While LDAP is still used to access X.500 directory service via gateways, LDAP is now more commonly directly implemented in X.500 servers.
The Standalone LDAP Daemon, or slapd(8), can be viewed as a lightweight X.500 directory server. That is, it does not implement the X.500’s DAP nor does it support the complete X.500 models.
If you are already running a X.500 DAP service and you want to continue to do so, you can probably stop reading this guide. This guide is all about running LDAP via slapd(8), without running X.500 DAP. If you are not running X.500 DAP, want to stop running X.500 DAP, or have no immediate plans to run X.500 DAP, read on.
It is possible to replicate data from an LDAP directory server to a X.500 DAP DSA. This requires an LDAP/DAP gateway. OpenLDAP Software does not include such a gateway.
SSSD and KDC spoofing
When using SSSD to manage kerberos logins on a Linux host, there is an attack scenario you should be aware of: KDC spoofing.
The objective of the attacker is to login on a workstation that is using Kerberos authentication. Let’s say he knows is a valid user on that machine.
The attacker first deploys a rogue KDC server in the network, and creates the principal there with a password of his choosing. What he has to do now is to have his rogue KDC respond to the login request from the workstation, before (or instead of) the real KDC. If the workstation isn’t authenticating the KDC, it will accept the reply from the rogue server and let in.
There is a configuration parameter that can be set to protect the workstation from this attack. It will have SSSD authenticate the KDC, and block the login if the KDC cannot be verified. This option is called , and it’s by default.
To enable it, edit and add this line to the domain section:
The second step is to create a principal on the KDC for this workstation. This is how the KDC’s authenticity is verified. It’s like a “machine account”, with a shared secret that the attacker cannot control and replicate in his rogue KDC…The principal has the format .
After the host principal is created, its keytab needs to be stored on the workstation. This two step process can be easily done on the workstation itself via (not ) to contact the KDC remotely:
Then exit the tool and make sure the permissions on the keytab file are tight:
You can also do it on the KDC itself using , but you will have to store the keytab temporarily in another file and securely copy it over to the workstation.
Once these steps are complete, you can restart sssd on the workstation and perform the login. If the rogue KDC picks the attempt up and replies, it will fail the host verification. With debugging we can see that happening on the workstation:
And the login is denied. If the real KDC picks it up, however, the host verification succeeds:
And the login is accepted.
6.1. Формат конфигурационного файла
Файл slapd.conf(5) состоит из трёх типов настроечной информации: глобальной, специфичной для механизмов манипуляции данными и специфичной для баз данных. Глобальные настройки указываются первыми, затем следуют настройки для конкретного типа механизма манипуляции данными, за которыми, в свою очередь, следуют настройки конкретного экземпляра базы данных. Глобальные директивы могут переопределяться директивами механизма манипуляции данными и/или базы данных, а директивы механизма манипуляции данными могут переопределяться директивами базы данных.
Пустые строки и строки комментариев, начинающиеся с символа ‘#‘ игнорируются. Если строка начинается с пробельного символа, она считается продолжением предыдущей строки (даже если предыдущая строка является комментарием).
Общий формат файла slapd.conf:
        # глобальные настройки
        <глобальные директивы конфигурации>

        # определение механизма манипуляции данными
        backend <typeA>
        <директивы, специфичные для ММД>

        # определение и директивы конфигурации первой базы данных
        database <typeA>
        <директивы, специфичные для БД>

        # определение и директивы конфигурации второй базы данных
        database <typeB>
        <директивы, специфичные для БД>

        # определение и директивы конфигурации третьей базы данных
        database <typeC>
        <директивы, специфичные для БД>

        # последующие определения и директивы конфигурации механизмов манипуляции данными и баз данных
        ...
У директивы конфигурации могут быть аргументы, которые отделяются друг от друга пробельными символами. Если пробельный символ содержится внутри аргумента, аргумент заключается в двойные кавычки "вот так". Если аргумент содержит двойные кавычки или символ обратного слеша `\‘, данные символы должны экранироваться символом обратного слеша `\‘.
В дистрибутиве есть пример конфигурационного файла, устанавливаемый в директорию /usr/local/etc/openldap. Также есть несколько файлов, содержащих наборы определения схемы (типы атрибутов и объектные классы), устанавливаемых в директорию /usr/local/etc/openldap/schema.
Шаг 2. Установка smbldap-tools
Устанавливаем perl-Jcode:
Распаковываем вышеуказанные пакеты Unicode-*.tar.gz в /usr/src/packages/sources, в раздельные каталоги и далее поступаем согласно документу INSTALL, где указано, что сборка и установка заключается в последовательном выполнении четырех команд:
При установке из исходных текстов в базе RPM сведений о пакетах не будет, поэтому при
получим ответ:
Важно убедиться, что RPM не затребовал еще каких-нибудь зависимостей. Если нет, то повторяем установку с опцией —nodeps:. Чистим каталог …/sources/… по завершении установки пакетов
Чистим каталог …/sources/… по завершении установки пакетов.
If you use Nginx
Nginx users will need to manually create a server block file for phpLDAPadmin.
sudo nano /etc/nginx/conf.d/phpldapadmin.conf
Copy the following text and paste it to the file. Replace ldap.your-domain.com with your preferred domain name.
server {
        listen 80;
        server_name ldap.your-domain.com;

        root /usr/share/phpldapadmin/htdocs;
        index index.php index.html index.htm;

        error_log /var/log/nginx/phpldapadmin.error;
        access_log /var/log/nginx/phpldapadmin.access;

        location ~ \.php$ {
            fastcgi_pass unix:/run/php/php7.0-fpm.sock;
            fastcgi_index index.php;
            fastcgi_param SCRIPT_FILENAME  $document_root/$fastcgi_script_name;
            include fastcgi_params;
        }
}
Save and close the file. Then text Nginx configurations.
sudo nginx -t
If the test is successful, reload Nginx for the changes to take effect.
sudo systemctl reload nginx
Now you can access phpLDAPadmin web interface at . To enable HTTPS, you can obtain and install a free TLS certificate issued from Let’s Encrypt.
1.1. What is a directory service?
A directory is a specialized database specifically designed for searching and browsing, in additional to supporting basic lookup and update functions.
Note:
Directories tend to contain descriptive, attribute-based information and support sophisticated filtering capabilities. Directories generally do not support complicated transaction or roll-back schemes found in database management systems designed for handling high-volume complex updates. Directory updates are typically simple all-or-nothing changes, if they are allowed at all. Directories are generally tuned to give quick response to high-volume lookup or search operations. They may have the ability to replicate information widely in order to increase availability and reliability, while reducing response time. When directory information is replicated, temporary inconsistencies between the consumers may be okay, as long as inconsistencies are resolved in a timely manner.
There are many different ways to provide a directory service. Different methods allow different kinds of information to be stored in the directory, place different requirements on how that information can be referenced, queried and updated, how it is protected from unauthorized access, etc. Some directory services are local, providing service to a restricted context (e.g., the finger service on a single machine). Other services are global, providing service to a much broader context (e.g., the entire Internet). Global services are usually distributed, meaning that the data they contain is spread across many machines, all of which cooperate to provide the directory service. Typically a global service defines a uniform namespace which gives the same view of the data no matter where you are in relation to the data itself.
A web directory, such as provided by the Curlie Project <https://curlie.org>, is a good example of a directory service. These services catalog web pages and are specifically designed to support browsing and searching.
While some consider the Internet Domain Name System (DNS) is an example of a globally distributed directory service, DNS is not browseable nor searchable. It is more properly described as a globally distributed lookup service.
2.-Basic configuration of the service
When the installation of the packages is finished it does not do so with an appropriate configuration, so we must use dpkg to do it, at least in a basic way.
sudo dpkg-reconfigure slapd
 4.- Reconfiguring slapd
When you run the above command, you will be asked certain questions. The first is whether we want to skip the LDAP server configuration. We say NO.
 5.- Configuring LDAP
The next step is to enter your domain.
 6.- Entering the domain
You will then ask us for the name of our organization
 7.- Entering organization name
After that, you will be asked to set the admin password again.
 8.- admin password
The next step is to define the database backend. We will choose MDB because it is the most efficient in performance and memory consumption.
 9.- Database backend
Do you want the database to be removed when slapd is purged? We say No.
 10.- configuring ldpa
Move old database? we say Yes
 11.- move old database
We finally got out of the configuration script
 12.- ldap configured
1: Установка и настройка сервера LDAP
Сначала нужно установить сервер LDAP и дополнительные утилиты. Все необходимые пакеты можно найти в стандартном репозитории системы.
Войдите на сервер. Обновите индекс пакетов и установите необходимые пакеты.
Во время установки вам будет предложено выбрать и подтвердить пароль администратора для LDAP. Вы можете ввести любой пароль, в дальнейшем у вас будет возможность обновить его.
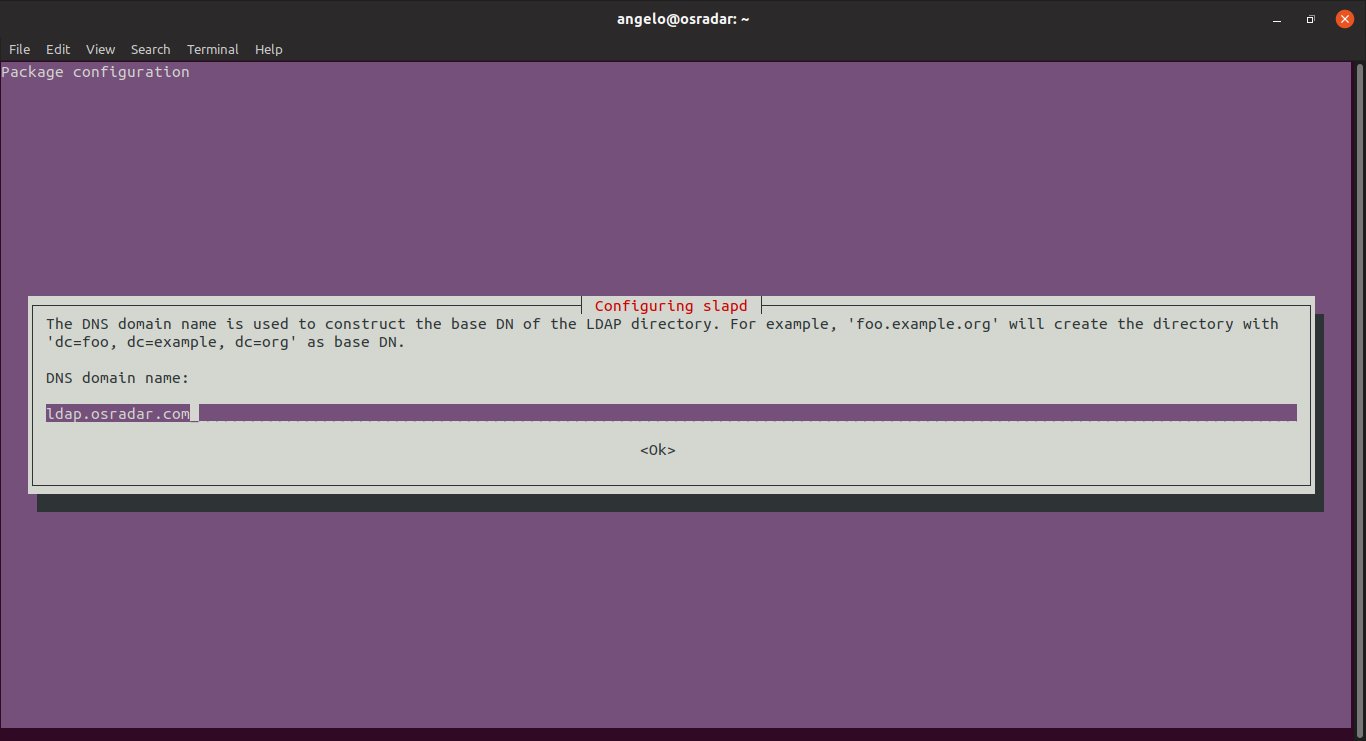
Теперь нужно настроить пакет. Пакет slapd может задавать много важных вопросов для конфигурации, но по умолчанию они пропускаются в процессе установки. Чтобы получить доступ ко всем запросам программы, запустите перенастройку пакета:
Программа выдаст все запросы информации. Большинство из них нужно оставить по умолчанию.
- Omit OpenLDAP server configuration? No
- DNS domain name? Этот параметр определяет базовую структуру пути к каталогу. Прочтите сообщение, чтобы точно понять, как это будет реализовано. Вы можете выбрать любое значение, даже если у вас нет собственного домена (однако в этом руководстве предполагается, что у вас есть домен). В руководстве используется условный домен example.com.
- Organization name? В руководстве в качестве имени организации используется example.
- Administrator password?Дважды введите надежный пароль.
- Database backend? MDB
- Remove the database when slapd is purged? No
- Move old database? Yes
- Allow LDAPv2 protocol? No
Теперь сервер LDAP запущен и настроен. Откройте порт LDAP в брандмауэре.
Протестируйте соединение LDAP с помощью ldapwhoami:
anonymous – ожидаемый результат, поскольку команда ldapwhoami была запущена без аутентификации на сервере LDAP.
Шаг 5. Запуск Samba-сервера
Открываем вкладку YaST «сетевые службы — сервер Samba», во вкладке «загрузка» установим опцию автозапуска сервера, во вкладке «общие ресурсы» проверим наличие netlogon, во вкладке «идентификация» установим имя домена и роль контроллера – PDC. Там же перейдем в «дополнительные настройки-способ идентификации пользователя» и выставим параметр LDAP и значение – ldap://127.0.0.1. Настройки сохранятся при закрытии инструмента, при этом будет предложено набрать пароль администратора samba-сервера.
После завершения работы в графической утилите используем текстовый редактор для правки секции глобальных настроек файла smb.conf:
# опции для LDAP
passdb backend = ldapsam:ldap://127.0.0.1/
ldap admin dn = cn=Administrator,dc=bgiki,dc=edu,dc=ru
#;ldap admin dn = cn=root,ou=People,dc=bgiki,dc=edu,dc=ru
ldap suffix = dc=bgiki,dc=edu,dc=ru
ldap group suffix = ou=Group
ldap idmap suffix = ou=Idmap
ldap machine suffix = ou=Computers
ldap user suffix = ou=People
ldap passwd sync = Yes
ldap ssl = Start_tls
ldap timeout = 15
ldap delete dn = No
#manage users from Win tools
add machine script = /usr/sbin/smbldap-useradd -a -w «%u»
add user script = /usr/sbin/smbldap-useradd -a -m «%u»
delete user script = /usr/sbin/smbldap-userdel «%u»
add group script = /usr/sbin/smbldap-groupadd -p «%g»
delete group script = /usr/sbin/smbldap-groupdel «%g»
add user to group script = /usr/sbin/smbldap-groupmod -m «%u» «%g»
delete user from group script = /usr/sbin/smbldap-groupmod -x «%u» «%g»
set primary group script = /usr/sbin/smbldap-usermod -g ‘%g’ ‘%u’
Добавим пароль корневой записи администратора ldap в samba:
Проверяем конфигурационный файл smb.conf с помощью команды testparm и перезапустим демон:
проверим, какие порты прослушивает smbd:
проверим доступность ресурсов samba:
вернет информацию о доступных ресурсах samba (если ошибка – ставим log level = 2 и читаем сообщения из /var/logs/).
1.2. What is LDAP?
LDAP stands for Lightweight Directory Access Protocol. As the name suggests, it is a lightweight protocol for accessing directory services, specifically X.500-based directory services. LDAP runs over TCP/IP or other connection oriented transfer services. LDAP is an IETF Standard Track protocol and is specified in «Lightweight Directory Access Protocol (LDAP) Technical Specification Road Map» RFC4510.
This section gives an overview of LDAP from a user’s perspective.
How is the information arranged? In LDAP, directory entries are arranged in a hierarchical tree-like structure. Traditionally, this structure reflected the geographic and/or organizational boundaries. Entries representing countries appear at the top of the tree. Below them are entries representing states and national organizations. Below them might be entries representing organizational units, people, printers, documents, or just about anything else you can think of. Figure 1.1 shows an example LDAP directory tree using traditional naming.
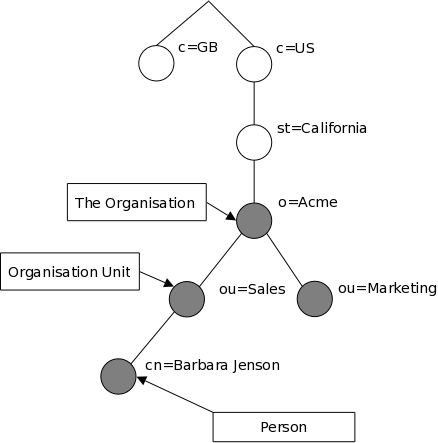
Figure 1.1: LDAP directory tree (traditional naming)
The tree may also be arranged based upon Internet domain names. This naming approach is becoming increasing popular as it allows for directory services to be located using the DNS. Figure 1.2 shows an example LDAP directory tree using domain-based naming.
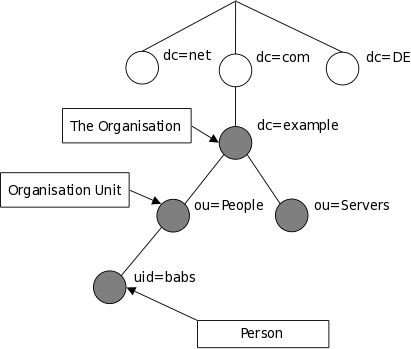
Figure 1.2: LDAP directory tree (Internet naming)
In addition, LDAP allows you to control which attributes are required and allowed in an entry through the use of a special attribute called objectClass. The values of the objectClass attribute determine the schema rules the entry must obey.
How is the information referenced? An entry is referenced by its distinguished name, which is constructed by taking the name of the entry itself (called the Relative Distinguished Name or RDN) and concatenating the names of its ancestor entries. For example, the entry for Barbara Jensen in the Internet naming example above has an RDN of uid=babs and a DN of uid=babs,ou=People,dc=example,dc=com. The full DN format is described in RFC4514, «LDAP: String Representation of Distinguished Names.»
How is the information accessed? LDAP defines operations for interrogating and updating the directory. Operations are provided for adding and deleting an entry from the directory, changing an existing entry, and changing the name of an entry. Most of the time, though, LDAP is used to search for information in the directory. The LDAP search operation allows some portion of the directory to be searched for entries that match some criteria specified by a search filter. Information can be requested from each entry that matches the criteria.
How is the information protected from unauthorized access? Some directory services provide no protection, allowing anyone to see the information. LDAP provides a mechanism for a client to authenticate, or prove its identity to a directory server, paving the way for rich access control to protect the information the server contains. LDAP also supports data security (integrity and confidentiality) services.
Step 1 — Installing and Configuring the LDAP Server
Our first step is to install the LDAP server and some associated utilities. Luckily, the packages we need are all available in Ubuntu’s default repositories.
Log into your server. Since this is our first time using in this session, we’ll refresh our local package index, then install the packages we want:
During the installation, you will be asked to select and confirm an administrator password for LDAP. You can enter anything here, because you’ll have the opportunity to update it in just a moment.
Even though we just installed the package, we’re going to go right ahead and reconfigure it. The package has the ability to ask a lot of important configuration questions, but by default they are skipped over in the installation process. We gain access to all of the prompts by telling our system to reconfigure the package:
There are quite a few new questions to answer in this process. We will be accepting most of the defaults. Let’s go through the questions:
- Omit OpenLDAP server configuration? No
-
DNS domain name?
-
Organization name?
- Administrator password? enter a secure password twice
- Database backend? MDB
- Remove the database when slapd is purged? No
- Move old database? Yes
- Allow LDAPv2 protocol? No
At this point, your LDAP server is configured and running. Open up the LDAP port on your firewall so external clients can connect:
Let’s test our LDAP connection with , which should return the username we’re connected as:
is the result we’re expecting, since we ran without logging in to the LDAP server. This means the server is running and answering queries. Next we’ll set up a web interface to manage LDAP data.
Add Organizational Units, Groups, and Users
At this point, you are logged into the phpLDAPadmin interface. You have the ability to add users, organizational units, groups, and relationships.
LDAP is flexible in how you wish to structure your data and directory hierarchies. You can basically create whatever kind of structure you’d like and create rules for how they interact.
Since this process is the same on Ubuntu 14.04 as it was on Ubuntu 12.04, you can follow the steps laid out in the “Add Organizational Units, Groups, and Users” section of the .
The steps will be entirely the same on this installation, so follow along to get some practice working with the interface and learn about how to structure your units.