Unifi — device adoption methods for remote unifi controllers
Содержание:
- How to Set Up the UniFi Network Controller as a Windows Service
- How to Enable Remote Access
- How to Enable Local Login with Ubiquiti Account
- How to Enable Remote Access to UDM and UDM-PRO
- Introduction
- Configure the UniFi Network Controller
- Introduction
- Table of Contents
- Introduction
- How to Migrate a Site
- How to Upgrade a UniFi Network Controller that is Running as a Windows Service
How to Set Up the UniFi Network Controller as a Windows Service
1. Close any instances of the UniFi software on the computer. If the UniFi Network Controller was just installed, make sure to open the controller software manually at least once, or let it run at the end of the wizard. Once you see the message UniFi Controller (a.b.c) started, the controller may be closed.
2. Launch the Command Prompt as an Administrator. On Windows 10 this would entail right-clicking and selecting «Run as administrator». Please see Windows documentation to identify the appropriate method for your specific Windows version.
3. Change directory to the location of UniFi in the computer using the following command (exactly as it is here, no need to substitute anything):
cd "%UserProfile%\Ubiquiti UniFi\"
4. Once in the root of the UniFi folder, issue the following command to install the UniFi Network Controller service:
java -jar lib\ace.jar installsvc
5. Once you’re at a new command prompt line, after it says “Complete Installation…”, issue the following:
java -jar lib\ace.jar startsvc
6. Close the command prompt window either by entering the command, or clicking the X.
7. To access the UniFi Network Controller now open a browser and go to https://localhost:8443. Alternatively, the desired interface IP, or FQDN that is mapped to that host (in place of “localhost”) may be used.
NOTE:We recommend using Oracle Java JRE 8, which can be downloaded in Oracle’s website. For the UniFi Cloud Access portal (https://network.unifi.ui.com/) to work properly, only use x64 Java.
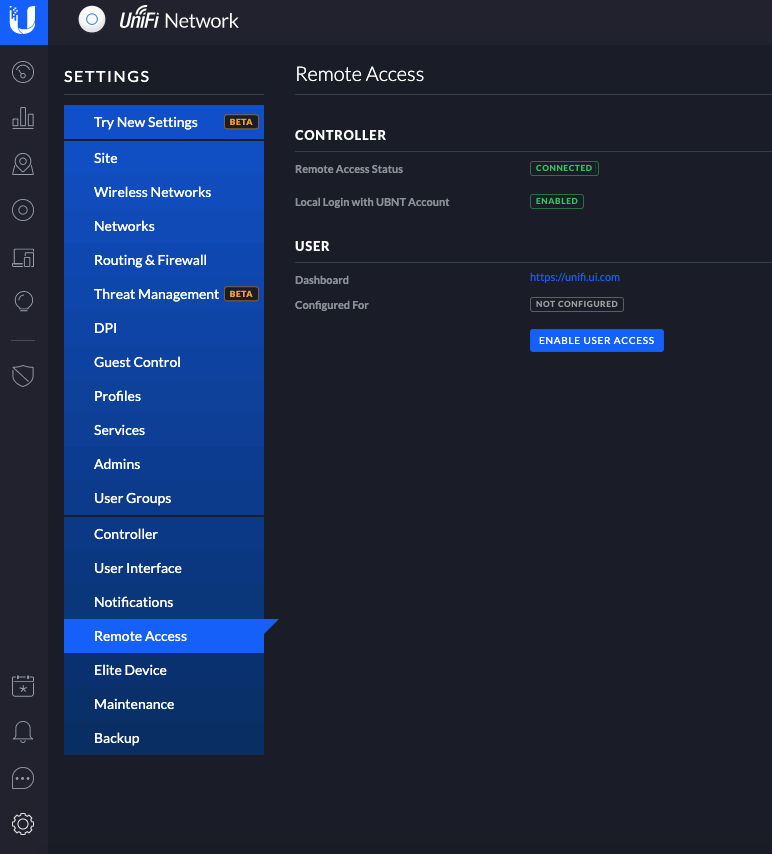
How to Enable Remote Access
1. Log into your local UniFi Network Controller as usual:
2. Navigate to Settings > Remote Access.
3. Turn the Enable Cloud Access feature ON.

4. Enter your Cloud Access Portal on login request and select Enable Remote Access.
NOTE: If you have not yet created an account please do so now. Once an account is created you may need to return to Step 1 of thisarticle.
If your UI.com account has two-factor authentication (2FA) enabled, you will have to provide the 2FA code to proceed.

5. Click on Apply Changes when you see that «Enable Remote Access» is «On», and your Cloud Access Portal credentials are displayed in the «Configured For» section of the page and the green status is «Connected»:
How to Enable Local Login with Ubiquiti Account
When the Enable Local Login with UI Account option is ON in the Settings > Cloud Access section, the credentials from your will be used for administrator accounts, so you would use your SSO credentials to log into your Controller. This option will only take effect after the «Apply Changes» button has been selected.
To revert these settings:
1. Turn the toggle of the Enable Local Login with UI Account option to the OFF position.
2. Select «Apply Changes».
3. Navigate to Settings > Admins.
4. Edit the admin account and revert the username and password.
5. The page will refresh and you can test your settings by visiting the Cloud Access Portal: https://network.unifi.ui.com.
How to Enable Remote Access to UDM and UDM-PRO
1. On the UDM the remote access is enabled by default. You can provide remote access to another user to manage the UDM in Settings > Remote Access > Enable User Access.
2. The UDM-PRO will not show this option on the Settings section because remote access is enabled by default and cannot be disabled.
NOTE:A Ubiquiti account is needed to use remote access for the UDM and UDM-PRO. Remember the UDM-Pro controller, running UniFi OS will be listed on https://unifi.ui.com, while all other controllers will be listed on https://networks.unifi.ui.com.
3. For the UDM Pro you need to log in to https://unifi.ui.com/:

4. Log in with your Ubiquiti credentials, and go to the Users button located on the bottom right of screen as shown: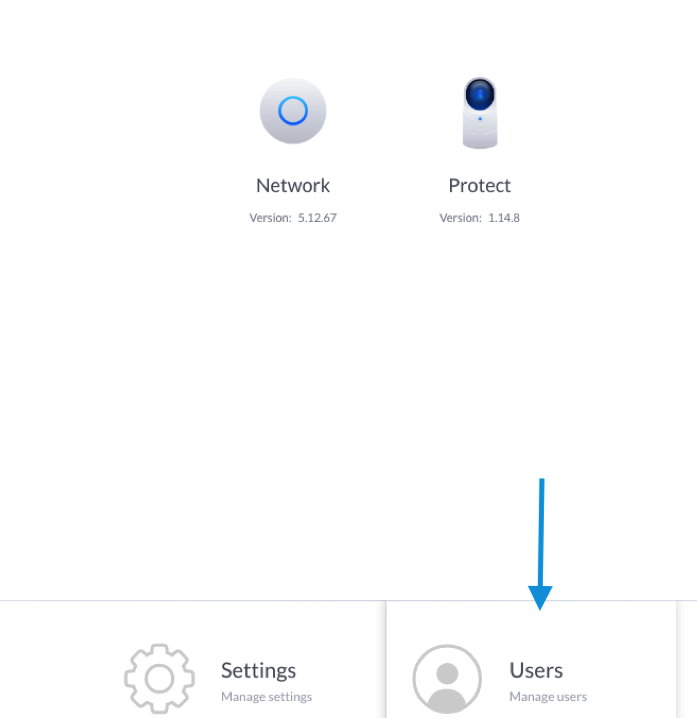
5. Use the Add User drop down in the upper, right corner:

Introduction
In order to update the UniFi Network Controller via APT, it is necessary to create source files or edit lines in an existing sources.list file with Linux text editors: vi or nano. That is the most common method for package updates and installs for these operating systems. The repo structure should be permanent, but if there are any changes they will be pointed out in the UniFi Network Controller software version release posts, found in the Community.
Follow the instructions below to stay with the current stable release, regardless of changes in versions. When there is a new stable release, there will be a post on the Community announcing it.
Configure the UniFi Network Controller
The process of configuring the controller is the same for all platforms. You can access the configuration page at any time by typing https://<IP_of_Controller_host>:8443 into the navigation bar of a browser.
If you see a «Your connection is your private» error, simply proceed to the next page via Advanced > Proceed.
Specify the name for your controller to make it easier to identify it when managing multiple networks.

2. Sign in with your Ubiquiti Account
You will need to sign in with your Ubiquiti Account you will use to manage your controller. If you don’t have an account yet, create it now.

3. Configure the basic network settings
Choose whether you want to enable automatic network optimization and auto backups (we recommend keeping both enabled).

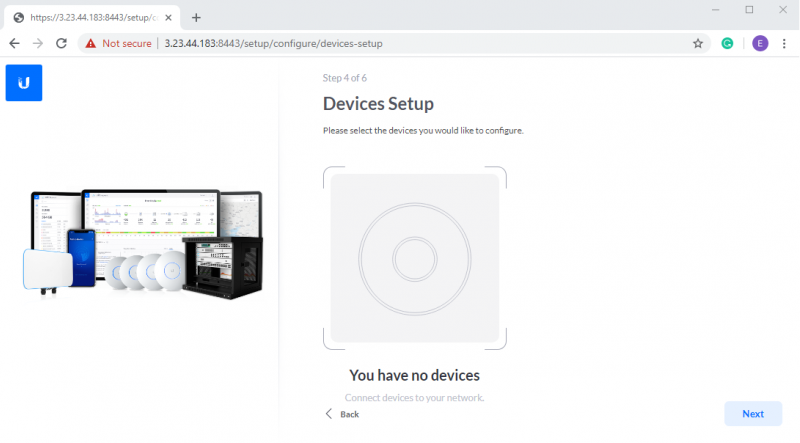
If you have unadopted UniFi devices connected to your network, you will be able to configure them during this step.

Specify a name and password for your new wireless network.

Introduction
The UniFi Network Controller allows administrators to have multiple logically separated «sites» to manage groups of devices and site configurations. For example, one site could be a building on the East coast and one on the West coast, each needing different SSIDs or security protocols, both managed from a single unified controller. Each site has its separate configurations, meaning most all changes done in the Settings section of the Controller is per site: Wireless Networks, Guest Control, Networks, to name only a few. If a site is deleted, all these configurations will be deleted as well.
Table of Contents
Introduction
The Site Export Wizard allows UniFi administrators (with Super Administrator roles only) to export sites from one UniFi Network Controller to be managed by another UniFi Network Controller. This was previously possible with manual configuration, but the wizard offers a more convenient, and user-friendly way to do this. This process can work to/from any type of UniFi Network Controller including locally hosted controllers, Cloud Keys, and UniFi Cloud Controllers, so long as Controller version is updated to current and that the new controller’s version is the same or newer that the original controller’s version.
IMPORTANT:It is important to note that the Site Export Wizard is not meant to be used to create a complete backup or to perform a restoration via the Setup Wizard since it does not include the admin accounts or credential information.
The migration process is virtually seamless, with a downtime of about a minute as devices provision and a few minutes for devices to appear in the new controller between steps 10 and 11 when changing the «inform URL».
How to Migrate a Site
NOTE:To minimize complications, make sure to complete every step of the process, not skipping any. Please verify that the new Controller version (the one you will be migrating the site to) is the same or newer than the original Controller’s.
To get started, open the Controller and site that will be exported.
1. Go to Settings > Site

2. Select the gray “Export Site” button in the bottom-right of the page. This will initiate the wizard.

3. In the first step, click “Download backup file” to download the file that contains the site configuration to be imported into the controller you are migrating to.
4. Next, import this site into the new controller. To do so, open up the second controller web UI, click “Current Site — (Site Name)” dropdown in top-right of the display. Within this drop-down box select the “Import Site” option:
5. Name the site. It does not have to match the original site name. Once the site has been named, select “Choose file” and select the backup file that was just downloaded i.e. «5.9.29_default.unf»
6. Once the import has finished, a confirmation that the site was imported will appear. Once the import step has been completed, go back to the site being exported and click «confirm».

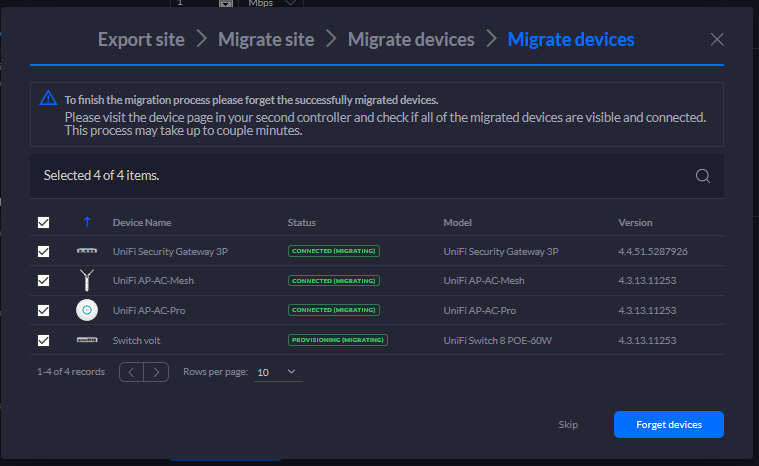
The following steps will migrate the devices. To do so:
8. First, find the URL or IP of the destination controller. In this case, the new controller has an IP of 192.168.1.8. So that is what is entered into the «Custom Inform URL» input field.

9. Next, select the devices that are to be migrated over by ticking the boxes next to each one, or select the entire list by ticking first checkbox.
10. Click “Migrate devices” button.
11. Verify that all devices are connected to the new controller and are visible on the devices page. Note this may take a few minutes. Once devices appear with a status of «connected» in the new controller site, you may select «forget devices».
IMPORTANT: Verify that the devices are visible and appear as connected in the new Controller’s Devices section before clickingForget Devices.
Once the site export wizard has completed with success, the devices will be configurable in the new controller. At this time, unless the site was a default site, it should be safe to remove the site from the previous controller.
How to Upgrade a UniFi Network Controller that is Running as a Windows Service
1. Open the UniFi Network Controller and make a backup.
2. Launch the Command Prompt as an Administrator. On Windows 10 this would entail right-clicking and selecting «Run as administrator». Please see Windows documentation to identify the appropriate method for your specific Windows version.
3. Change directory to the location of UniFi in the computer using the following command (exactly as it is here, no need to substitute anything):
cd "%UserProfile%\Ubiquiti UniFi\"
4. Once in the root of the UniFi folder, issue the following to uninstall the UniFi Network Controller service:
java -jar lib\ace.jar uninstallsvc
5. Once a new command prompt line is presented, that means uninstalling the service was successful. Update the UniFi Network Controller application’s version with any of the regular methods. Go to Settings > Maintenance in the Controller to upgrade to the latest public released version, or alternatively download the UniFi Network Controller installation package for Windows from the Downloads page or the Releases section of the Community.
6. Once the software update is successful, close the UniFi Network Controller application before going back to the Command Prompt.
7. In the Command Prompt issue the following to install the UniFi Network Controller service once again:
java -jar lib\ace.jar installsvc
8. Once you’re at a new command prompt line, after seeing the «Complete Installation…» message, issue the following:
java -jar lib\ace.jar startsvc
9. Close the Command Prompt window either by entering the command, or clicking the X.
10.To access the UniFi Network Controller now open a browser and go to https://localhost:8443. Alternatively, the desired interface IP, or FQDN that is mapped to that host (in place of “localhost”) may be used.