Apache jmeter корреляция использование экстента регулярного выражения в apache jmeter
Содержание:
Advanced Script
Now that we have covered a pretty basic JMeter usage, let’s explore a more complete one. Download The Example JMX and open it in your JMeter.
Why are we interested in this example? Because it covers probably the most important topic related to load testing: Correlating dynamic parameters.
What you are going to learn here:
- Extracting Data into variables from a Server Response using Regular Expression Extractor,
- Reinjecting extracted variables into subsequent requests,
- Design a dynamic behaving virtual user.
For this, we are going to use our JPetstore Demo application.
JPetstore JMX
You can Download The Example JMX and open it in your JMeter.
 JPetstore Buyer
So, what does the JPetStore buyer do? Typically it does:
- Sign in into his account,
- View the catalog,
- Select a random category,
- Select a random product from previously selected category,
- Add the product to cart,
- Order the product within the cart,
- Sign off.
That’s a pretty common simulation for an Ecommerce online shop.
Let’s see what the Buyer ThreadGroup contains:
- DNS Cache Manager: configure the user DNS settings,
- HTTP Cookie Manager: enables cookie management (required to properly handle user sessions),
- HTTP Cache Manager: simulates the behavior of a browser which caches requests to speed up page loading,
- Accounts CSV Data Set Config: points to a csv file containing all the login and passwords of the simulated users,
- 01, 02, … etc: Business transactions containing the HTTP Requests to the Petstore.
HTTP Requests are grouped within transaction controllers to provide meaningful metrics during the load test. We’re typically interested to see how long it takes to create an order for example.
Accounts CSV
On an ecommerce shop, every customer has its own account. So we need to simulate that too.
 JPetStore Accounts CSV
To do this with JMeter, we add a CSV Dataset Config. It points to a csv file containing the following lines:
As you can see, it’s configured to set variables and . These variables will contain the data and will change on every user iteration.
 HTTP Post to login on the PetStore
Here you can see that we replaced the login and password field values by their respective variables. That’s it! Now you have each user taking a different account to login.
You may also have noticed the parameter value which has been replaced by . This is a dynamic parameter we have handled.
Dynamic Parameters
That’s probably the most important thing to understand when load testing:
You need to correlate them. That means, applying this 4 steps procedure:
- First identify a dynamic parameter: usually it’s an odd value which looks cryptic, Here source page was equal to ,
- Try to find this cryptic value in a previous server response: execute the script to get them,
- Use either a Regular Expression Extractor or a Json Extractor to extract the value into a variable for later use,
- Replace the value within the request by the variable.
If you master this procedure, you have already acquired 95% of the knowledge needed by a Performance Tester.
You thought it was more difficult than that? It isn’t, really! It’s really that simple.
 Extracting sourcePage using a regular expression
Here we defined a regexp extractor on the request whose response contains the subsequently used dynamic parameter :
- Name: ,
- Regular Expression: ,
- Template: ,
- Match Nr: .
Why is the extractor configured so? Let’s take a look at the server response:
I have truncated the response for readability purpose. As you can see, those dynamic parameters are hidden form parameters.
This kind of parameters are usually set to protect the website from SpamBots or Cross-Site Request Forgery.
Regular Expressions should be part of the tools you know well.
They are heavily used to extract content from server responses.
Random Behavior
Now, let’s take care of extracting random and variables to simulate a dynamic user.


Again, we performed the extractions on the pages containing those ids:
- categoryId: comes from the page listing all product categories,
- productId: comes from the page listing all products within a category.
Then, we reuse those variables in subsequent requests. It’s time now to run the user!
Results

I’ve added a View Results Tree to view all the requests and responses being sent and received. Some notes about the execution:
- Some Requests in Red: it comes from an embedded resources parsed from the homepage which generates an HTTP 404 Not Found,
- _fp and _sourcePage parameters: those values should change on each run if they have been handled correctly.
JMeter Advantages
JMeter advantages are described as figure below
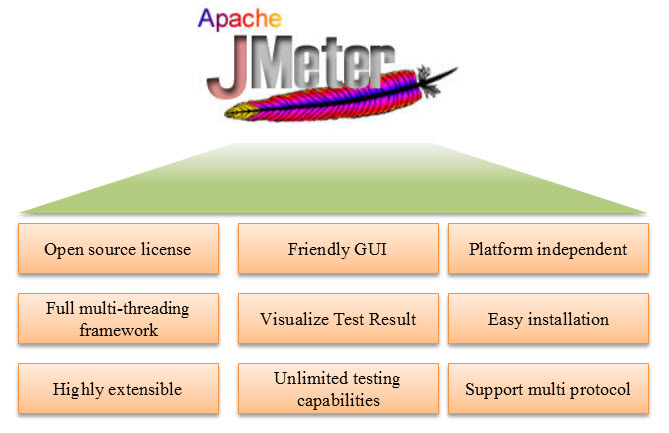
- Open source license: JMeter is totally free, allows developer use the source code for the development
- Friendly GUI: JMeter is extremely easy to use and doesn’t take time to get familiar with it
- Platform independent: JMeter is 100% pure Java desktop application. So it can run on multiple platforms
- Full multithreading framework. JMeter allows concurrent and simultaneous sampling of different functions by a separate thread group
- Visualize Test Result: Test result can be displayed in a different format such as chart, table, tree and log file
- Easy installation: You just copy and run the *.bat file to run JMeter. No installation needed.
- Highly Extensible: You can write your own tests. JMeter also supports visualization plugins allow you to extend your testing
- Multiple testing strategy: JMeter supports many testing strategies such as Load Testing, Distributed Testing, and Functional Testing.
- Simulation: JMeter can simulate multiple users with concurrent threads, create a heavy load against web application under test
- Support multi-protocol: JMeter does not only support web application testing but also evaluate database server performance. All basic protocols such as HTTP, JDBC, LDAP, SOAP, JMS, and FTP are supported by JMeter
- Record & Playback — Record the user activity on the browser and simulate them in a web application using JMeter
- Script Test: Jmeter can be integrated with Bean Shell & Selenium for automated testing.
Overview
What is JMeter
 JMeter’s UI (looks dated but does the job well!)
As stated on Apache JMeter Homepage:
But, the right question to ask yourself is: What should I use JMeter for?
To sum up, JMeter allows you to swarm a web application with thousands of virtual users and measure its performance at the same time.
JMeter Features
 JMeter Overall Feature List
As you can see, JMeter has a lot of features.
Don’t panic, If you know how to load a web application using the , you’ve already covered 90% of its usage.
Load Testing Use-Cases
Better than theorical explanations on the origin of the universe, you may use JMeter in the following cases:
- ECommerce Sales Event: think about thousands of people rushing to an Ecommerce site offering -70% on Jewelry,
- Special Sports Events: trying to buy tickets for the Super Bowl? Waiting, waiting… Timeout,
Any event involving an unusual number of users rushing to a web application is a good candidate for pre-production load testing.
The Basics
Basically JMeter allows to:
- Perform Automated Load Testing and Functional Testing of most web applications,
- Monitor you servers using Perfmon.
And your job (Yes, You’re the Performance Engineer in the room) is to yell Response Times are Too Damn High! if things go wrong.

And Just for the pleasure, here is how your colleagues may react:
Okay, enough fun! Let’s get more serious again and dive into JMeter.
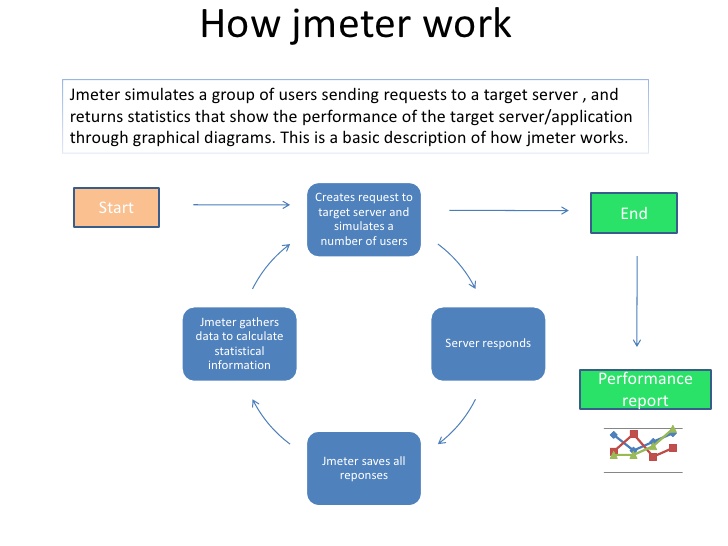
How JMeter Works
 Credits to Apache JMeter on SlideShare
You may have never heard it before, but JMeter is just an HTTP Client capable of running multiple sessions in parallel.
And the best part of it is it can be configured the way you want. Want to simulate users shopping on a ECommerce website? Easy!
Basically, You:
- Define a workflow composed of (like If, For and While),
- Swarm the system: JMeter spawns thousands of threads following your workflow,
- Collect and Analyze the Response Times: And yell what you know if things are running amok.
That’s It! Simple, isn’t it?
Of course, JMeter is not limited to HTTP. There are FTP, SMTP and more samplers.
But, given the fact most of the time JMeter is being used for HTTP tests, we’ll ignore them for now.
So you got the grasp of it: JMeter works on the protocol level. It simulates the network interactions (or requests) with a web application.
What can I do with it?
Apache JMeter may be used to test performance both on static and dynamic
resources, Web dynamic applications.
It can be used to simulate a heavy load on a server, group of servers,
network or object to test its strength or to analyze overall performance
under different load types.
Apache JMeter features include:
- Ability to load and performance test many different applications/server/protocol types:
- Web — HTTP, HTTPS (Java, NodeJS, PHP, ASP.NET, …)
- SOAP / REST Webservices
- FTP
- Database via JDBC
- LDAP
- Message-oriented middleware (MOM) via JMS
- Mail — SMTP(S), POP3(S) and IMAP(S)
- Native commands or shell scripts
- TCP
- Java Objects
- Full featured Test IDE that allows fast Test Plan recording (from Browsers or native applications), building and debugging.
- to load test from any Java compatible OS (Linux, Windows, Mac OSX, …)
- A complete and ready to present dynamic HTML report
- Easy correlation through ability to extract data from most popular response formats, , ,
or - Complete portability and 100% Java purity.
- Full multi-threading framework allows concurrent sampling by many threads and
simultaneous sampling of different functions by separate thread groups. - Caching and offline analysis/replaying of test results.
-
Highly Extensible core:
- Pluggable Samplers allow unlimited testing capabilities.
- Scriptable Samplers (JSR223-compatible languages like Groovy and BeanShell)
- Several load statistics may be chosen with pluggable timers.
- Data analysis and visualization plugins allow great extensibility
as well as personalization. - Functions can be used to provide dynamic input to a test or provide data manipulation.
- Easy Continuous Integration through 3rd party Open Source libraries for Maven, Gradle and Jenkins.
Simple Script
In this section, we are covering how to create a very simple test involving HTTPBin.
ThreadGroup
First, let’s create a by right clicking on the Test Plan, then .
 JMeter ThreadGroup represents a virtual user
The ThreadGroup is a container for the logic which will be run by a user thread. Said otherwise, it contains all the logic which will be run by
as many threads you would like in parallel.
As you can see, a ThreadGroup has many settings, with the most important being:
- Number of Threads: number of concurrent threads to run during the test,
- Duration (sec): How long should the test run in seconds.
The Thread Group Panel holds also the following settings:
-
When encountering a Sampler error: In case any error occurs during test execution, you may let the test either −
- Continue running,
- Stop Thread to stop the current Thread,
- Stop Test completely.
-
Number of Threads: concurrent users to simulate,
-
Ramp-Up Period: linear increase the load from 0 to target load over this time,
-
Loop Count: Total number of iterations the users should run,
-
Scheduler Configuration:
- Duration: Total Test duration in seconds,
- Startup Delay: number of seconds before the users ramp-up.
-
Scheduler Configuration: You can configure the start and end time of running the test.
Here are all the possible settings with their explanation:
 JMeter Threadgroup settings
Once you master running a simple test, you can play with them to see their effect on the load test. Remember JMeter has a lot of settings, but you rarely use them all.
Http Request
Now let’s add an .
Right-click on the ThreadGroup, then select .

In this example, I’ve configured a GET Http request to https://httpbin.org:
- Protocol: ,
- Server Name or IP: ,
- Port Number: (default https port, can be omitted),
- Path: .
Again, there are many possible options here. (and these wouldn’t even fit into the screen)
Most of the time, you won’t design Http Request from scratch. It’s way better to record them using JMeter.
JMeter has a built in Recorder which allows to record all HTTP Requests while using your browser.
Why not setting all requests by hand? Simply because it’s unpractical. Some web application may send 100+ requests.
View Results Tree
It’s now time to execute our user composed of a single request and see the results.
We going to add a listener. Remember this listener is only for debugging purpose.
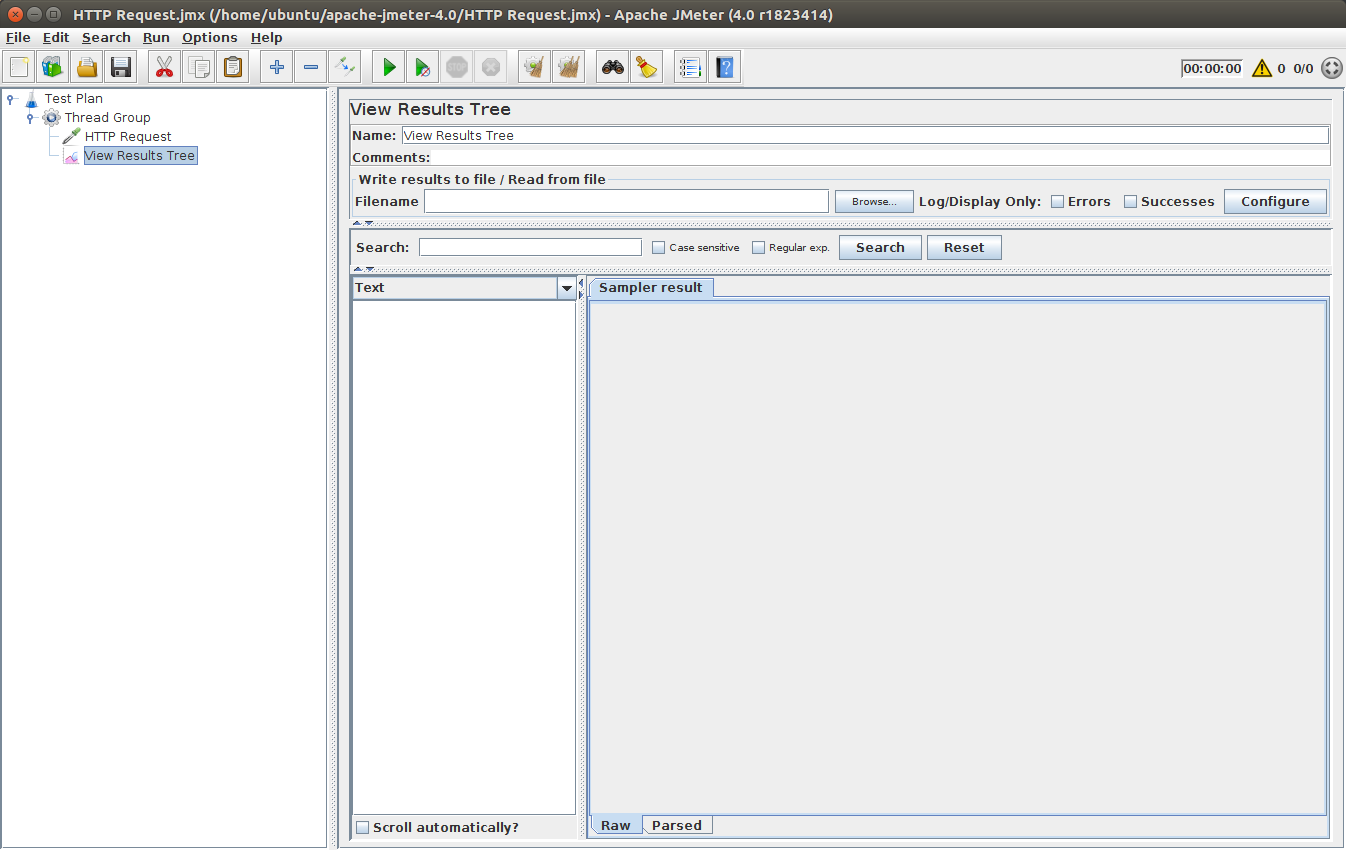 JMeter’s View Results Tree Listener
This UI listeners let’s you see the results of the requests being executed. Click on in the top menu to run the user.
Some key points here:
- Green color against the name Visit TutorialsPoint Home Page indicates success.
- JMeter stores all the requests and responses sent and received,
- Sampler Result Tab: shows JMeter metrics gathered about the request and response times,
- Request Tab: shows the request which has been played,
- Response Tab: shows the response sent by the web-server to JMeter.
The second tab is Request, which shows all the data sent to the web server as part of the request.
 Metrics should appear for the request being executed
On this screen, within the view, you should see something like:
It contains a lot of metrics about the server response time.
Of course, this listener is not designed to run multiple concurrent users and view the results. View Results Tree should be used To Debug a user execution.
 Request which has been executed
And that’s the request sent by JMeter to the remote server ():
As we can see, JMeter uses (which is a Java HTTP Client library) to send the request.
 Response sent by the server
The server sends the HTML of the web-page as a response:
So, you have seen how easy it’s to create a sample user which sends a request to a given web application.
You did it! The beginner tutorial introducing JMeter is now complete. Don’t hesitate to play with the tool and test different combinations, that’s the best way to learn.
By the way, If you want to dig further regarding Results Collection and Analysis, check our JMeter Result Analysis article.
Is the tutorial finished? Absolutely not!
пример
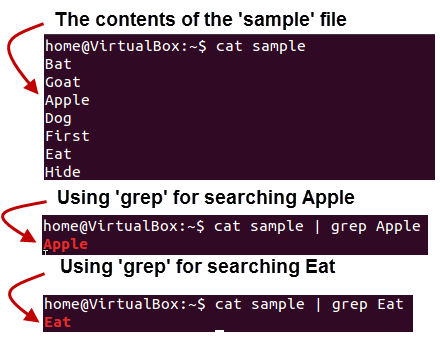
Если вам нужно извлечь информацию из текстового ответа, самым простым способом будет использование регулярных выражений. Соответствующий шаблон очень похож на шаблон, используемый в Perl. Предположим, мы хотим протестировать рабочий процесс покупки авиабилета. Первый шаг — отправить операцию покупки. Следующий шаг — убедиться, что мы можем проверить все детали, используя идентификатор покупки, который должен быть возвращен для первого запроса. Представим, что первый запрос возвращает html-страницу с этим типом идентификатора, который нам нужно извлечь:
Такая ситуация является лучшим кандидатом на использование экстрактора JMeter Regular Expression. Регулярное выражение представляет собой специальную текстовую строку для описания шаблона поиска. Существует множество онлайн-ресурсов, которые помогают писать и тестировать регулярные выражения. Один из них — https://regex101.com/ .

Чтобы использовать этот компонент, откройте меню JMeter и: Add -> Post Processors -> Extractor Expression Extractor

Экземпляр регулярного выражения содержит следующие поля:
- Reference Name — имя переменной, которая может быть использована после извлечения
- Регулярное выражение — последовательность символов и символов, выражающих строку (шаблон), которая будет искать в тексте
- Шаблон — содержит ссылки на группы. Поскольку регулярное выражение может иметь более одной группы, оно позволяет указать, какое значение группы нужно извлечь, указав номер группы как $ 1 $ или $ 2 $ или $ 1 $$ 2 $ (извлечь обе группы)
- Номер совпадения — указывает, какое совпадение будет использоваться (значение 0 соответствует случайным значениям / любое положительное число N означает выбор N-го совпадения / отрицательного значения, которое должно использоваться с контроллером ForEach)
- Значение по умолчанию — значение по умолчанию, которое будет сохранено в переменной в случае, если совпадения не найдены, сохраняется в переменной.
Флажок «Применить к» относится к образцам, которые делают запросы на встроенные ресурсы. Этот параметр определяет, будет ли регулярное выражение применяться к основным результатам выборки или ко всем запросам, включая внедренные ресурсы. Для этого параметра есть несколько вариантов:
- Основная выборка и подвыборки
- Только основной образец
- Только суб-выборки
- JMeter Variable — утверждение применяется к содержимому именованной переменной, которое может быть заполнено другим запросом
Флажок «Поле для проверки» позволяет выбрать, в какое поле должно быть применено регулярное выражение. Почти все параметры самоописательны:
Тело — тело ответа, например содержимое веб-страницы (исключая заголовки)
Body (unescaped) — тело ответа, с заменой всех кодов кода HTML
Обратите внимание, что экранирование HTML обрабатывается без учета контекста, поэтому могут быть сделаны некоторые неправильные замены (* этот параметр сильно влияет на производительность)
Тело — Тело как документ — текст извлечения из различных типов документов через Apache Tika (* также может повлиять на производительность)
Заголовок тела — запрос — может отсутствовать для образцов, отличных от HTTP
Заголовок Body — Response — может отсутствовать для образцов, отличных от HTTP
Тело — URL
Код ответа — например, 200
Тело — ответное сообщение — например, ОК. После выделения выражения его можно использовать в последующих запросах с помощью переменной $ {purchaseId}
После выделения выражения его можно использовать в последующих запросах с помощью переменной $ {purchaseId}.

Эта таблица содержит все сокращения, которые поддерживаются регулярными выражениями JMeter:


Previous
Next
Conclusion
At this tutorial reaches an end, you are now mastering some very important JMeter Aspects:
- Creating a thread group which performs an HTTP Request to a web application,
- Debugging thread groups using a View Results Tree and interpreting the results,
- Creating a dynamically behaving script by extracting random information from server responses,
- Handling dynamic parameters (that’s the most important thing to know!),
- Extracting content from server responses using Regular Expressions,
- Use multiple accounts to login each concurrent user.
You’re definitely a Performance Tester if you master all those concepts! And trust me, that’s not difficult, practice makes perfect.
Как задать шаг нагрузки в Apache.JMeter
В статье:
Рецепт хорошего скрипта JMeter
описаны компоненты, которые рекомендуется использовать при выполнении задания, которые обычно используются.
В том числе компоненты Test Action и Constant Throughput Timer, которые используются для задания фиксированного шага нагрузки в JMeter.
Если опустить другие элементы, то нужные для задания шага нагрузки блоки такие:
-
Test Plan
-
jp@gc — Ultimate Thread Group — сторонний компонент, для задания количества пользователей и длительности их работы, для боевого запуска сценария
-
Test Action
Constant Throughput Timer — ограничение частоты работы вышестоящего Test Action, для задания шага нагрузки
— для шага нагрузки, пауза длительностью 0, пустое действие
- Module Controller — ссылка на сценарий в Test Fragment
-
Test Action
-
Test Fragment — для задания операций в сценарии, общий сценарий для отладочного и боевого запуска выделяется в отдельный фрагмент
-
Transaction Controller — транзакция верхнего уровня для замера длительности работы всего сценария и пауз
-
Transaction Controller
… запросы ….
— транзакция верхнего уровня для замера длительности работы всего сценария без пауз
-
Transaction Controller
-
Transaction Controller — транзакция верхнего уровня для замера длительности работы всего сценария и пауз
-
jp@gc — Ultimate Thread Group — сторонний компонент, для задания количества пользователей и длительности их работы, для боевого запуска сценария
- WorkBench
А если ещё более кратко, то первым действием в катушке , для которой фиксируется шаг работы задаётся Sampler с типом Test Action:
-
- Name:
- Target:
- Action:
- Duration:
Важно заполнить поле Duration значением , так как поле обязательно для заполнения. Это пустое действие, sampler, выполняющий 0-ю паузу
Тут в поле Name я отразил пример длительности шага ««, каждый волен выбирать свою длительность. Это как пример. Указывается просто, чтобы не забыть размер шага.
Дочерним элементом добавляется timer Constant Throughput Timer:
-
- Name:
- Target throughput (in samples per minute): — или другое значение, задающее интенсивность работы пользователя (одного потока)
- Calculate Throughput based on:
3.1. Механизм работы связки «Test Action» и «Constant Throughput Timer»
Что происходит при таком составе компонент:
- Катушка запускает виртуального пользователя (thread).
- Первая итерация:
- Первым действием этого пользователя является Test Action, но прежде чем выполнить действие срабатывает заданный таймер Constant Throughput Timer.
- На первой итерации работы Test Action ещё не выполнялся, пока выполнилось 0 (samples per minute), поэтому таймер не создаст задержки и Test Action сработает — выполнится пауза длиной 0 секунд, и зафиксируется момент времени, в который выполнилось действие.
- Далее выполнятся все нужные действия, транзакции — отработает сценарий.
- Вторая и последующие итерации:
- Снова всё начнётся с Test Action, перед выполнением которого сработает таймер Constant Throughput Timer.
- В этот раз в памяти уже зафиксирован прежний момент выполнения, поэтому будет выдержана пауза равная шагу, такая, чтобы интенсивность работы Test Action была точно равна значению, заданному в Constant Throughput Timer.
- Далее выполнятся все нужные действия, транзакции — отработает сценарий.
Между моментами начала шага 2.3 и 3.3 всегда будет фиксированный временной интервал. При условии, что длительность выполнения 2.3 не будет превышать размер шага нагрузки.
Контролируя расстояние на временной школе между моментами выполнения пустого Test Action мы контролируем шаг нагрузки, отделяем одну итерацию сценария от другой.
3.2. Проверка правильности выбора шага нагрузки
Для проверки нужен тестовый запуск. Запустить тест и посмотреть на длительность выполнения сценария. Если она превышает шаг, то прервать тест, выбрать новый шаг, пересчитать параметры и повторить отладку.
Чтобы убедиться, что длительность выполнения шагов сценария не превышает шаг, в качестве корневого элемента используется Transaction Controller. Один учитывающий паузы и второй, вложенный в него, считающий время без учёта таймеров.
Используя транзакции верхнего уровня и сводные отчёты:
- https://jmeter.apache.org/usermanual/component_reference.html
Можно посмотреть максимальную длительность выполнения корневой транзакции. И если эта длительность превышает шаг, допустим, ««, то надо выбрать новый шаг и пересчитать параметры:
- вручную:
- шаг надо увеличить, взять значение, превышающее максимальное значение, пусть это 120 секунд или 2 минуты;
- уменьшить значение Target throughput (in samples per minute) в Constant Throughput Timer, так для шага 2 минуты интенсивность будет 1/2 = 0.5 (in samples per minute);
- увеличить количество виртуальных пользователей, чтобы в сумме они создали нужную интенсивность работы. Если нужна интенсивность 7 сценариев в минуту, то значит нужно 7 / 0.5 = 14 пользователей;
- или воспользовавшись калькулятором (смотри выше).
- With your browser, in the Address bar at the top, enter http://example.com/index.html (replace example.com with your websites address).
and hit the enter key. - Click on a few links on your sites pages.
- Close your browser and bring up the JMeter window.
Expand the Thread Group and there should be several samplers. At this point, the test plan can
be saved as is.
If you forget to add default HTTP Request settings, you will have to manually
delete the server name, and port.
In this sample, there aren’t any default request parameters. If a particular request parameter
is required by all pages, the request defaults is where one would add the entries.
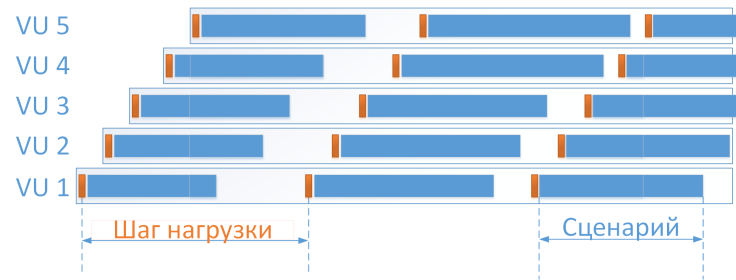
Что такое шаг нагрузки
При планировании нагрузки важно выдержать заданную интенсивность работы теста. Это достигается за счёт того, что используется фиксированный шаг нагрузки — такой интервал времени в течение которого гарантировано выполняется один проход сценария
Обозначим шаг нагрузки как T (минут).
Тогда за минуту работы, один виртуальный пользователь, выполнит 1/T сценариев. Интенсивность работы одного виртуального пользователя будет равна 1/T сценариев в минуту.
А если будет работать N виртуальных пользователей, то они суммарно будут выполнять N/T сценариев в минуту.
Важно, чтобы:
- Количество виртуальных пользователей N было положительным целым значением.
- Размер шага T был достаточно велик, чтобы сценарий под нагрузкой укладывался в эту длительность — был больше значения, указанного в SLA.
- Чтобы их отношение точно соответствовало требуемой интенсивности.
26.7 Start the test
At this point, we are ready to run our test plan and see what happens. When you’re
ready to run the test, there are two ways:
- With the gui, but it’s not recommended to big load test.
- With the command line.
Solution 1, with the gui, but just during debug phase, use CLI mode (Non GUI) for your load test.
Run → Start
or use the keyboard and press Ctrl + R
Before you start the test, add a Summary Report element and select it. As the test runs, the statistics will change
until the test is done. At the end of the test, the summary report should look like this.

While the test is running, in the upper right-hand corner, there should be a green circle. When the test is done, the circle should be grey.
Solution 2, in command line, use jmeter -n -t -l -e -o
At the end of the test, an HTML report will be generated and available in used in command line.
Setup
Let’s make things more practical by installing JMeter.
System Requirements
JMeter has the following system requirements:
- Java Virtual Machine Installed: JMeter is a Java-based application, It requires the Java Runtime to run,
- CPU: we suggest multicore cpus with 4 or more cores. JMeter is heavily multithreaded and benefits from more CPU cores,
- Memory: 16GB RAM is a good value. It let’s you simulate about 1000 concurrent users and leaving enough room for the Operating System,
- Disk: while JMeter not relies much on disk, having an SSD is a plus.
- Network: 1Gbps LAN recommended. JMeter simulates a huge number of concurrent users which are network bandwidth hungry!
Other system hardware specifications don’t matter much.
Take a look at our guide on how to optimize JMeter for more information.
Check Java Version
To check if Java is installed, running a command-line is necessary. It differs slightly depending on the Operating System:
| OS | Task | Command |
|---|---|---|
| Windows | Open Command Console | C:>java -version |
| Linux | Open Command Terminal | $:~java -version |
| Mac | Open Terminal | machine:~$ java -version |
As of JMeter 4.0, Java 8 and above are supported. For older versions, please refer to JMeter Documentation.
The command should output something like:
Here we have Java 8, Build 161 being installed.
If you don’t have Java installed, please download and install a Java JDK (Java Development Kit) from Java Download Page.
For more details on how to setup Java on various operating systems, Refer to Java Setup Guide.
We’re ready to download and install JMeter now!
JMeter Installation
It’s very easy to install JMeter since it’s a simple archive:
- Download JMeter Archive,
- Unzip the archive,
- Run executable in folder. Executable extensions depends on OS ( for Windows, for Linux / MaC)
- JMeter should launch the UI!
After a few seconds, you should see:
JMeter is Up and Running!
Let’s get to work now.