Использование rabbitmq в связке с php
Содержание:
- Message broker vs. ESB (enterprise service bus)
- Introduction
- Round-robin dispatching
- Fair dispatch
- Work Queues
- Installing RabbitMQ
- Plugin Directories
- Fair dispatch
- Temporary queues
- Channels
- Work Queues
- Glossary
- The Basics
- «Hello World»
- Production Suitability Disclaimer
- Work Queues
- Putting it all together
- Production Suitability Disclaimer
- Getting Help and Providing Feedback
- Fair dispatch
Message broker vs. ESB (enterprise service bus)
An enterprise service bus (ESB) is an architectural pattern sometimes utilized in service-oriented architectures implemented across enterprises. In an ESB, a centralized software platform combines communication protocols and data formats into a “common language” that all services and applications in the architecture can share. It might, for instance, translate the requests it receives from one protocol (such as XML) to another (such as JSON). ESBs transform their message payloads using an automated process. The centralized software platform also handles other orchestration logic, such as connectivity, routing, and request processing.
ESB infrastructures are complex, however, and can be challenging to integrate and expensive to maintain. It’s difficult to troubleshoot them when problems occur in production environments, they’re not easy to scale, and updating is tedious.
Message brokers are a “lightweight” alternative to ESBs that provide a similar functionality—a mechanism for interservice communications—more simply and at lower cost. They’re well-suited for use in the microservices architectures that have become more prevalent as ESBs have fallen out of favor.
Introduction
Prerequisites
This tutorial assumes RabbitMQ is installed and running
on localhost on standard port (5672). In case you use
a different host, port or credentials, connections settings would require adjusting.
Where to get help
The major difference between RabbitMQ and the post office is that it doesn’t deal with paper,
instead it accepts, stores and forwards binary blobs of data ‒ messages.
RabbitMQ, and messaging in general, uses some jargon.
-
Producing means nothing more than sending.
A program that sends messages is a producer :digraph {
bgcolor=transparent;
truecolor=true;
rankdir=LR;
node ;
//
P1 ;
} -
A queue is the name for a post box which lives inside RabbitMQ.
Although messages flow through RabbitMQ and your applications, they can only be stored inside a queue.
A queue is only bound by the host’s memory & disk limits, it’s essentially a large message buffer.
Many producers can send messages that go to one queue, and many consumers can try to receive data from one queue.
This is how we represent a queue:digraph {
bgcolor=transparent;
truecolor=true;
rankdir=LR;
node ;
//
subgraph cluster_Q1 {
label=»queue_name»;
color=transparent;
Q1 ;
};
} -
Consuming has a similar meaning to receiving.
A consumer is a program that mostly waits to receive messages:digraph {
bgcolor=transparent;
truecolor=true;
rankdir=LR;
node ;
//
C1 ;
}
Note that the producer, consumer, and broker do not have to reside on the same host; indeed in most applications they don’t.
An application can be both a producer and consumer, too.
Round-robin dispatching
One of the advantages of using a Task Queue is the ability to easily
parallelise work. If we are building up a backlog of work, we can just
add more workers and that way, scale easily.
First, let’s try to run two worker.go scripts at the same time. They
will both get messages from the queue, but how exactly? Let’s see.
You need three consoles open. Two will run the worker.go
script. These consoles will be our two consumers — C1 and C2.
# shell 1
go run worker.go
# =>  Waiting for messages. To exit press CTRL+C
# shell 2
go run worker.go
# =>  Waiting for messages. To exit press CTRL+C
In the third one we’ll publish new tasks. Once you’ve started
the consumers you can publish a few messages:
# shell 3
go run new_task.go First message.
go run new_task.go Second message..
go run new_task.go Third message...
go run new_task.go Fourth message....
go run new_task.go Fifth message.....
Let’s see what is delivered to our workers:
# shell 1
go run worker.go
# =>  Waiting for messages. To exit press CTRL+C
# =>  Received 'First message.'
# =>  Received 'Third message...'
# =>  Received 'Fifth message.....'
# shell 2
go run worker.go
# =>  Waiting for messages. To exit press CTRL+C
# =>  Received 'Second message..'
# =>  Received 'Fourth message....'
By default, RabbitMQ will send each message to the next consumer,
in sequence. On average every consumer will get the same number of
messages. This way of distributing messages is called round-robin. Try
this out with three or more workers.
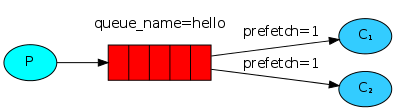
Fair dispatch
You might have noticed that the dispatching still doesn’t work exactly
as we want. For example in a situation with two workers, when all
odd messages are heavy and even messages are light, one worker will be
constantly busy and the other one will do hardly any work. Well,
RabbitMQ doesn’t know anything about that and will still dispatch
messages evenly.
This happens because RabbitMQ just dispatches a message when the message
enters the queue. It doesn’t look at the number of unacknowledged
messages for a consumer. It just blindly dispatches every n-th message
to the n-th consumer.
digraph {
bgcolor=transparent;
truecolor=true;
rankdir=LR;
node ;
//
P1 ;
subgraph cluster_Q1 {
label=»queue_name=hello»;
color=transparent;
Q1 ;
};
C1 [label=<C<font point-size=»7″>1</font>>, fillcolor=»#33ccff»];
C2 [label=<C<font point-size=»7″>2</font>>, fillcolor=»#33ccff»];
//
P1 -> Q1;
Q1 -> C1 ;
Q1 -> C2 ;
}
In order to defeat that we can use the basic_qos method with the
prefetch_count = 1 setting. This tells RabbitMQ not to give more than
one message to a worker at a time. Or, in other words, don’t dispatch
a new message to a worker until it has processed and acknowledged the
previous one. Instead, it will dispatch it to the next worker that is not still busy.
$channel->basic_qos(null, 1, null);
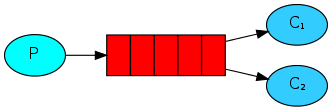
Work Queues
Prerequisites
This tutorial assumes RabbitMQ is installed and running
on localhost on standard port (5672). In case you use
a different host, port or credentials, connections settings would require adjusting.
Prerequisites
As with other Python tutorials, we will use the Pika RabbitMQ client
version 1.0.0.
digraph {
bgcolor=transparent;
truecolor=true;
rankdir=LR;
node ;
//
P1 ;
Q1 ;
C1 [label=<C<font point-size=»7″>1</font>>, fillcolor=»#33ccff»];
C2 [label=<C<font point-size=»7″>2</font>>, fillcolor=»#33ccff»];
//
P1 -> Q1 -> C1;
Q1 -> C2;
}
What This Tutorial Focuses On
In the first tutorial we
wrote programs to send and receive messages from a named queue. In this
one we’ll create a Work Queue that will be used to distribute
time-consuming tasks among multiple workers.
The main idea behind Work Queues (aka: Task Queues) is to avoid
doing a resource-intensive task immediately and having to wait for
it to complete. Instead we schedule the task to be done later. We encapsulate a
task as a message and send it to the queue. A worker process running
in the background will pop the tasks and eventually execute the
job. When you run many workers the tasks will be shared between them.
This concept is especially useful in web applications where it’s
impossible to handle a complex task during a short HTTP request
window.
In the previous part of this tutorial we sent a message containing
«Hello World!». Now we’ll be sending strings that stand for complex
tasks. We don’t have a real-world task, like images to be resized or
pdf files to be rendered, so let’s fake it by just pretending we’re
busy — by using the time.sleep() function. We’ll take the number of dots
in the string as its complexity; every dot will account for one second
of «work». For example, a fake task described by Hello…
will take three seconds.
We will slightly modify the send.py code from our previous example,
to allow arbitrary messages to be sent from the command line. This
program will schedule tasks to our work queue, so let’s name it
new_task.py:
import sys

message = ' '.join(sys.argv) or "Hello World!"
channel.basic_publish(exchange='',
                      routing_key='hello',
                      body=message)
print("  Sent %r" % message)
Our old receive.py script also requires some changes: it needs to
fake a second of work for every dot in the message body. It will pop
messages from the queue and perform the task, so let’s call it worker.py:
import time

def callback(ch, method, properties, body):
    print("  Received %r" % body.decode())
    time.sleep(body.count(b'.'))
    print("  Done")
Installing RabbitMQ
You can find detailed documentation for your platform here, but roughly for Ubuntu it goes as follows:
Add the following line to the file:
After this, just run the following commands
You should see something like the following:
If you get an error message, the server probably needs to be started with the following command
RabbitMQ defines a default user:
- Username: guest
- Password: guest
Be aware that this user will only be able to be used if connecting to RabbitMQ from localhost. For a true distributed system, you will have to define users and roles. You can read more on Access Control in the documentation. For the following examples we will be using the above credentials.
In order to be able to integrate your php application with RabbitMQ, you’ll need the php-amqplib library. Getting it is easy with composer, just define the requirement inside your file:
After a execution you’ll be all set.
Plugin Directories
RabbitMQ loads plugins from the local filesystem. Plugins are distributed as
archives (.ez files) with compiled code modules and metadata.
Since some plugins , every
node has at least one default plugin directory. The path varies between
package types and can be overridden using the
RABBITMQ_PLUGINS_DIR .
Please see File and Directory Locations guide to learn about the default
value on various platforms.
The built-in plugin directory is by definition version-independent: its contents will change
from release to release. So will its exact path (by default) which contains version number,
e.g. /usr/lib/rabbitmq/lib/rabbitmq_server-3.8.4/plugins. Because of this
automated installation of 3rd party plugins into this directory is harder and more error-prone,
and therefore not recommended. To solve this problem, the plugin directory can be a list
of paths separated by a colon (on Linux, MacOS, BSD):
# Example rabbitmq-env.conf file that features a colon-separated list of plugin directories
PLUGINS_DIR="/usr/lib/rabbitmq/plugins:/usr/lib/rabbitmq/lib/rabbitmq_server-3.8.4/plugins"
On Windows, a semicolon is used as path separator:
# Example rabbitmq-env-conf.bat file that features a colon-separated list of plugin directories
PLUGINS_DIR="C:\Example\RabbitMQ\plugins;C:\Example\RabbitMQ\rabbitmq_server-3.8.4\plugins"
Plugin directory paths that don’t have a version-specific component and are not updated
by RabbitMQ package installers during upgrades are optimal for 3rd party plugin installation.
Provisioning automation tools can rely on those directories to be stable and only managed
by them.
3rd party plugin directories will differ from platform to platform and installation method
to installation method. For example, /usr/lib/rabbitmq/plugins is a 3rd party plugin directory
path used by RabbitMQ Debian packages.
Plugin directory can be located by executing the following command on the host
with a running RabbitMQ node:
rabbitmqctl eval 'application:get_env(rabbit, plugins_dir).'
# => {ok,"/usr/lib/rabbitmq/plugins:/usr/lib/rabbitmq/lib/rabbitmq_server-3.8.4/plugins"}
The first directory in the example above is the 3rd party plugin directory.
The second one contains plugins that ship with RabbitMQ and will change as
installed RabbitMQ version changes between upgrades.
The list of currently enabled plugins on a node is stored in a file.
The file is commonly known as the enabled plugins file. Depending on the package type
it is usually located under the etc directory or under the node’s
data directory. Its path can be overridden using the RABBITMQ_ENABLED_PLUGINS_FILE
environment variable. As a user you don’t usually have to think about that file as it is
managed by the node and rabbitmq-plugins (when used in —offline mode).
Deployment automation tools must make sure that the file is readable and writeable by the local RabbitMQ node.
In environments that need to preconfigure plugins the file can be machine-generated at deployment time.
The plugin names on the list are exactly the same as listed by rabbitmq-plugins list.
The file contents is an Erlang term file that contains a single list:
.
Note that the trailing dot is significant and cannot be left out.
Not every plugin can be loaded from an archive .ez file.
For this reason RabbitMQ will extract plugin archives on boot into a separate
directory that is then added to its code path. This directory is known
as the expanded plugins directory. It is usually managed entirely by RabbitMQ
but if node directories are changed to non-standard ones, that directory will likely
need to be overridden, too. It can be done using the RABBITMQ_PLUGINS_EXPAND_DIR
. The directory
must be readable and writable by the effective operating system user of the RabbitMQ node.
Fair dispatch
You might have noticed that the dispatching still doesn’t work exactly
as we want. For example in a situation with two workers, when all
odd messages are heavy and even messages are light, one worker will be
constantly busy and the other one will do hardly any work. Well,
RabbitMQ doesn’t know anything about that and will still dispatch
messages evenly.
This happens because RabbitMQ just dispatches a message when the message
enters the queue. It doesn’t look at the number of unacknowledged
messages for a consumer. It just blindly dispatches every n-th message
to the n-th consumer.
digraph {
bgcolor=transparent;
truecolor=true;
rankdir=LR;
node ;
//
P1 ;
subgraph cluster_Q1 {
label=»queue_name=hello»;
color=transparent;
Q1 ;
};
C1 [label=<C<font point-size=»7″>1</font>>, fillcolor=»#33ccff»];
C2 [label=<C<font point-size=»7″>2</font>>, fillcolor=»#33ccff»];
//
P1 -> Q1;
Q1 -> C1 ;
Q1 -> C2 ;
}
In order to defeat that we can set the prefetch count with the
value of 1. This tells RabbitMQ not to give more than
one message to a worker at a time. Or, in other words, don’t dispatch
a new message to a worker until it has processed and acknowledged the
previous one. Instead, it will dispatch it to the next worker that is not still busy.
err = ch.Qos(
  1,     // prefetch count
  0,     // prefetch size
  false, // global
)
failOnError(err, "Failed to set QoS")
Temporary queues
As you may remember previously we were using queues that had
specific names (remember hello and task_queue?). Being able to name
a queue was crucial for us — we needed to point the workers to the
same queue. Giving a queue a name is important when you
want to share the queue between producers and consumers.
But that’s not the case for our logger. We want to hear about all
log messages, not just a subset of them. We’re
also interested only in currently flowing messages not in the old
ones. To solve that we need two things.
Firstly, whenever we connect to Rabbit we need a fresh, empty queue.
To do this we could create a queue with a random name, or,
even better — let the server choose a random queue name for us.
Secondly, once we disconnect the consumer the queue should be
automatically deleted.
In the .NET client, when we supply no parameters to QueueDeclare()
we create a non-durable, exclusive, autodelete queue with a generated name:
var queueName = channel.QueueDeclare().QueueName;
You can learn more about the exclusive flag and other queue
properties in the guide on queues.
At that point queueName contains a random queue name. For example
it may look like amq.gen-JzTY20BRgKO-HjmUJj0wLg.
Channels
Some applications need multiple connections to the
broker. However, it is undesirable to keep many TCP
connections open at the same time because doing so consumes
system resources and makes it more difficult to configure
firewalls. AMQP 0-9-1 connections are multiplexed with
channels that can be thought of as «lightweight
connections that share a single TCP connection».
Every protocol operation performed by a client happens on a channel.
Communication on a particular channel is completely separate
from communication on another channel, therefore every protocol
method also carries a channel ID (a.k.a. channel number), an integer
that both the broker and clients use to figure out which channel the method is for.
A channel only exists in the context of a connection and never on its own.
When a connection is closed, so are all channels on it.
For applications that use multiple threads/processes for
processing, it is very common to open a new channel per thread/process
and not share channels between them.
Work Queues
Prerequisites
This tutorial assumes RabbitMQ is installed and running
on localhost on standard port (5672). In case you use
a different host, port or credentials, connections settings would require adjusting.
Where to get help
digraph {
bgcolor=transparent;
truecolor=true;
rankdir=LR;
node ;
//
P1 ;
Q1 ;
C1 [label=<C<font point-size=»7″>1</font>>, fillcolor=»#33ccff»];
C2 [label=<C<font point-size=»7″>2</font>>, fillcolor=»#33ccff»];
//
P1 -> Q1 -> C1;
Q1 -> C2;
}
In the first tutorial we
wrote programs to send and receive messages from a named queue. In this
one we’ll create a Work Queue that will be used to distribute
time-consuming tasks among multiple workers.
The main idea behind Work Queues (aka: Task Queues) is to avoid
doing a resource-intensive task immediately and having to wait for
it to complete. Instead we schedule the task to be done later. We encapsulate a
task as a message and send it to a queue. A worker process running
in the background will pop the tasks and eventually execute the
job. When you run many workers the tasks will be shared between them.
This concept is especially useful in web applications where it’s
impossible to handle a complex task during a short HTTP request
window.
Glossary
| Concept | Definition | Icon |
|---|---|---|
| Producer | Application endpoint that sends messages | |
| Consumer | Application endpoint that receives messages | |
| Connection | Handles protocol, errors, authentication, etc… The connection is done using TCP protocol. | – |
| Channel | Connections are multiplexed through channels. Even though all channels share the same tcp connection, communication from one channel is completely independent of another. | – |
| Exchange | Receives messages from producers and pushes them to queues. Depending on the situation, this can be transparent to the developer. | |
| Queue | Buffer that stores messages | |
| Message | Piece of arbitrary information conforming to the AMQP format that is sent from the producer to a consumer through the broker. The broker cannot modify the information inside the message. | – |
| Acknowledgements | Notice sent back from the consumer to tell the server that a message has been received and processed, so the server can delete it from the queue. | – |
Another advantage of AMQP 0-9-1 is that the application defines the routing logic instead of a broker administrator. This gives the developer a lot of flexibility, without the need to learn a new programming/scripting/markup language.
You can learn more about AMQP and RabbitMQ at the “AMQP 0-9-1 Model Explained” guide. Although not necessary for this tutorial, I encourage you to read it completely.
The Basics
RabbitMQ supports plugins. Plugins extend core broker functionality in a variety of ways: with support
for more protocols, system state monitoring, additional AMQP 0-9-1 exchange types,
node federation, and more. A number of features are implemented as plugins
that ship in the core distribution.
This guide covers the plugin mechanism and plugins that ship in the latest release of the RabbitMQ distribution.
3rd party plugins can be installed separately. A set of is also available.
Plugins are activated when a node is started or at runtime when a CLI tool
is used. For a plugin to be activated at boot, it must be enabled. To enable a plugin, use
the rabbitmq-plugins:
rabbitmq-plugins enable <plugin-name>
For example, to enable the Kubernetes peer discovery plugin:
rabbitmq-plugins enable rabbitmq_peer_discovery_k8s
And to disable a plugin, use:
rabbitmq-plugins disable <plugin-name>
For example, to disable the plugin:
rabbitmq-plugins disable rabbitmq_top
A list of plugins available locally (in the node’s plugins directory) as well
as their status (enabled or disabled) can be obtained using rabbitmq-plugins list:
rabbitmq-plugins list
«Hello World»
(using the Bunny Ruby Client)
In this part of the tutorial we’ll write two small programs in Ruby; a
producer (sender) that sends a single message, and a consumer (receiver) that receives
messages and prints them out. We’ll gloss over some of the detail in
the Bunny API, concentrating on this very simple thing just to get
started. It’s a «Hello World» of messaging.
In the diagram below, «P» is our producer and «C» is our consumer. The
box in the middle is a queue — a message buffer that RabbitMQ keeps
on behalf of the consumer.

Now we have Bunny installed, we can write some
code.
Sending
We’ll call our message producer send.rb and our message consumer
receive.rb. The producer will connect to RabbitMQ, send a single message,
then exit.
In
send.rb,
we need to require the library first:
#!/usr/bin/env ruby
require 'bunny'
then connect to RabbitMQ server
connection = Bunny.new
connection.start
The connection abstracts the socket connection, and takes care of
protocol version negotiation and authentication and so on for us. Here
we connect to a broker on the local machine with all default settings.
If we wanted to connect to a broker on a different
machine we’d simply specify its name or IP address using the :hostname
option:
connection = Bunny.new(hostname: 'rabbit.local')
connection.start
Next we create a channel, which is where most of the API for getting
things done resides:
channel = connection.create_channel
To send, we must declare a queue for us to send to; then we can publish a message
to the queue:
queue = channel.queue('hello')

channel.default_exchange.publish('Hello World!', routing_key: queue.name)
puts "  Sent 'Hello World!'"
Declaring a queue is idempotent — it will only be created if it doesn’t
exist already. The message content is a byte array, so you can encode
whatever you like there.
Lastly, we close the connection;
connection.close
Receiving
That’s it for our producer. Our consumer is listening for messages from
RabbitMQ, so unlike the producer which publishes a single message, we’ll
keep the consumer running to listen for messages and print them out.
The code (in receive.rb) has the same require as send:
#!/usr/bin/env ruby
require 'bunny'
Setting up is the same as the producer; we open a connection and a
channel, and declare the queue from which we’re going to consume.
Note this matches up with the queue that send publishes to.
connection = Bunny.new
connection.start

channel = connection.create_channel
queue = channel.queue('hello')
Note that we declare the queue here, as well. Because we might start
the consumer before the producer, we want to make sure the queue exists
before we try to consume messages from it.
We’re about to tell the server to deliver us the messages from the
queue. Since it will push us messages asynchronously, we provide a
callback that will be executed when RabbitMQ pushes messages to
our consumer. This is what Bunny::Queue#subscribe does.
begin
  puts '  Waiting for messages. To exit press CTRL+C'
  queue.subscribe(block: true) do |_delivery_info, _properties, body|
    puts "  Received #{body}"
  end
rescue Interrupt => _
  connection.close

  exit(0)
end
Bunny::Queue#subscribe is used with the :block option that makes it
block the calling thread (we don’t want the script to finish running immediately!).
Putting it all together
Now we can run both scripts. In a terminal, run the consumer (receiver):
ruby receive.rb
then, run the publisher (sender):
ruby send.rb
The consumer will print the message it gets from the producer via
RabbitMQ. The consumer will keep running, waiting for messages (Use Ctrl-C to stop it), so try running
the producer from another terminal.
Time to move on to part 2 and build a simple work queue.
Production Suitability Disclaimer
Please keep in mind that this and other tutorials are, well, tutorials.
They demonstrate one new concept at a time and may intentionally oversimplify some things and leave out others. For example topics such as
connection management, error handling, connection recovery, concurrency and metric collection are largely omitted
for the sake of brevity. Such simplified code should not be considered production ready.
Please take a look at the rest of the documentation before going live with your app.
We particularly recommend the following guides: Publisher Confirms and Consumer Acknowledgements,
Production Checklist and Monitoring.
If you have questions about the contents of this tutorial or
any other topic related to RabbitMQ, don’t hesitate to ask them
on the .
Work Queues
Prerequisites
This tutorial assumes RabbitMQ is installed and running
on localhost on standard port (5672). In case you use
a different host, port or credentials, connections settings would require adjusting.
Where to get help
digraph {
bgcolor=transparent;
truecolor=true;
rankdir=LR;
node ;
//
P1 ;
Q1 ;
C1 [label=<C<font point-size=»7″>1</font>>, fillcolor=»#33ccff»];
C2 [label=<C<font point-size=»7″>2</font>>, fillcolor=»#33ccff»];
//
P1 -> Q1 -> C1;
Q1 -> C2;
}
In the first tutorial we
wrote programs to send and receive messages from a named queue. In this
one we’ll create a Work Queue that will be used to distribute
time-consuming tasks among multiple workers.
The main idea behind Work Queues (aka: Task Queues) is to avoid
doing a resource-intensive task immediately and having to wait for
it to complete. Instead we schedule the task to be done later. We encapsulate a
task as a message and send it to a queue. A worker process running
in the background will pop the tasks and eventually execute the
job. When you run many workers the tasks will be shared between them.
This concept is especially useful in web applications where it’s
impossible to handle a complex task during a short HTTP request
window.
Putting it all together
Final code of our new_task.go class:
package main

import (
        "log"
        "os"
        "strings"

        "github.com/streadway/amqp"
)

func failOnError(err error, msg string) {
        if err != nil {
                log.Fatalf("%s: %s", msg, err)
        }
}

func main() {
        conn, err := amqp.Dial("amqp://guest:guest@localhost:5672/")
        failOnError(err, "Failed to connect to RabbitMQ")
        defer conn.Close()

        ch, err := conn.Channel()
        failOnError(err, "Failed to open a channel")
        defer ch.Close()

        q, err := ch.QueueDeclare(
                "task_queue", // name
                true,         // durable
                false,        // delete when unused
                false,        // exclusive
                false,        // no-wait
                nil,          // arguments
        )
        failOnError(err, "Failed to declare a queue")

        body := bodyFrom(os.Args)
        err = ch.Publish(
                "",           // exchange
                q.Name,       // routing key
                false,        // mandatory
                false,
                amqp.Publishing{
                        DeliveryMode: amqp.Persistent,
                        ContentType:  "text/plain",
                        Body:         []byte(body),
                })
        failOnError(err, "Failed to publish a message")
        log.Printf("  Sent %s", body)
}

func bodyFrom(args []string) string {
        var s string
        if (len(args) < 2) || os.Args == "" {
                s = "hello"
        } else {
                s = strings.Join(args, " ")
        }
        return s
}
And our worker.go:
package main

import (
        "bytes"
        "github.com/streadway/amqp"
        "log"
        "time"
)

func failOnError(err error, msg string) {
        if err != nil {
                log.Fatalf("%s: %s", msg, err)
        }
}

func main() {
        conn, err := amqp.Dial("amqp://guest:guest@localhost:5672/")
        failOnError(err, "Failed to connect to RabbitMQ")
        defer conn.Close()

        ch, err := conn.Channel()
        failOnError(err, "Failed to open a channel")
        defer ch.Close()

        q, err := ch.QueueDeclare(
                "task_queue", // name
                true,         // durable
                false,        // delete when unused
                false,        // exclusive
                false,        // no-wait
                nil,          // arguments
        )
        failOnError(err, "Failed to declare a queue")

        err = ch.Qos(
                1,     // prefetch count
                0,     // prefetch size
                false, // global
        )
        failOnError(err, "Failed to set QoS")

        msgs, err := ch.Consume(
                q.Name, // queue
                "",     // consumer
                false,  // auto-ack
                false,  // exclusive
                false,  // no-local
                false,  // no-wait
                nil,    // args
        )
        failOnError(err, "Failed to register a consumer")

        forever := make(chan bool)

        go func() {
                for d := range msgs {
                        log.Printf("Received a message: %s", d.Body)
                        dot_count := bytes.Count(d.Body, []byte("."))
                        t := time.Duration(dot_count)
                        time.Sleep(t * time.Second)
                        log.Printf("Done")
                        d.Ack(false)
                }
        }()

        log.Printf("  Waiting for messages. To exit press CTRL+C")
        <-forever
}
Using message acknowledgments and prefetch count you can set up a
work queue. The durability options let the tasks survive even if
RabbitMQ is restarted.
For more information on amqp.Channel methods and message properties, you can browse the
amqp API reference.
Now we can move on to tutorial 3 and learn how
to deliver the same message to many consumers.
Production Suitability Disclaimer
Please keep in mind that this and other tutorials are, well, tutorials.
They demonstrate one new concept at a time and may intentionally oversimplify some things and leave out others. For example topics such as
connection management, error handling, connection recovery, concurrency and metric collection are largely omitted
for the sake of brevity. Such simplified code should not be considered production ready.
Please take a look at the rest of the documentation before going live with your app.
We particularly recommend the following guides: Publisher Confirms and Consumer Acknowledgements,
Production Checklist and Monitoring.
Getting Help and Providing Feedback
If you have questions about the contents of this tutorial or
any other topic related to RabbitMQ, don’t hesitate to ask them
on the .
Fair dispatch
You might have noticed that the dispatching still doesn’t work exactly
as we want. For example in a situation with two workers, when all
odd messages are heavy and even messages are light, one worker will be
constantly busy and the other one will do hardly any work. Well,
RabbitMQ doesn’t know anything about that and will still dispatch
messages evenly.
This happens because RabbitMQ just dispatches a message when the message
enters the queue. It doesn’t look at the number of unacknowledged
messages for a consumer. It just blindly dispatches every n-th message
to the n-th consumer.
digraph {
bgcolor=transparent;
truecolor=true;
rankdir=LR;
node ;
//
P1 ;
subgraph cluster_Q1 {
label=»queue_name=hello»;
color=transparent;
Q1 ;
};
C1 [label=<C<font point-size=»7″>1</font>>, fillcolor=»#33ccff»];
C2 [label=<C<font point-size=»7″>2</font>>, fillcolor=»#33ccff»];
//
P1 -> Q1;
Q1 -> C1 ;
Q1 -> C2 ;
}
In order to defeat that we can use the prefetch method with the
value of 1. This tells RabbitMQ not to give more than
one message to a worker at a time. Or, in other words, don’t dispatch
a new message to a worker until it has processed and acknowledged the
previous one. Instead, it will dispatch it to the next worker that is not still busy.
channel.prefetch(1);