Введение в fetch
Содержание:
- Advanced Usage
- Option 1: Using Graphical Configuration Utilities
- Common Usage
- 3. How to bypass ISP censorship to access Kali Linux servers
- Option 2: Manually Editing a Configuration File
- Option 3: Command Line Substitution
- 2. Specifying a certain Kali Linux update mirror
- 1. Cannot update Kali Linux because errors
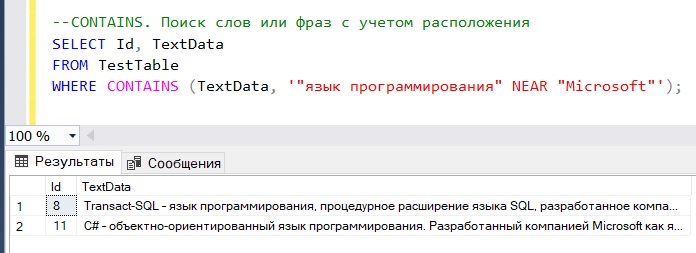
- «Непростые» запросы
- Итого
Advanced Usage
Streams
const util = require('util');
const fs = require('fs');
const streamPipeline = util.promisify(require('stream').pipeline);

(async () => {
	const response = await fetch('https://assets-cdn.github.com/images/modules/logos_page/Octocat.png');

	if (response.ok) {
		return streamPipeline(response.body, fs.createWriteStream('./octocat.png'));
	}

	throw new Error(`unexpected response ${response.statusText}`);
})();
Buffer
If you prefer to cache binary data in full, use buffer(). (NOTE: buffer() is a only API)
const fetch = require('node-fetch');
const fileType = require('file-type');

(async () => {
	const response = await fetch('https://octodex.github.com/images/Fintechtocat.png');
	const buffer = await response.buffer();
	const type = fileType.fromBuffer(buffer)

	console.log(type);
})();
Accessing Headers and other Meta data
const fetch = require('node-fetch');

(async () => {
	const response = await fetch('https://github.com/');

	console.log(response.ok);
	console.log(response.status);
	console.log(response.statusText);
	console.log(response.headers.raw());
	console.log(response.headers.get('content-type'));
})();
Extract Set-Cookie Header
Unlike browsers, you can access raw headers manually using . This is a only API.
const fetch = require('node-fetch');

(async () => {
	const response = await fetch('https://example.com');

	// Returns an array of values, instead of a string of comma-separated values
	console.log(response.headers.raw()'set-cookie');
})();
Post data using a file stream
const {createReadStream} = require('fs');
const fetch = require('node-fetch');

const stream = createReadStream('input.txt');

(async () => {
	const response = await fetch('https://httpbin.org/post', {method: 'POST', body: stream});
	const json = await response.json();

	console.log(json)
})();
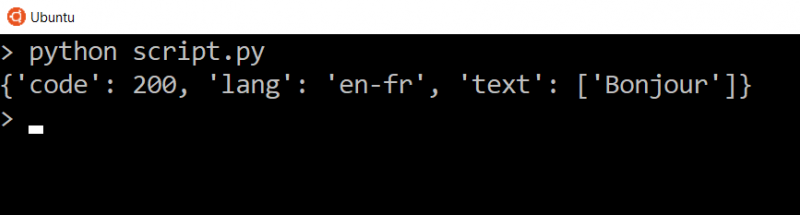
Post with form-data (detect multipart)
const fetch = require('node-fetch');
const FormData = require('form-data');

const form = new FormData();
form.append('a', 1);

(async () => {
	const response = await fetch('https://httpbin.org/post', {method: 'POST', body: form});
	const json = await response.json();

	console.log(json)
})();

// OR, using custom headers
// NOTE: getHeaders() is non-standard API

const options = {
	method: 'POST',
	body: form,
	headers: form.getHeaders()
};

(async () => {
	const response = await fetch('https://httpbin.org/post', options);
	const json = await response.json();

	console.log(json)
})();
node-fetch also supports spec-compliant FormData implementations such as formdata-node:
const fetch = require('node-fetch');
const FormData = require('formdata-node');

const form = new FormData();
form.set('greeting', 'Hello, world!');

fetch('https://httpbin.org/post', {method: 'POST', body: form})
	.then(res => res.json())
	.then(json => console.log(json));
Request cancellation with AbortSignal
An example of timing out a request after 150ms could be achieved as the following:
const fetch = require('node-fetch');
const AbortController = require('abort-controller');

const controller = new AbortController();
const timeout = setTimeout(() => {
	controller.abort();
}, 150);

(async () => {
	try {
		const response = await fetch('https://example.com', {signal: controller.signal});
		const data = await response.json();

		useData(data);
	} catch (error) {
		if (error.name === 'AbortError') {
            console.log('request was aborted');
		}
	} finally {
		clearTimeout(timeout);
	}
})();
See test cases for more examples.
Option 1: Using Graphical Configuration Utilities
Open Software Sources
Press Alt+F2, type , and enter your password. (Alternatively, select Settings… at the lower left corner of the Update Manager, or go to Settings > Repositories in Synaptic).
- That’s for Ubuntu 10.04 LTS, which you are running. In later releases, you can just run and when you make changes, PolicyKit will authenticate you.
- Most people using newer releases have the Software Center and not Synaptic. In the Software Center, you would go to Edit > Software Sources….
- The Update Manager is unchanged, but in new releases is called the Software Updater.
Change the Download Server
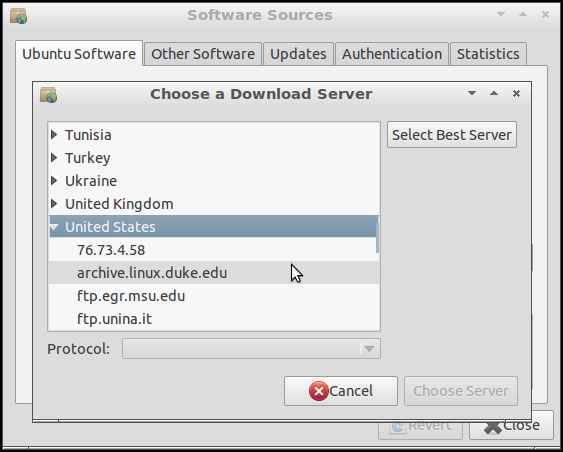
In the Ubuntu Software tab of the Software Sources window, there is a drop-down menu labeled Download from. Select your regional server. For example, I’m in the United States and it looks like this on my 11.10 machine:
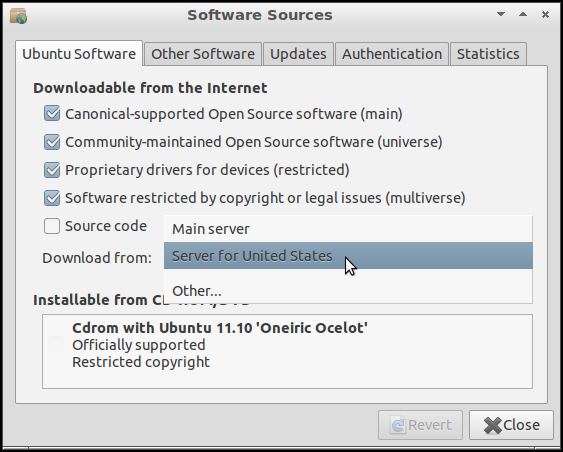 Software Sources window showing Sever for United States being selected in the «Download from» drop-down menu.
You may see other servers listed in that short list (like the server you currently have set up).
You can use the Main server too but it is almost always considerably slower than using your regional server. (At least in the United States, anyway.)
If you want to use another mirror, you can look through a list of mirrors by clicking Other….
Common Usage
NOTE: The documentation below is up-to-date with releases, if you are using an older version, please check how to .
Plain text or HTML
const fetch = require('node-fetch');

(async () => {
	const response = await fetch('https://github.com/');
	const body = await response.text();

	console.log(body);
})();
JSON
const fetch = require('node-fetch');

(async () => {
	const response = await fetch('https://api.github.com/users/github');
	const json = await response.json();

	console.log(json);
})();
Simple Post
const fetch = require('node-fetch');

(async () => {
	const response = await fetch('https://httpbin.org/post', {method: 'POST', body: 'a=1'});
	const json = await response.json();

	console.log(json);
})();
Post with JSON
const fetch = require('node-fetch');

(async () => {
	const body = {a: 1};

	const response = await fetch('https://httpbin.org/post', {
		method: 'post',
		body: JSON.stringify(body),
		headers: {'Content-Type': 'application/json'}
	});
	const json = await response.json();

	console.log(json);
})();
Post with form parameters
NOTE: The header is only set automatically to when an instance of is given as such:
const fetch = require('node-fetch');

const params = new URLSearchParams();
params.append('a', 1);

(async () => {
	const response = await fetch('https://httpbin.org/post', {method: 'POST', body: params});
	const json = await response.json();

	console.log(json);
})();
Handling exceptions
NOTE: 3xx-5xx responses are NOT exceptions, and should be handled in , see the next section.
Wrapping the fetch function into a block will catch all exceptions, such as errors originating from node core libraries, like network errors, and operational errors which are instances of FetchError. See the error handling document for more details.
const fetch = require('node-fetch');

try {
	fetch('https://domain.invalid/');
} catch (error) {
	console.log(error);
}
Handling client and server errors
It is common to create a helper function to check that the response contains no client (4xx) or server (5xx) error responses:
const fetch = require('node-fetch');

const checkStatus = res => {
	if (res.ok) {
		// res.status >= 200 && res.status < 300
		return res;
	} else {
		throw MyCustomError(res.statusText);
	}
}

(async () => {
	const response = await fetch('https://httpbin.org/status/400');
	const data = checkStatus(response);

	console.log(data); //=> MyCustomError
})();
Cookies are not stored by default. However, cookies can be extracted and passed by manipulating request and response headers. See for details.
3. How to bypass ISP censorship to access Kali Linux servers
With TorIptables2 you can enable redirection of all traffic through Tor. Accordingly, all IPs and web-sites blocked by ISP will be available.
Install Tor and TorIptables2
sudo apt install tor
sudo systemctl start tor
sudo systemctl enable tor
git clone https://github.com/ruped24/toriptables2
cd toriptables2/
sudo mv toriptables2.py /usr/local/bin/
cd
Now, when you want to redirect all traffic through the Tor network (before updating, for example), simply run the command:
sudo toriptables2.py -l
To return to the normal settings, do:
sudo toriptables2.py -f
Attention: the words “all traffic” means “all HTTP traffic. Some programs send raw packets and/or ignore system-wide proxy settings. TorIptables2 redirects traffic without usage of the proxy settings, but using the Iptables firewall, but with raw packets you still need to be careful and double-check their path.
Option 2: Manually Editing a Configuration File
Back Up and Open
Back up your file and open it in a text editor:
- If you’ve already ran the second line, don’t do it again, unless you want to overwrite the old backup with a copy of the new configuration.
- For a text-based editor (not requiring any GUI), replace the third line with (or , or ).
In the text editor, replace every instance of your old server name with the new server name. For example, you could replace every instance of with . (Your text editor, whichever you use, will facilitate this—you don’t have to manually find each instance and type in the name of the new mirror.)
Save the file, quit the text editor, run , and it should work with the new server.
Option 3: Command Line Substitution
allows you to write simple (or complicated) scripts that act on a file, one line at a time. So you can issue a single command that goes through , replacing all the instances of the old server name with the new server name.
First, go into and (unless you did so recently) back up the file:
Then run :
- For an old server besides , change that as appropriate.
- For a new server besides , change that as appropriate.
- I decided to copy into a temporary file and use that as ‘s input. This is one way to ensure that is not overwriting the file while it’s still reading it.
- The «script» here is very simple. how substitution works.
2. Specifying a certain Kali Linux update mirror
When updating Kali Linux, a request is made to the host http.kali.org for a list of mirrors. The system then uses one of these mirrors to update. You can skip the stage of getting the list of mirrors (referring to http.kali.org), and hardcode the desired mirror in the repository sources file /etc/apt/sources.list.
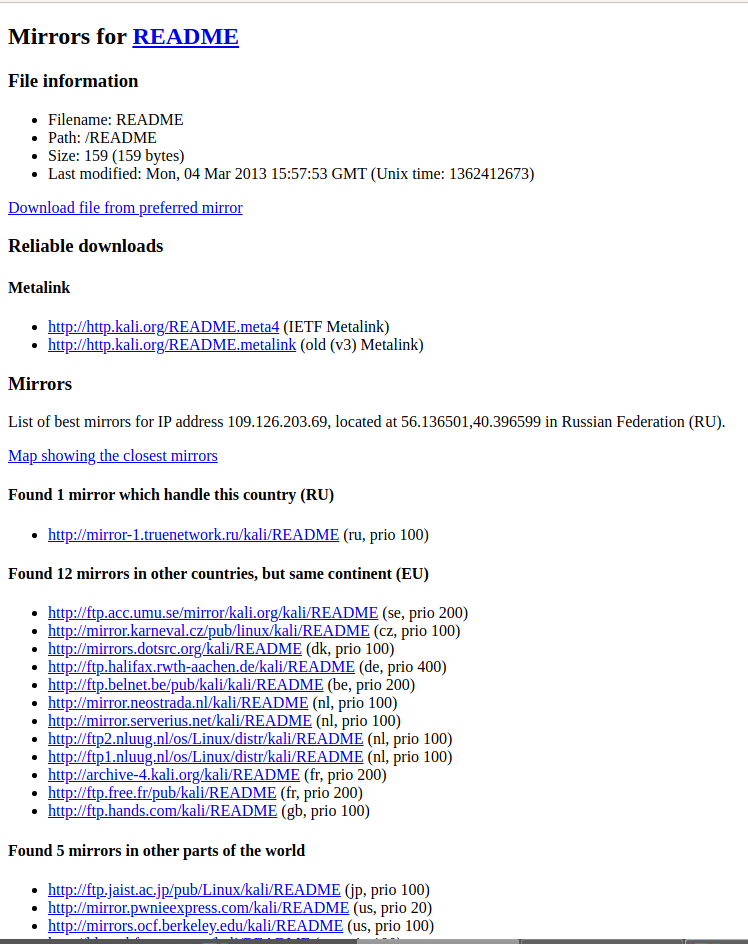
On the territory of my country there is one mirror. In other countries, but on the same continent (EU), another 11 mirrors. And another 14 mirrors on other continents.
The mirror line looks like this:
http://ftp.acc.umu.se/mirror/kali.org/kali/README
Cut /README from this line and get the mirror address:
http://ftp.acc.umu.se/mirror/kali.org/kali
Open the /etc/apt/sources.list file:
sudo gedit /etc/apt/sources.list
And enter the mirror address there instead of the ellipsis deb … kali-rolling main non-free contrib, for example:
deb http://ftp.acc.umu.se/mirror/kali.org/kali kali-rolling main non-free contrib

Now a specific mirror will be used for the upgrade.

If the mirror is also unavailable, use the following and so on until you find one that works for you.
All other methods are self-sufficient – they do not require to modify the sources.list file.
1. Cannot update Kali Linux because errors
A couple of people in recent days wrote about errors when updating programs in Kali Linux. An example of one of the errors:
Hit:1 https://mirror.karneval.cz/pub/linux/kali kali-rolling InRelease
Err:2 http://deb.i2p2.no unstable InRelease
  502  Connection timed out
Reading package lists… Done
W: Failed to fetch http://deb.i2p2.no/dists/unstable/InRelease  502  Connection timed out
W: Some index files failed to download. They have been ignored, or old ones used instead.
An example of the second error:
W: Failed to fetch https://http.kali.org/kali/dists/kali-rolling/InRelease
Could not find IP address for "http.kali.org"
The very first thing you need to check if you encounter similar problems, is everything all right with your Internet connection – for example, open some web site.
If your Internet connection is alright, then continue. Let’s consider several examples of solving the problem.
«Непростые» запросы
Мы можем использовать любой HTTP-метод: не только , но и , и другие.
Некоторое время назад никто не мог даже предположить, что веб-страница способна делать такие запросы. Так что могут существовать веб-сервисы, которые рассматривают нестандартный метод как сигнал: «Это не браузер». Они могут учитывать это при проверке прав доступа.
Поэтому, чтобы избежать недопониманий, браузер не делает «непростые» запросы (которые нельзя было сделать в прошлом) сразу. Перед этим он посылает предварительный запрос, спрашивая разрешения.
Предварительный запрос использует метод , у него нет тела, но есть два заголовка:
- содержит HTTP-метод «непростого» запроса.
- предоставляет разделённый запятыми список его «непростых» HTTP-заголовков.
Если сервер согласен принимать такие запросы, то он должен ответить без тела, со статусом 200 и с заголовками:
- должен содержать разрешённые методы.
- должен содержать список разрешённых заголовков.
- Кроме того, заголовок может указывать количество секунд, на которое нужно кешировать разрешения. Так что браузеру не придётся посылать предзапрос для последующих запросов, удовлетворяющих данным разрешениям.
Этот запрос не является простым по трём причинам (достаточно одной):
- Метод
- не один из: , , .
- Содержит «непростой» заголовок .
Перед тем, как послать такой запрос, браузер самостоятельно генерирует и посылает предзапрос, который выглядит следующим образом:
- Метод: .
- Путь – точно такой же, как в основном запросе: .
- Особые заголовки:
- – источник.
- – запрашиваемый метод.
- – разделённый запятыми список «непростых» заголовков запроса.
Сервер должен ответить со статусом 200 и заголовками:
- .
Это разрешит будущую коммуникацию, в противном случае возникает ошибка.
Если сервер ожидает в будущем другие методы и заголовки, то он может в ответе перечислить их все сразу, разрешить заранее, например:
Теперь, когда браузер видит, что есть в , а – в списке , он посылает наш основной запрос.
Кроме того, ответ на предзапрос кешируется на время, указанное в заголовке (86400 секунд, один день), так что последующие запросы не вызовут предзапрос. Они будут отосланы сразу при условии, что соответствуют закешированным разрешениям.
Если предзапрос успешен, браузер делает основной запрос. Алгоритм здесь такой же, что и для простых запросов.
Основной запрос имеет заголовок (потому что он идёт на другой источник):
Сервер не должен забывать о добавлении к ответу на основной запрос. Успешный предзапрос не освобождает от этого:
После этого JavaScript может прочитать ответ сервера.
Предзапрос осуществляется «за кулисами», невидимо для JavaScript.
JavaScript получает только ответ на основной запрос или ошибку, если со стороны сервера нет разрешения.
Итого
С точки зрения браузера запросы к другому источнику бывают двух видов: «простые» и все остальные.
должны удовлетворять следующим условиям:
- Метод: GET, POST или HEAD.
- Заголовки – мы можем установить только:
- со значением , или .
Основное их отличие заключается в том, что простые запросы с давних времён выполнялись с использованием тегов или , в то время как непростые долгое время были невозможны для браузеров.
Практическая разница состоит в том, что простые запросы отправляются сразу с заголовком , а для других браузер делает предварительный запрос, спрашивая разрешения.
Для простых запросов:
- → Браузер посылает заголовок с источником.
- ← Для запросов без авторизационных данных (не отправляются умолчанию) сервер должен установить:
- ← Для запросов с авторизационными данными сервер должен установить:
- в то же значение, что и
- в
Дополнительно, чтобы разрешить JavaScript доступ к любым заголовкам ответа, кроме , , , , или , сервер должен перечислить разрешённые в заголовке .
Для непростых запросов перед основным запросом отправляется предзапрос:
- → Браузер посылает запрос на тот же адрес с заголовками:
- – содержит запрашиваемый метод,
- – перечисляет непростые запрашиваемые заголовки.
- ← Сервер должен ответить со статусом 200 и заголовками:
- со списком разрешённых методов,
- со списком разрешённых заголовков,
- с количеством секунд для кеширования разрешений
- → Затем отправляется основной запрос, применяется предыдущая «простая» схема.