Введение в пространства имен в ооп на php
Содержание:
- Пространство имен в PHP:
- Design
- Как использовать интерфейсы API Composition из классического приложения Win32How to use Composition APIs from a Win32 desktop application
- AdministrativeEdit
- Defining a Namespace
- What is a Shell namespace object (shell folder)?
- The using directive
- Файлы заголовков в C++
- Linux Network Namespace
- Other Namespaces
- Why Use Namespaces for Process Isolation?
- Identifying namespaces
- Content namespaces
- Cross-Namespace Communication
- AdvisoryEdit
- Пространство имен
- Development Next steps
- Псевдонимы и вложенные пространства имен
- Классы .NET Framework
- Заключение
Пространство имен в PHP:
Покажу два примера программы, где показывается как работать с пространство имён в PHP.
Вот вам пример кода классов.
PHP
|
1 2 3 4 5 6 7 8 9 10 11 12 13 14 15 16 17 18 19 20 21 22 23 24 25 26 27 28 29 30 31 32 33 34 35 36 37 38 39 40 41 |
// Объявление пространства имён namespaceHome; classUser{ // Объявление свойства name public$name; // Конструктор класса publicfunction__construct($name,$surname){ $this->name=$name; $this->surname=$surname; $this->show_name(); } // Метод для вывода имени publicfunctionshow_name(){ echo»Имя: «.$this->name.»</br>»; echo»Фамилия: «.$this->surname.»</br>»; } } classAdminextendsUser{ // Объявление свойства status c значением admin public$status=’admin’; // Конструктор класса publicfunction__construct($name,$surname){ // Вызов конструктора класса который наследовали parent::__construct($name,$surname); } // Метод для вывода имени publicfunctionshow_name(){ // Вызов метода show_name() parent::show_name(); echo»Статус: «.$this->status.»</br>»; } } |
Теперь разберём этот код, в самом начале объявляется пространство имён, через ключевое слово, как можете заметить у меня называется «Home», но по факту можно любое название использовать, кроме «PHP».
Теперь посмотрите как объявлять класс из пространства имён.
PHP
|
1 2 3 4 |
require_once»user.php»; $user=new\Home\User(«Вася»,»Пупкин»); $admin=new\Home\Admin(«Павел»,»Иванов»); |
Сначала нам нужно подключить файл в котором хранятся наши классы в пространстве имён, делается это через слово , после пишется путь к файлу.
Дальше объявляем объект как обычно, но в название класса, сначала пишем пространство имён, а потом уже через обратный слеш пишем название класса.
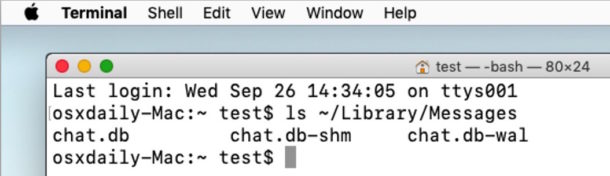
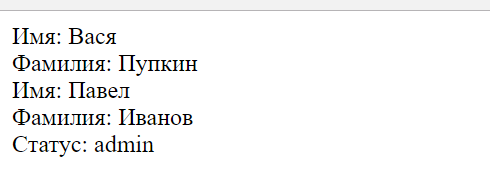
Важно: Пространство имён работает только для классов, функций и константами. Вот результат этой программы
Вот результат этой программы.
Также пространство имён может быть гораздо более большим, из-за чего объявлять объект класса может быть не удобно, вот пример такой программы и как это исправить.
В первом файле с классами, мы просто изменить значение .
PHP
|
1 2 |
// Объявление пространства имён namespaceHome\Users; |
А вот как изменим главный файл.
PHP
|
1 2 3 4 5 6 7 |
require_once»user.php»; useHome\Users asUsers; $user=newUsers\User(«Вася»,»Пупкин»); $admin=newUsers\Admin(«Павел»,»Иванов»); |
Мы создали псевдоним, для этого просто пишем слово , после пишем название пространство имён и слово , после которого пишем слово которым хотим заменить пространство имён, в нашем случае это , теперь не обязательно писать полностью пространство имён и потом класс, достаточно только написать псевдоним и имя класса.
Выводит тоже самое, что и в прошлый раз.
Также можете сделать псевдоним плоть до класса, делаться это будет примерно так.
PHP
|
1 2 3 4 5 6 7 8 |
require_once»user.php»; useHome\Users\User asUser; useHome\Users\Admin asAdmin; $user=newUser(«Вася»,»Пупкин»); $admin=newAdmin(«Павел»,»Иванов»); |
То есть теперь при объявление объекта нужно только использовать имя класса и всё.
Design
The design of user namespaces can be described in several parts:
- hierarchical user namespaces. The init task runs in init_user_ns. If a task with userid 500 does clone with CLONE_NEWUSER, then the resulting task will have userid 500 in the init_user_ns, and userid 0 in a new user_ns. User namespaces are not named, but let’s call it ‘1’ for convenience. So we might describe this task’s uid as (500:0, 0:1), that is, userid 500 in userns 0, and userid 0 in userns 1.
- targeted capabilities. The POSIX capabilities sets currently are context-free — if you have CAP_SYS_ADMIN, you have it, and that’s that. With targeted capabilities, proposed and implemented by Eric Biederman, capabilities are actually targeted to a user namespace, specifically to the deepest user namespace in your hierarchy. In the example above, where a task has userid (500:0, 0:1), if the task has a private network namespace, then it will have CAP_NET_ADMIN to that namespace. If it inherited the init_net_ns, then since that net_ns is owned by init_user_ns, (500:0, 0:1) will not have CAP_NET_ADMIN to its user_ns. The rules specifically are:
-
If current->userns == target->user_ns, and current has capability, then granted
-
If current->user is the creator of target->user_ns, then granted
-
If current->userns is an ancestor of target->user_ns, and current has capability, then granted. (This allows privileged root in init_user_ns to always be privileged to any resource)
- Else denied.
-
- simple file access.
- Every file, at first, will be owned by init_user_ns.
-
If current->user_ns == target->user_ns, then normal userid-based file access rules apply.
-
if current is ns_capable(target->user_ns, CAP_DAC_OVERRIDE), that is, has CAP_DAC_OVERRIDE to target->user_ns, then current gets access.
- Otherwise, current gets the user nobody, or ‘world’, access rights to the file.
- Eventually, three ways will be implemented to make file ownership more flexible:
- Some filesystems, esp proc, will need to mark some files as owned by init_user_ns unconditionally
- A mount option will be implemented to make a whole, new, filesystem owned by the user_ns of the caller of mount, provided that the caller owns the block device (or fstype is virtual), and the fstype is known safe to mount in non-init user_ns.
- Filesystems may implement (and use a generic lib/ implementation of) more flexible uid mapping, described below.
Как использовать интерфейсы API Composition из классического приложения Win32How to use Composition APIs from a Win32 desktop application
При работе с этим руководством вы создадите простое приложение Win32 на C++ и добавите в него элементы композиции UWP.In this tutorial, you create a simple Win32 C++ app and add UWP Composition elements to it
Основное внимание уделяется правильной настройке проекта, созданию кода взаимодействия и отрисовке простых элементов с помощью интерфейсов API Windows Composition.The focus is on correctly configuring the project, creating the interop code, and drawing something simple using Windows Composition APIs. Завершенное приложение выглядит следующим образом.The finished app looks like this
AdministrativeEdit
|
|
|
This user is a confirmed puppet master of one or more abusive sock puppets as determined by CheckUser.The use of abusive sockpuppets on Wookieepedia is prohibited; use of sockpuppets to evade bans results in the ban timer being reset. |
||||||||
|
|
| This user is a suspected sock puppet of ]. | ||||||||
|
|
|
This user is a confirmed sock puppet of ], established by CheckUser. |
||||||||
|
|
|
||||||||
|
|
|
||||||||
|
|
|
||||||||
|
|
Defining a Namespace
A namespace definition begins with the keyword namespace followed by the namespace name as follows −
namespace namespace_name {
   // code declarations
}
To call the namespace-enabled version of either function or variable, prepend (::) the namespace name as follows −
name::code; // code could be variable or function.
Let us see how namespace scope the entities including variable and functions −
#include <iostream>
using namespace std;

// first name space
namespace first_space {
   void func() {
      cout << "Inside first_space" << endl;
   }
}

// second name space
namespace second_space {
   void func() {
      cout << "Inside second_space" << endl;
   }
}

int main () {
   // Calls function from first name space.
   first_space::func();

   // Calls function from second name space.
   second_space::func();

   return 0;
}
If we compile and run above code, this would produce the following result −
Inside first_space
Inside second_space
What is a Shell namespace object (shell folder)?
Shell namespace objects are virtual folders that are powered by a shell extension. Take the case of the Recycle Bin. When you delete a file or folder, the deleted items are stored in a hidden and protected folder with cryptic names assigned to them. If you browse the hidden Recycle Bin’s file system directory using Command Prompt, you’ll know that it’s impossible to find the original file names of the deleted items.

Recycle Bin icon which you see on your desktop is a virtual folder that presents the collection of files and folders from the Recycle Bin store (Recycler or $Recycle.Bin directory) in a special, friendly view.
The using directive
You can also avoid prepending of namespaces with the using namespace directive. This directive tells the compiler that the subsequent code is making use of names in the specified namespace. The namespace is thus implied for the following code −
#include <iostream>
using namespace std;

// first name space
namespace first_space {
   void func() {
      cout << "Inside first_space" << endl;
   }
}

// second name space
namespace second_space {
   void func() {
      cout << "Inside second_space" << endl;
   }
}

using namespace first_space;
int main () {
   // This calls function from first name space.
   func();

   return 0;
}
If we compile and run above code, this would produce the following result −
Inside first_space
The ‘using’ directive can also be used to refer to a particular item within a namespace. For example, if the only part of the std namespace that you intend to use is cout, you can refer to it as follows −
using std::cout;
Subsequent code can refer to cout without prepending the namespace, but other items in the std namespace will still need to be explicit as follows −
#include <iostream>
using std::cout;

int main () {
   cout << "std::endl is used with std!" << std::endl;

   return 0;
}
If we compile and run above code, this would produce the following result −
std::endl is used with std!
Names introduced in a using directive obey normal scope rules. The name is visible from the point of the using directive to the end of the scope in which the directive is found. Entities with the same name defined in an outer scope are hidden.
Файлы заголовков в C++
Пространство имён из примера выше можно перенести в отдельный файл, чтобы потом подключить его к другой программе и избавиться от дополнительного кода в основном файле.
Для этого создайте файл заголовков — сохраните код с расширением .h, например mylib.h:
Здесь нет функции main (), потому что этот код — не самостоятельная программа, а библиотека для других программ. Следовательно, точка входа здесь не нужна. Также мы не подключаем iostream, потому что не собираемся ничего выводить, но вы можете добавить в свой заголовок любые другие файлы.
Поместите mylib.h в папку, где находится ваша программа. Затем добавьте в начало кода команду:
Обратите внимание на двойные кавычки вместо угловых скобок: первые используются для локальных заголовков, а вторые — для системных. Теперь вы можете использовать весь функционал из этой библиотеки:
Теперь вы можете использовать весь функционал из этой библиотеки:
Вот что будет выведено:

Linux Network Namespace
This is where a network namespace becomes useful. A network namespace allows each of these processes to see an entirely different set of networking interfaces. Even the loopback interface is different for each network namespace.
Isolating a process into its own network namespace involves introducing another flag to the function call: ;
Output:
What’s going on here? The physical ethernet device belongs to the global network namespace, as indicated by the “ip” tool run from this namespace. However, the physical interface is not available in the new network namespace. Moreover, the loopback device is active in the original network namespace, but is “down” in the child network namespace.
In order to provide a usable network interface in the child namespace, it is necessary to set up additional “virtual” network interfaces which span multiple namespaces. Once that is done, it is then possible to create Ethernet bridges, and even route packets between the namespaces. Finally, to make the whole thing work, a “routing process” must be running in the global network namespace to receive traffic from the physical interface, and route it through the appropriate virtual interfaces to to the correct child network namespaces. Maybe you can see why tools like Docker, which do all this heavy lifting for you, are so popular!
To do this by hand, you can create a pair of virtual Ethernet connections between a parent and a child namespace by running a single command from the parent namespace:
Here, should be replaced by the process ID of the process in the child namespace as observed by the parent. Running this command establishes a pipe-like connection between these two namespaces. The parent namespace retains the device, and passes the device to the child namespace. Anything that enters one of the ends, comes out through the other end, just as you would expect from a real Ethernet connection between two real nodes. Accordingly, both sides of this virtual Ethernet connection must be assigned IP addresses.
Other Namespaces
There are other namespaces that these processes can be isolated into, namely user, IPC, and UTS. The user namespace allows a process to have root privileges within the namespace, without giving it that access to processes outside of the namespace. Isolating a process by the IPC namespace gives it its own interprocess communication resources, for example, System V IPC and POSIX messages. The UTS namespace isolates two specific identifiers of the system: and .
A quick example to show how UTS namespace is isolated is shown below:
This program yields the following output:
Here, prints the , changes it to something else, and prints it again. Naturally, the change happens only inside the new UTS namespace.
More information on what all of the namespaces provide and isolate can be found in the tutorial here
Why Use Namespaces for Process Isolation?
In a single-user computer, a single system environment may be fine. But on a server, where you want to run multiple services, it is essential to security and stability that the services are as isolated from each other as possible. Imagine a server running multiple services, one of which gets compromised by an intruder. In such a case, the intruder may be able to exploit that service and work his way to the other services, and may even be able compromise the entire server. Namespace isolation can provide a secure environment to eliminate this risk.
For example, using namespacing, it is possible to safely execute arbitrary or unknown programs on your server. Recently, there has been a growing number of programming contest and “hackathon” platforms, such as HackerRank, TopCoder, Codeforces, and many more. A lot of them utilize automated pipelines to run and validate programs that are submitted by the contestants. It is often impossible to know in advance the true nature of contestants’ programs, and some may even contain malicious elements. By running these programs namespaced in complete isolation from the rest of the system, the software can be tested and validated without putting the rest of the machine at risk. Similarly, online continuous integration services, such as Drone.io, automatically fetch your code repository and execute the test scripts on their own servers. Again, namespace isolation is what makes it possible to provide these services safely.
Namespacing tools like Docker also allow better control over processes’ use of system resources, making such tools extremely popular for use by PaaS providers. Services like Heroku and Google App Engine use such tools to isolate and run multiple web server applications on the same real hardware. These tools allow them to run each application (which may have been deployed by any of a number of different users) without worrying about one of them using too many system resources, or interfering and/or conflicting with other deployed services on the same machine. With such process isolation, it is even possible to have entirely different stacks of dependency softwares (and versions) for each isolated environment!
If you’ve used tools like Docker, you already know that these tools are capable of isolating processes in small “containers”. Running processes in Docker containers is like running them in virtual machines, only these containers are significantly lighter than virtual machines. A virtual machine typically emulates a hardware layer on top of your operating system, and then runs another operating system on top of that. This allows you to run processes inside a virtual machine, in complete isolation from your real operating system. But virtual machines are heavy! Docker containers, on the other hand, use some key features of your real operating system, including namespaces, and ensure a similar level of isolation, but without emulating the hardware and running yet another operating system on the same machine. This makes them very lightweight.
Identifying namespaces
There are a number of ways by which the namespace of a particular page can be identified:
- Magic words
The magic word returns the value of the namespace the page is in.
To refer to another namespace, use (e.g. ), or / to refer to the namespace paired with the current one.
- JavaScript
The JavaScript variable contains the full namespace name. The variable contains the numerical index of the namespace.
- CSS
The tag of the HTML page output is given two CSS classes that vary by namespace: A class , where # is the index of the namespace, and , where XXX is «» for all , «» for pages in the Special namespace, and «» for .
So CSS code such as the following can be used to change the appearance of an object based on its namespace:
.ns-subject a {   /* Almost all links on subject pages to be green. */
    color #0f0;
}
.ns-talk a {      /* Links on talk pages to be blue. */
    color #00f;
}
.ns-3 a {         /* and links on user talk pages to be red */
    color #f00;
}
You can get a complete list of all namespace names of a MediaWiki installation from the Search results page Advanced tab, or from any recent changes page such as contributions or watchlist in its options box, in a drop-down list.
For the system properties of each namespace, use the MediaWiki API:
- API
Content namespaces
When building the site statistics page (see Special:Statistics), MediaWiki uses values stored in the database to calculate certain totals.
One particular total is the «number of articles» or «number of content pages» figure.
For a page to be considered an article, or proper content, it must:
- Be in the main namespace, or a defined content namespace
- Not be a redirect page
- Contain at least one
When creating custom namespaces to hold additional content, it is a good idea to indicate this in the configuration.
This is done via the $wgContentNamespaces configuration directive.
To extend the example above, one might add the following to :
$wgContentNamespaces[] = 3000;
-
- or
$wgContentNamespaces[] = NS_FOO;
MediaWiki will now consider pages in the «Foo» namespace to be articles, if they meet the remaining criteria, and will include them when updating the site statistics counters.
Running maintenance scripts
When adjusting the value of $wgContentNamespaces, it is a good idea to run either the maintenance/updateArticleCount.php or maintenance/initSiteStats.php script to update the internal statistics cache (see Manual:Скрипты обслуживания ).
Cross-Namespace Communication
Often it is necessary to establish some sort of communication between the parent and the child namespace. This might be for doing configuration work within an isolated environment, or it can simply be to retain the ability to peek into the condition of that environment from outside. One way of doing that is to keep an SSH daemon running within that environment. You can have a separate SSH daemon inside each network namespace. However, having multiple SSH daemons running uses a lot of valuable resources like memory. This is where having a special “init” process proves to be a good idea again.
The “init” process can establish a communication channel between the parent namespace and the child namespace. This channel can be based on UNIX sockets or can even use TCP. To create a UNIX socket that spans two different mount namespaces, you need to first create the child process, then create the UNIX socket, and then isolate the child into a separate mount namespace. But how can we create the process first, and isolate it later? Linux provides . This special system call allows a process to isolate itself from the original namespace, instead of having the parent isolate the child in the first place. For example, the following code has the exact same effect as the code previously mentioned in the network namespace section:
And since the “init” process is something you have devised, you can make it do all the necessary work first, and then isolate itself from the rest of the system before executing the target child.
AdvisoryEdit
|
||||||||
|
|
|
||||||||
|
|
|
||||||||
|
|
|
Warning: The following section is fanon. It is the biography of a user’s imaginary persona in the Star Wars universe, and should not be mistaken for canon. |
||||||||
|
|
| Fanon information ends here. | ||||||||
|
|
|
||||||||
|
|
|
||||||||
|
|
|
||||||||
|
|
Пространство имен
В первых версиях C++ все идентификаторы из Стандартной библиотеки C++ (такие как cin/cout и т.д.) можно было использовать напрямую. Тем не менее, это означало, что любой идентификатор из Стандартной библиотеки С++ потенциально мог конфликтовать с именем, которое вы выбрали для ваших собственных идентификаторов. Код, который работал, мог внезапно получить конфликт имен при подключении нового заголовочного файла из Стандартной библиотеки С++. Или, что ещё хуже, код, написанный по стандартам одной версии С++, мог уже не работать в новой версии С++. Чтобы устранить данную проблему, весь функционал Стандартной библиотеки С++ перенесли в специальную область — пространство имен (англ. «namespace»).
Аналогично тому, как город гарантирует, что все улицы в его пределах имеют уникальные названия, так и пространство имен гарантирует, что все его идентификаторы — уникальны.
Таким образом, состоит из двух частей: идентификатор и пространство имен . Весь функционал Стандартной библиотеки C++ определен внутри пространства имен (сокр. от англ. «standard»).
Мы ещё поговорим о пространствах имен на следующих уроках, а также рассмотрим создание своего собственного пространства имен. Сейчас, главное, что вам нужно запомнить, — это то, что всякий раз, когда вы используете идентификаторы из Стандартной библиотеки С++ (например, cout), вы должны сообщать компилятору, что этот идентификатор находится внутри пространства имен std.
Правило: При использовании идентификаторов из пространства имен — указывайте используемое пространство имен.
Development Next steps
I’ve been thinking about how to best approach the development of the remaining features. I intend to do it in 3 steps:
- First, I’ll painstakingly go through the kernel addressing capable() calls and uid comparisons which allow a task in a non-init namespace to get privilege it shouldn’t have. I expect to spend the next few months on that effort. I hope to start pushing patches upstream in the meantime. The end-result from this effort, if pushed upstream, would be a user namespace which can be used for sandboxing of very simple apps.
- Next, I’ll likely add the ability for a full filesystem to be owned by a non-init userns. This in itself will include:
- Tagging fstypes if they are safe to mount in non-init userns.
- A mount flag to mount a filesystem in your own userns, which is only allowed if the fs is virtual or the backing device or file is owned by your userns, and is marked as safe to mount in non-init userns.
-
No new uid translations will be introduced. inode->i_uid will always be the owning userid.
- A filesystem like proc will need to mark files which allow control of host resources as always owned by init_user_ns
- Finally, full-fledged uid mapping will be introduced, as described above.
At the end of the first step, we may have a user namespace which is safe for unprivileged users to unshare.
At the end of the second step, we should have something which full containers are able to use.
At the end of the third step, we have something which more complicated application containers (which bind-mount part of the hostfs into themselves) can use, and which users can safely use to mount removable filesystems from other hosts with different userid mappings. Furthermore, I believe we’ll have full in-kernel support for what the ‘fakeroot’ utility currently does.
Links:
a patchset implementing user namespace knowledge in VFS from 2008: https://lists.linux-foundation.org/pipermail/containers/2008-August/012679.html
Псевдонимы и вложенные пространства имен
Одни пространства имен могут быть вложены в другие пространства имен. Например:
#include <iostream>
namespace Boo
{
namespace Doo
{
const int g_x = 7;
}
}
int main()
{
std::cout << Boo::Doo::g_x;
return 0;
}
|
1 |
#include <iostream> namespaceBoo { namespaceDoo { constintg_x=7; } } intmain() { std::cout<<Boo::Doo::g_x; return; } |
Обратите внимание, поскольку находится внутри , то доступ к осуществляется через. Так как это не всегда удобно и эффективно, то C++ позволяет создавать псевдонимы для пространств имен:
Так как это не всегда удобно и эффективно, то C++ позволяет создавать псевдонимы для пространств имен:
#include <iostream>
namespace Boo
{
namespace Doo
{
const int g_x = 7;
}
}
namespace Foo = Boo::Doo; // Foo теперь считается как Boo::Doo
int main()
{
std::cout << Foo::g_x; // это, на самом деле, Boo::Doo::g_x
return 0;
}
|
1 |
#include <iostream> namespaceBoo { namespaceDoo { constintg_x=7; } } namespaceFoo=Boo::Doo;// Foo теперь считается как Boo::Doo intmain() { std::cout<<Foo::g_x;// это, на самом деле, Boo::Doo::g_x return; } |
Стоит отметить, что пространства имен в C++ не были разработаны, как способ реализации информационной иерархии — они были разработаны в качестве механизма предотвращения возникновения конфликтов имен. Как доказательство этому, вся Стандартная библиотека шаблонов находится в единственном пространстве имен .
Вложенность пространств имен не рекомендуется использовать, так как при неумелом использовании увеличивается вероятность возникновения ошибок и дополнительно усложняется логика программы.
Классы .NET Framework
Возможно, наибольшее преимущество написания управляемого кода — по крайней
мере, с точки зрения разработчика — состоит в том, что вы получаете возможность использовать библиотеку базовых классов .NET.
Базовые классы .NET представляют огромную коллекцию классов управляемого кода,
позволяющие решать практически любые задачи, которые раньше можно было решать с помощью Windows API. Все эти классы следуют той же объектной модели IL с одиночным
наследованием. Это значит, что можно либо создавать объекты любого из базовых классов .NET, либо наследовать от них собственные классы.
Отличие базовых классов .NET заключается в том, что они спроектированы интуитивно понятными и простыми в использовании. Например, для запуска потока необходимо вызвать метод Start() класса Thread. Чтобы сделать недоступным объект TextBox,
свойству Enabled этого объекта присваивается значение false. Такой подход, хорошо
знакомый разработчикам Visual Basic и Java, чьи библиотеки использовать столь же легко, принесет огромное облегчение разработчикам С++, которым в течение многих лет приходилось «воевать» с такими API-функциями, как GetDIBits(), RegisterWndClassEx() и
IsEqualIID(), а также с множеством функций, которые требовали передачи дескрипторов окон.
Однако разработчики на С++ всегда имели легкий доступ к полному набору Windows API, в то время как разработчики на Visual Basic 6 и Java были ограничены в использовании базовой функциональности операционной системы, доступ к которой они получали
из своих языков. Что касается базовых классов .NET, то они комбинируют простоту использования, присущую библиотекам Visual Basic и Java, с относительно полным покрытием набора функций Windows API. Многие средства Windows не доступны через базовые
классы, и в этих случаях придется обращаться к API-функциям, но, в общем, это касается
лишь наиболее экзотических функций. Для каждодневного применения набора базовых
классов, в основном, будет достаточно. Но если понадобится вызвать API-функцию, то для
этого .NET предоставляет так называемый механизм вызова платформы (platform-invoke),
гарантирующий корректное преобразование типов данных, поэтому теперь эта задача не труднее, чем вызов этих функций непосредственно из кода С++, причем независимо от того, на каком языке пишется код — C#, С++ или Visual Basic 2010.
Заключение
Библиотеки и пространства имён — это полезные инструменты для каждого разработчика. В интернете есть готовые решения для любых задач, поэтому многие работодатели ищут специалистов, которые разбираются в определённой библиотеке.
Если вы часто работаете над однотипными проектами, можете написать для себя библиотеку и подключать её во все проекты, чтобы ускорить работу. Однако новичкам стоит стараться писать код каждый раз заново — так вы сможете его постоянно переосмысливать и замечать то, чего раньше не замечали.
Если вы хотите освоить С++, то можете пройти наш курс. В нём все аспекты языка разбираются детально и на практике, а в конце каждого задания вы получаете обратную связь от преподавателей.