Python’s requests library (guide)
Содержание:
- Matching Request Parameters
- Parameter Values
- Transport Adapters
- Quick Overview of HTTP Requests
- Dynamic Responses
- Наш первый запрос
- Proxies
- Learning Python
- Event Hooks
- Using Python requests
- Headers
- Использование Translate API
- Коды состояния
- Conclusion
- POST Multiple Multipart-Encoded Files
- Conclusion#
- Basics
- Getting Python
- Migrating to 1.x
- Request-URI
- Our First Request
- Status Codes
- Streaming Requests
- Viewing/Modifying registered responses
- API and Module Auto-Generated Documentation
Matching Request Parameters
When adding responses for endpoints that are sent request data you can add
matchers to ensure your code is sending the right parameters and provide
different responses based on the request body contents. Responses provides
matchers for JSON and URLencoded request bodies and you can supply your own for
other formats.
import responses
import requests

@responses.activate
def test_calc_api():
    responses.add(
        responses.POST,
        url='http://calc.com/sum',
        body=4,
        match=
            responses.urlencoded_params_matcher({"left" 1, "right" 3})

    )
    requests.post("http://calc.com/sum", data={"left" 1, "right" 3})
Parameter Values
| Parameter | Description | |
|---|---|---|
| url | Try it | Required. The url of the request |
| params | Try it | Optional. A dictionary, list of tuples or bytes to send as a query string.Default |
| allow_redirects | Try it | Optional. A Boolean to enable/disable redirection.Default (allowing redirects) |
| auth | Try it | Optional. A tuple to enable a certain HTTP authentication.Default |
| cert | Try it | Optional. A String or Tuple specifying a cert file or key.Default |
| cookies | Try it | Optional. A dictionary of cookies to send to the specified url.Default |
| headers | Try it | Optional. A dictionary of HTTP headers to send to the specified url.Default |
| proxies | Try it | Optional. A dictionary of the protocol to the proxy url.Default |
| stream | Try it | Optional. A Boolean indication if the response should be immediately downloaded (False) or streamed (True).Default |
| timeout | Try it | Optional. A number, or a tuple, indicating how many seconds to wait for the client to make a connection and/or send a response.Default which means the request will continue until the connection is closed |
| verify |
Try it Try it |
Optional. A Boolean or a String indication to verify the servers TLS certificate or not.Default |
Transport Adapters
As of v1.0.0, Requests has moved to a modular internal design. Part of the
reason this was done was to implement Transport Adapters, originally
described here. Transport Adapters provide a mechanism to define interaction
methods for an HTTP service. In particular, they allow you to apply per-service
configuration.
Requests ships with a single Transport Adapter, the . This adapter provides the default Requests
interaction with HTTP and HTTPS using the powerful urllib3 library. Whenever
a Requests is initialized, one of these is
attached to the object for HTTP, and one
for HTTPS.
Requests enables users to create and use their own Transport Adapters that
provide specific functionality. Once created, a Transport Adapter can be
mounted to a Session object, along with an indication of which web services
it should apply to.
>>> s = requests.Session()
>>> s.mount('https://github.com/', MyAdapter())
The mount call registers a specific instance of a Transport Adapter to a
prefix. Once mounted, any HTTP request made using that session whose URL starts
with the given prefix will use the given Transport Adapter.
Many of the details of implementing a Transport Adapter are beyond the scope of
this documentation, but take a look at the next example for a simple SSL use-
case. For more than that, you might look at subclassing the
.
Quick Overview of HTTP Requests
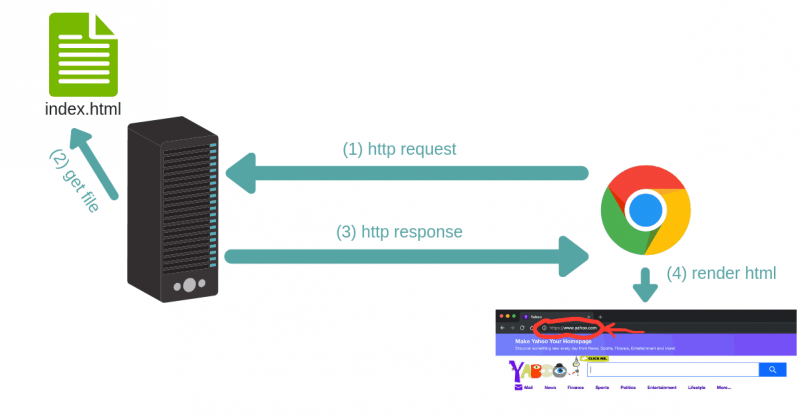
HTTP requests are how the web works. Every time you navigate to a web page, your browser makes multiple requests to the web page’s server. The server then responds with all the data necessary to render the page, and your browser then actually renders the page so you can see it.
The generic process is this: a client (like a browser or Python script using Requests) will send some data to a URL, and then the server located at the URL will read the data, decide what to do with it, and return a response to the client. Finally, the client can decide what to do with the data in the response.
Part of the data the client sends in a request is the request method. Some common request methods are GET, POST, and PUT. GET requests are normally for reading data only without making a change to something, while POST and PUT requests generally are for modifying data on the server. So for example, the Stripe API allows you to use POST requests to create a new charge so a user can purchase something from your app.
This article will cover GET requests only because we won’t be modifying any data on a server.
When sending a request from a Python script or inside a web app, you, the developer, gets to decide what gets sent in each request and what to do with the response. So let’s explore that by first sending a request to Scotch.io and then by using a language translation API.
Dynamic Responses
You can utilize callbacks to provide dynamic responses. The callback must return
a tuple of (status, headers, body).
import json

import responses
import requests

@responses.activate
def test_calc_api():

    def request_callback(request):
        payload = json.loads(request.body)
        resp_body = {'value' sum(payload'numbers'])}
        headers = {'request-id' '728d329e-0e86-11e4-a748-0c84dc037c13'}
        return (200, headers, json.dumps(resp_body))

    responses.add_callback(
        responses.POST, 'http://calc.com/sum',
        callback=request_callback,
        content_type='application/json',
    )

    resp = requests.post(
        'http://calc.com/sum',
        json.dumps({'numbers' 1, 2, 3]}),
        headers={'content-type' 'application/json'},
    )

    assert resp.json() == {'value' 6}

    assert len(responses.calls) == 1
    assert responses.calls.request.url == 'http://calc.com/sum'
    assert responses.calls.response.text == '{"value": 6}'
    assert (
        responses.calls.response.headers'request-id' ==
        '728d329e-0e86-11e4-a748-0c84dc037c13'
    )
You can also pass a compiled regex to add_callback to match multiple urls:
import re, json

from functools import reduce

import responses
import requests

operators = {
  'sum' lambda x, y x+y,
  'prod' lambda x, y x*y,
  'pow' lambda x, y x**y
}

@responses.activate
def test_regex_url():

    def request_callback(request):
        payload = json.loads(request.body)
        operator_name = request.path_url1:]

        operator = operatorsoperator_name

        resp_body = {'value' reduce(operator, payload'numbers'])}
        headers = {'request-id' '728d329e-0e86-11e4-a748-0c84dc037c13'}
        return (200, headers, json.dumps(resp_body))

    responses.add_callback(
        responses.POST,
        re.compile('http://calc.com/(sum|prod|pow|unsupported)'),
        callback=request_callback,
        content_type='application/json',
    )

    resp = requests.post(
        'http://calc.com/prod',
        json.dumps({'numbers' 2, 3, 4]}),
        headers={'content-type' 'application/json'},
    )
    assert resp.json() == {'value' 24}

test_regex_url()
If you want to pass extra keyword arguments to the callback function, for example when reusing
a callback function to give a slightly different result, you can use functools.partial:
from functools import partial

...

    def request_callback(request, id=None):
        payload = json.loads(request.body)
        resp_body = {'value' sum(payload'numbers'])}
        headers = {'request-id' id}
        return (200, headers, json.dumps(resp_body))

    responses.add_callback(
        responses.POST, 'http://calc.com/sum',
        callback=partial(request_callback, id='728d329e-0e86-11e4-a748-0c84dc037c13'),
        content_type='application/json',
    )
You can see params passed in the original request in responses.calls[].request.params:
Наш первый запрос
Для начала мы используем библиотеку Requests для отправки запроса на сайт Scotch.io. Создайте файл с именем и добавьте в него следующий код. В этой статье мы рассматриваем небольшое количество кода, поэтому если что-то изменится, вы можете просто обновить существующий код вместо добавления новых строк.
script.py
Этот код просто отправляет запрос GET на сайт Scotch.io. Это такой же тип запроса, какой используется вашим браузером для просмотра этой страницы, и единственное отличие заключается в том, что библиотека Requests не может выполнить рендеринг кода HTML, и поэтому вы получите просто код HTML и другую информацию, содержащуюся в ответе.
Здесь мы используем функцию , однако Requests также позволяет использовать при отправке запросов и другие функции, в том числе и .
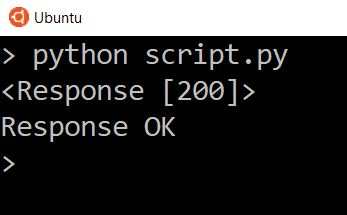
Для отправки запроса нужно запустить файл script.py.
Вот что вы получите в результате: запуск 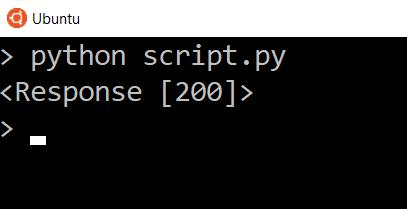 .
.
Proxies
If you need to use a proxy, you can configure individual requests with the
argument to any request method:
import requests

proxies = {
  'http' 'http://10.10.1.10:3128',
  'https' 'http://10.10.1.10:1080',
}

requests.get('http://example.org', proxies=proxies)
You can also configure proxies by setting the environment variables
and .
$ export HTTP_PROXY="http://10.10.1.10:3128"
$ export HTTPS_PROXY="http://10.10.1.10:1080"

$ python
>>> import requests
>>> requests.get('http://example.org')
To use HTTP Basic Auth with your proxy, use the http://user:password@host/ syntax:
proxies = {'http' 'http://user:pass@10.10.1.10:3128/'}
To give a proxy for a specific scheme and host, use the
scheme://hostname form for the key. This will match for
any request to the given scheme and exact hostname.
proxies = {'http://10.20.1.128' 'http://10.10.1.10:5323'}
Note that proxy URLs must include the scheme.
Learning Python
Next, read a tutorial and try some simple experiments with your new Python interpreter.
-
If you have never programmed before, see BeginnersGuide/NonProgrammers for a list of suitable tutorials.
-
If you have previous programming experience, consult BeginnersGuide/Programmers, which lists more advanced tutorials.
-
If English isn’t your first language, you might be more comfortable with a tutorial that’s been translated into your language. Consult python.org’s list of Non-English resources.
Most tutorials assume that you know how to run a program on your computer. If you are using Windows and need help with this, see .
Some sites offer in-browser coding for those who want to learn Python:
-
Dataquest for Python for data science.
-
HackInScience free and open source platform.
-
High School Technology Services for general Python
Print a cheat sheet of the most important Python features and post it to your office wall until you know the basics well.
Once you have read a tutorial, you can browse through Python’s online documentation. It includes a tutorial that might come in handy, a Library Reference that lists all of the modules that come standard with Python, and the Language Reference for a complete (if rather dry) explanation of Python’s syntax.
When you are ready to write your first program, you will need a text editor or an IDE. If you don’t want to use Thonny or something more advanced, then you can use IDLE, which is bundled with Python and supports extensions.
This Python wiki also contains a page about Python One-Liners — an obscure but interesting subculture in Python.
Event Hooks
Requests has a hook system that you can use to manipulate portions of
the request process, or signal event handling.
Available hooks:
- The response generated from a Request.
You can assign a hook function on a per-request basis by passing a
dictionary to the request
parameter:
hooks={'response' print_url}
That will receive a chunk of data as its first
argument.
def print_url(r, *args, **kwargs):
    print(r.url)
If an error occurs while executing your callback, a warning is given.
If the callback function returns a value, it is assumed that it is to
replace the data that was passed in. If the function doesn’t return
anything, nothing else is affected.
def record_hook(r, *args, **kwargs):
    r.hook_called = True
    return r
Let’s print some request method arguments at runtime:
>>> requests.get('https://httpbin.org/', hooks={'response' print_url})
https://httpbin.org/
<Response >
You can add multiple hooks to a single request. Let’s call two hooks at once:
>>> r = requests.get('https://httpbin.org/', hooks={'response' print_url, record_hook]})
>>> r.hook_called
True
You can also add hooks to a instance. Any hooks you add will then
be called on every request made to the session. For example:
>>> s = requests.Session()
>>> s.hooks'response'.append(print_url)
>>> s.get('https://httpbin.org/')
 https://httpbin.org/
 <Response >
Using Python requests
We will use the module requests for learning about http request.
pip install requests
In the below example we see a case of simple GET request annd print out the result of the response. We choose to print only the first 300 characters.
# How to make http request
import requests as req
r = req.get('http://www.tutorialspoint.com/python/')
print(r.text)
When we run the above program, we get the following output −
<!DOCTYPE html>
<!--><html class="ie ie8"> <!-->
<!--><html class="ie ie9"> <!-->
<!--><!-->	<html> <!--<!-->
<head>
<!-- Basic -->
<meta charset="utf-8">
<title>Python Tutorial</title>
<meta name="description" content="Python Tutorial
Previous Page
Print Page
Next Page
Headers
Another thing you can get from the response are the headers. You can take a look at them by using the headers dictionary on the response object.
Headers are sent along with the request and returned in the response. Headers are used so both the client and the server know how to interpret the data that is being sent and received in the response/response.
We see the various headers that are returned. A lot of times you won’t need to use the header information directly, but it’s there if you need it.
The content type is usually the one you may need because it reveals the format of the data, for example HTML, JSON, PDF, text, etc. But the content type is normally handled by Requests so you can easily access the data that gets returned.
Использование Translate API
Теперь перейдем к чему-то более интересному. Мы используем API Яндекс.Перевод (Yandex Translate API) для выполнения запроса на перевод текста на другой язык.
Чтобы использовать API, нужно предварительно войти в систему. После входа в систему перейдите к Translate API и создайте ключ API. Когда у вас будет ключ API, добавьте его в свой файл в качестве константы. Далее приведена ссылка, с помощью которой вы можете сделать все перечисленное: https://tech.yandex.com/translate/
script.py
Ключ API нужен, чтобы Яндекс мог проводить аутентификацию каждый раз, когда мы хотим использовать его API. Ключ API представляет собой облегченную форму аутентификации, поскольку он добавляется в конце URL запроса при отправке.
Чтобы узнать, какой URL нам нужно отправить для использования API, посмотрим документацию Яндекса.
Там мы найдем всю информацию, необходимую для использования их Translate API для перевода текста.
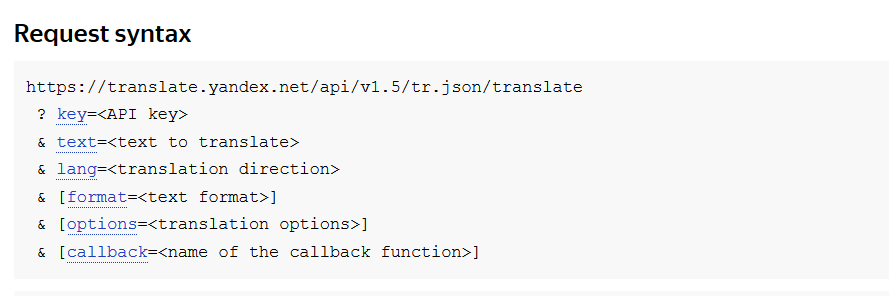
Если вы видите URL с символами амперсанда (&), знаками вопроса (?) или знаками равенства (=), вы можете быть уверены, что это URL запроса GET. Эти символы задают сопутствующие параметры для URL.
Обычно все, что размещено в квадратных скобках ([]), будет необязательным. В данном случае для запроса необязательны формат, опции и обратная связь, но обязательны параметры key, text и lang.
Добавим код для отправки на этот URL. Замените первый созданный нами запрос на следующий:
script.py
Существует два способа добавления параметров. Мы можем прямо добавить параметры в конец URL, или библиотека Requests может сделать это за нас. Для последнего нам потребуется создать словарь параметров. Нам нужно указать три элемента: ключ, текст и язык. Создадим словарь, используя ключ API, текст и язык , т. к. нам требуется перевод с английского на испанский.
Другие коды языков можно посмотреть здесь. Нам нужен столбец 639-1.
Мы создаем словарь параметров, используя функцию , и передаем ключи и значения, которые хотим использовать в нашем словаре.
script.py
Теперь возьмем словарь параметров и передадим его функции .
script.py
Когда мы передаем параметры таким образом, Requests автоматически добавляет параметры в URL за нас.
Теперь добавим команду печати текста ответа и посмотрим, что мы получим в результате.
script.py
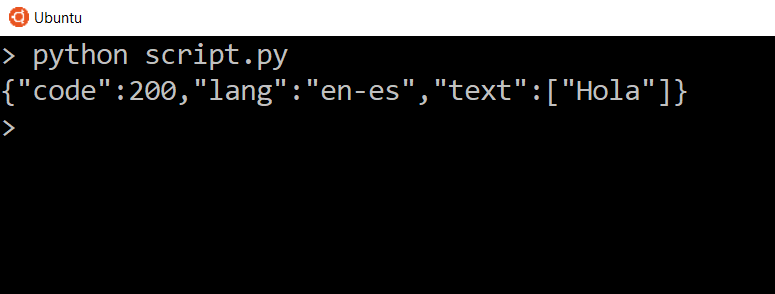
Мы видим три вещи. Мы видим код состояния, который совпадает с кодом состояния ответа, мы видим заданный нами язык и мы видим переведенный текст внутри списка. Итак, мы должны увидеть переведенный текст .
Повторите эту процедуру с кодом языка en-fr, и вы получите ответ .
script.py

Посмотрим заголовки полученного ответа.
script.py

Разумеется, заголовки должны быть другими, поскольку мы взаимодействуем с другим сервером, но в данном случае мы видим тип контента application/json вместо text/html. Это означает, что эти данные могут быть интерпретированы в формате JSON.
Если ответ имеет тип контента application/json, библиотека Requests может конвертировать его в словарь и список, чтобы нам было удобнее просматривать данные.
Для обработки данных в формате JSON мы используем метод на объекте response.
Если вы распечатаете его, вы увидите те же данные, но в немного другом формате.
script.py
 Причина отличия заключается в том, что это уже не обычный текст, который мы получаем из файла res.text. В данном случае это печатная версия словаря.
Допустим, нам нужно получить доступ к тексту. Поскольку сейчас это словарь, мы можем использовать ключ текста.
script.py
 Теперь мы видим данные только для этого одного ключа. В данном случае мы видим список из одного элемента, так что если мы захотим напрямую получить текст в списке, мы можем использовать указатель для доступа к нему.
script.py
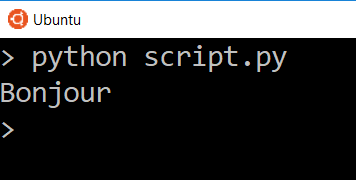
Теперь мы видим только переведенное слово.
Разумеется, если мы изменим параметры, мы получим другие результаты. Изменим переводимый текст с на , изменим язык перевода на испанский и снова отправим запрос.
script.py
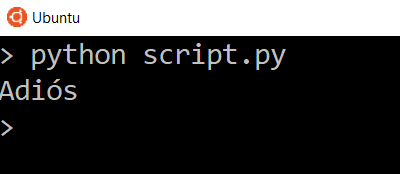 Попробуйте перевести более длинный текст на другие языки и посмотрите, какие ответы будет вам присылать API.
Коды состояния
Прежде всего мы проверим код состояния. Коды HTTP находятся в диапазоне от 1XX до 5XX. Наверняка вы уже знакомы с кодами состояния 200, 404 и 500.
Далее мы приведем краткий обзор значений кодов состояния:
- 1XX — информация
- 2XX — успешно
- 3XX — перенаправление
- 4XX — ошибка клиента (ошибка на вашей стороне)
- 5XX — ошибка сервера (ошибка на их стороне)
Обычно при выполнении наших собственных запросов мы хотим получить коды состояния в диапазоне 200.
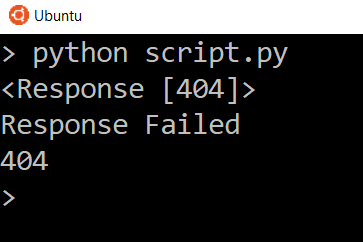
Библиотека Requests понимает, что коды состояния 4XX и 5XX сигнализируют об ошибках, и поэтому при возврате этих кодов состояния объекту ответа на запрос присваивается значение .
Проверив истинность ответа, вы можете убедиться, что запрос успешно обработан. Например:
script.py
Сообщение Response Failed появится только при возврате кода состояния 400 или 500. Попробуйте заменить URL на несуществующий, чтобы увидеть ошибку ответа 404.
Чтобы посмотреть код состояния, добавьте следующую строку:
script.py
Так вы увидите код состояния и сможете сами его проверить.
Conclusion
Here’s what we learned:
- How HTTP requests work
- The various status codes possible in a response
- How to send requests and receive responses using the Python Requests library
- How to use a language translation API to translate text
- How to convert application/json content responses to dictionariesThat covers the basics of Requests in Python. Of course you can do so much more, but what I talked about in this article is the foundation of most requests. Things may change slightly depending on the circumstances, but the basic ideas will remain the same.
If you want to do more, check out https://apilist.fun/ to see different APIs that are available, and try to use them with Python Requests.
POST Multiple Multipart-Encoded Files
You can send multiple files in one request. For example, suppose you want to
upload image files to an HTML form with a multiple file field ‘images’:
<input type="file" name="images" multiple="true" required="true"/>
To do that, just set files to a list of tuples of :
>>> url = 'https://httpbin.org/post'
>>> multiple_files =
...     ('images', ('foo.png', open('foo.png', 'rb'), 'image/png')),
...     ('images', ('bar.png', open('bar.png', 'rb'), 'image/png'))]
>>> r = requests.post(url, files=multiple_files)
>>> r.text
{
  ...
  'files': {'images': 'data:image/png;base64,iVBORw ....'}
  'Content-Type': 'multipart/form-data; boundary=3131623adb2043caaeb5538cc7aa0b3a',
  ...
}
Conclusion#
You’ve come a long way in learning about Python’s powerful library.
You’re now able to:
- Make requests using a variety of different HTTP methods such as , , and
- Customize your requests by modifying headers, authentication, query strings, and message bodies
- Inspect the data you send to the server and the data the server sends back to you
- Work with SSL Certificate verification
- Use effectively using , , Sessions, and Transport Adapters
Because you learned how to use , you’re equipped to explore the wide world of web services and build awesome applications using the fascinating data they provide.
Basics
The core of responses comes from registering mock responses:
import responses
import requests

@responses.activate
def test_simple():
    responses.add(responses.GET, ,
                  json={'error' 'not found'}, status=404)

    resp = requests.get()

    assert resp.json() == {"error" "not found"}

    assert len(responses.calls) == 1
    assert responses.calls.request.url ==
    assert responses.calls.response.text == '{"error": "not found"}'
If you attempt to fetch a url which doesn’t hit a match, responses will raise
a ConnectionError:
import responses
import requests

from requests.exceptions import ConnectionError

@responses.activate
def test_simple():
    with pytest.raises(ConnectionError):
        requests.get()
Lastly, you can pass an Exception as the body to trigger an error on the request:
Getting Python
Next, install the Python 3 interpreter on your computer. This is the program that reads Python programs and carries out their instructions; you need it before you can do any Python programming. Mac and Linux distributions may include an outdated version of Python (Python 2), but you should install an updated one (Python 3). See BeginnersGuide/Download for instructions to download the correct version of Python.
There are also Python interpreter and IDE bundles available, such as Thonny. Other options can be found at IntegratedDevelopmentEnvironments.
At some stage, you’ll want to edit and save your program code. Take a look at HowToEditPythonCode for some advice and recommendations.
Migrating to 1.x
This section details the main differences between 0.x and 1.x and is meant
to ease the pain of upgrading.
API Changes
-
is now a callable and not a property of a response.
import requests r = requests.get('https://github.com/timeline.json') r.json() # This *call* raises an exception if JSON decoding fails -
The API has changed. Sessions objects no longer take parameters.
is also now capitalized, but it can still be
instantiated with a lowercase for backwards compatibility.s = requests.Session() # formerly, session took parameters s.auth = auth s.headers.update(headers) r = s.get('https://httpbin.org/headers') -
All request hooks have been removed except ‘response’.
-
Authentication helpers have been broken out into separate modules. See
requests-oauthlib and requests-kerberos.
-
The parameter for streaming requests was changed from to
and the logic was inverted. In addition, is now
required for raw response reading.# in 0.x, passing prefetch=False would accomplish the same thing r = requests.get('https://github.com/timeline.json', stream=True) for chunk in r.iter_content(8192): ... -
The parameter to the requests method has been removed. Some of
these options are now configured on a such as keep-alive and
maximum number of redirects. The verbosity option should be handled by
configuring logging.import requests import logging # Enabling debugging at http.client level (requests->urllib3->http.client) # you will see the REQUEST, including HEADERS and DATA, and RESPONSE with HEADERS but without DATA. # the only thing missing will be the response.body which is not logged. try # for Python 3 from http.client import HTTPConnection except ImportError from httplib import HTTPConnection HTTPConnection.debuglevel = 1 logging.basicConfig() # you need to initialize logging, otherwise you will not see anything from requests logging.getLogger().setLevel(logging.DEBUG) requests_log = logging.getLogger("urllib3") requests_log.setLevel(logging.DEBUG) requests_log.propagate = True requests.get('https://httpbin.org/headers')
Request-URI
The Request-URI is a Uniform Resource Identifier and identifies the resource upon which to apply the request. Following are the most commonly used forms to specify an URI:
Request-URI = "*" | absoluteURI | abs_path | authority
| S.N. | Method and Description |
|---|---|
| 1 | The asterisk * is used when an HTTP request does not apply to a particular resource, but to the server itself, and is only allowed when the method used does not necessarily apply to a resource. For example:
OPTIONS * HTTP/1.1 |
| 2 | The absoluteURI is used when an HTTP request is being made to a proxy. The proxy is requested to forward the request or service from a valid cache, and return the response. For example:
GET http://www.w3.org/pub/WWW/TheProject.html HTTP/1.1 |
| 3 | The most common form of Request-URI is that used to identify a resource on an origin server or gateway. For example, a client wishing to retrieve a resource directly from the origin server would create a TCP connection to port 80 of the host «www.w3.org» and send the following lines:
GET /pub/WWW/TheProject.html HTTP/1.1 Host: www.w3.org Note that the absolute path cannot be empty; if none is present in the original URI, it MUST be given as «/» (the server root). |
Our First Request
To start, let’s use Requests for something simple: requesting the Scotch.io site. Create a file called script.py and add the following code to it. In this article, we won’t have much code to work with, so when something changes you can just update the existing code instead of adding new lines.
So all this code is doing is sending a GET request to Scotch.io. This is the same type of request your browser sent to view this page, but the only difference is that Requests can’t actually render the HTML, so instead you will just get the raw HTML and the other response information.
We’re using the .get() function here, but Requests allows you to use other functions like .post() and .put() to send those requests as well.
You can run it by executing the script.py file.
And here’s what you get in return:
Status Codes
The first thing we can do is check the status code. HTTP codes range from the 1XX to 5XX. Common status codes that you have probably seen are 200, 404, and 500.
Here’s a quick overview of what each status code means:
- 1XX — Information
- 2XX — Success
- 3XX — Redirect
- 4XX — Client Error (you messed up)
- 5XX — Server Error (they messed up)
Generally, what you’re looking for when you perform your own requests are status codes in the 200s.
Requests recognizes that 4XX and 5XX status codes are errors, so if those status codes get returned, the response object from the request evaluates to False.
You can test if a request responded successfully by simply checking the response for truth. For example:
The message «Response Failed» will only appear if a 400 or 500 status code returns. Try changing the URL to some nonsense to see the response fail with a 404.
You can take a look at the status code directly by doing:
This will show you the status code directly so you can check the number yourself.
Streaming Requests
With you can easily
iterate over streaming APIs such as the Twitter Streaming
API. Simply
set to and iterate over the response with
:
import json
import requests

r = requests.get('https://httpbin.org/stream/20', stream=True)

for line in r.iter_lines():

    # filter out keep-alive new lines
    if line
        decoded_line = line.decode('utf-8')
        print(json.loads(decoded_line))
When using decode_unicode=True with
or
, you’ll want
to provide a fallback encoding in the event the server doesn’t provide one:
r = requests.get('https://httpbin.org/stream/20', stream=True)

if r.encoding is None
    r.encoding = 'utf-8'

for line in r.iter_lines(decode_unicode=True):
    if line
        print(json.loads(line))
Viewing/Modifying registered responses
Registered responses are available as a private attribute of the RequestMock
instance. It is sometimes useful for debugging purposes to view the stack of
registered responses which can be accessed via responses.mock._matches.
The replace function allows a previously registered response to be
changed. The method signature is identical to add. response s are
identified using method and url. Only the first matched response is
replaced.
import responses
import requests

@responses.activate
def test_replace():

    responses.add(responses.GET, 'http://example.org', json={'data' 1})
    responses.replace(responses.GET, 'http://example.org', json={'data' 2})

    resp = requests.get('http://example.org')

    assert resp.json() == {'data' 2}
remove takes a method and url argument and will remove all
matched responses from the registered list.
API and Module Auto-Generated Documentation
This module provides the API for .
The module provides a clean and simple API for making requests via a thread
pool. The thread pool will use sessions for increased performance.
A simple use-case is:
from requests_toolbelt import threaded

urls_to_get = [{
    'url' 'https://api.github.com/users/sigmavirus24',
    'method' 'GET',
}, {
    'url' 'https://api.github.com/repos/requests/toolbelt',
    'method' 'GET',
}, {
    'url' 'https://google.com',
    'method' 'GET',
}]
responses, errors = threaded.map(urls_to_get)
By default, the threaded submodule will detect the number of CPUs your
computer has and use that if no other number of processes is selected. To
change this, always use the keyword argument . Using the
above example, we would expand it like so:
responses, errors = threaded.map(urls_to_get, num_processes=10)
You can also customize how a is initialized by
creating a callback function:
from requests_toolbelt import user_agent

def initialize_session(session):
    session.headers'User-Agent' = user_agent('my-scraper', '0.1')
    session.headers'Accept' = 'application/json'

responses, errors = threaded.map(urls_to_get,
                                 initializer=initialize_session)
- (requests, **kwargs)
-
Simple interface to the threaded Pool object.
This function takes a list of dictionaries representing requests to make
using Sessions in threads and returns a tuple where the first item is
a generator of successful responses and the second is a generator of
exceptions.Parameters: -
requests () – Collection of dictionaries representing requests to make with the Pool
object. -
**kwargs – Keyword arguments that are passed to the
object.
Returns: Tuple of responses and exceptions from the pool
Return type: (,
) -
requests () – Collection of dictionaries representing requests to make with the Pool
Inspiration is blatantly drawn from the standard library’s multiprocessing
library. See the following references:
- multiprocessing’s pool source
- map and map_async
- class (job_queue, initializer=None, auth_generator=None, num_processes=None, session=<class ‘requests.sessions.Session’>)
-
Pool that manages the threads containing sessions.
Parameters: - queue () – The queue you’re expected to use to which you should add items.
- initializer (collections.Callable) – Function used to initialize an instance of .
- auth_generator (collections.Callable) – Function used to generate new auth credentials for the session.
- num_process () – Number of threads to create.
- session (requests.Session) –
- ()
-
Iterate over all the exceptions in the pool.
Returns: Generator of
- classmethod (exceptions, **kwargs)
-
Create a from an s.
Provided an iterable that provides objects,
this classmethod will generate a new pool to retry the requests that
caused the exceptions.Parameters: - exceptions (iterable) – Iterable that returns
- kwargs – Keyword arguments passed to the initializer.
Returns: An initialized object.
Return type:
- classmethod (urls, request_kwargs=None, **kwargs)
-
Create a from an iterable of URLs.
Parameters: - urls (iterable) – Iterable that returns URLs with which we create a pool.
-
request_kwargs () – Dictionary of other keyword arguments to provide to the request
method. - kwargs – Keyword arguments passed to the initializer.
Returns: An initialized object.
Return type:
- ()
-
Get an exception from the pool.
Return type:
- ()
-
Get a response from the pool.
Return type:
- ()
-
Join all the threads to the master thread.
- ()
-
Iterate over all the responses in the pool.
Returns: Generator of
- class (request_kwargs, response)
-
A wrapper around a requests Response object.
This will proxy most attribute access actions to the Response object. For
example, if you wanted the parsed JSON from the response, you might do:thread_response = pool.get_response() json = thread_response.json()
- = None
-
The original keyword arguments provided to the queue
- = None
-
The wrapped response
- class (request_kwargs, exception)
-
A wrapper around an exception raised during a request.
This will proxy most attribute access actions to the exception object. For
example, if you wanted the message from the exception, you might do:thread_exc = pool.get_exception() msg = thread_exc.message
- = None
-
The captured and wrapped exception
- = None
-
The original keyword arguments provided to the queue