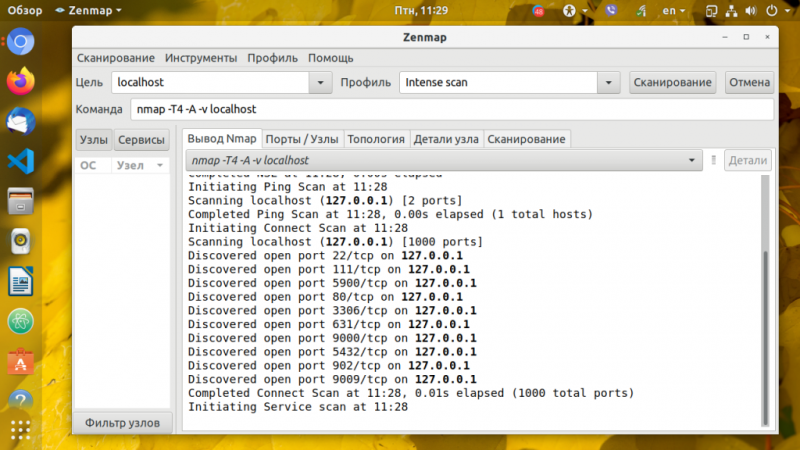
What is an smb port + ports 445 and 139 explained
Содержание:
- INODE NUMBERS
- Вы не можете получить гостевой доступ к общей папке без проверки подлинности
- SERVICE FORMATTING AND DELIMITERS
- Зачем нужен файловый FTP сервер через роутер TP-Link и как им пользоваться?
- Протокол SMB 1.0 в Windows Server 2012 R2
- ACCESSING FILES WITH BACKUP INTENT
- Автоматическое соединение с сетевой папкой со стороны STB
- Accessing Windows Shares: Discussion
- Mount CIFS Permission Denied Error
- SAMBA
- How Does The SMB Protocol Work?
- CACHE COHERENCY
INODE NUMBERS
When Unix Extensions are enabled, we use the actual inode number provided by the server in response to the POSIX calls as an inode number.
When Unix Extensions are disabled and «serverino» mount option is enabled there is no way to get the server inode number. The client typically maps the server-assigned «UniqueID» onto an inode number.
Note that the UniqueID is a different value from the server inode number. The UniqueID value is unique over the scope of the entire server and is often greater than 2 power 32. This value often makes programs that are not compiled with LFS (Large File Support), to trigger a glibc EOVERFLOW error as this won’t fit in the target structure field. It is strongly recommended to compile your programs with LFS support (i.e. with -D_FILE_OFFSET_BITS=64) to prevent this problem. You can also use «noserverino» mount option to generate inode numbers smaller than 2 power 32 on the client. But you may not be able to detect hardlinks properly.
Вы не можете получить гостевой доступ к общей папке без проверки подлинности
Начиная с версии Windows 10 1709 (Fall Creators Update) Enterprise и Education пользователи стали жаловаться, что при попытке открыть сетевую папку на соседнем компьютере стала появляться ошибка:
Вы не можете получить доступ к этой общей папке, так как политики безопасности вашей организации блокируют гостевой доступ без проверки подлинности. Эти политики помогают защитить ваш компьютер от небезопасных или вредоносных устройств в сети.
An error occurred while reconnecting Y: to
\\nas1\share Microsoft Windows Network: You can’t access this shared folder because your organization’s security policies block unauthenticated guest access. These policies help protect your PC from unsafe or malicious devices on the network.
При это на других компьютерах со старыми версиями Windows 8.1/7 или на Windows 10 с билдом до 1709, эти же сетевые каталоги открываются нормально. Эта проблем связана с тем, что в современных версиях Windows 10 (начиная с 1709) по умолчанию запрещен сетевой доступ к сетевым папкам под гостевой учетной записью по протоколу SMBv2 (и ниже). Гостевой (анонимный) доступ подразумевают доступ к сетевой папке без аутентификации. При доступе под гостевым аккаунтом по протоколу SMBv1/v2 не применяются такие методы защиты трафика, как SMB подписывание и шифрование, что делает вашу сессию уязвимой против MiTM (man-in-the-middle) атак.
При попытке открыть сетевую папку под гостем по протоколу SMB2, в журнале клиента SMB (Microsoft-Windows-SMBClient) фиксируется ошибка:
Source: Microsoft-Windows-SMBClient
Event ID: 31017
Rejected an insecure guest logon.
В большинстве случае с этой проблемой можно столкнуться при использовании старых версий NAS (обычно для простоты настройки на них включают гостевой доступ) или при доступе к сетевым папкам на старых версиях Windows 7/2008 R2 или Windows XP /2003 с настроенным анонимным (гостевым) доступом (см. таблицу поддерживаемых версий SMB в разных версиях Windows).
В этом случае Microsoft рекомендует изменить настройки на удаленном компьютере или NAS устройстве, который раздает сетевые папки. Желательно переключить сетевой ресурс в режим SMBv3. А если поддерживается только протокол SMBv2, настроить доступ с аутентификацией. Это самый правильный и безопасный способ исправить проблему.
В зависимости от устройства, на котором хранятся сетевые папки, вы должны отключить на них гостевой доступ.
- NAS устройство – отключите гостевой доступ в настройках вашего NAS устройства (зависит от модели);
- Samba сервер на Linux — если вы раздаете SMB каталог с Linux, в конфигурационном файле smb.conf в секции нужно добавить строку:А в секции с описанием сетевой папки запретить анонимный доступ:
- В Windows вы можете включить общий доступ к сетевым папкам и принтерам с парольной защитой в разделе Control Panel\All Control Panel Items\Network and Sharing Center\Advanced sharing settings. Для All Networks (Все сети) в секции “Общий доступ с парольной защитой” (Password Protected Sharing) имените значение на “Включить общий доступ с парольной защитой” (Turn on password protected sharing). В этом случае анонимный (гостевой) доступ к папкам будет отключен и вам придется создать локальных пользователей, предоставить им доступ к сетевым папкам и принтерам и использовать эти аккаунты для подключения к общим папкам на этом компьютере.
Есть другой способ – изменить настройки вашего SMB клиента и разрешить доступ с него на сетевые папки под гостевой учетной записью.
Этот способ нужно использовать только как временный (!!!), т.к. доступ к папкам без проверки подлинности существенно снижает уровень безопасности ваших данных.
Чтобы разрешить гостевой доступ с вашего компьютера, откройте редактор групповых политик (gpedit.msc) и перейдите в раздел: Конфигурация компьютера -> Административные шаблоны -> Сеть -> Рабочая станция Lanman (Computer Configuration ->Administrative templates -> Network (Сеть) -> Lanman Workstation). Включите политику Enable insecure guest logons (Включить небезопасные гостевые входы).
В Windows 10 Home, в которой нет редактора локальной GPO, вы можете внести аналогичное изменение через редактор реестра вручную:
HKLM\SYSTEM\CurrentControlSet\Services\LanmanWorkstation\Parameters “AllowInsecureGuestAuth”=dword:1
Или такой командой:
SERVICE FORMATTING AND DELIMITERS
It’s generally preferred to use forward slashes (/) as a delimiter in service names. They are considered to be the «universal delimiter» since they are generally not allowed to be embedded within path components on Windows machines and the client can convert them to blackslashes (\) unconditionally. Conversely, backslash characters are allowed by POSIX to be part of a path component, and can’t be automatically converted in the same way.
mount.cifs will attempt to convert backslashes to forward slashes where it’s able to do so, but it cannot do so in any path component following the sharename.
Зачем нужен файловый FTP сервер через роутер TP-Link и как им пользоваться?
В одной из статей я уже рассказывал, для чего нужно приобретать wifi маршрутизатор с USB портом. Он может использоваться для подключения и использования в сети различных устройств. Одним из самых популярных из них является внешний накопитель — жёсткий диск HDD или SSD, либо обычная флешка. Также можно подключить и SD карту через специальный переходник на USB разъем. Среди множества возможностей использования его в паре с роутером, нас сегодня интересует создание и настройка полноценного FTP сервера на роутере TP-Link для того, чтобы с любого устройства внутри сети получить через WiFi доступ к находящимся на ней файлам.
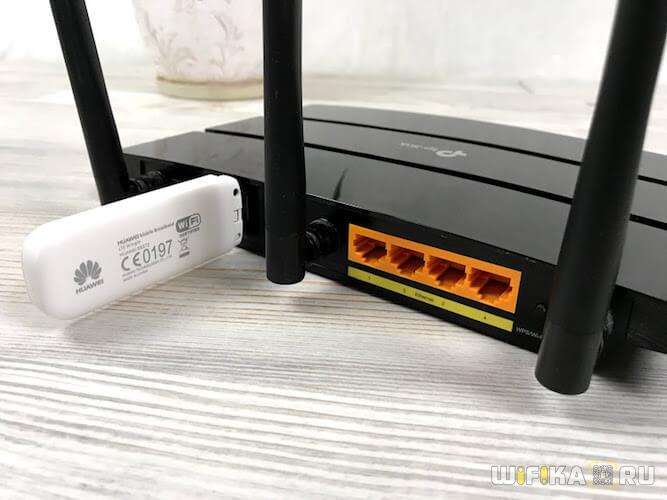
А если вспомнить, что во многих маршрутизаторах также есть функция прямой загрузки торрентов из интернета на накопитель, то этот FTP сервер становится мега удобной вещью, освобождающей нас от кучи лишних телодвижений в виде перекачки фильмов, видео, фотографий или музыки с компьютера на флешку для последующего просмотра на ТВ или ноутбуке.
Про планшеты и телефоны даже не говорю, так как чтобы подключить к ним флешку, обязательно должна иметься поддержка кабелей OTG.
Протокол SMB 1.0 в Windows Server 2012 R2
Если открыть список компонентов Windows Server 2012 R2, среди них можно увидеть функцию с именем SMB 1.0/CIFS File Sharing Support, которая не установлена. Но сам драйвер SMB 1.0 при этом работает. При установке данной роли в системе появляется служба Обозревателя компьютеров (Computer Browser). Это клиент SMB 1.0, без которого с данного сервера не получится подключиться к другим компьютерам, которые поддерживают только этот протокол.
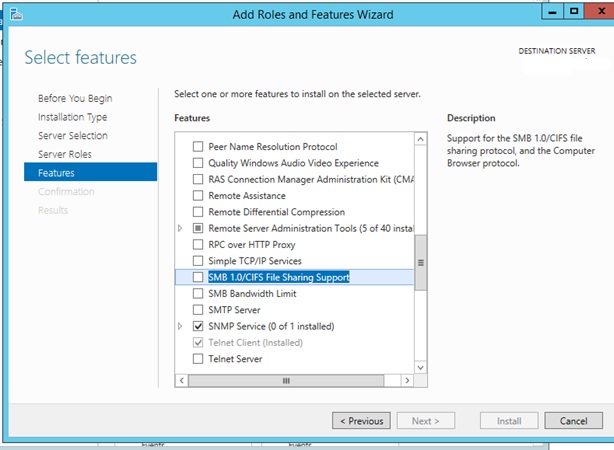
Совет. Если в сети не требуется поддерживать старую версию SMB 1.0 для компьютеров с Windows XP или Windows Server 2003, этот функционал с целью уменьшения нагрузки на систему и повышений безопасности можно отключить командой:Затем в настройках сервера нужно полностью отключить SMB 1.0 командой:
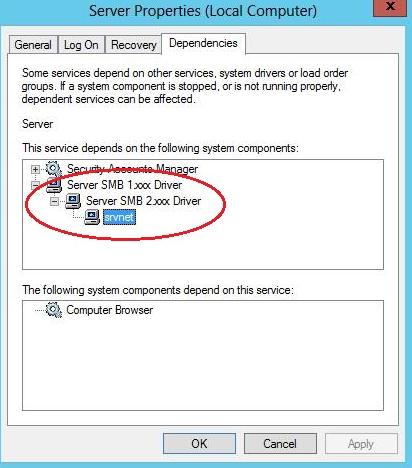
В Windows Server 2012 по-умолчанию загружаются драйверы как SMB 1, так и SMB 2. Чтобы удостоверится в этом, откроем свойства системной службы Server (LanmanServer) и на вкладке Dependencies убедимся, что на сервере одновременно работают драйвера Server SMB 1.xxx Driver и SMB 2.xxx Driver.
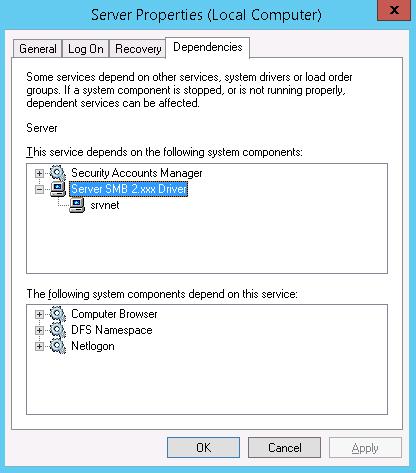
 Если открыть свойства службы LanmanServer на Windows 2012 R2 мы увидим, что драйвер, обеспечивающий поддержку SMB 1.0, исключен из зависимостей.
 Но это не говорит о том, что драйвер SMB 1.0 не работает. Проверить, включен ли протокол SMB 1.0 на стороне сервера можно командой:
Как вы видите, протокол SMB1 в WS 2012 R2 включен несмотря на отсутствие компонента SMB 1.0/CIFS File Sharing Support и зависимостей в службе LanmanServer.

В том случае, если устаревшие клиенты (XP / Server 2003 и т.д.) потеряли SMB доступ к файловым серверам / контроллерам домена на Windows Server 2012 R2 можно активировать поддержку SMB 1 следующим образом. Сначала включите протокол в настройках сервера:
Затем включите зависимости протокола SMB 1.0 в Windows Server 2012 R2 через реестр. Перейдите в ветку HKEY_LOCAL_MACHINE\SYSTEM\CurrentControlSet\Services\LanmanServer и измените значение параметра DependOnService с SamSS Srv2 на SamSS Srv. 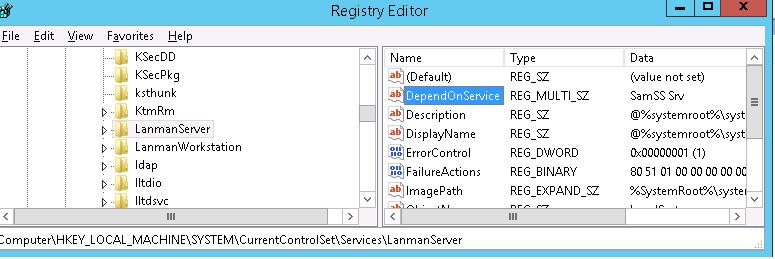
После этого сервер нужно перезагрузить и убедится, что драйвер SMB 1.0 вновь работает. 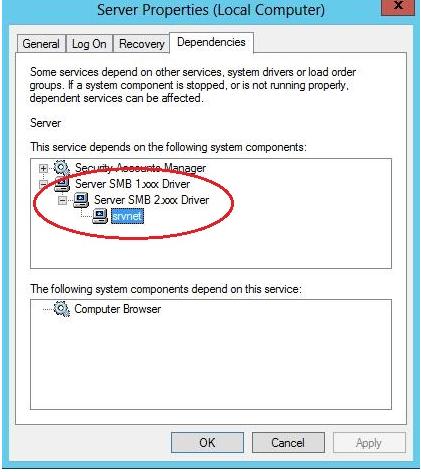
Эту операцию нужно выполнить на всех файловых серверах и контроллерах домена, к которым подключаются устаревшие версии клиентов.
ACCESSING FILES WITH BACKUP INTENT
For an user on the server, desired access to a file is determined by the permissions and rights associated with that file. This is typically accomplished using owenrship and ACL. For a user who does not have access rights to a file, it is still possible to access that file for a specific or a targeted purpose by granting special rights. One of the specific purposes is to access a file with the intent to either backup or restore i.e. backup intent. The right to access a file with the backup intent can typically be granted by making that user a part of the built-in group Backup Operators. Thus, when this user attempts to open a file with the backup intent, open request is sent by setting the bit FILE_OPEN_FOR_BACKUP_INTENT as one of the CreateOptions.
As an example, on a Windows server, a user named testuser, cannot open this file with such a security descriptor.
REVISION:0x1
CONTROL:0x9404
OWNER:Administrator
GROUP:Domain Users
ACL:Administrator:ALLOWED/0x0/FULL
But the user testuser, if it becomes part of the group Backup Operators, can open the file with the backup intent.
Any user on the client side who can authenticate as such a user on the server,
can access the files with the backup intent. But it is desirable and preferable for security reasons amongst many, to restrict this special right.
The mount option backupuid is used to restrict this special right to a user which is specified by either a name or an id. The mount option backupgid is used to restrict this special right to the users in a group which is specified by either a name or an id. Only users maching either backupuid or backupgid shall attempt to access files with backup intent. These two mount options can be used together.
Автоматическое соединение с сетевой папкой со стороны STB
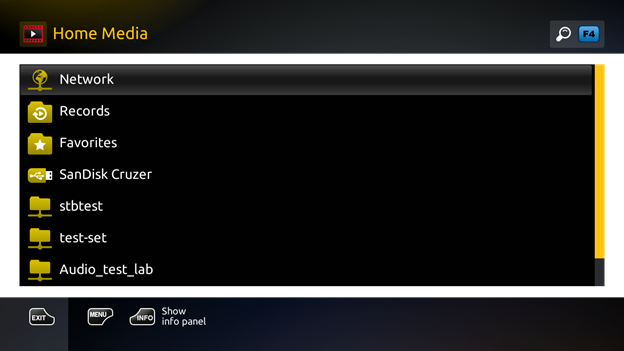
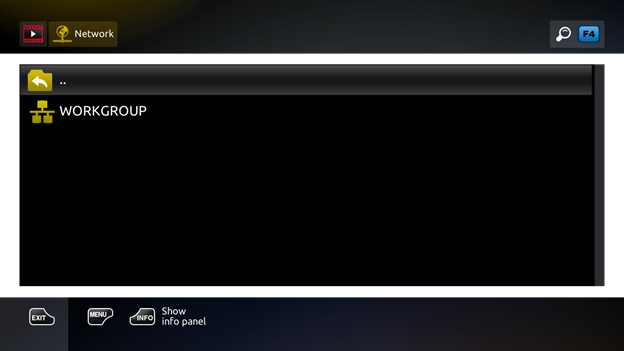
- Во Встроенном портале зайти в Главное окно ⇒ Home Media ⇒ Сетевое окружение (Network) ⇒ WORKGROUP
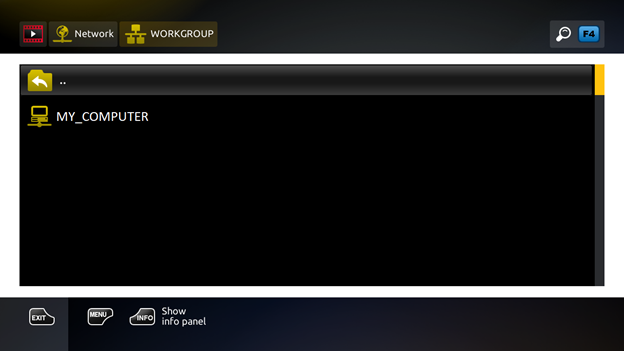
2. В папке WORKGROUP отображаются сетевые компьютеры рабочей группы.Откройте ярлык необходимого сетевого компьютера — My_Computer (в разделе My_Computer отображаются папки одноименного сетевого компьютера, для которых открыт доступ).
3. Чтобы убедиться, что автоматическое определение сетевого ресурса состоялось и проверить тип протокола необходимо выделить папку и воспользоваться кнопкой «i» (INFO) на ПДУ:

4. Открыть папку Video_E1. Внутри папки пройти по пути, по которому находится медиа-файл, который необходимо воспроизвести.

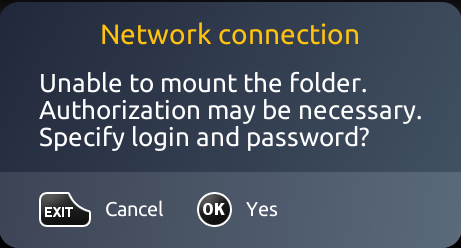
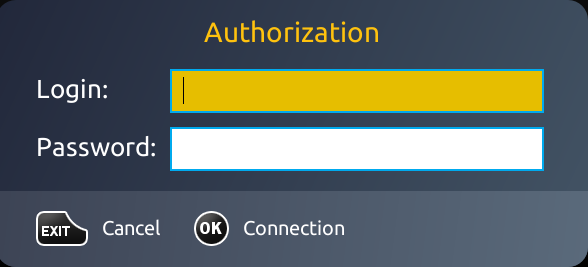
5. Если для папки установлен доступ по паролю, либо по каким-либо причинам STB не может «примонтировать» папку (то есть получить к ней доступ — см. раздел ), то при попытке открыть данную папку открывается окно Network connection.
Для авторизации необходимо выбрать ОК — открывается окно Authorization, в котором следует ввести параметры доступа к папке: Login и Password.
6. Запустить медиа-файл.
What are the various methods you can access these kinds of network shares? As of 2019: most people use the nemo file manager or something like it that can make temporary mounts to network shares. There are disadvantages. Not all file managers do this. Not all software is compatible. The mapping is not persistent.
Lets look at the three ways we can gain access to a shared folder or NAS resource.
- Using the Nemo File Manager a network resource is browsed and a share temporarily mounted: nemo /run/user/$USER/gvfs
- Using the traditional (old fashioned) persistent network mount with mount and fstab
- Using Gigolo to Mount Remote shares.
Gigolo
HIGHLY RECOMMENDED — As a means to mount NAS and network shares without having to edit fstab or hard coding passwords. More reliable than file manager tools like the one in Nautilus.
Gigolo is a facilitator to access and mount remote shares. It uses the same base samba client packages as other methods. “It mounts what it is told to.»
sudo apt-get install gigolo
sudo apt-get install gvfs-fuse
When you open up gigolo click on the Network tab on the side panel and it will eventually show you all your workgroups and all the hosts.
The remote share should be displayed in the right panel of gigolo and double clicking the share will open a file manager.
You can Set gigolo to start at login
mkdir /home/user-name/.config/autostart
Menu > System Tools > System Settings > Startup Programs > Add > Command = gigolo
Gigolo is a graphical frontend for the userspace virtual filesystem GIO/GVfs, which handles remote files. Gnome is not required however it requires GTK2 (2.12 or newer), DBus, and GLib (2.16 or newer).
Gigolo doesn’t just handle cifs sharing between a windows network and your linux desktop, it also facilitates other protocol connections or transfers from computer to computer including ssh / scp file copy without having to use the command terminal such as described Remote File Copy from the Linux Command Prompt, imagine doing it all from the GUI?
PROBLEMS — The problem with Gigolo is that it mounts shares using smb paths. Linux application support for smb paths is mostly broken. For this reason we are left with the problem of either exposing our password in the fstab file or using gigolo aka smb paths to access network shares and find a lot of applications can’t reach the files. Com’on devs! This is CRAP.
GVFS / SMB Paths
A gigolo mounted path uses the GVFS based SMB share format, like:
* smb://workgroup;username@192.168.100.110/share on 92.168.100.110
Boy is that ugly with spaces and special characters. An ugly path like that is just asking for trouble! Programs, such as USB Image Writer (a common utility available with Linux Mint / Ubuntu) will not work with smb paths. Try to read an ISO image from a network share, even after making a symlink to de-ugly the path, and the USB Image Writer application fails.
As explained elsewhere on this page, the traditional way to mount Windows (or Samba) shares involves hardcoding the credentials in fstab as plain text.
Mount CIFS Permission Denied Error
The error occurs mostly because you don’t provide sufficient credential information, specifically which Domain you are in. Most Tutorials out there only mention username and password when editing the .smbcredentials file. But let me take you through the process from the beginning.
Step 1 – Installing CIFS Utils
To mount a CIFS share on Linux, we first need to install cifs-utils. Let’s get started with that.
sudo apt-get install cifs-utils -y
It should probably be pre-installed in most distros anyway.
Step 2 – Creating a Mount Point
Next, we need to create the Directory where we want to Mount our Share in. You can later find the Share in this Directory. For this example, we will mount the imaginary “Photos” share.
sudo mkdir /media/share/Photos
Step 3 – Editing the fstab file
That we don’t have to mount our Share again after each reboot, we have to edit the fstab file to make the Share mount automatically after each reboot. But first, we make a Backup of this file in case something goes wrong.
sudo cp /etc/fstab /etc/fstab.old
That done, we edit our fstab file.
sudo gedit /etc/fstab
And paste this line at the end of the file (all in one line)
//YourServer/Photos /media/share/Photos/ cifs vers=2.0,credentials=/home/YourLinuxUsername/.smbcredentials,iocharset=utf-8,gid=1000,uid=1000,file_mode=0777,dir_mode=0777 0 0
Of course, adjust accordingly to your own Server and YourLinuxUsername! We will create the .smbcredentials file next.
By Default, you will have the gid=1000 and uid=1000. That’s your Group & User ID, but to make sure that those values are the same in your System, double check it by typing:
id
If all is correct, hit CTRL+S to Save the fstab file and close it.
Step 4 – Creating the .smbcredentials file
We could enter our username directly into our fstab file, but that would not be safe as someone could clearly read our Username and Password in this unencrypted file. Therefore, we are going to create a separate file containing this information.
sudo gedit .smbcredentials
And here is the key point to fixing the Mount CIFS Permission Denied error. Most guides simply state to enter Username and Password into this file, but you also have to enter your Domain!
So paste this into your .smbcredentials file:
username=yourusername
password=yourpassword
domain=yourdomain
Save & Close the file.
Now we just make the .smbcredentials file so that only the root user can read its contents.
sudo chmod 600 ~/.smbcredentials
Now when everything is done, try to mount the share by typing
sudo mount -a
And your share should now be successfully mounted! If there are still some errors, try rebooting your system and see again if the Share was mounted. The share should be located in your media/share/Photos folder.
SAMBA
What is Samba? Samba is a collection of different applications with when used together let a Linux server perform network actions like file serving, authentication/authorization, name resolution and print services.
Like CIFS, Samba implements the SMB protocol which is what allows Windows clients to transparently access Linux directories, printers and files on a Samba server (just as if they were talking to a Windows server).
Crucially, Samba allows for a Linux server to act as a Domain Controller. By doing so, user credentials on the Windows domain can be used instead of needing to be recreated and then manually kept in sync on the Linux server.
How Does The SMB Protocol Work?
In early versions of Windows, SMB ran on top of the NetBIOS network architecture. Microsoft changed SMB in Windows 2000 to operate on top of TCP and use a dedicated IP port. Current versions of Windows continue to use that same port.
Get the Free Pen Testing Active Directory Environments EBook
“This really opened my eyes to AD security in a way defensive work never did.”
Microsoft continues to make advancements to SMB for performance and security: SMB2 reduced the overall chattiness of the protocol, while SMB3 included performance enhancements for virtualized environments and support for strong end-to-end encryption.
SMB Protocol Dialects
Just like any language, computer programmers have created different SMB dialects use for different purposes. For example, Common Internet File System (CIFS) is a specific implementation of SMB that enables file sharing. Many people mistake CIFS as a different protocol than SMB, when in fact they use the same basic architecture.
Important SMB implementations include:
- CIFS: CIFS is a common file sharing protocol used by Windows servers and compatible NAS devices.
- Samba: Samba is an open-source implementation of Microsoft Active Directory that allows non-Windows machines to communicate with a Windows network.
- NQ: NQ is another portable file sharing SMB implementation developed by Visuality Systems.
- MoSMB: MoSMB is a proprietary SMB implementation by Ryussi Technologies.
- Tuxera SMB: Tuxera is also a proprietary SMB implementation that runs in either kernel or user-space.
- Likewise: is a multi-protocol, identity aware network file sharing protocol that was purchased by EMC in 2012.
CACHE COHERENCY
The CIFS protocol mandates (in effect) that the client should not cache file
data unless it holds an opportunistic lock (aka oplock) or a lease. Both of
these entities allow the client to guarantee certain types of exclusive access
to a file so that it can access its contents without needing to continually
interact with the server. The server will call back the client when it needs to
revoke either of them and allow the client a certain amount of time to flush
any cached data.
The cifs client uses the kernel’s pagecache to cache file data. Any I/O that’s
done through the pagecache is generally page-aligned. This can be problematic
when combined with byte-range locks as Windows’ locking is mandatory and can
block reads and writes from occurring.
cache=none means that the client never utilizes the cache for normal reads and
writes. It always accesses the server directly to satisfy a read or write request.
cache=strict means that the client will attempt to follow the CIFS/SMB2
protocol strictly. That is, the cache is only trusted when the client holds
an oplock. When the client does not hold an oplock, then the client bypasses
the cache and accesses the server directly to satisfy a read or write request. By
doing this, the client avoids problems with byte range locks. Additionally, byte
range locks are cached on the client when it holds an oplock and are «pushed» to
the server when that oplock is recalled.
cache=loose allows the client to use looser protocol semantics which can sometimes
provide better performance at the expense of cache coherency. File access always
involves the pagecache. When an oplock or lease is not held, then the client will
attempt to flush the cache soon after a write to a file. Note that that flush
does not necessarily occur before a write system call returns.
In the case of a read without holding an oplock, the client will attempt to
periodically check the attributes of the file in order to ascertain whether it
has changed and the cache might no longer be valid. This mechanism is much like
the one that NFSv2/3 use for cache coherency, but it particularly problematic
with CIFS. Windows is quite «lazy» with respect to updating the «LastWriteTime»
field that the client uses to verify this. The effect is that cache=loose can
cause data corruption when multiple readers and writers are working on the
same files.
Because of this, when multiple clients are accessing the same set of files, then
cache=strict is recommended. That helps eliminate problems with cache coherency by
following the CIFS/SMB2 protocols more strictly.
Note too that no matter what caching model is used, the client will always use
the pagecache to handle mmap’ed files. Writes to mmap’ed files are only guaranteed
to be flushed to the server when msync() is called, or on close().
The default in kernels prior to 3.7 was «loose». As of 3.7, the default is «strict».