Установка freeradius на ubuntu linux
Содержание:
History
Radiusclient traces its history to the early RADIUS code developed by the Livingston Enterprises, University of Michigan and Merit Network.
The radiusclient library itself was put together by Lars Fenneberg around 1995 and used to live at http://www.cityline.net/~lf/radius/ but seems to be no longer maintained (Tarballs are still available from ftp://ftp.cityline.net/pub/radiusclient/, latest release is 0.3.2 dated early 2002). It does however still ship with some Linux distributions including SUSE Linux.
A fork of the original radiusclient called radiusclient-ng had been created in 2003 by Maxim Sobolev and was used as the basis of the RADIUS support in SER, OpenSER and Sippy B2BUA. The library was significantly improved and refactored in the process, particularly the API was changed to eliminate shared state and make library re-entrant; Vendor Specific Attributes (VSA) support was introduced; support for SIP Digest attributes was added and the new radiusclient utility allowing to send RADIUS AAA requests from command line or from shell scripts was created. Quite few bugs were fixed in the process with the help from the comunity.
In late 2006 it was decided that the FreeRADIUS Project should adopt the latest code from radiusclient-ng cvs as the basis of a new FreeRADIUS client package. The intention is to roll some of the client functionality of the FreeRADIUS server into this separate client package and to make the FreeRADIUS suite a one stop shop for all people wishing to use and develop RADIUS related applications.
The first version released by the FreeRADIUS project was 1.1.5 which fixed an MD5 related endian issue and introduced a client configuration framework to the library which lends itself to allowing embedded radius client functionality.
Development of the radiusclient-ng and FreeRADIUS client were proceeding in parallel during 2006-2007, with periodic merges of fixes from radiusclient-ng into FreeRADIUS client until in early 2008 it has been decided to merge both projects on the basis of the latest code from the FreeRADIUS client and discontinue radiusclient-ng project. This would allow to avoid duplicate efforts and produce better package. All developers from the radiusclient-ng project joined FreeRADIUS team and few remaining fixes from the radiusclient-ng have been merged into FreeRADIUS client package.
Development of the codebase is ongoing.
Connection Terminating from RADIUS
Sub-menu:
This facility supports unsolicited messages sent from RADIUS server. Unsolicited messages extend RADIUS protocol commands, that allow to terminate a session which has already been connected from RADIUS server. For this purpose DM (Disconnect-Messages) are used. Disconnect messages cause a user session to be terminated immediately.
Note: RouterOS doesn’t support POD (Packet of Disconnect) the other RADIUS access request packet that performs a similar function as Disconnect Messages
Properties
| Property | Description |
|---|---|
| accept (yes | no; Default: no) | Whether to accept the unsolicited messages |
| port (integer; Default: 1700) | The port number to listen for the requests on |
Configuring FreeRADIUS to use SQL
Edit /etc/mods-available/sql module and enter the SQL dialect, driver, server, username and password details to connect to your SQL server and the RADIUS database. The database and table names should be left at the defaults if you used the default schema. For testing/debug purposes, uncomment the line — FreeRADIUS will dump all SQL commands to the log file specified here.
Next enable the sql module by executing
    cd mods-enabled
    ln -s ../mods-available/sql sql
Edit / (or whatever site config you use) and uncomment the line containing in the section.
Additionally, edit and uncomment the line containing ‘sql’ under «authorize {}».
Also uncomment the line saying ‘sql’ in the accounting{} section to tell FreeRADIUS to store accounting records in SQL as well.
Optionally add or uncomment ‘sql’ to the session{} section if you want to do Simultaneous-Use detection.
Optionally add or uncomment ‘sql’ to the post-auth{} section if you want to log all Authentication attempts to SQL.
Optionally, if you want to strip all realm names (i.e. you want user joe@domain.com to authenticate as just ‘joe’), then in file , under the ‘query config: username’ section, you MAY need to adjust the line(s) referring to sql_user_name. For example, in uncomment the line:
…and comment out the following line referring to just User-Name. If you want to see what’s happening here, switch on all the logging options in radiusd.conf and run radiusd in debug mode (-X) to see what’s happening : you’ll see » user@domain» being passed to SQL when using User-Name, but just «user» when using Stripped-User-Name. Of course, set all your other SQL options as needed (database login details, etc)
»’You should not change/delete any other lines in the config file without reading and understanding the comments!»’
The config you use (e.g. sites-enabled/default) should then look something like this:
 authorize {
        preprocess
        chap
        mschap
        suffix
        eap
        # We leave "files" enabled to allow creation of test users in the "users" file
        files
        sql
        pap
 }
 accounting {
        # We leave "detail" enabled to additionally log accounting to /var/log/radius/radacct
        detail
        sql
 }
Устанавливаем и настраиваем Freeradius
pkg install freeradius
Проверяем, что аутентификация в AD через модуль ntlm_auth работает корректно:
ntlm_auth —request-nt-key —domain=DMOSK.LOCAL —username=kdo
* Полужирным выделен домен.
Вы должны получить ответ:
NT_STATUS_OK: Success (0x0)
Редактируем конфигурационный файл модуля ntlm-аутентификации freeradius:
ee /usr/local/etc/raddb/modules/ntlm_auth
exec ntlm_auth {
wait = yes
program = «/usr/local/bin/ntlm_auth —request-nt-key —domain=DMOSK.LOCAL —username=%{mschap:User-Name} —password=%{User-Password}»
}
* Полужирным выделены данные, которые вы должны заменить своими.
Добавляем инструкцию для использования модуля ntlm_auth в конфигурационный файл:
ee /usr/local/etc/raddb/sites-enabled/default
authenticate {
…
ntlm_auth
…
}
Редактируем список пользователей freeradius (создаем правило использования модуля ntlm_auth по умолчанию) — эту строчку лучше поместить в самый верх файла:
ee /usr/local/etc/raddb/users
DEFAULT Auth-Type = ntlm_auth
Редактируем основной конфигурационный файл freeradius:
ee /usr/local/etc/raddb/radiusd.conf
allow_vulnerable_openssl = yes
Проверяем конфигурационный файл:
radiusd -X
Разрешаем запуск демона radius:
echo ‘radiusd_enable=»YES»‘ >> /etc/rc.conf
Запускаем сервер radius:
service radiusd start
На этом настройка Freeradius + AD закончена.
Проверяем:
radtest test test123 localhost 1218 testing123
* test, test123 — логин, пароль пользователя в Active Directory. testing123 — пароль по умолчанию для подключения к серверу freeradius.
Additional Snippets
- To use encrypted passwords in radcheck use the attribute ‘Crypt-Password’, instead of ‘Cleartext-Password’, and just put the encrypted password in the value field. ( i.e. UNIX crypt’d password).
- To get NTradPing to send test accounting (e.g. stop) packets it needs arguments, namely acct-session-time. Put something like ‘Acct-Session-Time=99999’ into the ‘Additional RADIUS Attributes’ box when sending stops.
-
If you have a Cisco nas, set the cisco-vsa-hack
-
Running a backup FreeRADIUS server and need to replicate the RADIUS database to it? You can follow Colin Bloch’s basic instructions at http://www.ls-l.net/mysql/ and got replication setup between two MySQL servers. Real easy. Read the MySQL docs on replication for more details.
On the subject of backup servers. If you want to run TWO MySQL servers and have FreeRADIUS fall over between them, you’ll need to do something like this:
- duplicate your file twice
- change the module names from to something like and
- edit the second copy to reflect connecting to your backup server
- in the different sections of your site config (eg. sites-enabled/default) change the ‘sql’ entry to a ‘redundant sql’ one, like this:
  redundant sql {
    sql1
    sql2
  }
Note that if FreeRADIUS fails over to the second MySQL server and tries to update the accounting table (radacct), nasty things might possibly happen to your replication setup and database integrity as the first MySQL server won’t have got the updates…
Summary
Sub-menu: Standards:
RADIUS, short for Remote Authentication Dial-In User Service, is a remote server that provides authentication and accounting facilities to various network apliances. RADIUS authentication and accounting gives the ISP or network administrator ability to manage PPP user access and accounting from one server throughout a large network. The MikroTik RouterOS has a RADIUS client which can authenticate for HotSpot, PPP, PPPoE, PPTP, L2TP and ISDN connections. The attributes received from RADIUS server override the ones set in the default profile, but if some parameters are not received they are taken from the respective default profile.
The RADIUS server database is consulted only if no matching user acces record is found in router’s local database.
Traffic is accounted locally with MikroTik Traffic Flow and Cisco IP pairs and snapshot image can be gathered using Syslog utilities. If RADIUS accounting is enabled, accounting information is also sent to the RADIUS server default for that service.
RADIUS Client
This sub-menu allows to add/remove RADIUS clients.
Note: The order of added items in this list is significant.
Properties
| Property | Description |
|---|---|
| accounting-backup (yes | no; Default: no) | Whether configuration is for backup RADIUS server |
| accounting-port (integer ; Default: 1813) | RADIUS server port used for accounting |
| address (IPv4/IPv6 address; Default: 0.0.0.0) | IPv4 or IPv6 address of RADIUS server. |
| authentication-port (integer ; Default: 1812) | RADIUS server port used for authentication. |
| called-id (string; Default: ) | Value depends on Point-to-Point protocol: PPPoE — service name, PPTP — server’s IP address, L2TP — server’s IP address. |
| certificate (string; Default: ) | Certificate file to use for communicating with RADIUS Server with RadSec enabled. |
| comment (string; Default: ) | |
| disabled (yes | no; Default: no) | |
| domain (string; Default: ) | Microsoft Windows domain of client passed to RADIUS servers that require domain validation. |
| protocol (radsec | udp; Default: udp) | Specifies the protocol to use when communicating with RADIUS Server. |
| realm (string; Default: ) | Explicitly stated realm (user domain), so the users do not have to provide proper ISP domain name in user name. |
| secret (string; Default: ) | Shared secret used to access the RADIUS server. |
| service (ppp|login|hotspot|wireless|dhcp; Default: ) | Router services that will use this RADIUS server:
|
| src-address (ipv4/ipv6 address; Default: 0.0.0.0) | Source IP/IPv6 address of the packets sent to RADIUS server |
| timeout (time; Default: 100ms) | Timeout after which the request should be resend |
Note: Microsoft Windows clients send their usernames in form domain\username
Note: When RADIUS server is authenticating user with CHAP, MS-CHAPv1, MS-CHAPv2, it is not using shared secret, secret is used only in authentication reply, and router is verifying it. So if you have wrong shared secret, RADIUS server will accept request, but router won’t accept reply. You can see that with /radius monitor command, «bad-replies» number should increase whenever somebody tries to connect.
Example
To setup a RADIUS Client for HotSpot and PPP services that will authenticate against a RADIUS Server (10.0.0.3), you need to do the following:
 > /radius add service=hotspot,ppp address=10.0.0.3 secret=ex
 > /radius print
Flags: X - disabled
  #   SERVICE         CALLED-ID     DOMAIN        ADDRESS         SECRET
  0   ppp,hotspot                                 10.0.0.3        ex
To setup a RADIUS Client with RadSec, you need to do the following:
 > /radius add service=hotspot,ppp address=10.0.0.3 secret=radsec protocol=radsec certificate=client.crt
 > /radius print
Flags: X - disabled
  #   SERVICE         CALLED-ID     DOMAIN        ADDRESS         SECRET
  0   ppp,hotspot                                 10.0.0.3        radsec
Note: Make sure the specified certificate is trusted.
To view RADIUS Client statistics, you need to do the following:
 > /radius monitor 0
             pending: 0
            requests: 10
             accepts: 4
             rejects: 1
             resends: 15
            timeouts: 5
         bad-replies: 0
    last-request-rtt: 0s
Make sure you enable RADIUS authentication for the desired services:
/ppp aaa set use-radius=yes
/ip hotspot profile set default use-radius=yes
Готовим сервер для работы с Active Directory
Устанавливаем samba:
pkg install samba4
Создаем конфигурационный файл для настройки Kerberos:
ee /etc/krb5.conf
default_realm = DMOSK.LOCAL
clockskew = 300
v4_instance_resolve = false
v4_name_convert = {
host = {
rcmd = host
ftp = ftp
}
plain = {
something = something-else
}
}
DMOSK.LOCAL = {
kdc = DMOSK.LOCAL # контроллер домена или домен
admin_server = DMOSK.LOCAL # контроллер домена или домен
}
.dmosk.local = DMOSK.LOCAL
* Полужирным выделены данные, которые вы должны заменить своими
Проверяем получение билета от Active Directory:
kinit -p admin && klist
* admin — логин в AD
Должен получиться, примерно, такой ответ:
Credentials cache: FILE:/tmp/krb5cc_0
Principal: admin@DMOSK.LOCAL
Issued Expires Principal
Jul 14 09:55:28 2014 Jul 14 19:55:28 2014 krbtgt/DMOSK.LOCAL@DMOSK.LOCAL
Если ответ получен правильно, идем дальше
Создаем конфигурационный файл для samba:
ee /usr/local/etc/smb4.conf
workgroup = DMOSK
server string = Samba Server
security = ads
;hosts allow = 192.168.0. 127.
log file = /var/log/samba/log.%m
max log size = 500
password server = DMOSK.LOCAL # контроллер домена или домен
encrypt passwords = yes
realm = DMOSK.LOCAL
socket options = TCP_NODELAY
os level = 1
display charset = koi8-r
unix charset = koi8-r
dos charset = cp866
winbind use default domain = yes
winbind uid = 10000-15000
winbind gid = 10000-15000
winbind enum users = yes
winbind enum groups = yes
* Полужирным выделены данные, которые вы должны заменить своими.
Редактируем файл nsswitch.conf:
sed -ie ‘s/group: compat/group: files winbind/g’ /etc/nsswitch.conf; sed -ie ‘s/passwd: compat/passwd: files winbind/g’ /etc/nsswitch.conf
Разрешаем запуск демона samba:
echo ‘samba_server_enable=»YES»‘ >> /etc/rc.conf
Запускаем сервер samba:
service samba_server start
Добавляем наш сервер в домен:
net ads join -U admin
* admin — учетная запись в AD с правами на добавление компьютеров в домен.
Перезагружаем сервер:
shutdown -r now
После перезагрузки проверяем, что сервер видит учетные записи в Active Directory:
wbinfo -u
Пример настройки Radius
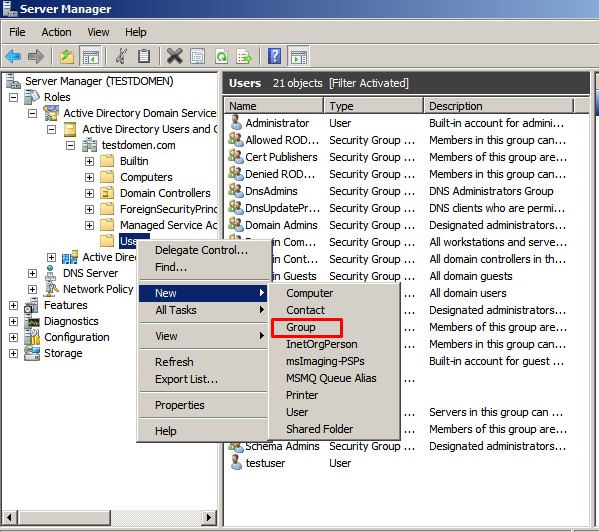
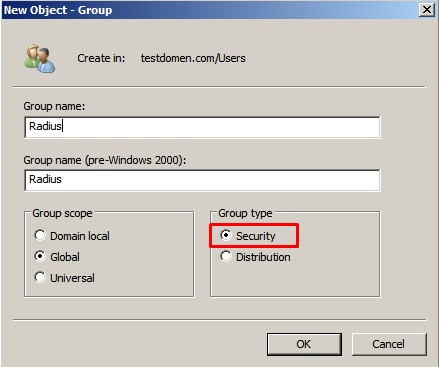
Начнём с того, что создадим в домене две локальных группы безопасности с ограниченными и полными правами Radius.
Создание группы с полными правами
В первую группу включим пользователей которым нужно предоставить полный административный доступ на управление коммутаторами, во вторую соответственно, — доступ только на чтение текущей конфигурации и состояния устройств. При этом, стоит помнить, что для пользователей, которые будут включаться в эти группы должно быть установлено разрешение в домене, дающее право удалённого доступа (значение настройки Network Access Permission на закладке Dial-In свойств учетной записи пользователя)
Аналогично создаётся группа для пользователей с ограниченным доступом.
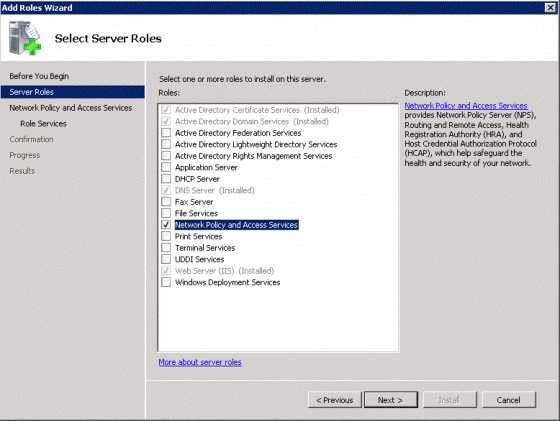
Установка ролей сетевой политики и служб доступа
В предыдущих версиях Windows Server функция RADIUS обеспечивалась службой Internet Authenticate Service (IAS). Начиная с Windows Server 2008, она обеспечивается сетевой политикой (Network Policy) и службами доступа (Access Services). Сюда входят предыдущие службы IAS наряду с новым компонентом NAP.
1. Перейдите Start> Server Manager, выберите Roles и нажмите Add Roles;
2. Выберите Network Policy and Access Services, и нажмите Далее:
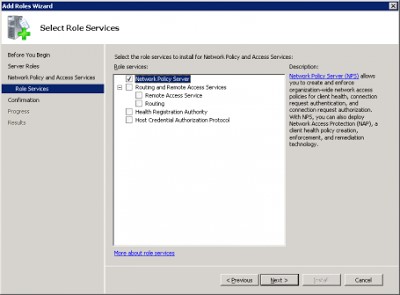
3. Выберите только Network Policy Server:
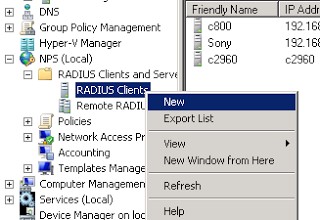
Добавление клиентов на сервер RADIUS
1. Перейдите Start > Admin Tools > Network Policy Server > RADIUS Clients and Servers
2. Правый клик RADIUS Clients, New:
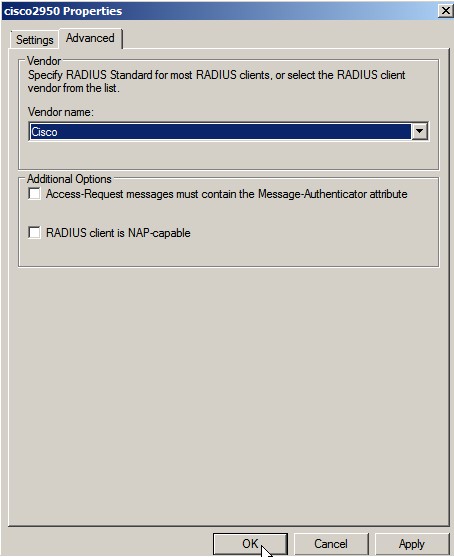
3. Вводим желаемое имя. Указываем Shared secret (это общий ключ для завязки устройства на RADIUS, для каждого клиента можно указать индивидуальный):

Значение поля Friendly name может отличаться от DNS имени. Оно потребуется нам в дальнейшем для идентификации конкретного сетевого устройства при создании политик доступа – Remote Access Policy. Опираясь на это имя мы сможем задавать например маску по которой будут обрабатываться определённой политикой доступа несколько разных RADIUS клиентов.
4. На вкладке Advanced выбрать Vendor name: Cisco
Создание политик доступа на сервере RADIUS
С помощью политик доступа NPS мы произведём связку созданных ранее записей о коммутаторах-клиентах RADIUS и доменных групп безопасности, определяющих уровень доступа к этим коммутаторам. То есть в нашем случае будет создано две политики доступа — с полными правами и ограниченными.
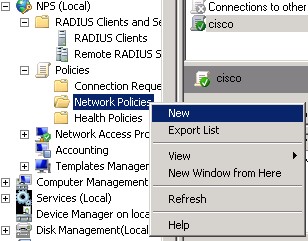
1. Перейдите Start > Admin Tools > Network Policy Server:
2. Правый клик по Network Policies, New:
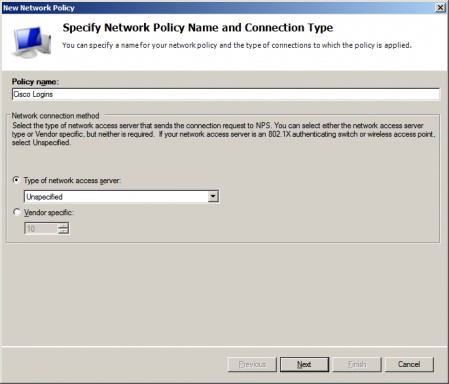
3. Укажите имя для политики, и выберем тип соединения Unspecified:
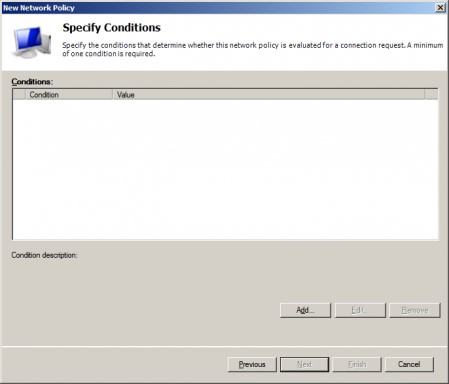
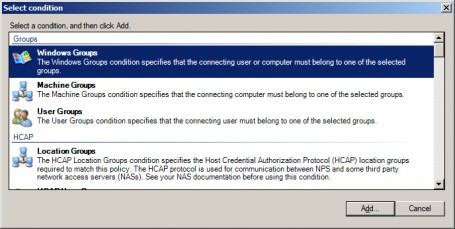
4. Указываем условия
На следующем шаге Specify Conditions нам нужно добавить условия при которых будет применяться данная политика RADIUS. Добавим два условия, – чтобы пользователь, проходящий авторизацию, входил в определенную доменную группу безопасности (созданную ранее группу Radius), и устройство, к которому осуществляется доступ, имело определённое имя «Friendly name» (созданное ранее).
Здесь важно понимать, что для условия с Windows Group использование встроенных групп безопасности таких как, например, Domain Admins не является хорошей практикой с точки зрения безопасности.
5. Через кнопку Add добавим условия по типам Windows Group и Client Friendly Name.
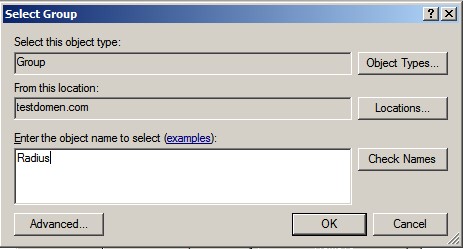
6. Выбираем Windows Group:
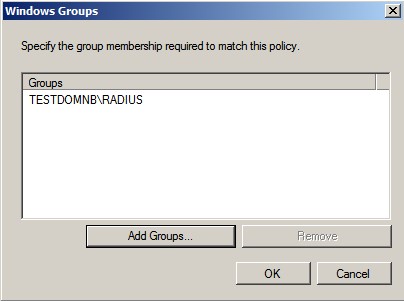
7. Указываем желаемую группу домена:
Процесс мониторинга
Процесс мониторинга – это управляющий процесс, который запускает или
перезапускает все другие процессы, ассоциированные с RADIUS-сервером. При
запуске процесс мониторинга читает и обрабатывает все конфигурационные
файлы (например, radiusd.conf, client, proxy, dictionary, default.policy).
Для регистрации информации процесс инициирует связь с демоном syslog.
Службы в сервере RADIUS – это процессы, которые обеспечивают сетевые
сервисы. Сервер RADIUS может запускать и управлять с помощью двух служб:
- аутентификация RADIUS;
- регистрация событий RADIUS-сервером.
Процесс мониторинга может запустить от 1 до N экземпляров каждой
службы. Каждый экземпляр службы прослушивает уникальный сетевой порт. По
умолчанию для аутентификации используется порт 1812. Порт для учета –
1813. Определить дополнительные порты можно в главном конфигурационном
файле RADIUS – radiusd.conf. Каждый порт, перечисленный в файле
radiusd.conf, запускает сервис, который прослушивает этот порт.
Экземпляры служб могут быть одинакового или различного типов. Например,
процесс мониторинга может запустить три экземпляра службы аутентификации и
два экземпляра службы регистрации событий.
Запомните, что все экземпляры служб должны работать на различных
портах. Как показано на , сервер
аутентификации может иметь три выполняющихся экземпляра на портах 1812,
6666, и 7779. Конфигурационный файл radiusd.conf содержит описания номеров
портов.
Рисунок 2. Процессы службы
аутентификации
После того как все службы были запущены, процесс мониторинга наблюдает за
процессами запущенных служб. Если процесс службы аварийно завершил свою
работу, процесс мониторинга зарегистрирует это событие и перезапустит
службу.
Примечание. При частом обновлении сервера RADIUS возможно
уменьшение числа служб.