Аутентификация на сетевом оборудовании через ssh с помощью публичных ключей
Содержание:
- Install PuTTY on Linux
- Download PuTTY for Mac and Installation Guide
- Features of SuperPuTTY
- Connecting through PuTTY
- Решение:
- Exporting a Private Key to Tectia SSH or OpenSSH
- Download PuTTYgen for Mac
- EXAMPLES
- License and Requirements to Run SuperPuTTY
- PuTTY for Linux
- Integrating PuTTY to WinSCP
- Download PuTTYgen for Linux
- KiTTY
Install PuTTY on Linux
On a Linux-based system, PuTTY can easily be installed via terminal. Let us look at the steps of installing the server application on a Ubuntu machine.
1. As a prerequisite, it is necessary to make sure whether the universe repository of Ubuntu is enabled or not.
Type the command:
sudo add-apt-repository universe
and hit enter.
2. Generally, PuTTY is already available in the repository of Ubuntu. Before starting with the installation process, update the packages and repositories of Ubuntu using the command:
sudo apt-get update
Note: The command would make sure that Ubuntu installs the latest version of PuTTY, in case, it might install the older versions of the software. The word “sudo” in the command is used to instruct the terminal to run the update command as “root” since a user might not have privileges to get going with the installation and updation. It will prompt you to enter the username and password if you have the required access.
3. Now, run the command:
sudo apt-get install PuTTY
It will complete the installation by installing the application tools.
4. A prompt will asked if you want to continue the installation. Press ‘y’.
5. PuTTY tools will be unpacked and set up in the further process.
6. To confirm if that the installation is successful, run the command:
sudo dpkg -l PuTTY
It will display information about the application such as version, architecture, and description.
Installation of PuTTY on other Linux distributions
In Debian based Linux system, use apt-get or aptitude to install the server application PuTTY. The command is:
sudo apt-get install PuTTY
PuTTY can easily be installed on Arch-based Linux system. The command for installing is:
sudo pacman -S PuTTY
It is also available for installation on Fedora or Red Hat based Linux system, and the default package manager does that job for it. The command is:
sudo dnf install PuTTY
Working on PuTTY on Linux
Now that you have installed PuTTY, working on it is pretty simple too.
- Just type the command “PuTTY” on the shell prompt. It will open the PuTTY SSH client application.
- After opening it, enter the IP address or the hostname of the computer or any device you want to connect on Hostname field.
- Next, select the required connection type, like SSH, Raw, Telnet, Rlogin, Serial, etc.
- For security reasons, a prompt will ask to confirm the connection. Just click ‘yes’ to continue.
- Now, you will be connected to your remote system. It will further ask for credentials – username and password, to make sure that you are authorized to connect to the system.
- In Linux, the application can also be opened by searching in the Computer Box.
- The Linux version of the program almost looks and feels exactly like the windows version.
SSH Key Management in PuTTY on Linux
Public key authentication is also supported by PuTTY. Public key authentication is used for interactive and automated connections. It offers a higher cryptographic strength which is difficult to achieve with long passwords. For generating a private key for authentication, the PuTTYgen tool is used.
Open PuTTYgen and run the following command to get public key authentication enabled:
puttygen -t rsa -b 2048 -o thekey.ppk
To get the public key use the following command:
puttygen -L thekey.ppk
Hence, that was all about installing and getting started with PuTTY on Linux based systems.
Download PuTTY for Mac and Installation Guide
PuTTY is a free, highly configurable and open-source SSH client which makes it convenient to connect to a remote server and transfer files over the network. Mainly aimed for the use of programmers and network administrator, it helps establish secure connections when transferring data over the network.
Apart from SSH, the application supports many other protocols like SCP, Telnet, Raw Socket Connection, etc. Additionally, it can also connect to a serial port. While it supports many variations on the secure remote terminal, it also facilitates user control over SSH encryption key and protocol versions.
Features of SuperPuTTY
One of the coolest features on the program is that users can manipulate tabs. The feature allows users to freely move open connections anywhere on the screen. Users can not only switch the sides of the tab to right, left, above or bottom but also split the toolbar tab entirely.
The advanced feature helps users compare screens simultaneously without having to shift tabs. To move any tab, users have to just left-click and drag the tab. While dragging, a color screen appears one can drag the tab of the SuperPutty program.
Accessing SuperPutty Using the Command Line
SuperPutty’s primary setting file is called ‘SuperPuTTY.Setting’ and is generally located where the USERPROFILE variable is directed. If not available then it can be found within the USERPROFILE directory. Although, it is advised not to make any changes to this file directly, instead use the ‘Tools option’ on the menu bar to edit.
However, for easy access, users can choose to move the ‘SuperPuTTY.Setting’ file where the applications executable file is stored.
Users can type the following command line on command prompt to see where the setting file is located –
C:\>echo %USERPROFILE%
Also, users are permitted to make the runtime configuration of the application. However, such advanced setting is accessible via the application file called ‘SuperPutty.exe.config’ that is located in the application directory.
It is highly recommended to maintain the default setting and make no changes. These files are only to be accessed by advanced users.
Interestingly it is possible to launch the application using the command line. Users must write the following code – SuperPutty.exe –help. The feature allows users to open the application simultaneously while operating other programs on the computer.
While PuTTY as a standalone software is highly advanced and does do most of the functions, SuperPutty makes the user experience more aesthetic by making it easy to save sessions and offer effortless tab management feature. You can check the other putty alternative software here.
Links Credit : https://github.com/jimradford/superputty
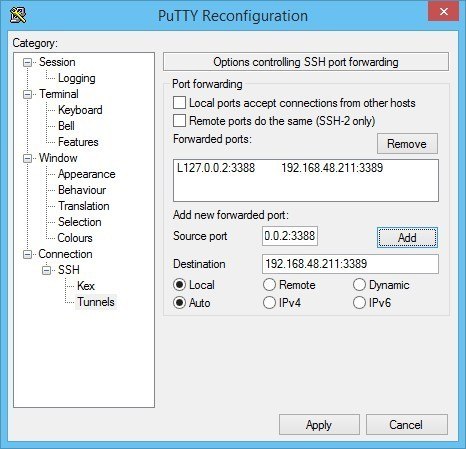
Connecting through PuTTY
- To connect to the server, enter the IP address of the server to the Host Name or IP address bar as shown in the image and keep the port as 22 and connection type as SSH. You may also save the configuration for further use.
- The PuTTY terminal will now open, asking for username and password to connect.
- You will be logged on the server you are trying to make a connection to.
If you using a Linux or Mac based Operating System, you don’t need a client like PuTTY as Linux has its own SSH terminal. You just need to use the following command to connect to the server:
ssh user@serverip
This command will connect you to a server whose IP address is “serverip”. “User” is the username that is authorized to connect to the server.
On entering the above command, you will be prompted to enter the password.
To close the connection to the remote server, just type “exit” on the terminal window. It will get you back to your local machine.
Решение:
PuTTY
PuTTY позволяет использовать различные протоколы удалённого доступа — SSH, Telnet, rlogin. Также имеется возможность работы через последовательный порт.
PuTTY позволяет подключиться и управлять удаленным узлом (например, сервером).
Пакет PuTTY включает в себя несколько утилит:
- PuTTY: Telnet и SSH клиент
- PSCP: SCP клиент — копирование файлов по шифрованному протоколу с управлением из командной строки
-
PSFTP: SFTP клиент — копирование файлов подобно FTP
- PuTTYtel: отдельный Telnet клиент
- Plink: интерфейс командной строки к PuTTY
- Pageant: агент SSH-аутентификации для PuTTY, PSCP и Plink
- PuTTYgen: утилита для генерации RSA и DSA ключей
Вы можете скачать и установить как полный инсталлятор, так и каждый модуль по отдельности.
Работа с программой:
Для начала работы запустите файл putty.exe.
Перед вами появится окно, представленное на рисунке ниже.
В поле Host Name (or IP address) вводите DNS—имя вашего сервера или IP-адрес.
Порт оставляйте по умолчанию 22. Измените его в соответствии с реальным значением.
В поле Saved Sessions введите любое имя сессии (подключения) и нажмите Save.
После этого необходимо изменить некоторые параметры заданные по умолчанию
В настройках terminal → Keyboard → The Function keys and keypads установите Linux
В настройках Connection → Data, в графе Terminal-type string установите значение linux
В настройках Window → Translation нужно выбрать UTF-8
Для того чтобы все новые соединения использовали настройку кодировки UTF-8 загрузите этот файл , распакуйте из архива и импортируйте в реестр
В настройках SSH в меню слева и Выберите протокол SSH версии 2
После выполнения настроек вернитесь в категорию меню Session, введите имя подключения в поле Saved Sessions и нажмите кнопку «Open». После ввода пароля вы подключитесь к виртуальной консоли сервера и можете выполнять там любые команды.
Midnight Commander при правильно настроенном PuTTY должен выглядет так:
Если у вас неверно отображаются символы, убедитесь, что параметры установлены в соответствии с этой инструкцией.
-
команды linux
-
неправильное отображение символов в putty
Exporting a Private Key to Tectia SSH or OpenSSH
It is rarely necessary to export a private key from PuTTY to Tectia
SSH or OpenSSH. However, the process is described here, as it can
sometimes be necessary when, for example, an application is moved to
Linux in the cloud and the destination server of a file transfer
cannot easily be reconfigured to change an authorized key.
Tectia SSH and OpenSSH both support the OpenSSH private key file
format, so using that key file format is described here. Tectia SSH
also supports certain other formats.
To convert an existing PuTTY private key for Tectia or OpenSSH, use
the command:
puttygen keyfile.ppk -O private-openssh -o keyfileThen copy keyfile to the .ssh directory on the host where Tectia
or OpenSSH will be run.
Download PuTTYgen for Mac
You can find the step by step guide to download PuTTYgen for Mac operating system. Command-line SSH client is a part of the Mac operating system. To utilize it, go to Finder and then opt for Go -> utilities from the top menu. After that find the terminal which supports SSH connections to remote servers.
Ported PuTTY for Mac
Mac has the port of PuTTY which can be installed in various ways described as below:
- Installation using Homebrew:Use the below-given command to install PuTTY in case you have already installed “brew”command.sudo brew install putty
-
Installation using MacPorts:PuTTY is easily available through MacPorts. First of all, install MacPorts and then apply the below-given command.
sudo port install puttyUse the below-given command to add the shortcut on the desktop.cp /opt/local/bin/putty ~/Desktop/PuTTY - Alternatives to PuTTY on Mac OSCyberduck, used by many people on Mac OS is the best SSH Client is the ultimate alternative to PuTTY on Mac OS.
EXAMPLES
To generate an SSH-2 RSA key pair and save it in PuTTY’s own format (you will be prompted for the passphrase):
puttygen -t rsa -C "my home key" -o mykey.ppk
To generate a larger (2048-bit) key:
puttygen -t rsa -b 2048 -C "my home key" -o mykey.ppk
To change the passphrase on a key (you will be prompted for the old and new passphrases):
puttygen -P mykey.ppk
To change the comment on a key:
puttygen -C "new comment" mykey.ppk
To convert a key into OpenSSH’s private key format:
puttygen mykey.ppk -O private-openssh -o my-openssh-key
To convert a key from another format (puttygen will automatically detect the input key type):
puttygen my-ssh.com-key -o mykey.ppk
To display the fingerprint of a key (some key types require a passphrase to extract even this much information):
puttygen -l mykey.ppk
To add the OpenSSH-format public half of a key to your authorised keys file:
puttygen -L mykey.ppk >> $HOME/.ssh/authorized_keys
License and Requirements to Run SuperPuTTY
The GUI-based application SuperPutty is licensed under MIT’s license for software, known as the X11 license. With the license, the program is both available for commercial and non-commercial operations. SuperPutty runs on all Windows operating system that supports.Net Framework 3.5 or newer version. As to the requirements, below are some of the basic prerequisite to run the application.
- Windows OS – XP, Vista, Windows 7, Windows 8, Windows 10
- Supports both 32-bit and 64-bit operating systems.
- The Microsoft .NET Framework 3.5 or newer 32 and 64 bit operating systems are supported
- The PuTTY SSH Client
PuTTY for Linux
PuTTY is not only limited to Windows OS, but it’s popular among Linux users too. The Linux version is a graphical terminal program which is not pre-installed in most of the Linux distributions.
In various enterprises, many IT projects have their development environment on a remote Linux system where Windows is used as the local system. Why PuTTY? There is already a Linux terminal in the Linux Operating System. Even then, why an SSH tool like PuTTY is preferred?
- The interface of PuTTY makes it a favorite choice among the users since most of them are accustomed to operating the application on Windows.
- It has the option of connecting to raw sockets and serial ports.
- Saving various sessions and loading them in one go is the main highlighting feature of PuTTY that its users swear by since it is difficult to edit sessions whenever logging-in manually.
Integrating PuTTY to WinSCP
A PuTTY is a great tool when one wants to connect to Linux shell command line. Users can
also choose PuTTY’s alternative Kitty also offers same and more functions than PuTTY.
Once the user has WinSCP installed and connected to Linux server via SSH, they can
follow below steps to integrate PuTTY into WinSCP.
1. First and foremost, .
2. Put the files in the following location to avoid modifying the command line
3. Without logging into WinSCP, click and Tools > Preferences.
4. Next, click on the option ‘Integration and then ‘Applications in the left column.’
5. Now, open the PuTTY/Terminal client path and add the following command
6. Next, choose the option ‘Remember session password and pass it to the PuTTY option.’
This option will save time for users as they won’t need to reenter the password again.
7. Click on ‘OK’ and Voila! It’s done.
While one can integrate PuTTY to WinSCP, users can also WinSCP as PuTTY
session manager; in fact, it has added advantages. Users can use WinSCP to open the site
in PuTTY from its Login dialog easily.
From the WinSCP window, navigate to the following path Use Manage > Open in PuTTY
command.
Advantage of Leveraging WinSCP to Launch Session in PuTTY
- Users can choose to color multiple sites on the list.
- One has the advantage to organize files in the folder.
- It offers a single list of all sites share between Secure File Transfer Protocol and
SSH terminal client. - The incremental search feature allows the user to search for a file by just typing
part of the file or folder name. - Users can choose to rename or clone files.
PuTTYgen With WinSCP
PuTTYgen is a component of the world’s most sought-out SSH client PuTTY. It comes as part
of the WinSCP installation package, and users can even choose to download from here.
In simple words, PuTTYgen is a crucial generator tool that generates both private and
public keys. It supports several network protocols such as SFTP, Serial, SSH, SCP,
Telnet, etc.
To use PuTTYgen, go to ‘Tools’ in WinSCP and then select PuTTYgen on login dialog.
Download PuTTYgen for Linux
In order to download PuTTYgen for Linux (Ubuntu) operating system, one required to install PuTTYgen separate from the PuTTY client in case of some Linux distributions.
For example, Debian Linux requires the below-given code to install PuTTYgen:
sudo aptitude install putty-tools
Generate Key Pair for Authentication in Linux
Use the below command to create the key pair for authentication in Linux.
PuTTYgen -t RSA -b 2048 -C “user@host” -o keyfile.ppk
Various Command Line Options of PuTTY in Linux
Below is the list of important command line options for PuTTY in Linux operating system.
PuTTYgen | keyfile]
Options:
- Keyfile – It is the name of the existing key file to read at the time of changing the current key.
- -t keytype – This command specifies the type of the key to creating. Its acceptable values are RSA and dsa.rsa1.
- -b bits – This command specifies a total number of bit in a particular key. 1024 is the perfect size for DSA key, while 2048 or 4096 are the perfect size for RSA keys.
- -q – This command suppresses the message about progress at the time of key generation.
- -C new-comment – This command is used to specify the comment to describe the key. It can be used for new and/or existing key. Key operation is not affected by comment. However, it is used to recognize the key owner, it’s not reliable completely as any value can be applied to it.
- –P – This command is used to update the passphrase of a key. Passphrase helps to encrypt the private key. As passphrase can’t be add or update on command line, it prompts a new passphrase tool to alter it.
- –old-passphrase-file – The old password of the key remains in this file. This is used when the key is protected by a passphrase.
- –new-passphrase file – This file entails the new passphrase of the key. This command comes in the action either at the time of generating new key or while applying –P command to change the passphrase.
- -O output-type – This command defines what to give in output. By default, the private key is the output.
Thus, above are the prominent commands of PuTTYgen in Linux operating system. There are many other commands also available to perform a various task from the command prompt in Linux at flank speed.
KiTTY
The KiTTY application is a fork of PuTTY, as such, it is coded on the same foundations of PuTTY. In simple words, KiTTY is a better version of PuTTY that not only has all the features that PuTTY has but offers many more.
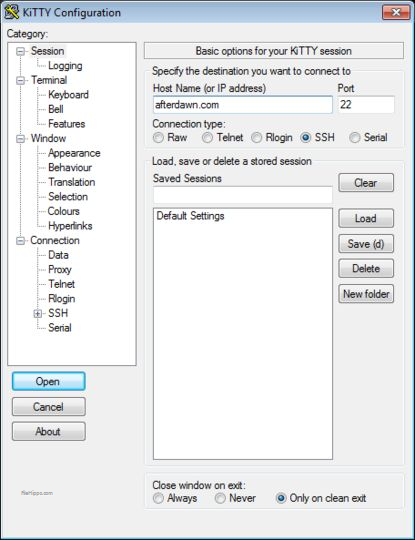 KiTTY Screenshot
While, the interface is developed for the Windows operating system but one can remotely access computers that run Linux, Mac OS, and Unix. As KiTTY was built altering the source code of PuTTY, it offers almost the same user interface and user experience.
PuTTY vs KiTTY
However, KiTTY solves one of the basic limitations of PuTTY’s, which is simultaneously representing multiple sessions. Apart from that KiTTY has many different features such as:-
- Multiple Session Launcher
- Portability
- Inbuilt Chat System
- Automatic Login Scripts
- Text Editor
- Includes SCP implementations – pscp and WinSCP
- Connect via Telnet and SSH
Therefore, KiTTY is perfect for those who are accustomed to PuTTY interface and are not looking for much change besides the additional features.
Download KiTTY
You can easily download Kitty from the official website 9bit.net. To download KiTTY for windows follow the simple steps.
- Go to the official website.
- Click on main download website.
- A new window will pop up.
- Click on either download KiTTY Windows Classic or KiTTY windows portable.
- Your download will start automatically.
KiTTY software is totally free to use.