Как установить arch с минимальной болью?
Содержание:
Performing the chroot
If your directory is on a different partition from your , and you want to manipulate files on it (e.g., if you’ll be working with GRUB, performing a kernel upgrade, etc.), you’ll also need to mount that partition. If it’s at /dev/sda2 and its filetype is ext2, then do:
Similarly for any other parts of your filesystem (, ) that reside on separate partitions but which you need access to. Generally when you’re chrooting to fix something you won’t need access to /home, so you don’t need to bother with it.
(It’s also possible to mount filesystems after you’ve chrooted, but it’s smarter to do so beforehand. The reason is that when you do it after, the outside/kernel environment won’t know about the mounted filesystems, so if you forget to umount them before exiting the chroot, the system won’t know to umount them when it shuts down, either. This could damage those filesystems.)
If you’ve setup your network and want to use it in the chrooted system, copy over so that you’ll be able to resolve domain names:
Now you’re ready to move into the mounted filesystem:
(If this returns an error , this usually indicates that you booted with one architecture (e.g. x86_32) and are trying to chroot into another (e.g. x86_64). The solution is to use a LiveCD which has the same architecture as the system you want to chroot into.)
At this point, you’re still running the kernel you booted with, but all paths will refer to what used to be .
If you’ll be doing anything with GRUB, you’ll need to be sure your file is up-to-date:
It might also be helpful at this point to do:
6 ответы
Известная проблема в системных дистрибутивах (Arch Linux,
OpenSUSE, Fedora).
Systemd заменяет sysvinit и обеспечивает одно большое
преимущество над этим. В sysvinit, когда вы запрашиваете запуск
службы, она наследует контекст выполнения лица, вызывающего скрипт,
который включает переменные среды, ulimits и т. Д. Systemd улучшает
это, наоборот, уведомляя демона, который запустит службу в четко
определенной, здоровой, постоянной среде, где, конечно,
характеристики услуг намного проще предсказать, так как среда
всегда одна и та же.
Это означает, что, когда я вызываю systemctl изнутри chroot, не
имеет значения, что я внутри chroot, среда, которая будет
унаследована, по-прежнему относится к PID 1, а не к моей текущей.
Но это становится хуже, чем это: поскольку сокеты связи размещены
внутри/run/systemd, процесс в chroot даже не сможет поговорить с
системой init!
Итак, как вы идете chroot’ing в systemd distros?
-
Если все, что вы хотите сделать, это контейнер Linux, эта страница Arch Wiki расскажет вам, как
настроить контейнер Linux менее чем за 30 секунд, благодаря
. -
Если вам действительно нужна среда chroot, эта красивая и кристально чистая
веб-страница предоставит вам два рабочих решения (второй
вариант — это модифицированная версия, предложенная в пункте № 1).
</Р>
23
only ignores «services», so I just run the
daemon commands manually.
Поэтому вместо
я использую
3
Нет. Службы выполняются systemd (pid 1), а не напрямую systemctl
(который отправляет только запрос на запуск), а так как systemd
запускается за пределами chroot, то будет и сервис.
Хотя технически это можно было бы реализовать (при условии, что
systemctl каким-то образом передаст свой корень в systemd), это
вряд ли произойдет, поскольку уже существует инструмент для
создания полных контейнеров (
). Вы всегда можете
связаться с списком рассылки .
2
Вы можете использовать команду для запуска
служб в chroot. Например, для запуска службы я
делаю это так.
to stop it
1
Столкнувшись с этой проблемой, однажды попытался открыть сеть в
режиме спасения, используя конфигурацию сети из chroot. Наконец,
это работает для меня:
или:
1
Если вы запускаете службу типа inetd с активацией сокета,
рассмотрите возможность запуска stunnel вместо файла конфигурации,
который указывает как chroot, так и ваш двоичный файл как цель
запуска inetd.
Обратите внимание, что вы можете иметь проблемы SELINUX. В
системе Oracle Linux 7.1 мне приходилось «chcon -v —type =
stunnel_etc_t» во всех файлах, которые нужно было читать
Вам нужно будет использовать TLS-шифрование на стороне клиента
сокета (т. Е. Еще один stunnel с «client = yes» в config). Дайте
мне знать, если вы хотите получить более подробную информацию об
этом.
Изменение корневого раздела
Используя arch-chroot
Bash-скрипт arch-chroot является частью пакета из официальных репозиториев. Перед тем, как запускать , этот скрипт монтирует интерфейсные файловые системы вроде и делает доступным из под окружения chroot.
Запустите arch-chroot с указанием нового корневого каталога:
# arch-chroot /mnt/arch
Чтобы запустить командную оболочку bash вместо sh:
# arch-chroot /mnt/arch /bin/bash
Чтобы запустить в окружении chroot минуя создание сеанса в командной оболочке:
# arch-chroot /mnt/arch /usr/bin/mkinitcpio -p linux
Используя chroot
# cd /mnt/arch
# mount -t proc proc proc/
# mount --rbind /sys sys/
# mount --rbind /dev dev/
И, опционально:
# mount --rbind /run run/
Чтобы использовать интернет-соединение в chroot может понадобиться скопировать resolv.conf:
# cp /etc/resolv.conf etc/resolv.conf
Чтобы запустить bash в окружении chroot:
# chroot /mnt/arch /bin/bash
Примечание: Если вы получили ошибки:
- , это значит, что архитектуры основной среды и среды нового корневого каталога не совпадают.
- , перемонтируйте раздел с разрешением exec: .
После входа в сеанс chroot может понадобиться проинициализировать среду командной оболочки в новой среде:
# source /etc/profile
# source ~/.bashrc
Совет: Вы также можете установить другое приглашение командной оболочки для того, чтобы отличать среду chroot от основной:
# export PS1="(chroot) $PS1"
Используя systemd-nspawn
systemd-nspawn может использоваться для запуска команды или операционной системы в легковесном контейнере. Во многих случаях он похож на chroot, но является более мощным инструментом, так как он полностью эмулирует отдельную иерархию файловой системы и дерево процессов, различные системы межпроцессного взаимодействия, имя хоста и домена.
Перейдите в точку монтирования нового корневого раздела и запустите systemd-nspawn:
# cd /mnt/arch
# systemd-nspawn
Нет необходимости самостоятельно монтировать интерфейсные файловые системы вроде ,
так как systemd-nspawn запускает новый процесс init в созданной виртуальной среде, который берет на себя эту задачу. Это похоже на загрузку второй операционной системы внутри основной, но без создания виртуальной машины.
Чтобы вернуться в основную систему, просто разлогиньтесь или запустите команду poweroff. После этого вы можете размонтировать разделы, как показано в .
Copia e incolla
Quanto detto sopra pronto per fare copia e incolla.
Prima la parte dove si impostano le variabili di shell.
export MCHRMIRROR=http://deb.debian.org/debian
export MCHRARCH=i386
export MCHRREL=buster
export MCHRDIR=/srv/chroot/${MCHRREL}-${MCHRARCH}
echo My chroot dir is ${MCHRDIR}
Poi il resto del materiale di cui fare copia-e-incolla, preferibilmente con attenzione.
mkdir -p ${MCHRDIR}
# passo successivo, richiede molto tempo
debootstrap --variant=buildd --arch=${MCHRARCH} ${MCHRREL} ${MCHRDIR} ${MCHRMIRROR}

# previene l'avvio di demoni da parte di dpkg nell'ambiente chroot
cat > ${MCHRDIR}/usr/sbin/policy-rc.d <<EOF
#!/bin/sh
exit 101
EOF
chmod a+x ${MCHRDIR}/usr/sbin/policy-rc.d

# nella chroot "codificare in modo fisso" ischroot a VERO
cp  ${MCHRDIR}/bin/true ${MCHRDIR}/usr/bin/ischroot

#
cp /etc/hosts ${MCHRDIR}/etc/hosts
cp /etc/resolv.conf ${MCHRDIR}/etc/resolv.conf

# quello sopra va fatto una sola volta

# montare, da fare piu' spesso
mount --bind /dev ${MCHRDIR}/dev
mount --bind /dev/pts ${MCHRDIR}/dev/pts
mount --bind /proc  ${MCHRDIR}/proc

# può anche essere necessario (es. nella modalità ripristino dell'Installatore Debian)
mount --bind /sys  ${MCHRDIR}/sys
mount --bind /run  ${MCHRDIR}/run

# Okay
# Entrare nella chroot, uscirne con exit
chroot ${MCHRDIR}
# godersi il proprio nuovo ambiente
# installare con apt quello di cui si ha bisogno
# fare quello che si vuole
Smontare
 && echo my chroot dir is ${MCHRDIR}
 && umount ${MCHRDIR}/proc
 && umount ${MCHRDIR}/dev/pts
 && umount ${MCHRDIR}/dev

# se sono state montate prima
 && umount ${MCHRDIR}/sys
 && umount ${MCHRDIR}/run
CategorySystemAdministration | CategoryVirtualization
Настройка инструментов
Чтобы добиться максимальной производительности chroot, нужно использовать некоторые инструменты для установки основных файлов дистрибутивов. Это ускорит процесс и предоставит необходимые библиотеки и пакеты.
Первый инструмент — dchroot или schroot – используется для управления chroot-окружениями. Он также позволяет выполнять команды в chroot-окружении.
Команда dchroot несколько устарела и сейчас используется как оболочка совместимости для более современной команды schroot.
Debootstrap – ещё один необходимый инструмент, создающий операционную систему в подкаталоге другой системы. Это позволяет ускорить запуск, так как chroot-окружение требует определенных инструментов и библиотек для того, чтобы функционировать должным образом.
Установите эти пакеты (рекомендуется установить dchroot, так как он поставляется с schroot):
Теперь необходимые инструменты установлены, и нужно только указать каталог, который будет использоваться как root-каталог окружения chroot. Для этого создайте в root-каталоге каталог test:
Как уже говорилось, команда dchroot в современных системах используется как оболочка для более мощной команды schroot. Потому нужно отредактировать конфигурационный файл schroot, внеся в него свои данные.
Откройте файл с привилегиями администратора:
В файл нужно добавить опции, которые будут использоваться для создания изолированной системы. Например, в Ubuntu нужно указать версию и т.п. Для Debian существуют хорошо закомментированные значения (т.к. команда schroot изначально разрабатывалась для Debian).
Итак, в данный момент используется система Ubuntu 12.04; для примера предположим, что вам необходимо протестировать некоторые пакеты для Ubuntu 13.10 (кодовое название — Saucy Salamander). Для того нужно внести следующие данные:
Сохраните и закройте файл.
Troubleshooting
Configuration validation
# nginx -t
nginx: the configuration file /etc/nginx/nginx.conf syntax is ok
nginx: configuration file /etc/nginx/nginx.conf test is successful
Accessing local IP redirects to localhost
In locate the line without a in front of it, and add below:
server_name_in_redirect off;
Default behavior is that nginx redirects any requests to the value given as in the config.
This is because the FastCGI server has not been started, or the socket used has wrong permissions.
In Archlinux, the configuration file mentioned in above link is .
Error: No input file specified
2. Another occasion is that, wrong argument in the section in . Make sure the points to the same directory as it in in the same server. Or you may just set root as global, do not define it in any location section.
3. Check permissions: e.g. for user/group, for directories and for files. Remember the entire path to the directory should have the correct permissions. See to bulk modify a directory tree.
4. You do not have the containing the full path to your scripts. If the configuration of nginx () is correct, this kind of error means php failed to load the requested script. Usually it is simply a permissions issue, you can just run php-cgi as root:
# spawn-fcgi -a 127.0.0.1 -p 9000 -f /usr/bin/php-cgi
or you should create a group and user to start the php-cgi:
# groupadd www
# useradd -g www www
# chmod +w /srv/www/nginx/html
# chown -R www:www /srv/www/nginx/html
# spawn-fcgi -a 127.0.0.1 -p 9000 -u www -g www -f /usr/bin/php-cgi
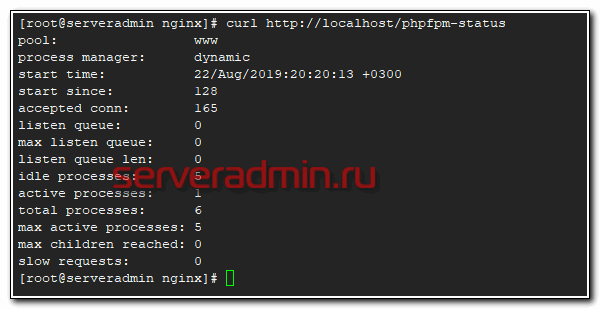
5. If you are running php-fpm with chrooted nginx ensure is set correctly within (or if working on older version)
Warning: Could not build optimal types_hash
When starting the , the process might log the message:
18872#18872: could not build optimal types_hash, you should increase either types_hash_max_size: 1024 or types_hash_bucket_size: 64; ignoring types_hash_bucket_size
/etc/nginx/nginx.conf
http {
    types_hash_max_size 4096;
    server_names_hash_bucket_size 128;
    ...
}
Cannot assign requested address
The full error from is
460#460: bind() to A.B.C.D:443 failed (99: Cannot assign requested address)
Even, if your nginx unit-file is configured to run after with systemd, nginx may attempt to listen at an address that is configured but not added to any interface yet. Verify that this the case by manually running start for nginx (thereby showing the IP address is configured properly). Configuring nginx to listen to any address will resolve this issue. Now if your use case requires listening to a specific address, one possible solution is to reconfigure systemd.
To start nginx after all configured network devices are up and assigned an IP address, append to within and start/enable .
Updating
The chroot should be up-to-date before building packages. Use the sbuild-update to perform updates.
First, note the name of the sbuild chroot to be updated. All sbuild chroots built with sbuild-createchroot will have a suffix of ‘-sbuild’. Thus to find the names of all sbuild chroots, run the following.
schroot -l | grep sbuild
If you followed the setup instructions above, there should be one chroot named source:unstable-$arch-sbuild where $arch is the architecture installed on your machine.
After noting the name of your sbuild chroot, run the following.
sudo sbuild-update -udcar unstable-$arch-sbuild
The arguments ‘-udcar’ will tell sbuild-update to run an apt-get update, dist-upgrade, clean, autoclean, and autoremove in the chroot.
You can also pass --apt-update --apt-distupgrade to the individual sbuild invocation to update the temporary copy of the build chroot, but this won’t cause any changes to happen in the persistent copy of the chroot (in the .tar.gz file). So if you are building more than once, you should run sbuild-update instead of relying on this.
Using aliases
In Debian, an unstable chroot is used for building in a number of situations like building an unpacked source package with UNRELEASED in debian/changelog or building packages for experimental. Furthermore, distributions have alternative names like sid/unstable or experimental/rc-buggy. Sbuild selects the chroot to use either from debian/changelog (so it would be nice if UNRELEASED would trigger a build in an unstable chroot) or through the -d option which also sets the Distribution value in the resulting .changes file (so it would be handy if saying -d sid were enough and one wouldn’t have to use the -c option to type unstable-amd64-sbuild manually). All of this can be solved by using schroot aliases. My sid schroot config says:
aliases=UNRELEASED,sid,rc-buggy,experimental
This means, that this schroot will be used for packages having UNRELEASED in their debian/changelog, for packages I build with -d sid (because writing out unstable is too long) as well as for packages I build for experimental.
Cleaning up
When you’re finished, ensure that all running programs have stopped. Then exit the chroot:
Now unmount all the partitions you mounted:
Finally attempt to unmount your hard drive:
If you get an error saying that /mnt (or any other partition) is busy, this can mean one of two things:
-
A program was left running inside of the chroot.
-
Or more frequently: a mount point still exists on this mount. For example, /mnt/usr is still mounted when trying to unmount /mnt.
In the latter case, simply unmount the offending mount point first. To get a reminder of all the current mount points, run with no parameters.
Finally:
Installing and configuring dchroot (deprecated)
This section formerly appeared before the debootstrap section above. The following is here merely for reference. This use of dchroot is deprecated (no longer preferred), so you should probably use schroot as described above.
dchroot is a convenient means of managing chroot environments; with this tool you can have both Dapper, Feisty and even Debian Sid chroots in your Ubuntu install, and using a chroot environment is a simple as dchroot -c dapper -d
To get it dchroot working in your system, just do the following in a Terminal:
 sudo apt-get install dchroot
 sudo mkdir -p /var/chroot/hardy # Remember, we assume our chroot is here
 sudo editor /etc/dchroot.conf
Then append this line in /etc/dchroot.conf:
mychroot /var/chroot/hardy
Примеры
Чтобы определить местонахождение ближайшего к вам зеркала, см. список Мировые серверы-зеркала Debian.
main # mkdir /stable-chroot
main # debootstrap stable /stable-chroot http://deb.debian.org/debian/
Полный процесс создания полноценной инсталляции Debian Sid (unstable):
main # export MY_CHROOT=/sid-root
main # cd /
main # mkdir $MY_CHROOT
main # debootstrap --arch i386 sid $MY_CHROOT http://deb.debian.org/debian/

main # echo "proc $MY_CHROOT/proc proc defaults 0 0" >> /etc/fstab
main # mount proc $MY_CHROOT/proc -t proc
main # echo "sysfs $MY_CHROOT/sys sysfs defaults 0 0" >> /etc/fstab
main # mount sysfs $MY_CHROOT/sys -t sysfs
main # cp /etc/hosts $MY_CHROOT/etc/hosts
main # cp /proc/mounts $MY_CHROOT/etc/mtab
main # chroot $MY_CHROOT /bin/bash
chroot # dselect

 main # echo "8:23:respawn:/usr/sbin/chroot $MY_CHROOT " \
        "/sbin/getty 38400 tty8"  >> /etc/inittab


 main # init q
Установка Ubuntu из Debian:
main # mkdir /ubuntu_xenial_1604
main # debootstrap --arch=amd64 xenial /ubuntu_xenial_1604 http://archive.ubuntu.com/ubuntu/
Installing and configuring schroot
schroot is a convenient means of managing chroot environments; with this tool you can have both Dapper, Feisty and even Debian Sid chroots in your Ubuntu install, and using a chroot environment is a simple as schroot -c dapper -d
To get schroot working in your system, just do the following in a Terminal:
 sudo apt-get install schroot
 sudo mkdir /var/chroot # Remember, we assume our chroot is here
 sudo editor /etc/schroot/schroot.conf
Then append this line in /etc/schroot/schroot.conf:
description=Ubuntu hardy
location=/var/chroot/hardy
priority=3
users=doko
groups=sbuild
root-groups=root
Additional steps for 64-bit systems
If you are running a 64bit kernel and install a 32bit chroot (architectures i386, lpia on amd64, sparc, powerpc), add the line:
personality=linux32
and install the linux32 package. This avoids prefixing each schroot command with the linux32 command.
aliases=dokochroot,default
default is very useful as are aliases.