Как скачать и установить debian 9 stretch
Содержание:
- Шаг 2 — Установка MariaDB
- Step 4 — Downloading WordPress
- 6: Веб-интерфейс WordPress
- Step 4 — Downloading WordPress
- Step 4 — Installing PHP
- Шаг 3 — Установка PHP
- Non-profit Organizations
- Step 2 — Installing Additional PHP Extensions
- Step Five — Enabling External Access for Your Regular User
- Instalar LAMP en Debian 10 Buster
- 4: Загрузка WordPress
- Step 3 — Installing and Securing MySQL
Шаг 2 — Установка MariaDB
Вы установили и запустили веб-сервер, а теперь можете устанавливать MariaDB. MariaDB — это система управления базами данных. Она организует и обеспечивает доступ к базам данных, где ваш сайт может хранить информацию.
MariaDB — это созданное сообществом разработчиков ответвление MySQL. В Debian 9 в качестве сервера MySQL по умолчанию используется MariaDB 10.1, а пакет , который обычно используется для установки MySQL, представляет собой переходный пакет, который фактически устанавливает MariaDB. Однако рекомендуется устанавливать MariaDB с помощью пакета .
Используйте для получения и установки этого программного обеспечения:
Примечание. В этом случае вам не нужно предварительно запускать команду до выполнения команды. Это связано с тем, что вы недавно запускали ее для установки Apache, и индекс пакетов на вашем компьютере уже должен быть обновлен.
Эта команда также выводит список устанавливаемых пакетов и показывает, сколько они займут места на диске. Введите , чтобы продолжить.
После завершения установки запустите простой скрипт безопасности, устанавливаемый вместе с MariaDB. Этот скрипт удаляет некоторые небезопасные параметры по умолчанию и блокирует доступ к системе баз данных. Для запуска интерактивного скрипта введите следующую команду:
При этом откроется серия диалогов, где вы можете внести некоторые изменения в параметры безопасности установки MariaDB. В первом диалоге вам нужно будет ввести пароль пользователя root для текущей базы данных. Это административная учетная запись MariaDB, имеющая повышенный уровень привилегий. Она напоминает учетную запись root на сервере (хотя эта учетная запись относится только к MariaDB). Поскольку вы только что установили MariaDB и еще не меняли параметры конфигурации, пароль будет пустым, так что вам достаточно нажать в этом диалоге.
В следующем диалоге вам будет предложено задать пароль для пользователя root базы данных. Введите и нажмите . В Debian учетная запись пользователя root для MariaDB тесно связана с автоматизированным обслуживанием системы, так что мы не должны изменять настроенные методы аутентификации для этой учетной записи. Это позволит нам обновить пакет для уничтожения системы базы данных посредством удаления доступа к административной учетной записи. Позднее мы расскажем о том, как настроить дополнительную административную учетную запись для доступа через пароль, если аутентификация через сокет не подходит для вашего случая.
Далее вы можете использовать клавиши и , чтобы принять ответы по умолчанию для всех последующих вопросов. Выбрав эти ответы, вы удалите ряд анонимных пользователей и тестовую базу данных, отключите возможность удаленного входа пользователя root и загрузите новые правила, чтобы внесенные изменения немедленно активировались в MariaDB.
При установке на системы Debian пользователь root MariaDB настроен для аутентификации с помощью плагина , а не с помощью пароля. Во многих случаях это обеспечивает более высокую безопасность и удобство, однако это также может осложнить ситуацию, если вам нужно предоставить права администратора внешней программе (например, phpMyAdmin).
Поскольку для ротации журналов, запуска и остановки сервера используется учетная запись root, лучше всего не менять учетные данные пользователя root. Изменение учетных данных в файле конфигурации может сработать на начальном этапе, но при обновлении пакета изменения могут быть перезаписаны. Если вам требуется настроить доступ с паролем, команда поддержки рекомендует создать отдельную учетную запись администратора вместо изменения учетной записи root.
Для этого мы создадим новую учетную запись с теми же привилегиями, что и у учетной записи root, но настроенную для аутентификации с использованием пароля. Для этого откройте командную строку MariaDB через терминал:
Теперь мы можем создать нового пользователя с привилегиями root и доступом с использованием пароля. Измените имя пользователя и пароль на желаемые:
Очистите привилегии, чтобы они были сохранены и доступны в текущем сеансе:
После этого закройте оболочку MariaDB:
Теперь для получения доступа к базе данных с правами администратора вам потребуется пройти аутентификацию учетной записи этого пользователя с указанием заданного пароля. Для этого необходимо использовать следующую команду:
Вы настроили систему базы данных и теперь можете перейти к установке PHP, заключительного компонента комплекта LAMP.
Step 4 — Downloading WordPress
Now that your server software is configured, you can download and set up WordPress. For security reasons in particular, it is always recommended to get the latest version of WordPress directly from their site.
Note: We will use to download WordPress, but this program may not be installed by default on your Debian server. To install it, run:
Change into a writable directory and then download the compressed release by typing:
Extract the compressed file to create the WordPress directory structure:
We will move these files into our document root momentarily. Before we do, though, add a dummy file so that this will be available for WordPress to use later.
Create the file by typing:
Then copy over the sample configuration file to the filename that WordPress actually reads:
Additionally, create the directory so that WordPress won’t run into permissions issues when trying to do this on its own following an update to its software:
Then, copy the entire contents of the directory into your document root. Notice that the following command includes a dot at the end of the source directory to indicate that everything within the directory should be copied, including hidden files (like the file you created):
With that, you’ve successfully installed WordPress onto your web server and performed some of the initial configuration steps. Next, we’ll discuss some further configuration changes that will give WordPress the privileges it needs to function as well as access to the MariaDB database and user account you created previously.
6: Веб-интерфейс WordPress
После настройки сервера можно завершить процесс установки WordPress в браузере.
Интерфейс предложит выбрать язык установки, после чего появится главная страница настройки. Укажите название сайта и имя пользователя для доступа к CMS. Система самостоятельно сгенерирует надёжный пароль.
Примечание: Использовать имя вроде «admin» крайне не рекомендуется.
Затем введите адрес электронной почты и настройте индексацию сайта в поисковых системах.
Нажмите кнопку Install WordPress. После этого появится страница входа. Укажите свои учётные данные, чтобы получить доступ к панели инструментов.
Step 4 — Downloading WordPress
Now that your server software is configured, you can download and set up WordPress. For security reasons in particular, it is always recommended to get the latest version of WordPress directly from their site.
Note: We will use to download WordPress, but this program may not be installed by default on your Debian server. To install it, run:
Change into a writable directory and then download the compressed release by typing:
Extract the compressed file to create the WordPress directory structure:
We will move these files into our document root momentarily. Before we do, though, add a dummy file so that this will be available for WordPress to use later.
Create the file by typing:
Then copy over the sample configuration file to the filename that WordPress actually reads:
Additionally, create the directory so that WordPress won’t run into permissions issues when trying to do this on its own following an update to its software:
Then, copy the entire contents of the directory into your document root. Notice that the following command includes a dot at the end of the source directory to indicate that everything within the directory should be copied, including hidden files (like the file you created):
With that, you’ve successfully installed WordPress onto your web server and performed some of the initial configuration steps. Next, we’ll discuss some further configuration changes that will give WordPress the privileges it needs to function as well as access to the MariaDB database and user account you created previously.
Step 4 — Installing PHP
For our last component, we will set up and install PHP, which stands for PHP: Hypertext Preprocessor. This popular server-side scripting language is used far and wide for dynamic web content, making it essential to many web and application developers.
To install PHP, type the following:
After you agree to the installation, PHP will be installed on your server. You will see many packages being installed beyond just PHP. Don’t worry; your system is integrating the PHP software with your existing Apache2 installation and other programs.
Restart Apache on your server to make sure all of the changes with the PHP installation take effect. To do this, type the following:
Now, let’s take a moment to test the PHP software that you just installed. Move into your public web directory:
Once there, use your favorite console text editor to create a file named . Here’s one method of doing this:
This command will use the command line editor to open a new blank file with this name. Inside this file, type the following to populate a web page with output information for your PHP’s configuration:
/var/www/html/info.php
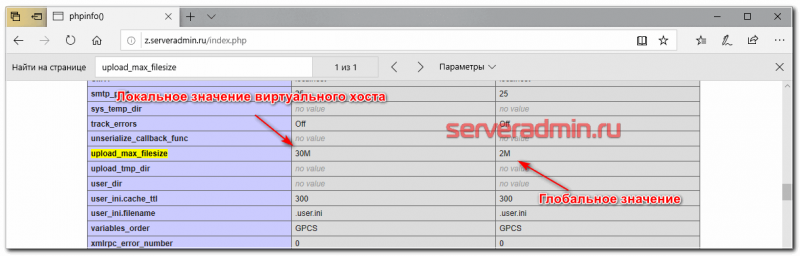
Hit to exit the file, then to save the changes that you made, then to confirm the file name. To access the configuration info, open your web browser and type the following URL, replacing the highlighted section with your server’s IP address:
http://111.111.111.111/info.php
If you’ve done everything correctly, you will see the default PHP information page, like the one shown below:

When you are done looking at this test PHP page, remove it for security. To do that, run this command:
The system will then ask if you wish to remove the test file that you’ve created. Answer yes to remove the file. Once this is done, you will have completed the basic PHP installation.
Шаг 3 — Установка PHP
PHP — это компонент системы, обрабатывающий код для отображения динамического контента. Он может запускать скрипты, подключаться к базам данных MariaDB для получения информации и передавать обработанный контент на веб-сервер для отображения.
Используйте систему для установки PHP. Кроме того, установите вспомогательные пакеты, чтобы код PHP можно было запускать на сервере Apache, и чтобы он мог взаимодействовать с базой данных MariaDB:
Эта команда должна установить PHP без каких-либо проблем. Сейчас мы это протестируем.
В большинстве случаев необходимо изменить способ обслуживания файлов Apache при запросе директории. Обычно, если пользователь запрашивает директорию на сервере, Apache в первую очередь ищет файл . Нам нужно, чтобы веб-сервер предпочитал файлы PHP, и чтобы Apache в первую очередь искал файл .
Для этого введите следующую команду, чтобы открыть файл в текстовом редакторе с привилегиями root:
Он будет выглядеть примерно так:
/etc/apache2/mods-enabled/dir.conf
Переместите файл индекса PHP (выделен выше) на первую позицию после спецификации , примерно так:
/etc/apache2/mods-enabled/dir.conf
После завершения сохраните и закройте файл, нажав . Для подтверждения сохранения нажмите , а затем нажмите для подтверждения расположения сохраняемого файла.
После этого перезапустите веб-сервер Apache, чтобы ваши изменения были готовы к распознанию. Для этого введите следующую команду:
Также вы можете проверить статус службы с помощью команды :
Вы можете установить дополнительные модули, чтобы расширить функционал PHP. Чтобы посмотреть доступные варианты модулей и библиотек PHP, отправьте результаты поиска на пейджер , позволяющий просматривать результаты выполнения других команд:
Используйте стрелки для прокрутки экрана и клавишу для выхода.
На экране результатов будут показаны все доступные для установки опциональные компоненты. Также будет выведено краткое описание каждого из них:
Дополнительную информацию о функциях каждого модуля можно найти в Интернете. Также вы можете посмотреть длинное описание пакета с помощью следующей команды:
На экране результатов будет много текста, а в поле описания будет приведено развернутое описание функционала модуля.
Например, чтобы узнать функции модуля , нужно использовать следующую команду:
Помимо другой информации вы увидите следующий фрагмент:
Если после изучения информации вы решите установить пакет, вы можете использовать для этого команду , как для любого другого программного обеспечения.
Если вы решили установить , введите следующую команду:
Если вы хотите установить несколько модулей, вы можете перечислить их после команды , разделяя пробелами:
Ваш комплект LAMP установлен и настроен. Однако прежде чем вносить другие изменения или развертывать приложения, будет полезно протестировать конфигурацию PHP на наличие возможных проблем.
Non-profit Organizations
- Bayour.com, Gothenburg, Sweden
- Eye Of The Beholder BBS, Fidonet Technology Network, Catalonia/Spain
- Dictionaries24.com, Poznan, Poland
- Beyond Disability Inc., Pearcedale, Australia
- E.O. Ospedali Galliera, Italy
- ESRF (European Synchrotron Radiation Facility), Grenoble, France
- GreenNet Ltd., UK
- GREFA, Grupo para la rehabilitación de la fauna autóctona y su hábitat, Majadahonda, Madrid, Spain
- GSI Helmholtzzentrum für Schwerionenforschung GmbH, Darmstadt, Germany
- LINKES FORUM in Oberberg e.V., Gummersbach, Oberbergischer Kreis, Germany
- MAG4 Piemonte, Torino, Italy
- Mur.at — Verein zur Förderung von Netzwerkkunst, Graz, Austria
- High School Technology Services, Washington DC USA
- PRINT, Espace autogéré des Tanneries, France
- Reware Soc. Coop — Impresa Sociale, Rome, Italy
- Systems Support Group, The Wellcome Trust Sanger Institute, Cambridge, UK
- SARA, Netherlands
- Institute for Snow and Avalanche Research (SLF), Swiss Federal Institute for Forest, Snow and Landscape Research (WSL), Davos, Switzerland
- SRON: Netherlands Institute for Space Research
- TuxFamily, France
Step 2 — Installing Additional PHP Extensions
When setting up our LAMP stack, we only required a very minimal set of extensions in order to get PHP to communicate with MariaDB. WordPress and many of its plugins leverage additional PHP extensions.
Download and install some of the most popular PHP extensions for use with WordPress by typing:
Note: Each WordPress plugin has its own set of requirements. Some may require additional PHP packages to be installed. Check your plugin documentation to find its PHP requirements. If they are available, they can be installed with as demonstrated above.
We will restart Apache to load these new extensions in the next section. If you are returning here to install additional plugins, you can restart Apache now by typing:
At this point, all that’s left to do before installing WordPress is to make some changes to your Apache configuration in order to allow the CMS to function smoothly.
Step Five — Enabling External Access for Your Regular User
Now that we have a regular user for daily use, we need to make sure we can SSH into the account directly.
Note: Until verifying that you can log in and use with your new user, we recommend staying logged in as root. This way, if you have problems, you can troubleshoot and make any necessary changes as root. If you are using a DigitalOcean Droplet and experience problems with your root SSH connection, you can log into the Droplet using the DigitalOcean Console.
The process for configuring SSH access for your new user depends on whether your server’s root account uses a password or SSH keys for authentication.
If the Root Account Uses Password Authentication
If you logged in to your root account using a password, then password authentication is enabled for SSH. You can SSH to your new user account by opening up a new terminal session and using SSH with your new username:
After entering your regular user’s password, you will be logged in. Remember, if you need to run a command with administrative privileges, type before it like this:
You will be prompted for your regular user password when using for the first time each session (and periodically afterwards).
To enhance your server’s security, we strongly recommend setting up SSH keys instead of using password authentication. Follow our guide on setting up SSH keys on Debian 9 to learn how to configure key-based authentication.
If the Root Account Uses SSH Key Authentication
If you logged in to your root account using SSH keys, then password authentication is disabled for SSH. You will need to add a copy of your local public key to the new user’s file to log in successfully.
Since your public key is already in the root account’s file on the server, we can copy that file and directory structure to our new user account in our existing session with the command. Afterwards, we can adjust ownership of the files using the command.
Make sure to change the highlighted portions of the command below to match your regular user’s name:
Now, open up a new terminal session and using SSH with your new username:
You should be logged in to the new user account without using a password. Remember, if you need to run a command with administrative privileges, type before it like this:
You will be prompted for your regular user password when using for the first time each session (and periodically afterwards).
Instalar LAMP en Debian 10 Buster
Instalar Apache web server
Antes de comenzar actualizamos el sistema.
sudo apt update && sudo apt -y upgrade
sudo apt install apache2 apache2-utils
systemctl status apache2
● apache2.service – The Apache HTTP ServerLoaded: loaded (/lib/systemd/system/apache2.service; enabled; vendor preset: enabled)Active: active (running) since Thu 2019-07-16 13:30:35 UTC; 4min 31s agoDocs: https://httpd.apache.org/docs/2.4/Process: 17962 ExecStart=/usr/sbin/apachectl start (code=exited, status=0/SUCCESS)Main PID: 17966 (apache2)Tasks: 55 (limit: 545)Memory: 4.8MCGroup: /system.slice/apache2.service├─17966 /usr/sbin/apache2 -k start├─17967 /usr/sbin/apache2 -k start└─17968 /usr/sbin/apache2 -k start
Si por algún motivo no inicia Apache, ejecutas lo siguiente.
sudo systemctl start apache2
sudo systemctl enable apache2
– Si usas iptables (nftables).
sudo iptables -I INPUT -p tcp --dport 80 -j ACCEPT
UFW Firewall
sudo ufw allow http
root
sudo chown www-data:www-data /var/www/html/ -R
Install LAMP on Debian 10 Buster
Instalar MariaDB Database Server
Por defecto Debian 10 viene con MariaDB 10.3.15.
sudo apt install mariadb-server mariadb-client
systemctl status mariadb
● mariadb.service – MariaDB 10.3.15 database serverLoaded: loaded (/lib/systemd/system/mariadb.service; enabled; vendor preset: enabled)Active: active (running) since Thu 2019-07-16 13:57:03 UTC; 16s agoDocs: man:mysqld(8)https://mariadb.com/kb/en/library/systemd/Main PID: 18566 (mysqld)Status: «Taking your SQL requests now…»Tasks: 31 (limit: 545)Memory: 73.9MCGroup: /system.slice/mariadb.service└─18566 /usr/sbin/mysqld
Si por algún motivo no inicia MariaDB, ejecutas lo siguiente.
sudo systemctl start mariadb
sudo systemctl enable mariadb
sudo mysql_secure_installation
- Configurar la contraseña de root.
- Eliminar usuarios anónimos.
- Deshabilitar el inicio de sesión remoto para el usuario root.
- Borrar la base de datos demo y los accesos.
ejemplo de lo que debes responder…
$ sudo mysql_secure_installationNOTE: RUNNING ALL PARTS OF THIS SCRIPT IS RECOMMENDED FOR ALL MariaDBSERVERS IN PRODUCTION USE! PLEASE READ EACH STEP CAREFULLY!In order to log into MariaDB to secure it, we’ll need the currentpassword for the root user. If you’ve just installed MariaDB, andyou haven’t set the root password yet, the password will be blank,so you should just press enter here.Enter current password for root (enter for none): OK, successfully used password, moving on…Setting the root password ensures that nobody can log into the MariaDBroot user without the proper authorisation.Set root password? [Y/n] YNew password: Re-enter new password: Password updated successfully!Reloading privilege tables..… Success!By default, a MariaDB installation has an anonymous user, allowing anyoneto log into MariaDB without having to have a user account created forthem. This is intended only for testing, and to make the installationgo a bit smoother. You should remove them before moving into aproduction environment.Remove anonymous users? [Y/n] Y… Success!Normally, root should only be allowed to connect from ‘localhost’. Thisensures that someone cannot guess at the root password from the network.Disallow root login remotely? [Y/n] Y… Success!By default, MariaDB comes with a database named ‘test’ that anyone canaccess. This is also intended only for testing, and should be removedbefore moving into a production environment.Remove test database and access to it? [Y/n] YDropping test database…… Success!Removing privileges on test database…… Success! Reloading the privilege tables will ensure that all changes made so farwill take effect immediately.Reload privilege tables now? [Y/n] Y… Success!Cleaning up…All done! If you’ve completed all of the above steps, your MariaDBinstallation should now be secure.Thanks for using MariaDB!
Puedes comprobar la version instalada.
mariadb --version
Instalar PHP 7.3 en Debian 10
Por defecto se instala la última versión estable de PHP que nos aporta una mejora en el rendimiento respecto a sus versiones anteriores.
sudo apt install php7.3 libapache2-mod-php7.3 php7.3-mysql php-common php7.3-cli php7.3-common php7.3-json php7.3-opcache php7.3-readline
Apache php7.3
sudo a2enmod php7.3
sudo systemctl restart apache2
sudo apt update && sudo apt -y upgrade
sudo reboot
Espero que este articulo te sea de utilidad, puedes colaborar con nosotros con el simple gesto de compartir los artículos en tu sitio web, blog, foro o redes sociales.
4: Загрузка WordPress
Теперь сервер готов к установке WordPress. Из соображений безопасности рекомендуется устанавливать последнюю версию WordPress с сайта проекта.
Примечание: Сейчас для работы понадобится утилита curl. Чтобы установить ее, введите:
Перейдите в каталог, открытый для записи, а затем загрузите сжатый пакет WordPress.
Распакуйте пакет:
Эти файлы нужно переместить в document root. Но прежде нужно добавить фиктивный файл .htaccess, который WordPress сможет использовать позже. Чтобы создать файл, введите:
Затем нужно скопировать образец конфигурации WordPress:
Также можно создать каталог upgrade , чтобы WordPress не столкнулся с конфликтом привилегий после обновления его программного обеспечения:
Теперь можно скопировать файлы в document root. Чтобы сохранить права на файлы, используйте опцию –a. Точка после исходного каталога указывает, что в этом каталоге нужно скопировать все файлы, включая скрытые файлы (например, только что созданный файл .htaccess)
sudo cp -a /tmp/wordpress/. /var/www/wordpress
Step 3 — Installing and Securing MySQL
The next component of the LAMP server is MySQL. This relational database software is an essential backend component for other software packages such as WordPress, Joomla, Drupal, and many others.
To install MySQL and PHP support for it, type the following:
This will install MySQL and other required packages. Note that the installation routine will ask you to enter a new password for the root MySQL user:

This is a separate account used specifically for administrative functions in MySQL. The username is root and the password is whatever you set here. Be sure to set a good password with various combinations of letters and numbers.
After this, the MySQL installation is finished.
To keep your new database server safe, there is an additional script you need to run. Type the following to get started:
At this point, the script will ask you a few questions. When prompted, enter the password for the root MySQL account. The system will then ask you:
Since we already set the root MySQL password at our installation, you can say no at this point. The script will then ask:
Answer yes to remove the anonymous users option for safety.
Next, the script will ask you to either allow or disallow remote logins for the root account. For safety, disallow remote logins for root unless your environment requires this.
Finally, the script will ask you to remove the test database and then reload the privilege tables. Answer yes to both of these. This will remove the test database and process the security changes.
If everything is correct, once done, the script will return with:
Let’s double-check that our new MySQL server is running. Type this command:
Enter the root password you set up for MySQL when you installed the software package. Remember, this is not the root account used for your server administration. Once in, type the following to get the server status, version information, and more:
This is a good way to ensure that you’ve installed MySQL and are ready for further configuration. When you are finished examining the output, exit the application by typing this:
After confirming that MySQL is active, the next step is to install PHP so that you can run scripts and process code on your server.