Как установить ubuntu server 14.04.1 lts? настройка сервера
Содержание:
- openSUSE
- Security Improvements
- Container Linux (Formerly CoreOS)
- Graphics and Display
- Official flavours
- More information
- Overview
- Выбор оборудования
- Upgrading from Ubuntu 14.04 LTS or 15.10
- Confirm partitions
- IBM LinuxONE and z Systems specific known issues
- Running the installer over serial
- Updated Packages
- Установка Ubuntu 19.04
- What is WSL?
- Первый способ: Магазин приложений
- Скачать Ubuntu
- Краткая история развития Ubuntu
- Desktop
- Ubuntu Desktop
openSUSE
SUSE Linux debuted in 1993. In 2015, open-source variant openSUSE migrated toward SUSE Linux Enterprise (SLE). There are two openSUSE derivatives: Leap and Tumbleweed. Leap features longer release cycles whereas Tumbleweed is the rolling release. Tumbleweed is better for power users with its up-to-date packages like the Linux Kernel and SAMBA. Leap is better for stability. Updates bolster the operating system.
Default tools posit openSUSE as a fantastic Linux server operating system. openSUSE includes openQA for automated testing, Kiwi for Linux image deployment on several platforms, YaST for Linux configuration, and the comprehensive package manager Open Build Service. In abandoning its previous nine month release cycle and focusing on stability like SLE, openSUSE became a viable Linux server environment. CIO even dubbed openSUSE «…the CentOS and Debian of SUSE.»
Who should use this: openSUSE is more suited to power users like system administrators. It’s great as a web server, home server, or home server/web server combo. System administrators benefit from tools like Kiwi, YaST, OBS, and openQA. The versatility of openSUSE makes it one of the best Linux server operating systems. In addition to solid server capabilities, openSUSE does sport a lovely desktop environment. For more basic servers, openSUSE is usable but a bit overkill. Still not convinced? Check out these six reasons to use openSUSE.
Security Improvements
In Ubuntu 18.04 LTS, gcc is now set to default to compile applications as position independent executables (PIE) as well as with immediate binding, to make more effective use of Address Space Layout Randomization (ASLR). All packages in main have been rebuilt to take advantage of this, with a few exceptions.
Mitigations are in place to protect against Spectre and Meltdown. See the Spectre and Meltdown KnowledgeBase article for more details about the remediation and configuration options.
bolt and thunderbolt-tools have been promoted to main to provide security controls for Thunderbolt devices.
Default CIFS/SMB protocol version change in CIFS mounts
Since 17.10, the default SMB protocol used when mounting remote CIFS filesystems via mount.cifs (from the cifs-utils package) changed to 2.1 or higher, depending on what is negotiated with the server. If no version is specified when mounting such a remote share, the following will be logged:
No dialect specified on mount. Default has changed to a more secure dialect, SMB2.1 or later (e.g. SMB3),
from CIFS (SMB1). To use the less secure SMB1 dialect to access old servers which do not support SMB3
(or SMB2.1) specify vers=1.0 on mount.
Should you encounter compatibility issues, like #1764778 or #1572132, please specify vers=1.0 when mounting the share and please file a bug if that fixes the problem for you.
Improved UEFI Secure Boot handling for the use of third-party modules
Ubuntu now allows you to generate a signing key when needed, as you install third-party (DKMS) modules. On install of a DKMS package, you will be prompted to enter a password that is used to enroll a signing key (an X509 certificate) that will then be used to sign the new kernel modules. The prompts will allow you to enter the same password twice, and describe the steps needed to enroll the new key at the next reboot. For more information, see https://wiki.ubuntu.com/UEFI/SecureBoot/DKMS.
Container Linux (Formerly CoreOS)
CoreOS rebranded to Container Linux in 2016. As the name suggests, Container Linux is a Linux operating system built for deploying containers. There’s a concentration on simplifying containerized deployments. Container Linux is a superb operating system for secure, highly scalable deployments. Clustered deploys are easy and this distro includes means for service discovery. There’s documentation and support for Kubernetes, Docker, and rkt.
However, there’s no package manager. All apps must run inside containers, so containerization is mandatory. Nevertheless, if you’re working with containers Container Linux is the best Linux server operating for a cluster infrastructure. It offers an etcd which is a daemon running across each computer within a cluster. You’ve got install flexibility too. In addition to an on-premise installation, you can run Container Linux on virtualization mediums like Azure, VMware, and Amazon EC2.
Who should use this: Container Linux is best for servers in a cluster infrastructure or with containerized deploys. This likely won’t mean the average home labber. But with official Docker images from the likes of Plex, Container Linux can function as anything from a basic home media server to complex clustered set up. Ultimately, use Container Linux if you’re comfortable with containers. Along with openSUSE, Container Linux is one of the best new and updated Linux operating systems you should try.
Graphics and Display
fglrx
The fglrx driver is now deprecated in 16.04, and we recommend its open source alternatives (radeon and amdgpu). AMD put a lot of work into the drivers, and we backported kernel code from Linux 4.5 to provide a better experience.
When upgrading to Ubuntu 16.04 from a previous release, both the fglrx driver and the xorg.conf will be removed, so that the system is set to use either the amdgpu driver or the radeon driver (depending on the available hardware).
More information is available at https://tjaalton.wordpress.com/2016/03/11/no-catalystfglrx-video-driver-in-ubuntu-16-04/
6th gen Intel Core CPUs and llvmpipe software rasterizer
LLVM-3.8 enables AVX512 on all 6th generation Intel Core CPUs («Skylake») when it should be enabled only on server CPU’s. This causes the user session to fail to start when Mesa llvmpipe driver is used. This should happen only when the system has a separate GPU which isn’t natively supported by open source drivers.
This bug will be handled in a post-release update. In order to install a machine suffering from this remember to boot directly to the installer instead of live-session which doesn’t start, and select the option to «Download updates while installing» to make sure updated packages are installed before logging in for the first time. https://bugs.launchpad.net/ubuntu/+source/llvm-toolchain-3.8/+bug/1564156
Official flavours
The release notes for the official flavours can be found at the following links:
-
Kubuntu https://wiki.ubuntu.com/XenialXerus/ReleaseNotes/Kubuntu
-
Lubuntu https://wiki.ubuntu.com/XenialXerus/ReleaseNotes/Lubuntu
-
Ubuntu GNOME https://wiki.ubuntu.com/XenialXerus/ReleaseNotes/UbuntuGNOME
-
Ubuntu Kylin https://wiki.ubuntu.com/XenialXerus/ReleaseNotes/UbuntuKylin
-
Ubuntu Kylin 中文 https://wiki.ubuntu.com/XenialXerus/ReleaseNotes/UbuntuKylinChinese
-
Ubuntu Mate https://ubuntu-mate.org/blog/ubuntu-mate-xenial-final-release/
-
Ubuntu Studio https://wiki.ubuntu.com/XenialXerus/ReleaseNotes/UbuntuStudio
-
Xubuntu https://xubuntu.org/news/xubuntu-16-04-1-release
Mythbuntu http://www.mythbuntu.org/home/news/mythbuntu1604released
More information
Reporting bugs
Your comments, bug reports, patches and suggestions will help fix bugs and improve the quality of future releases. Please report bugs using the tools provided.
If you want to help out with bugs, the Bug Squad is always looking for help.
Participate in Ubuntu
If you would like to help shape Ubuntu, take a look at the list of ways you can participate at
http://www.ubuntu.com/community/get-involved
More about Ubuntu
You can find out more about Ubuntu on the Ubuntu website and Ubuntu wiki.
To sign up for future Ubuntu development announcements, please subscribe to Ubuntu’s development announcement list at:
http://lists.ubuntu.com/mailman/listinfo/ubuntu-devel-announce
Overview
Ubuntu Server is a variant of the standard Ubuntu you already know, tailored for networks and services. It’s just as capable of running a simple file server as it is operating within a 50,000 node cloud.
Unlike the installation of Ubuntu Desktop, Ubuntu Server does not include a graphical installation program. Instead, it uses a text menu-based process. If you’d rather install the desktop version, take a look at our Install Ubuntu desktop tutorial.
This guide will provide an overview of the installation from either a DVD or a USB flash drive.
For a more detailed guide on Ubuntu Server’s capabilities and its configuration, take a look at our the Community Ubuntu Server documentation.
Выбор оборудования
Как я уже написал, оборудование нам подойдет практически любое, но все же кое-какие пожелания у нас есть. Поскольку сервер будет файловый, то и пожелания наши будут касаться дисковой системы. Было бы неплохо найти машину с RAID контроллером на борту. Если мы делаем сервер для размещения рабочей файловой базы, было бы неплохо разместить ее на RAID-5, если хранилище резервных копий, отличным вариантом будет RAID-1.
При этом у нас нет особых требований к оперативной памяти, хватит и 1 Гбайта. К процессору тоже нет особых требований, Linux будет работать на всем, что еще живо.
Пожалуй, самый оптимальный вариант — приобрести восстановленный сервер «с пробегом». Берите самый дешевый, какой найдете, главное, что бы перед этим он прошел профилактику, его очистили от пыли и прогнали все системные тесты.
За неимением лучшего, можно использовать любой старый компьютер, но помните, что Вы это делаете на свой страх и риск. Самое уязвимое место файлового сервера — дисковая подсистема. Если она у Вас будет состоять из одного единственного старого диска, Вы очень сильно рискуете.
Если не удалось найти RAID-контроллер, можно настроить программный RAID средствами операционной системы. Учтите, что это повысит требования к процессору и оперативной памяти, зато Вам будет не страшен выход из строя контроллера.
Upgrading from Ubuntu 14.04 LTS or 15.10
To upgrade on a desktop system:
-
Open the «Software & Updates» Setting in System Settings.
- Select the 3rd Tab called «Updates».
- Set the «Notify me of a new Ubuntu version» dropdown menu to «For any new version» if you are using 15.10, set it to «long-term support versions» if you are using 14.04 LTS.
- Press Alt+F2 and type in «update-manager» (without the quotes) into the command box.
- Software Updater should open up and tell you: New distribution release ‘16.04 LTS’ is available.
- Click Upgrade and follow the on-screen instructions.
To upgrade on a server system:
-
Install the update-manager-core package if it is not already installed.
- Make sure the /etc/update-manager/release-upgrades is set to normal if you are using 15.10, lts if you are using 14.04 LTS.
-
Launch the upgrade tool with the command sudo do-release-upgrade.
- Follow the on-screen instructions.
Note that the server upgrade will use GNU screen and automatically re-attach in case of dropped connection problems.
There are no offline upgrade options for Ubuntu Desktop and Ubuntu Server. Please ensure you have network connectivity to one of the official mirrors or to a locally accessible mirror and follow the instructions above.
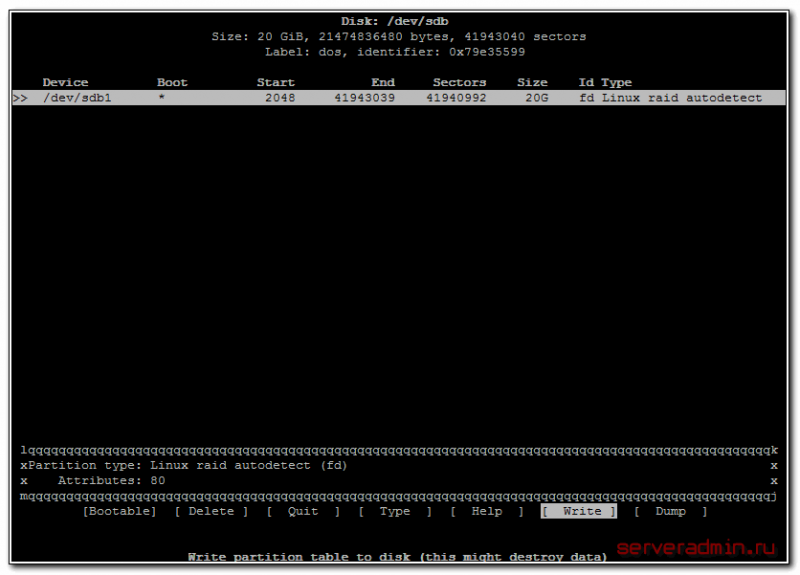
Confirm partitions
With the target drive selected, the installer will calculate what partitions to create and present this information…

If this isn’t what you expected to see (e.g., you have selected the wrong drive), you should use the arrow keys and enter to select from the options at the bottom of the screen. This will take you back to the previous menu where you can select a different drive.
It is also possible to manually change the partitions here, by selecting . Obviously you should only select this if you are familiar with how partitions work.
When you are happy with the disk layout displayed, select to continue.
IBM LinuxONE and z Systems specific known issues
Fully automated preseed install
Fully automated preseed installation is currently not possible with only DASD drives at the moment. For zfcp installation s390-zfcp/zfcp preseed key can be used. For more information please see bug and bug.
zfcpdump not available yet
zfcpdump kernel is not available yet, and will be made available as an SRU at a later date. Please see this bug for more information.
Install-time parameters are not propagated to the installed system
If installation is performed with special kernel parameters, e.g. cio_ignore, these are not propagated to the installed system. Please edit /etc/zipl.conf to apply these and re-run sudo zipl to update the IPL. Please see this bug for more information.
IPv6 with PCI/RoCE
The Linux kernel has an issue in its IPv6 stack with PCI/RoCE cards. IPv4 with PCI/RoCE cards is fully supported. The Linux kernel needs an upgrade to the first SRU kernel post-release for complete IPv6 PCI/RoCE support. Please see this bug for more information.
SCSI LUN detection issues
Usage of SCSI LUNs on a DS8870 Storage server with μCode Bundles 87.51.xx.0 (LMC 7.7.51.xx) via NPIV enabled zfcp adaptors causes detection issues. Please see this bug for more information.
Running the installer over serial
By default, the installer runs on the first virtual terminal, tty1. This is what is displayed on any connected monitor by default. Clearly though, servers do not always have a monitor. Some out-of-band management systems provide a remote virtual terminal, but some times it is necessary to run the installer on the serial port. To do this, the kernel command line needs to have an appropriate console specified on it – a common value is but this is not something that can be generically documented.
When running on serial, the installer starts in a basic mode that does using only the ASCII character set and black and white colours. If you are connecting from a terminal emulator such as gnome-terminal that supports unicode and rich colours you can switch to “rich mode” which uses unicode, colours and supports many languages.
Updated Packages
Linux kernel
Ubuntu 19.10 is based on the Linux release series 5.3. It adds a variety of new hardware support since the 5.0 kernel from 19.04, including support for AMD Navi GPUs, new ARM SoCs, ARM Komeda display, and Intel Speed Select on Xeon servers. Significant developer-facing features include pidfd support for avoiding races cause by pid reuse, a new mount api, and the io_uring interface for asynchronous I/O. To help improve boot speed the default kernel compression algorithm was changed to lz4 on most architectures, and the default initramfs compression algorithm was changed to lz4 on all architectures.
Toolchain Upgrades ️
Ubuntu 19.10 comes with refreshed state-of-the-art toolchain including new upstream releases of glibc 2.30, OpenJDK 11, rustc 1.37, GCC 9.2, updated Python 3.7.5, Python 3.8.0 (interpreter only), ruby 2.5.5, php 7.3.8, perl 5.28.1, golang 1.12.10. There are new improvements on the cross-compilers front as well with POWER and AArch64 toolchain enabled to cross-compile for ARM, PPC64 LE, S390X and RISCV64 targets.
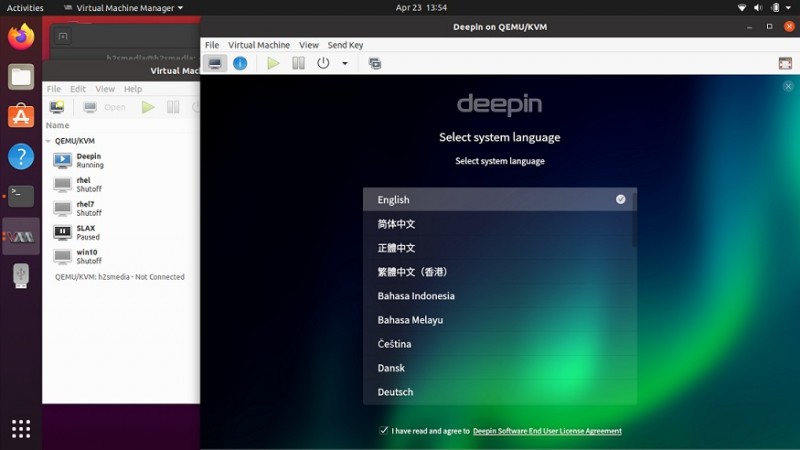
Установка Ubuntu 19.04
Откроется программа установки Ubuntu 19.04. В ней вам нужно выполнить несколько шагов.
Выбор компонентов
На данном шаге вы можете выбрать тип установки:
- Обычная установка. В данном режиме автоматически устанавливается набор программ: браузер, офисный пакет, видео и аудио проигрыватели, различные вспомогательные утилиты.
- Минимальная установка. Данный вариант стоит выбирать, если вы хотите получить максимально чистую систему после установки. Из программ будет установлен только браузер Firefox и некоторые основные утилиты.
Если вы новичок, то рекомендуем выбрать первый вариант.
Здесь же вы можете установить галочки:
- Загрузить обновления во время установки Ubuntu. В этом случае, во время процесса установки будут загружены обновления пакетов (если они существуют). Если скорость интернет соединения низкая или доступ к серверам обновлений медленный, то установка системы займет больше времени. Вы можете установить обновления и после того, как система установится, тогда галочку устанавливать не нужно.
- Установить стороннее программное обеспечение… В этом случае будут установлены необходимые драйвера и компоненты для поддержки вашего оборудования. Если вы новичок, то рекомендуем обязательно выбрать данный пункт.
Разметка диска
Данный шаг самый ответственный. Будьте предельно внимательны, чтобы не уничтожить существующие данные на диске (если вы устанавливаете систему не на пустой диск).
В простейшем случае, если вы устанавливаете систему на пустой диск или хотите очистить диск, то выбирайте пункт Стереть диск и установить Ubuntu.
Процесс разметки диска самостоятельно, а также установка системы рядом с Windows, описана в руководстве по установке Linux Mint (интерфейс разметки диска абсолютно аналогичный):
После выбора автоматического способа разметки диска или после самостоятельной разметки диска появится предупреждение.
Выберите ваш часовой пояс.
Создание пользователя
На данном шаге нужно задать имя пользователя, название компьютера и пароль для входа в систему. Обязательно запомните пароль.
Имя пользователя будет использоваться в качестве названия вашей домашней директории, поэтому рекомендуем не делать его слишком длинным.
Процесс установки
Начнется процесс установки системы, он займет несколько минут в зависимости от производительности вашего компьютера и способа установки.
Установка завершена
Когда установка завершится, появится следующее сообщение. Нажмите кнопку Перезагрузить, чтобы перезагрузить компьютер.
Сеанс работы в Live-системе будет завершен. Появится сообщение с предложением извлечь носитель, с которого происходила установка системы. Извлеките носитель и нажмите Enter, чтобы продолжить перезагрузку компьютера.
What is WSL?
Windows Subsystem for Linux (WSL) allows users to run a Linux terminal environment, install packages from the Ubuntu archive, and run Linux applications and workflows on Windows 10.
What is WSL 1?
The original WSL is now known as WSL1. WSL1 is a compatibility layer for running Linux binary executables (ELF) natively on Windows 10. No re-compilation or ‘porting’ of applications is required. WSL1 provides a Linux-compatible kernel interface developed by Microsoft that allows a user to choose a Linux distribution to install from the Microsoft Store. WSL1 executes unmodified Linux ELF64 binaries by operating a Linux kernel interface on top of the Windows kernel in Windows 10. The WSL1 interface translates Linux system calls from the binaries into Windows system calls and then executes them at native speed. Linux applications run within the Linux distribution which provides the application’s dependencies and package management in a container-like environment. WSL provides an interface to mount drives within WSL.
What is WSL 2?
WSL2 was announced at Microsoft Build 2019. WSL2 features a Linux kernel running inside Windows 10 and is built on the core technology of Hyper-V to provide better Linux application support and improved file performance. Transitioning to WSL2 is seamless. WSL2 is still in active development and is only available in Insider builds. These builds are not suitable for production devices and are not recommended for a user’s primary machine. Instead, users can try WSL2 using Hyper-V or on a secondary machine.
-
Announcing WSL2 — Microsoft blog announcing WSL2
-
The new Windows subsystem for Linux architecture: a deep dive — WSL2 presentation at Microsoft Build 2019
-
WSL2-Linux-Kernel — The source for the Linux kernel used in Windows Subsystem for Linux 2.
Первый способ: Магазин приложений
Самый новый и наиболее удобный метод. Работает в Arch, Linux Mint, Fedora и Elementary OS. Удобный формат упаковки и распространения ПО поддерживается ведущими разработчиками софта, в числе которых Google и Microsoft.
Перейдите в магазин приложений Snapcraft.
Прокрутите страницу вниз до кнопки «Browse the Snap Store».
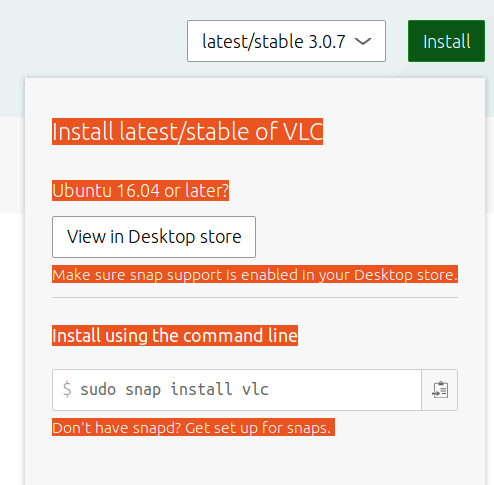
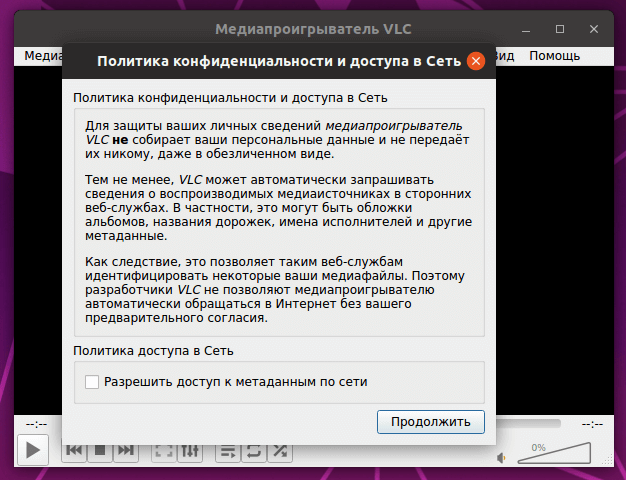
Если вы прокрутите страницу ниже, вы увидите различные приложения, расположенные по категориям. Устанавливать их можно тем же способом, который я рассмотрю на примере одной программы. Если вы точно знаете название нужного вам приложения, используйте поисковую строку. Чтобы установить популярный медиаплеер VLC, введите его название в строку поиска и нажмите кнопку «Search» («Поиск»). Отобразятся результаты поиска.
Откройте нужный вам: «VLC». Нажмите кнопку «Install».

Нажмите на кнопку «View in Desktop store». Ниже показана команда для установки через Консоль (Терминал).
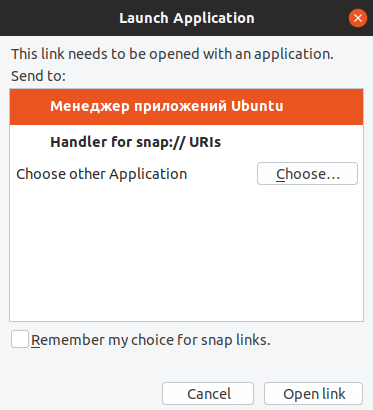
Вам будет предложено открыть ссылку в Менеджере приложений Ubuntu. Выберите этот вариант. Нажмите «Open link».
Нажмите кнопку «Установить».

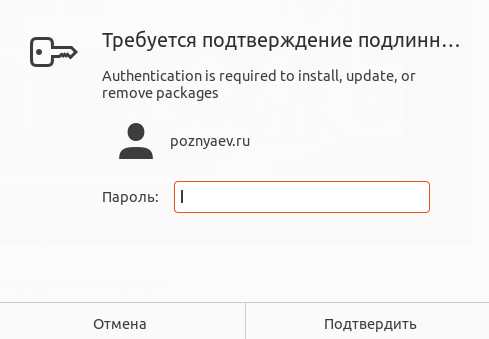
Введите пароль администратора компьютера. Нажмите «Подтвердить».
На экране отображается, на сколько процентов выполнен процесс установки.

Приложение установлено. Вам предлагается открыть программу нажатием кнопки «Запустить» или удалить ее.
Вы можете начать пользоваться плеером VLC прямо сейчас.
Он доступен вам в любое время в разделе приложений. В дальнейшем там будут появляться значки всех установленных вами приложений.
Скачать Ubuntu
Скачать Ubuntu 14.04 LTS (поддерживается до 17 апреля 2019)
Ubuntu 14.04 desktop (32-bit):
iso торрент
Ubuntu 14.04 desktop (64-bit):
iso торрент
Ubuntu 14.04 server (32-bit):
iso торрент
Ubuntu 14.04 server (64-bit):
iso торрент
Ubuntu 14.04 MinimalCD (32-bit):
iso
Ubuntu 14.04 MinimalCD (64-bit):
iso
Скачать Ubuntu 16.04 LTS (поддерживается до 21 апреля 2021)
Ubuntu 16.04 desktop (32-bit):
iso торрент
Ubuntu 16.04 desktop (64-bit):
iso торрент
Ubuntu 16.04 server (32-bit):
iso торрент
Ubuntu 16.04 server (64-bit):
iso торрент
Ubuntu 16.04 MinimalCD (32-bit):
iso
Ubuntu 16.04 MinimalCD (64-bit):
iso
Скачать Ubuntu 18.04 LTS (поддерживается до апреля 2023)
Ubuntu 18.04 desktop (64-bit):
iso торрент
Ubuntu 18.04 server (64-bit):
iso торрент
Ubuntu 18.04 MinimalCD (32-bit):
iso
Ubuntu 18.04 MinimalCD (64-bit):
iso
Ubuntu 18.10 desktop (64-bit):
iso торрент
Ubuntu 18.10 server (64-bit):
iso торрент
Ubuntu 19.04 desktop (64-bit):
iso торрент
Ubuntu 19.04 server (64-bit):
iso торрент
Ubuntu 19.10 desktop (64-bit):
iso торрент
Ubuntu 19.10 server (64-bit):
iso торрент
Краткая история развития Ubuntu
Операционная система Ubuntu относится к семейству linux и ориентирована на удобство и простоту использования. Изначально, рабочим окружением убунту являлся Gnome 2 и так продолжалось до выхода версии 11.04, которая вышла 28 апреля 2011 года.
Компания Canonical решила разработать собственное рабочее окружение, которое получило название Unity. Сообщество пользователей встретило новшество очень неоднозначно, так как в Unity внешний вид стал ориентироваться на планшеты и другие сенсорные экраны и был неудобен для использования на обычном экране. К слову, до сих пор невозможно комфортно использовать любой linux дистрибутив на планшете, так как поддерживается только одно касание, что очень ограничивает удобство.
Но разработчики системы не отступились от своих целей и развивали собственное рабочее окружение вплоть до версии системы 18.04, которая вышла 26 апреля 2018 года. В ней система предстала с рабочим окружением Gnome 3, которое было доработано под внешний вид привычной многим Unity.
Desktop
Enabling Wayland support with the NVIDIA proprietary driver
This is not something we recommend due to a number of bugs. But if you want to try it out then a new step is required in 19.10:
-
Add kernel parameter nvidia-drm.modeset=1
-
Comment out the nvidia line in /usr/lib/udev/rules.d/61-gdm.rules
-
As step 2 may have reintroduced an old bug you might need to disable the integrated graphics/GPU in your BIOS.
Fractional scaling in Xorg sessions
If you enable fractional scaling in Xorg sessions then you may encounter reduced performance and screen tearing. There are two possible workarounds:
- Only use scaling factors that are multiples of 100%; or
- Log into «Ubuntu on Wayland» instead.
Live Session can take a long time to start
On older hardware with a slow install medium (e.g. older USB drive) the live session can take a few minutes to start while seeding the default snaps finishes.
ext4 instead of ZFS displayed in confirmation dialog
When the user continues after having selected to install the system with ZFS, the «Write to change disks» message prints that an ext4 partition will be created. This is technically correct but confusing to the user. ()
Wrong Bootloader Device with 2 or more drives
When installing a system with more than one drive, drive selection and bootloader selection may end up out of sync when choosing a non-first drive. LP #1847898
To ensure the correct boot loader device perform the following steps:
- Select the last «Something Else» option
- Select desired boot loader device from the drop-down
- Click back
- Select guided partitioning option
- Select desired installation device
- Continue installation
This will ensure that the desired device is used both for the boot loader and root filesystem.
Ubuntu Desktop
The general theme for 16.04 on the desktop is one of bug fixes and incremental quality improvements.
General
- GNOME is mostly upgraded to 3.18. GLib upgraded to to 2.48 (corresponding to GNOME 3.20)
- GNOME Software replaces Ubuntu Software Center. This brings a faster store experience and moves our archive metadata in line with Debian. It has been renamed «Ubuntu Software» to improve recognition for Ubuntu Software Center users.
-
All default applications and libraries ported to use WebKit 2
- GNOME Calendar is now included by default
- Empathy and Brasero are removed from the default installation
- Chromium upgraded to version 48
- Firefox upgraded to version 45
- Online searches in the dash are now disabled by default
- Improved HiDPI support in the greeter
-
Added more supported languages by default More info
- Multiple bug fixes
Unity & Compiz
- Improved launcher integration with file manager and devices
- Support for formatting removable devices from quicklist
- Improved support for gtk applications using headerbars
- Improvements to the switcher and spread backends
- Activate app spread by Super+Ctrl+W
- Unity control center option to always show menus
- Improvements to GNOME key grabbing
- New dash overlay scrollbars
- Better Dash theming support
- Support for scaling cursors in HiDPI environments
- Show icons launching state in launcher when apps launched elsewhere
- Launcher can be moved to the bottom
LibreOffice
LibreOffice 5.1 brings a lot of improvements to the entire package. For more information on these improvements please see the LibreOffice release notes available here. You can see a video highlighting some of the new features here.
General
-
LibreOffice defaults to the Breeze theme in Ubuntu
-
Improvements in the Python scripting and language bindings http://conference.libreoffice.org/assets/Conference/Aarhus/Slides/MatthewFrancisPyUNO.pdf
- Support for WebDAV via HTTPS
Writer word processor
- Added support for whitespace hiding. A long standing feature request.
-
Mailmerge in Writer can use spreadsheets as a data source http://vmiklos.hu/blog/mail-merge-embedding.html
- Spell check dialogue no longer auto closes
Calc spreadsheets
- Exponential and power trend lines handle negative Y values
- Performance improvements leveraging SSE3 for SUM functions
- Added support for PNG export
- Search for numbers as formatted/displayed
Impress presentations
- Slide transitions use OpenGL 2.1+ and new transitions added
- Keyboard shortcuts for navigation and sorting
- Screensaver inhibiting for KDE, XFCE, Mate