Настройка образов загрузки с помощью configuration managercustomize boot images with configuration manager
Содержание:
- Windows Deployment Services
- Windows 部署服务Windows Deployment Services
- Microsoft Desktop Optimization Pack
- Установка Windows ADKInstall the Windows ADK
- ОбслуживаниеServicing
- 使用命令行Using the command line
- Microsoft Deployment ToolkitMicrosoft Deployment Toolkit
- 适用于 Windows 10 版本 1607 的 Windows ADK 中的新增功能What’s new in the Windows ADK for Windows 10, version 1607
- 适用于 Windows 10 版本 2004 的 WDKWDK for Windows 10, version 2004
- Windows 修復環境Windows Recovery Environment
- Windows 部署服務Windows Deployment Services
- Поддерживаемые платформыSupported platforms
- Microsoft Deployment Toolkit
- Установка на eMMC (DragonBoard 410c, другие устройства Qualcomm)Flashing with eMMC (for DragonBoard 410c, other Qualcomm devices)
Windows Deployment Services
Windows Deployment Services (WDS) has been updated and improved in several ways starting with Windows 8. Remember that the two main functions you will use are the PXE boot support and multicast. Most of the changes are related to management and increased performance. In Windows Server 2012 R2, WDS also can be used for the Network Unlock feature in BitLocker.
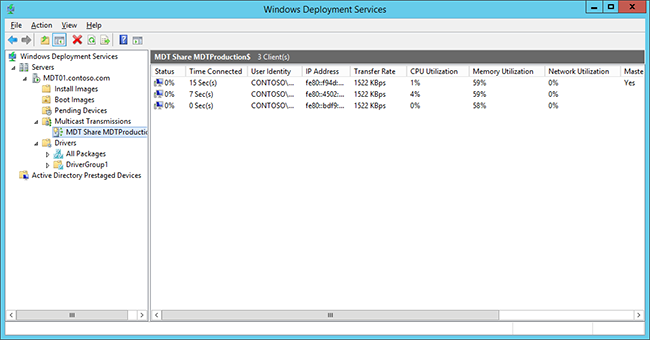
Windows Deployment Services using multicast to deploy three machines.
In Windows Server 2012 R2, Windows Deployment Services can be configured for stand-alone mode or for Active Directory integration. In most scenarios, the Active Directory integration mode is the best option. WDS also has the capability to manage drivers; however, driver management through MDT and Configuration Manager is more suitable for deployment due to the flexibility offered by both solutions, so you will use them instead. In WDS, it is possible to pre-stage devices in Active Directory, but here, too, Configuration Manager has that capability built in, and MDT has the ability to use a SQL Server database for pre-staging. In most scenarios, those solutions are better than the built-in pre-staging function as they allow greater control and management.
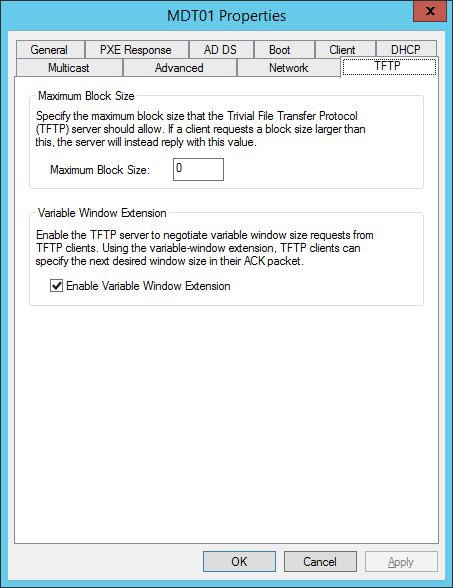
Trivial File Transfer Protocol (TFTP) configuration
In some cases, you need to modify TFTP Maximum Block Size settings for performance tuning reasons, especially when PXE traffic travels through routers and such. In the previous version of WDS, it was possible to change that, but the method of do so—editing the registry—was not user friendly. In Windows Server 2012, this has become much easier to do as it can be configured as a setting.
Also, there are a few new features related to TFTP performance:
- Scalable buffer management. Allows buffering an entire file instead of a fixed-size buffer for each client, enabling different sessions to read from the same shared buffer.
- Scalable port management. Provides the capability to service clients with shared UDP port allocation, increasing scalability.
- Variable-size transmission window (Variable Windows Extension). Improves TFTP performance by allowing the client and server to determine the largest workable window size.

TFTP changes are now easy to perform.
Windows 部署服务Windows Deployment Services
Windows 部署服务 (WDS) 在从 Windows 8 开始的几个方面进行了更新和改进。Windows Deployment Services (WDS) has been updated and improved in several ways starting with Windows 8. 请记住,你将使用的两个主要函数是 PXE 启动支持和多播。Remember that the two main functions you will use are the PXE boot support and multicast. 大多数更改与管理和性能提高相关。Most of the changes are related to management and increased performance. 在 Windows Server 2012 R2 中,WDS 还可用于 BitLocker 中的网络解锁功能。In Windows Server 2012 R2, WDS also can be used for the Network Unlock feature in BitLocker.

Windows 部署服务使用多播部署三台计算机。Windows Deployment Services using multicast to deploy three machines.
在 Windows Server 2012 R2 中,可以为独立模式或 Active Directory 集成配置 Windows 部署服务 。In Windows Server 2012 R2, Windows Deployment Services can be configured for stand-alone mode or for Active Directory integration. 在大多数情况下,Active Directory 集成模式是最佳选择。In most scenarios, the Active Directory integration mode is the best option. WDS 还具有管理驱动程序的功能;但是,由于这两个解决方案提供的灵活性,通过 MDT 和 Configuration Manager 的驱动程序管理更适合部署,因此你可以改用它们。WDS also has the capability to manage drivers; however, driver management through MDT and Configuration Manager is more suitable for deployment due to the flexibility offered by both solutions, so you will use them instead. 在 WDS 中,可以在 Active Directory 中预转储设备,但在这里,配置管理器也具有内置的功能,并且 MDT 能够使用 SQL Server 数据库进行预暂存。In WDS, it is possible to pre-stage devices in Active Directory, but here, too, Configuration Manager has that capability built in, and MDT has the ability to use a SQL Server database for pre-staging. 在大多数情况下,这些解决方案比内置的预暂存功能更好,因为它们允许更好地控制和管理。In most scenarios, those solutions are better than the built-in pre-staging function as they allow greater control and management.
(TFTP) 配置的简单文件传输协议Trivial File Transfer Protocol (TFTP) configuration
在某些情况下,出于性能优化原因,你需要修改 TFTP 最大块大小设置,尤其是当 PXE 流量通过路由器进行传输时。In some cases, you need to modify TFTP Maximum Block Size settings for performance tuning reasons, especially when PXE traffic travels through routers and such. 在早期版本的 WDS 中,可以更改,但执行此操作的方法(编辑注册表)不是用户友好的。In the previous version of WDS, it was possible to change that, but the method of do so—editing the registry—was not user friendly. 在 Windows Server 2012 中,当它可以配置为设置时,此操作将变得更容易。In Windows Server 2012, this has become much easier to do as it can be configured as a setting.
此外,还有一些与 TFTP 性能相关的新功能:Also, there are a few new features related to TFTP performance:
- 可伸缩的缓冲区管理。Scalable buffer management. 允许对每个客户端的整个文件(而不是固定大小的缓冲区)进行缓冲,从而使不同的会话可以从同一共享缓冲区进行读取。Allows buffering an entire file instead of a fixed-size buffer for each client, enabling different sessions to read from the same shared buffer.
- 可伸缩的端口管理。Scalable port management. 提供通过共享 UDP 端口分配服务客户端的功能,增加了可伸缩性。Provides the capability to service clients with shared UDP port allocation, increasing scalability.
- 可变大小的传输窗口 (变量 Windows 扩展) 。Variable-size transmission window (Variable Windows Extension). 通过允许客户端和服务器确定最大的可工作窗口大小来改善 TFTP 性能。Improves TFTP performance by allowing the client and server to determine the largest workable window size.

TFTP 更改现在很容易执行。TFTP changes are now easy to perform.
Microsoft Desktop Optimization Pack
MDOP is a suite of technologies available to Software Assurance customers through an additional subscription.
The following components are included in the MDOP suite:
-
Microsoft Application Virtualization (App-V). App-V 5.0 provides an integrated platform, more flexible virtualization, and powerful management for virtualized applications. With the release of App-V 5.0 SP3, you have support to run virtual applications on Windows 10.
-
Microsoft User Experience Virtualization (UE-V). UE-V monitors the changes that are made by users to application settings and Windows operating system settings. The user settings are captured and centralized to a settings storage location. These settings can then be applied to the different computers that are accessed by the user, including desktop computers, laptop computers, and virtual desktop infrastructure (VDI) sessions.
-
Microsoft Advanced Group Policy Management (AGPM). AGPM enables advanced management of Group Policy objects by providing change control, offline editing, and role-based delegation.
-
Microsoft Diagnostics and Recovery Toolset (DaRT). DaRT provides additional tools that extend Windows RE to help you troubleshoot and repair your machines.
-
Microsoft BitLocker Administration and Monitoring (MBAM). MBAM is an administrator interface used to manage BitLocker drive encryption. It allows you to configure your enterprise with the correct BitLocker encryption policy options, as well as monitor compliance with these policies.
For more information on the benefits of an MDOP subscription, see Microsoft Desktop Optimization Pack.
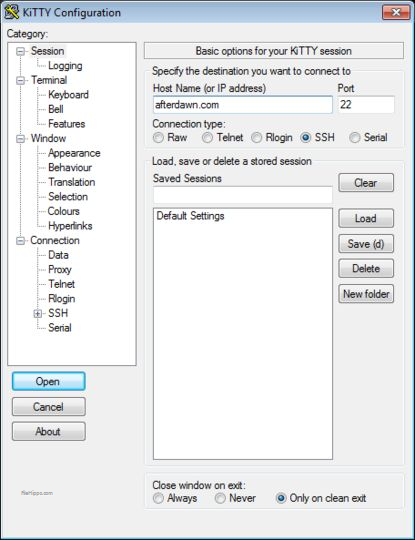
Установка Windows ADKInstall the Windows ADK
В этих инструкциях предполагается, что у вас установлен сервер MDT01 и он настроен как сервер доменных пользователей.These steps assume that you have the MDT01 member server running and configured as a domain member server.
На MTD01:On MTD01:
Перейдите на страницу загрузки и установите на странице Windows ADK и скачайте следующие элементы в папку D:\Downloads\ADK на MDT01 (вам потребуется создать эту папку):Visit the Download and install the Windows ADK page and download the following items to the D:\Downloads\ADK folder on MDT01 (you will need to create this folder):
- Windows ADK для Windows 10The Windows ADK for Windows 10
- Надстройка Windows PE для ADKThe Windows PE add-on for the ADK
- Обновление диспетчера системных образов Windows (WSIM) 1903The Windows System Image Manager (WSIM) 1903 update
Совет
Возможно, потребуется временно отключить конфигурацию усиленной безопасности Internet Explorer для администраторов, чтобы загружать файлы из Интернета на сервер.You might need to temporarily disable IE Enhanced Security Configuration for administrators in order to download files from the Internet to the server. Этот параметр можно отключить с помощью диспетчера серверов (локального сервера и свойств).This setting can be disabled by using Server Manager (Local Server/Properties).
-
Убедитесь, что вы вошли в домен CONTOSO в качестве администратора в MDT01.On MDT01, ensure that you are signed in as an administrator in the CONTOSO domain.
В данном руководстве используется учетная запись администратора домена администратором с паролем Pass@word1.For the purposes of this guide, we are using a Domain Admin account of administrator with a password of pass@word1. Вы можете использовать свое имя пользователя и пароль администратора, если правильно настроить все действия, описанные в этом руководстве, в которых используются эти учетные данные.You can use your own administrator username and password as long as you properly adjust all steps in this guide that use these login credentials.
- Запустите настройку ADK (D:\Downloads\ADK\adksetup.exe), дважды нажмите кнопку Далее , чтобы сохранить параметры установки по умолчанию, нажмите кнопку сохранить , чтобы приступить к принятию лицензионного соглашения, а затем выберите компоненты, которые вы хотите установить , пригласите список функций по умолчанию, нажав кнопку установить.Start the ADK Setup (D:\Downloads\ADK\adksetup.exe), click Next twice to accept the default installation parameters, click Accept to accept the license agreement, and then on the Select the features you want to install page accept the default list of features by clicking Install. Будут установлены средства развертывания и USMT.This will install deployment tools and the USMT. Убедитесь, что установка успешно завершена, прежде чем переходить к следующему шагу.Verify that the installation completes successfully before moving to the next step.
- Запустите программу установки WinPE (D:\Downloads\ADK\adkwinpesetup.exe), дважды нажмите кнопку Далее , чтобы сохранить параметры установки по умолчанию, нажмите кнопку сохранить , чтобы приступить к принятию лицензионного соглашения, а затем на странице выберите компоненты, которые нужно установить , и нажмите кнопку установить.Start the WinPE Setup (D:\Downloads\ADK\adkwinpesetup.exe), click Next twice to accept the default installation parameters, click Accept to accept the license agreement, and then on the Select the features you want to install page click Install. Будут установлены Windows PE для x86, AMD64, ARM и ARM64.This will install Windows PE for x86, AMD64, ARM, and ARM64. Убедитесь, что установка успешно завершена, прежде чем переходить к следующему шагу.Verify that the installation completes successfully before moving to the next step.
-
Извлеките Обновление WSIM 1903 (D:\Downloads\ADK\WSIM1903.zip) и запустите файл UpdateWSIM. bat .Extract the WSIM 1903 update (D:\Downloads\ADK\WSIM1903.zip) and then run the UpdateWSIM.bat file.
Вы можете проверить, применено ли обновление, просмотрев свойства файлов ImageCat. exe и ImgMgr. exe на C:\program Files файлы (x86) \Windows Kits\10\Assessment и развертывание Kit\Deployment Tools\WSIM и убедившись в том, что на вкладке » сведения » отображается Версия файла 10.0.18362.144 или более поздней.You can confirm that the update is applied by viewing properties of the ImageCat.exe and ImgMgr.exe files at C:\Program Files (x86)\Windows Kits\10\Assessment and Deployment Kit\Deployment Tools\WSIM and verifying that the Details tab displays a File version of 10.0.18362.144 or later.
ОбслуживаниеServicing
Windows 10 версии 1909 — это отобранный набор компонентов с улучшением производительности отдельных функций, корпоративными компонентами и улучшениями качества.Windows 10, version 1909 is a scoped set of features for select performance improvements, enterprise features and quality enhancements.
Для оптимального развертывания этих обновлений мы используем новый способ— технологию обслуживания.To deliver these updates in an optimal fashion, we are providing this feature update in a new way: using servicing technology. Пользователи, уже установившие Windows 10 версии 1903 (обновление за май 2019 г.), получат это обновление так же, как и ежемесячные обновления.Users that are already running Windows 10, version 1903 (the May 2019 Update) will receive this update similar to how they receive monthly updates. При использовании версии 1903 обновление до нового выпуска будет происходить гораздо быстрее, так как оно будет установлено как ежемесячное обновление.If you are running version 1903, then updating to the new release will have a much faster update experience because the update will install like a monthly update.
При обновлении с более ранней версии Windows 10 (1809 или более ранней) процесс обновления до текущей версии будет таким же, как и для предыдущих обновлений компонентов Windows 10.If you are updating from an older version of Windows 10 (version 1809 or earlier), the process of updating to the current version will be the same as it has been for previous Windows 10 feature updates. Дополнительные сведения см. в разделе .For more information, see .
Примечание. Устройства с выпусками Windows 10 версии 1909 Корпоративная, IoT Корпоративная и для образовательных учреждений получают 30 месяцев поддержки.Note: Devices running the Enterprise, IoT Enterprise, or Education editions of Windows 10, version 1909 receive 30 months of support. Дополнительные сведения о жизненном цикле обслуживания Windows см. в таблице о жизненном цикле продуктов Windows.For more information about the Windows servicing lifecycle, please see the Windows lifecycle fact sheet.
Службы Windows Server Update Services (WSUS)Windows Server Update Services (WSUS)
Предварительные версии обновления компонентов Windows 10 теперь доступны ИТ-администраторам с помощью служб WSUS.Pre-release Windows 10 feature updates are now available to IT administrators using WSUS. Требуется Microsoft Endpoint Configuration Manager версии 1906 или более поздней.Microsoft Endpoint Configuration Manager version 1906 or later is required. Дополнительные сведения см. в разделе Публикация предварительной версии обновления компонентов Windows10 в WSUS.For more information, see Publishing pre-release Windows 10 feature updates to WSUS.
Пакет Enablement для Windows 10 версии 1909 будет доступен в WSUS как обновление KB4517245, которое можно установить в существующих развертываниях Windows 10 версии 1903.The Windows 10, version 1909 enablement package will be available on WSUS as KB4517245, which can be deployed on existing deployments of Windows 10, version 1903.
Центр обновления Windows для бизнесаWindows Update for Business (WUfB)
Если вы используете Центр обновления Windows для бизнеса, вы получите обновление Windows 10 версии 1909 так же, как и для предыдущих обновлений компонентов, и в соответствии с политикой отсрочки обновления компонентов.If you are using WUfB, you will receive the Windows 10, version 1909 update in the same way that you have for prior feature updates, and as defined by your feature update deferral policy.
使用命令行Using the command line
如果需要以无提示方式安装 Windows ADK,可以使用命令行进行安装。If you have a scenario where you need to silently install the Windows ADK, you can install using the command line.
-
在能够访问 Internet 的电脑上,查看下载和安装 Windows ADK。On a PC that has Internet access, see Download and install the Windows ADK.
-
单击链接之一来下载你需要的 ADK 版本,并将 adksetup.exe 保存到你的计算机上的某个位置。Click one of the links to download the ADK version you desire, and Save adksetup.exe to a location on your computer.
-
以管理员身份打开命令提示符窗口。Open a Command Prompt window as administrator.
-
更改到存储着 Adksetup.exe 文件的目录:Change to the directory that stores the Adksetup.exe file:
-
运行 adksetup.exe。Run adksetup.exe. 使用 /quiet 以无提示方式运行安装程序。Use /quiet to run the installer silently. 使用 /layout 指定要将脱机安装文件复制到何处。Use /layout to specify where the offline install files will be copied to.
-
将下载的文件复制到脱机计算机可以访问的某个位置。Copy the downloaded files to a location that the offline computer can access. 例如,将文件复制到可移动媒体或脱机计算机可以访问的文件服务器。For example, copy the files to removable media or to a file server that the offline computer can access.
-
在脱机计算机上,以管理员身份打开命令提示符窗口。On the offline computer, open a Command Prompt window as an administrator.
-
更改到包含 adksetup.exe 的目录。Change to the directory that contains adksetup.exe.
-
运行 adksetup.exe。Run adksetup.exe. 使用 /quiet 指定无提示安装,使用 /installpath 指定要将 ADK 安装到何处,使用 /features 来指定功能。Use /quiet for a silent installation, /installpath to specify where to install the ADK, and /features to specify features. 例如,以无提示方式将部署工具安装到 c:\ADK:For example, install Deployment Tools to c:\ADK silently:
Microsoft Deployment ToolkitMicrosoft Deployment Toolkit
MDT 是來自 Microsoft 的免費部署解決方案。MDT is a free deployment solution from Microsoft. 它提供規劃、建立及部署 Windows 作業系統所需的端對端指南、最佳做法及工具。It provides end-to-end guidance, best practices, and tools for planning, building, and deploying Windows operating systems. MDT 是在 Windows ADK 中的核心部署工具之上建立的,可提供指導方針、減少複雜性,以及為企業準備好的部署方案新增重要功能。MDT builds on top of the core deployment tools in the Windows ADK by contributing guidance, reducing complexity, and adding critical features for an enterprise-ready deployment solution.
MDT 有兩個主要的部分:第一個是簡化式觸控,這是獨立的部署方案;第二個是零觸控,這是 System Center 2012 R2 建構管理員的延伸。MDT has two main parts: the first is Lite Touch, which is a stand-alone deployment solution; the second is Zero Touch, which is an extension to System Center 2012 R2 Configuration Manager.
記事 和 是 MDT 支援之兩個解決方案的行銷名稱,且命名與自動化無關。Note Lite Touch and Zero Touch are marketing names for the two solutions that MDT supports, and the naming has nothing to do with automation. 您可以將獨立的 MDT 方案完全自動化 (精簡的觸控) ,而且您可以設定解決方案與 Configuration Manager 整合以提示資訊。You can fully automate the stand-alone MDT solution (Lite Touch), and you can configure the solution integration with Configuration Manager to prompt for information.
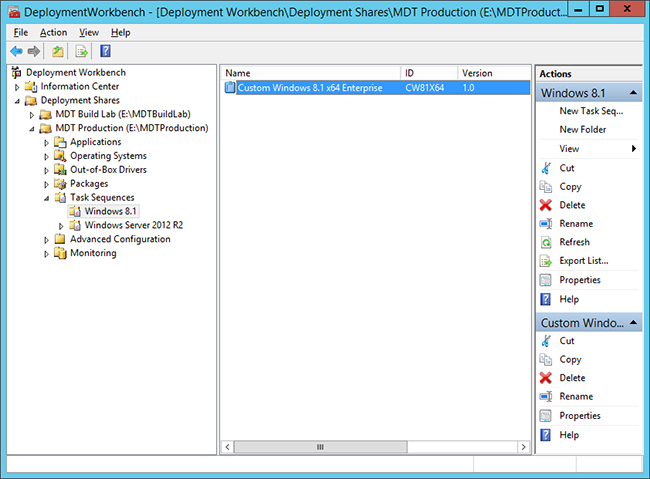
中的部署工作臺,顯示任務順序。The Deployment Workbench in, showing a task sequence.
如需 MDT 的詳細資訊,請參閱 Microsoft 部署工具 組資源中心。For more information on MDT, see the Microsoft Deployment Toolkit resource center.
适用于 Windows 10 版本 1607 的 Windows ADK 中的新增功能What’s new in the Windows ADK for Windows 10, version 1607
选取和选择桌面应用程序Pick and choose desktop applications
现在,在使用孤立的预配包时,可以选取和选择要在部署过程中添加到映像的桌面应用程序。With siloed provisioning packages, you can now pick and choose which desktop applications to add to your images during deployment. 不再需要将整个应用程序集重新捕获到恢复映像中,它们会自动添加进去。You no longer need to recapture the entire set of applications into your recovery image, they’re added in automatically. 这些包支持节省空间的功能,例如简洁操作系统和单实例存储。These packages support space-saving features like Compact OS and single-instancing.
构建适用于大规模部署的 IoT 核心版映像Build IoT Core images for large-scale deployment
捕获应用、驱动程序和设置,并将其安全地部署到新设备。Capture your apps, drivers, and settings, and deploy them securely to new devices. 通过 IoT Core manufacturing guides(IoT 核心版制造指南)了解详细信息。Learn how with the IoT Core manufacturing guides.
为 Windows 10 版本 1607 添加的新应答文件设置New answer file settings added for Windows 10, version 1607
- 将更多磁贴添加到“开始”菜单:SquareOrDesktopTile7 到 SquareOrDesktopTile12Add more tiles to the Start Menu: SquareOrDesktopTile7 through SquareOrDesktopTile12
- 添加高级触笔设置应用Add an advanced pen settings app
- 允许在远程访问会话中存在聊天窗口Allow a chat window in a remote access session
- 设置自动亮度控制Set auto-brightness controls
- 查看更多的See more
适用于 Windows 10 版本 2004 的 WDKWDK for Windows 10, version 2004
步骤 1:安装 Visual Studio 2019Step 1: Install Visual Studio 2019
WDK 需要 Visual Studio。The WDK requires Visual Studio. 有关 Visual Studio 系统要求的详细信息,请参阅 Visual Studio 2019 系统要求。For more information about system requirements for Visual Studio, see Visual Studio 2019 System Requirements.
以下版本的 Visual Studio 2019 支持针对此发行版进行驱动程序开发:The following editions of Visual Studio 2019 support driver development for this release:
- 下载 Visual Studio Community 2019Download Visual Studio Community 2019
- 下载 Visual Studio Professional 2019Download Visual Studio Professional 2019
- 下载 Visual Studio Enterprise 2019Download Visual Studio Enterprise 2019
安装 Visual Studio 2019 时,选择“使用 C++ 的桌面开发”工作负荷。When you install Visual Studio 2019, select the Desktop development with C++ workload. Windows 10 软件开发工具包 (SDK) 会自动包括在内,并显示在右侧的“摘要”窗格中。The Windows 10 Software Development Kit (SDK) is automatically included, and is displayed in the right-hand Summary pane. 请注意,与适用于 Windows 10 版本 2004 的 WDK 兼容的 SDK 版本可能不是默认的 SDK。Note that the version of the SDK that is compatible with the WDK for Windows 10, version 2004 may not be the default SDK. 若要选择正确的 SDK:To select the correct SDK:
在 Visual Studio 安装程序中的“单个组件”选项卡上,搜索“Windows 10 SDK (10.0.19041.0)”,选择此版本,然后继续安装。In Visual Studio Installer, on the Individual components tab, search for Windows 10 SDK (10.0.19041.0), select this version and continue with install. 请注意,Visual Studio 将在计算机上自动安装 Windows 10 SDK (10.0.19041.1)。Note that Visual Studio will automatically install Windows 10 SDK (10.0.19041.1) on your machine.
如果已安装 Visual Studio 2019,则可以使用 Visual Studio 安装中的“修改”按钮来安装 Windows 10 SDK (10.0.19041.1)。If you already have Visual Studio 2019 installed, you can install the Windows 10 SDK (10.0.19041.1) by using the Modify button in Visual Studio install.
WDK 默认启用了 Spectre 缓解,但需要为要开发的每个体系结构将 Spectre 缓解库安装在 Visual Studio 中。WDK has Spectre mitigation enabled by default but requires spectre mitigated libraries to be installed with Visual Studio for each architecture you are developing for. 此外,开发适用于 ARM/ARM64 的驱动程序还需要这些体系结构的生成工具也安装在 Visual Studio 中。Additionally, developing drivers for ARM/ARM64 require the build tools for these architectures to also be installed with Visual Studio. 若要查找这些项,需要知道系统上安装的 MSVC 的最新版本。To locate these items you will need to know the latest version of MSVC installed on your system.
若要查找系统上安装的最新版 MSVC,请在 Visual Studio 安装程序中转到“工作负荷”页,在右侧窗格的“安装详细信息”下展开“使用 C++ 的桌面开发”,然后找到“MSVC v142 — VS 2019 C++ x64/x86 生成工具(V14.xx)”(请注意,其中的 xx 应该就是可用的最高版本)。To find the latest version of MSVC installed on your system, in Visual Studio Installer go to workload page, on the right pane under installation details, expand Desktop development with C++ and locate the MSVC v142 — VS 2019 C++ x64/x86 build tools (V14.xx) — note where xx should be the highest version available.
有了此信息 (v14.xx),转到“单个组件”,然后搜索“v14.xx”。With this information (v14.xx), go to Individual components and search for v14.xx. 这会返回所有体系结构的工具集,包括 Spectre 缓解库。This will return the tool sets for all architectures, including Spectre mitigated libs. 选择要为其开发的驱动程序体系结构。Select the driver architecture you are developing for.
例如,搜索 v14.25 返回以下内容:For example, searching for v14.25 returns the following:
步骤 2:安装适用于 Windows 10 版本 2004 的 WDKStep 2: Install WDK for Windows 10, version 2004
下载适用于 Windows 10 版本 2004 的 WDKDownload WDK for Windows 10, version 2004
WDK Visual Studio 扩展包含在默认 WDK 安装中。The WDK Visual Studio extension is included in the default WDK installation.
Windows 修復環境Windows Recovery Environment
Windows 修復環境 (windows RE) 是 Windows Vista 及更新版本作業系統中包含的診斷與修復工具組。Windows Recovery Environment (Windows RE) is a diagnostics and recovery toolset included in Windows Vista and later operating systems. 最新版本的 Windows RE 是以 Windows PE 為基礎。The latest version of Windows RE is based on Windows PE. 您也可以視需要擴充 Windows RE 並新增您自己的工具。You can also extend Windows RE and add your own tools if needed. 如果 Windows 安裝無法啟動且已安裝 Windows RE,您會看到自動容錯移轉到 Windows RE。If a Windows installation fails to start and Windows RE is installed, you will see an automatic failover into Windows RE.
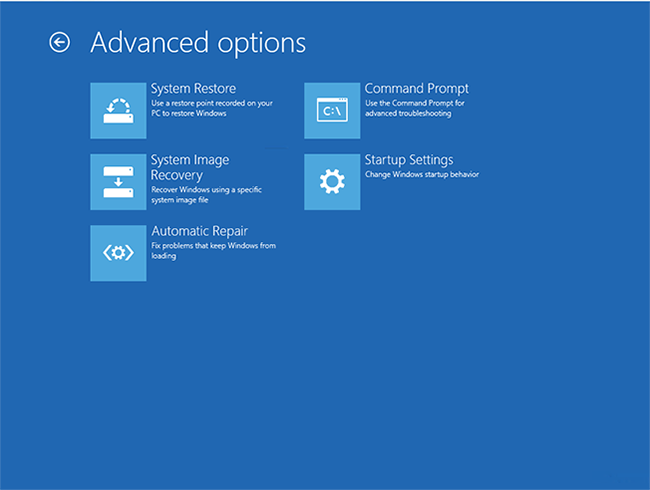
Windows 10 用戶端啟動至 Windows RE,顯示 選項。A Windows 10 client booted into Windows RE, showing Advanced options.
如需 Windows RE 的詳細資訊,請參閱 Windows 修復環境。For more information on Windows RE, see Windows Recovery Environment.
Windows 部署服務Windows Deployment Services
Windows 部署服務 (WDS) 已從 Windows 8 開始,以數種方式進行更新和改進。Windows Deployment Services (WDS) has been updated and improved in several ways starting with Windows 8. 請記住,您會使用的兩個主要函數是 PXE 啟動支援和多播。Remember that the two main functions you will use are the PXE boot support and multicast. 大部分的變更都與管理和提高效能有關。Most of the changes are related to management and increased performance. 在 Windows Server 2012 R2 中,WDS 也可以用於 BitLocker 中的網路解除鎖定功能。In Windows Server 2012 R2, WDS also can be used for the Network Unlock feature in BitLocker.

使用多播來部署三台電腦的 Windows 部署服務。Windows Deployment Services using multicast to deploy three machines.
在 Windows Server 2012 R2 中,可以針對獨立模式或 Active Directory 整合設定 Windows 部署服務 。In Windows Server 2012 R2, Windows Deployment Services can be configured for stand-alone mode or for Active Directory integration. 在大部分的情況下,Active Directory 整合模式是最佳選項。In most scenarios, the Active Directory integration mode is the best option. WDS 也具備管理驅動程式的能力;不過,透過 MDT 與 Configuration Manager 的驅動程式管理更適合部署,因為這兩個解決方案都提供了靈活性,因此您可以改用它們。WDS also has the capability to manage drivers; however, driver management through MDT and Configuration Manager is more suitable for deployment due to the flexibility offered by both solutions, so you will use them instead. 在 WDS 中,您可以在 Active Directory 中測試裝置,但在這裡,Configuration Manager 也有內建的功能,而 MDT 則能使用 SQL Server 資料庫進行預分段。In WDS, it is possible to pre-stage devices in Active Directory, but here, too, Configuration Manager has that capability built in, and MDT has the ability to use a SQL Server database for pre-staging. 在大部分的情況下,這些解決方案比內建的預先測試函式功能好用,因為它們允許更大的控制和管理。In most scenarios, those solutions are better than the built-in pre-staging function as they allow greater control and management.
(TFTP) 設定的普通檔案傳輸通訊協定Trivial File Transfer Protocol (TFTP) configuration
在某些情況下,您需要針對效能調整原因來修改 TFTP 的 設定,尤其是當 PXE 流量透過路由器進行傳播時。In some cases, you need to modify TFTP Maximum Block Size settings for performance tuning reasons, especially when PXE traffic travels through routers and such. 在舊版的 WDS 中,您可以變更它,但執行此操作(編輯登錄的方法)不是方便使用的方式。In the previous version of WDS, it was possible to change that, but the method of do so—editing the registry—was not user friendly. 在 Windows Server 2012 中,當您可以將它設定為設定時,就會變得更容易。In Windows Server 2012, this has become much easier to do as it can be configured as a setting.
此外,與 TFTP 效能相關的一些新功能如下:Also, there are a few new features related to TFTP performance:
- 可伸縮的緩衝區管理。Scalable buffer management. 允許為每個用戶端緩衝整個檔案,而不是固定大小的緩衝區,以便從相同的共用緩衝區讀取不同的會話。Allows buffering an entire file instead of a fixed-size buffer for each client, enabling different sessions to read from the same shared buffer.
- 可伸縮埠管理。Scalable port management. 提供可讓共用 UDP 埠分配的客戶服務,增加可伸縮性的功能。Provides the capability to service clients with shared UDP port allocation, increasing scalability.
- 可變大小的傳輸視窗 (變數 Windows 延伸) 。Variable-size transmission window (Variable Windows Extension). 透過允許用戶端和伺服器判斷最大的可執行視窗大小來改善 TFTP 效能。Improves TFTP performance by allowing the client and server to determine the largest workable window size.
現在,您可以輕鬆執行 TFTP 變更了。TFTP changes are now easy to perform.
Поддерживаемые платформыSupported platforms
Конструктор конфигураций Windows может создавать пакеты подготовки для настольных и мобильных выпусков Windows 10, включая Windows 10 IoT Базовая, а также Microsoft Surface Hub и Microsoft HoloLens.Windows Configuration Designer can create provisioning packages for Windows 10 desktop and mobile editions, including Windows 10 IoT Core, as well as Microsoft Surface Hub and Microsoft HoloLens. Можно запустить конструктор конфигураций Windows в следующих операционных системах:You can run Windows Configuration Designer on the following operating systems:
- Windows 10— x86 и amd64Windows 10 — x86 and amd64
- Windows 8.1 с обновлением— x86 и amd64Windows 8.1 Update — x86 and amd64
- Windows 8.1— x86 и amd64Windows 8.1 — x86 and amd64
- Windows8— x86 и amd64Windows 8 — x86 and amd64
- Windows 7— x86 и amd64Windows 7 — x86 and amd64
- Windows Server 2016Windows Server 2016
- Windows Server 2012 R2 ОбновленнаяWindows Server 2012 R2 Update
- Windows Server2012R2Windows Server 2012 R2
- Windows Server 2012Windows Server 2012
- Windows Server2008R2Windows Server 2008 R2
Предупреждение
Необходимо запустить конструктор конфигураций Windows в Windows 10 для настройки регистрации Azure Active Directory с помощью любого из мастеров.You must run Windows Configuration Designer on Windows 10 to configure Azure Active Directory enrollment using any of the wizards.
Microsoft Deployment Toolkit
MDT is a free deployment solution from Microsoft. It provides end-to-end guidance, best practices, and tools for planning, building, and deploying Windows operating systems. MDT builds on top of the core deployment tools in the Windows ADK by contributing guidance, reducing complexity, and adding critical features for an enterprise-ready deployment solution.
MDT has two main parts: the first is Lite Touch, which is a stand-alone deployment solution; the second is Zero Touch, which is an extension to System Center 2012 R2 Configuration Manager.
Note
Lite Touch and Zero Touch are marketing names for the two solutions that MDT supports, and the naming has nothing to do with automation. You can fully automate the stand-alone MDT solution (Lite Touch), and you can configure the solution integration with Configuration Manager to prompt for information.

The Deployment Workbench in, showing a task sequence.
For more information on MDT, see the Microsoft Deployment Toolkit resource center.
Установка на eMMC (DragonBoard 410c, другие устройства Qualcomm)Flashing with eMMC (for DragonBoard 410c, other Qualcomm devices)
- Скачайте и установите средство DragonBoard Update Tool той версии, которая соответствует архитектуре вашего компьютера — x86 или x64.Download and install the DragonBoard Update Tool for your x86 or x64 machine.
- Скачайте образ Windows 10 IoT Core DragonBoard FFU.Download the Windows 10 IoT Core DragonBoard FFU.
- Дважды щелкните скачанный ISO-файл и найдите подключенный виртуальный CD-диск.Double-click on the downloaded ISO file and locate the mounted Virtual CD-drive. Этот диск будет содержать файл установщика (MSI). Дважды щелкните его.This drive will contain an installer file (.msi); double-click on it. При этом на компьютере будет создан новый каталог с файлом образа flash.ffu.This creates a new directory on your PC under in which you should see an image file, «flash.ffu».
- Переключите плату в режим загрузки, установив переключатель USB Boot (1) в положение ON (Включено), как показано на иллюстрации.Ensure your DragonBoard is in download mode by setting the first boot switch on the board to USB Boot, as shown below. Подключите плату к компьютеру с помощью кабеля Micro-USB и подключите к ней источник питания 12 В (> 1 А).Then, connect DragonBoard the host PC via a microUSB cable, then plug in the DragonBoard to a 12V (> 1A) power supply.
- Запустите средство обновления DragonBoard, которое должно обнаружить подключенную плату DragonBoard, пометив состояние подключения зеленым кружком.Start the DragonBoard Update Tool, which should detect that the DragonBoard is connect to your PC with a green circle. Нажмите кнопку Browse (Обзор) и перейдите к скачанному образу FFU, после чего нажмите кнопку Program (Программа).»Browse» to the DragonBoard’s FFU that you downloaded, then click the Program button.
- Снова нажмите кнопку Browse (Обзор) и выберите файл «rawprogram0.xml», созданный на шаге 5.Click «Browse» again and select «rawprogram0.xml» that was generated in step 5. Теперь нажмите кнопку Program (Программа).Then click the «Program» button.
- После скачивания отключите от платы кабель питания и кабель Micro-USB и установите переключатель USB Boot в положение OFF (Отключено).Once the download is complete, disconnect the power supply and microUSB cable from the board and toggle the USB Boot switch back to OFF. Подключите к плате DragonBoard монитор (через разъем HDMI), мышь, клавиатуру и источник питания, после чего включите питание.Connect a HDMI display, a mouse, and a keyboard to the DragonBoard and re-connect the power supply. Через несколько минут должно отобразиться приложение по умолчанию Windows 10 IoT Базовая.After a few minutes, you should see the Windows 10 IoT Core default application.
Примечание
Убедитесь, что устройство теперь загружается из памяти eMMC. Для этого снова откройте настройки BIOS и настройте загрузку с жесткого диска, а не с USB-накопителя.Make sure the device is now booting from the eMMC memory by entering the BIOS setup again and switching the Boot Drive order to load from the Hard Drive instead of from the USB Drive.