Настройка pam в linux
Содержание:
- 3.) Initial configuration
- Here’s the Best IPAM Software & Tools of 2020:
- DDI
- Basics of IP Address Management
- Switch Port Mapper
- 3.4 Addresses controller
- Other IPAM products
- 2.) phpIPAM up to version 1.3.1
- Why must OpUtils IP address monitor be used for monitoring a heterogeneous network environment?
- Why IPAM?
- 1.) Preparing environment and installing required apps
- Steps to Deploy IPAM on Windows Server 2012
- 1.) phpIPAM version 1.3.2 and higher
- Why OpUtils IP Address Tools for IP Management?
- IP Address Management
- 2.) Downloading phpipam files and configure phpipam
- Настройка сервисов
- 1: Настройка Apache
- 1. Менеджер IP-адресов SolarWinds
- 2. Менеджер адресов Blue Cat
- Заключение
3.) Initial configuration
Before you start installing database files, you need to enter database details, that you will use for phpipam connecting to database. First copy config.dist.php to config.php and enter required details.
For automatic installation phpipam will configure database with settings you enter in config.php file, for manual installation you will have to do it yourself.
$db = "localhost";
$db = "phpipam";
$db = "phpipamadmin";
$db = "phpipam";
also, if you extracted phpipam directory in any other directory than web server root folder, you need to set that as well (BASE directive) in config.php:
define('BASE', "/");
For example, if you will have phpipam installed in directory than set BASE as /phpipam/.
Here’s the Best IPAM Software & Tools of 2020:
1. SolarWinds IPAM
The Solarwinds IPAM, which starts at $1,995, offers a lot of great features that are easy to integrate in existing systems. Easy to use and navigate, it is the best choice for mid-size organizations as it allows the monitoring of your entire address space from a single dashboard.
It has the active scanning function that discovers and tracks IPv4 and IPv6 subnets and associated address blocks making it effortless to manage and deploy in networks.
Some of the other key features are:
Automated IP address tracking. Always know how the IP addresses in your network are being used through automated subnet discovery and IP scanning.
Integrated DHCP, DNS and IP address management. Save time and enhance network reliability by monitoring your entire address space in a single dashboard.
IP alerting, troubleshooting and reporting. Receive an alert and troubleshoot IP conflicts, depleted subnets, scopes and mismatched DNS entries.
Multi-vendor DHCP and DNS support. Have the ability to centrally manage and monitor Microsoft, Cisco, and ISC DHCP servers as well as BIND and Microsoft DNS servers.
Integration with VMware vRealize Orchestrator. Be able to automate virtual machine IP address management with vRO plug-in.
API Support. By Providing a two-way integration with third-party software, automate the creation, modification, and deletion of IP addresses
Price:
30 Day Free Trial !
Official Download:
Solarwinds also Offers a FREE IP Tracking Solution that is Limited in the Amount of IP Addresses you can track, but its a great Starting point.
Download the Free Version here:
2. Infoblox IPAM
Fully integrated with their industry-leading Grid technology,Infoblox IPAM provides enterprise-grade, automated core network services for public and private clouds and virtualized environments.
With the Infoblox tool, DNS, DHCP, NTP, FILE distribution and IPAM are all integrated into one console. The biggest advantage of Infoblox is the fact that it is highly scalable. This is because of its signature Grid technology that allows the various databases to be distributed and replicated throughout your environment.
Infoblox makes it easy to work with high-volume databases by having the ability to export the data into a CSV file, use Excel to make the modifications, save and re-import.
Price:
The price for the tool starts at $7,145
Official Download:
3. BlueCat Address Manager
BlueCat Network’s incorporated software distributions of their applications enables you to run it on any virtual machine in your environment. It’s IPAM tool provides a user-friendly interface and it’s particularly quick and accurate in gathering all the usual data in a network such as the IP address, DNS, DHCP lease, host records and mac addresses.
Their software is mostly used for enterprise environments especially where DNS or IP configurations are constantly updated. The BlueCat Networks currently offers the Proteus family of IPAM appliances which features next-generation, web-based, IP address management solutions and the Adonis family of DNS/DHCP appliances which are end-to-end, fast, intelligent, cross-platform, secure DNS and DHCP solutions.
Price:
Inquiry for Pricing
Official Download:
4. BT Diamond IP
BT Diamond IP is the most affordable of all the items mentioned on this list. It is available as an appliance or as a software install for your own hardware. It integrates well with existing DNS and DHCP services in your network. It offers a fully-staffed managed solution making it ideal for companies with a small IT department or those who don’t have a centralized IT staff.
It supports IPv6 as well as templates and extensible attributes that allows you to have extra information attached to your networks and hosts. It is also comes with a 24/7 tech support.
Price:
Inquiry for Pricing
Official Download:
5. LightMesh IPAM
LightMesh IPAM software offers the same functionality as the others IPAM softwares out there but its user-friendly and sophisticated UI is the reason why it stands out among the rest. It does a very good job at presenting the data and information in a way that is intuitive and efficient.
It starts at $200 per month and is a simple solution for enterprise environments. LightMesh IPAM easily integrates with existing DNS and DHCP servers to provide you with a view of all your IP, DNS, and DHCP data regardless of where it resides.
Price:
$200/month up to 10,000 IP Addresses
$500/month up to 1,000,000 IP Addresses
Inquiry for Enterprise Level
Official Download:
DDI
The allocation and replacement of temporary addresses all around your network has many consequences for other sections of the addressing system, which need to be coordinated. A typical DHCP environment will include a DHCP server that distributes new addresses to devices as they connect to the network, a DNS server, which maps between hostnames and IP addresses, and an IP address manager (IPAM), which is a central store of available addresses. These three tasks need to be coordinated. For example, if all of the IP addresses on your network get reallocated through the DHCP server, all of the cross-reference entries in the DNS server will have to be updated. The IPAM needs to know which addresses are available. That includes the task of recovering abandoned addresses and registering them as available again.
The coordination of these three addressing functions into a coordinated tool is called ‘DDI,’ which stands for DNS, DHCP, and IPAM. The extent to which you automate the interaction between these three servers is up to you. Just because you have a degree of manual intervention in your system does not mean that you do not have a DDI environment. As long as the DNS server gets updated when you change IP addresses and your IPAM pool of available addresses gets updated when different addresses are live, then you have a DDI. Whether it is all done without you lifting a finger or if you actually have to copy over some files from one application to another, you are still running a DDI.
Basics of IP Address Management
Before we get into the software review portion of this guide, lets discuss the basics of what IP address management software does and the main components.
The most important function of IPAM software is to monitor and manage DHCP, DNS and IP addresses – this is referred to as “DDI“.
There are many types of products available on the market that serve this purpose, ranging from cloud hosted platforms to desktop software products to virtualized or physical hardware appliances that are meant to completely replace your existing DNS/DHCP infrastructure, while also providing enhanced tools and features above and beyond the virtual-only options.
Traditionally though, most IP address management systems will seamlessly integrate into your Windows (2003, 2008 and 2012 R2) environment while providing a single location or console for managing all things related to your DNS/DHCP and IP address setup.
Most IP management software will include features such as IP address auto-discovery, automated databasing of all devices on your network (laptops, desktops, VoIP nodes, wireless devices, etc.) all while eliminating issues like IP sprawl, stale IP address records within DNS/DHCP, IP Conflicts and so forth while also helping to minimize downtime.
Switch Port Mapper
Gain better visibility on switch ports
Map the devices plugged into each switch port in real-time and gain visibility into:
- The IP/ MAC address details of the connected devices (workstations, IP Phone, etc.)
- VLAN information, port status (administrative and operational status and port speed) and availability of switch ports.
Historic Switch port mapping information works similar to the Historical IP Address tracking. This tools helps admins find out which devices were connected a particular switch at a specified period of time.
Superior search that lets you find devices by searching for MAC, IP Address, DNS Name, or the location of the device.
Group switches for easy identification and control: Switch Port Mapper allows creating different groups of switches based on the location or the building they are located in. Switches can seamlessly be moved within groups. Switches in different groups can be scheduled to scan connected devices at different times.
Get notified on switch port status changes (Transient/ Available/ Used) or if the devices connected to a port have changed.
PrevNext
Manage Switch Port using SNMP
This add-on allows administrators to block or unblock a switch port. A switch port can be made administratively up or down through SNMP using the ‘SNMP write community’ string of a switch. This is very useful to block unwanted traffic from a particular port due to a virus attack or hacking.
3.4 Addresses controller
| Method | URL | Description |
|---|---|---|
| GET | /api/my_app/addresses/{id}/ | Returns specific address |
| /api/my_app/addresses/{id}/ping/ | Checks address status | |
| /api/my_app/addresses/{ip}/{subnetId}/ | Returns address from subnet by ip address 1.3 | |
| /api/my_app/addresses/search/{ip}/ | searches for addresses in database, returns multiple if found | |
| /api/my_app/addresses/search_hostname/{hostname}/ | searches for addresses in database by hostname, returns multiple if found 1.3 | |
| /api/my_app/addresses/first_free/{subnetId}/ | Returns first available address (subnetId can be provided with parameters) 1.3 | |
| /api/my_app/addresses/custom_fields/ | Returns custom fields | |
| /api/my_app/addresses/tags/ | Returns all tags | |
| /api/my_app/addresses/tags/{id}/ | Returns specific tag | |
| /api/my_app/addresses/tags/{id}/addresses/ | Returns addresses for specific tag | |
| POST | /api/my_app/addresses/ | Creates new address |
| /api/my_app/addresses/first_free/{subnetId}/ | Creates new address in subnets – first available (subnetId can be provided with parameters) 1.3 | |
| PATCH | /api/my_app/addresses/{id}/ | Updates address |
| DELETE | /api/my_app/addresses/{id}/ | Deletes address use ‘remove_dns=1’ parameter to remove all related DNS records 1.3 |
| /api/my_app/addresses/{ip}/{subnetId}/ | Deletes address by IP in specific subnet |
Other IPAM products
After seeing that the first release of Microsoft’s IPAM solution requires some scripting and manual work to make a complete solution, you may want to investigate what other products are on the market. Some quick research found these two, and neither one of these is free.
- Solar Winds IP Address Manager. Automated DHCP, DNS, & IP Space Management. Starts at $1995. http://www.solarwinds.com/solutions/ipam-dns-dhcp-ddi.aspx
- BlueCat Address Manager for Windows DNS/DHCP. http://www.bluecatnetworks.com/products/bluecat-address-manager-windows
For more details:Step-by-Step: Configure IPAM to Manage Your IP Address Spacehttp://technet.microsoft.com/en-us/library/hh831622.aspx
2.) phpIPAM up to version 1.3.1
For older phpIPAM versions please use below snippet. Again we assume phpipam will be on separate subfolder on webserver.
server {
# root directory
root /var/www/;
# phpipam
location /phpipam/ {
try_files $uri $uri/ =404;
index index.php;
error_page 500 /app/error/index.php;
error_page 404 /app/error/index.php;
error_page 403 /app/error/index.php;
rewrite ^/phpipam/login/dashboard/?$ /phpipam/dashboard/ redirect;
rewrite ^/phpipam/logout/dashboard/?$ /phpipam/dashboard/ redirect;
rewrite ^/phpipam/tools/search/(.*)/(.*)/(.*)/(.*)/(+)$ /phpipam/index.php?page=tools§ion=search&addresses=$1&subnets=$2&vlans=$3&vrf=$4&ip=$5 last;
rewrite ^/phpipam/tools/search/(.*) /phpipam/index.php?page=tools§ion=search&ip=$1 last;
rewrite ^/phpipam/(.*)/(.*)/(.*)/(.*)/(.*)/(+)/? /phpipam/index.php?page=$1§ion=$2&subnetId=$3&sPage=$4&ipaddrid=$5&tab=$6 last;
rewrite ^/phpipam/(.*)/(.*)/(.*)/(.*)/(+)/? /phpipam/index.php?page=$1§ion=$2&subnetId=$3&sPage=$4&ipaddrid=$5 last;
rewrite ^/phpipam/(.*)/(.*)/(.*)/(+)/? /phpipam/index.php?page=$1§ion=$2&subnetId=$3&sPage=$4 last;
rewrite ^/phpipam/(.*)/(.*)/(+)/? /phpipam/index.php?page=$1§ion=$2&subnetId=$3 last;
rewrite ^/phpipam/(.*)/(+)/? /phpipam/index.php?page=$1§ion=$2 last;
rewrite ^/phpipam/(+)/? /phpipam/index.php?page=$1 last;
}
# phpipam - api
location /phpipam/api {
rewrite ^/phpipam/api/(.*)/(.*)/(.*)/(.*)/(.*) /phpipam/api/index.php?app_id=$1&controller=$2&id=$3&id2=$4&id3=$5 last;
rewrite ^/phpipam/api/(.*)/(.*)/(.*)/(.*) /phpipam/api/index.php?app_id=$1&controller=$2&id=$3&id2=$4 last;
rewrite ^/phpipam/api/(.*)/(.*)/(.*) /phpipam/api/index.php?app_id=$1&controller=$2&id=$3 last;
rewrite ^/phpipam/api/(.*)/(.*) /phpipam/api/index.php?app_id=$1&controller=$2 last;
rewrite ^/phpipam/api/(.*) /phpipam/api/index.php?app_id=$1 last;
}
location /phpipam/css {
try_files $uri $uri/ =404;
}
location /phpipam/js {
try_files $uri $uri/ =404;
}
# php-fpm
location ~ \.php$ {
fastcgi_pass unix:/var/run/php-fpm.socket;
fastcgi_index index.php;
try_files $uri $uri/ index.php = 404;
include fastcgi_params;
}
}
Why must OpUtils IP address monitor be used for monitoring a heterogeneous network environment?
OpUtils is a Switch port and IP address management software that helps network engineers manage their switches and IP’s with ease. Businesses increasingly rely on their networks and resources for basic operations. ManageEngine OpUtils with its suite of 30+ IP tools, addresses the need of network engineers for troubleshooting connectivity issues and on-demand monitoring of the network. These effective network tools offer comprehensive network monitoring functionalities like IP monitor that provides manual and scheduled IP address monitoring of the network address space, and more.
ManageEngine OpUtils provides the following utilities for performing address monitoring operations.
Why IPAM?
Even organizations without formal IPAM applications keep track of their IP address information somehow—most typically in spreadsheets. IPAM lets you view IP address availability and configuration from a database perspective, enabling you to use your addresses more efficiently. IPAM features such as IP reconciliation and automation can eliminate the need to use spreadsheets for tracking addresses.
IPAM is performed on a Microsoft network by an installable Windows Server 2012 feature that you run on a domain member server to «centrally watch and manage» the other servers on your network that are actually doing the work. IPAM manages the functionality of the following Windows servers:
- DHCP Service
- DNS Server
- Network Policy Server (NPS)
- Active Directory Domain Controller (DC)
After you deploy IPAM, you can choose which services on which servers are to be centrally managed or unmanaged. Managed servers must be configured with access settings that allow IPAM to remotely manage, monitor, or audit them. You can either configure these settings manually on each server, or IPAM can provision managed servers automatically using Group Policy Objects (GPOs). Once you deploy IPAM, you use IPAM for making changes because the IPAM database becomes your central authority on IP addresses.
1.) Preparing environment and installing required apps
1.1) Installing Apache, MySQL, PHP (LAMP) stack packages
Install all required packages for phpipam:
sudo apt-get install apache2 mariadb-server php php-pear php7.0-gmp php7.0-mysql php7.0-mbstring php7.0-gd php7.0-mcrypt php7.0-curl git
1.2) Configuring and running Apache webserver
Main apache configuration is in file . Open it and add directory settings for /var/www/html to allow mod_rewrite URL rewrites:
<Directory "/var/www/html">
	Options FollowSymLinks
	AllowOverride all
	Order allow,deny
	Allow from all
</Directory>
Set correct timezone to php.ini to avoid php warnings:
# grep timezone /etc/php/7.0/apache2/php.ini
; Defines the default timezone used by the date functions
; http://php.net/date.timezone
date.timezone = Europe/Ljubljana
Enable url_rewrite module for apache:
sudo a2enmod rewrite
Now start apache webserver:
sudo /etc/init.d/apache2 start
1.3) Configuring and running MySQL (MariaDB) database server
Steps to Deploy IPAM on Windows Server 2012
#1 Install the IPAM Server Role
IP Address Management (IPAM) Server#2 Provision the IPAM Server
- The manual provisioning method requires that you configure the required network shares, security groups, and firewall rules manually on each managed server.
-
The Group Policy based provisioning method requires Group Policy Objects (GPOs) to be created in each domain that you manage with the IPAM server. IPAM will automatically configure settings on managed servers by adding the computers to the appropriate GPO. Figure A shows the confirmation dialog for this step.
Provisioning IPAM using the GPO-based method.
When using the GPO provisioning method (recommended), next run the Invoke-IpamGpoProvisioning PowerShell command as seen in Figure B on the IPAM computer (replacing «IPAM_» with the prefix you selected in the provisioning):
This PowerShell command creates and links the IPAM GPOs.
#3 Configure Server Discover #4 Start Server Discover #5 Set Manageability StatusFigure C
Change the discovered DC, DNS, DHCP, or NPS server status to Managed status.
If you correctly performed the Invoke-IpamGpoProvisioning PowerShell command, and domain group policy has refreshed, your server will appear as UnBlocked and «green» status in the IPAM server list. If GPOs have not been applied, or the computer account of the IPAM server is not added to the security filtering of the IPAM GPOs, you will see Blocked and «red» status flags in Server Manager.
1.) phpIPAM version 1.3.2 and higher
If you are using phpIPAM version 1.3.2 or higher please use below snippet to configure your nginx server. We assume phpipam will be on separate subfolder on webserver, e.g. http://hostname/phpipam/, if not adjust settings accordingly.
server {
    # root directory
    root   /var/www/;

    # phpipam
    location /phpipam/ {
        try_files $uri $uri/ /phpipam/index.php;
        index index.php;
    }
    # phpipam - api
    location /phpipam/api/ {
        try_files $uri $uri/ /phpipam/api/index.php;
    }

    # php-fpm
    location ~ \.php$ {
        fastcgi_pass   unix:/var/run/php-fpm.socket;
        fastcgi_index  index.php;
        try_files      $uri $uri/ index.php = 404;
        include        fastcgi_params;
    }
 }
Why OpUtils IP Address Tools for IP Management?
IP Address Management tool helps you manage your IP efficiently by proving advanced IP scanning, IP Address tracking, and keeping in check of all your IP Addresses. IP management software allows you to define a hierarchy to add all your subnets based on their usage/location and then scan them to get the current status of each of the IP Addresses. Thus, IP Address Software helps you have a complete overview of all the IP Addresses in your network. The IP management tool main features include
- — to check whether the IP pertains to a computer object
- — to exercise more control by creating users with Administrator or Technician Roles
- — to create a hierarchical representation of their network
- — to track and audit the changes made using IP Address Manager.
- — to scan the subnets to get the details of the IP Addresses
- — to discover and add subnets for monitoring and managing
- — to provide the IP Availability Report of the network
- — to support Microsoft DHCP Servers
- — to scan manually or can be scheduled to run at specified intervals
- — to use the global search option to get the details of an IP Address
- — to notify the administrators about the change in state of an IP Address by email
- — for getting the current availability, DNS name, etc., of any IP Address.
An IP Address solution gives control over different aspects of your network’s IP Address Management, monitoring and troubleshooting. Thereby, using an IP Address Tracker helps you to keep in track, the IP Allocation, reservation, and more.
IP Address Management
End-to-end IP address tracking
Extensive details to track each IP Address: For every IP address, this add-on provides DNS name, MAC address, State, System Name, Device Type, Switch Name it is connected to, Switch Port it is connected to, Alias Name, Owner & more. Besides these, administrators can also add their own custom fields against each device, both at the subnet-level and at the IP details level.
Integration with Active Directory: The integration with Active Directory does a look-up for each IP address to determine if the device pertains to a computer object in the Active Directory (AD). If yes, the IPAM tool fetches more nformation from AD viz. Created Time, GUID, Last Logon, OS Name, OS Version, & more.
Historical IP Address tracking: This add-on helps you time travel and fetch past information related to a particular IP address. Admins can track down the user to whom a particular IP was allocated on a given date, using the IP history tracker.
Get notified instantly when there is a change in state for a particular IP address or the address space such as:
- From transient to available or available to used IP address.
- If DNS forward or reverse lookup fails, or if DNS lookup returns a different IP address value.
- If IP Utilization of a subnet falls below or greater than a specified percentage.
PrevNext
An agile hierarchical view and search
The IPAM add-on enables administrators to create a hierarchical subnet tree view to represent the location or the usage and add subnets under them. This way the administrator can easily locate a subnet to get the required details.
The agile GUI lets admins drag-n-drop subnets between groups, renaming a tree node, add/delete a subnet, scan all the subnets in a group, search using IP Address, MAC Address, DNS Name, Switch Name, Switch Port, Alias Name, & more.
Flexi-subnet scanning
The IP Address management tool does a periodic scan (or triggered on-demand) on the network to provide the status (reserved or transient or available) of any IP address. It uses various protocols to scan the subnets viz. ICMP, SNMP, DNS, and WMI to get the details of the IP Addresses.
Auditing user access
The OpManager IPAM add-on logs every event performed using this tool, along with the time and date of the event. These granular logs help admins track and audit the changes made using the IP address manager.
2.) Downloading phpipam files and configure phpipam
We have configured database and webserver, it is time to install and configure phpipam.
2.1) Downloading phpipam installation files
For the purpose of this guide we will use git to fetch files directly from Github repository. This is preferred and easiest way to setup and maintain phpipam. For other options please read Download guide.
# cd /var/www/html/
# git clone https://github.com/phpipam/phpipam.git .
Cloning into '.'...
remote: Counting objects: 10513, done.
remote: Compressing objects: 100% (2/2), done.
remote: Total 10513 (delta 0), reused 0 (delta 0), pack-reused 10511
Receiving objects: 100% (10513/10513), 7.84 MiB | 2.59 MiB/s, done.
Resolving deltas: 100% (7310/7310), done.
# git checkout 1.2
#
development version
Also make sure upload folders are accessible for xls/csv imports:
sudo chown www-data:www-data -R /var/www/html/

cd /var/www/html/
find . -type f -exec chmod 0644 {} ;
find . -type d -exec chmod 0755 {} ;
* If you wish to make separate subfolder for phpipam, e.g. to access phpipam on , than install files to /phpipam/ subfolder:
# cd /var/www/html/
# git clone https://github.com/phpipam/phpipam.git phpipam
# cd phpipam
# git checkout 1.2
2.2) Configuring database connection
Next we need to configure connection to database. To do it we first need to copy over sample config file to config.php that phpipam uses:
# cp config.dist.php config.php
config.phpDo not use root user/pass
BASE directive should be left at because we will serve phpipam from default directory . If you changed this adjust BASE directive accordingly.
Настройка сервисов
Начнем, пожалуй, с простого. А именно: будем конфигурировать DHCP.
Настройка службы DHCP в Zentyal очень проста. Главное — запомнить, что Zentyal считает все сетевые объекты сетевыми узлами, будь то ПК, ноуты, принтеры, коммутаторы и так далее — в общем, любая железяка. А под службами Zentyal понимает сетевые порты сервисов.
Вариант 1. Присоединись к сообществу «Xakep.ru», чтобы читать все материалы на сайте
Членство в сообществе в течение указанного срока откроет тебе доступ ко ВСЕМ материалам «Хакера», увеличит личную накопительную скидку и позволит накапливать профессиональный рейтинг Xakep Score!
Подробнее
Вариант 2. Открой один материал
Заинтересовала статья, но нет возможности стать членом клуба «Xakep.ru»? Тогда этот вариант для тебя!
Обрати внимание: этот способ подходит только для статей, опубликованных более двух месяцев назад.
Я уже участник «Xakep.ru»
1: Настройка Apache
По умолчанию phpIPAM использует в своей структуре URL строки запроса для передачи данных из одной части приложения в другую. Строки запроса добавляются к URL-адресу с помощью ? и содержат одну или несколько пар поле-значение, разделенных символом &.
phpIPAM поддерживает перезапись URL-адресов с помощью модуля Apache mod_rewrite, который переводит строки запросов в более читаемые и удобные для пользователя URL-адреса.
Если вы еще не включили модуль mod_rewrite для перенаправления всех HTTP-запросов на HTTPS, вам нужно сделать это сейчас.
Команда создаст симлинк на /etc/apache2/mods-available/rewrite.load в /etc/apache2/mods-enabled/rewrite/, что включит модуль при следующем запуске Apache.
Если же mod_rewrite был включен ранее, команда вернет:
В противном случае вывод сообщит о создании симлинка и попросит перезапустить Apache:
Apache включит mod_rewrite при следующем запуске. Сейчас нужно изменить конфигурацию виртуального хоста phpIPAM, чтобы сделать mod_rewrite доступным для phpIPAM. Потому пока не перезапускайте Apache.
Откройте конфигурационный файл Apache, созданный для phpIPAM.
sudo nano /etc/apache2/sites-available/example.com-le-ssl.conf
Вставьте в файл следующий блок после раздела DocumentRoot:
- Directory – это место на сервере, в котором хранятся директивы. Это должен быть каталог, в который вы собираетесь установить phpIPAM. В данном мануале это /var/www/example.com/public_html.
- Options FollowSymLinks помогает Apache следовать симлинкам в этом каталоге. Это стандартный параметр.
- AllowOverride all включает переопределение глобальных директив файлом .htaccess.
- Require all granted включает поддержку всех входящих запросов.
Сохраните и закройте файл.
Протестируйте изменения в конфигурации:
Если проверка вернет Syntax OK, можно перезапустить веб-сервер. В противном случае нужно пересмотреть все предыдущие действия и исправить ошибки.
Чтобы перезапустить веб-сервер, введите:
1. Менеджер IP-адресов SolarWinds
SolarWinds — одно из самых известных имен в управлении сетью. Компания делает некоторые из лучших инструментов для помощи администраторам. Он также известен своими бесплатными утилитами и испытаниями. SolarWinds IP Address Manager — это одно из таких программ, которое вы можете попробовать бесплатно в течение 30 дней.Диспетчер IP-адресов SolarWinds позволяет использовать встроенные серверы DHCP и DNS, что делает его полноценной системой DDI, а также программное обеспечение также может взаимодействовать с DHCP и DNS-сервером от Microsoft и Cisco, поэтому вам не придется заменять все ваши инфраструктуры.
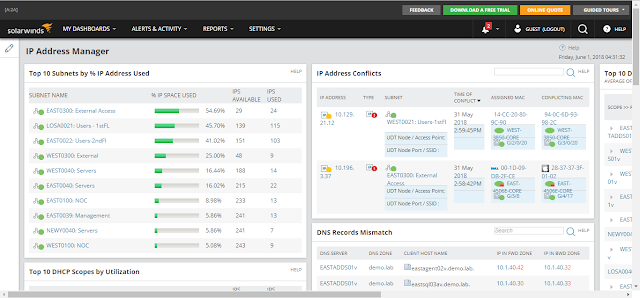
Программное обеспечение позволяет использовать несколько методов распределения для IP-адресов. Например, вы можете использовать резервирование для серверов и другого оборудования и динамически распределенных адресов для рабочих станций. Все полностью интегрируется в DNS. Кроме того, мастер настройки включен, чтобы помочь в настройке областей DHCP.Диспетчер IP-адресов SolarWinds использует учетные записи пользователей с различными уровнями доступа. Вы можете предоставить только частичный доступ к некоторым младшим администраторам или позволить менеджерам просматривать отчеты. Существует также хорошая система регистрации, в которой записываются все изменения с отметкой времени и имя пользователя оператора, внесшего изменения. Это может помочь в вопросах соблюдения. Посетите сайт SolarWinds для получения дополнительной информации и загрузите бесплатную 30-дневную пробную версию диспетчера IP-адресов SolarWinds.
2. Менеджер адресов Blue Cat
Наша вторая запись — от BlueCat, одного из лидеров отрасли в этой области. Их управление адресами лучше всего подходит для крупных корпораций с командой сетевого управления. Система IPAM на самом деле является полной системой DDI, которая включает в себя DHCP и DNS. Он также может взаимодействовать с DHCP и DNS-серверами от Microsoft.BlueCat AddressManager представляет собой систему двойного стека, что означает, что она может работать одновременно с IPv4 и IPv6. Это действительно отличный инструмент для использования при переходе от одного к другому. С точки зрения безопасности, в системе есть рабочие процессы и схемы одобрения, а также учетные записи пользователей с иерархическими правами.
Заключение
Вы установили и настроили phpIPAM, веб-приложение для управления IP-адресами с открытым исходным кодом. Теперь вы можете отслеживать использование IP-адресов как в своей собственной инфраструктуре, так и в других сетях.
Кроме того, вы можете использовать phpIPAM для отслеживания ваших VLAN и связи их с вашими подсетями, проводить инвентаризацию своих сетевых устройств, а также настраивать уведомления по электронной почте.
Для автоматизации интеграции phpIPAM с приложениями, которые вы пишете сами, см. официальную документацию по встроенному API-интерфейсу phipIPAM. Чтобы ускорить работу с API, ознакомьтесь с официальными вводными руководствами.
phpIPAMUbuntu 16.04