Ansible: настраиваем zsh терминал с antigen, autosuggestions, fzf и красивым prompt одной командой
Содержание:
- Installing zsh
- Configuring zsh
- Bash vs zsh: Common features between bash and zsh
- Термины
- setopt и emulate
- zkbd
- Зачем переходить
- Conclusion
- Resources
- Установка
- Выводы
- OH MY ZSH Theme Settings
- autoload -Uz
- Fish
- Bash vs zsh: Reasons to consider switching between shells
- Syntax highlighting
- A short history of bash and zsh
- Параметры
- Step 3: Install & Configure Oh my zsh
Installing zsh
If you are on OS X, chances are you already have installed on your system. To check, run the following command:
which zsh
If it is already installed, you should receive an output message that states as the file path for the shell. There is an off-chance that it may display another file path, if for some reason you moved the default installation directory. If you receive an output that states , you will need to install it via Homebrew. You can do so by running the following command:
brew install zsh
For CentOS, Redhat, and Fedora Linux distributions, you can install zsh by running .
Similarly, will install the shell on Debian and Ubuntu distributions. You can start using zsh even if bash is set to as your default shell. To temporarily try it out, you can just run on the command line. This will temporarily switch the shell for your current session. To get the most out , it’s also highly recommended to upgrade your terminal instead of using the default.
Terminal is the default on Mac OS X. While it works perfectly fine, options such as iTerm 2 or Hyper offer an enormous amount of customization. I personally use iTerm 2, although Hyper is an excellent choice available cross-platform.
Configuring zsh
Like bash’s , zsh uses a dot file to store user configuration settings, . Stored in the home directory (). By default there won’t be a configuration file setup, so you’ll need to create one in your home directory ().
Similarly, you can add a file to your home directory. is a script that will run upon login. You can add in any commands you’d like to run upon starting up a new instance of the shell. Given the wide spectrum of customization available in zsh, it can be beneficial to use a dedicate configuration manager. Numerous options exist, including Prezto, Oh My ZSH, and Antigen.
Oh My ZSH
To install Oh My ZSH, simply run
curl -L https://raw.github.com/robbyrussell/oh-my-zsh/master/tools/install.sh | sh
This will download the executable shell script and install it on your system. The default settings upon installing Oh My ZSH are a great place to start.
By default, it will install the ‘robbyrussell’ theme (its namesake coming from the original developer of the project).
Additionally, it will install a number of useful plugins. At least a few aspects of the terminal’s display will appear immediately different.
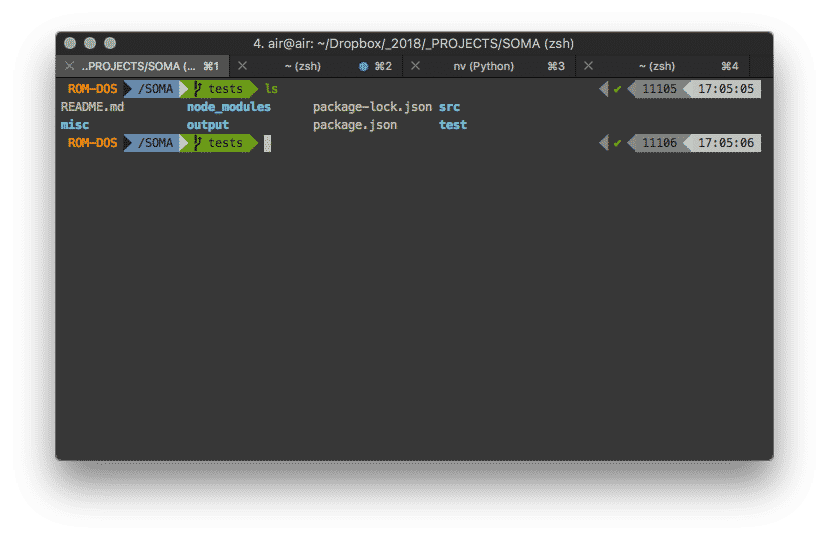
Git branches
Similar to the above, Oh My ZSH also adds a plugin that will display the current branch you are on in a project. Appearing after the working directory in the command prompt, you’ll always know which branch you’re on. This way you never have to to know the current branch. The plugin also adds in several other useful features.
In the example below, the project directory is currently on the branch. We can also know that the working tree is clean, with no changes that you haven’t committed yet. In this case, this is indicated by the fact that the display is green. As soon as you make a change, the display turns another color, indicating that there are new changes to commit:
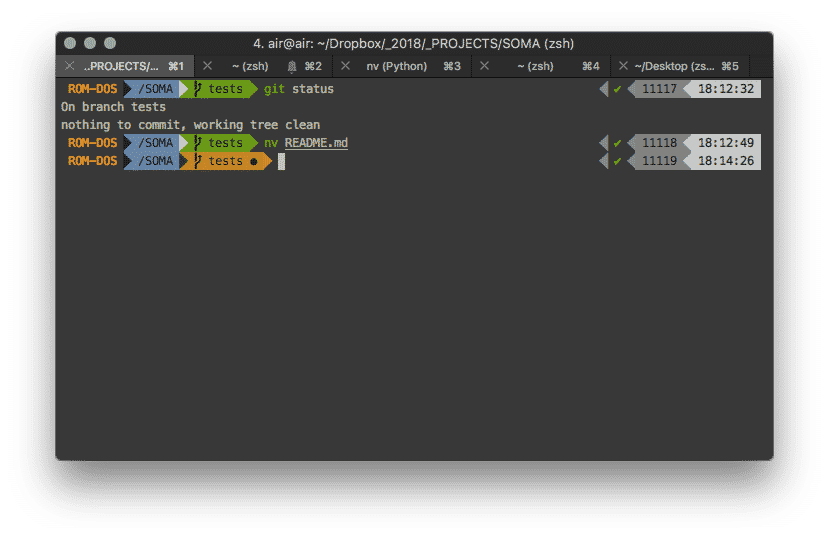
significantly improves the Git workflow with these types of indications right in the command prompt.
Changing your theme
As mentioned above, comes with hundreds of different themes to choose from. will be the default theme, although you can easily change this. To find a new theme offered by Oh My ZSH, you can preview each on the Themes page in the project repo. Given the many choices available, chances are you’ll find one available with almost exactly the features you’re looking for.
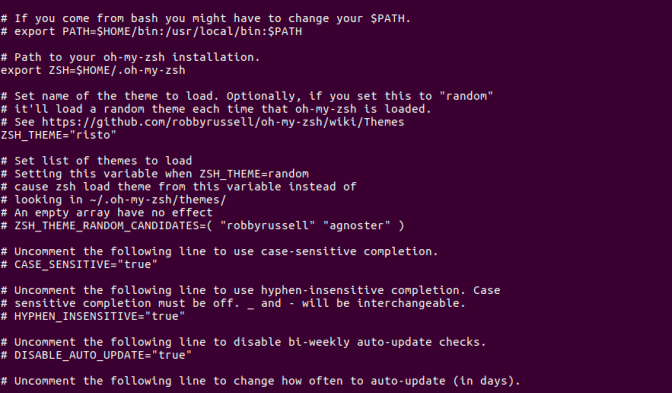
Once you find one you like, open up your file, in the home directory. Then, you’ll just need to update the line starting with . Put the name of the name you want to use (inside of quotes), then save the file. Opening a new terminal session should now display the new theme.

You can even set as your . This will load a new random theme each time you open up a new session in the shell.
Some themes may require additional packages or fonts, such as the popular Powerline fonts. The theme’s installation’s instructions should specify any additional required packages, though.
Bash vs zsh: Common features between bash and zsh
For the most part, bash vs zsh share many convenient features that qualify both as highly efficient shells.
The z-command
One highly useful feature that both share is the command, which allows developers to essentially keep track of their directories. With the command, you can navigate to a frequently/recently visited directory just by typing z , followed by the directory name. For example, say you have a directory located at . Using this tool, you can simply type .
Auto-completion
Another practical aspect of both shells is their tab auto-complete functions. Within each shell, you can just type the command, followed by , then hit tab. This action will then immediately display all of the available options for that command. You can then just tab through the available options, until you find the one you’re looking for. Both shells offer flexibility and customization to their command-line auto-completion.
Auto-correction
Additionally, a helpful utility for web developers in both shells, for the most part, is the auto-correction. In the Z shell, if you make an innocent typo while writing a file location, for example, spell correction is built-in and will automatically detect the typo. While this is not custom to bash, you can easily make the necessary adjustments to allow auto-correction by using shopt commands and .
Color customization
Even in terms of visual appeal and organization, both shells accomplish the task fairly well. will differentiate the two by adding color highlighting to directories. Additionally, the font-weight will be slightly bolder. This is extremely helpful to see what’s a file and what’s a directory. The exact colors used will depend on your terminal color settings. On the other hand, bash users can also tweak their interface to reflect their visual needs with the variable.
While these are only some of the various tools offered by both shells, they provide a glimpse of how bash and admittedly resemble each other. However, they both possess some distinctions that can create a preference for one over the other among developers.

Термины
- Параметр: обычная переменная — скаляр (строка, целое, дробное), массив, ассоциативный массив (хеш). А переменными называют в основном переменные окружения, т.е. экспортированные скалярные параметры.
- Аргумент: параметр (в традиционном смысле) вызываемой команды или функции (аргументы функции доступны через параметры , , …).
- Шаблон: глоб. Как правило шаблоны подразумевают совпадение с реально существующими файлами, но в некоторых случаях они применяются к строке или значению параметра. Поддержка полноценных регулярок тоже есть, но в основном везде в качестве шаблонов для совпадения или поиска/замены используются глобы.
- Флаги: задаются в круглых скобках перед тем, на что они должны влиять. Для параметров задаются между открывающей фигурной скобкой и именем параметра: . Для шаблонов могут быть в начале или середине: .
- Квалификаторы: задаются в круглых скобках после шаблона, уточняя его свойствами не связанными с именем файла: .
- Модификаторы: задаются каждый после двоеточия, применяются по очереди изменяя текущее значение. Для параметров задаются после имени параметра: , . Для шаблонов задаются перед закрывающей круглой скобкой квалификаторов: .
setopt и emulate
- В именах опций регистр и подчёркивания значения не имеют, плюс перед любой опцией можно добавить префикс «no».
- Вызов для одной и той же опции с префиксом «no» и без «no» (равно как и наоборот!) делают одно и то же.
- В выводе используются маленькие буквы без подчёркиваний, в документации используются большие буквы с подчёркиваниями. Это создаёт некоторое неудобство — при поиске в документации нужно догадаться, где вставлять подчёркивания чтобы найти нужную опцию.
- Команда позволяет массово установить группу опций в состояние совместимости с sh, ksh, csh или в состояние по умолчанию для zsh. Многие функции в zsh начинаются командой , что позволяет на время выполнения функции привести ключевые опции в состояние по умолчанию для zsh — без этого большинство нетривиальных функций может ломаться из-за выставленных пользователем опций (например, есть опция которая управляет тем, как индексируются массивы — от 1 или от 0).
В начале использования zsh, для более привычной работы после bash, я бы рекомендовал следующие опции:
Ещё есть опция , и формально для привычной работы после bash её тоже надо включить, но я бы этого не рекомендовал: поведение zsh без этой опции более удобное и логичное, лучше сразу к нему привыкать. Она отвечает за то, как сработает если значение это строка содержащая пробелы: в bash получит несколько аргументов, а в zsh — один (как если бы вызвали ). А если это массив, то zsh передаст по одному аргументу на каждый не пустой элемент массива (даже если эти элементы содержат пробелы).
(В основном, эта статья описывает поведение zsh с опциями по умолчанию, иначе каждое второе предложение пришлось бы уточнять в стиле «но вот при таких-то опциях всё это работает иначе».)
zkbd
При первом запуске zsh нередко оказывается, что часть кнопок вроде F1/Backspace/Delete/курсора работает некорректно. Это связано с тем, что абсолютное большинство консольных приложений использует readline и корректная настройка этих кнопок считывается из и , а zsh этого не делает.
Проблема решается в лоб — нужно посмотреть, какие escape-последовательности выдают нужные кнопки в вашем терминале и задать в нужные обработчики для этих escape-последовательностей. Примерно так:
Смотреть выдаваемые кнопками последовательности можно запустив и нажимая перед нужной кнопкой. (И таки да, занимаясь этим в 2017 я чувствовал себя немного странно…) Но в комплекте с zsh идёт вспомогательная утилита , которая автоматизирует этот процесс. Для этого необходимо подключить её в , после чего у вас появится ассоциативный массив содержащий нужные escape-последовательности:
Я не уточняю детально какие команды (вроде ) на какие кнопки назначать потому, что во-первых назначать надо не все подряд, а только те, которые у вас из коробки не заработают, и во-вторых если мнения насчёт того, что должны делать Home или Backspace у всех сходятся, то вот поиск в истории по Up и Down может выполняться довольно разными способами, и функции в этих случаях на эти кнопки надо назначать тоже разные.
(Кстати, задавать символ Escape () в параметре bindkey можно и настоящим символом, вводя его через , и двумя обычными символами , и двумя символами .)
Зачем переходить
Для начала — а стоит ли вообще тратить своё время и внимание на переход? Учить ещё один диалект sh, менее распространённый чем POSIX sh или bash, заново заниматься настройкой рабочего окружения…
На мой взгляд, если вы проводите много времени в консоли, вам нравятся Vim или Emacs и вы уже потратили немало времени на их настройку «под себя» — однозначно стоит! Zsh по духу очень на них похожа: это очень сложная и гибкая программа, чьи возможности полностью мало кто знает, но потратив некоторое время на настройку можно получить очень удобную лично вам рабочую среду.
Что касается изучения нового диалекта sh… пользы от этого, скорее всего, действительно мало, но описанного в этой статье минимума должно быть достаточно чтобы настраивать zsh, а писать новые скрипты на диалекте zsh вам никто и не предлагает. В общем и целом это ничем не отличается от необходимости минимально знать VimL или Emacs Lisp исключительно для настройки Vim/Emacs.
В инете куча статей и презентаций описывающих конкретные фичи zsh, значительно упростившие чью-то жизнь. Я не буду их перечислять, потому что фичи всем нужны разные, и в zsh найдутся варианты на любой вкус. Вместо этого я опишу ключевые особенности zsh, которые позволили реализовать эти фичи:
- Zsh не использует readline для ввода команд пользователем. Вместо этого используется собственный редактор ZLE (Zsh Line Editor). Это позволило реализовать множество фич: удобное редактирование многострочных команд, подсветку синтаксиса прямо в процессе ввода команды, особую обработку «paste» из clipboard чтобы не выполнить случайно вставленный текст, гибкое управление горячими клавишами, undo (в т.ч. отменяющее результат автодополнения и разворачивания glob-ов)… плюс интегрировать функционал редактора с zsh, что позволяет управлять его поведением через обычные функции zsh (например, подсветка синтаксиса так и реализована).
- Невероятно сложный и гибкий механизм автодополнения команд. Он сильно зависит от контекста, поэтому при нажатии в разных местах командной строки будут дополняться разные вещи: имена команд, их параметры, файлы, имена пользователей и серверов, номера процессов, названия переменных, индексы массивов и ключи хешей, элементы синтаксиса zsh, названия цветов и шрифтов, сетевых интерфейсов, системных пакетов… короче, вообще всего что можно автодополнять. И его можно детально контролировать, вплоть до изменения логики автодополнения для конкретного контекста у конкретной команды.
- Громадное количество (177 в zsh-5.2) опций, изменяющих поведение zsh. С их помощью можно, например, изменять поддерживаемый синтаксис и включать (в т.ч. частично) режимы совместимости с sh/bash/ksh/csh. Они позволяют настолько значительно влиять на работу, что в zsh пришлось сделать отдельный «режим совместимости с zsh», который многие функции обычно включают первой командой, потому что только это даёт им гарантию, что код этой функции будет понят zsh именно так, как ожидал его автор.
- Предпочтение максимально сжатого, краткого синтаксиса — чтобы вам нужно было набирать как можно меньше текста для выполнения типичных, пусть даже довольно сложных, задач. В коде, где важна читабельность через месяц — это однозначно минус. Но в командной строке — однозначно плюс.
- Модульная организация настроек через фреймворки (вроде oh-my-zsh и prezto), плагины, темы, etc. На самом деле здесь нет ничего специфичного для zsh, ровно то же самое можно сделать и для bash, но… почему-то для zsh всё это уже есть, а для bash — нет (а если и есть, то про это мало кто знает). А это даёт возможность относительно быстро собрать свой вариант настроек zsh из готовых «кубиков» (как пример, посмотрите видео менеджера плагинов zsh Аntigen), точно так же, как обвешивается плагинами Vim.
Conclusion
As we’ve looked at in this zsh vs bash post, and bash both share a similar and impressive array of features, but also have their own distinct tools as well. If you’re looking for extensibility, greater customization and advanced features not found in bash, the shell combined with Oh My Zsh framework is an excellent choice. Regardless of what shell you choose, improved fluency on the command line provides countless benefits in efficiency, automation, and better understanding of your computer’s inner workings.
For an introduction to some of the most essential shell commands, check out our post on basic command line usage.

Resources
- Basic Command Line Usage
- Getting Started with Sass
- Choosing The Best Text Editor For Web Development
- Magento FAQ
- Open-Source
- Web Design Blog
- WordPress FAQ
- Photoshop Retouching
- Some common use cases of Sass
- An Introduction to Version Control using Git (2018 Update)
- Choosing The Best Text Editor For Web Development
- An introduction to the htaccess file (2018 Update)
- Using node-sass to compile Sass files in an npm script
- How to get rid of the “You have mail” Unix message
- Designing a simple navigation bar with Bootstrap 4
- Using Surge for deploying static sites (2018 Update)
- WP Engine’s Staging Area has Revolutionized Our WordPress Development Process
- 4 Ways To Keep Your Data More Secure
- Getting Started with Animate.css
- Some common use cases of Sass
- Designing a simple navigation bar with Bootstrap 4
- Using ImageOptim for reducing image file sizes
- Choosing The Best Text Editor For Web Development
- An introduction to the htaccess file:The Ultimate Guide (2018 Update)
- Using A CSS Reset For Better Cross-Browser Compatibility
- How to get rid of the “You have mail” Unix message
- Using chunkwm as a window manager
Author Bio
Crystal is a senior at a public high school in Santa Clarita, CA. She has been invested in technology since her sophomore year, when she took her first Web Development course and used Dreamweaver to design her first websites.
She branched into college-level computer science courses where she became proficient in Java programming. During the summer of 2018, Crystal attended a selective program called Kode with Klossy, where she gained skills in HTML5/CSS, Javascript, and experimented with developing virtual and augmented reality simulations.
Crystal hopes to continue her studies in computing and technology in her post-secondary education.
Установка
Перед установкой на рабочую систему внимательно прочитайте это:
- Роль не установится, если у вас уже есть директория , переименуйте ее, если она у вас есть.
- Роль затрет ваш , сделайте бекап!
- После применения роли, если хотите и дальше управлять терминалом через ansible, нужно писать свои настройки либо в переменные плейбука, либо в , этот файл инклюдится в конце и ansible его не трогает.
Если все устраивает, можно установить роль через :
Потом создать плейбук вроде такого:
Сохранить, например, в . После этого роль можно применить к локальному юзеру:
Как применить к другим юзерам и серверам пользователи ansible думаю разберутся.
Проверено на Debian 6, Ubuntu 14.04, Ubuntu 16.04, macOS 10.12, CentOS 7.
Все доступные переменные не стал выносить в README.md, их можно посмотреть
в defaults/main.yml.
Выводы
Я понимаю, что конфиг терминала — очень личная вещь, не уверен, что будет много желающих воспользоваться именно моей ansible ролью, поэтому я постарался сделать ее максимально настраиваемой. Если будут желающие использовать, пожалуйста, оставляйте issues.
Конечно, это не последний конфиг, например, пока я писал эту статью, я нашел antigen, менеджер плагинов для zsh, который написан по аналогии с Vundle для Vim, заточен на работу в паре с oh-my-zsh и избавляет от ручной установки плагинов. Это как раз одна из проблем, которую я решал написанием роли. Поделитесь, кто пользовался.
UPD 03.04.2017: переписал роль с использованием antigen.
В комментах хотелось бы найти новых вкусных плагинов, пожалуйста, напишите, какие плагины вызвали у вас чувство «как я жил без этого раньше?»
UPD: добавилась поддержка CentOS, спасибо, BeeVee!
OH MY ZSH Theme Settings
The default configuration of .zshrc provided by Oh my zsh is using the ‘robbyrusell’ theme.
In this step, we will edit the configuration and change the default theme.
The Oh-my-zsh framework provides many themes for your zsh shell, we can go to the following link to see more available options:
Another option is to go to the directory of themes of the application by executing the following lines:
cd ~/.oh-my-zsh/themes/
ls -a
To edit the theme we go to the next directory using nano:
nano ~/.zshrc
There we will place the line “ZSH_THEME” and we will specify the desired theme:
ZSH_THEME='risto'
Save the changes using the following key combination Ctrl + O and exit the editor using Ctrl + X.
We can reload the configuration using:
source ~/.zshrc.
So we have the option to install and configure these two tools in Linux to give a new functionality to the system.
autoload -Uz
Помимо традиционного способа подгружать код через или в zsh активно используется автозагрузка кода в момент первого вызова функции.
Для поиска файла с нужной функцией используется — переменная аналогичная по формату , содержащая список каталогов в которых выполняется поиск файла с именем, идентичным имени загружаемой функции.
При вызове никаких файлов с диска не считывается, и даже не проверяется их наличие — всё это произойдёт при первом вызове функции. Практически всегда необходимо передавать аргументы (отменяет эффект текущих alias-ов для загружаемого файла, потому что нередко alias-ы настроенные пользователем могут нарушать работу сторонних функций) и (необязательное уточнение что загружаемый файл — в формате zsh, но безопаснее его всегда задавать).
При этом содержимое файла может быть в одном из этих трёх форматов:
Fish
Fish, or the “Friendly Interactive Shell,” is the most user-friendly and interactive shell, in my opinion.
It is much more customizable than Zsh and Bash. It has a ton of cool features like consistent syntax, nice tab completion and syntax highlighting, is easy to pick up and use, and has excellent runtime help.
You can change the theme and color of your shell just by using a framework called Oh My Fish. Unlike the aforementioned shells, fish is not POSIX compliant, but it also doesn’t intend to be.
You can run Bash scripts in both Zsh and fish by adding the following shebang line to the first line of your Bash file.
Bash vs zsh: Reasons to consider switching between shells
The commands and overall interaction for bash vs zsh are essentially identical. Knowledge and familiarity with one shell can easily be translated into the other without tackling a steep learning curve. However, both shells do have their share of unique features that may prompt developers to declare a clear preference.
For one, has the leverage of a powerful online community called Oh My Zsh. Oh My ZSH is one of the oldest and most popular options for managing configurations. Offering over 250 plugins and 140 different themes supplied by the community, Oh My ZSH is a great place to start in customizing the z shell that even comes with an auto-update function that keeps your shell updated. This allows users to work in a shell with a more personalized interface, amp up their workspace with a diverse array of tools, and have access to a convenient out-of-the-box support system. For instance, a highly favorable option for the interface is a right-handed side prompt or a side prompt that auto-hides when typing in long file paths or commands. Even this minute level of flexibility turns developers’ heads towards .
On the other hand, Bash has an impressive set of programming functions such as looping and conditional constructs, tilde and brace expansions, and the use of aliases. It also has its share of quirks such as powerful invocation tools, being set into a restricted shell mode, having a particular POSIX mode, and more. Because Bash is also an older and established shell, there are boundless online resources for this software as well.
Syntax highlighting
Syntax highlighting is a feature that we all wish our CLI could perform. It saves a lot of time and frustration. Well, fish does it, and it does it pretty well.
It shows you whether your command or the directory to be searched exists before you even hit enter. You’ll know whether you’re typing anything wrong before you hit enter. This makes it easier for people to parse commands, and find errors.
It highlights (most) errors in red, such as misspelled commands, misspelled options, reading from non-existing files, mismatched parenthesis and quotes, and many other common errors.
It also features highlighting of matching quotes and parenthesis. Oh, and it’s pretty, colorful.
A short history of bash and zsh
In 1971, the very first version of the Unix operating system came with the Thompson shell as its default shell. While lacking in scripting capabilities, this first shell established many of the standards for input/output redirection. With the release of Version 7 Unix in 1979, the new OS came distributed with the Bourne shell as its default shell.
Creation of bash
Later in 1989, Brian Fox created the Bash shell for the GNU Project as a viable software alternative for the Bourne shell. Bash introduced significant improvements over its predecessor. Most prominent of these improvements was its capacity as a scripting language.Users of bash could write their own programs for automating tasks.
These “shell” scripts were executable by typing the file name (typically with a .sh extension). For the most part, bash can support the majority of Bourne and C shell’s features in addition to its own unique additions including command-line editing and integer calculations.
Creation of zsh
Shortly after Bash emerged, a student at Princeton University created the Z shell or “zsh.” Hand in hand with this operating shell is a community-based, online platform called Oh My Zsh which features major extensions such as plug-ins and themes for zsh. As of June 2019, macOS Catalina announced that they would be adopting zsh as their default shell in replacement of bash—a major “win” for zsh enthusiasts.
Параметры
- Соглашение: для имён скалярных параметров (строки, целые и дробные числа) обычно используют буквы, а для массивов (обычных и ассоциативных) — .
- Через можно объявить массив с уникальными элементами (попытки добавления уже существующих элементов будут игнорироваться).
- Через можно связать массив со скаляром в формате . Несколько таких связанных параметров уже созданы: и , и , и , и . Для связанных параметров не имеет значения какой из них мы изменяем — изменяются сразу оба. Поэтому в zsh с такими параметрами практически всегда работают через массивы (, , …) — это значительно удобнее.
- Некоторые скалярные параметры так же связаны между собой, например , и (хотя, это скорее просто синонимы для одного параметра).
Массивы
- Индексируются с 1.
- Можно использовать отрицательные индексы (от конца массива).
- Можно использовать срезы.
- При использовании как скаляра — объединяют элементы через пробел.
- Индексирование скаляра возвращает символы строки.
- Глоб возвращает массив, так что индекс можно использовать как квалификатор глоба: .
Step 3: Install & Configure Oh my zsh
With the Z shell installed on the system, the next step is to install the Oh my zsh framework to manage Z shell zsh.
Oh my zsh provides an installer script to install the framework, and we need to install some other necessary packages, including wget to download the installer script and Git to download the Oh my zsh shell from GitHub.
The first step is to install wget and git in the system, we will execute the following commands for it:
In CentOS 7
yum install wget git
On Ubuntu
apt install wget git
Once installed, we proceed to download the installer script and run it using the next line:
wget https://github.com/robbyrussell/oh-my-zsh/raw/master/tools/install.sh -O - | zsh
With this we have installed Oh my zsh in ~ / .oh-my-zsh.
We will copy the template configuration file .zshrc.zsh-template in the .zshrc home directory and apply the configuration by executing the source command, as follows:
cp ~/.oh-my-zsh/templates/zshrc.zsh-template ~/.zshrc
source ~/.zshrc