Что такое ansible и как его использовать
Содержание:
- Структура Ansible
- Чему мы научились
- Examples
- How to copy a file from the local host to a remote host
- How to copy a file from the local host to a remote host with owner, group and file permissions
- How to copy a directory from the local host to a remote host (recursive copy)
- How to copy a directory between locations on the remote host (recursive copy)
- How to write templated text into a file on the remote host with
- How to test that a file is valid before copying to the remote host
- How to backup a file if needs to overwrite it
- How to capture module output
- Configure IIS & the Apache web application
- Setting the permissions for a new file
- Copying files between different folders on the same remote machine
- Настройка WinRM для Ansible
- Какие модули ресурсов появятся в Ansible Engine 2.9?
- Creating an empty file in Ansible
- Что такое Ansible Playbooks?
- Conclusion
- How to use Variables in Ansible Playbook
- Запуск плейбука
- Creating a new file with content
- Что все это значит? Почему это важно?
Структура Ansible
Модули
Это небольшие программы, выполняющие определённую работу на сервере. Например, вместо запуска этой команды:
Мы можем использовать модуль apt и установить htop:
Использование модуля даст вам возможность узнать, установлен он или нет.
Плагины
Это фрагменты кода, которые расширяют основные функциональные возможности Ansible. Ansible поставляется с несколькими удобными плагинами, и вы можете легко написать свой собственный.
Инвентаризация хостов
Чтобы предоставить перечень хостов, нам нужно обозначить список, находящийся в файле инвентаризации. Он напоминает содержание файла hosts.
В простейшем виде он может содержать одну строку:
Playbooks
Ansible playbooks — это способ отправки команд на удалённые компьютеры с помощью скриптов. Вместо того, чтобы индивидуально использовать команды Ansible для удалённой настройки компьютеров из командной строки, вы можете настраивать целые сложные среды, передавая скрипт одной или нескольким системам.
Роли
Это способ сгруппировать несколько задач в один контейнер, чтобы эффективно автоматизировать работу с помощью понятной структуры каталогов.
Обработчики
Представляют собой списки задач, которые на самом деле не отличаются от обычных задач, на которые ссылается глобально уникальное имя и которые оповещаются уведомителями. Если ничто не уведомляет обработчик, он не будет запускаться. Независимо от того, сколько задач уведомляет обработчик, он запускается только один раз, после того как все задачи завершены.
Теги
Если у вас playbook с большим объёмом, может быть полезно иметь возможность запускать только определённую часть его конфигурации.
Чему мы научились
В последние четыре года мы много узнали о разработке платформы для автоматизации сети. Еще мы узнали о том, как применяются артефакты платформы в плейбуках и ролях Ansible со стороны конечных пользователей. И вот что мы выяснили:
- Организации автоматизируют устройства не одного, а многих вендоров.
- Автоматизация — явление не только техническое, но еще и культурное.
- Масштабная автоматизация сетей сложнее, чем кажется, из-за фундаментальных архитектурных принципов проектирования автоматизации.
Когда мы обсуждали наши долгосрочные планы развития больше года назад, наши корпоративные клиенты просили о следующем:
- Сбор фактов нужно лучше стандартизировать и согласовать с рабочим процессом автоматизации для любых устройств.
- Обновление конфигураций на устройстве тоже нужно стандартизировать и согласовать, чтобы модули Ansible обрабатывали вторую половину цикла после сбора фактов.
- Нужны строгие и поддерживаемые методы преобразования конфигурации устройства в структурированные данные. На этой основе источник истины можно будет переместить с сетевого устройства.
Examples
How to copy a file from the local host to a remote host
You can use the (local host) and (remote host) parameters to copy a file to a remote host. Note that the searches the directory relative to the playbook.
How to copy a file from the local host to a remote host with owner, group and file permissions
The , and parameters give you fine control over the ownership and file permissions of the file(s) created by the module. Remember that you will need if you are setting the or to values that don’t match the .
The parameter accepts the file permissions setting in the following ways:
- An octal number: e.g. , ,
- Symbolic mode format: e.g. (where is the owner, is the group, and is others). The permissions are for , for write and for execute.
With octal mode:
With symbolic mode:
Setting a different owner with :
With octal mode:
With symbolic mode:
Setting a different owner with :
How to copy a directory from the local host to a remote host (recursive copy)
The module can be used to copy a directory from the local host to a remote host (called a recursive copy). To do a recursive copy, set the parameter to a directory rather than a file.
There are two different behaviors:
- (without trailing slash): recursively copies the whole from into
- (with trailing slash): copies only the contents of recursively into
Let’s look at the results of recursive given the following file structure on the local host:
Recursive copy with trailing slash
How to copy a directory between locations on the remote host (recursive copy)
This functionality is not currently supported by the module. If you want to recursively copy directories between locations on the remote host, please use the module.
How to write templated text into a file on the remote host with
You can write templated text to a file using the parameter. Although this is fine for simple one-line files, if you want to write multi-line templated text to a file, please use the module.
How to test that a file is valid before copying to the remote host
Use the parameter to check whether a file is valid on the remote host before copying the file into place. This parameter is highly recommended if you have some program that can confirm the whether a target file is valid.
in the string refers to the file to be checked.
How to check the validity of a file before copying
How to check the validity of an configuration file before copying
The command checks the validity of an configuration file:
How to backup a file if needs to overwrite it
By default, the module will overwrite a file if it already exists on the remote host. If you want to backup the file before it is overwritten, use the parameter:
With , will make a backup and append the timestamp before overwriting the file:
How to capture module output
Use the keyword to capture the output of the module.
The task above will output the following:
How to capture module output from a loop
Configure IIS & the Apache web application
Create Ansible playbooks
It can be tedious and time-consuming to use Ansible ad-hoc commands when you need to do a task more complex than just pinging a target host or getting the host’s uptime information. Ansible playbooks are YAML-formatted files that contain a set of configurations and tasks that achieve an end state on an Ansible Windows or Linux target host. The ad-hoc command above could become:
- hostswin-server
 gather_factsno
 tasks:
 - nameChecking connection to {{ inventory_hostname }}
   win_ping:
To run an Ansible playbook, use the ansible-playbook command. The result displays all successful and failed tasks.
Setting the permissions for a new file
From the above examples, you can see the default permission if none are specified. You can specify the permission of the file being created in both cases. Whether using are the copy module or file module you can use the follow parameters to set the permission of the file.
- mode – you can set the mode of the file here. You can give it in 3 ways. In Octal notation like 0777(always put the zero at the beginning) or as a symbolic representation like. ‘
- Owner – Give the name of the owner here.
In the below exmaple, I am creating a new file ‘devops,txt’ with mode as 0777 and owner as mdtutorials2. As you can see in the output, all the permissions are set and the owner is given correctly.
- hosts: all
  tasks:
  - name: Ansible create new file with permissions example.
    file:
      path: "/Users/mdtutorials2/Documents/Ansible/devops.txt"
      state: touch
      mode: 0777
      owner: mdtutorials2
output
——-
-rwxrwxrwx 1 mdtutorials2 staff 0 Feb 6 08:55 devops.txt
Copying files between different folders on the same remote machine
You can also copy files between the various locations on the remote servers. You have to set the remote_src parameter to yes.
The following example copies the hello6 file in the /tmp directory of the remote server and pastes it in the /etc/ directory.
- hosts: blocks
  tasks:
  - name: Ansible copy files remote to remote
    copy:
      src: /tmp/hello6
      dest: /etc
      remote_src: yes
Note 1: As of Ansible 2.2.1.0, copying directories in the remote servers are not supported. If you try, you will get the following error.
fatal: : FAILED! => {"changed": false, "failed": true, "msg": "Remote copy does not support recursive copy of directory: /tmp/copy_dir_ex"}
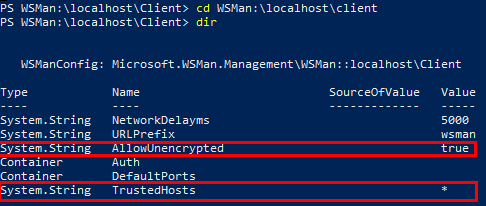
Настройка WinRM для Ansible
Соединение с WinRM может оказаться непростым делом, особенно, если вы не находитесь в одном домене с ним. Существует несколько удобных команд WinRM, которые могут помочь установить соединение с WinRM с сервера Ansible, или с любого другого сервера.
Просмотр текущей конфигурации WinRM. Находясь в PowerShell, выполните следующие команды:
В результате будут выведена текущая конфигурация WinRM, доверенные хосты, настройки шифрования и т.п. Для моего лабораторного сервера Ansible я устанавливаю параметр AllowUnencrypted (работать без шифрования) в значение true, а в качестве значения TrustedHosts (доверенные хосты) ставлю *, что позволяет работать с любыми хостами.
Чтобы разрешить нешифрованный трафик, выполните команду:
Чтобы добавить новый TrustedHost (доверенный хост) в конфигурацию, выполните команду:
Также вы можете указать конкретный хост, если вам это нужно.
Какие модули ресурсов появятся в Ansible Engine 2.9?
Прежде чем подробно рассказать, что будет в Ansible 2.9, давайте вспомним, как мы разделили весь объем работ.
Мы выделили 7 категорий и каждой назначили определенные сетевые ресурсы:
Примечание: ресурсы, выделенные жирным, были запланированы и реализованы в Ansible 2.9.
На основе отзывов от корпоративных клиентов и сообщества логично было сначала заняться теми модулями, которые связаны с протоколами топологии сети, виртуализацией и интерфейсами.
Следующие модули ресурсов разработаны командой Ansible Network и соответствуют платформам, которые поддерживает Red Hat:
Следующие модули разработаны сообществом Ansible:
- — от Extreme Networks.
- — от Cisco
- — от Cisco
Как видите, концепция модулей ресурсов вписывается в нашу стратегию ориентации на платформы. То есть мы включаем необходимые возможности и функции в сам Ansible, чтобы поддержать стандартизацию при разработке сетевых модулей, а еще упростить работу пользователей на уровне ролей и плейбуков Ansible. Чтобы расширить разработку модулей ресурсов, команда Ansible выпустила инструмент Module Builder.
Creating an empty file in Ansible
You can Create an empty file using the file module. You just need to set two parmaters.
- Path – This is the location where you want the file to be created. It can be either a relative path or an absolute path. You should also include the name of the file being created here.
- State – To create a new file this parameter should be set to ‘touch’. It works like the touch operation in Linux.
In the following task, I am creating a new file called ‘devops_server’ in the location set against the ‘path’ parameter. I am giving the absolute path. Please see the default permissions and owner in the output.
- hosts: all
  tasks:
  - name: Ansible create file if it doesn't exist example
    file:
      path: "/Users/mdtutorials2/Documents/Ansible/devops_server.txt"
      state: touch

output
------
-rw-r--r--  1 root       staff       0 Feb  5 12:00 devops_server.txt
Что такое Ansible Playbooks?
Playbook в Ansible определяет серию некоторых действий для выполнения и адресованы определенным наборам серверов. В отличие от некоторых других инструментов для выполнения настроек, Playbook не описывает состояние машины, а Ansible самостоятельно определяет все изменения, которые необходимо внести. Тем не менее, плейбуки должны быть разработаны как идемпотенты, а это значит, что они могут запускаться более одного раза без негативных последствий.
Часто плейбуки используют для выполнения начальной настройки серверов — добавления пользователей и каталогов, управлением пакетами программного обеспечения и файлами.
Playbook — это YAML-файл, который обычно имеет следующую структуру:
---
- hosts:
  remote_user:
  tasks:
    -
    -
Например, следующий playbook будет входить на все серверы группы marketingservers и обеспечивать запуск веб-сервера Apache:
---
- hosts:
  remote_user: webadmin
  tasks:
    - name: Ensure the Apache daemon has started
      service: name=httpd state=started
      become: yes
      become_method: sudo
В плейбуке выше приведен пример задания (task):
tasks:
  - name: Ensure the Apache daemon has started
    service: name=httpd state=started
    become: yes
    become_method: sudo
Каждое задание должно иметь имя, которое впоследствии регистрируется и может помочь отслеживать прогресс. После строки имени (name) находится модуль, который будет запущен, в данном случае это служебный модуль. Другие атрибуты разрешают больше опций, в примере Ansible разрешается использовать привилегии sudo.
Conclusion
I hope this article gave you some solid base on what is Ansible playbook and I know you might still have questions. the best way to learn is to explore and practice. So keep writing many playbooks and you can share it with us in the comments or send them to me.
If you want your Playbook to be shared with the world consider uploading it to Ansible Galaxy
Keep Learning.
Rate this article
Cheers,
Sarav AK
Follow us on or
For more practical videos and tutorials. Subscribe to our channel
Find me on Linkedin My Profile
For any Consultation or to hire us hello@gritfy.com
If you like this article. Show your Support! Buy me a Coffee.

How to use Variables in Ansible Playbook
Ansible playbook supports defining the variable in two forms, Either as a separate file with full of variables and values like a properties file. or a Single liner variable declaration like we do in any common programming languages
to define inline variables within the playbook
to import files with variables
Let’s suppose we want to add a few variables for our webserver like the server name and SSL key file and cert file etc.
it can be done with like this
---
  - name: Playbook
    hosts: webservers
    become: yes
    become_user: root
    vars:
       key_file:  /etc/apache2/ssl/mywebsite.key
       cert_file: /etc/apache2/ssl/mywebsite.cert
       server_name: www.mywebsite.com
    tasks:
      - name: ensure apache is at the latest version
        yum:
          name: httpd
          state: latest


      - name: ensure apache is running
        service:
          name: httpd
          state: started
and the variables can be referred with the jinja2 template later
If you want to keep the variables in a separate file and import it with
You have to first save the variables and values in the same format you have written in the playbook and the file can later be imported using vars_files like this
---
  - name: Playbook
    hosts: webservers
    become: yes
    become_user: root
    vars_files:
        - apacheconf.yml
    tasks:
      - name: ensure apache is at the latest version
        yum:
          name: httpd
          state: latest


      - name: ensure apache is running
        service:
          name: httpd
          state: started
the content of the would like like this
key_file: /etc/apache2/ssl/mywebsite.key
cert_file: /etc/apache2/ssl/mywebsite.cert
server_name: www.mywebsite.com
to keep things cleaner and to keep your playbook simple, It is recommended to use separate variable files and when you are creating ansible roles, you would have to use the variable files more than defining it inline.
Запуск плейбука
Запускаем наш плейбук:
ansible-playbook /etc/ansible/play.yml -kK
После ввода данной команды система запросит первый пароль для учетной записи, от которой мы подключаемся к удаленным серверам (в нашем примере мы задали ее в самом плейбуке, опции remote_user):
SSH password:
После ввода пароля, будет запрошен второй пароль — для повышения привилегий на самой удаленной системе:
BECOME password:
… в итоге мы должны увидеть следующую картину:
192.168.0.11 : ok=2 changed=1 unreachable=0 failed=0 skipped=1 rescued=0 ignored=0
192.168.0.12 : ok=2 changed=1 unreachable=0 failed=0 skipped=1 rescued=0 ignored=0
Creating a new file with content
One way is to create an empty file using the above method and then using the blockinfile or lineinfile module to add content to it.
But an easier method is to use the Ansible copy module to create a new file with content inside.
The copy module is commonly used to copy a source file to a destination file. But there is a parameter ‘content’ which can be used to create a file with the content.
Note: If the file already exists then the module would check for the contents of that file. And if the contents are same then nothing happens. But if the content is different then the file will be overwritten. So do not use this on an existing file unless necessary.
The following task will create a new file ‘remote_server.txt’ if the file is not present.
- hosts: all
  tasks:
  - name: Ansible create file with content example
    copy:
      dest: "/Users/mdtutorials2/Documents/Ansible/remote_server.txt"
      content: |
        dog1
        tiger

output
------
-rw-r--r--  1 root       wheel      11 Feb  6 08:37 remote_server.txt

bash-3.2# cat remote_server.txt
dog1
tiger
Что все это значит? Почему это важно?
В этом посте описывается много сложных концепций, но мы надеемся, что в конце концов вы лучше поймете, что корпоративные клиенты просят о сборе фактов, нормализации данных и конфигурации цикла для платформы автоматизации. Но почему им нужны эти улучшения? Сейчас многие организации занимаются цифровой трансформацией, чтобы сделать свои ИТ-среды более гибкими и конкурентоспособными. Хорошо это или плохо, но многие сетевые инженеры становятся сетевыми разработчиками — из собственного интереса или по велению руководителей.
Организации понимают, что автоматизация отдельных сетевых шаблонов не решает проблему разрозненности и повышает эффективность только до определенного предела. Платформа Red Hat Ansible Automation Platform предоставляет строгие и нормирующие модели данных ресурсов, чтобы программно управлять базовыми данными на сетевом устройстве. То есть пользователи постепенно отказываются от индивидуальных способов конфигурации в пользу более современных методов с акцентом на технологиях (например, IP-адреса, VLAN, LLDP и т д.), а не на конкретной реализации вендора.
Значит ли это, что дни надежных и проверенных модулей команд и конфигурации сочтены? Ни в коем случае. Ожидаемые модули сетевых ресурсов будут применимы не во всех случаях и не для каждого вендора, так что модули команд и конфигурации еще понадобятся сетевым инженерам для определенных реализаций. Цель модулей ресурсов — упростить большие шаблоны Jinja и нормализовать неструктурированные конфигурации устройства в структурированный формат JSON. С модулями ресурсов существующим сетям будет проще преобразовывать свою конфигурацию в структурированные пары ключ-значение, которые будут представлять собой удобный для чтения источник истины. Если использовать структурированные пары ключ-значение, можно перейти от запуска конфигураций на каждом устройстве к работе с независимыми структурированными данными и вывести сети на первый план при подходе «инфраструктура как код».