Настраиваем wireguard на роутере mikrotik под управлением openwrt
Содержание:
- Конфигурация OpenVPN
- Sections
- Особенность 2
- Extracting default values
- Creating new CFE image
- Утилита Командной Строки (UCI)
- Проверка туннеля
- Discovery (How to find out)
- Detailed boot sequence
- Отключение/включение SSH
- Почему именно SSH и OpenSSH
- Szekciók
- Linux Terminal Emulators
- OPTIONS
- Security fixes
- Több Dropbear példány futtatása
Конфигурация OpenVPN
OpenVPN может быть настроен как с помощью интерфейса UCI(характерного для OpenWrt), так и с помощью традиционных конфигурационных файлов OpenVPN (*.conf). OpenVPN будет автоматически подгружать все *.conf файлы из /etc/openvpn/.
Пользователи, знакомые с OpenVPN, вероятно, предпочитают использовать файлы конфигурации, и этот выбор, вероятно, будет более простым и удобным для тех кто планирует запускать несколько экземпляров OpenVPN.
Для простоты и последовательности, остальная часть этого руководства будет использовать интерфейс OpenWRT UCI для настройки OpenVPN, как описано ниже. Следует отметить, что раздел содержит инструкции для UCI интерфейса (Пользователям, использующим традиционные файлы конфигурации, придется подкорректировать эти команды под свою систему).
Традиционный (TUN) Сервер
echo > etcconfigopenvpn # очистите UCI конфигурацию для OpenVPN
uci set openvpn.myvpn=openvpn
uci set openvpn.myvpn.enabled=1
uci set openvpn.myvpn.verb=3
uci set openvpn.myvpn.port=1194
uci set openvpn.myvpn.proto=udp
uci set openvpn.myvpn.dev=tun
uci set openvpn.myvpn.server='10.8.0.0 255.255.255.0'
uci set openvpn.myvpn.keepalive='10 120'
uci set openvpn.myvpn.ca=etcopenvpnca.crt
uci set openvpn.myvpn.cert=etcopenvpnmy-server.crt
uci set openvpn.myvpn.key=etcopenvpnmy-server.key
uci set openvpn.myvpn.dh=etcopenvpndh2048.pem
uci commit openvpn
Сервер в режиме моста (TAP)
echo > etcconfigopenvpn # очистите UCI конфигурацию для OpenVPN
uci set openvpn.myvpn=openvpn
uci set openvpn.myvpn.enabled=1
uci set openvpn.myvpn.verb=3
uci set openvpn.myvpn.proto=udp
uci set openvpn.myvpn.port=1194
uci set openvpn.myvpn.dev=tap
uci set openvpn.myvpn.mode=server
uci set openvpn.myvpn.tls_server=1
uci add_list openvpn.myvpn.push='route-gateway dhcp'
uci set openvpn.myvpn.keepalive='10 120'
uci set openvpn.myvpn.ca=etcopenvpnca.crt
uci set openvpn.myvpn.cert=etcopenvpnmy-server.crt
uci set openvpn.myvpn.key=etcopenvpnmy-server.key
uci set openvpn.myvpn.dh=etcopenvpndh2048.pem
uci commit openvpn
Клиент
Конфигурация клиента очень сильно зависит от настроек сервера. Вам необходимо откорректировать их в соответствии с данными сервера, к которому вы подключаетесь.
echo > etcconfigopenvpn # очистите UCI конфигурацию для OpenVPN
uci set openvpn.myvpn=openvpn
uci set openvpn.myvpn.enabled=1
uci set openvpn.myvpn.dev=tun
uci set openvpn.myvpn.proto=udp
uci set openvpn.myvpn.verb=3
uci set openvpn.myvpn.ca=etcopenvpnca.crt
uci set openvpn.myvpn.cert=etcopenvpnmy-client.crt
uci set openvpn.myvpn.key=etcopenvpnmy-client.key
uci set openvpn.myvpn.client=1
uci set openvpn.myvpn.remote_cert_tls=server
uci set openvpn.myvpn.remote="SERVER_IP_ADDRESS 1194"
uci commit openvpn
Если ваш сервер требует проверки подлинности пароля:
uci set openvpn.myvpn.auth_user_pass=pathtopassword.txt
Файл password.txt должен содержать в себе логин на первой строке и пароль на второй. Этот файл следует хранить в безопасном месте.
Вы можете также использовать опцию route.nopull. Это отключит автоматическую маршрутизацию. Имейте ввиду, что вам придётся самостоятельно прописывать все маршруты, к тому же сервер по-прежнему будет сам определять свойства TCP/IP для вашего TUN/TAP устройства:
uci set openvpn.myvpn.route_nopull=1
На этом вы закончили базовую настройку. Запустите OpenVPN:
etcinit.dopenvpn enable
etcinit.dopenvpn start
Sections
The configuration contains settings for the dropbear SSH server in a single section.
Dropbear
The section contains these settings. Names are case-sensitive.
| Name | Type | Required | Default | Description |
|---|---|---|---|---|
| boolean | no | 1 | Set to to disable starting dropbear at system boot. | |
| boolean | no | Set to to enable verbose output by the start script. | ||
| string | no | (none) | Name of a file to be printed before the user has authenticated successfully. | |
| boolean | no | 1 | Set to to disable authenticating with passwords. | |
| integer | no | 22 | Port number to listen on. | |
| boolean | no | 1 | Set to to disable authenticating as root with passwords. | |
| boolean | no | 1 | Set to to disable SSH logins as root. | |
| boolean | no | Set to to allow remote hosts to connect to forwarded ports. | ||
| string | no | (none) | Tells dropbear to listen only on the specified interface. (e.g. , , ) | |
| file | no | (none) | Path to RSA file | |
| file | no | (none) | Path to DSS/DSA file | |
| integer | no | 300 | Keep Alive | |
| integer | no | Idle Timeout | ||
| integer | no | 1 | Whether to annouce the service via mDNS | |
| integer | no | 3 | Amount of times you can retry writing the password when logging in before the SSH server closes the connection from this commit |
Default configuration
This is the default configuration:
# uci show dropbear
dropbear.@dropbear=dropbear
dropbear.@dropbear.RootPasswordAuth='on'
dropbear.@dropbear.PasswordAuth='on'
dropbear.@dropbear.Port='22'
Multiple dropbear instances
Add a second instance of dropbear listening on port 2022.
uci add dropbear dropbear
uci set dropbear.@dropbear-1.RootPasswordAuth='on'
uci set dropbear.@dropbear-1.PasswordAuth='off'
uci set dropbear.@dropbear-1.Port='2022'
uci commit dropbear
service dropbear restart
Use interface binding fix if you experience DoS due to a startup timing issue.
cat << "EOF" > etchotplug.diface40-dropbear
if  "$INTERFACE" = "wan"  &&  "$ACTION" = "ifup" -o "$ACTION" = "ifupdate"
then
        etcinit.ddropbear restart
fi
EOF
Security considerations
Security considerations are beyond the scope of this document, but:
- Avoid connecting using passwords; use public key authentication instead.
- If you allow SSH access on the WAN, be sure to use strong passwords, or disable password authentication and use public key authentication.
Disable password authentication:
uci set dropbear.@dropbear.PasswordAuth="off"
uci commit dropbear
service dropbear restart
Set up public key authentication.
SFTP functionality
While the package provides SCP functionality, it does not contain anything for SFTP. Please install if you want to use SFTP.
Особенность 2
Работа протокола PPTP осуществляется с использованием протокола GRE, с которым у некоторых интернет провайдеров России имеются технические сложности. Эти сложности не позволят вам использовать PPTP для построения VPN туннлей. К таким провайдерам относятся МГТС (Московская городская телефонная сеть), Yota, Мегафон. Однако, такая ситуация не во всех частях их сетей.
Для пользователя ситуация будет выглядеть так, что проверка имени пользователя и пароля проходить не будут. Точнее до этого момента даже не дойдет…В пункте меню «События безопасности» вы будете видеть начало успешного подключения и последней будет являться фраза, говорящая о том, что мы готовы проверять имя и пароль, но …
Access granted. No whitelist is set for user. Ready to check username / password.
Отсуствие соединения и дальнейших записей в логе (при том, что вы твердо уверены в том, что логин и пароль верные), скорее всего, говорит о том, что GRE у вашего провайдера не пропускается. Можете погуглить на этот счет.
Extracting default values
Telnet/ssh to your router running your favorite firmware and type the following
dd if=/dev/mtdblock/0 bs=1 skip=4116 count=2048 | strings > /tmp/cfe.txt
dd if=/dev/mtdblock/0 of=/tmp/cfe.bin
Copy both cfe.bin and cfe.txt to your linux box (this is required).
To copy files from your router to your computer, make sure the Dropbear package is installed, and type:
scp root@:/tmp/cfe.bin /directory/on/your/computer
scp root@:/tmp/cfe.txt /directory/on/your/computer
Check cfe.txt, it should look like this (this is from v.2.2):
boardtype=0x0708
boardnum=42
boardrev=0x10
boardflags=0x0118
boardflags2=0
sromrev=2
clkfreq=200
sdram_init=0x000b
sdram_config=0x0062
sdram_refresh=0x0000
sdram_ncdl=0x0
et0macaddr=00:90:4C:00:00:00
et0phyaddr=30
et0mdcport=0
gpio5=robo_reset
vlan0ports=1 2 3 4 5*
vlan0hwname=et0
vlan1ports=0 5
vlan1hwname=et0
wl0id=0x4320
il0macaddr=00:90:4C:00:00:00
aa0=3
ag0=255
pa0maxpwr=0x4e
pa0itssit=62
pa0b0=0x15eb
pa0b1=0xfa82
pa0b2=0xfe66
wl0gpio2=0
wl0gpio3=0
cctl=0
ccode=0
dl_ram_addr=a0001000
os_ram_addr=80001000
os_flash_addr=bfc40000
lan_ipaddr=192.168.1.1
lan_netmask=255.255.255.0
scratch=a0180000
boot_wait=off
watchdog=5000
bootnv_ver=2
Creating new CFE image
You will need a nvserial utility which comes with several GPL tarballs. Linksys supplies it in the wrt54g.1.42.3, wrt54g.1.42.2, wap55ag.1.07, wap54gv2.2.06. Launch nvserial in the way like this on your x86 linux box: You can get nvserial from http://downloads.openwrt.org/people/inh/programs/nvserial
nvserial -i cfe.bin -o cfe_new.bin -b 4096 -c 2048 cfe.txt
It works really slow, but it should finally create cfe_new.bin file for you, which has new embedded nvram.
Recompiling kernel with writable pmon partition
By default most firmwares has pmon partition write protected, i.e. you can’t flash anything to this first 256k of flash. This is to prevent corrupting PMON/CFE. To remove this “lock” you will need to compile your own firmare with the following patch, you will need to copy the patch into “target/linux/linux-2.4/patches/brcm”. (This patch works with WHITERUSSIAN RC3)
--- linux-2.4.30/arch/mips/bcm947xx/setup.c.orig        2005-09-21 11:24:09.000000000 -0400
+++ linux-2.4.30/arch/mips/bcm947xx/setup.c     2005-09-21 13:48:46.853425632 -0400
@@ -174,7 +174,7 @@
 #ifdef CONFIG_MTD_PARTITIONS

 static struct mtd_partition bcm947xx_parts[] = {
-       { name: "pmon", offset: 0, size: 0, mask_flags: MTD_WRITEABLE, },
+       { name: "pmon", offset: 0, size: 0 /*, mask_flags: MTD_WRITEABLE,*/ },
        { name: "linux", offset: 0, size: 0, },
        { name: "rootfs", offset: 0, size: 0, },
        { name: "nvram", offset: 0, size: 0, },
Note: At least on White Russian recompiling the kernel is not necessary. Theres a kernel module thats makes the CFE Partition writable at http://myantihero.net/pub/openwrt/
Утилита Командной Строки (UCI)
Использование awk и grep для парсинга конфигурационных файлов OpenWrt является избыточным, неумным и неэффективным. Вместо этого используйте утилиту uci для получения того что Вам нужно.
Ниже приведено описание, а также некоторые полезные примеры использования этой мощной утилиты. Запомните, друзья не позволяют друзьям парсить собственные конфигурационные файлы!
Когда есть несколько правил, следующих одно за другим, uci использует для них ссылки похожие на адресацию в массивах.
Если есть 8-мь серверов NTP, uci позволит Вам ссылаться на их секции как timeserver.@timeserver для первого сервера или timeserver.@timeserver для последнего. Вы также можете использовать отрицательные индексы, как например timeserver.@timeserver. ”-1“ означает “последний”, ”-2“ предпоследний, и т.д. Это оказывается очень удобно, когда добавляются новые правила к концу списка. См. пример ниже.
Использование
Usage: uci  <command>

Commands:
	batch
	export
	import
	changes
	commit
	add        <config> <section-type>
	add_list   <config>.<section>.<option>=<string>
	show       ]]
	get        <config>.<section>
	set        <config>.<section>=<value>
	delete     <config>]
	rename     <config>.<section>=<name>
	revert     <config>]

Options:
	-c <path>  установка пути поиска конфигурационных файлов (по умолчанию: /etc/config)
	-d <str>   установка разделителя для значений списка в uci show
	-f <file>  использовать для ввода информации содержимое файла <file> вместо стандартного потока stdin
	-m         при импорте, объединение данных в уже существующий пакет
	-n         имя не именованной секции при экспорте (по умолчанию)
	-N         не присваивать имени не именованным секциям
	-p <path>  добавить путь поиска файлов измененной конфигурации
	-P <path>  добавить путь поиска файлов измененной конфигурации и использовать его по умолчанию
	-q         тихий режим (не печатаются сообщения об ошибках)
	-s         строгий режим (останавливаться на ошибках парсинга, используется по умолчанию)
	-S         отключить строгий режим
	-X         не использовать расширенный синтаксис для 'show'
| Цель | Описание | |
|---|---|---|
| Сохраняет изменения данного конфигурационного файла, либо, если он не указан, всех конфигурационных файлов в файловую систему. Все команды “uci set”, “uci add”, “uci rename” и “uci delete” сохраняют результаты во временное хранилище и сохраняются сразу скопом во флэш-память с помощью “uci commit”. Это не нужно делать после редактирования конфигурационного файла в текстовом редакторе, но необходимо для скриптов, GUI и других программ работающих непосредственно с UCI файлами. | ||
| — | Запускает многострочный UCI скрипт, который обычно выполнен в форме here-документа). | |
| Экспорт конфигурации в машино-читаемый формат. Используется внутренне для преобразования конфигурационных файлов в shell-скрипты. | ||
| Импорт конфигурационных файлов в синтаксисе UCI. | ||
| Список зарезервированных (пер. но еще не сохраненных) изменений данного конфигурационного файла или, если файл не указан, всех конфигурационных файлов. | ||
| Добавить анонимную секцию типа в данную конфигурацию. | ||
| Добавить данную строку в существующий список опций. | ||
| Отобразить данную опцию, секцию или конфигурацию в компактном виде. | ||
| Получить значение данной опции или тип данной секции. | ||
| Установить значение данной опции, или добавить новую секцию с типом равным указанному значению. | ||
| Удалить данную секцию или опцию. | ||
| Переименовать данную секцию или опцию. | ||
| Отменить изменения данной опции, секции или конфигурационного файла. |
Нет необходимости рестарта всей системы
После изменения порта, который слушает сервер uhttpd, с 80 на 8080 в файле /etc/config/uhttpd, сохраним изменения. Затем выполним
И затем
Все сделано. Перезагрузка не требуется.
Рассмотрим следующий пример конфигурационного файла:
В соответствующих группах адресация эквивалентна:
Добавление правила межсетевого экрана
Это хороший пример, демонстрирующий добавление правила для перенаправления TCP SSH порта и синтаксис отрицательной адресации (-1), используемый в uci (пер. — в данном случае, используется ссылка на последнее добавленное правило).
Получение IP адреса WAN интерфейса
-
Backfire
uci -P/var/state get network.wan.ipaddr
-
Trunk (not really uci)
. /lib/functions/network.sh; network_get_ipaddr ip wan; echo $ip
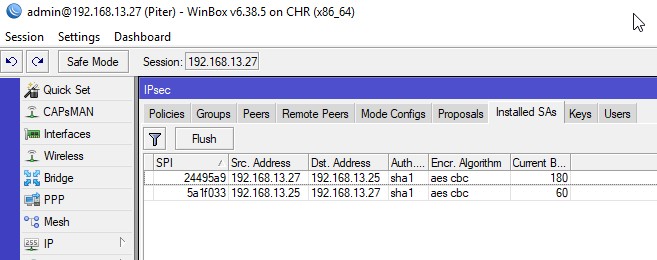
Проверка туннеля
Поздравляем! Теперь ваш OpenVPN сервер или клиент должен быть в рабочем состоянии. Однако возможно, что сервер до сих пор не может отправлять трафик клиентам, так как всё ещё не настроена маршрутизация. Перед настройкой маршрутизации вы должны убедиться, что клиенты могут связаться с сервером.
Проверьте соединение в соответствии с инструкциями вашей ОС.
На OpenWrt это можно сделать с помощью команды traceroute.
Традиционный (TUN) Сервер
Проверьте соединение, введя команду:
traceroute 10.8.0.1
Тем не менее соединение с интернетом не будет идти через OpenWrt сервер без соответствующих маршрутов
traceroute 8.8.8.8 #Google-DNS сервер
После проверки работоспособности соединения вам нужно настроить встраивание маршрутов клиентам.
Server-Bridge (TAP) Server
Трафик внутри локальной подсети (192.168.7.XXX) будет маршрутизироваться через VPN без какой-либо дальнейшей настройки. Остальной трафик будет маршрутизироваться на шлюз по умолчанию. Для пинга клиента используйте:
traceroute 192.168.7.100 #Пример IP. Укажите IP вашей подсети.
Если вам требуется только доступ к интрасети и не требуется направлять обычный интернет-трафик (WAN) через VPN, ваша конфигурация завершена!
Client
Unless the OpenVPN option route-nopull was specified by the client, routes pushed by the server should be in place. If route-nopull was used, only the server will be accessible. Using traceroute on any address with a route pushed by the server should result in that traffic being sent through the VPN, while other addresses should be sent through the default gateway.
The OpenVPN gateway can generally be found on *nix systems using:
ifconfig tun0
And you can then test it using:
traceroute 10.8.0.1 #Arbitrary example IP
If you are not using route-nopull, then your configuration should now be complete!
Discovery (How to find out)
cat /proc/mtd
dev:    size   erasesize  name
mtd0: 00020000 00010000 "u-boot"
mtd1: 00140000 00010000 "kernel"
mtd2: 00690000 00010000 "rootfs"
mtd3: 00530000 00010000 "rootfs_data"
mtd4: 00010000 00010000 "art"
mtd5: 007d0000 00010000 "firmware"
The erasesize is the block size of the flash, in this case 64KiB. The size is little or big endian hex value in Bytes. In case of little endian, you switch to hex-mode and enter 02 0000 into the calculator for example and convert to decimal (by switching back to decimal mode again). Then guess how they are nested into each other. Or execute after a fresh boot and look for something like:
Creating 5 MTD partitions on "spi0.0":
0x000000000000-0x000000020000 : "u-boot"
0x000000020000-0x000000160000 : "kernel"
0x000000160000-0x0000007f0000 : "rootfs"
mtd: partition "rootfs" set to be root filesystem
mtd: partition "rootfs_data" created automatically, ofs=2C0000, len=530000
0x0000002c0000-0x0000007f0000 : "rootfs_data"
0x0000007f0000-0x000000800000 : "art"
0x000000020000-0x0000007f0000 : "firmware"
These are the start and end offsets of the partitions as hex values in Bytes. Now you don’t have to guess which is nested in which. E.g. 02 0000 = 131.072 Bytes = 128KiB.
Detailed boot sequence
Boot loader
After the bootloader (grub, in this example) initializes and parses any options that are presented at the boot menu, the bootloader loads the kernel.
Example from the openwrt-x86-ext2-image.kernel file entry for normal boot:
“kernel /boot/vmlinuz root=/dev/hda2 init=/etc/preinit ”
This entry in the boot/grub/menu.lst file tells grub that the kernel is located under the /boot directory and the filename is vmlinuz. The rest of the lines are the options that are passed to the kernel. To see how the kernel was started, you can view the options by reading the /proc/cmdline file. You can see what options were passed from grub by logging into the device and typing “cat /proc/cmdline”.
For my test system, the options that were passed to the kernel at load time was:
“root=/dev/hda2 rootfstype=ext2 init=/etc/preinit noinitrd console=ttyS0,38400,n,8,1 reboot=bios”
The options are:
- root: root device/partition where the rest of the OpenWrt system is located
- rootfstype: Format for the root partition — ext2 in this example
- init: The first program to call after the kernel is loaded and initialized
- noinitrd: All drivers for access to the rest of the system are built into the kernel, so no need to load an initial ramdisk with extra drivers
- console: Which device to accept console login commands from — talk to ttyS0 (first serial port) at 38400 speed using no flow control, eight data bits and one stop bit. See the kernel documentation for other options
- reboot: Not sure, but I believe that this option tells the kernel how to perform a reboot
The first program called after the kernel loads is located at the kernel options entry of the boot loader. For grub, the entry is located in the openwrt–.image.kernel.image file in the /boot/grub/menu.lst file.
In this example, the entry “init=/etc/preinit” tells the kernel that the first program to run after initializing is “preinit” found in the “/etc” directory located on the disk “/dev/hda” and partition “hda2”.
/etc/preinit script
The preinit script’s primary purpose is initial checks and setups for the rest of the startup scripts. One primary job is to mount the /proc and /sys pseudo filesystems so access to status information and some control functions are made available. Another primary function is to prepare the /dev directory for access to things like console, tty, and media access devices. The final job of preinit is to start the init daemon process itself.
Busybox init
Init is considered the “Mother Of All Processes” since it controls things like starting daemons, changing runlevels, setting up the console/pseudo-consoles/tty access daemons, as well as some other housekeeping chores.
Once init is started, it reads the /etc/inittab configuration file to tell it what process to start, monitor for certain activities, and when an activity is triggered to call the relevant program.
The init program used by busybox is a minimalistic daemon. It does not have the knowledge of runlevels and such, so the config file is somewhat abbreviated from the normal init config file. If you are running a full linux desktop, you can “man inittab” and read about the normal init process and entries. Fields are separated by a colon and are defined as:
: : :
For busybox init, the only fields needed are the “ID” (1st), “Action” (3rd) and “Process” (4th) entries. Busybox init has several caveats from a normal init: the ID field is used for controlling TTY/Console, and there are no defined runlevels. A minimalistic /etc/inittab would look like:
- ::sysinit:/etc/init.d/rcS S boot
- ::shutdown:/etc/init.d/rcS K stop
- tts/0::askfirst:/bin/ash –login
- ttyS0::askfirst:/bin/ash –login
- tty1::askfirst:/bin/ash –login
Lines 1 and 2 with a blank ID field indicate they are not specific to any terminal or console. The other lines are directed to specific terminals/consoles.
Notice that both the “sysinit” and “shutdown” actions are calling the same program (the “/etc/init.d/rcS” script). The only difference is the options that are passed to the rcS script. This will become clearer later on.
At this point, init has parsed the configuration file and is looking for what to do next. So, now we get to the “sysinit” entry: call /etc/init.d/rcS with the options “S” and “boot”
Отключение/включение SSH
Отключение SSH-доступа
Отключение SSH-доступа может быть выполнено в работающем STB отдельно для каждой STB (после этого необходимо перегрузить STB) или выполняется для всей версии ПО, в процессе создания образа.
Для отключения SSH-доступа необходимо произвести следующие изменения:
-
MAG2xx — удалить скрипты etc/rcS.d/S30ssh и /usr/sbin/sshd
- MAG3хх — закомментировать строку dropbear в скрипте /etc/rc.d/rcS.d/S60netsrv
- MAG4хх — закомментировать строку TARGET_BIN=/sbin/dropbea в скрипте /etc/init.d/S81dropbear
Пример. MAG322. Отключение SSH. Содержимое файла /etc/rc.d/rcS.d/S60netsrv
#!/bin/sh. /etc/rc.d/init.d/splash-utils.sh
${SPLASH} prg 40 ${SPLASH} clear_log ${SPLASH} log «Starting network services…»
#portmap & #telnetd
if [ -e /sbin/dropbear ]; then if [ ! -e /etc/dropbear/dropbear_rsa_host_key ]; then mkdir -p /etc/dropbear dropbearkey -t rsa -f /etc/dropbear/dropbear_rsa_host_key dropbearkey -t dss -f /etc/dropbear/dropbear_dss_host_key
fi # dropbear fi
Пример. MAG420. Отключение SSH. Содержимое файла /etc/init.d/S81dropbear.
#!/bin/sh
TARGET_DESC=»Dropbear (SSH daemon)»# TARGET_BIN=/sbin/
source /etc/utils/shell-utils.sh
echo » Starting…»
/sbin/ifup eth0
# wait for /dev/urandom before we start dropbearwhile ; do if [ -c /dev/urandom ]; then #echo » urandom is ready» break; else #echo » urandom NOT found. waiting…» sleep 0.2 fidone
if [ -e /sbin/dropbear ]; then if [ ! -e /etc/dropbear/dropbear_rsa_host_key ]; then echo » HOST KEY not found. Creating host key» mkdir -p /etc/dropbear dropbearkey -t rsa -f /etc/dropbear/dropbear_rsa_host_key dropbearkey -t dss -f /etc/dropbear/dropbear_dss_host_key fi
$TARGET_BIN #-E 2>> /ram/db.txt
#echo «$?» >> /ram/db.txt
if ; then echo » Started OK» else echo » FAILED to start!» fifi
${SPLASH} prg 50${SPLASH} clear_log${SPLASH} log «Init SSH server…»
Включение SSH-доступа
Для восстановления SSH-доступа на STB необходимо обновить STB на версию ПО с включенным SSH-доступом.
На этой странице:
Связанные статьи:
- Операторские утилиты и инструкции для сборки образа ПО
- Обновление ПО STB
Почему именно SSH и OpenSSH
В целом, вы не обязаны использовать конкретно протокол SSH. Есть и другие типы протоколов. Например, ранее был популярен Telnet и похожий на него протокол RCP. Но в последнее время взламывать сервера через такие протоколы стало слишком просто для хакеров и это превратилось в серьезную проблему для пользователей. Нужно было срочно найти альтернативу. И ею стала вторая версия протокола SSH – это защищенное соединение, по которому все данные проходят тщательную шифровку, прежде чем дойти от клиента к серверу. Таким образом, злоумышленники не сумеют украсть пароли, даже если они им попали в руки – это будет нелепый набор символов, который без дешифратора не имеет никакой пользы.
Чтобы создать SSH server, многие выбирают именно OpenSSH. А все потому, что это приложение распространяется бесплатно и его можно установить прямо с терминала при помощи определенной строки. Вы сможете создать реально защищенный сервер с полным набором функций для удобства работы.
Про типы аутентификации еще будет сказано далее в статье.
Szekciók
Egy Dropbear példány összes beállítását egy típusú anonymous config section tartalmazza. A konfigfájl több section-t is tartalmazhat (maximum 10-et), például a belső és a külső hálózat számára is saját eltérő beállítású SSH szerver indítható.
dropbear
A section ezeket az opciókat tartalmazhatja. Az opciók nevei kis/nagybetű érzékenyek!
| Név | Típus | Kötelező | Alapértelmezés | Leírás |
|---|---|---|---|---|
| boolean | nem | 1 | Állítsuk -ra a section figyelmen kívül hagyásához. Ekkor az aktuális section-höz nem fog elindulni Dropbear szerver. | |
| boolean | nem | Állítsuk -re ha induláskor “verbose” kimenet szereténk. | ||
| string | nem | (none) | Üdvözlőszöveget tartalmazó fájl, amit a felhasználók bejelentkezés előtt látnak közvetlenül csatlakozás után. Pl: | |
| boolean | nem | 1 | Állítsuk -ra a jelszavas hitelesítés kikapcsolásához minden felhasználó esetén. (Ekkor csak előre tárolt kulcsokkal lehet belépni) | |
| boolean | nem | 1 | Állítsuk -ra a jelszavas hitelesítés kikapcsolásához root felhasználó esetén. (A root csak tárolt kulccsal fog tudni belépni) | |
| boolean | nem | 1 | Állítsuk -ra, hogy a root felhasználóval történő bejelentkezést letiltsuk. (A root felhasználó sehogyan sem fog tudni belépni) | |
| boolean | nem | Állítsuk -re ha a forwardolt portokhoz hozzáférést szeretnénk biztosítani a távoli kliensek számára. | ||
| string | nem | → | RSA host key-t tartalmazó file, alapértelmezésben | |
| string | nem | → | DSS host key-t tartalmazó file, alapértelmezésben | |
| integer | nem | 22 | Port, amin figyel az SSH. | |
| string | nem | (none) | Alapesetben minden hálózati interfészen figyel a szerver. Ha beállítjuk, akkor a konfiguráció kizárólag az adott interfészre lesz érvényes. Különböző interfészeket több section-nel eltérően konfigurálhatunk. | |
| integer | nem | Keepalive küldése megadott időközönként, másodpercben megadva. 0=soha | ||
| integer | nem | Kapcsolat bontása egy idő után, ha nincs forgalom, másodpercben megadva. 0=soha | ||
| integer | nem | 24576 | vételi puffer mérete. A nagyobb érték gyorsabb lehet, max 1 MB |
Az alapértelmezett konfiguráció a következő:
config dropbear
        option PasswordAuth 'on'
        option RootPasswordAuth 'on'
        option Port         '22'
#       option BannerFile   '/etc/banner'
Linux Terminal Emulators
Все дистрибутивы Linux предоставляют клиентский интерфейс ssh как часть стандартной установки.
- Откройте эмулятор терминала и напишите (“ssh» — это команда, это пользователь OpenWrt, к которому вы подключаетесь, а это светодиод по умолчанию OpenWrt)
-
появится сообщение о принятии нового ключа от устройства OpenWrt, напишите “yes” и нажмите клавишу “Ввод”.
- Если по какой-то причине вы переустановили OpenWrt, у устройства будет другой ключ, и вы получите сообщение о несоответствии ключей. В этой ошибке будет указано, что является командной строкой для копирования-вставки в вашем терминале, чтобы удалить старый ключ и продолжить.
- если вы хотите закрыть сеанс, напишите “exit”
Обычно у Linux также есть клиенты SCP (для открытия/редактирования/загрузки/выгрузки файлов в OpenWrt), которые могут быть установлены или не установлены по умолчанию. Вам нужно найти документацию вашего дистрибутива или выполнить поиск с помощью интерфейса управления пакетами для “SCP”, чтобы найти, где он находится, и его текущий статус установки. Прочтите его встроенное руководство (“man scp”, например, для клиента командной строки SCP) или google некоторые учебные пособия, чтобы узнать, как его использовать.
OPTIONS
- -b banner
-
bannerfile.
Display the contents of the file
bannerbefore user login (default: none).
- -r hostkey
-
Use the contents of the file
hostkeyfor the SSH hostkey.
This file is generated with
dropbearkey(1)or automatically with the ‘-R’ option. See «Host Key Files» below.
- -R
- Generate hostkeys automatically. See «Host Key Files» below.
- -F
- Don’t fork into background.
- -E
- Log to standard error rather than syslog.
- -m
- Don’t display the message of the day on login.
- -w
- Disallow root logins.
- -s
- Disable password logins.
- -g
- Disable password logins for root.
- -j
- Disable local port forwarding.
- -k
- Disable remote port forwarding.
- -p [address:]port
-
Listen on specified
addressand TCP
port.If just a port is given listen
on all addresses.
up to 10 can be specified (default 22 if none specified). - -i
-
Service program mode.
Use this option to run
dropbearunder TCP/IP servers like inetd, tcpsvd, or tcpserver.
In program mode the -F option is implied, and -p options are ignored. - -P pidfile
-
Specify a pidfile to create when running as a daemon. If not specified, the
default is /var/run/dropbear.pid - -a
- Allow remote hosts to connect to forwarded ports.
- -W windowsize
-
Specify the per-channel receive window buffer size. Increasing this
may improve network performance at the expense of memory use. Use -h to see the
default buffer size. - -K timeout_seconds
-
Ensure that traffic is transmitted at a certain interval in seconds. This is
useful for working around firewalls or routers that drop connections after
a certain period of inactivity. The trade-off is that a session may be
closed if there is a temporary lapse of network connectivity. A setting
if 0 disables keepalives. If no response is received for 3 consecutive keepalives the connection will be closed. - -I idle_timeout
- Disconnect the session if no traffic is transmitted or received for idle_timeout seconds.
- -V
-
Print the version
Security fixes
CVE-2017-7478
Description: OpenVPN version 2.3.12 and newer is vulnerable to unauthenticated Denial of Service of server via received large control packet. Note that this issue is fixed in 2.3.15 and 2.4.2.
Link: https://cve.mitre.org/cgi-bin/cvename.cgi?name=CVE-2017-7478Commits:openvpn: update to v2.4.2 (+2,-2)
CVE-2017-7479
Description: OpenVPN versions before 2.3.15 and before 2.4.2 are vulnerable to reachable assertion when packet-ID counter rolls over resulting into Denial of Service of server by authenticated attacker.
Link: https://cve.mitre.org/cgi-bin/cvename.cgi?name=CVE-2017-7479Commits:openvpn: update to v2.4.2 (+2,-2)
CVE-2017-7494
Description: Samba since version 3.5.0 is vulnerable to remote code execution vulnerability, allowing a malicious client to upload a shared library to a writable share, and then cause the server to load and execute it.
Link: https://cve.mitre.org/cgi-bin/cvename.cgi?name=CVE-2017-7494Commits:samba: fix CVE-2017-7494 (+33,-4)
CVE-2017-8890
Description: The inet_csk_clone_lock function in net/ipv4/inet_connection_sock.c in the Linux kernel through 4.10.15 allows attackers to cause a denial of service (double free) or possibly have unspecified other impact by leveraging use of the accept system call.
Link: https://cve.mitre.org/cgi-bin/cvename.cgi?name=CVE-2017-8890Commits:kernel: update kernel 4.4 to 4.4.71 (+5,-5)
CVE-2017-9074
Description: The IPv6 fragmentation implementation in the Linux kernel through 4.11.1 does not consider that the nexthdr field may be associated with an invalid option, which allows local users to cause a denial of service (out-of-bounds read and BUG) or possibly have unspecified other impact via crafted socket and send system calls.
Link: https://cve.mitre.org/cgi-bin/cvename.cgi?name=CVE-2017-9074Commits:kernel: update kernel 4.4 to 4.4.71 (+5,-5)
CVE-2017-9075
Description: The sctp_v6_create_accept_sk function in net/sctp/ipv6.c in the Linux kernel through 4.11.1 mishandles inheritance, which allows local users to cause a denial of service or possibly have unspecified other impact via crafted system calls, a related issue to CVE-2017-8890.
Link: https://cve.mitre.org/cgi-bin/cvename.cgi?name=CVE-2017-9075Commits:kernel: update kernel 4.4 to 4.4.71 (+5,-5)
CVE-2017-9076
Description: The dccp_v6_request_recv_sock function in net/dccp/ipv6.c in the Linux kernel through 4.11.1 mishandles inheritance, which allows local users to cause a denial of service or possibly have unspecified other impact via crafted system calls, a related issue to CVE-2017-8890.
Link: https://cve.mitre.org/cgi-bin/cvename.cgi?name=CVE-2017-9076Commits:kernel: update kernel 4.4 to 4.4.71 (+5,-5)
CVE-2017-9077
Description: The tcp_v6_syn_recv_sock function in net/ipv6/tcp_ipv6.c in the Linux kernel through 4.11.1 mishandles inheritance, which allows local users to cause a denial of service or possibly have unspecified other impact via crafted system calls, a related issue to CVE-2017-8890.
Link: https://cve.mitre.org/cgi-bin/cvename.cgi?name=CVE-2017-9077Commits:kernel: update kernel 4.4 to 4.4.71 (+5,-5)
CVE-2017-9078
Description: The server in Dropbear before 2017.75 might allow post-authentication root remote code execution because of a double free in cleanup of TCP listeners when the -a option is enabled.
Link: https://cve.mitre.org/cgi-bin/cvename.cgi?name=CVE-2017-9078Commits:dropbear: bump to 2017.75 (+13,-17)
CVE-2017-9079
Description: Dropbear before 2017.75 might allow local users to read certain files as root, if the file has the authorized_keys file format with a command= option. This occurs because ~/.ssh/authorized_keys is read with root privileges and symlinks are followed.
Link: https://cve.mitre.org/cgi-bin/cvename.cgi?name=CVE-2017-9079Commits:dropbear: bump to 2017.75 (+13,-17)
CVE-2017-9242
Description: The __ip6_append_data function in net/ipv6/ip6_output.c in the Linux kernel through 4.11.3 is too late in checking whether an overwrite of an skb data structure may occur, which allows local users to cause a denial of service (system crash) via crafted system calls.
Link: https://cve.mitre.org/cgi-bin/cvename.cgi?name=CVE-2017-9242Commits:kernel: update kernel 4.4 to 4.4.71 (+5,-5)
Több Dropbear példány futtatása
Az alábbi példa egy olyan beállítás tartalmaz, ahol a LAN oldalon a 22-es porton, míg a WAN oldalon a 2022-es porton fut egy-egy SSH szerver.
A biztonság kedvéért a wan interfészen a opció ki van kapcsolva, így a külső hálózatról csak tárolt ssh kulccsal lehet belépni.
Ellenőrizd a tűzfal DNAT (port forward) beállításokat, hogy a wan oldalon engedelyezve legyen a hozzáférés a 2022-es porthoz.
config dropbear
        option PasswordAuth 'on'
        option Port '22'
        option Interface 'lan'

config dropbear
        option PasswordAuth 'off'
        option Interface 'wan'
        option Port '2022'
Előfordulhat, hogy mégsem indul el minden beállított Dropbear példány. Ezt az okozhatja, hogy a wan interfész csak a dropbear initscript lefutása után kap IP-t. Ezt az időzítési problémát az alábbi hotplug scripttel lehet elkerülni. Mentsük a kódot fájlba és így az SSH szerver automatikusan újraindul amikor a WAN interfész feléled.
/etc/hotplug.d/iface/40-dropbear
#!/bin/sh

if  &&
then
        /etc/init.d/dropbear restart
fi
További info a fórumban (angolul): [https://forum.openwrt.org/viewtopic.php?pid=209590|Getting dropbear to listen on multiple ports].
pl. , ,
,
, jelenleg nincs implementálva