Add users
Содержание:
- IV. Migrate your emails
- POP Configuration settings for Zoho Mail
- Using HubSpot extension in eWidget
- How Streams works:
- II. Add users and groups
- Search Across Zoho
- 2019
- Unusual Activity:
- Email Composer/ Editor
- Searching across entities
- Autofill/ Address Book in Compose
- Close Account
- 2020
- Educational Resources
- Quick Access
- Categorizing Templates from Email Composer
- Microsoft Exchange Server accounts:
IV. Migrate your emails
Once you have set up your domain and added users, you can migrate your data from your previous provider to Zoho Mail.
Migrating from G Suite, Office 365, and Microsoft Exchange Server
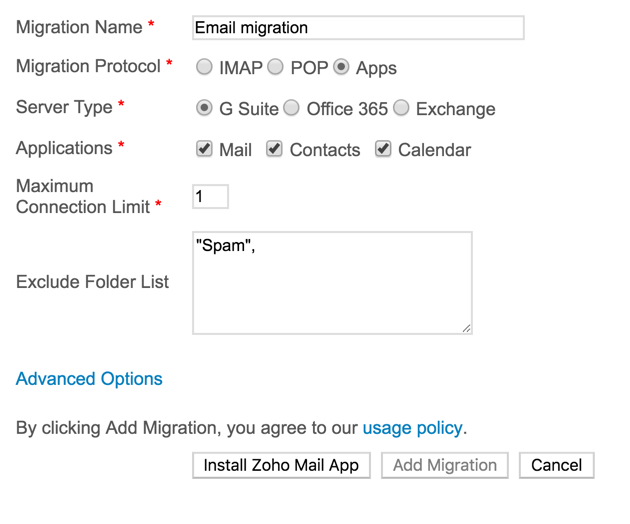
You should then add users, either manually or by uploading a CSV file with their details. You can also choose to fetch user accounts from the source server and then select the user accounts you want to run the migration for.
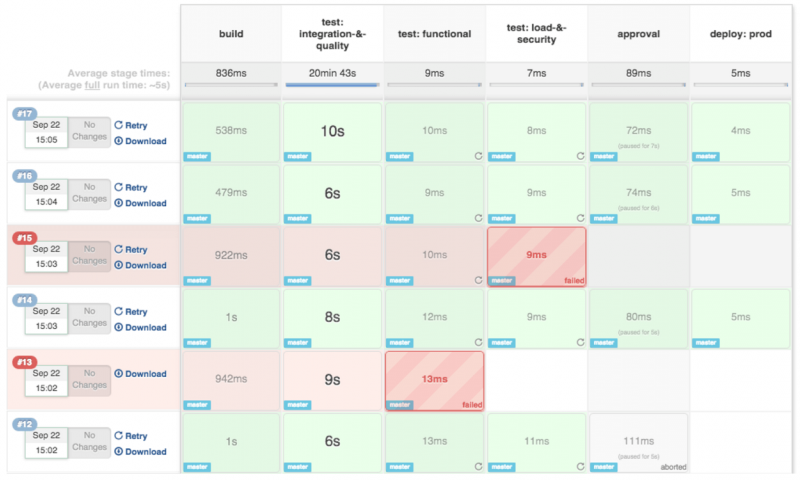
Now you’re all set to start the migration. Once the migration is complete you’ll be shown a detailed report about the data that was migrated, and what failed, along with the reasons for the failure.
IMAP/POP migration
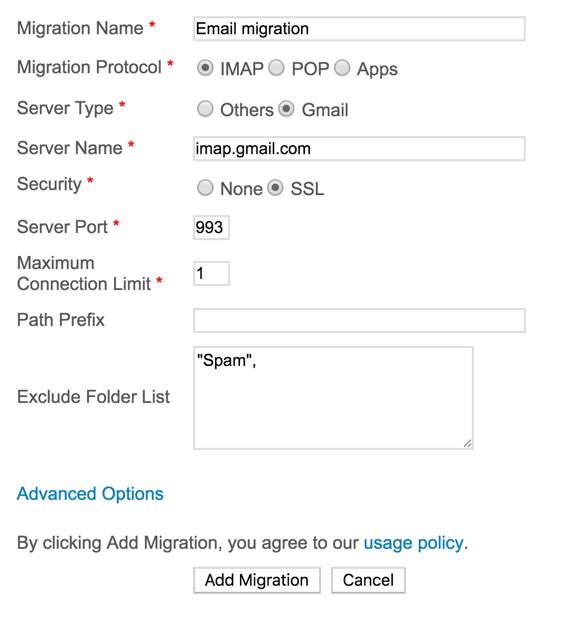
You should then add users, either manually or by uploading a CSV file with their details.
You can now start the migration. You will be able to view a detailed report after it’s finished.
POP Configuration settings for Zoho Mail
Incoming Server Name: pop.zoho.com
Port: 995
Require SSL: Yes
Username: username@zoho.com
Incoming Server Name: poppro.zoho.com
Port: 995
Require SSL: Yes
Username: you@yourdomain.com
Outgoing Server Settings:
Outgoing Server Name: smtp.zoho.com
Port: 465, SSL or
Port: 587, TLS
Require Authentication: Yes
Password: Your Zoho account password
You may require to set up the account in other devices if Two Factor Authentication is enabled for your account.
Note:
If you are a Federated Sign In user, you will not have a ‘Zoho’ password for your account. Use the Forgot Password link in the accounts.zoho.com page, to generate Zoho specific password for your account in Zoho. The Federated Login credentials will not work for POP/ IMAP/ Active Sync access.
Using HubSpot extension in eWidget
- Click on the eWidget icon on the bottom-right corner of your mailbox.
- Select HubSpot from the app menu.
- You will have options to Create Contact or Create Company.
Add a Contact:
- Navigate to eWidget and select HubSpot
- Click Add to Contacts to create a contact from email
- Fill in the details in appropriate fields and click Save
Associate a Task with a Contact:
Once a contact is added you can set deals, add notes, associate tasks, and schedule events with them right from your mailbox.
- Go to eWidget >> HubSpot
- If an email from the contact is open their info will be displayed. You can also manually search for a contact’s info with their email address.
- Select the Tasks tab
- Click on Create Task
- Fill in the task description and due date and click Save.
How Streams works:
Streams enables social media style interaction within teams/ groups facilitated by likes and comments for different entities, which can be shared with groups or individuals.
- Status Messages
- Events
- Tasks
- Notes
- Emails
- Bookmarks
A moderator or an Administrator can enable Streams for the group. Once the group is ‘Streamified’, all the members can view it under Streams Groups listing on the left pane. Once enabled, the members can start posting messages to the groups. The users can also add posts directly to individual members’ walls. Group Streams will have the activities and shares in Streams for the particular group. Any individual posts or shares will be available in the ‘My Streams’ area of the Home.
Likes
The users can ‘Like’ a post or a comment, by clicking the Heart icon of the post/ comment. A like to the post/ comment can be interpreted as an agreement or a positive nod to the post. The owner of the post/ comment will receive notifications whenever someone likes his/ her post or comment.
Comments
Comments help the users to provide their feedback instantly in a quick and simple manner. Using Markdown option, you can make formatting changes to your comment to emphasize the points. You can other users in the Comment area to add them to the discussion or to notify them about the discussion. It can also help you to get the feedback from someone in particular or to pass the ball to someone about the particular topic.
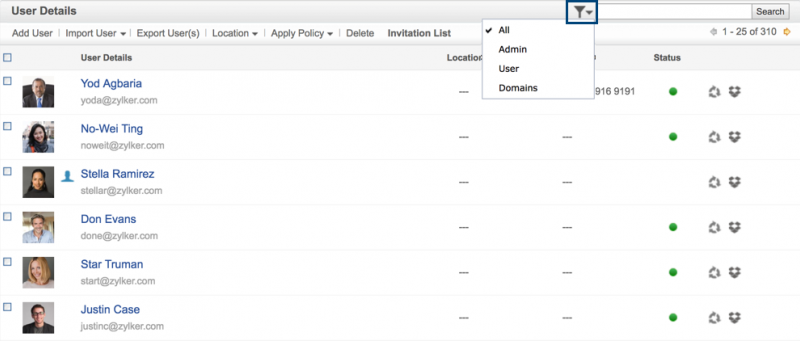
II. Add users and groups
You can add users in one of the following ways:
-
Login to Zoho Mail’s control panel as an Admin, select User Details from the Control Panel and click Add User. Click Create User and enter the user details as required. You will have to set a password for the user and share it with them for their first login.
-
Login to Zoho Mail’s control panel as an Admin, select User Details from the Control Panel and click Add User. Select Import from CSV option. Download the sample CSV file provided and fill in the user details along with a password for each user. Upload this file and select the domain to which you want to add these accounts to.
You can also import users from other Zoho Services. .
Click to learn how to troubleshoot user addition.
Search Across Zoho
Search across Zoho from Selected Text
- In the email you are currently reading, highlight a section of the content.
- Once you highlight the text by selecting, Smart create menu pops up.
- Click on the Search across Zoho icon, to start a search in all Zoho Apps with has the highlighted text.
Filter Options
You can narrow down the search results using the filters available.
- By email address/ email alias: Click on your email address displayed in the filter bar. A drop down with all your aliases will appear. Choose any one email address to view only the emails sent/ recieved with the chosen email address from the entered contact.
- By folders: Click on the All folder option to view a drop-down of all your Folders. Choose any folder to restrict your search to that folder.
- More filters: Click on the More Option to apply filters such as Date range, Tags, with attachment, flagged and with replies.
2019
Dec
Intergromat, Blendr.io, and Workato integrations in Zoho Mail
Extend your inbox and connect your apps to Zoho Mail with Intergromat, Blendr.io, or Workato integrations.
Learn more
Learn more
Oct
Zoho Mail mobile app is iOS 13 ready
Dark mode, custom fonts, and a document scanner—all the exciting features of the iOS 13 update are now supported on our Zoho Mail mobile app.
Learn more
Enhancement
Sep
Marketplace
Zoho Marketplace is an online platform that offers extensions and widgets that help you enhance your workflow across multiple apps. Connect and access external apps as extensions in your inbox using eWidget in Zoho Mail. You can discover various compatible apps in Zoho Marketplace from the Integrations card in Settings.
Go to Zoho Marketplace
New
Developer Space
Build your own extensions in Zoho Mail using our Developer Space. You can create custom app extensions with your favorite functionalities and publish it on Zoho Marketplace for other Zoho users to use them too.
Zoho Mail Developer Space
New
Markdown support in Streams comments
Start expressing your views as comments on streams posts in Zoho Mail. With Markdown support you can now format your comments to emphasize your points.
Aug
Huge Attachments
Overcome your attachment limits with Zoho Mail’s Huge Attachments feature. If your attachment limit exceeds your plan limit you can use this feature in Zoho Mail to send attachments of up to 250 MB each
Learn more
New
HotKeys
Create custom text shortcuts (Hotkeys) to expand and replace your choice of abbreviations with full words and phrases as you type.
Jul
Track and manage your tasks and contacts using Trello and Hubspot integrations in Zoho Mail.
Learn more
Enhancement
Dismiss all your notifications at once with the Clear all option in Zoho Mail.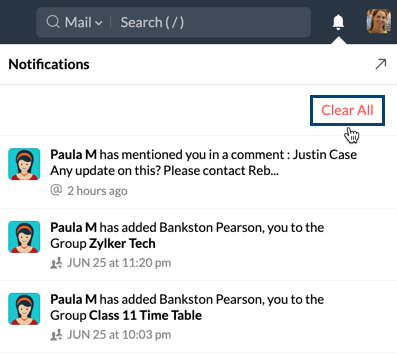
Chinese Traditional and Simplified
Display language now supports both Chinese Traditional and Chinese Simplified in Zoho Mail. Choose your preferred display language from the System settings in Zoho Mail.
Now you can insert your signatures using the Signature icon available in the formatting options in composer.

Jun
Button Labels
Choose how your options appear in Zoho Mail. You now have the option to view them as icons or icons with their titles. You can change it in Zoho Mail Settings >> System >> Button Labels.
May
Out of Office response — Save or Sweep
Now have more control over your out of office reply. You can now choose to Save all the responses in Sent folder or choose to skip them from your Sent folder. This new setting is now available in Out of Office settings, in case you want to change it.
Learn more
Enhancement
Learn more
Zoho Recruit, Zoho Assist and Zoho Notebook Integrations in eWidget
Forward the resumes, handle remote support, and jot down the notes all without leaving your inbox. eWidget now sports Zoho Recruit, Zoho Assist, and Zoho Notebook extensions in Zoho Mail.
Key in with Zoho Mail
If you are Key-Savvy user, there is more for you in Zoho Mail. Keyboard Shortcuts are now customizable. You can now define your most favorite/ comfortable key combinations for the oft-repeated Zoho Mail Actions done by you.
Choose your keys
Enhancement
Check it out!
Unusual Activity:
In case the system detects unusual activity in your account, to protect your account from being compromised/ misused, there are some automated actions on your account. These are in place to prevent abuse and to control any potential spam/ fraudulent phishing activities from being done using your account by Spammers or other Illegal Hackers.
- Sending a large number of undeliverable emails (Bounce emails)
- Sending a large number of emails within a short span of time
- Sending to a large number of recipients per email
- Sending an unusually large size of Outgoing emails in a single day
- Sending emails to an unusually large number of recipients on a single day
- Multiple suspicious login attempts from different locations within a specific period of time.
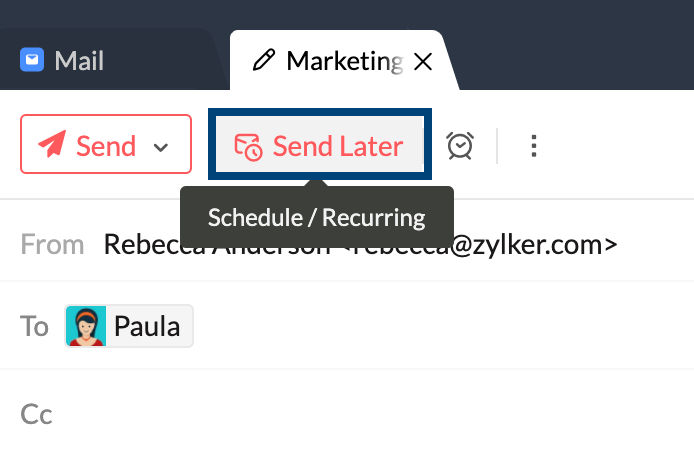
Email Composer/ Editor
The composer includes the following:
- From: The From address can be selected from the drop-down which contains the main email address of your account, your email aliases, and the external email addresses configured. The corresponding Display name will also be displayed next to the selected email address. Refer for instructions to configure external email address as a From Address.
- To: Specify the direct recipients of the email here. The organization email addresses will be available from the AutoFill. Click the To Label, to open the address book and choose an email address from the address book.
- Cc (Carbon Copy): Specify the recipients to whom the email should be copied. When you add an email address in Cc, other recipients will be able to view the addresses.
- Bcc: (Blind Carbon Copy): Specify the recipients to whom the email should be copied, without exposing the email addresses to others. The other recipients will not know about the email addresses in Bcc.
- Subject: Title or a Short Summary of the contents of the email
Mail Content — Richly Formatted Mail

Here is a list of formatting options available in the Rich Text mode:
- Bold
- Italics
- Underline
Strike through- Font Face Options
- Font Size Options
- Font Color Options
- Background Color for text (Text highlight)
- Alignment Options
- List Options
- Indentation for text and Lists
- Line Spacing
- Superscript
- Subscript
- Text Direction
- Quote
- Remove formatting
- Format painter
- Hyperlinks — Directs a selected portion of the text to the linked URL or email address.
- Images — Inserts images either from the disk storage or directly from the web.
- Signatures — Inserts the selected signature in the composer.
- HTML — Provides options to enter content in HTML format, which will be reflected in the compose window.
- Tables — Inserts tables according to the customizations provided.
- Horizontal Separators — Inserts a horizontal line between text.
- Smiley — Inserts the selected smileys from the list of options.
Plain Text Mail

To revert back to the Rich Text mode, click the same drop-down and choose Rich Text mode. Now you will be able to format the text that you’ve inserted, add tables, images etc. Even if you revert to Rich Text Mode, the prior formatting will not be restored.
Ask Receipt

- Log in to Zoho Mail
- Click the Settingsicon.
- Go to
-
- Select Always Send to always send a Read Receipt acknowledgment to the sender.
- Select Never Send to never send a Read Receipt acknowledgment to the sender.
- Select Ask me to ask for confirmation before sending a Read Receipt acknowledgment to the sender.
Searching across entities
Zoho Mail automatically chooses the search entity depending on which application you’re currently using. For example, say you’re using Streams, the search bar automatically changes the search entity to Streams.
Despite this, if you want to search in a different application, you can pick where you want to search from by clicking the drop-down. Choose the relevant application from the listing, and any query that you enter will be searched for in that application alone. Also, along with each application you can select from the multiple parameters that are associated with each entity.
To search for something, pick the entity in which you want to search, type in your search key, pick the relevant parameter from the listing and hit enter. Similarly, you include multiple parameters in the search to narrow it down.
Note:
- You can clear the search key for a specific parameter by erasing the content within that box.
- To remove a specific parameter from the search, click the close icon next to the box.
Searching in Streams
A Streams post consists of different entities such as Posts, Notes, Tasks etc. In some cases, you will want to retrieve some data from a certain Streams group or from your own Streams wall.
In this case, you can pick Streams from the listing, and type in your search key. Several parameters such as Posted by, Post contains, @mentioned, commented by, in group are available in the Streams search category.
When you’re sure that the Streams content that you’re looking for is either a Note, Task or a message, you can make use of the Filter by option to select the entity that you want to search in. The filter by option will list all the Streams entities that are available.
Searching for Notes
You can search for personal Notes that you’ve added or Group Notes by selecting the Notes entity.
You can search based on the note content, note color, the group to which it was added or the user who added the note. This helps you filter down and search for specific Notes easily.
Event Search
To keep track of events that you’ve been invited to, meetings or appointments that have been added to group Calendars and to locate specific events, you can search your Calendar based on Title, Location, Organizer etc. You can type in the relevant search key and results from either your personal calendar or the Group Calendars that you’ve subscribed to will be returned as per your query.
Searching in Tasks
You might be a part of several groups and keeping track of the Tasks in the multiple groups might be difficult.
Sometimes, you’ll want to search for a task, but you might not be sure which group it was added to. Or, you might know that a task was assigned to a specific group, but you might not know who assigned it.
In cases like these, the Task search comes in handy. You can search based on any of the Task criteria such as the person who assigned the task, the due date, the group in which it was assigned etc. The search will yield the results based on your search criteria.
Attachment Search
The Attachment Viewer menu in Zoho Mail offers filters to narrow down on the attachment that you’re looking for. In addition to that, you can also filter attachments based on the name, the content of the attachment, the file type, file size, the entity it belongs to, received date, tags, favorites or the user who sent it.
Bookmark Search
The Bookmarks application lets you save important links to your mailbox, either to a group or your personal Bookmarks. These Bookmarks can later be launched like you would launch any application from your mailbox. You can search for these Bookmarks using parameters such as the Bookmark Title, Description etc.
Autofill/ Address Book in Compose
Autofill Contacts
Similarly, if you start typing any particular name, you can select from among the matching categories that are listed in the Autofill drop down. All the contacts associated with that category will be automatically added as recipients.
Address Book
Adding recipient in Compose
Further, to view and select the contacts from the Address book, click the To/ Cc/ Bcc links in the respective fields. The ‘Address Book’ pops up with your contact details. You can directly select from the listed contacts, or use the ‘Search contact’ option to search and select the corresponding recipients from the address book. Click the relevant contacts, to add them as the recipients.
Using the drop-down on the left top corner of the ‘Address book’, you can choose to view «All Contacts» or the contacts associated with any of the Personal or Organization Contacts . You can select the desired contacts from the chosen list or use the ‘Select All’ checkbox to add all the contacts in that category as recipients.

The selected contacts will be displayed below the address book. You can remove them from here if needed. Finally, select the Insert option to insert the selected contacts in the corresponding field.
Contact Suggestions

You can also view your CRM contacts from the address book and add them as recipients. Click on the «All Contacts» drop down and scroll to the bottom. Click on the CRM option. You can search for your CRM contacts here.

Creating Category
You can create directly from the address book. This way you can easily add a group of contacts as recipients.
- Open the Address book from Compose window.
- Select a minimum of 4 contacts from your the listing.
- Click on the Create category option that appears below the selected list.
- Enter the desired name for the category and click on the tick sign next to it.
A contact category with the entered details is now created.
Close Account
When you close the Zoho Account, this will close the Zoho account across all Zoho Applications like CRM/ Recruit/ Mail/ Docs and so on. You will lose access to all the Zoho Applications.
Steps for Super Administrators to Close the account:
If you are a Super Administrator of an account, you will be able to close the account only after the following actions are completed:
- — If you are free plan user and have not subscribed to any paid services, you can skip this step. In case you have active Zoho Mail Subscription, you need to cancel the Subscription before closing the account.
- — You need to remove all the domains associated with your organization and further delete the organization.
- Once you have deleted the Organization, you can follow the instructions below to close the account.
Steps to Close the account:
- Login to Zoho Account, the Identity and Access management application for all Zoho accounts. (Or Click on the My Account link)
- Select Preferences.
- Under Preferences select Close Account
- Provide your current Password.
- Provide your comments and click Close Account.
2020
MailNew Service
Learn More
Jul
MailEnhancement
Learn more
MailNew
Zoho People Integration in Zoho Mail
Zoho People integration lets you Check-In and Out of work right from Zoho Mail. You can also view the availability status of your colleagues along with their designation and contact details in the Contact card.
Learn more
Jun
Zoho Meeting integration in Zoho Mail
Start a meeting with your colleagues in one click using the Zoho Meeting integration in Zoho Mail. 
Learn more
May
MailEnhancement
All Unread in Streams
The All Unread section lists all your unread streams posts in one organized view. You also have options to mark all the posts as read or mark the posts of a particular streams group as read from this section.

MailEnhancement
Mar
Extract content from an inline image in Notes
You can insert inline images into your notes and extract the content in these images into the note. Select the Inline image and click More >> Extract Content.
Feb
New
Zoho Mail Bookmark Extension
This Bookmarks extension lets you save links (web URLs) as bookmarks in Zoho Mail from your browser in one-click. It is available in Google Chrome Webstore and Firefox Add-ons.
Learn more
New
16 New Display languages
Zoho mail now supports 60 display languages! You can select your preferred Display Language from the settings in Zoho Mail.

Enhancement
Educational Resources
Our Thoughts
 4 Min Read
The one strategy managers need to make sure employees stay after the COVID-19 crisis
By Raju Vegesna
Read Now
 10 Min Read
5 marketing lessons from a pandemic
By Vibhav
Read Now

Five Tips For Responsible Growth In Unstable Business Environments
By Vijay Sundaram
Updates from Zoho
 5 Min Read
How 8000 of us at Zoho—across 12 offices—went remote in 3 days
By Ritika Datta Roy
Read Now
 2 Min Read
Coronavirus Update
By Vijay Sundaram
Read Now
 9 Min Read
How do I become remote work ready? Some of our experts share their tips, best practices, and stories.
By Rithika Mahbubani
Read Now
Managing your Finances
 3 Min Read
10 best practices to maintain a steady cash flow during the COVID-19 crisis
By Harikrishna
Read Now
 4 Min Read
Tips to keep your Accounts Payable in the safe zone during a crisis
By Vidhya Krishnan
Read Now

Solutions for Working from Home for Accountants
By Val Steed, Talha Baqar and Nathan Rodgerson
Watch Now
View All
Helpful Resources from Our Product Teams
By Niyathi Bhat
Read Now
 4 Min Read
Remote sales: Using CRM telephony to make connections
By Jaanu Surendran
Read Now
 9 Min Read
What to look for in a CRM in the WFH Era
By Rishi
Read Now
 4 Min Read
Customer service amid COVID 19: A guide to managing remote customer support teams
By Divya R
Read Now
 3 Min Read
Stay safe and in touch
By Smita Ashok
Read Now
CampaignsSignpagesenseSocial
 5 Min Read
By Aishwarya Ashok
Read Now
 2 Min Read
By Aishwarya Ashok
Read Now
 4 Min Read
By Aishwarya Ashok
Read Now
View more
 2 Min Read
How digital signatures can help businesses with remote work
By Chandramouli Dorai
Read Now
 3 Min Read
Important updates that should go on your website in times of crisis
By Vaijayanthi N
Read Now
 4 Min Read
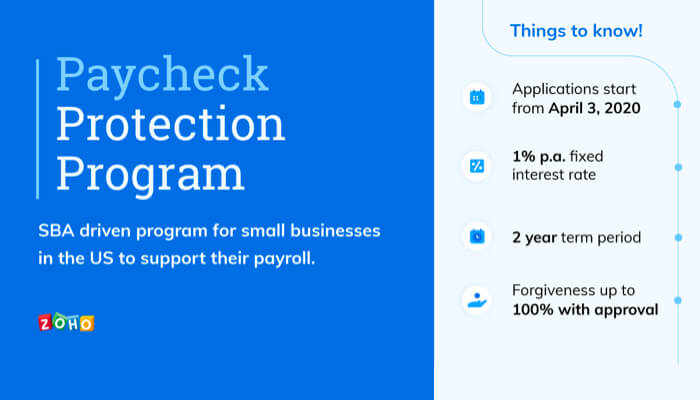
Paycheck Protection Program for small businesses
By Ajay Aadhithya Chandrasekaran
Read Now
 5 Min Read
COVID-19: Initiatives taken by the Government of India
By Jeena Mary George
Read Now
 3 Min Read
Strategies for remote payroll management at scale
By Christopher Joseph
Read Now
View more
VaultShowTimeCliqShowWriterWorkDriveMeeting
 3 Min Read
5 ways to tackle cyber threats when working from home
By Meenakshisundaram R
Read Now
 2 Min Read
ShowTime’s guide to working from home: training your staff and customers remotely
By Gopal P
Read Now
 2 Min Read
The show must go on: Providing uninterrupted learning experiences with Zoho ShowTime
By Gopal P
Read Now
View more
 4 Min Read
The Working from Home Guide: Remote Collaboration with Cliq
By Manasa M
Read Now
 2 Min Read
Remote Work Matters
By Srijeet Bose
Read Now
 2 Min Read
The Working from Home Guide: Remote Collaboration with Show
By prasanna.v
Read Now
 2 Min Read
The Working from Home Guide: Document Collaboration Basics
By Rakeeb Rafeek
Read Now
 2 Min Read
Our working from home guide: Team collaboration with WorkDrive
By Vaishnavi Venkatakrishnan
Read Now
 4 Min Read
How Zoho Meeting can help you do remote work
By Sera Cherian
Read Now
PeopleRecruitWorkerly
 1 Min Read
Engage your remote workforce with these 6 tips
By tarika a
Read Now
 1 Min Read
COVID-19 outbreak: Tips to protect your organization
By tarika a
Read Now
 2 Min Read
Using an LMS to manage remote learning
By tarika a
Read Now
View more
 2 Min Read
Keeping candidates & clients informed during COVID-19
By Pradyumn Karthic
Read Now
 3 Min Read
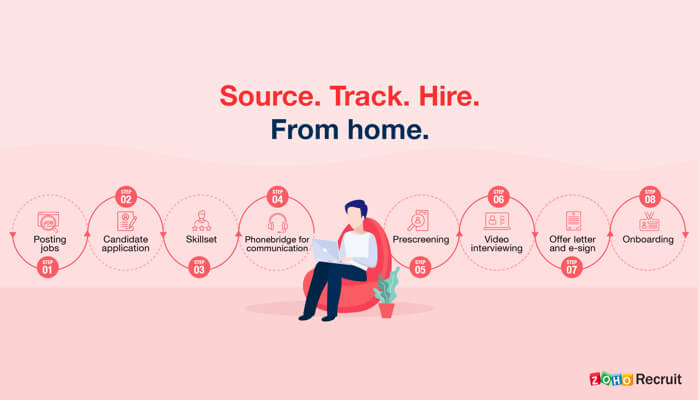
Remote hiring practices to keep your recruiting funnel moving
By Aruna Muralidharan
Read Now
 2 Min Read
Transitioning to remote recruitment with Zoho Recruit
By Kruthi Gonwar
Read Now
View more
 2 Min Read
Here are 5 must-try features in Zoho Workerly for remote staffing
By Revathi K
Read Now
 2 Min Read
Transitioning to remote temp staffing
By Revathi K
Read Now
 3 Min Read
Shorten your recovery curve with a comprehensive BCP built on Orchestly
By Rukmani S
Read Now
 1 Min Read
Dashboards to help you stay informed about COVID-19
By Supraja Krishnan
Read Now
 2 Min Read
Adopting remote work with Zoho Assist: Extending 60-day free licenses with all premium features.
By Rahul Narayan
Read Now
 2 Min Read
Announcing Zoho Assist’s Professional bundle for Unattended Access!
By Srini
Read Now
 4 Min Read
5 ways to tackle cyber threats when working from home
By Meenakshisundaram R
Read Now
The importance of adopting a password manager when working from home
By Meenakshisundaram R
Watch Now
Quick Access
Opening a specific setting, going to a specific folder or Streams group, navigating to a different application, can all be done from the Quick Access option in the search bar. Type in the first few letters of the Streams Group or the Settings page that you want to access, and choose from the options listed. This will directly take you to the required page.
You can also change certain settings options using Quick Access. Enter the following options into the quick access menu and choose the desired option from the listing to apply it to your account:
- Select Theme — To change your display theme
- Select Mail view — To choose how you want to open a new email (Preview, new window, new tab etc)
- Select Compose View — To choose how you want the compose window to open (New tab, inline, new window etc)
- Select Read receipt — To choose when to send read receipts (Always, Never, Ask)
- Load External Image — To choose when to load external images in the emails you receive
- Select Time Format — To choose the time format for your account
- Select Editor Mode — To choose the default editor mode for your mail composer (Rich text mode, Plain text mode)
- Select Text direction — To choose your preferred text direction (Left-to-right, Right-to-left)
Categorizing Templates from Email Composer
After the template is saved, you can categorize it from the composer using the Insert template option in the formatting options menu.
Create a category using the ‘+’ option in the pop-up window. Once done, you can simply drag and drop the templates to it (You can select multiple templates to drag and drop into a category). You can also edit or delete a category with the respective options available when you hover over it.
A template can be saved in more than one category. Click the name of the category available in a template’s preview and select the checkboxes of the categories you want to save the template in.
Note: The templates are displayed in list view by default. You can change it by clicking on the ‘Thumbnail view’ icon.
Microsoft Exchange Server accounts:
Exchange Emails marked as Read after POP retrieval:
The KB article from Microsoft mentions the Exchange version as 2000. However, the behavior seems to be the same in 2003, 2007 and Office 365 servers also.
Hence you can check with Microsoft for any recent fix or patch that is available for the issue to resolve this. The users may alternatively use Zoho CRM Outlook Plugin, instead of on Mail Add-on.
Google Apps Accounts:
Enabling POP in Google Apps Accounts:
- Log in to your Google Apps / Gmail account
- Click the Gear icon to launch the Settings.
- Locate POP Access.
- Choose ‘Enable POP from now on’ or ‘Enable POP for all messages’
Captcha Unblock:
The URL for Captcha Unlock is https://www.google.com/accounts/DisplayUnlockCaptcha. If you are not yet a transitioned user, you need to use the url and replace your domain name in the url: https://www.google.com/a/<your-gapps-domain.com>/UnlockCaptcha.
Ex: For the domain zillum.org, the URL for Captcha Unlock will be https://www.google.com/a/zillum.org/UnlockCaptcha
Delete Mails from Server — GApps behavior :
- Login to Zoho Mail
- Go to Settings
- Navigate to >> Add POP3 Account
- Click on the gear icon (settings) in the corresponding Google Apps account to be modified.
- Select ‘Delete emails from Server’ in the Delete settings.
- Provide the Google Apps password.
- Make sure that you are not in ‘Recent’ mode.
- Click Save to save the changes
Steps to switch to ‘Recent mode’ for Google Apps accounts in Zoho Mail:
- Login to Zoho Mail
- Go to Settings
- Navigate to >> Add POP3 Account
- Click on the gear icon (settings) in the corresponding Google Apps account to be modified.
- In the username field, specify recent: <your Google Apps username>
- Provide the Google Apps password
- Make sure ‘Leave Messages on the Server’ is checked.
- Click Save to save the changes
Zoho Mail — CRM Integration:
When you recieve an event invite, once you accept the event, it will be added to your calendar. You can choose to add the event you accept to your Zoho CRM Calendar. For detailed instructions, go to this .