Documentation
Содержание:
- 7 Additional Software
- CentOS
- Change System Settings
- 4 Service Actions for Resellers
- 8. Create new list for Mailman
- 2 Terms and structure of the manual
- Configure the Backend Components
- Install Additional Components
- OpenSuSE
- Prerequisites
- What’s new in ISPConfig 3.1.9
- 9. Disable SpamAssassin
- Using multiple PHP versions
- 1 General
- Step 3: Install MariaDB, Postfix, and Dovecot
- Шаг 3: Установите MariaDB, Postfix и Dovecot
- Migration Tool
7 Additional Software
The following
additional software is available for the ISPConfig system:
- Webmail: A browser
interface for email boxes. -
phpMyAdmin: A
browser interface for the administration of your MySQL databases.
The software is
available for free on the
ISPConfig website and can be installed via the «Update Manager»
(see chapter I-2.5). After the installation you can find links for both
applications under «Tools».
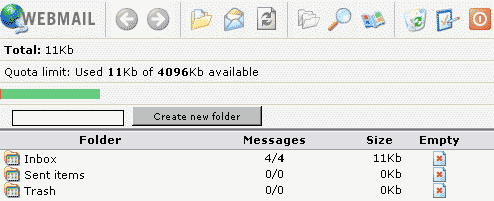
7.1
Webmail
The application can
be accessed via the link under «Tools» or via the folder «webmail»
which is located in the web of the ISPConfig system, thus
https://www.domain.tld:81/webmail/ where www.domain.tld has to be
replaced appropriately.
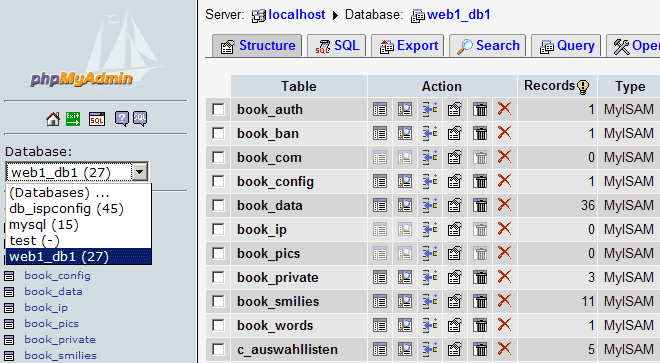
7.2
phpMyAdmin
Further information
about phpMyAdmin can be found under
http://www.phpmyadmin.net/ .
The application can
be accessed via the link under «Tools» or via the folder «phpmyadmin»
which is located in the web of the ISPConfig system, thus
https://www.domain.tld:81/phpmyadmin/ where www.domain.tld has to be
replaced appropriately.
CentOS
- The Perfect Server CentOS 7.6 with Apache, PHP 7.2, Postfix, Dovecot, Pure-FTPD, BIND and ISPConfig 3.1
- The Perfect Server CentOS 7.3 with Apache, Postfix, Dovecot, Pure-FTPD, BIND and ISPConfig 3.1
- The Perfect Server CentOS 7.2 with Apache, Postfix, Dovecot, Pure-FTPD, BIND and ISPConfig 3.1
- The Perfect Server – CentOS 7 (Apache2, Dovecot, ISPConfig 3)
- The Perfect Server – CentOS 7 x86_64 (nginx, Dovecot, ISPConfig 3)
- The Perfect Server – CentOS 6.5 x86_64 (Apache2, Dovecot, ISPConfig 3)
- The Perfect Server – CentOS 6.4 x86_64 (Apache2, Dovecot, ISPConfig 3)
- The Perfect Server – CentOS 6.4 x86_64 (nginx, Dovecot, ISPConfig 3)
- The Perfect Server – CentOS 6.3 x86_64 (Apache2, Dovecot, ISPConfig 3)
- The Perfect Server – CentOS 6.3 x86_64 (Apache2, Courier, ISPConfig 3)
- The Perfect Server – CentOS 6.3 x86_64 (nginx, Dovecot, ISPConfig 3)
- The Perfect Server – CentOS 6.3 x86_64 (nginx, Courier, ISPConfig 3)
- The Perfect Server – CentOS 6.2 x86_64 With Apache2
- The Perfect Server – CentOS 6.2 x86_64 With nginx
- The Perfect Server – CentOS 6.1 x86_64 With Apache2
- The Perfect Server – CentOS 6.1 x86_64 With nginx
- The Perfect Server – CentOS 6.0 x86_64
- The Perfect Server – CentOS 5.10 x86_64
- The Perfect Server – CentOS 5.7 x86_64
- The Perfect Server – CentOS 5.6 x86_64
- The Perfect Server – CentOS 5.5 x86_64
- The Perfect Server – CentOS 5.4 x86_64
- The Perfect Server – CentOS 5.3 x86_64
- The Perfect Server – CentOS 5.2
Change System Settings
There are a few items that Ubuntu configures in an unconventional way that we need to undo in order for our software to function properly.
The first thing we need to do is disable AppArmor, which is incompatible with ISPConfig. First, we should stop the service:
We can also tell it to unload its profiles by typing:
After this is done, we need to tell our server not to start this service at boot:
We can actually delete all of the associated files and packages by typing:
Another configuration that we need to modify is the default system shell. Ubuntu uses the shell for system processes, but ISPConfig leverages additional functionality that is provided specifically by . We can set to be the default system shell by typing:
At the prompt, select “No” to have the utility reconfigure the system shell pointer to use instead of .
4 Service Actions for Resellers
4.1
Customers
You can get an
overview of the resellers and your own customers by viewing the
structure tree:
The applications
affecting customers can be carried out by resellers in the ISPConfig
reseller level. Thus they get touched only briefly in here. Learn more
about them in the Reseller Manual.
The following customer related actions can be taken:
-
Add a new
customer:
Click on the button «New Customer» and follow the steps described in
chapter II-2. -
Assign a
customer to another reseller:
Open the document of the customer in the structure tree. In the field
«Group» in the form «ISP Customer» choose the corresponding reseller or
yourself as admin. In the field «Folder» select the folder «Customers»
or another folder if available. Click on «Save». -
Delete a
customer:
Click on the customer to be deleted in the structure tree. The
corresponding form opens. Click on «Delete». - Customer
Statistics: Every customer has his own statistics which can be seen
in the tab «Statistics» in the customer’s form.
4.2
Manage Sites
The management of
the administrator’s sites is done via the folder «Sites». Resellers’
sites can be managed via the subfolder «Sites» in the reseller’s
folder.
Applications related
to sites can also be carried out by resellers and to some extent by
customers. Here is only a brief list.
Reseller Level:
- Add a new site:
( see II-3.2) -
Delete a site:
(see II-3.2) -
Change limits of
sites, users and domains:
(see II-3.2) -
Change a site’s
additional features:
(see II-3.2)
Customer Level:
-
Adding and
managing users:
(see III-2.2) -
Adding and
managing co-domains:
(see III-2.3) -
Apply for an
SSL-certificate:
(see III-2.4) -
Change MySQL
access data:
(see III-2.5) - View site
statistics: (see III-3)
4.3
DNS Entries
4.3.1 Create DNS
Entries (see Reseller Manual)
A DNS entry for a
site or co-domain is created as follows:
1. Step: Open
Site Form.
In the structure
tree click on the corresponding client, go into the register «Webs» and
click on the IP address of the corresponding web.
Or:
Open the
corresponding site in the structure tree.
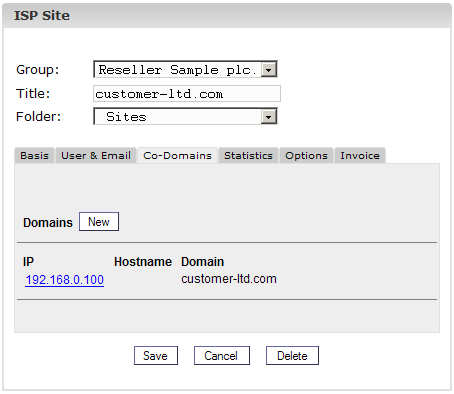
2. Step: Open a
co-domain and activate it (optional).
Go to the tab
«Co-Domains» and click on the IP address of the co-domain.
 3. Step: Activate DNS.
Check «Create DNS»
and «Create DNS MX».
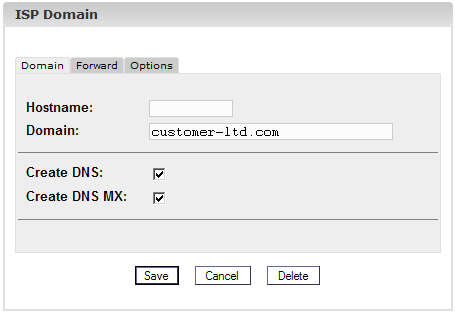
4. Step: Save.
Click on «Save».
Now the site is
visible as a new entry in the «DNS Manager».
4.3.2 Secondary-DNS
Entries (Slave Zone)
This is how you
create a Secondary-DNS entry (Slave Zone):
1. Step: Open
Slave Zone Form
Click on
«New Slave».
2. Step: Create
Slave Zone
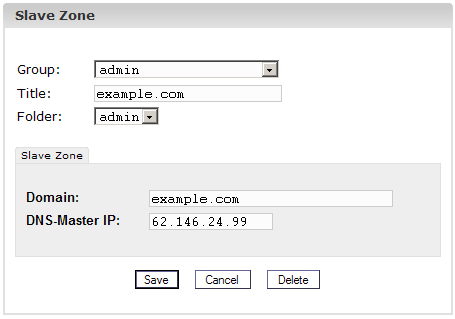
- Domain:
Enter the domain that the Secondary-DNS entry is for. - DNS-Master IP:
Enter the IP address of the Primary-DNS server of the domain.
3. Step: Save
Click on
«Save».
4.3.3 Edit DNS
Entries.
You can edit DNS
entries as follows:
Click on the menu
«DNS Manager».
In the structure
tree click on the DNS entry to be edited.
-
Delete DNS
Entries:
Open the entry and click on «Delete». The entry is now in the dustbin
and can be restored from there. - Search Function:
You can search for whole DNS entries as well as A records, C-Name
records and MX records. Click on the button «Search», select the
corresponding document. Enter your search criteria and click on
«Continue». A list with matches to your search criteria is displayed.
Learn more about the search function in chapter II-4.2.
8. Create new list for Mailman
Save and close the file. Then we can create a new list for Mailman.
sudo newlist mailman
sudo nano /etc/aliases
The file should be similar like the following:
# Required aliases
postmaster:     root
MAILER-DAEMON:  postmaster

# Common aliases
abuse:          postmaster
spam:           postmaster

# Other aliases
clamav: root

mailman:              "|/var/lib/mailman/mail/mailman post mailman"
mailman-admin:        "|/var/lib/mailman/mail/mailman admin mailman"
mailman-bounces:      "|/var/lib/mailman/mail/mailman bounces mailman"
mailman-confirm:      "|/var/lib/mailman/mail/mailman confirm mailman"
mailman-join:         "|/var/lib/mailman/mail/mailman join mailman"
mailman-leave:        "|/var/lib/mailman/mail/mailman leave mailman"
mailman-owner:        "|/var/lib/mailman/mail/mailman owner mailman"
mailman-request:      "|/var/lib/mailman/mail/mailman request mailman"
mailman-subscribe:    "|/var/lib/mailman/mail/mailman subscribe mailman"
mailman-unsubscribe:  "|/var/lib/mailman/mail/mailman unsubscribe mailman"
Save and close the file. Initialize the alias database and restart the services.
sudo newaliases
sudo systemctl restart mailman.service
sudo systemctl restart postfix.service
2 Terms and structure of the manual
According to the 3
levels the manual is split into 3 sections:
-
I Administrator
Manual
describes the services available for server administrators. -
II Reseller
Manual
describes the services available for resellers. - III Customer
Manual describes the services available for customers.
Please note:
This structure does not mean that each section is independent from each
other. Level I contains levels II and III and level II contains level
III.
For a better overview the manuals I and II include links to the
applications that are available in the respective sub-levels and that
are described there.
Configure the Backend Components
Now that everything is installed, we need to start configuring our services and tools.
Mail Configuration
Let’s start by enabling some functionality in . Open the default configuration file with your editor:
We just need to uncomment some of the lines in this file. Specifically the line that deals with the submission service and the first three option lines beneath, and the smtps service and the first three option lines for that one as well:
Now, we need to append an additional option under both of these services. It will be the same for each:
<pre>
submission inet n — — — — smtpd
-o syslogname=postfix/submission
-o smtpdtlssecuritylevel=encrypt
-o smtpdsaslauthenable=yes
<span class=“highlight”>-o smtpdclientrestrictions=permitsaslauthenticated,reject</span>
…
smtps inet n — — — — smtpd
-o syslogname=postfix/smtps
-o smtpdtlswrappermode=yes
-o smtpdsaslauthenable=yes
<span class=“highlight”>-o smtpdclientrestrictions=permitsasl_authenticated,reject</span>
</pre>
Save and close the file when you are finished.
We can start off by telling it to create a new list:
The script will output a long list of aliases. You should add those to the bottom of the your file:
It should look something like this:
Save and close the file after you’re done. You need to make aware of the aliases you added. You can do that by typing:
While we’re dealing with services, we should also stop and disable . ISPConfig calls this as needed and it does not need to be running all of the time:
We can then tell the server to not start it again at boot:
LAMP Configuration
We need to enable functionality in PHP:
Another thing we need to do is enable some of the Apache modules we installed.
We also need to make some adjustments to some of the Apache configuration files.
One of the modules that we enabled will currently intercept all of our PHP files. We want to stop it from doing this. Open the configuration file:
<pre>
sudo nano /etc/apache2/mods-available/suphp.conf
</pre>
<pre>
<IfModule modsuphp.c>
<FilesMatch “.ph(p3?|tml)$”>
SetHandler application/x-httpd-suphp
</FilesMatch>
suPHPAddHandler application/x-httpd-suphp
…
</pre>
We are going to replace the top block with a single command. It should look like this when you are finished:
<pre>
<IfModule modsuphp.c>
<span class=“highlight”>AddType application/x-httpd-suphp .php .php3 .php4 .php5 .phtml</span>
suPHPAddHandler application/x-httpd-suphp
</pre>
Save and close the file when you are done.
We can then enable that by typing:
If you plan on creating sites that host Ruby files, you should comment out the processing of files in the file. ISPConfig will handle this itself:
<pre>
sudo nano /etc/mime.types
</pre>
<pre>
application/x-rss+xml rss
<span class=“highlight”>#</span>application/x-ruby rb
application/x-rx
</pre>
Save and close the file when you are done.
Now, we can restart Apache to implement our changes:
Install Additional Components
Now that we have our base system ready to go, we can begin installing some of the services that ISPConfig can manage and some software that supports ISPConfig.
We will be installing basic LAMP (Linux, Apache, MySQL, PHP) components, mail software, anti-virus scanning software for our mail, and other packages.
We will do this all in one big command, so this will be a lot of packages installed at once:
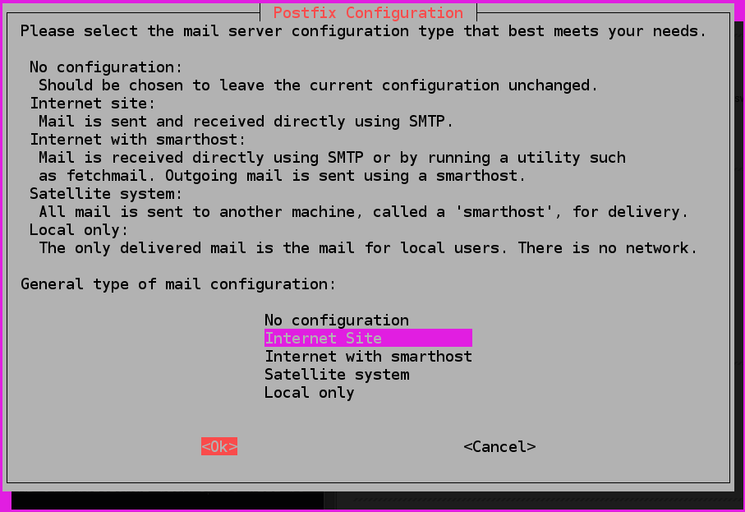
During the installation, you will be asked a few questions. You will be asked to select a language for . Select to continue. You will also be asked to select and confirm a password for the MySQL administrative user.
Another prompt that you will get is whether to create a self-signed SSL certificate for . You should select “Yes”. You will have to enter the “commonName” for your SSL certificate. This is just your fully qualified domain name:
For , you will be asked what kind of mail configuration you need. Select . You will then be asked to choose the system mail name. You should set this to your domain name as well:
For phpMyAdmin, the software has the ability to automatically configure itself based on your web server. Select “apache2” and press “SPACE” to select that option. Hit “TAB” then “ENTER” to make the selection.
Later on, you will asked whether you wish to configure the database for phpMyAdmin with . Choose “Yes” here. You will need to enter the password of the MySQL administrator account that you selected above. You can then select and confirm a password for the phpMyAdmin user.
At this point, all of your components should be installed.
OpenSuSE
- The Perfect Server – OpenSUSE 13.1 x86_64 (Apache2, Dovecot, ISPConfig 3)
- The Perfect Server – OpenSUSE 12.2 x86_64 (Apache2, Dovecot, ISPConfig 3)
- The Perfect Server – OpenSUSE 12.2 x86_64 (nginx, Dovecot, ISPConfig 3)
- The Perfect Server – OpenSUSE 12.1 x86_64 With Apache2
- The Perfect Server – OpenSUSE 12.1 x86_64 With Nginx
- The Perfect Server – OpenSUSE 11.4 x86_64
- The Perfect Server – OpenSUSE 11.3 x86_64
- The Perfect Server – OpenSUSE 11.2 x86_64
- Script For Automatically Setting Up A Perfect Server On OpenSUSE 11.2 And Installing ISPConfig 3
- The Perfect Server – OpenSUSE 11.1 x86_64
- The Perfect Server – OpenSUSE 11.1 i386
- The Perfect Server – OEL 5.4
Prerequisites
The applications of the ISPConfig Migration Toolkit requires you to have a valid license to use them. You don’t need an extra license for the target server or further source servers. The migration script asks for the license key when you start it.
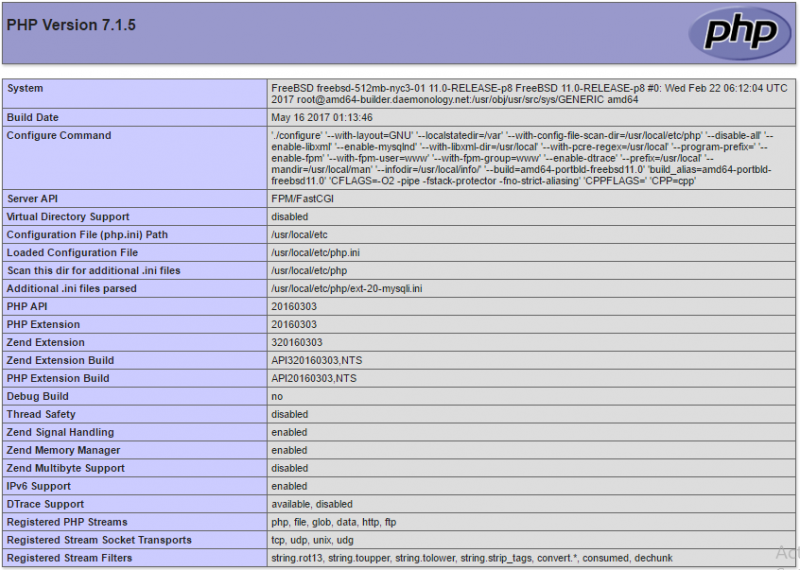
The tools support PHP versions between 5.3 – 7.3 on the source server. The PHP version on the target server does not matter, it just has to be supported by ISPConfig itself.
When an ISPConfig installation is migrated, then the ISPConfig version on the new server must be the same or a newer version than the ISPconfig version that is used on the old server. In other words: you can not use the tools to downgrade a system to an older ISPConfig release.
The Tools require the ioncube loader. The ioncube loader will be installed automatically in a temporary folder if it is not already present on the server, there is no manual configuration required, the php.ini of your server is not altered.
You cannot migrate from and to the same server. You need one source server and one target server. The source server is the one that has the data you want to import, the target server is the one with ISPConfig 3 or 3.1 already installed.
Currently, the Migration Tool cannot import client templates (the client limits get imported). ISPCopy is not affected by this limitation.
You can find tutorials for setting up a new ISPConfig server here. We recommend to use Debian or Ubuntu, but CentOS works as well.
Your installed PHP version on the server needs to support MySQL, SOAP and SSL. Check that you have those PHP modules installed, otherwise, the importer might fail to work.
You need to have postfix with courier or dovecot as mail server on the SOURCE server.
What’s new in ISPConfig 3.1.9
This release contains an important security fix for an authenticated local root vulnerability in the ISPConfig website cron system, the vulnerability has the CVE number CVE-2017-17384 assigned and has been reported to us by Chris Kessler. The update should be installed immediately. All ISPConfig 3 versions before 3.1.9 are affected.
An attacker requires either the correct ISPConfig admin password or a remote user (valid username and password) which has the permissions to create cronjobs or a client login with permission to create cronjobs.
We received reports that the net is currently scanned for ISPConfig installations with weak admin passwords, especially for systems with password ‘admin’. Ensure that your system uses a strong admin user password to protect your server!
The ISPConfig 3.1.9 release scans your system for potentially malicious cronjobs and will report them during update.
In case that you can not install the update right now, then a possible temporary attack prevention is to disable the cron plugin by removing the symlink like this:
rm -f /usr/local/ispconfig/server/plugins-enabled/cron_plugin.inc.php
It is not possible to create cronjobs from within ISPConfig after you deleted that symlink (cronjobs will show up in ISPConfig UI in that case but will not get added to the Linux cron.d directory). The symlink in plugins-enabled folder to the cron plugin in the plugins-available folder has to be added again to get the cron functionality back.
If you like to scan your system for potentially malicious cronjobs on the shell, use this command (copy / paste it on the shell as root user to execute it):
IFS=$'\n' ;
for F in $(find /etc/cron.d -type f -name "ispc_*") ; do
 USR=${F:17} ;
 if ] ; then
  USR=${USR:9} ;
 fi ;
 USR=${USR%.*} ;
 echo "Checking cron file $F for user $USR";
 for L in $(awk '{print $6}' "$F") ; do
  if ] ; then
   echo "WARNING: $F contains cron job for user $L" ;
  fi ;
 done ;
done
The 3.1.9 release contains some other minor bugfixes beside the security fix, please see release notes for details.
Supported Linux Distributions
– Debian Etch (4.0) – Stretch (9.0) and Debian testing
– Ubuntu 7.10 – 17.10
– OpenSuSE 11 – 13.2
– CentOS 5.2 – 7
– Fedora 9 – 15
Update
To update existing ISPConfig 3 installations, run these commands in the shell:
cd /tmp
wget http://www.ispconfig.org/downloads/ISPConfig-3.1.9.tar.gz
tar xvfz ISPConfig-3.1.9.tar.gz
cd ispconfig3_install/install
php -q update.php
9. Disable SpamAssassin
Additionally, you need to stop and disable SpamAssassin.
sudo systemctl stop spamassassin.service
sudo systemctl disable spamassassin.service
Next, remove the file:
sudo rm -f /etc/cron.d/awstats
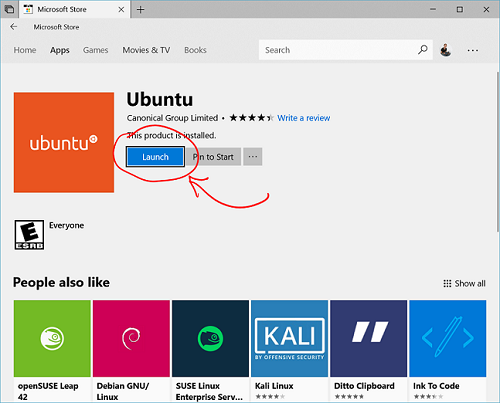
10. Install ISPConfig on Ubuntu 16.04
Finally, let’s install ISPConfig. Download the latest release and install it by using the following commands:
cd /tmp
sudo wget -O ispconfig.tar.gz https://git.ispconfig.org/ispconfig/ispconfig3/repository/archive.tar.gz?ref=stable-3.1
sudo tar xfz ispconfig.tar.gz
cd ispconfig3*/install/
sudo php -q install.php
Answer the questions to complete the installation and then access the ISPConfig hosting control panel at:
https://IP-ADDRESS:8080
You need to replace with your server IP address. Alternatively, you can use a domain name that points to your server IP address. To log in you need to use as username and the password you set up during the installation process. Once you log in you should see something like the following.

Of course, you don’t have to install ISPConfig 3 on Ubuntu 16.04, if you use one of our Ubuntu 16.04 VPS Hosting services, in which case you can simply ask our expert Linux admins to install ISPConfig on Ubuntu 16.04, for you. They are available 24×7 and will take care of your request immediately.
PS. If you liked this post on how to install ISPConfig 3 on Ubuntu 16.04, please share it with your friends on the social networks using the buttons or simply leave a reply below. Thanks.
Using multiple PHP versions
- How to install PHP 7.1, 7.2 and 5.6 as PHP-FPM and FastCGI for ISPConfig 3 on Debian 9
- How to install PHP 7.1 (PHP-FPM & FastCGI) for ISPConfig 3.1 on Debian 8 (Jessie)
- How to install PHP 5.6 as additional PHP-FPM & FastCGI for ISPConfig 3.1 on Ubuntu 16.04
- How to install PHP 7 (PHP-FPM & FastCGI) for ISPConfig 3 on Debian 8 (Jessie)
- How To Build PHP 5.6 (PHP-FPM & FastCGI) with Zend OPcache And APCu For ISPConfig 3 On Debian 7 (Wheezy)
- How To Use Multiple PHP Versions (PHP-FPM & FastCGI) With ISPConfig 3 (Debian Wheezy)
- How To Use Multiple PHP Versions (PHP-FPM & FastCGI) With ISPConfig 3 (Ubuntu 12.10)
- How To Use Multiple PHP Versions (PHP-FPM & FastCGI) With ISPConfig 3 (Ubuntu 12.04 LTS)
- How To Use Multiple PHP Versions (PHP-FPM & FastCGI) With ISPConfig 3 (CentOS 6.3)
- How To Use PHP 4.4.9 (FastCGI) With Apache & ISPConfig 3 (Debian Wheezy)
1 General
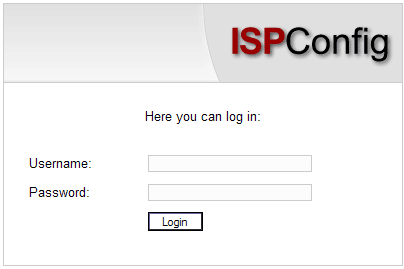
1.1
Login and Password
After you have
received your user name and password and the url of the ISPConfig
system from your reseller you can login. Please go to the URL of the
ISPConfig system (e.g. https://www.domain.tld:81 ; «www.domain.tld» has
to be replaced appropriately) with your browser and enter your user
name and password in the form «Login». Confirm by clicking on «Login».
Forgot your
Password? Please contact your hosting company to help you.
1.2
Customer Interface
The customer
interface consists of the following sections:
-
Menubar
with the menus «Web-Manager», «Web-FTP», «Tools», «Help» and «Logout». - Structure Tree:
The structure tree is the storage system of the ISPConfig system. The
sites are managed here. By clicking on «expand» all folders are opened.
By clicking on «collapse» the tree is closed. - Information
Field for Customers
1.3
ISPConfig Privileges for Customers
As an ISPConfig
customer you can do the following tasks:
|
1.4
Saving
The ISPConfig system
offers you two possibilities to save data you enter into a form:
- «Save»-Button:
Click onto the «Save»-button to save your entries. The information will
be submitted, and the structure tree as well as the start page will be
reloaded in your browser.
- Change the tab:
If a form consists of more than one tab you can simply change the tab
to save your data. The data of the old tab will be saved, and the new
tab will be loaded, whereas the structure tree will not be reloaded.
This technique of saving data allows you to process forms with more
than one tab in one pass and is one of the main characteristics of
ISPConfig.
1.5
Changing the ISPConfig Password
You can edit your
ISPConfig password under
«Tools» -> «Change Password».
Please enter your
current and your new password (2x) into the form «Change Password» and
click on «Save».
1.6
Language Settings
You can set the
language of your ISPConfig system under «Tools» -> «Change Language»
.
In the form «Change
Language» select the language the system should use for you and click
on «Save».
Please note:
The language setting only affects your own account. Other users of the
ISPConfig system (other customers) can select their language
individually.
1.7
Display of Passwords in the ISPConfig System
Passwords that you
entered in the ISPConfig system (e.g. reseller or customer passwords
for accessing the ISPConfig system; passwords for customers’ MySQL
databases) will not be displayed in the ISPConfig system for
security reasons after they were saved! Thus, an empty password field
in an ISPConfig form does not mean that no password was entered before.
An existing
password does not get displayed after the reload of the respective
form.
1.8
Help
Click onto the menu
item «Help».
Here you will find
the customer manual in English and German in PDF format as well as
links to the
knowledgebase on the Projektfarm website.
In addition to that
you can find a question mark next to many input fields in the ISPConfig
system:
If you click on the
question mark a small pop-up window with context-sensitive help will
open.
Step 3: Install MariaDB, Postfix, and Dovecot
Run the folowing commands to install MariaDB, Postfix, and Dovecot.
apt install mariadb-server postfix postfix-mysql openssl dovecot-mysql dovecot-pop3d dovecot-sieve dovecot-lmtpd binutils dovecot-imapd
In the installation process, you will be asked two questions for postfix – make sure you use your hostname as the system mail name.
General type of mail configuration: Internet Site
System mail name:
Next, edit using your preferred text editor.
Basically, we will need to uncomment a few lines in the configuration file and append under the submission and smtpd sections. The file should look like the following:
submission inet n - y - - smtpd
-o syslog_name=postfix/submission
-o smtpd_tls_security_level=encrypt
-o smtpd_sasl_auth_enable=yes
-o smtpd_client_restrictions=permit_sasl_authenticated,reject
# -o smtpd_reject_unlisted_recipient=no
# -o smtpd_client_restrictions=$mua_client_restrictions
# -o smtpd_helo_restrictions=$mua_helo_restrictions
# -o smtpd_sender_restrictions=$mua_sender_restrictions
# -o smtpd_recipient_restrictions=
# -o smtpd_relay_restrictions=permit_sasl_authenticated,reject
# -o milter_macro_daemon_name=ORIGINATING

smtps inet n - y - - smtpd
-o syslog_name=postfix/smtps
-o smtpd_tls_wrappermode=yes
-o smtpd_sasl_auth_enable=yes
-o smtpd_client_restrictions=permit_sasl_authenticated,reject
# -o smtpd_reject_unlisted_recipient=no
# -o smtpd_client_restrictions=$mua_client_restrictions
# -o smtpd_helo_restrictions=$mua_helo_restrictions
# -o smtpd_sender_restrictions=$mua_sender_restrictions
# -o smtpd_recipient_restrictions=
# -o smtpd_relay_restrictions=permit_sasl_authenticated,reject
# -o milter_macro_daemon_name=ORIGINATING
When done, save and exit the file and restart Postfix:
systemctl restart postfix
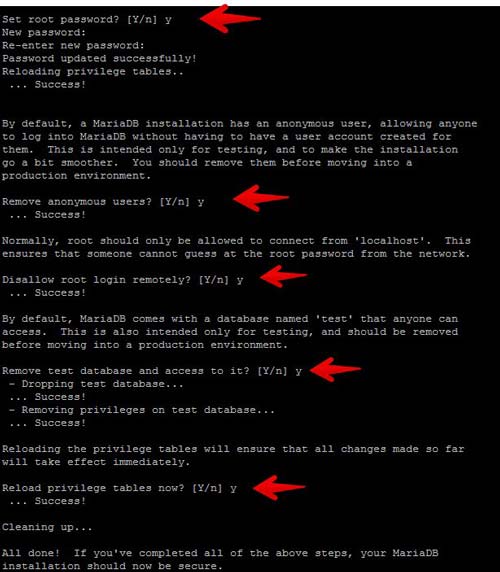
At this point, MariaDB is running and we are now going to create a password for the root user. Run the following command to create a root password, remove the test database, remove the anonymous user then reload the privileges.
mysql_secure_installation

Once created, you can test the password by invoking this command. You will be asked for the root password that you set in the previous command:
# mysql -u root -p
Шаг 3: Установите MariaDB, Postfix и Dovecot
Запустите следующие команды для установки MariaDB, Postfix и Dovecot.
apt установить mariadb-server postfix postfix-mysql openssl dovecot-mysql dovecot-pop3d dovecot-sieve dovecot-lmtpd binutils dovecot-imapd
В процессе установки вам будет предложено два вопроса для postfix — убедитесь, что вы используете свое имя хоста в качестве системного почтового имени.
Общий тип почтовой конфигурации: Почтовое имя системы Интернет-сайта:
Затем отредактируйте используя предпочитаемый вами текстовый редактор.
В принципе, нам нужно раскомментировать несколько строк в файле конфигурации и добавить под разделами представления и smtpd. Файл должен выглядеть следующим образом:
представление инет п - у - - smtpd -o syslog_name = постфикса / представление -o smtpd_tls_security_level = шифровать -o smtpd_sasl_auth_enable = да -o smtpd_client_restrictions = permit_sasl_authenticated, отклонять # -o smtpd_reject_unlisted_recipient = нет # -o smtpd_client_restrictions = $ mua_client_restrictions # -o smtpd_helo_restrictions = $ mua_helo_restrictions # -o smtpd_sender_restrictions = $ mua_sender_restrictions # -o smtpd_recipient_restrictions = # -o smtpd_relay_restrictions = allow_sasl_authenticated, отвергнуть smtpd_sasl_auth_enable = да -o smtpd_client_restrictions = permit_sasl_authenticated, отклонять # -o smtpd_reject_unlisted_recipient = нет # -o smtpd_client_restrictions = $ mua_client_restrictions # -o smtpd_helo_restrictions = $ mua_helo_restrictions # -o smtpd_sender_restrictions = $ mua_sender_restrictions # -o smtpd_recipient_restrictions = # -o smtpd_relay_restrictions = permit_sasl_auth заманчивый, отклонить # -o milter_macro_daemon_name = ORIGINATING
Когда закончите, сохраните и выйдите из файла и перезапустите Postfix:
Системный перезапуск postfix
На этом этапе MariaDB запущен, и теперь мы создадим пароль для пользователя root. Выполните следующую команду, чтобы создать пароль root, удалить тестовую базу данных, удалить анонимного пользователя, а затем перезагрузить эти привилегии.
mysql_secure_installation
После создания вы можете проверить пароль, вызвав эту команду. Вам будет предложено ввести пароль root, который вы установили в предыдущей команде:
# MySQL-гооЬ-р
Migration Tool
Installation and setup
Copy the program archive to the SOURCE server and extract it to a folder of your choice. We recommend to use /root/migration as we will use this directory in this README. If you choose a different directory, please keep in mind to change the path in the commands we mention in here.
Start the migration
You should now be ready to start your migration. The importer will tell you everything you have to configure on your SOURCE or TARGET system during the migration run.
The most simple way to use the importer is:
/root/migration/migrate
There are some arguments that you can use to define the behavior of the importer, please see README file in the migration tool tar.gz file for details.