Как изменить разрешение в ubuntu
Содержание:
Testing configuration
When run without any option, xrandr shows the names of different outputs available on the system (, , etc.) and resolutions available on each, with a * after the current one and a + after the preferred one :
xrandr
Screen 0: minimum 320 x 200, current 3200 x 1080, maximum 8192 x 8192
VGA-1 disconnected (normal left inverted right x axis y axis)
HDMI-1 connected primary 1920x1080+0+0 (normal left inverted right x axis y axis) 531mm x 299mm
   1920x1080     59.93 +  60.00*   50.00    59.94
   1920x1080i    60.00    50.00    59.94
   1680x1050     59.88
…
Note: If your resolution is not present in the above list, see
You can use xrandr to set different resolution (must be present in the above list) on some output:
$ xrandr --output HDMI-1 --mode 1920x1080
When multiple refresh rates are present in the list, it may be changed by the option, either at the same time or independently. For example:
$ xrandr --output HDMI-1 --mode 1920x1080 --rate 60
The option will turn the specified output on if it is off and set the preferred (maximum) resolution:
$ xrandr --output HDMI-1 --auto
It is possible to specify multiple outputs in one command, e.g. to turn off and turn on with preferred resolution:
$ xrandr --output HDMI-1 --off --output HDMI-2 --auto
Note:
- Changes you make using xrandr will only last through the current session.
- xrandr has a lot more capabilities — see for details.
Adoption
- Unix and Linux
- The X.Org Server runs on many free-software Unix-like operating systems, including being adopted for use by most Linux distributions and BSD variants. It is also the X server for the Solaris operating system. X.Org is also available in the repositories of Minix 3.
- Windows
- Cygwin/X, Cygwin’s implementation of the X server for Microsoft Windows, uses the X.Org Server, as do VcXsrv (Visual C++ X-server) and Xming. SSH clients such as PuTTY allow launching of X applications through X11 forwarding on the condition that it is enabled on both the server and client.
- OS X / macOS
- OS X versions prior to Mac OS X Leopard (10.5) shipped with an XFree86-based server, but 10.5’s X server adopted the X.Org codebase. Starting with OS X Mountain Lion, (10.8) X11 is not bundled in OS X; instead, it has to be installed from, for example, the open source XQuartz project. As of version 2.7.4, X11.app/XQuartz does not expose support for high-resolution Retina displays to X11 apps, which run in pixel-doubled mode on high-resolution displays.
Installation
Xorg can be installed with the package.
Additionally, some packages from the group are necessary for certain configuration tasks, they are pointed out in the relevant sections.
Finally, an group is also available, which includes Xorg server packages, packages from the group and fonts.
Tip: You will typically seek to install a window manager or a desktop environment to supplement X.
Driver installation
The Linux kernel includes open-source video drivers and support for hardware accelerated framebuffers. However, userland support is required for OpenGL and 2D acceleration in X11.
First, identify your card:
$ lspci | grep -e VGA -e 3D
Then install an appropriate driver. You can search the package database for a complete list of open-source video drivers:
$ pacman -Ss xf86-video
Xorg searches for installed drivers automatically:
- If it cannot find the specific driver installed for the hardware (listed below), it first searches for fbdev ().
- If that is not found, it searches for vesa (), the generic driver, which handles a large number of chipsets but does not include any 2D or 3D acceleration.
- If vesa is not found, Xorg will fall back to kernel mode setting, which includes GLAMOR acceleration (see ).
In order for video acceleration to work, and often to expose all the modes that the GPU can set, a proper video driver is required:
| Brand | Type | Driver | OpenGL | OpenGL (multilib) | Documentation |
|---|---|---|---|---|---|
| AMD / ATI | Open source | AMDGPU | |||
| ATI | |||||
| Intel | Open source | Intel graphics | |||
| NVIDIA | Open source | Nouveau | |||
| Proprietary | NVIDIA | ||||
| AUR | AUR | AUR |
Note:
- For NVIDIA Optimus enabled laptop which uses an integrated video card combined with a dedicated GPU, see NVIDIA Optimus.
- For Intel graphics on 4th generation and above, see for available drivers.
Other video drivers can be found in the group.
Xorg should run smoothly without closed source drivers, which are typically needed only for advanced features such as fast 3D-accelerated rendering for games. The exceptions to this rule are recent GPUs (especially NVIDIA GPUs), that are not supported by the open source drivers.
AMD
| GPU architecture | Radeon cards | Open-source driver | Proprietary driver |
|---|---|---|---|
| GCN 4and newer | various | AMDGPU | AMDGPU PRO |
| GCN 3 | AMDGPU | Catalyst /AMDGPU PRO | |
| GCN 2 | AMDGPU* / ATI | Catalyst | |
| GCN 1 | AMDGPU* / ATI | Catalyst | |
| TeraScale 2&3 | HD 5000 — HD 6000 | ATI | Catalyst |
| TeraScale 1 | HD 2000 — HD 4000 | Catalyst legacy | |
| Older | X1000 and older | not available |
- *: Experimental
Separate screens
This is the original way of configuring multiple monitors with X, and it has been around for decades. Each physical monitor is assigned as an X screen, and while you can move the mouse between them, they are more or less independent.
Normally the X display has a single identifier such as set in the environment variable, but in this configuration each screen has a different value. The first screen is , the second is and so on.
With this configuration, it is not possible to move windows between screens, apart from a few special programs like GIMP and Emacs which have multi-screen support. For most programs you must change the environment variable when launching to have the program appear on another screen:
# Launch a terminal on the second screen
$ DISPLAY=:0.1 urxvt &
Alternatively, if you have a terminal on each screen launching programs will inherit the value and appear on the same screen they were launched on. But moving an application between screens involves closing it and reopening it again on the other screen.
Working this way does have certain advantages, such as windows popping up on one screen won’t steal the focus away from you if you are working on another screen — each screen is quite independent.
RandR version 1.2 options
- —prop, —properties
- This
option causes xrandr to display the contents of properties for each output.
—verbose also enables —prop. - —fb widthxheight
- Reconfigures the screen to the
specified size. All configured monitors must fit within this size. When this
option is not provided, xrandr computes the smallest screen size that will
hold the set of configured outputs; this option provides a way to override
that behaviour. - —fbmm widthxheight
- Sets the reported values for the physical
size of the screen. Normally, xrandr resets the reported physical size values
to keep the DPI constant. This overrides that computation. - —dpi dpi
- This also
sets the reported physical size values of the screen, it uses the specified
DPI value to compute an appropriate physical size using whatever pixel
size will be set. - —newmode name mode
- New modelines can be added to the server
and then associated with outputs. This option does the former. The mode is
specified using the ModeLine syntax for xorg.conf: hdisp hsyncstart hsyncend
htotal vdisp vsyncstart vsyncend vtotal flags. flags can be zero or more
of +HSync, -HSync, +VSync, -VSync, Interlace, DoubleScan, CSync, +CSync,
-CSync. Several tools permit to compute the usual modeline from a height,
width, and refresh rate, for instance you can use cvt. - —rmmode name
- This removes
a mode from the server if it is otherwise unused. - —addmode output name
- Add
a mode to the set of valid modes for an output. - —delmode output name
- Remove
a mode from the set of valid modes for an output.
Per-output options
- —output
output - Selects an output to reconfigure. Use either the name of the output
or the XID. - —auto
- For connected but disabled outputs, this will enable them
using their preferred mode (or, something close to 96dpi if they have no
preferred mode). For disconnected but enabled outputs, this will disable
them. - —mode mode
- This selects a mode. Use either the name or the XID for mode
- —preferred
- This selects the same mode as —auto, but it doesn’t automatically
enable or disable the output. - —pos xxy
- Position the output within the screen
using pixel coordinates. In case reflection or rotation is applied, the
translation is applied after the effects. - —rate rate
- This marks a preference
for refresh rates close to the specified value, when multiple modes have
the same name, this will select the one with the nearest refresh rate. - —reflect
reflection - Reflection can be one of ‘normal’ ‘x’, ‘y’ or ‘xy’. This causes the output
contents to be reflected across the specified axes. - —rotate rotation
- Rotation
can be one of ‘normal’, ‘left’, ‘right’ or ‘inverted’. This causes the output contents
to be rotated in the specified direction. ‘right’ specifies a clockwise rotation
of the picture and ‘left’ specifies a counter-clockwise rotation. - —left-of, —right-of,
—above, —below, —same-as another-output - Use one of these options to position
the output relative to the position of another output. This allows convenient
tiling of outputs within the screen. The position is always computed relative
to the new position of the other output, so it is not valid to say —output
a —left-of b —output b —left-of a. - —set property value
- Sets an output property.
Integer properties may be specified as a valid (see —prop) decimal or hexadecimal
(with a leading 0x) value. Atom properties may be set to any of the valid
atoms (see —prop). String properties may be set to any value. - —off
- Disables
the output. - —crtc crtc
- Uses the specified crtc (either as an index in the
list of CRTCs or XID). In normal usage, this option is not required as xrandr
tries to make sensible choices about which crtc to use with each output.
When that fails for some reason, this option can override the normal selection. - —gamma red:green:blue
- Set the specified floating point values as gamma correction
on the crtc currently attached to this output. Note that you cannot get
two different values for cloned outputs and that switching an output to
another crtc doesn’t change the crtc gamma corrections at all.
Как изменить разрешение экрана на Ubuntu
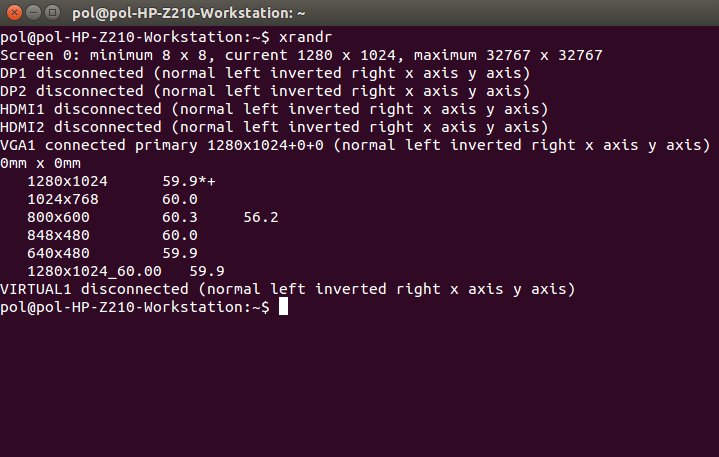
Итак приступим, открываем терминал вводим команду:
команда показывает нам существующие доступные разрешения для установки, а так же порты через которые подключены те или иные мониторы. В моем случае монитор был подключен через порт VGA, соответственно на скрине ниже мы можем увидеть такую строчку VGA1 connected ……
Теперь нам необходимо узнать данные о том разрешение которые мы хотим установить, нам поможет команда:
цифры подставляйте свои, я же хочу изменить разрешение на 1600х1200
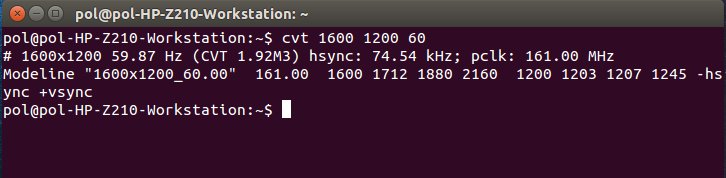
Сейчас нам понадобится строчка после слова Modeline, выделяем и копируем, в моем случае значения которые мне понадобятся в дальнейшем «1600х1200_60.00» 161.00 1600 1712 1880 2160 1200 1203 1207 1245 -hsync +vsync
Вводим в терминале и подставляем наши значения:

Теперь нашему режиму надо задать интерфейс через который мы подключаем монитор, в моем случае это VGA1, у вас же это может быть и DVI и HDMI, или же экран ноутбука LVDS.

Осталось только установить необходимое разрешение, можем это сделать как через Параметры системы>Настройка экранов так и через терминал:

Казалось бы все, но это не так, !После перезагрузки разрешение может слететь! ,как это было у меня, придется еще немного поиграться со скриптами, не пугайтесь, там ничего сложного. Нам необходимо создать скрипт с проведенными нами ранее действиями и установить его в автозагрузку.
Создание скрипта
В одной из статей мне посоветовали создать в домашней папке папку для скриптов с именем .bin и в дальнейшем помещать все скрипты туда. Итак создаем папку, и в этой папке создаем текстовый файл назовем его например screen и задаем ему расширение .sh Затем добавляем в него команды которые мы сделали ранее, должно получится примерно так:

Теперь готовый скрипт необходимо поместить в файл автозагрузки 50-unity-greeter.conf который находится в /usr/share/lightdm/lightdm.conf.d . Можем открыть его с помощью терминала, просто введите:

Или же просто пройдите по этому пути и откройте его текстовым редактором. Добавляем в конце строку display-setup-script=/home/pol/.bin/screen.sh . Если вы не создавали папку .bin, просто задайте путь где находится ваш скрипт, имя юзера тоже желательно изменить на свой =).

Еще где то я вычитал что разрешение можно изменить правкой файла xorg.conf, но руки изучить и опробовать этот метод пока не дошли, по крайней мере ничего не получилось. В дальнейшем я еще вернусь к этому вопросу и попробую описать этот метод в будущих статьях.
Всем спасибо за внимание, надеюсь у вас все получилось. источник
источник
Реализация[править]
Заставить xorg скриптом переключать к нужному видеовыходу картинку максимального разрешения. При этом приходится отключать другой видеовыход, чтоб драйвер не пробовал искать компромисс.
Для начала я определил, как называются видеовыходы (обозначены полужирным шрифтом):
#xrandr
Screen 0: minimum 320 x 200, current 1280 x 800, maximum 1680 x 1600
VGA-0 connected (normal left inverted right x axis y axis)
  1680x1050      60.0 +   60.0
<... cut ...>
  720x400        70.1
LVDS connected 1280x800+0+0 (normal left inverted right x axis y axis) 0mm x 0mm
  1280x800       60.0*+
 <... cut ...>
  640x480        59.9
HDMI-0 disconnected (normal left inverted right x axis y axis)
Затем был создан первый скрипт, который:
- Отключал экран ноутбука (LVDS)
- Переключал монитор (VGA-0) в наилучший режим
#!/bin/bash
xrandr --output LVDS --off
xrandr --output VGA-0 --auto
Второй скрипт, позволял переключаться обратно на экран ноутбука:
#!/bin/bash
xrandr --output VGA-0 --off
xrandr --output LVDS --auto
Третий, включал оба выхода ( VGA-0 и LVDS ) в режиме дублирования, при этом использовалось «минимальное общее» разрешение
#!/bin/bash
xrandr --output LVDS --off
xrandr --output VGA-0 --off
xrandr --output LVDS --mode 1024x768
xrandr --output VGA-0 --mode 1024x768
TODO: Найти устройство с HDMI и попробовать выводить сигнал на него.
Настройка
xrandr сам по себе является простым интерфейсом для конфигурации RandR и не имеет собственных файлов конфигурации. Тем не менее существует множество способов задать нужные параметры:
- Сконфигурировать RandR можно без помощи xrandr через файлы конфигурации , смотрите так же . Это метод позволяет создать только статическую конфигурацию.
- Также можно использовать xrandr непосредственно в время запуска X сервера. Смотрите .
- Динамические конфигурации можно получить используя различные скрипты вызова xrandr которые в свою очередь можно запускать по определённым события ( подключение, отключение интерфейсов и.т.п. ), смотрите udev и acpid. В секции приведено несколько скриптов.
Примечание: В KDM и GDM есть сценарии запуска которые выполняются до запуска X сервера. Для GDM, это , а для KDM и для SDDM это . Этот метод требует прав на доступ к корневым каталогам и изменения файлов системных конфигураций, однако позволяет внести изменения до запуска xprofile.
Примеры
1. Позволяет включать интерфейс VGA или .др, отключая при этом LVDS или др.
Примечание:
Для ноутбуков по умолчанию используется $IN LVDS.
#!/bin/bash

IN="LVDS1"
EXT="VGA1"

if (xrandr | grep "$EXT disconnected"); then
    xrandr --output $EXT --off --output $IN --auto
else
    xrandr --output $IN --off --output $EXT --auto
fi
2. Позволяет включать интерфейс VGA или .др , и затем отключать их после отключения внешнего монитора.
#!/bin/bash

IN="LVDS1"
EXT="VGA1"

if (xrandr | grep "$EXT disconnected"); then
    xrandr --output $IN --auto --output $EXT --off
else
    xrandr --output $IN --auto --primary --output $EXT --auto --right-of $IN
fi
3. Позволяет автоматизировать выбор режимов работы для всех подключённых мониторов.
# get info from xrandr
connectedOutputs=$(xrandr | grep " connected" | sed -e "s/\(\+\) connected.*/\1/")
activeOutput=$(xrandr | grep -E " connected (primary )?+" | sed -e "s/\(\+\) connected.*/\1/")

# initialize variables
execute="xrandr "
default="xrandr "
i=1
switch=0

for display in $connectedOutputs
do
	# build default configuration
	if
	then
		default=$default"--output $display --auto "
	else
		default=$default"--output $display --off "
	fi

	# build "switching" configuration
	if
	then
		execute=$execute"--output $display --auto "
		switch=0
	else
		execute=$execute"--output $display --off "
	fi

	# check whether the next output should be switched on
	if
	then
		switch=1
	fi

	i=$(( $i + 1 ))
done

# check if the default setup needs to be executed then run it
echo "Resulting Configuration:"
if
then
	echo "Command: $default"
	`$default`
else
	echo "Command: $execute"
	`$execute`
fi
echo -e "\n$(xrandr)"
4. Позволяет автоматизировать выбор режимов работы для всех подключённых мониторов.
Примечание:
I am using it with srandrdAUR in my i3-wm like so (#Example 3 didn’t work for me for some reason or other):.
~/.xprofile
srandrd ~/.i3/detect_displays.sh
#!/bin/bash

XRANDR="xrandr"
CMD="${XRANDR}"
declare -A VOUTS
eval VOUTS=$(${XRANDR}|awk 'BEGIN {printf("(")} /^\S.*connected/{printf("=%s ", $1, $2)} END{printf(")")}')
declare -A POS
#XPOS=0
#YPOS=0
#POS="${XPOS}x${YPOS}"

POS=(=0 =0)

find_mode() {
  echo $(${XRANDR} |grep ${1} -A1|awk '{FS=""} /^\s/{printf("WIDTH=%s\nHEIGHT=%s", $4,$5)}')
}

xrandr_params_for() {
  if
  then
    eval $(find_mode ${1})  #sets ${WIDTH} and ${HEIGHT}
    MODE="${WIDTH}x${HEIGHT}"
    CMD="${CMD} --output ${1} --mode ${MODE} --pos ${POS}x${POS}"
    POS=$((${POS}+${WIDTH}))
    return 0
  else
    CMD="${CMD} --output ${1} --off"
    return 1
  fi
}

for VOUT in ${!VOUTS}
do
  xrandr_params_for ${VOUT} ${VOUTS}
done
set -x
${CMD}
set +x
5. Позволяет включить интерфейс если подключённое устройство находится в спящем режиме(DisplayPort и аналоги).
local times=2
local seconds=1

while ; do
    xrandr 1> /dev/null
    sleep $seconds
    let times-=1
done
Module-based options
The kernel module allows for configuration via . Some of the module options impact power saving.
A list of all options along with short descriptions and default values can be generated with the following command:
$ modinfo -p i915
To check which options are currently enabled, run
# systool -m i915 -av
You will note that many options default to -1, resulting in per-chip powersaving defaults. It is however possible to configure more aggressive powersaving by using .
Framebuffer compression (enable_fbc)
Making use of Framebuffer compression (FBC) can reduce power consumption while reducing memory bandwidth needed for screen refreshes.
To enable FBC, use as kernel parameter or set in :
/etc/modprobe.d/i915.conf
options i915 enable_fbc=1
To enable fastboot, set as kernel parameter or set in :
/etc/modprobe.d/i915.conf
options i915 fastboot=1
Linux console
Fonts outside the kernel
The largest font present in the package is and other packages like contain further alternatives, such as (normal) and (bold). See for configuration details. Also see in particular for applying the font setting during the early userspace boot sequence.
After changing the font, it is often garbled and unreadable when changing to other virtual consoles (). To fix this you can for KMS, such as (substitute in the native resolution of your HiDPI display), and reboot.
Users booting though UEFI may experience the console and boot loader being constrained to a low resolution despite correct KMS settings being set. This can be caused by legacy/BIOS boot being enabled in UEFI settings. Disabling legacy boot to bypass the compatibility layer should allow the system to boot at the correct resolution.
Avoid screen tearing
Tearing can be avoided by forcing a full composition pipeline, regardless of the compositor you are using. To test whether this option will work, run:
$ nvidia-settings --assign CurrentMetaMode="nvidia-auto-select +0+0 { ForceFullCompositionPipeline = On }"
Or click on the Advanced button that is available on the X Server Display Configuration menu option. Select either Force Composition Pipeline or Force Full Composition Pipeline and click on Apply.
In order to make the change permanent, it must be added to the section of the Xorg configuration file. When making this change, should be enabled and should be disabled in the driver configuration as well. See example configuration below:
/etc/X11/xorg.conf.d/20-nvidia.conf
Section "Device"
        Identifier "Nvidia Card"
        Driver     "nvidia"
        VendorName "NVIDIA Corporation"
        BoardName  "GeForce GTX 1050 Ti"
EndSection

Section "Screen"
    Identifier     "Screen0"
    Device         "Device0"
    Monitor        "Monitor0"
    Option         "metamodes" "nvidia-auto-select +0+0 {ForceFullCompositionPipeline=On}"
    Option         "AllowIndirectGLXProtocol" "off"
    Option         "TripleBuffer" "on"
EndSection
If you do not have an Xorg configuration file, you can create one for your present hardware using (see ) and move it from to the preferred location .
Note: Many of the configuration options produced in by using are set automatically by the driver and are not needed. To only use this file for enabling composition pipeline, only the section containing lines with values for and are necessary. Other sections may be removed from this file.
Multi-monitor
For multi-monitor setup you will need to specify for each display. For example:
$ nvidia-settings --assign CurrentMetaMode="DP-2: nvidia-auto-select +0+0 {ForceCompositionPipeline=On}, DP-4: nvidia-auto-select +3840+0 {ForceCompositionPipeline=On}"
Without doing this, the command will disable your secondary display.
You can get the current screen names and offsets using :
$ nvidia-settings --query CurrentMetaMode
The above line is for two 3840×2160 monitors connected to DP-2 and DP-4. You will need to read the correct by exporting and append to each of your displays. Setting only affects the targeted display.
Tip: Multi monitor setups using different model monitors may have slightly different refresh rates. If vsync is enabled by the driver it will sync to only one of these refresh rates which can cause the appearance of screen tearing on incorrectly synced monitors. Select to sync the display device which is the primarily used monitor as others will not sync properly. This is configurable in as or by installing and using the graphical configuration options.
1. GL threads
Set GL threads to sleep by exporting to just . Unlike setting up a global environment variable, this affects only KWin. It should also have the advantage over other workarounds, like forcing triple buffering or forcing composition pipeline in the driver, that it doesn’t introduce additional stuttering when scrolling in Firefox or moving windows.
The script can be executed automatically at login with an autostart script:
~/.config/autostart-scripts/kwin.sh
#!/bin/bash

(sleep 2s && __GL_YIELD="USLEEP" kwin_x11 --replace)
Flag the script as executable.
The argument helps to prevent issues when KWin is restarted/hanging after logging in, you might need to increase this time.
2. Use TripleBuffering
Make sure has been enabled for the driver, see .
Create the file:
/etc/profile.d/kwin.sh
export KWIN_TRIPLE_BUFFER=1
Use OpenGL 2.0 or later as rendering backend under System Settings > Display and Monitor > Compositor.
Тест режимов вывода изображения
Если запустить xrandr без дополнительных параметров, то она проверит все доступные интерфейсы (, , и.т.д.) выведет их состояние и возможные режимы работы для них.
$ xrandr
Screen 0: minimum 320 x 200, current 1440 x 900, maximum 8192 x 8192
VGA disconnected (normal left inverted right x axis y axis)
LVDS connected (normal left inverted right x axis y axis)
   1440x900       59.9*+
   1280x854       59.9
   1280x800       59.8
...
Вы можете использовать xrandr для установки разрешения на нужном интерфейсе (режим работы с этим разрешением должен быть в списке выше):
$ xrandr --output LVDS --mode 1280x800
Если в списке присутствуют несколько режимов с одинаковым разрешением, но разной частотой, то необходимо в параметрах так же указывать нужную частоту , либо её можно задать потом отдельно. Например:
$ xrandr --output LVDS --mode 1280x800 --rate 75
Параметр запустит интерфейс в режиме с максимально возможными параметрами (имеющимися в списке выше).
$ xrandr --output LVDS --auto
Можно указывать несколько интерфейсов в одной команде например, выключить и включить в автоматическом режиме:
$ xrandr --output LVDS --off --output HDMI-0 --auto
Примечание:
- Изменения внесённые xrandr не запоминаются после окончания X сессии.
- xrandr имеет большое количество параметров — читайте .