Удалённый рабочий стол ubuntu: возможные варианты подключения
Содержание:
- Prepare Windows RDP to Ubuntu Connections
- Установка и настройка VNC сервера
- Обмен файлами между Windows и Linux в рамках сеанса rdp
- PulseAudio
- Enabling Ubuntu Remote Desktop
- Локальные группы для доменных пользователей[править]
- Remote Control Ubuntu With VNC
- Set Up a Remote Desktop RDP Connection With Ubuntu
- Conclusion
- Installation
- Why Remote Connect to Ubuntu From Windows?
- building on CentOS 5.x
- WindowManager
- Конфигурирование RDP
- Connect to Ubuntu from Windows With VNC
- Ротация логов xrdp
- Управление XRDP
Prepare Windows RDP to Ubuntu Connections
Remote access solutions are simple to set up and manage across the same network. However, if you’re working from home, this instantly complicates things.
To use VNC and RDP with a PC on a different network, you’ll need to enable access to the remote computer via its router. This is done using «port forwarding.» Before you set this up, however, you’ll need the IP address.
Find Your Ubuntu PC’s IP Address
Before you can establish a connection to your Ubuntu device over RDP or VNC, you’ll need the IP address.
The first way is the easiest. Physically go to the Ubuntu machine, press Ctrl + Alt + T to open the Terminal, and input the command:
Look for the «inet addr» against the connection you’re currently using. For instance, if you’re on Wi-Fi, look for wlan0. If the computer is connected to the network for Ethernet, look for eth0.
Another way to find the IP address is to find the connection icon in the panel, right-click, and select Connection Information. You’ll find the IP address listed here.
Neither of these options open? You can also connect to your router directly, via your computer’s browser.
Once signed into the router’s admin console, you’ll be able to see which devices are connected. Just look for your Ubuntu device name, find the IP address, and make a note of it for later.
Enable Port Forwarding
To access a computer on another network (e.g. your work network) you need to enable port forwarding on the router where your Ubuntu PC is located.
Start by establishing the IP address of the router. You can use the ip r command for this, with grep to specify the default:
Make a note of the IP address, then open it in your browser to display the router’s admin console. Enabling port forwarding is simple:
- Look for the Port Forwarding settings
- Create a New Rule labeled Remote Desktop
- Set the Internal Port number to 3389
- Set the External Port number to 3389
- Input the IP address of the Ubuntu PC
- Click Save
Note that these steps are generic and will differ depending on your router. For detailed steps, check your router documentation.
Once saved, you should be able to RDP into the Ubuntu PC remotely via your organization’s static IP address. If your employer does not use a static IP (unlikely, but it happens) then use a dynamic DNS provider instead.
Note: your organization’s system admin can set up port forwarding if you’re not using commercial remote desktop tools.
Set Up Access Using SSH
To save time you might want to install PuTTY on your PC (or just try the built-in Windows SSH function). This enables you to set up an SSH connection, which gives remote access to the Ubuntu command line.
To be clear: this isn’t a remote desktop option; there is no mouse control. But it is useful to have to remotely install the tools you’ll be using. SSH is often disabled by default, however, so if it is not installed, you’ll need to fix this.
In short, it depends on which Ubuntu version you’re using, and whether you’ve used SSH previously.
Once installed via the terminal (sudo apt install openssh-server) you’ll be able to make a remote connection. Simply enter the IP address and the Ubuntu username and password. You can then use the terminal to install the tools you need for RDP and for VNC.
Установка и настройка VNC сервера
Рассмотрим два варианта использования графической оболочки — xfce и gnome.
Если используем XFCE
Установка
Установку выполняем следующей командой:
apt install xfce4 xfce4-goodies tightvncserver
Задаем пароль для доступа по удаленному рабочему столу. Для этого вводим команду:
vncserver
… на запрос пароля вводим его дважды.
* Если система не затребует второй раз пароль, проверьте внимательно сообщение. Сервер может выдать ошибку, если пароль будет короткий.
После будет предложено ввод пароля для гостевого доступа — можно согласиться (y) и ввести пароль или отказаться (n).
Настройка
Для начала, останавливаем экземпляр VNC сервера:
vncserver -kill :1
* экземпляр :1, по умолчанию, слушает на порту 5900+1 (5901).
Настраиваем VNC сервер:
vi ~/.vnc/xstartup
#!/bin/bash
xrdb $HOME/.Xresources
startxfce4
Снова запускаем vncserver:
vncserver
Установка
Установку выполняем следующей командой:
apt install ubuntu-desktop gnome-panel gnome-settings-daemon metacity nautilus gnome-terminal vnc4server
Задаем пароль для доступа по удаленному рабочему столу. Для этого вводим команду:
vncserver
… на запрос пароля вводим его дважды.
* Если система не затребует второй раз пароль, проверьте внимательно сообщение. Сервер может выдать ошибку, если пароль будет короткий.
После будет предложено ввод пароля для гостевого доступа — можно согласиться (y) и ввести пароль или отказаться (n).
Настройка
Для начала, останавливаем экземпляр VNC сервера:
vncserver -kill :1
* экземпляр :1, по умолчанию, слушает на порту 5900+1 (5901).
Настраиваем VNC сервер для текущего пользователя:
vi ~/.vnc/xstartup
#!/bin/sh
# Uncomment the following two lines for normal desktop:
# unset SESSION_MANAGER
# exec /etc/X11/xinit/xinitrc
[ -x /etc/vnc/xstartup ] && exec /etc/vnc/xstartup
[ -r $HOME/.Xresources ] && xrdb $HOME/.Xresources
xsetroot -solid grey
vncconfig -iconic &
x-terminal-emulator -geometry 80×24+10+10 -ls -title «$VNCDESKTOP Desktop» &
x-window-manager &
gnome-panel &
gnome-settings-daemon &
metacity &
Снова запускаем vncserver:
vncserver
Обмен файлами между Windows и Linux в рамках сеанса rdp
Остро встает вопрос о возможности обмена файлами в рамках сессии между локальным и удаленным компьютером, так как перетаскивание не поддерживается. Первое, что можно сделать, это при помощи опции «-r disk:<sharename>=<path>» подключить любую локальную папку как диск Windows, который можно будет увидеть в «Мой компьютер». Например команда
rdesktop -r disk:share=/home/documents -z -P -g 1280×900 -u USERNAME -p PASSWORD SERVER_IP
кроме всего прочего подключит папку /home/documents в качестве диска «share» в «Мой компьютер» на стороне Windows. Вы сможете читать и записывать файлы. Однако, следует помнить, что владельцем подключаемой папки должен быть тот пользователь, от лица которого запускается rdp client. Иначе (запуская rdesktop от лица, например, root) вы не сможете потом получить доступ к записанным файлам, пока не установите правильного владельца. Если это произошло, воспользуйтесь командой chown для смены владельца и группы:
chown -R /home/documents USERNAME:USERGROUP
Второй доступный способ, это при помощи протоколов SMB или NFS сделать общую сетевую папку. Читайте документацию по созданию таких хранилищ и их подключению к системам Windows и Linux
PulseAudio
Звук работает с сервером PulseAudio.
Проверено с клиентами FreeRDP и стандартным для MS Windows .
cd ~
#Build Debian 8 pulseaudio xrdp sink modules
#You should download the version of pulseaudio nearest to that in your disto – check using:

pulseaudio --version


#Now, download the pulseaudio source and configure – note you do not have to make / make install pulseaudio.
#Be sure to change the version number (5.0, in bold, below) to match that from the command above.

sudo apt-get install -y libjson0-dev libsndfile1-dev libspeex-dev libspeexdsp-dev libcap-dev


cd tmp
wget https://freedesktop.orgsoftwarepulseaudioreleasespulseaudio-5.0.tar.gz
tar -zxvf pulseaudio-5.0.tar.gz
cd tmppulseaudio-5.0
.configure


#Now, build the modules and copy them to /usr/lib/pulse-5.0/modules and, finally for the xrdp sink modules, call them to /etc/pulse/default.pa
#Again, watch the version numbers / paths as you may need to change these for your build.

#Переходим в эту папку и делаем всё в ней
cd ~installX11RDP-o-Maticworkxrdpsesmanchansrvpulse

# Change the patch here to match your path
sudo sed -i 's/PULSE_DIR = \/home\/lk\/pulseaudio-1.1/PULSE_DIR = \/tmp\/pulseaudio-5.0/g' Makefile
sudo make
sudo cp *.so usrlibpulse-5.0modules


cd ~
sudo cp etcpulsedefault.pa ~
sudo sed -i -e '$amodule-xrdp-sink.so' etcpulsedefault.pa
sudo sed -i -e '$amodule-xrdp-source.so' etcpulsedefault.pa
Enabling Ubuntu Remote Desktop
Enabling the Ubuntu Remote Desktop could not be easier. You don’t need to install a thing: Ubuntu has built in VNC support. However, you will need to move to the Ubuntu PC to set it up the first time.
Click Search and enter desktop sharing, then click Sharing. You’ll be presented with a simple window of options. Along the top edge of the window, click the switch to enable the feature. Next, click the Screen Sharing button and again, find the switch on the window and click it to enable.
Ensure that Allow connections to control the screen is enabled. For security purposes, you should also set a password here.
As soon as you enable remote connection, the local name of your Ubuntu device will be displayed. This is a VNC address—keep a note of it for remote access later.
Локальные группы для доменных пользователей[править]
Вариант с локальной группой для доменных пользователей не работает, поэтому для них работает отключение группы (или указание любой нелокальной, даже несуществующей):
В файле /etc/xrdp/sesman.ini
TerminalServerUsers=
После исправления файла запустите
systemctl restart xrdp-sesman
Журнал для sesman (сеансов пользователей) находится в файле /var/log/xrdp-sesman.log.
Данная ситуация возникла потому, что в больших доменах показ всех членов группы нагружает систему, поэтому в /etc/sssd/sssd.conf по умолчанию используется значение enumerate = false
Если в разделе домена в файле /etc/sssd/sssd.conf явно указать enumerate=true:
[domain/TEST.ALT]
id_provider = ad
auth_provider = ad
chpass_provider = ad
default_shell = /bin/bash
fallback_homedir = /home/%d/%u
debug_level =
enumerate = true
то в /etc/xrdp/sesman.ini можно указать
TerminalServerUsers=domain users
Примечание:
Доменные группы под Линуксом видны в нижнем регистре.
Не забудьте перезапустить службы sssd и xrdp-sesman.
Remote Control Ubuntu With VNC
Controlling an Ubuntu PC over VNC is straightforward from another device. Just be sure you have a VNC client or viewer app installed. Here’s how to use VNC from another desktop computer.
Remote Desktop Ubuntu From Another Linux Device
Ubuntu (and many other Linux distributions) comes with a preinstalled remote desktop viewer. This means that once your Ubuntu PC is configured for remote connection, you can connect to it from whatever Linux distro you’re using.
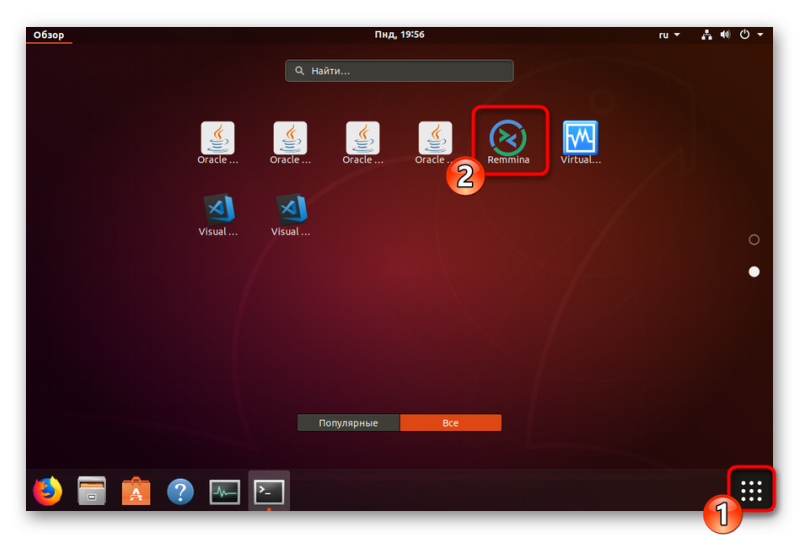
- Click Search and enter remote.
- Select the first result, Remmina.
- Select VNC in the drop-down menu on the left.
- Enter the VNC address (or IP address) you noted earlier for the Ubuntu PC.
- Tap Enter to commence the connection.
- When prompted, input the password.
As you add devices, they’ll be saved in the list so you can quickly access them in future.
Use this tool to connect to other Ubuntu desktops on your network, and you’ll be controlling that computer remotely. The tool can also be used to control any computer with a VNC client installed.
Remotely Connect to Ubuntu From Windows
Want to control your Ubuntu computer from a Windows computer? Using the same VNC address (or your Ubuntu computer’s IP address) you can.
First, however, you’ll need a VNC client, such as VNC Viewer (from VNC Connect) installed on your Windows computer. Then you can connect to your Ubuntu machine by entering the VNC or IP address.
Check our guide about establishing a remote desktop connection to Ubuntu from Windows for full details.
Establish an Ubuntu Remote Desktop From a Mac
Mac users wanting to connect to their Ubuntu machines should use the built-in VNC Viewer tool.
Again, connecting to your Ubuntu machine is a simple matter of entering your IP address or the provided VNC address., Want for some in-depth information about using VNC on a Mac?
Check our tutorial to easy remote desktop support on the Mac.
Set Up a Remote Desktop RDP Connection With Ubuntu
As noted, RDP clients are available for most platforms. For example, you can use Remmina’s RDP function if you’re using a Linux computer to remotely control Ubuntu. Similarly, RDP is built into Windows.
If you’re using a standard desktop, use these steps to use RDP to connect to Ubuntu.
- Ubuntu/Linux: Launch Remmina and select RDP in the drop-down box. Enter the remote PC’s IP address and tap Enter.
- Windows: Click Start and type rdp. Look for the Remote Desktop Connection app and click Open. Input the IP address of your Ubuntu computer and click Connect.
Mac: Start by installing the Microsoft Remote Desktop 10 software from the App Store. Launch the software, click Add Desktop, add the IP address under PC Name, then Save. Simply double-click the icon for the connection in the app window to start a remote desktop session.
Our guide to using RDP on a Mac will help here. It’s aimed at remote controlling a Windows PC, but the setup is the same for Linux.
Note that RDP will prompt for your Ubuntu PC account credentials when the connection is first established.
Conclusion
Today’s blog post has explained how to use remote desktop connection in Ubuntu Linux. Configuring inbound and outbound remote desktop connections in Ubuntu is affordable for the majority of users. You need to install a remote desktop client for connecting from Ubuntu to Windows machines and other machines. To connect to your Ubuntu Linux machine, you need to install and configure a remote desktop server on your Linux machine. Xrdp and XFCE must be installed for this purpose.
If for some reason you cannot use RDP for Ubuntu, consider using VNC, which is the protocol alternative to RDP. Using RDP and VNC allows you to connect to your physical and virtual machines remotely with the graphical user interface. Don’t forget to back up your Linux servers and virtual machines to protect your data. Download NAKIVO Backup & Replication and back up your virtual machines and physical servers.
Installation
Install the AUR package (or alternatively AUR for the development version).
Running as Terminal Server (Xorg)
Install the AUR package.
Add to to allow anybody to start X
Edit or to launch your DE.
Troubleshooting
If you encounter black box around mouse pointer create with line and load it in like
xrdb ~/.Xresources-xrdp
exec startlxde
You may need to install .
Running with Vino (Gnome VNC-Server for root session)
Enable the server to be seen via vino-preferences. Since vino defaults to port 5900 for connections, we will edit the xrdp configuration file to understand this. Append the vino session to xrdp’s configuration file:
/etc/xrdp/xrdp.ini
name=Vino-Session
lib=libvnc.so
username=ask
password=ask
ip=127.0.0.1
port=5900
If you encounter VNC connection errors, it may be because defaults to accepting only TLS connections. This must be changed to standard VNC authentication so that may connect:
gsettings set org.gnome.Vino require-encryption false
You can also restrict to only listen on the loopback interface:
gsettings set org.gnome.Vino network-interface lo
Remember to restart the xrdp server, and one should be able to connect to the vino session (tested using xfreerdp).
Why Remote Connect to Ubuntu From Windows?
There are several reasons why you might want to remote connect to your Ubuntu computer. Perhaps you’re at work and need to log into your home computer. Alternatively, you might have an Ubuntu PC in one room, your Windows PC in another. Maybe you want to run updates on Ubuntu, or access files.
How to Remote Control Linux From Windows
Need to remotely access your Linux desktop computer from Windows? Here’s what you need to know about RDP, VNC, and SSH to Linux.
Alternatively, you might be running an Ubuntu server, for data, a website, even a game. Either way, a method of setting up a remote connection will save a lot of time and effort.
You have three key options for establishing a remote connection with an Ubuntu machine running the default desktop environment:
- Remote Desktop (RDP)
- Virtual Network Computing (VNC)
- Third party remote desktop software
First, however, you need to make some preparations:
- Enable port forwarding on the remote device’s router
- Find the IP address
- Install SSH
Let’s look at these in turn.
building on CentOS 5.x
Written by Jay Sorg
Friday, 28 December 2012 05:14
Last Updated on Friday, 28 December 2012 05:15
# install Centos 5.6

# as root
yum update
reboot

yum install finger cmake patch gcc make autoconf libtool automake
pkgconfig openssl-devel gettext file
yum install pam-devel libX11-devel libXfixes-devel libjpeg-devel
yum install flex bison gcc-c++ libxslt perl-libxml-perl xorg-x11-font-utils
reboot

# git
# if yum install git fails
wget http://git-core.googlecode.com/files/git-1.8.0.2.tar.gz
tar -zxvf git-1.8.0.2.tar.gz
cd git-1.8.0.2
./configure --without-tcltk
make
make install

cd
mkdir git
cd git

mkdir freerdp
cd freerdp

git clone git://github.com/FreeRDP/xrdp.git
cd xrdp
./bootstrap
./configure --enable-jpeg
make
make install

cd xorg
cd X11R7.6
./buildx.sh /opt/X11rdp
# create the symbolic link for sesman
ln -s /opt/X11rdp/bin/X11rdp /usr/local/bin/X11rdp

# start on boot
cp /etc/xrdp/xrdp.sh /etc/init.d/
/sbin/chkconfig --add xrdp.sh
reboot
WindowManager
Telling xrdp what kind of session we want, after logging in…
UPDATE: I have re-written this section, because of the new method we did above, which has made this procedure FAR simpler!
There is a script in /etc/xrdp called startwm.sh , which is responsible for starting the window manager after you have logged in. In the step above we renamed it and turned it into a symbolic link to /etc/X11/Xsession.
In its original form, the beginning of the script as supplied read like this;
# change the order in line below to run to run whatever window manager you
# want, default to kde

SESSIONS="gnome-session blackbox fluxbox startxfce4 startkde xterm"

# start the window manager
wm_start()
{
  for WindowManager in $SESSIONS
  do
    which $WindowManager
    if test $? -eq 0
    then
      echo "Starting $WindowManager"
      $WindowManager
      return 0
    fi
  done
  return 0
}
This would have caused us trouble when logging into xrdp, because what it’s saying is «Here’s a default bunch of the usual window managers. Go through each one and if you find one, start it».
Blech!
Not very flexible, and way over-complicated. Personally speaking, I’d rather it look at a file in my login directory and start whatever window manager or session I want.
Also, we can do really interesting things with a customizable .xsession script – read Update 1 at the bottom of this article for bonus hot-ness 😉
By turning startwm.sh into a symbolic link above, we can now automatically use our .xsession script in our home directory.
Edit or create the file .xsession in your login directory.
Please read Update 1 at the bottom of this article for additional hotness – automatically remove background for the RDP session and restore when you log out of the RDP session.
In your home directory there should be a file called .xsession
Don’t worry if there isn’t – it just means you haven’t created it yet. Anyway, after logging in via the xrdp login screen, the .xsession file basically specifies what kind of desktop session we want.
In this case, I’m going to use the Gnome 3 classic session, which if you followed my other article, should be configured by now to resemble a pretty usable old skool gnome desktop.
Simply open up a terminal and as your normal user either edit or create a file called .xsession , and enter the following;
Save the file, and if the xrdp server is not already running, start it up.
Now try to connect to an RDP session!
Конфигурирование RDP
Windows
Remote Desktop Connection
Откройте Панель Управления и перейдите в Система и Безопасность -> Система
Панель Управления
System properties
Доступны три опции под пунктом «Удаленный рабочий стол»:
- Не разрешать удаленные подключения к этому компьютеру» — Эта опция предотвращает пользователей от подключений к их компьютерам с использованием Remote Desktop Connection или RemoteApp. RemoteApp подключение отличается тем, что соединение происходит к одному приложению.
- «Разрешить удаленные подключение к этому компьютеру» (Windows 10 и Windows 8.1) или «Разрешать подключения от компьютеров с любой версией удаленного рабочего стола» (в Windows 7) — это позволит пользователям, использующим любую версию RemoteApp или Remote Desktop Connection, подключаться к вашему компьютеру. Используйте этот режим, если вы не уверены, какую версию удаленного рабочего стола клиент будет использовать, или если они используют стороннее приложение Remote Desktop Connection. Например, клиентам Ubuntu вероятно потребуется вторая опция.
- «Разрешать подключения только от компьютеров с удаленным рабочим столом с сетевой проверкой подлинности» — эта опция ограничивает Remote Desktop Connections до использования версий, которые имеют Network Level Authentication. Network Level Authentication была введена в Remote Desktop Client 6.0. Если компьютер клиента запущен под управлением Windows 10, Windows 8.1, Windows 7 или он недавно скачал клиент Remote Desktop Connection, то используйте эту опцию, так как этот режим более защищенный.
Теперь можно нажать «ОК», и клиенты смогут войти в ваш компьютер через Remote Desktop Connection, используя учетные данные для пользователей группы администраторов.
Если служба ролей узла сеанса удаленного рабочего стола не установлена на компьютере, количество подключений ограничено максимум двумя одновременными подключениями к этому компьютеру.
Windows Server
Remote Desktop Services
Установка RDS
Установка RDS
Remote Desktop Licensing (RD Licensing), бывший Terminal Services Licensing (TS Licensing), управляет лицензиями доступа клиентов служб удаленного рабочего стола (RDS CAL), которые необходимы для каждого устройства или пользователя для подключения к серверу узла сеанса удаленного рабочего стола (RD Session Host). RD Licensing используется для установки, выпуска и отслеживания доступности лицензий RDS CAL на сервере лицензий удаленного рабочего стола.
Когда клиент — либо пользователь, либо устройство — подключается к серверу узла сеанса удаленного рабочего стола, сервер определяет, нужна ли лицензия RDS CAL. Сервер узла сеанса удаленного рабочего стола затем запрашивает RDS CAL из сервера лицензий удаленного рабочего стола от имени клиента, пытающегося подключиться к серверу узла сеанса удаленного рабочего стола. Если подходящая RDS CAL доступна на сервере лицензий, RDS CAL выдается клиенту, и клиент может подключаться к серверу узла сеанса удаленного рабочего стола.
Чтобы изменить число одновременных удаленных соединений разрешенный для подключения:
- На сервере узла сеанса удаленного рабочего стола откройте конфигурацию узла сеанса удаленного рабочего стола. Чтобы это сделать, кликнете Пуск, затем Административные Инструменты, потом Службы удаленного рабочего стола, и наконец конфигурация узла сеанса удаленного рабочего стола.
- Под «Подключения» кликнете правой кнопкой на имя подключения и нажмите свойства.
- В диалоговом окне «Свойства» на вкладке «Сетевой адаптер» выберите «Максимум подключений», теперь введите требуемое число подключений и нажмите «ОК».
Если опция максимума соединений выбрана и отображается серым цветом, значит включена установка групповой политики лимита подключений и применена на сервере узла сеанса удаленного рабочего стола. Вы можете также установить максимальное число разрешенных одновременных подключений, применяя установку групповой политики лимита числа подключений. Эта установка групповой политики находится в и может быть изменена с помощью редактора локальных групповых политик или консоли управления групповыми политиками (GPMC). Установка групповой политики имеет преимущество над установкой, примененной в конфигурации узла сеанса удаленного рабочего стола.
Connect to Ubuntu from Windows With VNC
Another option with full remote desktop functionality is VNC (Virtual Network Computing). This requires a client application on the Windows PC and a server on Ubuntu.
On the remote PC, install the TightVNC Server component after checking for updates:
Then install the server utility:
You’ll then need to run it:
At this point you’ll be prompted to set a password for the connection. Make a note of the desktop number, usually :1.
Now that TightVNC Server is set up on Ubuntu, you’ll need to install the client on Windows. This can be downloaded from www.tightvnc.com/download.php—make sure you choose the right version, as it is available in 32-bit and 64-bit flavors.
TightVNC tools are only available as a bundle, so once installed, look for TightVNC Viewer in Windows search.
Once you’ve launched the viewer, input the IP address of the Ubuntu box in Remote Host, followed by the desktop number. So, it might look like this:
Input the password when prompted and commence your remote desktop activity!
Making TightVNC More Secure
By default, TightVNC will encrypt your password, but nothing else. This makes it insecure for connections over the internet. Fortunately, security can be enhanced, thanks to SSH and Xming.
To use this, download and install the Xming tool for Windows from Sourceforge. Once this is done, look for the desktop shortcut, right-click, and choose Properties.
Look for the Shortcut tab, and in the Target field, enter the following:
Click Apply to save the change, then OK. Double-click the icon to run Xming, then open PuTTY. Here, expand the menu on the left to Connection > SSH > X11.
Check Enable X11 Forwarding, then return to Session at the top of the menu.
Enter the IP address for the remote device and click Open. Moments later, a secure connection to the remote Ubuntu desktop will be available.
Ротация логов xrdp
По умолчанию логи не ротируются и мы изменим это недоразумение. Можно создать свой файл ротации но мне это не надо и я добавлю параметры в один из стандартных файлов.
Откроем файл и добавим необходимые логи:
mcedit /etc/logrotate.d/rsyslog
=вывод команды с необходимыми дополнениями =
/var/log/syslog
{
 rotate 7
 daily
 missingok
 notifempty
 delaycompress
 compress
 postrotate
 invoke-rc.d rsyslog rotate > /dev/null
 endscript
}

/var/log/mail.info
/var/log/mail.warn
/var/log/mail.err
/var/log/mail.log
/var/log/daemon.log
/var/log/kern.log
/var/log/auth.log
/var/log/user.log
/var/log/lpr.log
/var/log/cron.log
/var/log/debug
/var/log/messages
/var/log/хrdp-sesman.log
/var/log/хrdp.log
{
 rotate 4
 weekly
 missingok
 notifempty
 compress
 delaycompress
 sharedscripts
 postrotate
 invoke-rc.d rsyslog rotate > /dev/null
 endscript
}
Управление XRDP
Управление службой стандартное для систем Debian.
service xrdp restart
service xrdp start
service xrdp stop
service xrdp status
Так выглядит статус после старта службы:
service xrdp status
● xrdp.service - xrdp daemon
 Loaded: loaded (/lib/systemd/system/xrdp.service; enabled)
 Active: active (running) since Вт 2017-05-23 15:05:32 MSK; 32s ago
 Docs: man:xrdp(8)
 man:xrdp.ini(5)
 Process: 759 ExecStart=/usr/sbin/xrdp $XRDP_OPTIONS (code=exited, status=0/SUCCESS)
 Process: 730 ExecStartPre=/bin/sh /usr/share/xrdp/socksetup (code=exited, status=0/SUCCESS)
 Main PID: 949 (xrdp)
 CGroup: /system.slice/хrdp.service
 └─949 /usr/sbin/хrdp

май 23 15:05:31 хrdp systemd: PID file /run/xrdp/xrdp.pid not readable (yet?) after start.
май 23 15:05:32 хrdp systemd: Started xrdp daemon.
май 23 15:05:33 хrdp xrdp: (949)(140156439295744) starting хrdp with pid 949
май 23 15:05:45 хrdp xrdp: (949)(140156439295744) listening to port 3389 on 0.0.0.0