Создание простого архива tar директории в linux
Содержание:
Functions
Specifying one of the following functions selects what tar‘s main mode of operation will be:
| A, —catenate, —concatenate | Append tar files to an archive. |
| c, —create | Create a new archive. |
| d, —diff, —compare | Calculate any differences between the archive and the file system. |
| —delete | Delete from the archive. (This function doesn’t work on magnetic tapes). |
| r, —append | Append files to the end of a tar archive. |
| t, —list | List the contents of an archive. |
| —test-label | Test the archive label, and exit. |
| u, —update | Append files, but only those that are newer than the copy in the archive. |
| x, —extract, —get | Extract files from an archive. |
tar через ssh
Если компьютер-источник и целевой компьютер связаны по LAN или WAN, то для экономии времени можно комбинировать использование SSH (Secure Shell) и tar для архивирования, копирования и извлечения файлов за один раз. Вот как это делать:
$ (cd ~/stuff; tar --create --gzip --file - *) | \
ssh destination tar --extract --gunzip --file --verbose -C stuff
В этой команде выполняется сразу несколько действий. Давайте разберем ее:
- Последовательность команд, заключенных в круглых скобках, называют вложенной оболочкой — subshell. Изменения, сделанные в subshell-оболочке — например, изменение каталога, — не повлияют на команду в целом, а затронут только среду вложенной оболочки. Поэтому первая управляющая последовательность — (cd ~/stuff; tar –create –gzip –file — *) меняет текущий рабочий каталог на ~/stuff, а затем запускает tar. Так как за вложенной оболочкой следует перенаправление в канал, то все результаты работы subshell посылаются в следующую на очереди команду.
- Как и много других UNIX-утилит, tar может писать в стандартный поток вывода (stdout) и читать из стандартного потока ввода (stdin). И stdout и stdin обычно обозначаются дефисом (-). Поэтому команда –create –file — создает архив в stdout.
- Канал (|) передает все результаты работы subshell в утилиту ssh, которая, в свою очередь, передает все необходимые данные с исходного компьютера на удаленный.
- Наконец, удаленный компьютер запускает собственный экземпляр утилиты tar для извлечения данных из архива. Теперь –extract –file — считывает архив из стандартного потока ввода. Опция -C принуждает tar на целевом компьютере сменить текущий рабочий каталог на stuff, прежде чем начать какие-либо операции разархивирования. Конечным результатом работы этой команды в целом будет передача архива через ssh и распаковка его в ~/stuff.
Итак, с помощью одной команды архив был создан, передан и распакован. Кстати, слегка изменив эту команду, можно копировать архив с удаленного компьютера на локальный и разархивировать его. Вот команда, которую для этого надо выполнить на локальном компьютере:
$ ssh destination cat archive.tgz | \
(cd ~/stuff; tar --extract --gunzip --file -)
Архив на удаленном компьютере будет открыт, затем поток байтов из cat будет послан во вложенную оболочку, которая сменит рабочий каталог, а затем извлечет архив. (Добавление -C ~/stuff к команде tar приведет к тем же результатам; пример показывает только то, что subshell тоже могут работать со входными данными.)
tar exclude
–exclude pattern (-W exclude=pattern)
Не обрабатывать файлы или директории, которые совпадают с указанным шаблоном. Учтите, что исключения имеют приоритет над шаблонами или именами файлов, указанных в командной строке.
-
Пример: Из директории test при архивировании tar исключить поддиректорию .svn
tar -czf test1.tar.gz --exclude=".svn" test/
-
Пример: При архивировании текущей директории и сжатием Примеры использования gzip и gunzip, исключить файл с расширениями .tar.gz .iso .deb .py
$ tar -czf test.tar.gz *.* --exclude="*.tar.gz" --exclude="*.iso" --exclude="*.deb" --exclude="*.zip" --exclude="*.py"
tar с сохранением прав доступа
Создать архив с сохранением прав доступа. Ключ -p, –preserve-permissions, –same-permissions извлекать информацию o правах доступа к файлу (по умолчанию для суперпользователя)
tar -cvpf archive.tar.gz dir1
Распаковать архив с сохранением прав доступа
tar -xvpf archive.tar.gz
tar распаковать в нужную директорию
Чтобы распаковать архив в нужную директорию используется ключ -С
# man tar
...
     -C directory
             In c and r mode, this changes the directory before adding the
             following files.  In x mode, change directories after opening the
             archive but before extracting entries from the archive.

...
Например, пример проверен для FreeBSD:
# tar -xvf /usr/home/darkfire/backup.ns.server.254/usr/ports/distfiles.tar -C /usr/ports/
TAR Files in Linux
Tar is a very commonly used archiving format on Linux systems. The advantage with tar is that it consumes very little time and CPU to compress files, but the compression isn’t very much either. Tar is probably the Linux/UNIX version of zip – quick and dirty. Here’s how you compress a directory:
# tar -cvf archive_name.tar directory_to_compress
And to extract the archive:
# tar -xvf archive_name.tar.gz
This will extract the files in the archive_name.tar archive in the current directory. Like with the tar format you can optionally extract the files to a different directory:
# tar -xvf archive_name.tar -C /tmp/extract_here/
Examples
tar -cf archive.tar file1 file2
Create archive archive.tar containing files file1 and file2. Here, the c tells tar you will be creating an archive; the f tells tar that the next option (here it’s archive.tar) will be the name of the archive it creates. file1 and file2, the final arguments, are the files to be archived.
tar -tvf archive.tar
List the files in the archive archive.tar verbosely. Here, the t tells tar to list the contents of an archive; v tells tar to operate verbosely; and f indicates that the next argument will be the name of the archive file to operate on.
tar -xf archive.tar
Extract the files from archive archive.tar. x tells tar to extract files from an archive; f tells tar that the next argument will be the name of the archive to operate on.
tar -xzvf archive.tar.gz
Extract the files from gzipped archive archive.tar.gz verbosely. Here, the z tells tar that the archive will be compressed with gzip.
tar -cf archive.tar mydir/
Creates an archive of the directory mydir.
tar -czf archive.tar.gz mydir/
Creates an gzip-compressed archive of the directory mydir.
tar -zxvf myfile.tar.gz
Extract the contents of the myfile.tar.gz into the current directory.
tar -xvf archive.tar documents/work/budget.doc
Extract only the file documents/work/budget.doc from the archive archive.tar. Produce verbose output.
tar -xvf archive.tar documents/work/
Extract only the directory documents/work/, and any files it contains, from the archive archive.tar. Produce verbose output.
tar -xvf archive.tar --wildcards '*.doc'
Extract only files with the extension .doc from the archive archive.tar. The —wildcards option tells tar to interpret wildcards in the name of the files to be extracted; the file name (*.doc) is enclosed in single-quotes to protect the wildcard (*) from being expanded incorrectly by the shell.
tar -rvf archive.tar documents/work/budget.doc
Add the file documents/work/budget.doc to the existing archive archive.tar. The r option is the same as the long option —append.
tar -uvf archive.tar documents/work/budget.doc
Add the file documents/work/budget.doc to the archive archive.tar only if it is newer than the version already in the archive (or does not yet exist in the archive). Here, u is the same as the long option —update.
tar -cf - documents/work/ | wc -c
Estimate the file size of an archive of the directory documents/work, but do not create the file. Here, the archive file is specified as a dash («—«), which tells tar to send its archived output to the standard output rather than a file on disk. This output is then piped to the wc command, which reports how many bytes (-c) were in the input it received.
tar -czf DogPhotos.tar.gz --exclude='kitty.jpg' MyPetPhotos
Create DogPhotos.tar.gz of all files contained in the MyPetPhotos without the kitty.jpg photo.
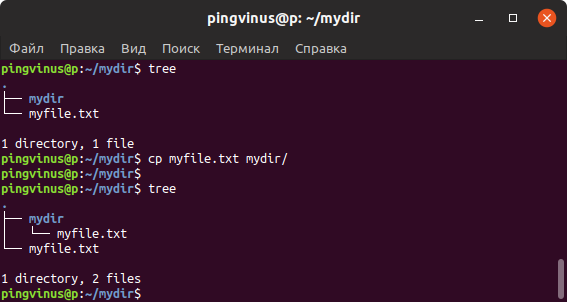
tar tf hope.tar.gz | grep myfile.txt
Search the hope.tar.gz file for the file myfile.txt and list the full path of the file. The returned results would resemble the line shown below.
computerhopehope/homedir/public_html/data/myfile.txt
tar -zxvf hope.tar.gz computerhopehope/homedir/public_html/data/myfile.txt
In the above example, the tar command would extract the one file myfile.txt from the hope.tar.gz. The full path to this file was determined by using the example shown earlier.
Создание архивов, используя команды SSH
Теперь, когда мы уже знаем, как распаковать все эти типы архивов, рассмотрим также обратный процесс создания архива, сжатия файлов в любой желаемый формат.
Как создать .tar.gz
Показанный ниже метод позволит вам сжать выбранные файлы в архив:
tar -zcf NewArchive.tar.gz yourfile1.php yourfile2.php yourfile3.txt
Если вам нужно сжать содержимое каталога, воспользуйтесь этой командой:
tar -zcf NewArchive.tar.gz DirectoryName
По завершению, как и раньше, консоль освободится для дальнейших операций.

Как создать .tar
Синтаксис создания архива .tar при помощи команды ssh очень простой:
tar -zcf archive-name.tar.gz filename1.php filename2.php filename3.php
Если вы хотите заархивировать каталог, просто укажите имя каталога в списке файлов для архивации.
tar -zcf archive-name.tar.gz DirectoryName
Как только вы сможете снова запускать команды, это значит ваш архив готов.

Как создать .zip
Этот тип архива создавать ещё проще. Синтаксис выглядит так:
zip archive-name.zip filename1.php filename2.php filename3.php
Сжатие каталога имеет такой же синтаксис:
zip archive-name DirectoryName
На экране будет показан процесс создания архива и после завершения создания консоль снова освободится для других команд.

Распаковка архивов, используя команды SSH
Прежде всего, вам понадобится перейти в тот каталог, где находится ваш архив. К примеру, если ваш архив находится в каталоге public_html/files, выполните команду, чтобы перейти туда:
cd public_html/files
Как распаковать .tar.gz
Следующая команда позволит вам распаковать содержимое архива .tar.gz:
tar -zxvf ArchiveName.tar.gz
На экран будет выведен список файлов из архива и по завершению распаковки вы сможете ввести другую команду, при необходимости.

Как распаковать .tar
Файл архива с таки типом сжатия можно распаковать следующей командой:
tar -xvf ArchiveName.tar
На экран появится список файлов вашего архива и по завершению распаковки консоль освободится для введения других команд.

Как распаковать .zip
Эта команда позволит распаковать .zip:
unzip ArchiveName.zip
Как только завершиться процесс, командная строка будет свободна.

Пайплайны
Как мы уже упомянали в начале статьи, tar можно использовать для потоковой упаковки/распаковки. Классический пример — это tar через ssh. «А чем scp не угодил?» — спросите вы. А тем, что tar позволяет контент сжимать перед передачей, а scp нет. Скажем мы хотим передать нашу папку test на хост 192.168.1.200, используя ssh
В данной примере мы сначала просим tar запаковать и сжать папку с использованием gz, потом передать ее на вход ssh, который затем через зашифрованный канал транслирует данные на другой хост, передавая их там местному tar для распаковки в папку, указанную вместо ${DIR}. Идеально, не правда ли?
Say hi to tar command line tool
You need to use the tar command which can create and manipulate archive files in .tar.gz under Unix like operating systems. Open a command-line terminal (select Applications > Accessories > Terminal), and then type the following to open and extract a .tar.gz file:
tar -zxvf data.tar.gz |
Where,
- -z : Uncompress the resulting archive with gzip command.
- -x : Extract to disk from the archive.
- -v : Produce verbose output i.e. show progress and file names while extracting files.
- -f data.tar.gz : Read the archive from the specified file called data.tar.gz.
By defaults files will be extracted into the current directory. To change the directory use -C option. In this example, extract files in /data/projects directory:
tar -zxvf data.tar.gz -C dataprojects |
To view a detailed table of contents (list all files) for this archive, enter:
tar -tzvf data.tar.gz |
Sample outputs:
-rw-r--r-- root/root      2981 2012-01-11 03:24 etc/adduser.conf
-rw-r--r-- root/root      6302 2012-01-11 04:46 etc/ca-certificates.conf
-rw-r--r-- root/root      2969 2011-01-31 00:14 etc/debconf.conf
-rw-r--r-- root/root       600 2010-11-22 02:46 etc/deluser.conf
-rw-r--r-- root/root       346 2010-12-05 20:23 etc/discover-modprobe.conf
-rw-r--r-- root/root      8661 2011-12-31 21:45 etc/ffserver.conf
-rw-r--r-- root/root      2940 2011-01-24 00:26 etc/gai.conf
-rw-r--r-- root/root       899 2009-08-31 12:51 etc/gssapi_mech.conf
-rw-r--r-- root/root      4794 2010-09-30 17:44 etc/hdparm.conf
-rw-r--r-- root/root         9 2006-08-07 22:44 etc/host.conf
-rw-r--r-- root/root       145 2010-08-26 08:09 etc/idmapd.conf
-rw-r--r-- root/root       882 2010-05-07 15:33 etc/insserv.conf
-rw-r--r-- root/root     31393 2007-10-21 13:50 etc/jwhois.conf
-rw-r--r-- root/root       144 2012-01-11 04:55 etc/kernel-img.conf
-rw-r--r-- root/root      1180 2009-04-24 02:55 etc/kerneloops.conf
-rw-r--r-- root/root        34 2012-01-11 03:23 etc/ld.so.conf
-rw-r--r-- root/root      3587 2010-04-10 03:54 etc/lftp.conf
-rw-r--r-- root/root        26 2010-08-14 20:40 etc/libao.conf
-rw-r--r-- root/root       191 2010-06-18 19:54 etc/libaudit.conf
-rw-r--r-- root/root       599 2009-02-19 17:27 etc/logrotate.conf
-rw-r--r-- root/root     15752 2009-07-25 20:43 etc/ltrace.conf
-rw-r--r-- root/root       801 2011-06-20 08:24 etc/mke2fs.conf
-rw-r--r-- root/root       624 2010-02-15 10:09 etc/mtools.conf
-rw-r--r-- root/root       513 2012-01-11 04:53 etc/nsswitch.conf
-rw-r--r-- root/root       552 2010-10-19 22:22 etc/pam.conf
-rw-r--r-- root/root      7649 2012-01-11 04:53 etc/pnm2ppa.conf
-rw-r--r-- root/root      2724 2010-08-08 01:33 etc/reportbug.conf
-rwxr-xr-x root/root       332 2012-05-05 14:14 etc/resolv.conf
-rw-r--r-- root/root      2573 2012-04-06 00:00 etc/rsyslog.conf
-rw-r--r-- root/root      8596 2010-05-26 23:02 etc/sensors3.conf
-rw-r--r-- root/root      7093 2010-12-26 17:23 etc/smartd.conf
-rw-r--r-- root/root      2089 2012-02-26 03:35 etc/sysctl.conf
-rw-r--r-- root/root       645 2009-03-25 16:35 etc/ts.conf
-rw-r--r-- root/root      1260 2008-05-30 11:52 etc/ucf.conf
-rw-r--r-- root/root       274 2009-11-04 03:46 etc/updatedb.conf
-rw-r--r-- root/root       571 2010-11-11 20:13 etc/usb_modeswitch.conf
Background
Data compression has been extremely useful to us over the years. Whether its a zip file containing images to be sent in a mail or a compressed data backup stored on a server, we use data compression to save valuable hard drive space or to make the downloading of files easier. There are compression formats out there which allow us to sometimes compress our data by 60% or more. I’ll run you through using some of these formats to compress and decompress files and directories on a Linux machine. We’ll cover the basic usage of zip, tar, tar.gz and the tar.bz2 formats. These are some of the most popular formats for compression used on Linux machines.
Quick Note: If you’re looking for the Windows version of this tutorial, you can find it at How to Open tar.gz Files in Windows.
Before we delve into the usage of the formats I’d like to share some of my experience using the various formats of archiving. I’m talking about only a few data compression formats here, and there are many more out there. I’ve realized that I need two or three formats of compression that I’m comfortable using, and stick to them. The zip format is definitely one of them. This is because zip has become the de-facto standard choice for data compression, and it works on Windows as well. I use the zip format for files that I might need to share with Windows users. I like to use the tar.gz format for files that I would only use on my Mac and Linux machines.
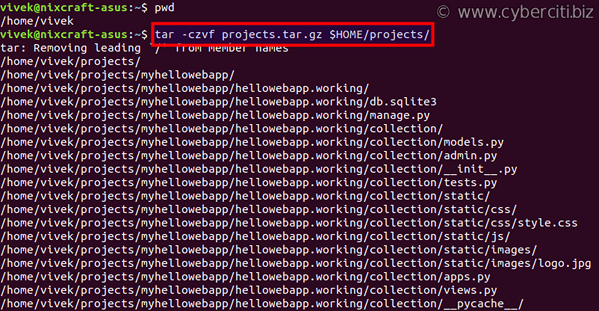
Linux create tar.gz file with tar command
Say you want to create tar.gz file named projects.tar.gz for directory called $HOME/projects/: Sample outputs:
total 8
drwxr-xr-x 2 vivek vivek 4096 Oct 30 22:30 helloworld
drwxr-xr-x 4 vivek vivek 4096 Oct 30 13:16 myhellowebapp
The syntax for the tar command is as follows: To create projects.tar.gz in the current working directory, run:
Verification
Next verify newly created tar.gz file in Linux using the ls command: Example outputs:
-rw-r--r-- 1 vivek vivek 59262 Nov 3 11:08 projects.tar.gz
One can list the contents of a tar or tar.gz file using the tar command:
Click to enlarge image
How to extract a tar.gz compressed archive on Linux
The syntax is follows to extract tar.gz file on Linux operating system: One can extract files in a given directory such as /tmp/: Sample outputs:
home/vivek/projects/myhellowebapp/ home/vivek/projects/myhellowebapp/hellowebapp.working/ home/vivek/projects/myhellowebapp/hellowebapp.working/db.sqlite3 home/vivek/projects/myhellowebapp/hellowebapp.working/manage.py home/vivek/projects/myhellowebapp/hellowebapp.working/collection/ home/vivek/projects/myhellowebapp/hellowebapp.working/collection/models.py home/vivek/projects/myhellowebapp/hellowebapp.working/collection/admin.py home/vivek/projects/myhellowebapp/hellowebapp.working/collection/__init__.py home/vivek/projects/myhellowebapp/hellowebapp.working/collection/tests.py home/vivek/projects/myhellowebapp/hellowebapp.working/collection/static/ home/vivek/projects/myhellowebapp/hellowebapp.working/collection/static/css/ home/vivek/projects/myhellowebapp/hellowebapp.working/collection/static/css/style.css ... .. ... home/vivek/projects/myhellowebapp/hellowebapp/hellowebapp/__pycache__/urls.cpython-36.pyc home/vivek/projects/myhellowebapp/hellowebapp/hellowebapp/wsgi.py home/vivek/projects/myhellowebapp/hellowebapp/hellowebapp/settings.py home/vivek/projects/helloworld/ |
Understanding tar command options
| tar command option | Description |
|---|---|
| -c | Create a new archive |
| -x | Extract files from an archive |
| -t | List the contents of an archive |
| -v | Verbose output |
| -f file.tar.gz | Use archive file |
| -C DIR | Change to DIR before performing any operations |
| -z | Filter the archive through gzip i.e. compress or decompress archive |