Unifi — troubleshooting offline cloud key and other stability issues
Содержание:
- Содержание
- Введение
- Как обновить Cloud Key с помощью контроллера UniFi
- Как обновить Cloud Key с помощью интерфейса управления ключом облака
- How Device Adoption Works
- WebUI: How to Adopt UniFi Devices
- Cloud Key Gen 1 Emergency Recovery
- Mobile App: How to Adopt UniFi Devices
- Step 5: Install the UniFi Controller
- Step 4: Connect Via SSH to the Instance
- Impact of key version state on cryptographic operations
- How to Update the Cloud Key’s Firmware with the Cloud Key Management UI
- Managing Cloud Subscriptions
- Applying API key restrictions
- Ubiquiti SSO Cloud Credentials
- Troubleshooting Duplicate Controllers
- Requirements
- Symptoms
Содержание
- Введение
- Как обновить Cloud Key с помощью контроллера UniFi
- Как обновить Cloud Key с помощью интерфейса управления ключом облака
Введение
Перед началом работы всегда проверяйте наличие резервной копии сетевого контроллера UniFi. Вы можете загрузить резервную копию с сетевого контроллера UniFi в Settings > Maintenance > Backup и нажмите Download Backup. Помните, что для восстановления резервной копии версия программного обеспечения контроллера должна быть такой же или более новой, чем версия в резервной копии
Также важно отметить, что при обновлении Ubiquiti Unifi Cloud Key, он автоматически обновит версию контроллера UniFi до соответствующей версии контроллера в комплекте
Как обновить Cloud Key с помощью контроллера UniFi
1. Чтобы обновить прошивку Cloud Key : В контроллере сети UniFi перейдите в Settings > Maintenance > Cloud Key Firmware и нажмите Check for Update. Вы увидите кнопку «Применить обновление», если доступно обновление.
2. Чтобы обновить программное обеспечение UniFi Network Controller, размещенное на облачном ключе: В UniFi Network Controller перейдите в Settings > Maintenance > Cloud Key Controller и нажмите Check for Update. Вы увидите кнопку Apply Update, если обновление доступно.
Как обновить Cloud Key с помощью интерфейса управления ключом облака
1. Откройте веб-интерфейс управления облачным ключом, введя IP-адрес своего облачного ключа в браузере.
Напоминание
Имена переменных чувствительны к регистру.
Advanced
3. Нажмите Manage Cloud Key» (в облачных ключах поколения 2) или Configure (в облачных ключах поколения 1), чтобы настроить параметры облачного ключа UniFi через пользовательский интерфейс управления облачным ключом. Изображение ниже для UCK-G2-PLUS, каждый Ключ Облака будет иметь свой набор опций.
4. Введите учетные данные Ключа Облака. Эти учетные данные не совпадают с учетными данными UniFi Network Controller. При первоначальной настройке ключа доступа к облаку будет предложено изменить пароль. Учетные данные по умолчанию были:
| Имя пользователя: root
Пароль: ubnt |
или | Имя пользователя: ubnt
Пароль: ubnt |
Так что, скорее всего, имя пользователя все еще root (или ubnt). Это те же учетные данные, которые вы использовали бы для SSH в вашем облачном ключе. Подробнее об этом здесь.
5. В пользовательском интерфейсе Cloud Key перейдите в Settings (или в UC-CK на вкладке Maintenance) и раскройте раздел «Прошивка», чтобы проверить, есть ли доступные обновления. Если есть, нажмите кнопку Update Now. Если вы хотите использовать нестабильную версию, нажмите Update Manually. Вам понадобится ссылка на прошивку (или файл прошивки), которую вы можете получить на нашей странице загрузок или для нестабильных выпусков, найти их в блоге Beta. Для доступа к ним вам необходимо включить Early Access в вашей учетной записи.
How Device Adoption Works
When you plug in a UniFi device like a UniFi Access Point or a UniFi Switch, the UniFi device will boot up and eventually show a static white LED. This white LED indicates that the device is not currently managed by a UniFi controller and ready to be adopted by a UniFi controller. When the device is in this state it makes itself available for discovery and adoption.
When using the UniFi Network Controller, the Device Discovery tool scans the local network for any UniFi device. All UniFi devices, if detected show up with a status of either Managed or Pending Adoption. Devices with a white LED should show up as Pending Adoption within the UniFi controller, while other devices that have a Blue LED should show up as “Online” if managed by this controller, or “Managed by Other” if still adopted and managed by a different controller.
When the administrator clicks Adopt, the adoption request is sent to the AP over port 22, using SSH to authenticate the default credentials and issue the inform command. The AP then executes the set-inform command and sends the inform packet to the URL provided by the UniFi Network Controller, and sends it over port 8080.
The device, if successful in adopting will start provisioning and be configured to match the controller’s configured wireless networks or other settings. Once it is finished the device will show as connected in the controller.
Most often when there are issues with the adoption process it is because something in the environment obstructs the above process from completing. Understanding where the device stops working can help pinpoint the issue and make it easier to resolve the issue.
WebUI: How to Adopt UniFi Devices
Make sure the computer where you are launching the UniFi Network Controller is connected to the same network where the controller is hosted (in other words: connect locally) before proceeding.
1. Launch the UniFi Network Controller on a web browser (Google Chrome is recommended) by typing the IP address of the Controller host in the search bar, or launching the UniFi app if hosted on a computer or server.
2. Select the option to Launch the UniFi Network and log in with your . If presented a warning page first, go ahead and click Advanced > Proceed to <local host IP number>.
3. Within the Controller, navigate to the Devices section.
4. Your locally connected, unadopted device should appear with a Pending Adoption status, or when hovered over (when viewing in list), show an option to Adopt.
NOTE: If the unadopted devices are not visible, it will be necessary to determine why the controller is unable to discover these devices before proceeding. Double check the requirements above and take a look at the Troubleshooting article in the Related Articles below.
5. Click on the device to display its Properties Panel and click Adopt; or if in list mode, hover over the device and click on the Adopt action that appears.

The adoption process can take a few minutes to complete. If there is a newer firmware version available it will also show the Upgrade action. Adopt it first, and then upgrade once the adoption is successful and the device appears as Connected.
6. The status of the UniFi device will change from “Pending Adoption” to “Adopting”.
User Tip:If you experience an issue where the status of the device loops from trying to adopt > disconnected > trying to adopt, it may be an issue with the firewall of the machine hosting the UniFi Network Controller. Port 8080 must be open for inbound traffic. Either open up that port or turn off the firewall if that’s a possibility. See what ports are needed for UniFi here: UniFi — Ports Used.
7. Once a connection between device and controller has been successfully established, the status will change to “Provisioning”. This indicates the controller is pushing configuration to the device.
8. After this has been completed, the status will return “Connected”. In rare occasion, you will need to leave this screen and come back to see this Status change.
Cloud Key Gen 1 Emergency Recovery
For first generation Cloud Keys follow these steps to access the Emergency Recovery UI:
- Power off the system.
-
Press and hold the reset button and then power on the Cloud Key by connecting it to the power source.
- Keep the reset button pressed for about 10 seconds, or until you see the recovery LED pattern in a loop (blue — off — white).
-
Once the LED is flashing in the recovery mode pattern, open your browser and type the IP address for the Cloud Key. The IP address comes from your DHCP server, if you can’t access DHCP, the fallback IP will work: 192.168.1.30. However, keep in mind that if your Cloud Key does have a IP address assigned by the DHCP server, the fallback IP will not work. If you are using a Gen 2 Cloud Key you will see its IP address on the device screen.
User Tip: If you don’t know your Cloud Key’s IP address, you can use the SSH command or software such as nmap to find the IP address.
- You should be taken to the Recovery Mode screen. From here you can reset, reboot, power off and most importantly you can upload an updated firmware bin file.
- To update the firmware, go to the Downloads page, find the correct Cloud Key model on the left hand menu and then click on the download button, read and accept information, and then download the firmware file to your computer to upload in the Recovery Mode UI. Once it is uploaded you will have to reboot the Cloud Key to complete the firmware upgrade.
- Once it is uploaded you will have to reboot the Cloud Key to complete the firmware upgrade.
- The LED will flash white while upgrading and then a steady white when it is ready.
Mobile App: How to Adopt UniFi Devices
Devices can be adopted via the mobile app as easily as with the webUI controller. This section describes how to adopt a device to a network that does have a running UniFi Network Controller (using Controller mode). For users interested in just setting up a standalone UniFi Access Point without the controller, please take a look at this article: UniFi — Mobile App: Setting Up an Access Point with Standalone Mode.
User Tip:This same process will work if your mobile is connected locally to the same UniFi network as the controller’s host and the device being adopted; or remotely to another network, as long as remote access is enabled on the webUI Controller and the device being adopted is connected to the same network as the controller.
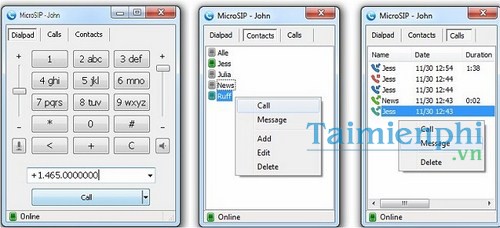
1. Launch the UniFi mobile app and select the UniFi Network Controller.
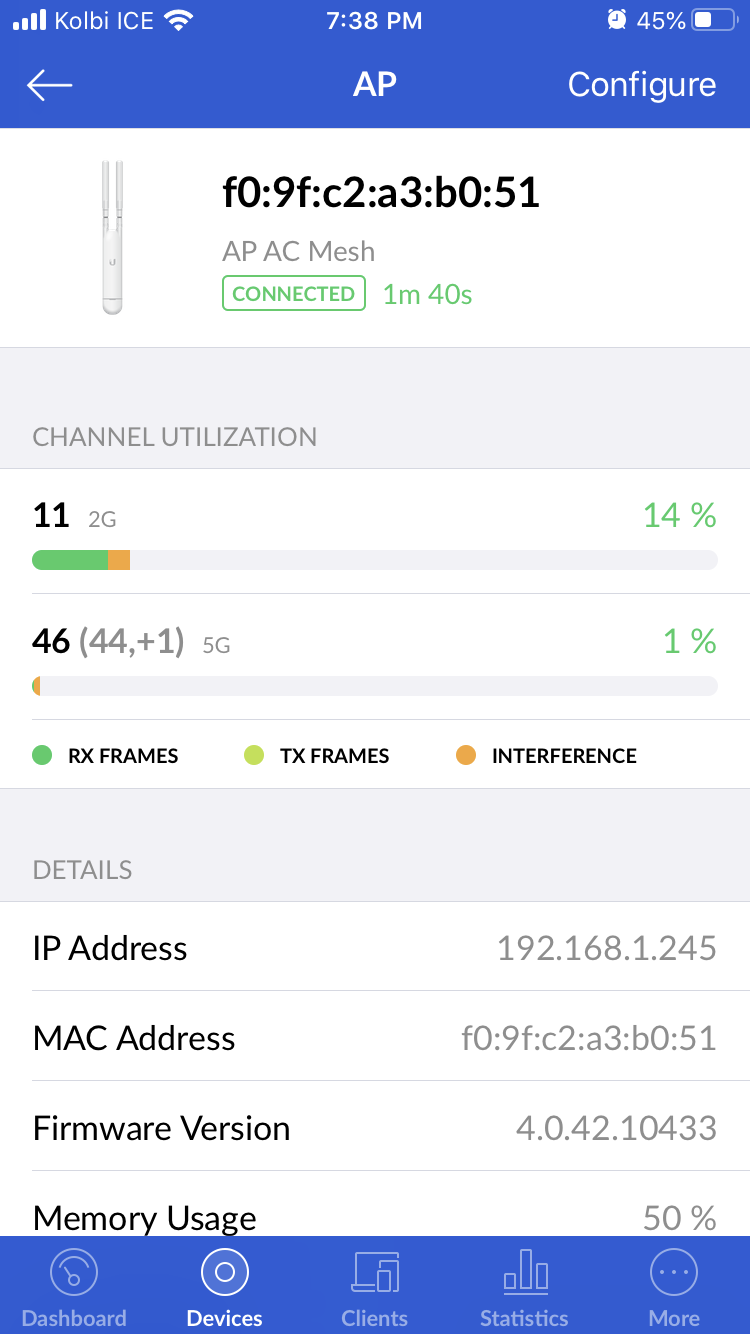
2. Go to the Devices tab. In the iOS app, this button is on the bottom bar. In the Android app, select from the menu shown when you press the menu button in the top left corner. The Devices screen will list all adopted devices as well as any detected unadopted devices with a status of «Pending Adoption».
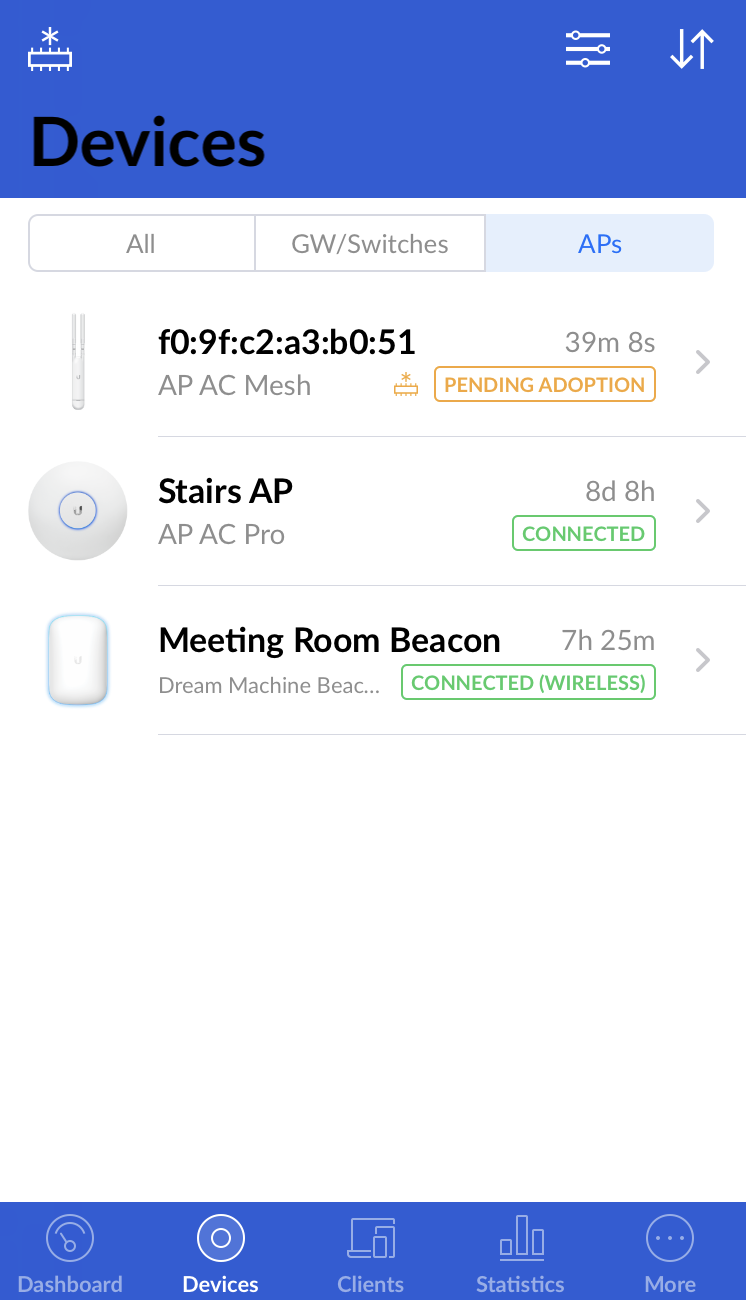
If after a few minutes the device doesn’t appear in this list and all the requirements are met, please see the Troubleshooting article in the below.
3. Click on the device that is pending adoption and click Adopt under the Actions header at the bottom of the screen. If a newer firmware version is available it will show an upgrade option there as well. Adopt it first, and upgrade after adoption.
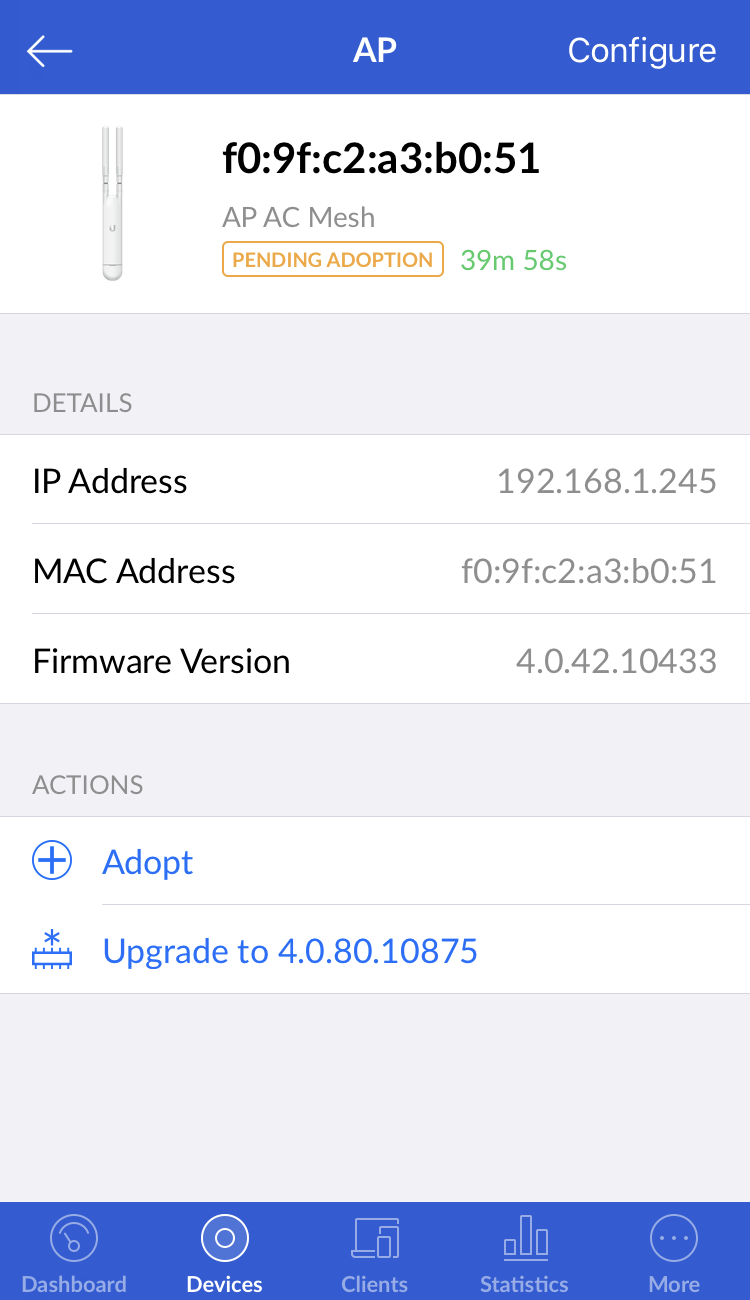
4. The app will show the device go through Adopting and then Provisioning statuses. After the device is fully adopted, it will display the green Connected status. Do not disconnect the device from power while the adoption is on going. You may have to refresh the app’s screen if the device’s LED has stopped blinking and is a solid blue but the app still shows provisioning.
Step 5: Install the UniFi Controller
ATTENTION: The UniFi Network Controller does not support Java 9 yet. Amazon EC2 now installs with Java 9, so to ensure compatibility you must uninstall Java 9 and install Java 8 for the system to run properly.
Once you connect to the Server and are greeted with the Ubuntu Command Line Interface (CLI), do the following:
5.1. Add the Ubiquiti repository to /etc/apt/sources.list:
echo "deb http://www.ubnt.com/downloads/unifi/debian stable ubiquiti" | sudo tee -a /etc/apt/sources.list
5.2. Add the Ubiquiti GPG Key:
sudo apt-key adv --keyserver keyserver.ubuntu.com --recv 06E85760C0A52C50
5.3. Update the server’s repository information:
sudo apt-get update

5.4. Install UniFi:
sudo apt-get install unifi


5.5. Disconnect from the server:
exit

5.6. You may now close the Terminal or PuTTY window.
5.7. Open your browser and navigate to https://<elastic-ip>:8443/
NOTE:If the UniFi Network Controller is running on the computer where you are setting up the AWS Controller, make sure you close it before trying to navigate to the URL above.

5.8. Complete the UniFi Setup Wizard. You will need to skip Step 4: Devices Setup as no devices will be available for adoption since the controller is not on the same subnet. But you can still complete steps 5 and 6.

5.9. Your controller setup is now complete! You may now proceed to adopt your UniFi devices using Layer 3 Adoption.
NOTE:Remember that the IP of the controller is the same as the Elastic IP we set above. This is helpful if you are doing an L3 adoption via SSH.
Step 4: Connect Via SSH to the Instance
Using Windows (PuTTY)
If you are using a Windows computer, you can use PuTTY to connect to the server via SSH. You will need to convert the Key Pair (UniFiController.pem) file you created earlier from a .pem file to a .ppk file that is supported by PuTTY.
For detailed instructions on how to convert your .pem to a .ppk file and connect to the server using PuTTY on Windows, please read Amazon’s PuTTY Setup Guide.
Using macOS or Linux
If you are using a Linux or macOS computer, you can use the built-in SSH client.
Open Terminal and follow these steps:
4.1. Edit permissions for the .pem file as required for SSH:
chmod 400 /location/to/UniFiController.pem
4.2. Connect to server using SSH and the .pem file, where <elastic-ip> is the Elastic IP Address configured previously:
ssh -i “/location/to/UniFiController.pem" ubuntu@<elastic-ip>

Impact of key version state on cryptographic operations
The impact of key version state on cryptographic operations depends on whether
the key is used for:
- Symmetric encryption
- Asymmetric encryption or digital signing
Symmetric encryption
Each symmetric encryption key has a designated
primary version which is used at that point in time to encrypt data. In
order for a key to be available for use to encrypt data, it needs to have a
primary key version which is enabled.
When a key is used to encrypt plaintext, its primary key version is
used to encrypt that data. The information as to which version was used to
encrypt data is stored in the ciphertext of the data. Only one version of a
key can be primary at any given point in time.
If the primary key version is disabled, that key version cannot be used to
encrypt data. Note that an enabled primary key version can be disabled,
scheduled for destruction or destroyed, and a version which is not enabled can
be made the primary version.
Which key version is primary does not impact the ability to decrypt data.
A key version can be used to decrypt data as long as it is enabled.
Asymmetric encryption or digital signing
Each time an asymmetric key is used for encryption or digital signing, a key
version must be specified. In order for the key version to be available for
asymmetric encryption or digital signing, the key version must be enabled. You
can retrieve a key version’s public key only if the key version is enabled.
How to Update the Cloud Key’s Firmware with the Cloud Key Management UI
1. Access the Cloud Key Management WebUI, by typing your Cloud Key’s IP in your browser.
User Tip:Gen2 Cloud Keys will show their IP in the front panel screen. For gen1 Cloud Keys, find it in the Host column of the UniFi Cloud Access Portal: https://unifi.ui.com.
2. You will land on a warning page, click on Advanced and Proceed to <your IP>(unsafe).

3. Click on Manage Cloud Key (on gen2 Cloud Keys) or Configure (on gen1 Cloud Keys) to configure your UniFi Cloud Key’s settings via the Cloud Key’s Management UI. The image below is for a UCK-G2-PLUS, each Cloud Key will have a different set of options.

4. Type in the Cloud Key’s credentials. These credentials are not the same as the UniFi Network Controller credentials. When you initially set the Cloud Key up, it will have prompted you to change the password. The default credentials were:
|
Username: root Password: ubnt |
Or |
Username: ubnt Password: ubnt |
So chances are, the username is still root (or ubnt). These are the same credentials you would use to SSH into your Cloud Key. More information on that .NOTE: After you enter the management screen for the first time it will ask you to change the password from default values, please make note of this new password as you cannot recover or reset this password.
5. Once inside the Cloud Key UI, go to Settings (or if on UC-CK, the Maintenance tab) and expand the Firmware section to verify if there are updates available. If there are, click the Update Now button. If you wish to use a non-stable version, click on Update Manually. You will need the firmware link (or the firmware file), which you can get from our Downloads page or for the non-stable releases, find them in the Beta blog. To access these you will need to have enabled Early Access on your account.

|
Click here to see Cloud Key Gen1 (UC-CK) Instructions. Go to the Maintenance tab. Here you can once again upgrade the UniFi Network Controller under the UNIFI header. Or change the Cloud Key firmware under the FIRMWARE header. You can Check for Updates to get the latest publicly released version, or if you wish to use a non-stable version, click on Update Manually. You will need the firmware link, which you can get from our Downloads page or for the non-stable releases, find them in the Beta blog. To access these you will need to have enabled Early Access on your account.
|

Managing Cloud Subscriptions
View and Download UniFi Cloud Invoices
You can access and Cloud-related invoices/billing information by going tohttps://network.unifi.ui.com > Clicking Settings (Gear icon in lower-left corner) > Cloud > Invoices.

Here you can see the amount of invoices and download a copy of them for your own records.
Change Billing Information
If you wish to change your billing information, including Credit Card, Address, etc. Go to https://network.unifi.ui.com > Settings > Cloud > Information > Click Change, update the fields and click Save.
Change Device Tiers
Once you have subscribed to a UniFi Cloud controllers, which is based on the number of devices in tiers of ten devices, you can change the tier of your controller.
To do this go to https://network.unifi.ui.com > Settings > Cloud > Subscriptions > Select the controller you wish to update and click «Change Tier», then adjust to the desired device tier.
Cancel Subscription/Trial for Single Controller
You can see the status of subscription for each controller at https://network.unifi.ui.com. For a controller that is set to renew at the subscription renewal date or at the end of trial it should show the following status.
To cancel your UniFi Cloud subscription or Trial for a single controller, select «Do not renew» next to the controller at https://network.unifi.ui.com.
This will prevent the controller from being renewed at the renewal date or at the expiry of your trial. Prior to cancellation the controller show as follows:
Once this has been done the status should change from RENEWING to NON-RENEWING. No further action is needed from the customer or Ubiquiti.
Cancel Subscription/Trial for Entire Account
To cancel your UniFi Cloud subscription for all controllers, Go to https://network.unifi.ui.com > Settings > Cloud > Subscriptions > Select Subscription by clicking View, click Cancel Subscription and click Confirm. No further action is needed from the customer or Ubiquiti.

Applying API key restrictions
API keys are unrestricted by default. Unrestricted keys are insecure because
they can be used by anyone from anywhere. For production applications, you
should set both application restrictions and API restrictions.
To add API key restrictions:
-
Navigate to the
APIs & Services→Credentials
panel in Cloud Console. -
Select the name of an existing API key.
Adding application restrictions
Application restrictions specify which web sites, IP addresses, or apps can use
an API key. Add application restrictions based on your application type. You
can only set one restriction type per API key.
Choose the restriction type based on the needs of your application.
-
Use None for testing purposes only.
-
Use HTTP referrers for API clients that run on a web browser, so that only
the specified pages can call the API. These types of applications expose their
API keys publicly, so we recommend using a
service account instead. See the
section below for
examples. -
Use IP addresses to limit API key access to certain IP addresses.
-
Use Android apps for Android applications. This option requires adding
your package name and SHA-1 signing-certificate fingerprint. -
Use iOS apps for iOS applications. This option requires adding at least
one iOS bundle identifier to restrict API calls to specific iOS bundles.
Adding HTTP restrictions
API keys used by web applications should have HTTP restrictions. To add
HTTP restrictions:
-
Select HTTP referrers (web sites) in the Application restrictions
section. -
Input at least one restriction in the Website restrictions section.
-
If your domain supports both HTTP and HTTPS, both restrictions must be added
separately. -
You can optionally use wildcard characters () for the subdomain and/or
path.
The following table shows example scenarios and restrictions, from most
restrictive to least restrictive. We recommend using the most restrictive
example that fits your use case.
| Scenario | Restrictions |
|---|---|
| Allow a specific URL. |
Add a single restriction with an exact path. For example: |
| Allow any URL in a single subdomain or naked domain. |
You must set at least two restrictions to allow an entire domain.
|
| Allow any subdomain URLs in a single domain. |
You must set at least two restrictions.
|
Adding API restrictions
API restrictions specify which APIs can be called using the API key. All API
keys used by production applications should have API restrictions.
To set API restrictions:
-
Select Restrict key in the API restrictions section.
-
Select all API names that your API key needs to call from the dropdown.
-
Select the Save button.
Ubiquiti SSO Cloud Credentials
The Ubiquiti Cloud username and password are your Single Sign-On, UI.com account credentials created in https://account.ui.com/. This set of credentials is used in the UI Community, the UI Store, and the UI Help Center. To change this username and password go to https://account.ui.com. This is also where you would enable (or disable) your 2FA verification. See this article for more: How to Enable / Disable Two Factor Authentication (2FA).
How to create an account:
Click to Expand
- Visit: https://account.ui.com
- Under the Sign In button, click on Not a Member? Create account.
-
Fill in the required information.
- First name — First name of the user account owner.
- Last name — Last name of the user account owner.
- Username — Public display name for the account. Used for sign in on required Ubiquiti websites.
- Email — Email address to receive notification emails. Can also be used for sign in. Will be used by Ubiquiti Support to contact you if necessary.
- Password — This password can be any combination of characters as long as it meets the minimum of 8 characters in length.
- Agree to the terms and policies, decide if you wish to receive periodic newsletters and updates and click Register.
User Tip:If you wish to use your SSO Cloud credentials for your Controller and have one less set of credentials to worry about, you can set this up by logging into your Controller and going to Settings > Remote Access and enabling the Enable Local Login with Ubiquiti Account. Please make sure to read the tooltip in the Controller before enabling.
Troubleshooting Duplicate Controllers
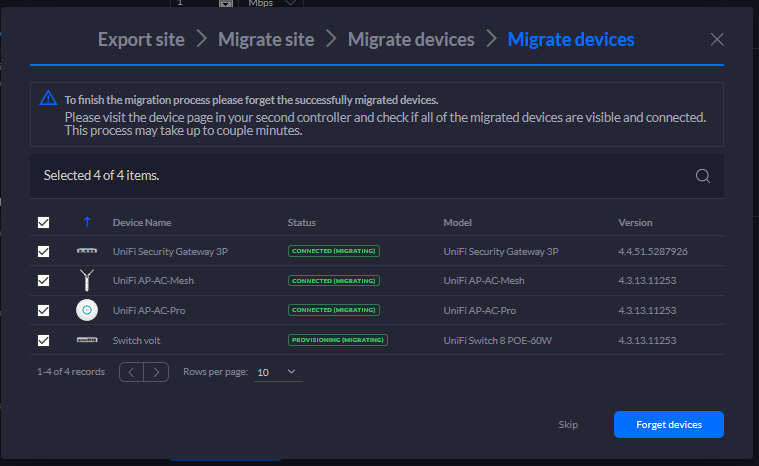
Disconnected Devices After Migration
If after migrating the controller to its new host, the devices appear as disconnected in the Devices section, it could mean there is a duplicate controller issue, or that the devices are still adopted by the old controller.

To verify, log into the UniFi Cloud Access portal using your Ubiquiti SSO account: https://network.unifi.ui.com/ and see how many controllers appear listed. If you see something similar to the image above, where both controllers are still listed, it probably means both controllers are running on the same LAN, at the same time. This will create an adoption failure and other connectivity issues.
To address this, physically disconnect the host of the old controller to make sure there is no confusion. Refresh the new controller and after a moment, the old controller should disappear from the UniFi Cloud Access Portal list, and the devices in the new controller should begin to appear as adopted. Please see the articles below for more troubleshooting help.
UniFi Mobile App Warning: Controllers with Same UUIDs
For cases where the error «Controllers with Same UUID» is seen, please follow these instructions to solve:
1. Remove and disable Cloud Access under Settings > Remote Access > Disable and Remove Cloud Access.
2. Forget both controllers from the Cloud Access Portal list, by clicking on Forget on each controller row.
3. Enable and reconfigure Cloud Access once again in Settings > Remote Access.
4. Rename the new controller to make sure it is not confused with the old one in Settings > Controller > Controller Name.
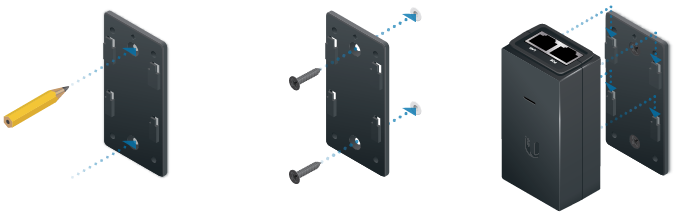
Requirements
- See the device’s Quick Start Guide to verify the hardware setup is done correctly. Find the QSG in the device’s box or in the Downloads page, under the Documentation section. Use the menu to the left to filter down to your specific device. Using the QSG, you can also adopt the device when setting up the Controller for the first time by following the QSG and then the Setup Wizard.
- UniFi devices can be adopted when connected directly to the same network as the controller (local adoption), or remotely if remote access is enabled on the controller. The process described in this article is for local adoption.
- The device needs to be powered up, and unadopted as indicated by a steady white LED. If the device were previously connected to another UniFi Network Controller, reset the device so they’re in factory default state before attempting to adopt. If they appear as «Managed by Other» you can follow the instructions in the article found in the Related Articles below if you don’t wish to reset them, although that’s the easiest way to adopt them.
- The controller and devices must be able to send and receive traffic over determined ports. See this article for information: UniFi — Ports Used. You will not need to change anything about this unless you face issues or have already changed default ports before.
- Only if adopting UniFi Security Gateway (USG) — Verify that the default LAN network in Settings > Networks, does not conflict with the network to which your USG’s WAN interface will be connected. If your USG will be given a DHCP address on the default 192.168.1.x subnet, make sure to change the subnet of LAN network in controller settings to a different subnet, for instance: change to 192.168.2.1/24, then “Update DHCP Scope” prior to adopting the USG. As an alternative, we recommend in these cases that if possible the upstream router be put in Bridge Mode as to limit potential complications.
Symptoms
All of the following symptoms can indicate stability issues with your Cloud Key:
- Flashing white LED indicating the UniFi Cloud Key is disconnected.
- Cloud Key may show as offline in UniFi Cloud Access Portal (https://network.unifi.ui.com/)
- The Cloud Key management UI may not be accessible via direct URL when typing the Cloud Key’s IP on browser: https://:8443/manage/
- UniFi service shows as not running through Web UI (https://, Select option Configure > Maintenance > Service > Stop UniFi will be grayed out indicating it is already offline)
- UniFi service will not start by clicking the button «Start UniFi».