Экстренное и безвозвратное удаление/затирание/уничтожение файлов/каталогов (данных/информации)
Содержание:
- How to Use SDelete in Windows 10/8/7?
- Best 5 Data Shredders
- Файл подкачки
- Лучшая защита — это нападение
- Recovering the Deleted Data, Deleting It Securely, and Overwriting
- Top Products
- Suggestion: Back up Files Before Using SDelete
- What Happens When You Hit Delete
- Does It Delete the Data?
- SDelete
- Sdelete Alternative – MiniTool Partition Wizard
- Secure Delete Tools
- Why Are SSDs Different?
- Заключение
- Правда и мифы о магнитной микроскопии
How to Use SDelete in Windows 10/8/7?
Download and Add SDelete
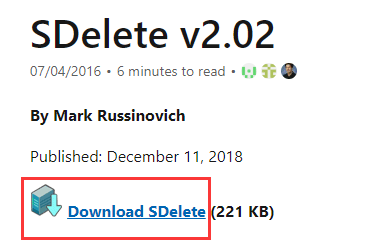
1. Download
Windows SDelete is downloadable. You can go to the Microsoft SDelete page and get this utility via the download link.
2. Add SDelete to CMD
This tool doesn’t have a traditional installer. Instead, the downloaded file is a .zip file that contains two executable files — sdelete.exe for 32-bit versions and sdelete64.exe for 64-bit versions. Some of you may choose to directly double-click the .exe file. Actually, this doesn’t work.
To use SDelete in Command Prompt (CMD), you need to make some settings by following the instructions.
1. Extract the file to a folder called SDelete. You can put the folder to your desktop or the path — C:\Program Files.
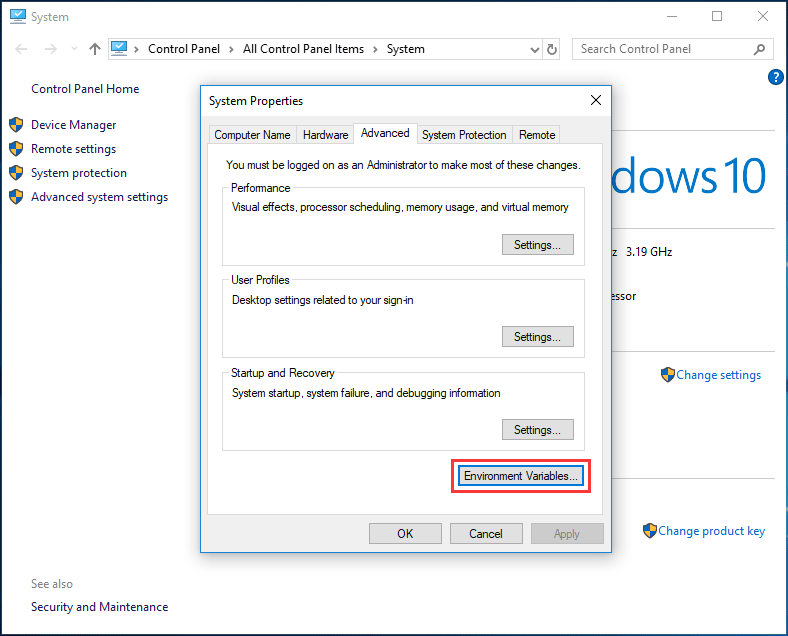
2. Right-click on This PC in File Explorer and choose Properties.
3. In the new window, click Advanced system settings.
4. Under the Advanced tab, click Environment Variables.
5. Click Path from System variables and click Edit.
6. In the new window, click New and Browse to find the SDelete folder and add it to the list.
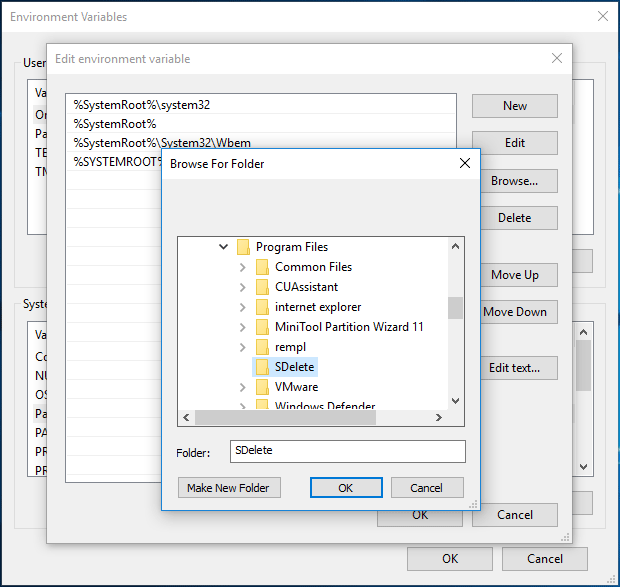
7. Finally, click OK three times to save your change.
Now, you can run Command Prompt to use SDelete to delete your files or folders.
How to Use SDelete to Delete Files
According to Microsoft, this command-line utility allows you to delete one or more files and directories. Also, you can clean free space on your logical disk. It accepts wild card characters as part of the file specifier or directory.
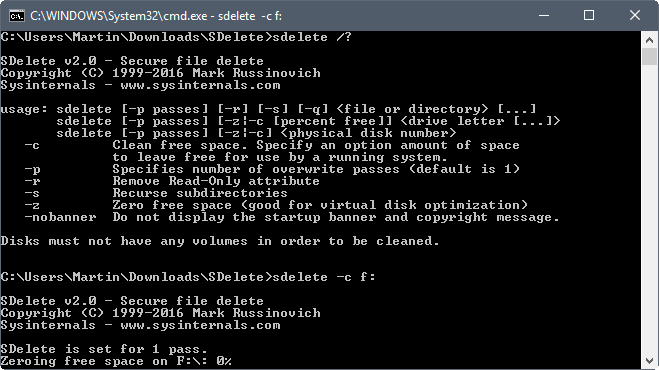
When you press Windows + R, input cmd in the Run window and click OK to run Command Prompt. Then, type the sdelete command and press Enter. You will get the following figure, showing you some parameters.

-c: Clean free space and specify an option amount of space
-p: Specifies number of overwrite passes (default is 1)
-r: Remove Read-Only attribute
-s: Recurse subdirectories
-z: Zero free space (good for virtual disk optimization)
Now, let’s see some Sdelete examples.
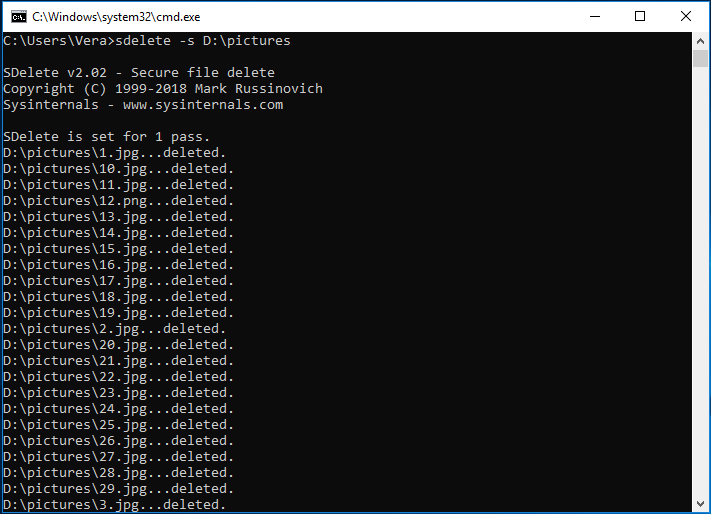
Delete files or folders securely
sdelete -s D:\pictures — This deletes the pictures folder and all subdirectories securely that locate in D drive.
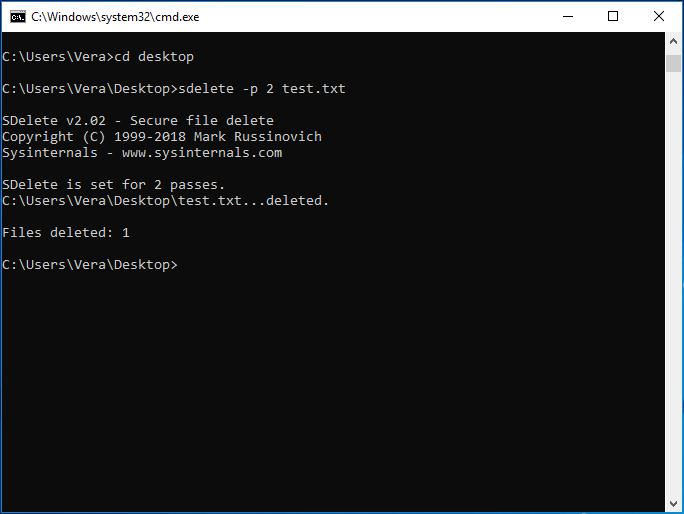
To delete a single file on the desktop, use these commands:
cd desktop
sdelete –p 2 test.txt
This deletes the test.txt file on the desktop and runs the operation in two passes.
Simply put, all the SDelete commands for delete files should rely on the base: sdelete <file or directory>.
Delete free disk space securely
sdelete –c c: — This deletes the free space of C drive and won’t impact existing files.

sdelete –c –p 3 f: — This runs three delete passes on the free disk space of F drive.
sdelete –z d: — This zeroes the free disk space of D drive. This benefits virtual disk optimization.
Of course, all the operations here should reply on the command: sdelete . For deleting free disk space, this may take some time to complete. It is fairly fast to delete individuals files but if you run the operation on large folders or free space of the hard drive, it may take hours or even longer.
After finishing deletion, you can run data recovery software to check if your files can be recovered. Without a doubt, they are unrecoverable.
Best 5 Data Shredders
As discussed above, erasing data securely from your storage is extremely important, especially when you are dealing with sensitive information.
Below are the best 5 data erasing tools that not only delete data from your hard drive or any other re-writable storage but also make the erased information unrecoverable:
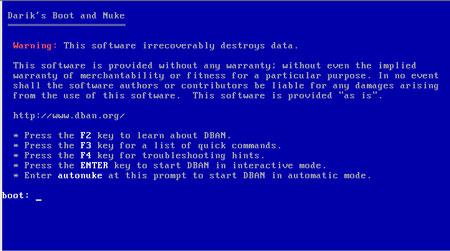
Part 1Darik’s Boot And Nuke (Rating 4.5/5)
This is one of the best and most appreciated data shredding tool worldwide. Its ready-to-use .ISO file can be downloaded easily and all you need to do after that is, burn the .ISO file to a blank optical media (CD or DVD), boot the PC with the media and permanently erase the sensitive data from your storage.
Methods that DBAN uses for data sanitization are: DoD, RCMP TSSIT OPS-II, 5220-22M, Gutman, Write Zero, and Random Data.
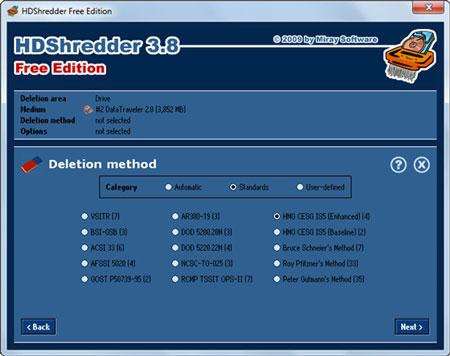
Part 2HDShredder Free Edition (Rating 4.5/5)
HDShredder has two variants that allow you to use the tool both from within Windows and externally. You can use the former variant when you want to permanently wipe the data from any storage other than the system drive (where Windows is installed), whereas the latter variant must be used to wipe the drive that has Windows in it. The paid version of this program offers even more promising features.
Methods that HDShredder Free Edition uses for data sanitization are: Write Zero (for up to 7 times overwrite).
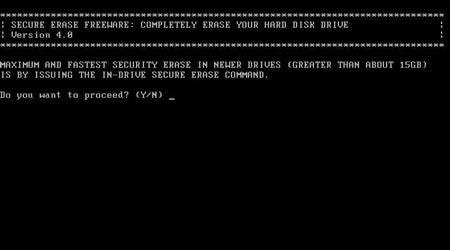
Part 3HDDErase (Rating 3.5/5)
HDDErase requires a bootable media (USB/CD/DVD) to boot your PC externally and thus it allows you to wipe your entire hard disk drive even if it has the operating system installed in it. Since the PC is booted externally using the HDDErase program, no Windows files are in use. This allows HDDErase to wipe all the files permanently off the storage.
Methods that HDDErase uses for data sanitization are: Secure Erase.
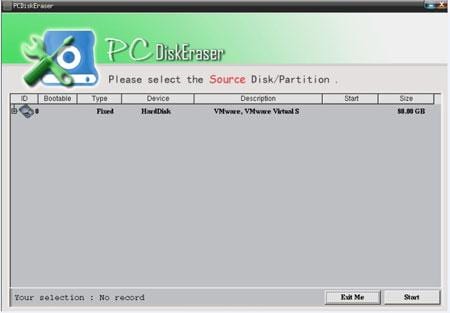
Part 4PCDiskEraser (Rating 3/5)
Yet another data shredding tool that requires a bootable media to run, thus giving the program full and unrestricted access on your hard drive including the system partition (C:). With such kind of privilege, PCDiskEraser can completely wipe your hard disk and can permanently delete your data off from it.
Methods that PCDiskEraser uses for data sanitization are: DoD and 5220 22-M.
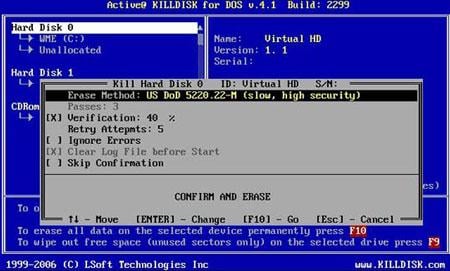
Part 5KillDisk (Rating 3/5)
KillDisk is a multiplatform program that comes in two variants – installer and bootable. The tool can be installed on Windows or Linux operating systems to wipe the data off from the external hard disk drives or other storage media. With the bootable variant, the program is capable of shredding the data off even from the system disk where the primary operating system is installed.
Methods that KillDisk uses for data sanitization are: Write Zero.
Файл подкачки
Подставы со стороны операционной системы на одном только файле с эскизами не заканчиваются. По мере работы с документом информация о нем попадает в различные части ОС — временную папку, реестр и так далее. Поэтому очень трудно отследить и удалить все связанные с файлом данные. Вдобавок ко всему, есть места, где копия файла может оказаться совершенно случайно (иногда такая случайность может стоить очень дорого). Я говорю о файле подкачки (pagefile.sys) и свопе памяти, используемом во время режима Hibernation (hiberfil.sys). Предсказать содержимое файла подкачки заведомо невозможно, и тут никто ничего не может гарантировать. Предлагаю еще на одном эксперименте убедиться в том, что это — опасное место.
Поскольку просмотреть или скопировать файл подкачки операционная система просто так не дает, то у нас есть два варианта: задействовать специальные утилиты или же загрузиться в другую операционку и получить доступ к файлу из нее. Мне второй способ показался более простым, так как под рукой был Back Track, начиненный различными утилитами, в том числе и для восстановления файлов. Поэтому, загрузившись с LiveCD, я смонтировал виндовый раздел и пошел в раздел «BackTrack — Forensic», откуда запустил утилиту Foremost. Эта замечательная консольная прога умеет восстанавливать файлы исходя из их заголовков и внутренней структуры. Необходимо лишь передать имя входного файла, в котором будет осуществляться поиск, и указать директорию, куда будут сохранены все найденные данные:
В качестве входного файла я указал файл подкачки /mnt/hda1/pagefile.sys, а директорию для сохранения результатов — /root/Desktop/page_file. Программа начала свою работу. За короткое время Foremost сумел найти и извлечь 524 файла.
Статистика извлеченных файлов
Утилита удобно отсортировала все файлы по типу и разложила по разным папкам. Первым делом я полез проверять, что же попало в папку jpg. Из всех восстановленных файлов около половины отказалось отображаться, зато другая — отлично просматривалась. И чего только не было среди картинок: пара фоток, которые я не так давно удалил; много мелких изображений с веб-сайтов; аватарки друзей из Facebook и прочее. Честно сказать, я не планировал обнаружить так много изображений. Кроме картинок мне хотелось еще узнать, что за единственный doc-файл, который попал в файл подкачки. Но, к сожалению, Word лишь ругнулся, что файл попорчен и не смог его открыть.
Неожиданный сюрприз ждал меня в папке cookie — бегло пролистав несколько файлов, я обнаружил адреса роликов, которые я смотрел чуть ли не год назад на YouTube. Вот и еще одно доказательство, что даже удалив в браузере все куки и историю, все равно можно проколоться.
Что тут можно сделать? Есть несколько вариантов. Первый — отключить вообще файл подкачки.
Для этого надо зайти в «Control Panel, System and Security — Systemr Advanced System Settingsy.Per formance — Advanced — Virtual Memory — Change» и выбрать опцию «No paging file». Второй вариант — заставить операционную систему затирать все данные в файле подкачки перед выключением компьютера.
Такой режим активируется, если установить для ключа ClearPageFileAtShutdown в разделе HKEY_LOCAL_MACHINESYSTEMCurrentControlSetControlSession ManagerMemory Management значение «1». К сожалению, второй метод очень медленный, и выключение системы будет занимать достаточно длительное время, так что применять его на практике или нет — решай сам. Аналогичная ситуация и с файлом hiberfil.sys. Его также можно попросту отключить, что сэкономит дополнительное место на диске. Кстати, исследовать файл подкачки можно и под виндой. Но так как операционная система не дает его просмотреть и скопировать с помощью штатных средств, нам понадобится программка FTK Imager (accessdata.com/support/adownloads).
Переходим в раздел «File — Add Evidence Item» и указываем диск, где находится файл подкачки. На панели слева отобразится дерево каталогов, где необходимо выбрать pagefile.sys и воспользоваться функцией экспорта через контекстное меню. Файл подкачки без проблем скопируется в указанную нами папку, и никакие блокировки системы с этого момента не помешают его анализировать. Для анализа, кстати, можно воспользоваться DiskDigger (diskdigger.org) или PhotoRec (www.cgsecurity.org/wiki/PhotoRec). Первая — проще, но вторая умеет восстанавливать более широкий круг различных форматов файлов.
Лучшая защита — это нападение
Что можно сделать, чтобы усложнить жизнь людям, к которым может попасть для экспертизы твой компьютер? Тут есть несколько вариантов. В случае, если на компьютере нашли «интересный» файл, время его создания будет веским доказательством против его владельца. Чтобы проследить цепь событий, эксперты опираются также на время создания/доступа/модификации файла. Так почему бы не запутать следы? На сайте metasploit.com есть такая замечательная утилита, как Timestomp (metasploit.com/data/antiforensics/timestomp.exe), которая позволяет менять время создания, модификации или доступа для заданного файла. Основные опции для ее использования:
задает дату последней модификации файла
задает дату последнего доступа к файлу
задает время создания файла
задает время модификации файла, хранящееся в MFT
задает четыре вышеперечисленных параметра
Дата задается в следующем виде: DayofWeek MonthDayYear HH:MM:SS . Есть еще очень интересная опция -b, которая устанавливает вышеперечисленные атрибуты таким образом, что известная в кругах компьютерных криминалистов программа EnCase их не видит и отображает пустыми :). Таким образом, чтобы поменять атрибуты файла, достаточно выполнить в консоли команду:
Легко можно набросать скриптик, который будет рекурсивно менять временные атрибуты файлов. Простейший вариант выглядит так:
Есть и другие способы подпортить жизнь товарищам-исследователям чужих HDD. В своей работе они используют программы, написанные обычными людьми, а потому — содержащими ошибки. Да-да, мы можем использовать уязвимости программного обеспечения, применяемого для поиска улик. Подробней об этом можно почитать в одном из докладов с конференции DefCon: isecpartners.com/files/iSEC-Breaking_Forensics_Software-Paper.v1_1.BH2007.pdf.
Recovering the Deleted Data, Deleting It Securely, and Overwriting
If you don’t want your sensitive data to be recovered at all after deletion, you must make some smart moves to ensure your data becomes unusable and unrecoverable by any means. Your best bet to get this done would be:
1. Use an efficient secure data deletion tool to delete and destroy the data securely.
2. Write and re-writing another random data multiple times on the storage to make the sensitive data completely unrecoverable and unusable forever. Most of the times the data deletion tools do this right after wiping the storage. In fact, it is because of this final step that your data becomes unrecoverable.
Top Products
- Filmora Video Editor
- Easy & trendy video editor with rich filters and transitions.
- Video Converter Ultimate
- Your complete video toolbox: download, convert, edit, burn, transfer videos and more.
- PDFelement — PDF Editor
- Easily Create, Edit, Convert, Sign, OCR PDF files. Change the way you work with PDF.
- eSign+
- Fast, secure & legally binding electronic document signing platform.
- Dr.Fone — iPhone Data Recovery
- The world’s 1st iPhone and iPad data recovery software.
- Dr.Fone — Data Recovery for Android
- The world’s 1st data recovery software for Android phones and tablets.
- Data Recovery
- Retrieve your lost/deleted files from PC/Mac and storage devices including hard drive, memory card, flash drive etc.
- TunesGo
- Enjoy Your Favorite Music Without iTunes. Transfer and Manage Music, Photos and More With Ease.
- MirrorGo
- Play Android Games on Computer with Big Screen and Mouse&Keyboard Combination. Just take full control!
- SafeEraser — iPhone Eraser
- Permanently erase your android & iPhone and protect your personal information.
- MobileGo — Android Manager
- One-stop solution that lets you manage your mobile lifestyle in one convenient place.
- MobileTrans — Phone Transfer
- The easy 1-Click Phone to Phone Transfer software.
Suggestion: Back up Files Before Using SDelete
As said before, files deleted by SDelete are unrecoverable. Before performing the deletion operation, we suggest backing up your important files since sometimes data loss is caused by mistaken operation. In addition, before selling your PC or throwing it away, you should also make sure your critical data is backed up.
How can you back up your disk data? A free backup software – MiniTool ShadowMaker can be your good assistant. This program can help you easily create a backup for your vital data via two methods: imaging backup and file sync.
The first option means the selected files will be compressed into an image file and you should perform a file restoration if you need to use it. File sync means the original folder and target folder are identical and you can directly use files.
Just get MiniTool ShadowMaker by hitting the download button and start a file backup. Here, we will take file sync as an example.
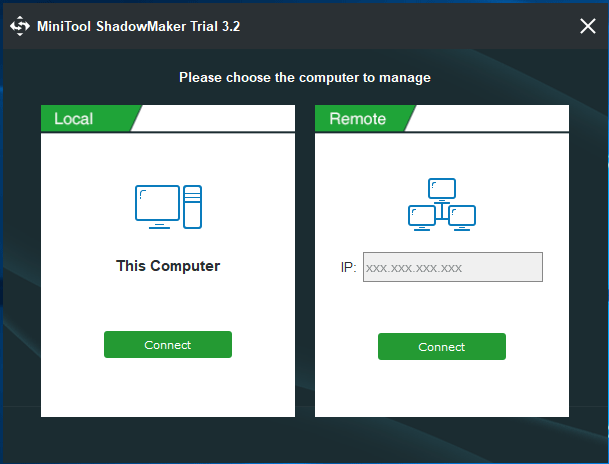
1. Double-click the icon of MiniTool ShadowMaker on your computer.
2. Click the Keep Trial icon for the use of the trial edition.
3. Decide which backup mode you want – local backup or remote backup. Then, click Connect to continue.
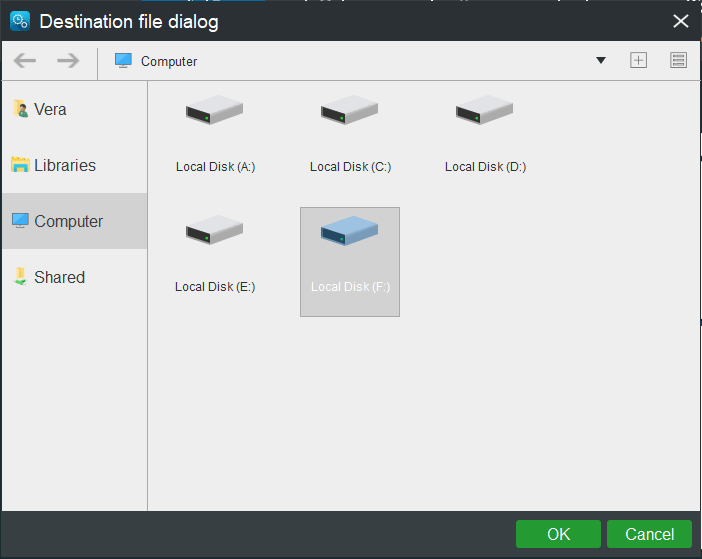
4. Go to the Sync page and choose files you want to back up by entering the Source section.
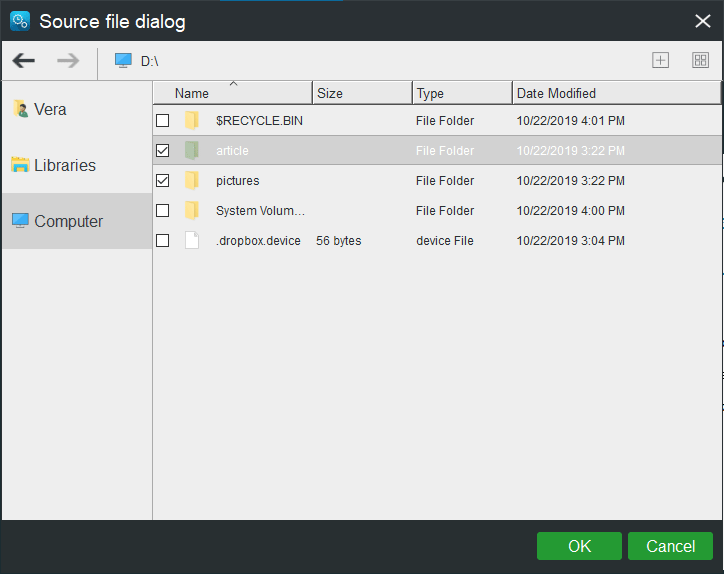
5. Click Destination to choose a path for the source contents – a USB flash drive, external drive, and shared folder can be OK.
6. After finishing the selections, click Sync Now to start the sync operation.

Tip: If you want to use its Backup feature to back up files, refer to our previous post — How to Backup Files on Windows 10? Try These Top 4 Ways.
After finishing file backup, now you can perform the file deletion with SDelete. The following is how to use this command-line tool.
What Happens When You Hit Delete
We hit delete, and the file disappears from the screen. But what happens? Well, deleting a file is a multi-stage process. The first time you delete a file, it simply moves to the Recycle Bin (or Trash). The file contents remain intact. This allows us to recover files we accidentally delete.
The next step is removing it from the Recycle Bin (or using Shift + Delete to directly delete). Most operating systems keep track of files using «pointers.» Each file and folder has a pointer telling the file system exactly where to look for a file. When you delete a file from the Recycle Bin, Windows deletes the pointer and marks the disk sectors containing the data as available for overwriting.
17 Shift Key Shortcuts You Should Remember in Windows
If you are on Windows, then learning the many Windows shortcuts can take a while. Here are some of the most valuable ones you should start with.
In your file explorer, the file is gone. In practice, though, until the disk sector containing the existing data is overwritten, the file data still exists. This is why file recovery programs can restore files. Furthermore, this is why some file recovery programs can recover parts of files — the sector containing old data wasn’t entirely written over, leaving some data intact.
This is how file deletion works on a regular hard drive. SSDs work differently.
Does It Delete the Data?
Secure Erase methods should theoretically delete all the data from a drive on the first pass. But as several studies have shown, poorly-implemented or buggy Secure Erase versions can result in lingering data. This data is recoverable. The best method is to complete at least two full Secure Erase processes to ensure that every SSD cell is completely clear.
Otherwise, if you’re not selling the drive and want to destroy it, just hit the SSD, repeatedly, with a hammer. Please note that this will destroy the contents of the drive as well as the drive itself. But at least your data will be irrecoverable. If you need to purchase a new SSD, remember that you also have the choice between a PCIe or SATA SSD and check out our guide on upgrading to NVMe versus sticking with SATA SSDs.
Did you have your data recovered from an SSD? Have you tried to securely erase the data beforehand? Let us know your thoughts below!
Grove Beginner Kit for Arduino Review: The Best Arduino Starter Kit Yet
An innovative way to get started with Arduino programming at a great price.
About The Author
Gavin is a Senior Writer for MUO. He is also the Editor and SEO Manager for MakeUseOf’s crypto-focused sister site, Blocks Decoded. He has a BA (Hons) Contemporary Writing with Digital Art Practices pillaged from the hills of Devon, as well as over a decade of professional writing experience. He enjoys copious amounts of tea.
More About Gavin Phillips
SDelete
SDelete is a free command line tool that you can use to delete files securely so that they cannot be recovered anymore.
The program overwrites the data on the hard drive directly when it is run to prevent file recovery software from picking up traces of deleted files and data.
The application has two main use cases: delete files securely to prevent recovery, or overwrite free disk space securely to delete traces of previously deleted files on it.
You can download SDelete from the Microsoft website. You find a detailed article on it and its use as well. Extract the archive to your system. Since SDelete is a command line tool, you need to run it from the command line.
One easy option to open the SDelete folder on the command line is to open it in Windows Explorer, type cmd in the Explorer address field, and hit the Enter-key. This should open a command prompt at that location.
Deleting files or folders securely
The command sdelete <file or directory> is the base command for any file or directory operations. Here are some examples that demonstrates the different options that you have:
- sdelete -s c:\users\martin\downloads — This deletes the folder downloads and all subdirectories securely.
- sdelete -q c:\users\martin\text.txt — This deletes the file text.txt securely, and suppresses any error messages.
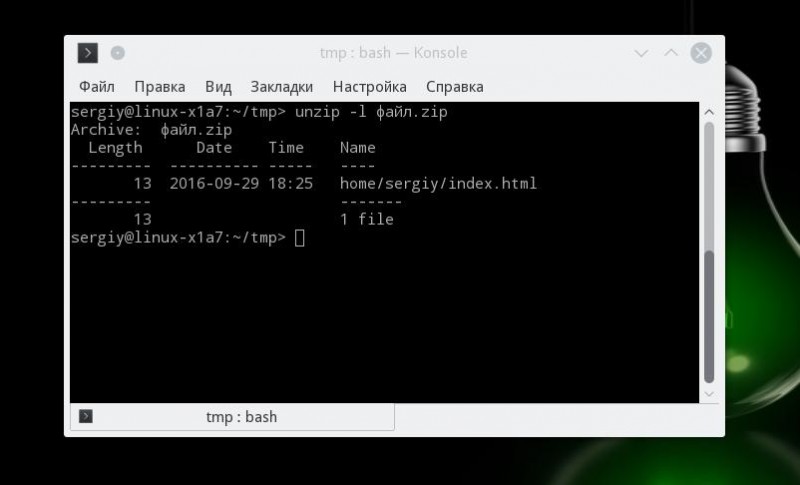
- sdelete -p 5 c:\*.zip — This deletes all zip files under c:, and runs the operation in five passes.
Deleting free disk space securely
The base command sdelete -c <drive letter> deletes free disk space on the specified drive securely. Here are some examples that demonstrate the various options that SDelete offers:
- sdelete -c c: — Deletes the free disk space on drive C: securely.
- sdelete -c -p 2 f: — Runs two delete passes on the free disk space of drive f:
- sdelete -z d: — Zeroes the free disk space of drive d:
SDelete uses the Department of Defense algorithm by default when it deletes files, folders or free disk space. The -z parameter overwrites the free disk space with zeroes instead which is faster.
The operations may take quite some time to complete. The length it takes depends on the selection. Deleting individual files securely is pretty fast, but it may take hours or even longer if you run the operation on large folders or free space of entire hard drives.
It is recommended to run recovery software afterwards on the path to verify that the files cannot be recovered anymore.
Closing Words
SDelete is a handy, tiny program which you may use to delete files or folders securely, and to process free space on hard drives so that any content that was once store on those drives cannot be recovered anymore.
SDelete
For Windows
Download Now
Summary
Author Rating
5 based on 6 votes
Software Name
SDelete
Operating System
Windows
Software Category
Administration
Landing Page
https://docs.microsoft.com/en-us/sysinternals/downloads/sdelete
Sdelete Alternative – MiniTool Partition Wizard
After reading the above information on SDelete, you should know it is so complicated. If you are not a professional, it is best to not use this utility to delete your files permanently since the commands you input may be incorrect or you don’t know how to use SDelete although you have read this post. Sometimes you may be bothered by the SDelete access denied issue.
In these cases, it is necessary to look for an alternative to SDelete to erase your data. Well then, which one should you use? MiniTool Solution has such a tool and it is MiniTool Partition Wizard.
As a partition manager, it has many powerful features, such as resize/extend/format/delete partition, etc. Additionally, it can be a professional eraser since its Wipe Partition and Wipe Disk features can help you erase a specific partition or disk permanently. And all the data on the target drive cannot be recovered even if you use a data recovery program.
Right now, get this wipe tool by hitting the download button below and then install it on your Windows 10/8/7 computer.
Tip: Note that the wiping operation can delete your files forever. Before sending your disk to others, you should also create a backup for your important files with MiniTool ShadowMaker (follow the operations above) and then wipe the drive.
1. Double-click on the icon of MiniTool Partition Wizard to launch it.
2. Click the Launch Applications section to the main interface.
3. Choose the target partition and select Wipe Partition from the Partition Management menu.

Tip: The Wipe Partition feature will erase the entire drive and all the data on it will be removed. This is different from SDelete that only deletes specific folders or files. Before the operation, you can transfer files that you want to delete permanently to a certain partition and then use this feature. This is pretty easy for you to do these operations.
4. In the pop-up window, you can see this eraser offers 5 wiping methods; you should choose one and click OK to continue.
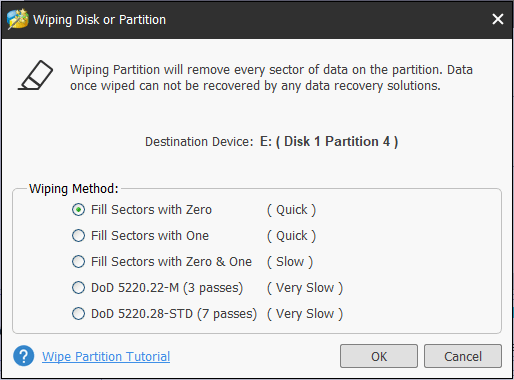
As for the wiping methods, each one gets a different result and take uneven time. MiniTool Partition Wizard wipes partition by repeatedly filling sectors or writing 3/7 times. For example, if you choose one of the first three methods, you can fill each sector with 1, 0 or 1 & 0. For the latter two methods, you should know they can get the best effect but take longer time comparatively.
Tip: As mentioned above, SDelete uses the DOD 5220.22-M standard to delete files. Here, you find MiniTool Partition Wizard also gives you the option. By contrast, it supports more wiping methods.
5. When returning to the main interface, the partition has become unformatted. Just click Apply to let the change take effect.

After finishing all the operations, you can format the target partition and write new data to the place. Additionally, you can wipe the entire disk with this hard drive eraser if you don’t want the whole disk data. For more information on the operation, refer to our previous post — How Do I Wipe Disk with A Free Hard Drive Eraser.
Secure Delete Tools
Самым универсальным инструментом является пакет “Secure Delete Tools”.
По умолчанию утилиты пакета используют алгоритм стирания, предложенный в докладе криптографа Питера Гутмана (Secure Deletion of Data from Magnetic and Solid-State Memory by Peter Gutmann, 1996).
Сначала все данные затираются значением . Пять раз данные перезаписываются значениями из (случайные данные). 27 раз происходит перезапись специальным шаблоном разработанным Гутманом. Снова пять раз перезаписывается значением из и наконец удаляется обычной командой .
В состав входят:
- — используется для удаления файлов или каталогов на жестком диске.
- — уничтожает следы из оперативной памяти (RAM).
- — уничтожает следы данных из раздела подкачки (SWAP).
- — уничтожает следы данных из свободного пространства на жестком диске.
srm
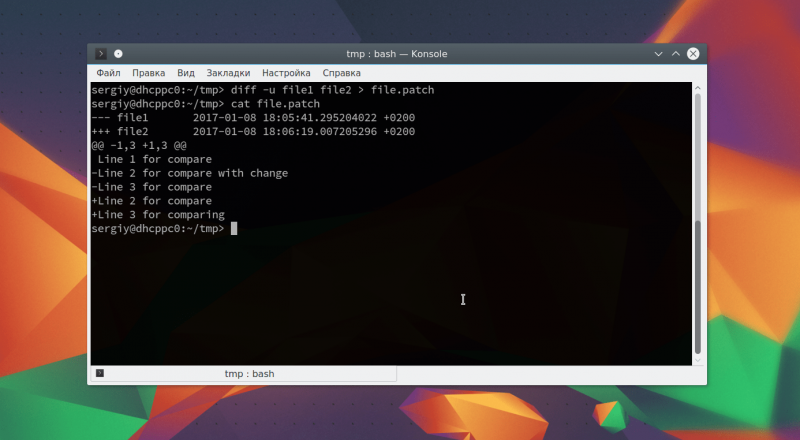
Использование аналогично . Соответственно, чтобы надёжно стереть директорию просто используйте вместо :
Для одного прохода надо добавить ключ ():
Кроме режима есть ещё один упрощенный режим , делающий 7 проходов.
Узнаем где раздел с :
Отключаем (при условии, что он на ):
Очищаем в однопроходном режиме:
Включаем :
Why Are SSDs Different?
SSDs are different from regular HDDs, primarily because they use different technologies to record data. An HDD is a spinning platter that writes with a moving mechanical arm. An SSD is more akin to a flash memory stick, storing information in cells. To write new data to a cell, the drive must first erase existing data.
That’s where the TRIM command comes in. During regular operations, SSDs essentially rapidly zero the data containing cell before rewriting data. SSDs maintain control over where data is written within the cells. This means that the operating system might request data to be written to block 1,000, whereas the SSD pointer table contains an altogether different number. This is known as wear-leveling.
The data writes and retrieves, but there are differences. This process allows SSDs to manage data, always allocating an already-zeroed block for the write process while ensuring the flash memory degrades at an equal rate.
Of course, there cannot be pre-zeroed blocks forever. And while the SSD knows how to redirect its pointers to pre-zeroed blocks, it doesn’t know about operating system marked unused blocks. This is where TRIM steps in. The TRIM command allows the operating system to inform the SSD as to which blocks are available for pre-zeroing, saving time and keeping the write process fast.
However, TRIM doesn’t securely delete data. Because the SSD hardware controller decides the blocks to level, you cannot be entirely sure as to when your drive will complete the task. Furthermore, SSDs use a small amount of unallocated space as a buffer during the wear-leveling process, essentially keeping a data record. Unfortunately, this means SSDs are susceptible to a range of data recovery techniques.
Заключение
«Безопасное удаление данных» — это не панацея. Смею тебя заверить, что описанные лазейки — не единственные в своем роде. И тот, кто по роду деятельности проводит экспертизы компьютеров на профессиональном уровне, знает, где и как найти необходимые ему данные. Теперь твоя безопасность в твоих руках — не дай «охотникам за приведениями» найти ни одного «призрака» на твоем компе. А еще лучше — не давай им повода приходить к тебе в гости :).
Правда и мифы о магнитной микроскопии
Очень часто люди впадают в две крайности. Одни откровенно забивают на свою безопасность и хранят на винте всю компрометирующую информацию, будучи уверенными, что <Shift+Delete> их спасет. Другие же, наоборот, каждый день затирают винт и заново устанавливают операционку. Быть может, я утрирую. Тем не менее, довольно часто приходится читать в Сети споры о том, сколько же раз надо перезаписать винт, чтобы информацию невозможно было восстановить.
Предлагаю опытным путем выяснить, хватит ли одной полной перезаписи, чтобы безвозвратно удалить все данные. Итак, опять возьмем нашу подопытную флешку и полностью перезапишем ее нулями, после чего отформатируем в NTFS. Для проверки закинем на нее какой-нибудь файл: пусть это будет опять же JPEG. Его легко можно найти в WinHex’е по сигнатуре «jfif». У меня он расположился по смещению 274432. Ну что ж, запустим шредер (я юзал HDD Wipe Tool) и затрем весь диск. Теперь, если посмотреть в WinHex, что расположилось по смещению 274432, то мы увидим только нули. Для успокоения и большей уверенности можно попробовать восстановить данные с помощью DiskDigger, Photorec, Foremost и прочих утилит. Но это заведомо пустая трата времени — ничего у них не выйдет.
«Хорошо, — скажешь ты, — а как же насчет серьезных приборов, имеющихся у компетентных органов, которые умеют восстанавливать данные?» Ну что ж, давай поговорим о магнитной микроскопии. Суть метода в том, чтобы определить состояние каждого бита до его перезаписи. То есть, был ли он равен единице или нулю. Возьмем текст в кодировке ASCII. Каждый символ кодируется восемью битами таким образом, что если даже всего один бит восстановлен неверно — получается совсем другой символ. Например, есть последовательность символов «anti», выглядящая в бинарном виде следующим образом: 0110000101 1011100111010001101001. Предположим, что магнитная микроскопия правильно определила все биты, кроме последнего — в результате такого восстановления мы получаем последовательность «anth». Неувязочка получается.
И это мы говорим о простейшем текстовом файле. Представь, что будет в случае со структурированными форматами — такими как архивы, файлы БД, исполняемые файлы и так далее. Вдобавок к этому метод достаточно медленный и дорогой. Так что во многих случаях использование магнитной микроскопии дает такой же точный результат, как и восстановление путем подбрасывания монетки на «орел-решка». Поэтому нет никакой необходимости по три раза перезаписывать диск.