Программа testdisk: инструкция по восстановлению данных
Содержание:
- Running TestDisk executable
- Запуск PhotoRec
- TestDisk Startup
- Honeynet — Scan of the month
- Восстановление загрузочного сектора NTFS
- Documentación
- Признаки
- Example problem
- Symptoms
- Восстановление двух разделов FAT32
- Normal Scan
- Dateisysteme
- Как это работает?
- Раздел все еще отстутсвует: Deeper Search
- Libraries
- A partition is still missing: Deeper Search
- How to make the system bootable again
- NTFS Boot sector recovery
- Symptômes
- Running TestDisk executable
- Lancer TestDisk
Running TestDisk executable
If TestDisk is not yet installed, it can be downloaded from TestDisk Download. Extract the files from the archive including the sub-directories.
To recover a lost partition or repair the filesystem from hard disk, USB key, Smart Card, etc., you need enough rights to access a physical device.
- Under DOS, run TestDisk.exe
- Under Windows, start TestDisk (ie ) from an account in the Administrator Group.
- Under Unix/Linux/BSD, you need to be root to run TestDisk (ie. )
- Under MacOSX, start TestDisk (ie ). If you are not root, will restart itself using sudo after confirmation from your part.
- Under OS/2, TestDisk doesn’t handle physical device, only a disk image. Sorry.
To recover a partition from a media image or repair a filesystem image, run
- to carve a raw disk image
- to recover files from an Encase EWF image
- if the Encase image is split into several files.
To repair a filesystem not listed by TestDisk, run , i.e.
- or to repair the NTFS or FAT32 boot sector files from a TrueCrypt partition. The same method works with a filesystem encrypted with cryptsetup/dm-crypt/LUKS.
- to repair a filesystem on top of a Linux RAID device.
Запуск PhotoRec
Если PhotoRec еще не был установлен, вы можете его скачать отсюда: TestDisk Download. Извлеките все содержимое архива.
Чтобы восстановить данные с жесткого диска, USB-флешки, Смарт-карты, CD- или DVD-диска или иных носителей, Вам нужно иметь к ним полный доступ.
- Для DOS: запустите photorec.exe
- Для Windows: запустите PhotoRec (testdisk-6.9/win/photorec_win.exe) от имени пользователя из группы Администраторы. Под Vista, нажмите на файл photorec.exe правой клавишей мыши и выберите «Запустить от администратора».
- Для Unix/Linux/BSD: Вам необходимы права пользователя root для запуска PhotoRec ()
- Для MacOSX, запустите PhotoRec (testdisk-6.9/darwin/photorec). Если PhotoRec был запущен без прав пользователя root, программа сама перезапустится используя sudo после подтверждения.
- Для OS/2: извините, PhotoRec не может работать с устройствами, только с их образами
Чтобы восстановить данные с образа устройства:
- чтобы снять ‘сырой’ образ диска
- чтобы восстановить данные из Encase EWF-образа
- если Encase-образ разбит на части.
- Если части Encase-образа находятся в каталоге d:\evidence
Чтобы восстановить данные с любого другого устройства запустите , т.е.
- чтобы восстановить данные с разделла созданного программой TrueCrypt. Тот же принцип работает для файловых систем зашифрованных программами cryptsetup, dm-crypt, LUKS и др.
- чтобы восстановить данные с программного RAID-массива Linux
Существует также параметр предназначенный для создания файла и записи в него путей всех файлов восстановленных PhotoRec.
TestDisk Startup
When TestDisk is executed, you may see the phrase
on your screen until it has gathered enough data from the BIOS or OS to get the hard disk list.
TestDisk 6.10-WIP, Data Recovery Utility, February 2008
Christophe GRENIER <grenier@cgsecurity.org>
https://www.cgsecurity.org


TestDisk is a free data recovery software designed to help recover lost
partitions and/or make non-booting disks bootable again when these symptoms
are caused by faulty software, certain types of viruses, or human error.
It can also be used to repair some filesystem errors.

Information gathered during TestDisk use can be recorded for later
review. If you choose to create the text file, testdisk.log, it
will contain TestDisk options, technical information and various
outputs, including any folder/file names TestDisk used to find and
list onscreen.

Use arrow keys to select, then press Enter key:
  Create a new log file
  Append information to log file
  Don't record anything
TestDisk 6.10-WIP, Data Recovery Utility, February 2008
Christophe GRENIER <grenier@cgsecurity.org>
https://www.cgsecurity.org

  TestDisk is free software, and
comes with ABSOLUTELY NO WARRANTY.

Select a media (use Arrow keys, then press Enter):
Disk /dev/sda - 120 GB / 111 GiB - ATA ST3120026AS
Disk /dev/sdb - 120 GB / 111 GiB - ATA ST3120026AS


Note: Disk capacity must be correctly detected for a successful recovery.
If a disk listed above has incorrect size, check HD jumper settings, BIOS
detection, and install the latest OS patches and disk drivers.
If the reported size doesn’t match the hard disk size — i.e. a 120 GB hard disk is recognized as only a 32 GB hard disk — check your BIOS hard disk settings and the jumpers on the disk. On most large hard disks, there are jumpers to limit the size to only 32 or 8 GB. If your HD is detected as only 130 GB, LBA48 support may not be available in your OS — read OS notes for more information.
Next step is to select the partition table type.
TestDisk 6.10-WIP, Data Recovery Utility, February 2008
Christophe GRENIER <grenier@cgsecurity.org>
https://www.cgsecurity.org


Disk /dev/sda - 120 GB / 111 GiB - ATA ST3120026AS

Please select the partition table type, press Enter when done.
  Intel/PC partition
  EFI GPT partition map (Mac i386, some x86_64...)
  Apple partition map
  Non partitioned media
  Sun Solaris partition
  XBox partition
  Return to disk selection


Note: Do NOT select 'None' for media with only a single partition. It's very
rare for a drive to be 'Non-partitioned'.
Honeynet — Scan of the month
scan15: recover of delete files from an ext2 filesystem
- Download the archive from http://old.honeynet.org/scans/scan15/
- Decompress the archive
- Run
- Partition type: None
- Advanced
- Undelete
TestDisk 6.12-WIP, Data Recovery Utility, October 2010
Christophe GRENIER <grenier@cgsecurity.org>
https://www.cgsecurity.org
   P ext2                     0   0  1    32 253 63     530082
Directory /

>drwxr-xr-x     0     0      1024 16-Mar-2001 02:45 .
 drwxr-xr-x     0     0      1024 16-Mar-2001 02:45 ..
 drwxr-xr-x     0     0     12288 15-Mar-2001 12:09 lost+found
 drwxr-xr-x     0     0      1024 15-Mar-2001 12:09 boot
 drwxr-xr-x     0     0      1024 15-Mar-2001 12:09 home
 drwxr-xr-x     0     0      1024 15-Mar-2001 12:10 usr
 drwxr-xr-x     0     0      1024 15-Mar-2001 12:10 var
 drwxr-xr-x     0     0      1024 15-Mar-2001 12:10 proc
 drwxrwxrwt     0     0      1024 16-Mar-2001 15:48 tmp
 drwxr-xr-x     0     0     34816 16-Mar-2001 02:45 dev
 drwxr-xr-x     0     0      3072 16-Mar-2001 02:45 etc
 drwxr-xr-x     0     0      2048 16-Mar-2001 02:45 bin
 drwxr-xr-x     0     0      3072 15-Mar-2001 12:18 lib
 drwxr-xr-x     0     0      1024 15-Mar-2001 12:10 mnt
 drwxr-xr-x     0     0      1024 23-Aug-1999 18:03 opt
 drwxr-x---     0     0      1024 15-Mar-2001 18:23 root
 drwxr-xr-x     0     0      3072 16-Mar-2001 02:45 sbin
 drwxr-xr-x     0     0      1024 15-Mar-2001 18:23 floppy
 -rw-r--r--     0     0    520333 16-Mar-2001 02:36 lk.tgz
 drwxr-xr-x  1031   100         0 16-Mar-2001 02:45 last


Use Right arrow to change directory, c to copy,
    h to hide deleted files, q to quit
The last two lines list a deleted file and a delete directory containing several delete files.
- Select the file, press to get a copy
- Other deleted files can be found in /tmp, /etc, /etc/X11/fs, /etc/rc.d/rc.d, /etc/pam.d
To get a listing of all the files, run
and check the testdisk.log file. Lines listing deleted files are beginning by an X.
scan24: recovery from a damaged FAT12
- Download the image from http://old.honeynet.org/scans/scan24/
- Run
- Partition type: None
- Advanced
- Undelete
TestDisk 6.12-WIP, Data Recovery Utility, October 2010
Christophe GRENIER <grenier@cgsecurity.org>
https://www.cgsecurity.org
   P FAT12                    0   0  1    79   1 18       2880
Directory /

>-rwxr-xr-x     0     0     15585 11-Sep-2002 09:30 cover page.jpgc
 -rwxr-xr-x     0     0      1000 24-May-2002 09:20 SCHEDU~1.EXE
 -rwxr-xr-x     0     0      4096 14-Oct-2002 15:18 _OVERP~1.SWP


Use Right arrow to change directory, c to copy,
    h to hide deleted files, q to quit
- Copy the files
- We can now examine the files and discover that the exe file is a zip archive and that all files are corrupted. Let’s try another method.
- Run
- Partition type: None
- Search
- Select Other as the filesystem was FAT
- to recover all the files and ignore the File Allocation Table (FAT)
PhotoRec 6.12-WIP, Data Recovery Utility, October 2010
Christophe GRENIER <grenier@cgsecurity.org>
https://www.cgsecurity.org

Disk scan24.dd - 1474 KB / 1440 KiB (RO)
     Partition                  Start        End    Size in sectors
   P FAT12                    0   0  1    79   1 18	  2880


3 files saved in /home/kmaster/recup_dir directory.
Recovery completed.
Check the recovered files
$ ls -l
total 36
-rw-rw-r--. 1 kmaster kmaster 20480 Apr 15  2002 f0000033_Jimmy_Jungle.doc
-rw-rw-r--. 1 kmaster kmaster  8754 Nov  9 20:44 f0000073.jpg
-rw-rw-r--. 1 kmaster kmaster  2420 Nov  9 20:44 f0000104.zip
The files are perfectly recovered. The challenge isn’t finished but PhotoRec helps a lot 😉
Восстановление загрузочного сектора NTFS
The boot sector of the first partition named is still damaged. It’s time to fix it.
The status of the NTFS boot sector is bad and the backup boot sector is valid.
Boot sectors are not identical.
To copy the backup of the boot sector over the boot sector, select Backup BS, validate with Enter, use y to confirm and next Ok.
More Information about repairing your boot sector under TestDisk Menu Items.
The following message is displayed:
The boot sector and its backup are now both ok and identical: the NTFS boot sector has been successfully recovered.
Press Enter to quit.
TestDisk displays You have to restart your Computer to access your data so press Enter a last time and reboot your computer.
Documentación
- Cómo obtener TestDisk
- Descargar — Los Ejecutables Binarios y el Código Fuente están disponibles para: DOS, Win32, MacOSX y Linux.
- Compilación de TestDisk
- TestDisk y CD Live rescue
- Trabajando con medios especiales
- Recuperación de Discos rígidos dañados (sectores dañados)
- Imagen de Disco
- CD-R/CR-RW/DVD…
- Usando TestDisk
- Notas específicas de Sistemas Operativos
- TestDisk Paso A Paso para recuperar particiones perdidas y reparar sectores de arranque FAT/NTFS
- Ejecutando el programa de TestDisk
- Recuperar archivos y directorios de sistemas de archivos NTFS
- Recuperar archivos y directorios de sistemas de archivos FAT12, FAT16 y FAT32
- Recuperar archivos y directorios de sistemas de archivos ext2
- Ejemplos de Recuperación
- Ejecución con Scripts
- Soporte
- Luego de usar TestDisk
- Notas Técnicas
- Desarrolladores Cómo contribuir código a TestDisk & PhotoRec
- Tabla de particiones de Intel
- FDisk de Microsoft
- Monitoreo SMART
- Aplicación Norton GoBack
- Limitaciones Actuales
- Cómo ayudar
- TestDisk & PhotoRec en las Noticias
- Equipo TestDisk
Para recuperar imágenes perdidas de archivos de cámaras digitales o discos rígidos, ejecutar el comando PhotoRec.
Признаки
1. Если на жестком диске первичный раздел содержит операционную систему, то, скорее всего, которая больше не загрузиться; из-за в первичном разделе загрузочного сектора.
2. Если жесткий диск содержит вторичные разделы, к которым невозможно получить доступ или вы можете подключаете свой диск на второй канал в другом компьютере (обычно там подключены CD / DVD привод),и наблюдаются следующие симптомы следующие симптомы бы отметил следующее:
- Проводник Windows или Дисковый менеджер отображает первый первичный раздел как raw неотформатированный и Windows показывает:The drive is not formatted, do you want to format it now? [Ваш диск неотформатирован. Отформатировать его сейчас?]
- Логический раздел отсутствует. В ПРОВОДНИКЕ Windows логический диск не доступен. В Оснастке Управление дисками отображает только «незанятое пространство», на месте где этот логический раздел был расположен.
Example problem
We have a 36GB hard disk containing 3 partitions. Unfortunately;
- the boot sector of the primary NTFS partition has been damaged, and
- a logical NTFS partition has been accidentally deleted.
This recovery example guides you through TestDisk, step by step, to recover these ‘lost’ partitions by:
- rewriting the corrupted NTFS boot sector, and
- recovering the accidentally deleted logical NTFS partition.
Recovery of a FAT32 partition (instead of an NTFS partition) can be accomplished by following exactly the same steps. Other recovery examples are also available. For Information about FAT12, FAT16, ext2/ext3, HFS+, ReiserFS and other partition types, read Running the TestDisk Program.
Symptoms
If this hard disk’s primary partition contained an operating system, it would most likely no longer boot up — due to its corrupted boot sector. If the hard disk was a secondary (data) drive or you can connect the drive to another computer in its secondary channel (usually where a CD/DVD drive is connected), the following symptoms would be observed:
- Windows Explorer or Disk Manager displays the first primary partition as raw (unformatted) and Windows prompts: [You should never do so without knowing why!]
- A logical partition is missing. In Windows Explorer, that logical drive is no longer available. The Windows Disk Management Console now displays only «unallocated space» where this logical partition had been located.
Восстановление двух разделов FAT32
Было два раздела FAT32 на жестком диске, но они были удалены. После выполнения анализа , быстрого поиска и глубокого поиска , TestDisk нашел только второй раздел.
Disk 81 - CHS 525 255 63 - 4118 MB
L FAT32                  384   1  1   524 254 63    2265102
Используем кнопку A для добавления раздела, который считаем потерянным, так создаем новую таблицу разделов с двумя FAT32:
1 P FAT32                    0   1  1   383 254 63    6168897
2 E extended               384   0  1   524 254 63    2265165
5 L FAT32                  384   1  1   524 254 63    2265102
Используя последовательно , , , мы пробуем заново создать загрузочный сектор (boot sector) первого FAT32 раздела.
Используя , можно увидеть список файлов в корневом каталоге, правда вместе с кучей «мусора»…
Ничего еще не записано.
В лог-файле (эта информация может быть получена в режиме Expert), мы видим 4 найденные копии FAT32:
FAT32 at 32(0/1/33), nbr=123
FAT32 at 8221(0/131/32), nbr=123
FAT32 at 16097(1/1/33), nbr=1234
FAT32 at 22100(1/96/51), nbr=1234
В нормальной ситуации должно быть найдено только 2 копии FAT.
Существуют остатки данных от 2 различных FAT32 разделов:
одни в начале 0/1/1, вторые в конце 1/1/1. Следовательно, мы допустили ошибку. Теперь нужно добавить правильный раздел и затем записать его .
1 E extended                 1   0  1   524 254 63    8418060
5 L FAT32                    1   1  1   383 254 63    6152832
6 L FAT32                  384   1  1   524 254 63    2265102
Далее, используя (Advanced/Boot), мы можем успешно воссоздать загрузочный сектор.
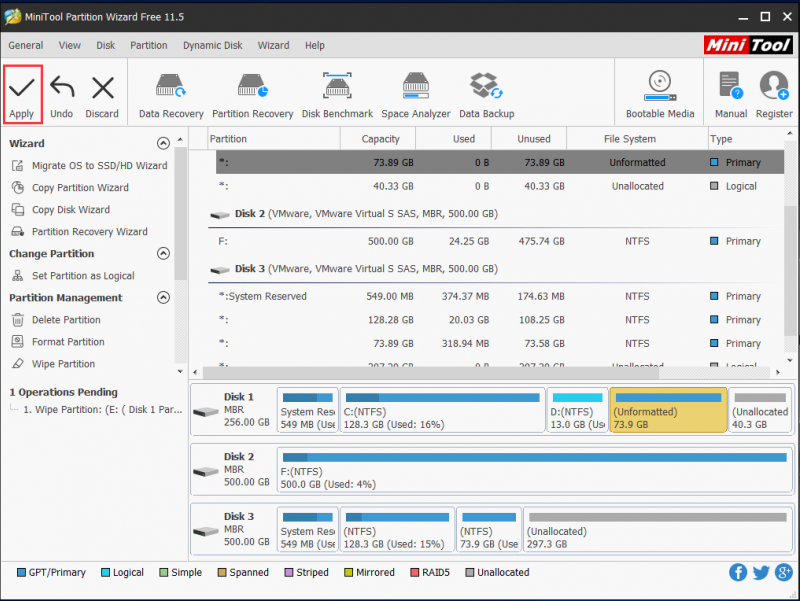
Normal Scan
When you launch TestDisk, you’ll be asked a question about how to handle log files. As this is the first time we’re launching it, we just need to create a new one.
That’s not a bad screenshot, the program really is that odd grey color.
Once the program has detected your drives, you’ll be given the option to select which of them needs the recovery. This list also includes external media such as USB hard drives, so be certain you’re selecting the right device. Additionally, the size value must be accurate if you want a proper recovery. Anything else indicates a problem detecting the drive and will result in a recovery failure.
After that you’ll select the type. Changes are, you want the first option, Intel. Anything else and you’d probably know it.
Now, you choose the action you want to perform. For a normal recovery attempt, just choose Analyse. We’ll cover the other options in a moment.
Hopefully, TestDisk will find your lost partition(s) and give you the option to write the recovered data to disk. If not, you may be in for a deeper scan. This will search your drive cylinder-by-cylinder in an attempt to find the lost data. If you’ve gotta do a deep scan, get yourself come coffee and a magazine. It’ll take a while.
Dateisysteme
Testdisk findet verlorene Partitionen für folgende Dateisysteme:
- BeFS (BeOS)
- BSD disklabel (FreeBSD/OpenBSD/NetBSD)
- CramFS, Compressed File System
- DOS/Windows FAT12, FAT16 und FAT32
- Windows exFAT
- HFS, HFS+ und HFSX Hierarchical File System
- JFS, IBM’s Journaled File System
- Linux btrfs
- Linux ext2, ext3 und ext4
- Linux LUKS encrypted partition
- Linux RAID md 0.9/1.0/1.1/1.2
- RAID 1: mirroring
- RAID 4: striped array with parity device
- RAID 5: striped array with distributed parity information
- RAID 6: striped array with distributed dual redundancy information
- Linux Swap (Versionen 1 und 2)
- LVM and LVM2, Linux Logical Volume Manager
- Mac partition map
- Novell Storage Services NSS
- NTFS (Windows NT/2K/XP/2003/Vista/2008/7)
- ReiserFS 3.5, 3.6 und 4
- Sun Solaris i386 disklabel
- Unix File System UFS und UFS2 (Sun/BSD/…)
- XFS, SGI’s Journaled File System
Как это работает?
Тем не менее в TestDisk инструкция предполагает, что пользователь может внести некоторые корректировки и улучшить работу программы. Например, можно просмотреть список возможных разделов, найденных при сканировании, и выбрать один или несколько, которые использовались как раз перед тем, как диск перестал загружаться или он(и) был(и) потерян(ы). В некоторых случаях, особенно после начала детального поиска потерянных элементов, TestDisk может показать данные, которые были удалены и перезаписаны заново.
В TestDisk инструкция по применению разъясняет особенности работы с ПО для новичков и для опытных пользователей. Для тех, кто знает мало или вообще ничего о методах восстановления данных, параметры командной строки, входа и отладки могут быть использованы для сбора детальной информации о незагружающемся диске, которые затем могут быть направлены в техподдержку для дальнейшего анализа. В свою очередь, пользователи, которые хорошо знакомы с такими процедурами, должны найти TestDisk (инструкция к которому покажется для них предельно простой) удобным инструментом при выполнении восстановления очень быстро.
Раздел все еще отстутсвует: Deeper Search
Deeper Search
так же ищет резервную копию загрузочного сектора FAT32, резервную копию суперблока загрузочного сектора NTFS , резервную копию суперблока ext2/ext3 чтобы найти больше разделов,
| будет проверяться каждый цилиндр |
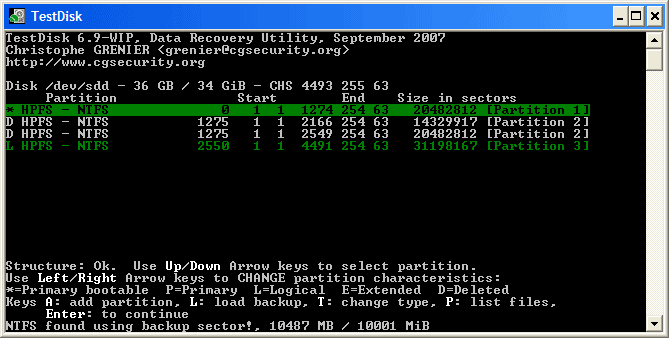
После Deeper Search, результаты будут отображены как на рисунке ниже: Первый раздел «Partition 1»
был найден с помощью резервной копии загрузочного сектора. В нижней строке окна можно увидеть сообщение«NTFS found using backup sector!» и размер раздела. Второй раздел«Partition 2» отображен дважды с различными размерами. Оба раздела помечены со статусомD для удаления, потому что они частично совпадают.
| (click on thumb). |
|
|
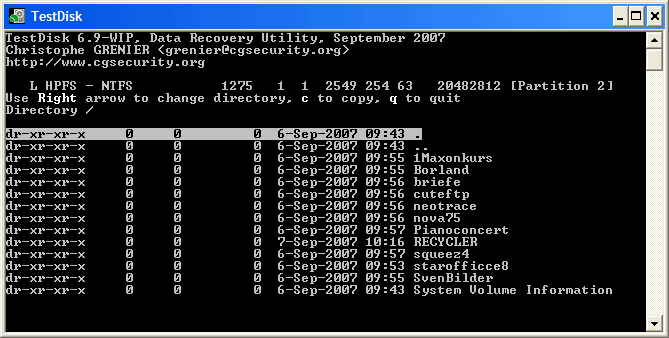
Highlight the first partition Partition 2 and press p to list its data.
| The file system of the upper logical partition (label Partition 2) is damaged |
- Press q for Quit to go back to the previous display.
- Let this partition Partition 2 with a damaged file system marked as D(deleted) .
- Highlight the second partition Partition 2 below
- Press p to list its files.
| (click on thumb). |
|
|
It works, you have found the correct partition!
Use the left/right arrow to navigate into your folders and watch your files for more verification
Note:
FAT directory listing is limited to 10 clusters, some files may not appears but it doesn’t affect recovery.
Press q for Quit to go back to the previous display.
The available status are Primary, * bootable, Logical and Deleted.
Using the left/right arrow keys, change the status of the selected partition to L(ogical)
Hint: read How to recognize primary and logical partitions?
Note: If a partition is listed *(bootable) but if you don’t boot from this partition, you can change it toP rimary partition.
Нажмите Ввод (Enter) для продолжения.
Libraries
- libncurses — Required, TestDisk and PhotoRec use a text user interface, Ncurses library and development files must be available.
- Ext2fs library — Optional, used by TestDisk to list files from ext2/ext3/ext4 partition and by PhotoRec to be able to carve the free space from an ext2/ext3/ext4 partition instead of the whole partition
- EWF library — Optional, TestDisk and PhotoRec use it to access Expert Witness Compression Format files (ie Encase files)
- Iconv — Optional, used to handle unicode filenames
- Jpeg library — Optional, used by PhotoRec to improved JPEG recovery rate
- NTFS library — Optional, used by TestDisk to list files from NTFS partition
- Reiserfs library — Optional, used by TestDisk to list files from reiserfs partition
- zlib library — Optional, used by PhotoRec to decompress gzipped content
- Qt5 library — Optional, required for QPhotoRec and to update the configure script.
ncurses Library
Ncurses library is usually installed with your OS, so you don’t need to compile it yourself.
If ncursesw is available, TestDisk and PhotoRec will use it to display unicode chars.
Ext2fs Library
Ext2fs library is usually installed with your OS, so you don’t need to compile it yourself.
Otherwise get latest version of e2fsprogs at e2fsprogs.sf.net
tar xzf e2fsprogs-1.38.tgz
cd e2fsprogs-1.38
./configure --with-cc=gcc
make libs
make install
EWF library
EWF library source code can be downloaded from https://github.com/libyal/libewf. Note that it requires openssl and zlib to compile and run sucessfully.
tar xzf libewf-beta-20070408.tar.gz
cd libewf-20070408
./configure
make lib
make install
Iconv library
On most plateform, iconv functions are integrated in libc, so no additional library is needed.
Under Windows, a libiconv package is available on cygwin website, cygwin 1.7 and later handles unicode.
A libiconv package is available for DOS/djgpp but it’s useless as the OS doesn’t support unicode filename.
Jpeg library
Libjpeg library is usually installed with your OS, so you don’t need to compile it yourself.
Otherwise download libjpeg source from http://www.ijg.org/files/jpegsrc.v6b.tar.gz
tar xzf jpegsrc.v6b.tar.gz
cd jpeg-6b
./configure --enable-shared --enable-static
make
sudo make install
Mac OS X 10.3 ships with GNU libtool, albeit under a slightly different name, glibtool. You may have
to run
ln -s `which glibtool` ./libtool
How to compile ntfsprogs
Get the latest version of ntfsprogs from https://www.tuxera.com/
tar xzf ntfsprogs-1.13.0.tar.gz
cd ntfsprogs-1.13.0
./configure
make libs
make install
To get a working version under NT 4, use
because SetFilePointerEx used by win32_io.c is not exported by NT 4 DLL.
ReiserFS Library
This library is not needed to recover a ReiserFS partition.
As this library is deprecated, use it only if you really need to list the content of reiserfs partition or copy files using testdisk.
Get progsreiserfs-0.3.1-rc8.tar.gz at https://git.kernel.org/pub/scm/linux/kernel/git/jeffm/reiserfsprogs.git
tar xzf progsreiserfs-*.tar.gz
cd progreiserfs-0.3.1-rc8
./configure --disable-nls --disable-Werror
make
make install
Qt
QPhotoRec is a graphical version of PhotoRec. Qt5 is require to compile qphotorec and to update the configure script.
If Qt5 is missing, QPhotoRec is not compiled but it remains possible to compile testdisk, photorec and fidentify.
A partition is still missing: Deeper Search
Deeper Search will also search for FAT32 backup boot sector, NTFS backup boot superblock, ext2/ext3 backup superblock
to detect more partitions,
| it will scan each cylinder | (click on thumb). |
After the Deeper Search, the results are displayed as follows:
The first partition «Partition 1» was found by using backup boot sector.
In the last line of your display, you can read the message «NTFS found using backup sector!» and the size of your partition.
The «partition 2» is displayed twice with different size.Partitions listed as D(eleted) will not be recovered if you let them listed as deleted.
Both partitions are listed with status D for deleted, because they overlap each other. You need to identify which partition to recover.
Highlight the first partition Partition 2 and press p to list its data.
| The file system of the upper logical partition (label Partition 2) is damaged | (click on thumb). |
- Press q for Quit to go back to the previous display.
- Let this partition with a damaged file system marked as .
- Highlight the second partition below
- Press p to list its files.
It works, your files are listed, you have found the correct partition!
Use the left/right arrow to navigate into your folders and watch your files for more verification
Note: FAT directory listing is limited to 10 clusters — some files may not appear but it doesn’t affect recovery.
Press q for Quit to go back to the previous display.
The available status are Primary, * bootable, Logical and Deleted.
Using the left/right arrow keys, change the status of the selected partition from to . This way you will be able to recover this partition.
| set partition to recover |
Hint: read How to recognize primary and logical partitions?
Note: If a partition is listed *(bootable) but if you don’t boot from this partition, you can change it to Primary partition.
Press Enter to proceed.
How to make the system bootable again
- DOS — Win9x: If your OS doesn’t boot, you can reinstall the system files with .
-
Windows 2000/XP/2003
- Run fixmbr from the Recovery Console (ie. fixmbr \Device\HardDisk0)
- Check c:\boot.ini
- Run to repair NTFS boot sector.
-
Windows Vista/Windows 7/…
- Run from the Recovery Console
- Check c:\boot.ini
- Run to repair NTFS boot sector.
-
Linux/FreeBSD
- Remember to update your /etc/fstab to reflect the new partition order.
- Update your multiboot configuration and reinstall the multiboot in the Master Boot Record.
- Lilo: /etc/lilo.conf, to re-install
- Grub: /boot/grub/grub.conf,
- Grub2: /etc/grub2-efi.cfg,
NTFS Boot sector recovery
The boot sector of the first partition named is still damaged. It’s time to fix it.
The status of the NTFS boot sector is bad and the backup boot sector is valid.
Boot sectors are not identical.
To copy the backup of the boot sector over the boot sector, select Backup BS, validate with Enter, use y to confirm and next OK.
More information about repairing your boot sector under TestDisk Menu Items.
The following message is displayed:
The boot sector and its backup are now both OK and identical: the NTFS boot sector has been successfully recovered.
Press Enter to quit.
TestDisk displays You have to restart your Computer to access your data so press Enter a last time and reboot your computer.
Symptômes
Si la partition primaire de ce disque contenait le système d’exploitation, celui-ci ne pourrait plus démarrer à cause de son secteur de boot corrompu.
Si ce disque était un disque secondaire (disque de données) ou si vous connectez ce disque sur un autre ordinateur en disque secondaire, les symptômes suivants seraient observés:
- L’explorateur Windows () ou le Gestionnaire de disque () affichent la première partition comme raw (non formatée) et Windows propose: [Vous ne devez jamais formater le disque si vous voulez récupérer des données]
- Une partition logique est manquante. Dans l’explorateur Windows, ce volume logique n’est plus visible. Le Gestionnaire de disque de Windows affiche désormais de l’ là où était la partition.
Running TestDisk executable
If TestDisk is not yet installed, it can be downloaded from TestDisk Download. Extract the files from the archive including the sub-directories.
To recover a lost partition or repair the filesystem from a hard disk, USB key, Smart Card, etc., you need enough rights to access a physical device.
- Under DOS, run TestDisk.exe
- Under Windows, start TestDisk (ie ) from an account in the Administrator group. Under Vista, right-click testdisk_win.exe and then «Run as administrator» to launch TestDisk.
- Under Unix/Linux/BSD, you need to be root to run TestDisk (ie. )
- Under MacOSX, if you are not root, TestDisk (ie ) will restart itself using sudo after confirmation on your part.
- Under OS/2, TestDisk doesn’t handle a physical device, only a disk image. Sorry.
To recover partition from a media image or repair a filesystem image, run
- to work from a raw disk image
- to recover files from an Encase EWF image
- if the Encase image is split into several files.
To repair a filesystem not listed by TestDisk, run , i.e.
- or to repair the NTFS or FAT32 boot sector files from a TrueCrypt partition. The same method works with filesystem encrypted with cryptsetup/dm-crypt/LUKS.
- to repair a filesystem on top of a Linux RAID device.
Lancer TestDisk
Si TestDisk n’est pas encore installé, téléchargez-le depuis Télécharger TestDisk.
Extraire les fichiers de l’archive, y compris les sous répertoires.
Pour récupérer des partitions perdues ou réparer un système de fichier d’un disque dur, de clés USB, Smart Card…, vous devez avoir suffisamment de droits pour accéder directement aux périphériques.
- Sous Dos, exécuter
- Sous Windows, exécuter TestDisk (par exemple, ) depuis un compte dans le groupe Administrateur. Sous Vista, utiliser le clic droit pour lancer TestDisk.
- Sous Unix/Linux/BSD, vous avez besoin d’être root pour exécuter TestDisk (par exemple, )
- Sous MacOSX, si vous n’êtes pas root, TestDisk (par exemple, ) va redémarrer lui-même en utilisant sudo après confirmation de votre part.
- Sous OS/2, TestDisk ne gère pas les périphériques physiques, uniquement les images disques, désolé.
Pour travailler sur une image disque, utiliser
- pour analyser une image brute d’un disque ()
- pour exploiter une image Encase EWF
- si l’image Encase est découpée en plusieurs fichiers.
Pour réparer un système de fichier non listé par TestDisk, exécuter , par exemple:
- pour réparer le secteur de boot NTFS ou FAT32 d’une partition TrueCrypt. La même méthode s’applique aussi aux systèmes de fichiers (ext2/ext3/ext4/…) chiffrés par cryptsetup/dm-crypt/LUKS.
- pour réparer un système de fichiers utilisant un RAID logiciel sous Linux.